Spectrum EMW-1000ST Supplement

COMMERCIAL STAINLESS STEEL
TOUCH CONTROL MICROWAVE
Installation and Operating Instruction Manual
Model Voltage Input
Power
(W)
Output
Power
(W) Amps Oven
Capacity
Dimensions (inches)
Width Depth Height
EMW-1000ST 120 V 1500 W 1000 W 12.5 0.9 Ft320.1" 17. 0 " 12.2"
BEFORE OPERATING ANY EQUIPMENT, READ AND FAMILIARIZE YOURSELF WITH THESE USE AND SAFETY INSTRUCTIONS
Congratulations on your purchase of SPECTRUM commercial cooking equipment. SPECTRUM takes pride in the design
and quality of our products. When used as intended and with proper care and maintenance, you will experience years of
reliable operation from this equipment. To ensure best results, it is important that you read and follow the instructions in
this manual carefully. It’s important to save these instructions for future reference.
EMW-1000ST
CUS LISTED
SPECTRUM products have undergone strict product testing in order to comply with
regulatory standards and specications set by international independent,
commonwealth and federal authorities.
As testimony to such compliance, SPECTRUM products carry the following marks/symbols:

2
Touch Control Microwave
Important For Future Reference
Introduction
Congratulations on the purchase of your SPECTRUM commercial microwave oven. Please take time to carefully read through this manual to ensure
the unit is operated and maintained properly for peak performance and longevity.
SPECTRUM will not accept liability for the following if:
• The instructions in this manual have not been followed correctly.
• Non-authorized personnel have tampered with the machine.
• Non-original spare parts are used.
• The machine has not been handled and cleaned correctly.
• There is any use damage to the unit.
PLEASE COMPLETE THIS INFORMATION AND RETAIN THIS MANUAL FOR THE LIFE OF THE
EQUIPMENT. FOR WARRANTY SERVICE AND/OR PARTS, THIS INFORMATION IS REQUIRED.
MODEL NUMBER SERIAL NUMBER DATE PURCHASED
!
!
!
!
!
!
WARNING:IMPROPERINSTALLATION,ADJUSTMENT,
ALTERATION,SERVICEORMAINTENANCECANCAUSE
PROPERTY DAMAGE, INJURY, OR DEATH. READ THE
INSTALLATION, OPERATION, AND MAINTENANCE
INSTRUCTIONS THOROUGHLY BEFORE INSTALLING
OR SERVICING THIS EQUIPMENT.
CAUTION:THESEMODELSAREDESIGNED,BUILT,AND
SOLDFOR COMMERCIALUSEONLY.IFTHESEMODELS
ARE POSITIONED SO THE GENERAL PUBLIC CAN USE
THE EQUIPMENT, MAKE SURE THAT CAUTION SIGNS,
WARNINGS, AND OPERATING INSTRUCTIONS ARE
CLEARLY POSTED NEAR EACH UNIT SO THAT ANYONE
USINGTHE EQUIPMENTWILLUSE ITCORRECTLY AND
NOTINJURETHEMSELVESORHARMTHEEQUIPMENT.
WARNING: A FACTORY AUTHORIZED SERVICE
PROVIDER SHOULD HANDLE ALL MAINTENANCE
AND REPAIR. BEFORE DOING ANY MAINTENANCE
OR REPAIR, ARRANGE FOR SERVICE.
AVERTISSEMENT: TOUTE INSTALLATION, RÉGLAGE,
MODIFICATION, RÉPARATION OU ENTRETIEN
INCORRECT PEUT OCCASIONNER DES DOMMAGES
MATÉRIELS, DES BLESSURES GRAVES OU LA MORT.
LIRE LES INTRUCTIONS D'INSTALLATION, D'UTILISATION ET
D'ENTRETIEN ATTENTIVEMENT AVANT D'INSTALLER OU DE
RÉPARER CET APPAREIL.
ATTENTION: CES MODÈLES SONT CONÇUS, FABRIQUÉS,
ET VENDUS POUR UN USAGE COMMERCIAL SEULEMENT.
SI CES MODÈLES SONT PLACÉS POUR QUE LE GRAND
PUBLICPUISSELESUTILISER,ASSUREZ-VOUSQUELESCONSIGNES
D’ATTENTION, D'AVERTISSEMENT, ET LES INSTRUCTIONS
D'UTILISATION SOIENT CLAIREMENT AFFICHÉES PRÈS DE
CHAQUEUNITÉDESORTEQUEN'IMPORTEQUELUTILISATEURDE
L'APPAREIL L'EMPLOIECORRECTEMENTETNESE BLESSEPASOU
N'ENDOMMAGE PAS L'APPAREIL.
AVERTISSEMENT: UN TECHNICIEN AUTORISÉ PAR
L'USINE DEVRA EFFECTUER TOUT L'ENTRETIEN ET LES
RÉPARATIONS. AVANT DE FAIRE TOUT ENTRETIEN OU
RÉPARATION, VEUILLEZ CONTACTER WINCO.
EMW-1000ST

3
Touch Control Microwave
Table of Contents
Specications .............................................................................. 1
Warnings ..................................................................................... 2
Introduction ................................................................................ 2
Table of Contents ....................................................................... 3
Packaging .................................................................................... 3
Important Safety Instructions .................................................. 4
Precautions ................................................................................. 5
Safety ........................................................................................... 6
Installation ................................................................................... 7
Operation..................................................................................... 7
Care & Cleaning Instructions .................................................. 12
Service & Repair ........................................................................ 12
Troubleshooting ....................................................................... 14
Limited Warranty ..................................................................... 15
Package Contents
Package includes one EMW-1000ST unit and one Operating Instruction
Manual.
SPECTRUM prides itself on quality and service, ensuring that at the
time of packing, all products are supplied fully functional and free
of damage. Should you nd any damage as a result of freight, please
contact your SPECTRUM dealer immediately.
Unpacking the Equipment
DISPOSE OF ALL PACKAGING MATERIALS IN AN
ENVIRONMENTALLY RESPONSIBLE MANNER.
1. Remove all packing materials and tape, as well as any protective
plastic and cardboard, from the unit.
2. Clean any glue residue left over from the plastic or tape.
3. Place the unit in the desired position and height.
SAVE THE ORIGINAL BOX AND PACKAGING FOR USE IN
PACKAGING AND SHIPPING THE EQUIPMENT IF SERVICES
ARENEEDED.
PLEASE KEEP THIS MANUAL IN A SAFE PLACE FOR FUTURE USE!

4
Proper Grounding · Mise à la terre correcte
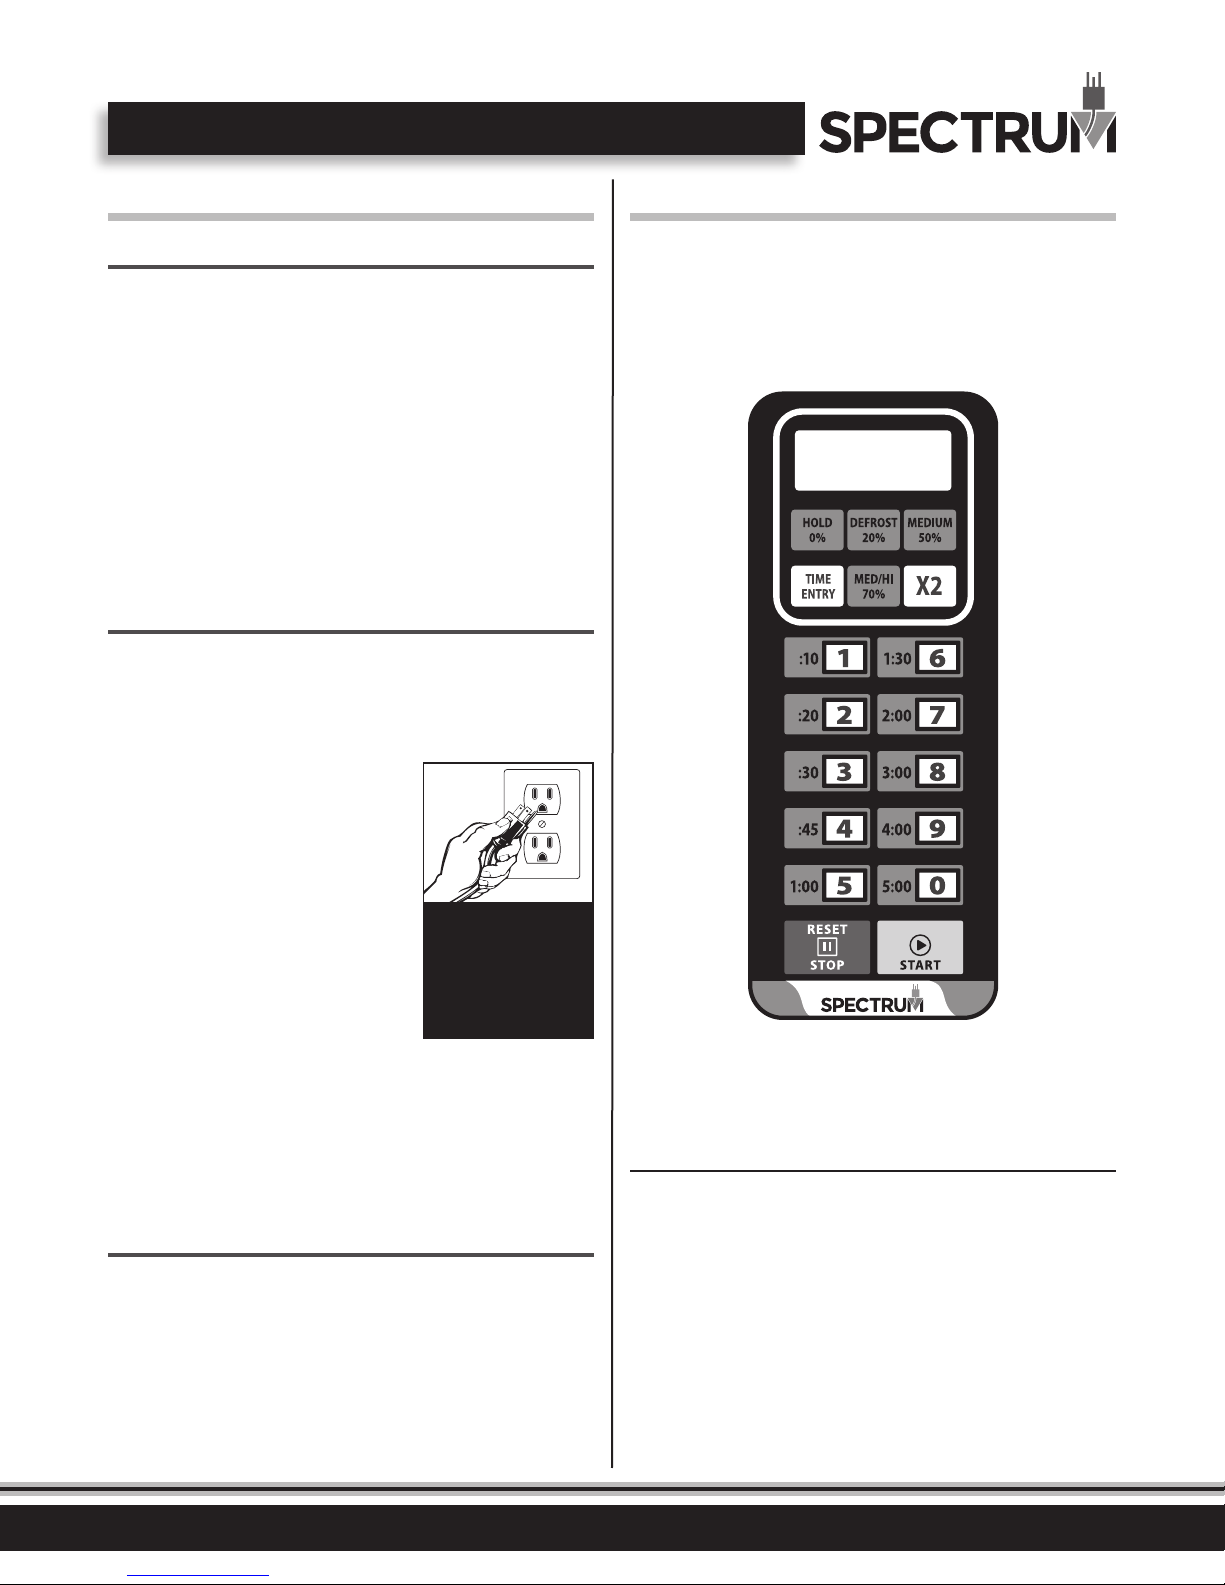
This machine is provided with a three-pronged
grounding plug. The outlet to which this plug
is connected must be properly grounded. If the
receptacle is not the proper grounding type, contact
an electrician. DO NOT, under any circumstances, cut
or remove the third ground prong from the power cord
or use any adapter plug.
Cette machine est équipée d'une che à trois broches.
La prise sur laquelle cette che est branchée doit être
correctement mise à la terre. Si la prise n'est pas le type de
mise à la terre, contactez avec un électricien. NE PAS, en
aucun cas couper ou enlever la troisième broche de terre à
partir du cordon d'alimentation ou utiliser un adaptateur.
USE A GROUNDED OUTLET
DO NOT ADD AN ADAPTOR
TO THE PLUG
UTILISER UNE PRISE AVEC MISE
À LA TERRE NE PAS AJOUTER UN
ADAPTATEUR SUR LA FICHE
IMPORTANT SAFETY INSTRUCTIONS
3. This equipment must be GROUNDED. Connect only to properly
GROUNDED outlet. See “GROUNDING INSTRUCTIONS” on page 7 for
further details.
4. Install or locate this equipment only in accordance with the
installation instructions in this manual.
5. DO NOT heat items susceptible to explosion in the microwave.
These include, but are not limited to: eggs, sealed containers,
glass jars, etc.
6. Use this equipment properly and only for its intended use as
described within this manual. DO NOT use corrosive chemicals
or vapors in this equipment. This type of oven is specically
designed to heat, cook, or dry food. It is NOT designed for
industrial or laboratory use.
7. Inspect the product closely upon un-boxing. DO NOT operate
this equipment if it has a damaged door, cord, or plug, if it is not
working properly, or if it has been damaged or dropped.
8. DO NOT cover or block lter or other openings on this equipment.
9. DO NOT store or use this equipment outdoors.
10. DO NOT store or use this product near or in water. Never immerse
the cord and / or plug in water.
11. Keep the cord away from heated surfaces.
12. DO NOT allow the cord to hang over the edge of a table or counter.
13. DO NOT overcook food as to avoid re in the oven cavity.
14. If materials inside the oven ignite, keep the oven door CLOSED,
turn the unit o, and disconnect the power cord or shut o power
at the fuse or circuit breaker panel.
15. DO NOT store items in the cavity. DO NOT operate the oven
without load or food in the cavity.
16. To reduce the risk of re in oven cavity:
a. Do not overcook food. Carefully attend to appliance when paper, plastic,
or other combustible materials are placed in the oven to facilitate cooking.
NEVER use paper, plastic, or combustible materials are placed inside the oven
to facilitate cooking.
b. Remove wire twist-ties from paper or plastic bags before placing bag in oven.
17. After heating, allow the container to stand in the microwave oven
for a short time before removing the container.
18. Clean the oven regularly and remove any food deposits. Closely
follow the door cleaning instructions in the manual.
19. As with any appliance, close supervision is necessary when
operated by children.
20. Do not use an extension cord. If the power supply cord is too
short, have a qualied electrician or serviceman install an outlet
near the appliance. Consult a qualied electrician or serviceman
if the grounding instructions are not completely understood, or if
doubt exists as to whether the appliance is properly grounded.
21. Clean the oven regularly and remove any food deposits. When
cleaning surfaces of door and oven that comes together on
closing the door, use only mild nonabrasive soaps, or detergents
appllied with a sponge or soft cloth.
22. As with any appliance, close supervision is necessary when
operated by children.
NOTE
Please remember that this manual and the warning
labels do not replace the need to be alert, to properly
train and supervise operators, and to use common
sense when using this equipment.
SAVE THESE INSTRUCTIONS
When using electrical appliances basic safety precautions should be
followed, including the following:
WARNING
TO REDUCE THE RISK OF BURNS, ELECTRIC SHOCK,
FIRE, INJURY TO PERSONS, OR EXPOSURE TO EXCESSIVE
MICROWAVE ENERGY:
1. Read this manual thoroughly before installation and operation.
DO NOT proceed with installation and operation if you have any
questions or do not understand anything in this manual. Contact
your representative or the manufacturer rst.
2. Read and follow the specic “PRECAUTIONS TO AVOID POSSIBLE
EXPOSURE TO EXCESSIVE MICROWAVE ENERGY” section on page 5.
Fire Hazard.
Correct installation precautions,
procedures and regulations
must be followed. Operation
and safety training is necessary
for all users of this equipment.
Risque d'incendie
La surchaue des vapeurs d'huile ou de
l'huile peut s'enammer et provoquer
un incendie. Surveillez la température,
la qualité et le niveau d’huile. Utilisez et
entretenez le système d'élimination des
vapeurs d'huile.
WARNING AVERTISSEMENT

5
PRECAUTIONS - AVOID POSSIBLE EXPOSURE TO EXCESSIVE MICROWAVE ENERGY
1. DO NOT attempt to operate this microwave
oven with its door open, since open
door operation can result in harmful and
dangerous exposure to microwave energy.
It is important not to defeat or tamper with
the safety interlocks.
2. DO NOT place any object between the
front face of the oven and its door, or allow
debris or residue to accumulate on sealing
surfaces.
3. DO NOT operate the oven if it is damaged.
It is especially important that the oven door
closes properly and completely, and that
there is no damage to the:
a. Door (bent)
b. Hinges and latches (broken or loose)
c. Door seals and sealing surfaces
4. The oven should NOT be adjusted or
repaired by anyone except properly-
qualied service personnel.
SAVE THESE INSTRUCTIONS

6
Additional Warnings
To avoid personal injury or property damage, observe the following:
1. DO NOT attempt to deep fat fry in the oven. Fat can overheat and
be extremely hazardous to handle.
2. DO NOT cook or reheat eggs in shell or with an unbroken yolk
using microwave energy. Doing so may build up pressure and
cause the egg to erupt. Pierce the yolk with a fork or knife before
cooking.
3. Pierce the skin of potatoes, tomatoes, and similar foods before
cooking with microwave energy. When the skin is pierced, steam
escapes evenly.
4. DO NOT operate equipment without load or food in oven cavity.
5. Use only popcorn in packages designated for microwave use.
Popping time varies based on oven wattage. DO NOT continue
to heat after popping has stopped: popcorn will scorch or burn.
DO NOT leave oven unattended.
6. DO NOT use regular cooking thermometers in oven. Most cooking
thermometers contain mercury and will cause an electrical arc,
malfunction, or damage to the oven.
7. DO NOT use metal utensils in the oven.
8. NEVER use paper, plastic, or other combustible materials that are
not intended for cooking.
9. When cooking with paper, plastic, or other combustible materials,
follow manufacturer’s recommendations on product use.
10. DO NOT use paper towels that contain nylon or other synthetic
bers. Heated synthetics could melt and cause paper to ignite.
11. DO NOT heat sealed containers or plastic bags in oven. Food or
liquid could expand quickly and cause container or bag to break.
Pierce or open container or bag prior to heating.
12. To avoid pacemaker malfunction, consult physician or pacemaker
manufacturer about eects of microwave energy on pacemaker.
13. Clean oven regularly and remove food deposits.
14. To avoid surface deterioration, keep oven in clean condition.
Infrequent cleaning could adversely aect the life of the
appliance and possibly result in a hazardous situation.
Warning: Liquids
Liquids such as water, coee, or tea are able to be overheated beyond
the boiling point without appearing to be boiling due to surface
tension of the liquid. Visible bubbling or boiling when the container is
removed from the microwave oven is not always present.
Burn Hazard.
Liquids such as water, coee, or
tea are able to be overheated
beyond the boiling point without
appearing to be boiling due to
surface tension of the liquid.
Please take extreme caution.
Risque de brûlure.
Liquides tels que l'eau, le café ou le thé
peuvent être surchaués au-delà du point
d'ébullition sans sembler bouillir en raison
de la tension de surface du liquide.
Se il vous plaît prendre une extrême
prudence.
WARNING AVERTISSEMENT
HOT
THIS COULD RESULT IN VERY HOT LIQUIDS SUDDENLY BOILING
OVER WHEN A SPOON OR OTHER UTENSIL IS INSERTED INTO
THE LIQUID.
To reduce the risk of injury to persons:
1. DO NOT overheat the liquid.
2. Stir the liquid both before and halfway through heating it.
3. DO NOT use straight-sided containers with narrow necks.
4. After heating, allow the container to stand in the microwave oven
for a short time before removing the container.
5. Use extreme care when inserting a spoon or other utensil into the
container.
Safety
A WINCO Approved Service Technician should carry out repairs if
necessary. DO NOT remove any components or service panels on this
product.
If the power cord is damaged, it must be replaced by a WINCO
Approved Service Technician in order to avoid a hazard.
SAVE THESE INSTRUCTIONS

7
OperationInstallation
IMPORTANT
Prior to first operation or to calling for service,
please read this section carefully. Operation of
a commercial microwave differs from that of a
conventional household microwave.
1. POWER UP
“-- --“ displays when the oven is powered up for the rst time. If the
[STOP] button is pressed, the oven will change to Idle Mode.
NOTE
In Idle Mode, no key can be pressed.
2. IDLE MODE
a. The oven will enter Idle mode after a set number of seconds
have gone by in Ready Mode without a user keyboard press or
a door open and close. The default number of seconds is 60 and
may be changed by resetting User Option 4.
b. During Idle Mode, the LED is blank. There will be no oven
activity.
c. By opening and closing the oven door, the user can exit Idle
Mode and go into Ready Mode.
USE A GROUNDED OUTLET
DO NOT ADD AN ADAPTOR
TO THE PLUG
UTILISER UNE PRISE AVEC MISE
À LA TERRE NE PAS AJOUTER UN
ADAPTATEUR SUR LA FICHE
Unpacking The Oven
1. Inspect oven for damage, including dents or cracks in the door or
inside the oven cavity.
2. Remove all materials from oven interior.
3. Remove all plastic wrap and packaging material prior to use.
4. DO NOT install next to or above a source of heat (such as a pizza
oven or deep fat fryer). This could cause microwave oven to operate
improperly and could shorten the life of the electrical parts.
5. Install the oven on a level countertop surface.
6. Outlet should be located so that the plug is accessible when the
oven is in place.
GROUNDING INSTRUCTIONS
WARNING
IMPROPER USE OF THE GROUNDING CAN
RESULT IN A RISK OF ELECTRIC SHOCK
To avoid risk of electrical shock or death,
this oven must be grounded. To avoid risk
of electrical shock or death, do NOT alter
the plug.
Grounding reduces the risk of electric
shock by providing an escape wire for the
electric current should an electrical short
occurs. This oven is equipped with a cord
having a ground wire with a grounding
plug. The plug must be plugged into
an outlet that is properly installed and
grounded. DO NOT use an extension cord.
If the power supply cord is too short, have a qualied electrician or
serviceman install an outlet near the appliance. Consult a qualied
electrician or serviceman if the grounding instructions are not
completely understood, or if doubt exists as to whether the appliance
is properly grounded.
Radio Interference
Microwave operation may cause interference to radio, television, or a
similar oven. Reduce or eliminate interference by doing the following:
1. Clean door and sealing surfaces of oven according to instructions
in Care and Cleaning section.
2. Place radio, television, etc. as far as possible from oven.
3. Use a properly installed antenna on radio, television, etc., to
obtain a stronger signal reception.

8
3. READY MODE
a. In this mode, the oven is ready to either begin a manual or
preset cook cycle.
b. Opening and closing the door while the oven is in Idle Mode will
put the oven into Ready Mode.
c. During Ready Mode, the LED display shows “0:00”.
4. DOOR OPEN MODE
a. While the door of the oven is open, the oven will be in Door
Open Mode. This allows for entry into Programming Mode.
b. During this mode, the LED is blank, the fan operates, and the
oven light will be on.
c. When the door is opened and closed, if User Option "OP:60"
is selected and the oven was running a manual or preset cook
cycle, the oven will enter Pause Mode.
d. In all other cases, the oven shall return to Door Open Mode with
User Option "OP:61" set. Opening and closing the door will clear
all information about a Manual or Preset program that was
running.
5. PAUSE MODE
a. This mode allows users to temporarily stop the cooking cycle to
inspect or stir the food item.
b. While in Time Entry Mode or Preset Program Cook Mode, if the
door is opened or closed, or if the [STOP] button is pressed, the
oven will enter Pause Mode.
c. While paused the LED will display the remaining cooking time.
d. Pause Mode will expire back to Idle Mode in the exact same
fashion as Ready Mode, depending upon User Option 4.
e. If the [STOP] button is pressed, the oven will immediately go
into Ready Mode. If [START] is pressed, the oven will go into
working mode.
6. MANUAL COOK ENTRY MODE
a. This mode allows for a user to manually enter a cooking time
and power level.
b. While in Ready Mode, pressing the [TIME ENTRY] button on the
keypad will put the oven into Manual Cook Entry Mode.
c. During this mode, “00:00” displays.
d. Press the [0%], [20%], [50%], or [70%] keys to select power
level, and the LED will display the related power. If the same key
is pressed twice, the power will change to PL10 (Power Level 10,
or full power). If no power is chosen, PL10 is the default.
e. During the setting process, press [START] button to enter
Manual Cook Entry Mode and begin cooking. Press the [STOP]
key to enter Ready Mode.
Operation
7. MANUAL COOK MODE
a. This mode allows for cooking of food items. While in Manual
Cook Entry Mode, pressing the [START] button will cause the
oven to begin in Manual Cook Mode.
b. In this mode, cooking time displays, the fan operates, and the
oven light is on.
c. When the cooking program completes, the oven will enter End
of Cook Cycle Mode. If you press the [STOP] button under this
mode, the oven will enter Pause Mode.
8. END OF COOK CYCLE MODE
a. After time has expired in Manual Cook Mode or a Preset
Program Cook Mode, the oven will enter into the End of Cook
Cycle Mode.
b. During this mode, “End” displays on the LED screen.
c. If either User Option "OP:11" or "OP:12" is selected, the oven
will continue to sound until the user acknowledges by either
opening and closing the door or pressing the [STOP] key. If User
Option "OP:10" is selected, after the 3-second beep, the oven
will enter Idle Mode.
9. PRESET PROGRAM COOK MODE
a. This mode allows for cooking of food items through a one-pad
touch operation. While in Ready Mode, pressing one of the ten-
digit keys on the keyboard will cause the oven to run the Preset
Program associated with that key.
b. The LED will display the remaining cooking time. If it is multi-
stage cooking, the total remaining cooking time will not display
a particular stage cooking time.
c. If the program chosen exceeds the maximum time allowed by
User Option 7, then the oven will beep three times and display
“00:00” to indicate that the program is not acceptable.
d. When the cooking program nishes, the oven will enter End of
Cook Cycle Mode. If the user presses the [STOP] button while in
this mode, the oven will enter Pause Mode.
10. ONTHEFLY COOKING
a. The user may start another cook cycle while the oven is
operating or paused.
b. While the oven is operating or while in the Pause Mode and
if User Option "OP:51" is selected, pressing a Number Key will
automatically start the preset cooking program associated with
the selected number key.
c. The LED will display the remaining cooking time.
d. When the cooking program completes, the oven will enter End
of Cook Cycle Mode. If the user presses the [STOP] key while in
this mode, the oven will enter Pause Mode.

9
Operation
11. PROGRAMMING MODE
a. This mode allows the user to assign cooking times and power
levels to the keypad number keys.
b. Open the door and press the Number 1 key for 5 seconds. The
buzzer will sound once to indicate Programming Mode has been
activated.
c. The LED will display “ProG”.
d. Press any number button, 0-9, and the LED will display the
saved time. Input the new desired time.
e. Press [0%], [20%], [50%], or [70%] to input the power level.
The LED will display the related power. If the same button is
pressed twice, the power will change to PL10 (Power Level 10, or
full power). If no power is chosen, PL10 serves as the default.
f. If [X2] is pressed, the LED will display “CF:80”, the default factor
of 80%. To change the cooking factor, press the desired number
key for new factor.
g. After setting the time and power, press [START] to save the
cooking program. The LED display will show “ProG”.
h. If the total cooking time entered exceeds the maximum time
allowed in User Option 7, when the [START] key is pressed to
save the program, the buzzer will sound three times briey,
and the LED will display “00:00” to indicate that the program is
unacceptable.
i. Close the door and the oven will return to Ready Mode. Pressing
the [STOP] button during the setting process will turn the oven
to Door Open Mode. Programs not saved will be lost.
PROGRAMMING EXAMPLE:
Step 1: Open the oven door and press Number Key “1” for 5 seconds.
The LED will display “ProG”.
Step 2: Press Number Key “3”. The program will be saved in “3”.
Step 3: Press the Number Keys “1”, “2”, and “5” to input the cooking
time. The LED will now display “1:25”.
Step 4: Press the [Med-Hi 70%] button; “PL7” will display. Setting is
complete.
Step 5: Press [START] to save. When the program is used the next
time, only pressing “3” will suce and the related program
will begin.
NOTES
1. If the electricity supply is interrupted, the saved programs will
not be lost.
2. Pressing [STOP] returns the oven to the Ready Mode and cancels
the entered settings.
12. DOUBLE QUANTITY COOKING
a. The [X2] pad allows two quantities of the same food item to be
cooked at once.
b. Press the [X2] key and then Preset Program Number(s) 0-9
within 5 seconds. The oven will begin cooking per the quantity
preset cooking time.
c. Press [X2], and the LED will display “doub”. Press the
preprogrammed number key, and the LED will display the
cooking time for two quantities.
For example: If the number “5” key is programmed to cook for
1 minute, when rst pressing [X2] and then pressing the number
“5”, the oven will automatically set the cooking time to 1:48 (1:00
cook cycle x 1.8 “X2” cook factor = 1:48).
d. When the cooking program completes, the oven will enter End
of Cook Cycle Mode.
Note: X2 functionality may only be used with Programming
Mode cooking.
13. STAGE COOKING PROGRAMMING
a. This allows users to cook food items at a combination of various
Power Levels.
b. A maximum of three stages can be set. After setting the power
and time for the rst stage, press [TIME ENTRY] to set the
second stage. Repeat to set the third stage.
c. When setting the second or third stage, press [TIME ENTRY].
The LED will display “S-2” or “S-3” respectively.
d. Press [START] to begin cooking.
PROGRAMMING EXAMPLE:
Stage 1: 1:25 at 70% power
Stage 2: 5:40 at 50% power
e. Open oven door and press “1” key for 5 seconds. The LED
displays “ProG”.
f. Press number key “3”. The program will be saved in “3”.
g. Press “1”, “2”, “5” to input the cooking time. “1:25” displays.
h. Press [Med-Hi 70%]. “PL7” displays.
i. The rst stage is complete.
j. Press [TIME ENTRY]. The LED will display “S-2”.
k. Press “5”, “4”, “0” to input the cooking time. “5:40” displays.
l. Press [Medium 50%]. “PL5” displays.
m.The second stage is complete.
n. Press [START] to save the program. To use this program, press
“3”. The oven will start operating for 7:05 (1:25 at 70% power,
and 5:40 at 50% power).

10
Operation
14. USER OPTION MODE
a. This allows the user to choose various
operation methods.
b. Open the oven door and press “2” for
5 seconds. The buzzer sounds once to
indicate User Option Mode is activated.
c. The LED will display “OP: --“.
d. Press any number key to enter related
mode setting. Please refer to the chart
below for options.
1. Example: to set the buzzer of key
beep volume to “Medium,” press
“2”. “OP:22” will display on the LED.
2. To change, continue pressing “2”.
The LED will cycle “OP:20”, “OP:21”,
"OP:22”, “OP:23”, etc.
3. Press [START] to save the current
setting. After the setting has been
saved, “OP: --“ will display again.
4. During the programming process,
press [STOP] to enter Door Open
Mode. Closing the door will have
the oven enter Ready Mode.
5. If [START] is not pressed as the last step,
the program will not be saved.
15. INQUIRY FUNCTION
a. During the cooking process, press
[TIME ENTRY] to check the power
level. The LED will display the power
for 3 seconds and then turn back to the
previous state.
NUMBER KEYS DISPLAY OPTIONS Factory Settings Bold
1
END OF CYCLE
BEEP
OP:10 3 second beep.
OP:11 Continuous beep until door is opened.
OP:12 5 beep bursts until door is opened.
2
KEY BEEP
VOLUME
OP:20 Eliminates beep.
OP:21 Sets volume to low.
OP:22 Sets volume to medium.
OP:23 Sets volume to high.
3
KEY BEEP
OP:30 Prevents beep when Number Key is pressed.
OP:31 Allows beep when Number Key is pressed.
4
ACTIVE
DISPLAY
OP:40 15 seconds after oven door is opened, keyboard is disabled.
OP:41 30 seconds after oven door is opened, keyboard is disabled.
OP:42 1 minute after oven door is opened,
keyboard is disabled.
OP:43 2 minutes after oven door is opened, keyboard is disabled.
5
ONTHEFLY
COOKING
OP:50 Prevents dierent pre-programmed Number Key to be
activated during cooking.
OP:51 Allows dierent pre-programmed Number Key to be
activated during cooking.
6
RESET TO
READY MODE
OP:60 Opening oven door does not reset oven back to
ready mode.
OP:61 Opening oven door resets oven back to ready mode.
7
MAXIMUM
HEATING TIME
OP:70 Allows 60 minutes of heating time (some models).
OP:71 Allows 10 minutes of heating time.
8
MANUAL
OPERATION
OP:80 Allows use of preprogrammed Number Key only.
OP:81 Allows use of manual time entry and
preprogrammed Number Key.
9
DOUBLE DIGIT
OPERATION
OP:90 Allows 10 (0-9) preprogrammed Number Keys.
OP:91 Allows 100 (00-99) preprogramed Number Keys.

11
Exploded View & Spare Parts List
NO. DESCRIPTION PART # QTY
1Door Assembly EMWT-P1 1
2Door Frame Assembly EMWT-P2 1
3Handle EMWT-P3 1
4Door Gasket EMWT-P4 1
5 Screw ST4x30PBHC EMWT-P5 2
6Screw ST4x8PBHC EMWT-P6 1
7Control Panel Assembly EMWT-P7 1
8PCB Assembly EMWT-P8 1
9 Screw ST3x8PBHC EMWT-P9 8
10 Cover Wave Guide EMWT-P10 1
11 Prant Cover EMWT-P11 1
12 Base Plate EMWT-P12 1
13 Leg EMWT-P13 4
14 Assembly Bracket Hinge EMWT-P14 1
15 Magnetron EMWT-P15 1
16 H.V. Transformer EMWT-P16 1
17 H.V. Capacitor EMWT-P17 1
18 H.V. Diode EMWT-P18 1
19 Filter Noise EMWT-P19 1
20 Fuse EMWT-P20 1
21 Lamp EMWT-P21 1
22 Themostat 110/70 EMWT-P22 1
23 Power Cord Assembly EMWT-P23 1
24 Themostat 160/95 EMWT-P24 1
25 Board Latch EMWT-P25 1
4
7
9
8
5
2
6
1
3
NO. DESCRIPTION PART # QTY
26 Lever Switch EMWT-P26 1
27 Micro Switch Interlock EMWT-P27 2
28 Micro Switch Monitor EMWT-P28 1
29 Harness Main EMWT-P29 1
30 Screw CT3*8BBHC EMWT-P30 2
31 Screw ST4*10TBHC EMWT-P32 15
32 Screw ST4*12PwBHC EMWT-P33 3
33 Screw ST4*20TBHC EMWT-P34 2
34 Screw CT4*8TBHC EMWT-P35 8
35 Screw CT4*10HwBHC EMWT-P36 2
36 Screw ¢4*6 EMWT-P37 2
37 Spring Washer ¢4.1 EMWT-P38 1
38 Motor Tray EMWT-P39 1
39 Shaft Stirrer EMWT-P40 1
40 Fan Assembly EMWT-P41 1
41 Holder H.V.C. EMWT-P42 1
42 Fan Stirrer EMWT-P43 1
43 Damper EMWT-P44 1
44 Sponge EMWT-P45 1
45 Case Out EMWT-P46 1
46 Rubber Noise EMWT-P47 2
47 Front Plate Bracket EMWT-P48 1
48 Wave Guide Bracket EMWT-P49 1
49 Water Sealing Bracket EMWT-P50 1

12
Exploded View & Spare Parts List
COMPONENTS
34
34 31
31
31
32 27
21
38
36 16
14
12
31 13 31 44 34
31
46
41
29
18
17
25 26
28
40
15
35
24
3332
37
23
11
19 20
42
48
49
43
45
39 47
22
9
9

13
Care & Cleaning Instructions
WARNING
TO AVOID ELECTRICAL SHOCK, WHICH CAN CAUSE SEVERE
PERSONAL INJURY OR DEATH,UNPLUG POWER CORD OR OPEN
CIRCUIT BREAKER TO OVEN BEFORE CLEANING OR REMOVING
LIGHTBULB.DONOTPOWERSPRAY,ANDDONOTUSEMETALPANS.
Interior, Exterior, and Door
Clean microwave oven with mild detergent in warm water using a soft
sponge or cloth. Wring sponge or cloth to remove excess water before
wiping equipment. If desired, boil a cup of water in the microwave
oven to loosen and dislodge any debris or residue prior to cleaning.
IMPORTANT
• DO NOT use abrasive cleansers or cleaners containing ammonia or
citrus. These can damage the nish.
• NEVER pour water into microwave oven bottom.
• DO NOT use water pressure type cleaning systems.
Discharge Air Vents
Check monthly for buildup of cooking vapors along intake and
discharge louvers on bottom and back of oven. Clean air vents with
damp cloth to ensure proper airow. Dry thoroughly.
Control Panel
Open oven door to deactivate oven timer. Clean with mild detergent
in warm water using soft sponge or cloth.
Service and Repair
There are no user serviceable parts within this appliance.
To avoid serious injury or damage, never attempt to repair the unit
or replace a damaged power cord yourself.
inquiries and sales must rst go through our Warranty Service
Department.
To initiate warranty service contact: support@wincous.com
or call: 973-295-3899
DO NOT send unit to WINCO without rst contacting our customer
service department.
See "Limited Warranty" section on page 15 for details.

14
Warning: To avoid electrical shock, which can cause severe personal injury or death, do not remove the outer case at any time. Only an authorized
SPECTRUM servicer should conduct repairs. Unauthorized repair will void your warranty.
Troubleshooting
ISSUE MIGHT BE CAUSED BY RECOMMENDED SOLUTION
Oven will not start
Electrical cord for oven is not plugged in Plug cord into outlet correctly
Door is open Close the door and try again
Wrong operation is set Check instructions
Fuse blown or circuit breaker is open Replace fuse (should be repaired by authorized
servicer) or reset breaker
Malfunctioning outlet Test outlet with other electrical appliances
Arcing or sparking
Materials to be avoided in microwave oven were used Use microwave-safe cookware only
The oven is operated when empty DO NOT operate with cavity empty
Spilled food remains in the cavity Clean cavity with a wet towel
Dim oven light Cooking at low power level This is normal
Steam forms on oven door When cooking foods in a microwave, steam is generated This is normal
Hot air expelled from vents Food cooking in a microwave may release heat This is normal
Unevenly cooked foods
Materials to be avoided in microwave oven were used Use microwave-safe cookware only
Food is not defrosted completely Completely defrost food prior to using oven
Cooking time, power level, are not suitable Use correct cooking time and power level
Food is not turned or stirred Turn or stir food. Follow food distributor's
instructions if necessary
Overcooked foods Cooking time, power level, are not suitable Use correct cooking time and power level
Undercooked foods
Materials to be avoided in microwave oven were used Use microwave-safe cookware only
Food is not defrosted completely Completely defrost food prior to using oven
Oven ventilation ports are restricted Check to see that oven ventilation ports are not
restricted
Cooking time, power level, are not suitable Use correct cooking time and power level
Improper defrosting
Materials to be avoided in microwave oven were used Use microwave-safe cookware only
Cooking time, power level, are not suitable Use correct cooking time and power level
Food is not turned or stirred Turn or stir food. Follow food distributor's
instructions if necessary
Fan continues after food is
done and door open
Unit keeps fan on to cool the electronics This is normal

15
WINCO® warrants to the original purchaser of new equipment that
said equipment, when installed in accordance with our instructions
within North America and subjected to normal use, is free from
defects in material or workmanship for a period of 1 year. The labor
warranty is one year from original date of purchase or 18 months from
actual factory shipment date, whichever date occurs rst.
THIS WARRANTY IS IN LIEU OF ALL OTHER WARRANTIES,
WHETHER EXPRESSED OR IMPLIED. WINCO EXPRESSLY
DISCLAIMS ANY IMPLIED WARRANTY OR MERCHANTABILITY
OR EXPRESSED OR IMPLIED WARRANTY OF FITNESS FOR A
PARTICULAR PURPOSE.
WINCO’SOBLIGATIONANDLIABILITYUNDERTHISWARRANTYIS
EXPRESSLYLIMITEDTOREPAIRINGANDREPLACINGEQUIPMENT
THATPROVESTOBEDEFECTIVEINMATERIALORWORKMANSHIP
WITHIN THE APPLICABLE WARRANTY PERIOD.
IN NO EVENT SHALL WINCO BE LIABLE FOR INCIDENTAL OR
CONSEQUENTIAL DAMAGES TO BUYER OR ANY THIRD PARTY,
INCLUDING, WITHOUT LIMITATION, LOSS OF PROPERTY,
PERSONAL INJURY, LOSS OF BUSINESS OR PROFITS OR OTHER
ECONOMIC LOSSES, OR STATUTORY OR EXEMPLARY DAMAGES,
WHETHER IN NEGLIGENCE, WARRANTY, STRICT LIABILITY, OR
OTHERWISE.
This warranty is given only to the rst purchaser from a retail dealer.
No warranty is granted to subsequent transferees. A valid serial
number as deemed by WINCO is necessary to be covered under
warranty.
Warranty does not cover product failures due to: failure to maintain,
neglect, abuse, damage due to excess water, re, normal wear,
improper setup and use. Periodic maintenance is not covered.
This warranty is not in force until such time as a properly completed
and digitally signed Warranty Registration has been received by
WINCO within 30 days from the date of purchase.
WARRANTY SERVICE
To initiate warranty service contact: support@wincous.com
or call: 973-295-3899
DO NOT send unit to WINCO without rst contacting our customer
service department.
Limited Warranty
REGISTER ONLINE AT:
http://support.wincous.com
Proof of purchase is required to extend warranty more than 1 year
from date of shipment from the factory.
THE FOREGOING WARRANTY PROVISIONS ARE A COMPLETE
AND EXCLUSIVE STATEMENT BETWEEN THE BUYER AND SELLER.
WINCO NEITHER ASSUMES NOR AUTHORIZES ANY PERSONS
TO ASSUME FOR IT ANY OTHER OBLIGATION OR LIABILITY IN
CONNECTION WITH SAID EQUIPMENT.
Examples of items not covered under warranty, but not limited to just
these items:
1. Acts of God, re, water damage, burglary, accident, theft.
2. Freight damage.
3. Improper installation or alteration of equipment.
4. Use of generic or after market parts.
5. Repairs made by anyone other than a WINCO designated
service provider.
6. Lubrication.
7. Expendable wear parts, adjustable feet, blown fuses, lamps, etc.
8. Cleaning of equipment.
9. Misuse or abuse.
WARRANTY REGISTRATION
SCAN THE QR CODE WITH YOUR MOBILE DEVICE
or go to
http://support.wincous.com
TO FILL OUT AND SUBMIT YOUR WARRANTY REGISTRATION.

Model: EMW-1000ST
www.wincous.com
Table of contents
Other Spectrum Microwave Oven manuals