Spectrum WatchDog 3349CN User manual

Sprayer Station
Console
PRODUCT MANUAL
Item # 3349CN
®

2
Copyright 2008 Spectrum Technologies, Inc.
Quick Start
1. Check the box.
Ensure that it contains the Console with mounting
bracket, two cables, and a CD-ROM.
Page 4
2. Install the WatchDog Sprayer Station.
Use the instructions provided with the Sprayer Sta-
tion.
3. Install the Console.
Connect the Console to the Sprayer Station. You
can power it on and check the display, but don’t log
or snapshot data until it is configured to meet your
needs.
Pages
5-6
4. Install the ConsoleSync software.
Use the CD to install ConsoleSync on your PC. Page 14
5. Configure your Console
Use ConsoleSync to set units of measure and data
storage parameters.
Pages
15-25
6. Use the Sprayer Station / Console
Connect the Console to the Sprayer Station, and
gather weather data.
Pages
7-13
7. Save the Weather Data on Your PC
Bring the Console in to your PC, and use Console-
Sync to preserve the data you collected.
Pages
26-27
8. Import the Weather Data to Other Programs
The Weather Data is stored as a tab-separated text
file for ease of importing to Excel, etc.
Pages
28-29
WatchDog® is a registered trademark, and SpecWareTM
is a trademark of Spectrum Technologies, Inc.
SpecWare ConsoleSync software © 2008 by
Spectrum Technologies, Inc.

3
Contents
Components 4
Specifications 4
Installing the Console 5
Operating the Console 7
Installing the ConsoleSync Software 14
Configuring Your Console Using ConsoleSync 15
Data Storage 16
System Settings 20
Console Appearance 22
Saving Weather Data on Your PC 26
Log File Format 28
Troubleshooting 29
Thank you for purchasing the WatchDog
Sprayer Station Console. The Console is
designed to be used with the WatchDog
Sprayer Station, and will provide an accu-
rate indication and record of the environ-
mental conditions around a vehicle,
whether it is stationary or in motion. It al-
lows for real-time measurement of weather
data before, during, and after a field opera-
tion.

4
Components
Your WatchDog Sprayer Station package should contain the follow-
ing components:
• Console with mounting bracket
• Station/Console Cable Assembly
• PC Interface Cable
• SpecWare Mobile / ConsoleSync CD
• User Guide
—————————————————-
Please note that the front label on the Console has a high-gloss
finish. Most consoles ship with a layer of film protecting the label.
If your Console has a matte finish, or the LCD display is somewhat
cloudy through the window, the protective film needs to be peeled
off.
Specifications
Supply Voltage 10-16VDC (nominal 12VDC)
Supply Current 2 mA

5
Installing
the Console
First Things First
Install the WatchDog Sprayer Station according to the instructions
found in the WatchDog Sprayer Station User Guide.
Mounting the Console
Determine where in your cab you want to mount the WatchDog
Sprayer Station Console. The location should be easily seen by the
operator, preferably when they look forward (as compared to look-
ing to the side) so that the drift arrow indicator is intuitive.
Connect the Console and the Sprayer Station as shown in the Wir-
ing Diagram on the next page. The two jacks on the bottom of the
Console permit inserting the plugs in only one way. The jacks on
the Station Connecter Box, and the plugs on that end of the Con-
sole Cable are similarly unique. See the image on Page 7 for the
locations of the Console jacks.
Loosen the knobs on the sides of the Console, and lift it out of the
bracket. Mount the Console bracket securely with bolts, screws,
foam mounting tape, or Velcro strips. Put the Console back in the

6
bracket, and tighten the side knobs. You may wish to secure the
cables that plug into the console. Since you will be periodically re-
moving the Console from the cab to transfer the weather data to
your PC, it would be best if the cables did not fall down to the floor.

7
On / Off Switch
The On / Off Switch is on the bottom of the Console (see image
above). Switch the Console On to use it; switch it Off when you are
through. Your data is stored on flash memory in the Console, and
will not be lost when the power is turned off.
When the Console is switched on, it waits for communications from
either the Sprayer Station, or the PC. Once it establishes a con-
nection with one, it will not recognize the other unless it is switched
off and the on again. This step is implicit in the normal operating
procedure of turning the Console off, removing it from the sprayer,
carrying it in to a PC, connecting it, and turning it back on.
IMPORTANT: The console contains a 9V rechargeable battery
which is designed to be used when the Console is removed from
Operating
the Console

8
the vehicle cab and connected to the PC. This battery will run the
Console for only 30 minutes to an hour. If the console is not shut
off when the vehicle is turned off, the battery will be fully drained
within an hour. Repeatedly doing this will impact the battery life.
When you switch the Console on, the LCD displays the current bat-
tery level (see “Display-Startup” on page 10 for details). If the initial
battery level is below 6V, the Console has only about five minutes
of internal battery life left. It should be recharged (on the vehicle)
before attempting to download any data from the Console.
Replacing the Battery
If the standalone battery life becomes too short, the battery can be
replaced. Remove the Console from the bracket. Using a Phillips
screwdriver, remove the four screws on the back. Lift off the back.
The battery will be visible on the left. Remove it from its connector,
and replace it with a standard 9 volt NiCad rechargeable battery.
WARNING: If you replace the battery with another type, especially
an alkaline or heavy duty battery, severe damage will result when
the Console attempts to recharge it from the vehicle’s power sup-
ply.
Place the back on the case (it only fits one way), and tighten the
screws to hold it securely.
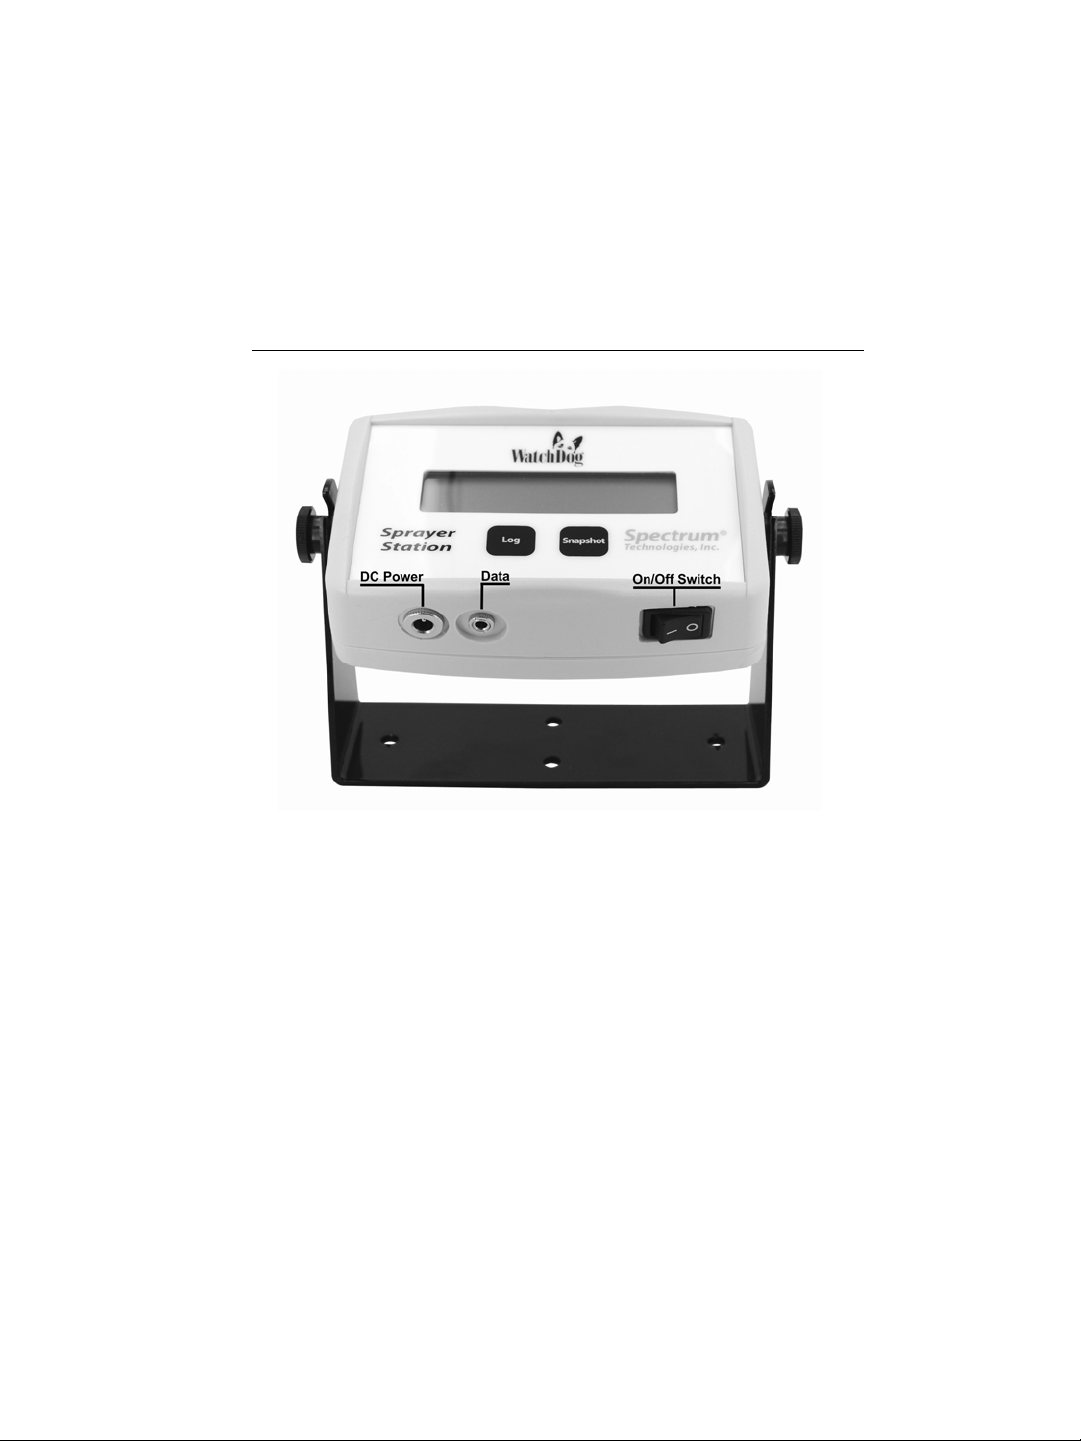
Log Button
When the Console is connected to the Sprayer Station, pressing
the Log button starts the logging of weather data. The recording
interval is specified in the ConsoleSync program. The interval
ranges from four seconds to one minute, and can also be disabled.
Data will be recorded at the specified interval until the Log button is
again pressed. “Log” is displayed on the LCD while logging is en-
abled.
The Log button must be pressed and held for up to one-half sec-
ond. The Console will beep to indicate it recognized the button
press.

9
Snapshot Button
When the Console is connected to the Sprayer Station, pressing
the Snapshot button records the geo-referenced weather data cur-
rently displayed on the LCD. Snapshot data is maintained in files
separate from logged records.
The Snapshot button must be pressed and held for up to one-half
second. The Console will beep to indicate it recognized the button
press.
Diagnostic Mode
If the “Log” button is pressed and held while the Console is
switched on, the Console will enter a diagnostic mode once it re-
ceives communications from the Sprayer Station. Hold the button
down until the Console beeps twice, then release the button.
For more information on the Console’s diagnostic mode, see the
Troubleshooting section in this manual.

10
Display—Startup
When the Console is switched on, it displays the following screen
as it scans its flash memory for the location to begin storing new
data.
Once the flash memory starting point is determined, the location
number is displayed on the first line (the highest location is 8192).
This screen will be displayed until communications records are re-
ceived from either the Sprayer Station or a PC.
The bottom line of the startup display contains (from left to right) the
Console Serial Number (“00100” in the image), the firmware version
number (“1.0”) , and the initial voltage level (“10.2”) of the internal
battery, or the external supply, if connected.
scanning... 0
Spectrum Technologies
WatchDog Sprayer Station
Console 00100 v1.0 10.2v
waiting... 28
Spectrum Technologies
WatchDog Sprayer Station
Console 00100 v1.0 10.2v

11
Display—Weather Conditions
Once the Console receives data from the Sprayer Station, it dis-
plays the following screen, which is updated once every 4 seconds.
The above screen shows weather data without GPS information.
This will be displayed until the GPS obtains a position fix. The GPS
time to first fix is approximately one minute. Note that a GPS fix will
not be possible when there is not a clear view of the sky, such as
indoors, or in a heavily forested location.
Customization:
The screen images on these pages represent the defaults for the
Console. ConsoleSync can be used to hide any of the parameters
shown, or to change the prompt words from English to another lan-
guage. The units for Speed, Temperature, and Barometric Pres-
sure can also be changed within ConsoleSync.
The standard display view consists of the following information:
Wind Speed
The wind speed is displayed in the upper right corner. Either ap-
parent or true wind speed will be displayed, using the same rules as
wind direction. If GPS data is available, the true wind will be com-
puted and displayed, otherwise the apparent wind will be displayed,
and the indicator “Apparent” displayed on the center of the top line.
Apparent wind is the wind a person riding on the vehicle would feel.
True wind is the wind that would be measured if the vehicle were
stationary. It is computed from the apparent wind and the GPS-
provided course and speed.
See the WatchDog Sprayer Station manual for a more detailed ex-
planation of Apparent vs. True wind speeds.
Gust 7 Apparent HH
Temp 82 RH 24 Dew 41 HH
Bar 29.35 dT 14 HH HH
Hdg E s0 HHSW

12
Wind Direction
The wind direction is displayed in the lower left corner, using eight
compass points (or degrees, if specified in ConsoleSync). True or
apparent direction will be displayed using the same rules as wind
speed.
Wind Gust (“Gust”)
The apparent or true wind gust is displayed on the first text line.
“Apparent”
If GPS data is not available, then “Apparent” is displayed, and the
apparent wind direction, speed, and gust are displayed instead of
the true values.
Apparent Wind (“ApWind”)
The apparent wind direction and speed is displayed on the first text
line when GPS data is available. See the following page for a sam-
ple screen showing the display with GPS-dependent data.
Temperature (“Temp”)
The current temperature is displayed on the second line in whole
degrees
Relative Humidity (“RH”)
The relative humidity is displayed as a percent.
Dew Point (“Dew”)
Dew Point is computed from the current temperature and relative
humidity, and is displayed in whole degrees.
Barometric Pressure (“Bar”)
Barometric pressure is displayed on the third line.
Delta T (“dT”)
Delta T is the difference between dry bulb and wet bulb tempera-
tures (in Celsius). Delta T is used in countries such as Australia to
define limits for spraying.
Heading/Course (“Hdg”)
Heading or Course are displayed on the bottom line. Heading is
the direction the vehicle is pointed, and is displayed when the vehi-
cle is not moving (or GPS data is not available). Course is the di-
rection the vehicle is moving, and it and speed are displayed when

13
the vehicle is in motion.
Satellites (“s”)
The number of GPS satellites currently being received is displayed.
A GPS position fix is not obtained until at least three satellites are
being received, and the more satellites, the more accurate the posi-
tion fix, and the computation of the vehicle and true wind speeds.
Log
The “Log” indicator is displayed whenever weather data is being
periodically logged to flash memory. Logging is started and
stopped using the “Log” button. Logging is enabled and the re-
cording interval set within ConsoleSync.
Wind Drift Indicator
The Wind Drift Indicator is an arrow showing the direction any spray
drift would travel. Although this could be computed by the operator
using the travel and wind directions, the Indicator provides an intui-
tive visual aid for the operator, that shows potential drift relative to
the vehicle itself, regardless of the direction it is headed. For exam-
ple, if the vehicle is traveling East, and the wind is from the North,
the arrow will point to the right, indicating that any drift would be
heading to the right. On a return pass, traveling West, the arrow
would point left.
Gust 7 ApWind SE 5
Temp 82 RH 24 Dew 41
Bar 29.35 dT 14
Hdg E 7 s6 Log HHSW

14
Insert the SpecWare Mobile / ConsoleSync installation CD in your
computer’s disk drive. On most machines, the software installation
will begin automatically. If the installation program does not auto-
matically run, click Start on the Windows Taskbar, and select Run.
Click Browse, and locate the ConsoleSync CD. Double click the
setup.exe file.
Follow the screen instructions to complete the installation. You will
be asked which products you want to install. Select at least Con-
soleSync. If you are using a laptop, you may also want to install
SpecWare Mobile for the PC, as this program will allow you connect
the Sprayer Station directly to your laptop, and view the weather
conditions on your laptop screen. Desktop icons and Start menu
entries will be created to run the products you select.
Once the SpecWare ConsoleSync software is installed, you are
ready to configure your Console to use with your Sprayer Station.
——————————————
The current version of SpecWare Mobile and ConsoleSync soft-
ware is available on the Spectrum Technologies web site at
www.specmeters.com. This may contain corrections or new fea-
tures for ConsoleSync.
Installing
ConsoleSync
Software

15
Start ConsoleSync by clicking on the entry in your Start Menu or the
icon on your desktop. Your screen will look like the following im-
age.
ConsoleSync uses tabs to separate its functions. The Sync tab
displays first, because that will be used on a day-to-day basis.
The tabs are arranged so that initial configuration is done from right
to left, ending with the Sync tab to transmit the configuration to the
Console.
Configuring Your
Console Using
ConsoleSync

16
Buttons
There are three buttons on the bottom of the screen for the configu-
ration tabs:
Apply saves any configuration changes made.
Cancel returns the screen to the last saved values.
Exit exits ConsoleSync.
Data Storage
The Data Storage tab allows you to specify what data to collect on
your Console, and where to preserve it on your PC. It contains the
following configuration options:

17
Data Storage Location
By default, ConsoleSync saves files in a folder named
“SprayerStation” in your “My Documents” folder (“Documents” for
Vista users). The current location is displayed here, and it can be
changed by clicking the Change Location button.
The Set to My Documents button provides a quick way to get back
to “My Documents”.
Note that changing the file location affects future files; you must
manually move any existing files to the new location.
Separate Multiple Consoles’ Data
If you own more than one Sprayer Station Console, then their data
files need to be separated. You are given the opportunity to name
each Console, and that name is used to uniquely identify the files.

18
ConsoleSync offers two naming options:
By Folder
Folders are created in the Data Storage Location folder, and each
Console’s data is saved in the corresponding folder.
By filename
Data files are all stored in the Data Storage Location folder, and the
Console name is used as the first part of the data file name to dif-
ferentiate them.
Save Logged Data As
Logged data files are saved with the name
“Sprayer.Log.variable.txt” (prefixed by or saved in the folder named
for the Console name). The variable part of the name can take
three forms:
One file per day
The logged data date is substituted for variable in the form
“yyyymmdd”.
One file per logged period
When there is a break in the logged data of at least five minutes, a
new log file is started. The time associated with the first record is
substituted for variable in the form “yyyymmdd.hhmm”.
Prompt for File Name for each period
When there is a break in the logged data of at least five minutes, a
new log file is started. You are given the time the logging period
began, and asked for a name. This name is substituted for vari-
able. This option would be most commonly used to mark files by
customer or location name or number.
Log Interval
The logging interval is set as a standard for all the Consoles you
manage. Log Interval allows you to disable logging (which deacti-
vates the Log button on the Console), or set a recording interval
ranging from four seconds to one minute.

19
Save Snapshot Data As
Snapshot data is a single geo-referenced weather data point, ob-
tained by pressing the Snapshot button on the Console. Snapshots
could be used to record conditions at the beginning and/or end of
spraying a field. Snapshot records are saved in files with the name
“Sprayer.Snap.variable.txt” (prefixed by or saved in the folder
named for the Console name). The variable part of the name can
take two forms:
One file per day
The logged data date is substituted for variable in the form
“yyyymmdd”.
One file per year
The logged data year is substituted for variable in the form “yyyy”.
In essence this records all Snapshot records in a single file. The
file is split by year to ensure individual files do not get too long, and
to ease archiving old files.
Date and Time
Log and Snapshot records begin with the date and time. If Use two
columns for Date and Time is checked, then they are stored sepa-
rately, otherwise they are saved in a single column.

20
System Settings
The Systems Settings tab lets you customize key systems parame-
ters.
Connection
To download data from the Console, or to set parameters on the
Console, it must be attached to the PC using the gray cable pro-
vided. The gray cable plugs into a 9-pin serial port on your PC. If
your PC does not have a serial port, then you must purchase a
USB to Serial Adapter cable (one is available from Spectrum Tech-
nologies as item number 3661USB).
You must select the serial port (“COM”) number that the cable is
plugged into from the pull-down list labeled Ports.
Scan / All button
Clicking the button marked Scan causes ConsoleSync to check for
valid serial ports on your system, and only list valid serial ports in
the pull-down. The button will now read All, and clicking it again will
Other manuals for WatchDog 3349CN
1
Table of contents