Spide HA06 User manual
HA06
(SDO Hot Air One)
HOT AIR / QUARTZ REFLOW OVEN
User manual
Version 2.25

Rev. 2.25 Manual HA06 Hot Air / Quartz Reflow Oven June 2018
©Spidé, the Netherlands Page 1
Tabel of contents
IMPORTANT SAFETY RULES FORCED AIR CONVECTION OVEN................................................................ 2
Introduction. ............................................................................................................................................ 4
Inside the box .......................................................................................................................................... 4
Installation. .............................................................................................................................................. 4
Controls explained. .................................................................................................................................. 5
Changing the soldering parameters. ....................................................................................................... 6
Soldering your first PCB ........................................................................................................................... 7
Inert gas extension (Optional). ................................................................................................................ 8
Technical specifications ........................................................................................................................... 9
Maintenance ........................................................................................................................................... 9
Replacing quartz lamp. ........................................................................................................................ 9
Lubricating drawer slides .................................................................................................................... 9
Error codes ........................................................................................................................................ 10

Rev. 2.25 Manual HA06 Hot Air / Quartz Reflow Oven June 2018
©Spidé, the Netherlands Page 2
IMPORTANT SAFETY RULES FORCED AIR CONVECTION OVEN
Risk of fire and burning:
When the oven is in production mode it is dangerous to leave the oven unattended, high
temperature and long producing times can be overheat the oven what can lead to
fire. When you place in - or take out – a PCB when oven is at working temperature use
protective gloves or a heat resistant tool. We recommend the use of our PCB carrier 625 to
handle the placement an removal of the PCB.
When the oven produce too much smoke, pull out the plug and close the door because then
the flames will be extinguished.
Put no flammable materials near or on the reflow –oven, don’t block the ventilation grate.
Don’t touch the cover of the oven, it can be hot. You risk a serious burning of the skin.
Machine location:
Use this oven not outdoors! The oven is developed to install it on a flat, dry surface. This
surface or table must be capable to care a weight of at least 30 Kg. The oven should be used
with normal room temperatures from 15 to 25 degrees.
It is not allowed and even dangerous to build it in a cupboard or box. Install this oven not
near a heating element or stove, also not in a wet environment.
Power supply:
Put the main plug in the wall socket near by the oven, this is important! Because in case of
an emergency the operator can pull out the plug.
The power supply is 230V 50 Hz AC normal power outlet. It must be secured with a 16 A
fuse. This oven must have a dedicated power outlet which can only be used by this oven.
Normal use:
The oven is developed only for soldering of PCB’s , don’t use the oven for food, animals or
heating of other materials. You will lose warranty if you don’t commit to those rules.
Don’t use the oven when it’s damaged or not working properly.
Check the properly working of the oven by following the checklist below:
1. Check the door. The door must not be bent or damaged. After firing-up on the oven
check the closing mechanism by opening and closing door. The oven must respond to
it. If not DON’T USE THE OVEN but contact your dealer. Don’t use the oven when there
is a piece of material between the door latch and ceiling’s. When the door or ceilings
are damaged it’s dangerous to use the oven
2. Check the hinge and safety door handles. Don’t use the oven if they are broken or
loose.
3. Check the door sealing. Are they not damaged?
4. Check if there are no dents in the oven space
5. Check the line cord, plug and outlet. Be sure they are not damaged.
Clean the oven frequently, when the operator doesn’t clean the oven frequently there can
be cause a dangerous situation
High voltage - ONLY QUALIFIED PERSONS MAY OPEN THE CASING:
The casing may never be opened or removed! Inside the machine are high voltages which
can be lead to dead or serious injuries.
Don’t put the plug and the line cord into any kind of liquid. Avoid situations that liquids or
other materials entering the oven through door latching or ventilation grate.

Rev. 2.25 Manual HA06 Hot Air / Quartz Reflow Oven June 2018
©Spidé, the Netherlands Page 3
In the case this is happening:
Switch off the oven immediately or/and, pull the plug out of the wall socket.
Ask your supplier what to do.
Be sure the line cord is not making a sharp hook or is hanging on sharp things. Avoid line
cord to be in contact with warm or hot surfaces.
In case of damage only qualified persons may replace the line cord.
Operating the oven:
It’s not allowed to operate this oven under the age of 18 years. It’s also not allowed that the
oven is operated persons with disabilities which will make it impossible to use the machine
in a save and responsible way.
It’s strongly recommended that the operator has enough knowledge if working with
soldering machines and the use of the right paste for soldering.
Use the oven only in well ventilated rooms. Follow the safety rules of your paste supplier.
During the soldering process gas and heat will be produced. The gasses can be affect your
health in a negative way.
It is recommended to buy our extraction hood and fume extractor options!
Responsibility at improperly use:
Nor the supplier or manufacturer is responsible for damage at the oven or personal injury
when safety rules and correct installation are not committed. Also, warranty will be
immediately omitted.

Rev. 2.25 Manual HA06 Hot Air / Quartz Reflow Oven June 2018
©Spidé, the Netherlands Page 4
Introduction.
The HA06 is a solder oven for SMD component with the use of lead free paste. The oven is working
with full convection forced air during the preheat stage. When the reflow stage is entered the
heating will be done by hot air and quartz lamps. The lamps are needed to get a short ramp speed.
Once the reflow set point is reached the lamp power will be reduced to a minimum. At this point 85%
of the heating is caused by forced hot air. This unique feature makes the oven suitable for solder big
SMD components and/or components with pads under their casing while using lead free paste. Whit
good maintenance and proper use the oven will serve your solder needs for a long time with high
quality solder results.
Some of the features include:
Outstanding reflow soldering quality for SMD and hybrid
Cures SMD adhesive
Two microprocessor-controlled heat zones
Inside the box
When you’ve opened the box you will find:
One spare quartz lamp
One tube XADO lubricant
This manual
The oven
Carefully take out the oven. Watch the weight which is 23Kg!
Installation.
The oven is to be installed on a heat resistant surface capable of carry a load of at least 30 Kg. Put the
main supply plug into the wall outlet. This wall outlet/power line must be dedicated to the oven and
no other equipment shall use the same power line. The power line must be secured with a 16 amp
fuse. The machine itself is also secured with an automatic fuse of 15 amp.

Rev. 2.25 Manual HA06 Hot Air / Quartz Reflow Oven June 2018
©Spidé, the Netherlands Page 5
Controls explained.
On the front you will find 8 buttons, 2 LED’s, 2 number bars and also the main switch.
The functions are:
1. A - Temperature display
Here the temperature is displayed. Depending of the cycle you will see the pre-heat or reflow
temperature. The decimal point on the far right shows the status of the hot air heating. If the
point lights on, heating is powered, and the temperature rises. The decimal point one digit to
the left has the same function for the quartz heating.
2. B - Time display
Here the time is displayed. Depending of the cycle you will see the actual preheat or reflow
time left. When the oven is in standby position you will see the set preheat time.
After you edit the parameters the decimal points of the far-right number will light up for a
very short time. This indicates that the controller is saving the new profile to E2Prom. Next
time you turn on the oven it will remember you last setting.
3. Switches E. With those switches you set the preheat time between 1 and 999 seconds.
4. Switches F. With those switches you set the preheat set point temperature between 60 and
240 °C.

Rev. 2.25 Manual HA06 Hot Air / Quartz Reflow Oven June 2018
©Spidé, the Netherlands Page 6
5. Switches G. With those switches you can set the reflow time between 1 and 999 seconds.
6. Switches H. With those switches you set the reflow set point temperature between 100 and
290 °C.
7. Status LED C and D.
a. Both LED’s are blinking in Red and Green. This will be the situation when the oven is
heating up or cool down and means the oven is not ready.
b. Both LED’s are steady Green. The oven is ready to solder with.
c. LED C is blinking, and LED D is steady Green. You have started a solder cycle and the oven
is busy with preheating. You will see that the time bar is counting down and shows the
seconds left for reflow.
d. LED C is steady Red and LED D is blinking. The reflow process is running, and you will see
the quartz lamps are turned on. Also, the most right decimal point of the time bar is
continuously on and temperature is rising fast.
c. Both LED’s are steady Green. You will also hear a tune playing and the temperature and
time bar shows the message “oPn dOr”. The solder cycle is completed, and you are asked to
open the drawer.
WARNING! Use protective gloves or a heat resistant tool to remove the PCB.
8. LED “C” and LED “D” are blinking in opposite colours. An error has occurred. Please see the
page “Error codes explained” for more information.
9. The main switch I. In the “ON” position the machine will be connected with the wall outlet
(main power). DO NOT OPEN THE CASE OF THE MACHINE! In “OFF” position the oven is
turned off and not working.
10. The reset button J. This will re-initiate the oven as if you turn the main switch G into the
“ON” position. This is also known as “hard reboot”. Sometimes the program is confused by
what the user has done. For example, opens the drawer during the solder process. You can
recover the oven by pushing on this button.
Changing the soldering parameters.
If you are an experience operator you know that soldering is more than just heating your product
until the paste is melting. You know what to do. For those who hasn’t that experience we
recommend reading about soldering as match as you can. Ask your paste supplier for advice because
the paste demands the solder heating curve and timing together with the SMD components.
To create a good solder curve you must set the temperatures and times from both the preheating
and the reflow. This can be done with the push buttons E-F for preheating and G-H for reflow
parameters. Editing the value during a soldering cycle isn’t possible. You can interrupt the soldering
process by opening the drawer. This will terminate the solder process!
It is not possible to set preheat and reflow temperature in a way that the gap between them is less
than 40 °C. The min. preheat set point value is 60 °C with and max. 240 °C. The timing reaches from 1
to 999 seconds.
For the reflow temperature these limits are between 100 °C and 290 °C. The time also reaches from 1
to 999 seconds.
Although those settings are available it isn’t recommended to use such extreme parameters. Your
board will be either to cold or burned out when using the extremes. A standard receipt cannot be

Rev. 2.25 Manual HA06 Hot Air / Quartz Reflow Oven June 2018
©Spidé, the Netherlands Page 7
given because it depends on both solder paste and components. As mentioned before: let your paste
supplier inform you about best practice.
If you are unexperienced and you will solder a PCB with lead free paste use this setting to start from:
Use paste with a melt point of 217 °C.
Pre-heat time: 300 sec. and Pre-temperature: 180 °C.
Reflow time: 70 sec. and Reflow temperature: 230 °C.
Remember! Those settings do not guarantee good results but a guideline!
Soldering your first PCB
Be sure the door is closed and set switch A on the front panel into the “ON” position. The oven will
now start heating up to the preheat set point. To speed up this heating both heaters, hot air and
quartz lamps are used. Both LED’s (C-D) are blinking in this stage. In the time panel you will see the
preheat time. It will be stable in this stage. In the temperature panel you can see how the
temperature is rising to the preheat set point. During the heat-up time you can edit the
temperatures and timing of both zones. In that case the heating-up process is stopped and will be
continued after editing is finished. If the set point temperature is reached the quartz will be turned
off. This causing the temperature to drop. When it drops below a certain point (it depends on the
height of the set point) the quartz will be activated again. This cycle is repeated for several times and
is a normal behaviour.
When the preheat temperature is reached and established the LED’s (C-D) are stop blinking,
accompanied by an acoustic signal. The oven is now ready for soldering PCB boards with SMD
components.
REMARK. When the oven is ready for use and is not used for a period of 30 minutes it will shut down
automatically. This will also happen if the drawer is opened for starting a solder cycle and not closed
with 2 minutes. When this happens push at the “Reset” button J to restart the oven. The same cycle
now is started as if you turn switch I to “ON”.
Paste and PCB has materials which are release gasses and smoke when heated. Those
gasses, especially the gasses and smoke from the paste, are very bat for your health!
Therefore, arrange enough room ventilation to extinct the gasses and smoke and thereby conserve
your health.
We recommend the use of our “Extraction hood” combined with our fume extractor FE-400I which is
capable to suck off the gasses and smoke fast enough.
When the oven is ready to solder, and you’ve set al the parameters in the right manner you can start
to solder.
1. Open the drawer and carefully place your PCB on the middle of the rooster. This should
preferable be done within two minutes. If the drawer is not closed within two minutes, the
oven will switch off automatically!
WARNING! Use protective gloves or a heat resistant tool to place the PCB in position.
Close the drawer. As you can see the temperature has dropped a few degrees, that’s normal.
2. The preheater cycle is started after closing the drawer. On the time display you will see the
time decreasing. The time is displayed in seconds
De temperature display is showing the actual temperature. When the timer is reaching zero
the reflow stage is automatically started.

Rev. 2.25 Manual HA06 Hot Air / Quartz Reflow Oven June 2018
©Spidé, the Netherlands Page 8
3. The reflow cycle is started. The quartz lamps are turn on for 100% and the temperature
display shows a rapidly rising temperature. The time display is decreasing in seconds.
When the reflow set point is reached you will see that the quartz lamp are no longer at 100%
power but about 15%. This means that the main part of soldering is caused by forced hot air
which make the machine unique in its class.
When the time is reaching zero the solder cycle is ended.
4. When the cycle is ended the oven starts making noise and on the display the message: “oPn
dOr”. To avoid the burning out of your PCB it recommended to do this right away! Opening
the drawer to maximum giving the PCB and oven the opportunity to cool down.
WARNING. The air coming out of the oven is VERY HOT. You can easily burn
seriously your skin on it! KEEP DISTANCE!
When the oven is near preheat set point you must remove your PCB a lay it down on a heat
resistant surface.
WARNING! Use protective gloves or a heat resistant tool to remove the PCB from the
drawer!
5. The oven will cool down to a much lower temperature as the preheat set point, that’s
normal. How much depends of the preheater- and reflow set points. At a certain point the
oven demands that you close the drawer. After you’ve done this you will see that the
temperature is rising to its preheater set point. When established at set point the oven will
beep and the status LED’s will burn steady.
Congratulations! You just finished soldering you first PCB! You now can restart the cycle from point 1.
Inert gas extension (Optional).
WARNING! Arrange enough ventilation or use a safety mask. Be sure that the gas you’re
using is a non-toxic nor explosive gas when heated!
Inert gas is being used when you will prevent oxidation of the solder during soldering. With this
extension it is possible to use an inert gas like N2. Its recommended to use N2 but if you want to use
another gas type be sure that this gas isn’t explosive when heated nor that it is toxic! The use of our
“Extraction hood” is strongly recommended so the minimum of gas is flow into the room. Even then
be sure that there is suffices room ventilation to preserve your health!
Do not use more gas then necessary for the process.
The flowmeter on the solder oven has a scale for air/nitrogen. Working with other gasses will only
indicate a flow. It isn’t possible to work in a complete inert process chamber since there always will
leak some air in to this process chamber. This is inherent onto the machine construction. Its
recommended to use a gas flow to approximately 100-400 L/hour with a pressure between 2 and 4
bar. The flowmeter is limited to 500 L/hour.
The inert gas is heating before entering the process chamber and cannot disturb your temperature
profile.
Rev. 2.25 Manual HA06 Hot Air / Quartz Reflow Oven June 2018
©Spidé, the Netherlands Page 9
Technical specifications
Power requirements : 200 – 230 VAC. / 50-60Hz
Max. power consumption : 3680W
Pre-heat zone : 2180W
Reflow zone : 1500W
Max. PCB substrate surface : 300 x 370mm
Max. pre-heat time : 1 – 999 sec.
Max. pre-heat temperature : 60 -240 °C
Max. reflow time : 1 – 999 sec.
Max. reflow temperature : 100 – 290 °C
Heat up time : approx. 8 minutes
Net weight : +/- 22Kg
Options (not standard) : N2 inert gas connection with flowmeter
: Extraction hood
: FE-4001 fume extractor
Maintenance
In general, there is no need to maintenance the oven. After a while the glass can become trouble by
residues on it, caused by the flux. You use any cleaner as long it doesn’t scratch.
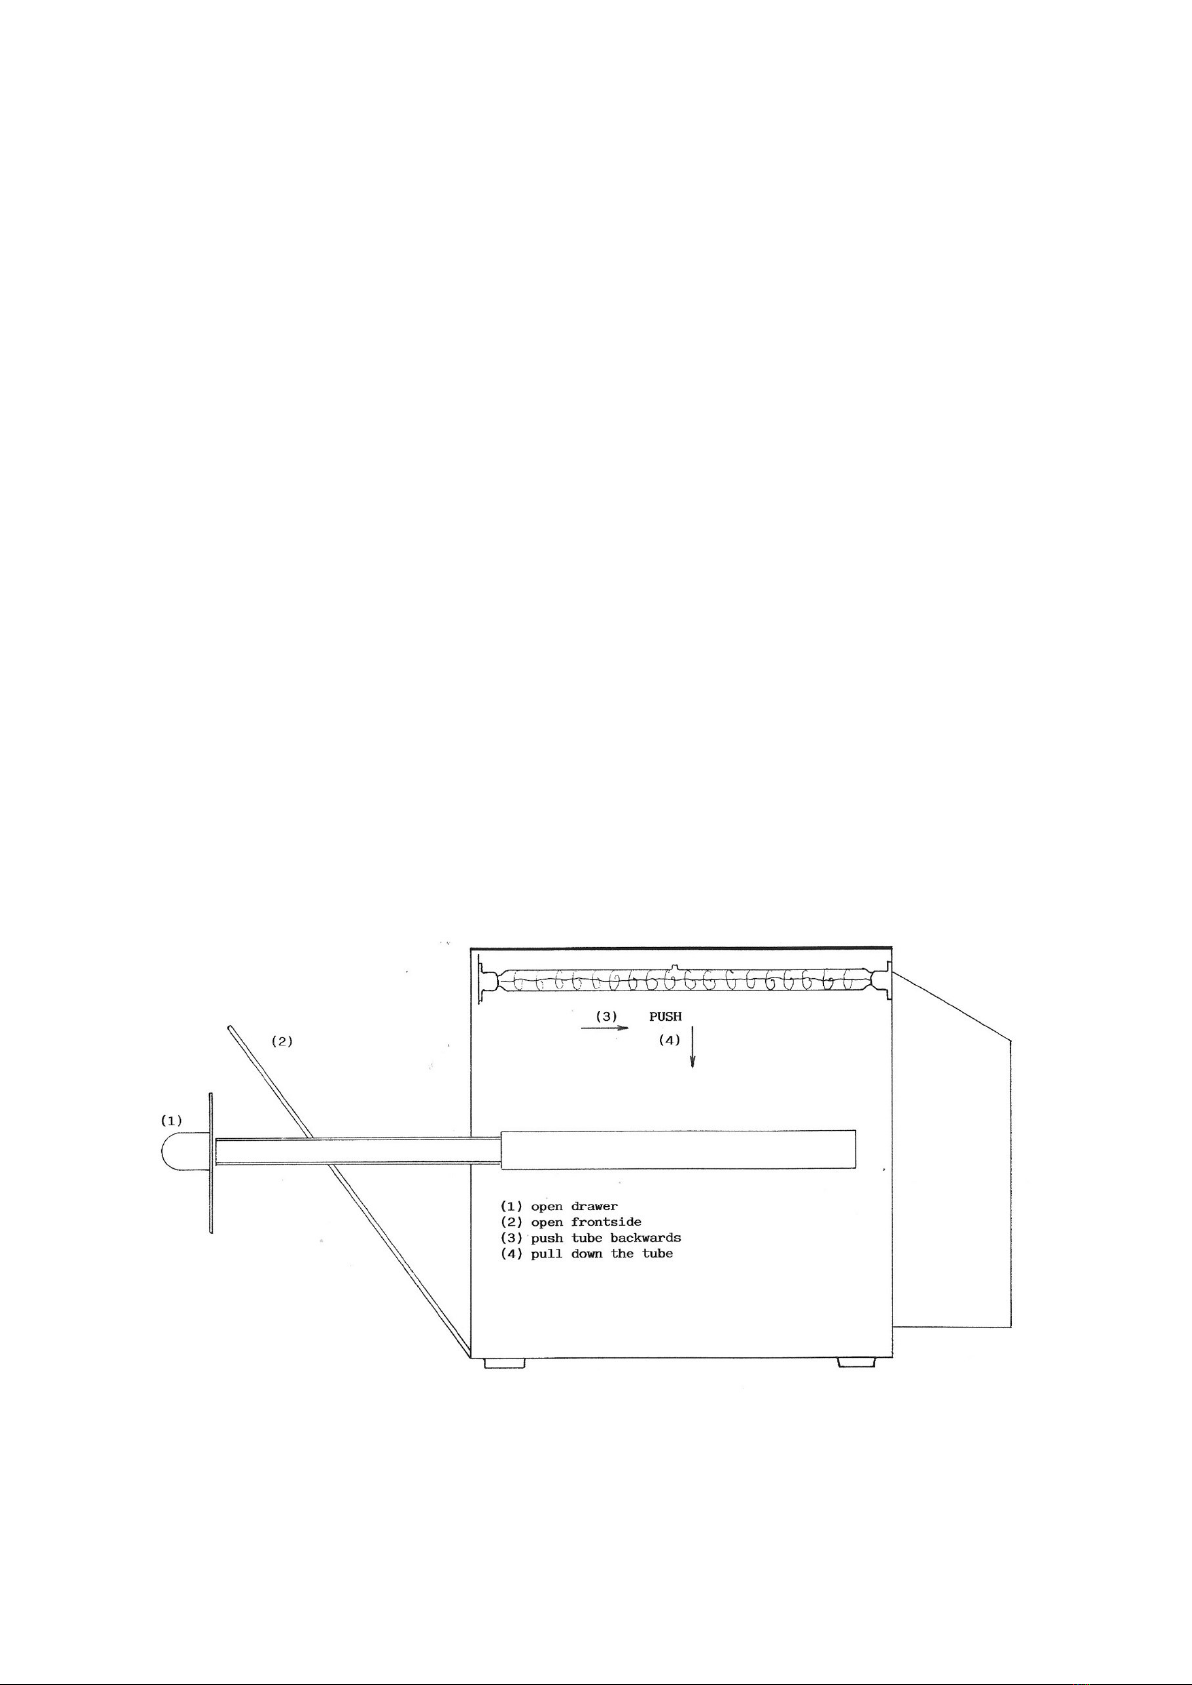
Replacing quartz lamp.
The lifetime of quartz lamps is limited. After +/- 1000 hours lamps need to be replaced. Ask your
dealer for new lamps. Changing the lamps is not problematic. Remove the two screws at the top of
the door. Sometimes you need also to remove the upper cap of the oven. Now open the door and
replace the lamps. (See the sketch below.)
Lubricating drawer slides
Enclosed in the package there was a small tube of XADO. This is a special heat resistant lubricant.
Apply it on the bars with a narrow tassel. Open and close the drawer a few times. Now you need to

Rev. 2.25 Manual HA06 Hot Air / Quartz Reflow Oven June 2018
©Spidé, the Netherlands Page 10
“burn in” this lubricant. It will give a lot of smoke. Therefor you need to do this procedure in a well-
ventilated area. Apply a normal solder cycle several times.
Error codes
Err 1 = E2Prom write err
Err 2 = Some error in the Reflow lamp circuit.
Err 3 = Some error in the Preheater circuit
Err 4 = Some error with the thermocouple
Err 5 = Thermocouple connected to VCC
Err 6 = Thermocouple connected to GND
Err 7 = Thermocouple not connected or error in the circuits
Table of contents
Popular Oven manuals by other brands

Artusi
Artusi AO601 Operation manual

KitchenAid
KitchenAid KEBC247VBL - 24 Inch Double Electric Wall... parts manual

Smeg
Smeg CE9IMX Instructions for installation and use

TZS First AUSTRIA
TZS First AUSTRIA FA-5047 instruction manual

Whirlpool
Whirlpool AKZ 479 User and maintenance manual

Bosch
Bosch HBA23B1 0R Series instruction manual


W quick start guide")

