SPIEGEL SP3201 User manual

SP3201 Instruction Manual
General Overview ( Page 2 )
Setting Up Your Machine ( Page 8 )
Threading Your Machine ( Page 13 )

Copyright 2017 Spiegel LLC, all rights reserved

Always follow basic safety procedures when using your sewing machine. Read all of the following
instructions before operating your Spiegel SP3201.
DANGER - To reduce the risk of electric shock:
1. The sewing machine should never be left unattended when plugged in.
2. Always unplug the sewing machine immediately after using and before cleaning the machine.
3. If the LED lamp is damaged or broken, it must be replaced by the manufacturer or its service
agent or a similarly qualified person, in order to avoid a hazard.
WARNING - To reduce the risk of burns, fire, electric shock, or injury to persons:
1. Read these instructions carefully before using the machine.
2. Keep the instructions in a suitable place close to the machine. If you loan or sell the machine to
someone else, keep the instructions with the machine.
3. Use the machine only in dry locations. Never use the machine in a wet environment.
4. Never leave the machine unattended with children, elderly people, or any individual who may not
be able to assess the risk of operating the machine..
5. This appliance may be used by children aged from 8 years and above, as well as persons with
reduced physical, sensory, or mental capabilities or lack of experience and knowledge, provided
they understand the hazards involved, are supervised, and have been given instructions
concerning the safe use of the sewing machine.
6. The Spiegel SP3201 is not a toy. Children should not play with the sewing machine.
7. Children should not clean or maintain the sewing machine without supervision.
8. Always switch off the machine when preparing to sew (changing the needle, feeding thread
through the machine, changing the footer, etc.)
IMPORTANT SAFETY INSTRUCTIONS
I

9. To avoid injury through inadvertently switching on the machine, always unplug it when leaving it
unattended.
10. Always unplug the machine to perform maintenance (oiling, cleaning) or change the lamp.
11. Never pull the cord. Always unplug the machine by gripping the plug.
13. Never place anything but your foot on the pedal.
14. Never use the machine if the air vents are blocked. Keep the air vents and the foot pedal free
from dust.
15.The machine may only be used with foot pedal types KD-1902, FC-1902 (110-120V area) /
KD-2902, FC-2902A, FC-2902C, FC-2902D (220-240V area) / 4C-316B (110-125V area),
4C-316C (127V area) / 4C-326C (220V area), 4C-326G (230V area), 4C-336G (240V area),
4C-336G (220-240V area).
16. The foot pedal cord cannot be replaced. If the foot pedal cord is damaged, the foot controller must
be disposed of.
17. The noise produced by the Spiegel SP3201 during normal operation is not more than 75dB(A).
18. Do not dispose of electrical appliances as unsorted municipal waste. Use separate collection
facilities. Contact your local government for information regarding the collections systems
available. If electrical appliances are disposed of in landfills or dumps, hazardous substances can
leak into the groundwater and enter the food chain, damaging your health and well-being.
SAVE THESE INSTRUCTIONS
This sewing machine is intended for household use only.
II

Congratulations!
As the owner of a new sewing machine, you will enjoy precision quality stitching on all types of fabrics,
from multiple layers of denim to delicate silks.
Your sewing machine offers the ultimate in simplicity and ease of operation. For your safety and to fully
enjoy the many advantages and ease of operation of your sewing machine, we recommend that you
read all the important safeguards and use/care instructions in this instruction manual.
Before you start using your sewing machine, familiarize yourself with its features and advantages by
reading through these instructions step by step while sitting in front of your machine.
III

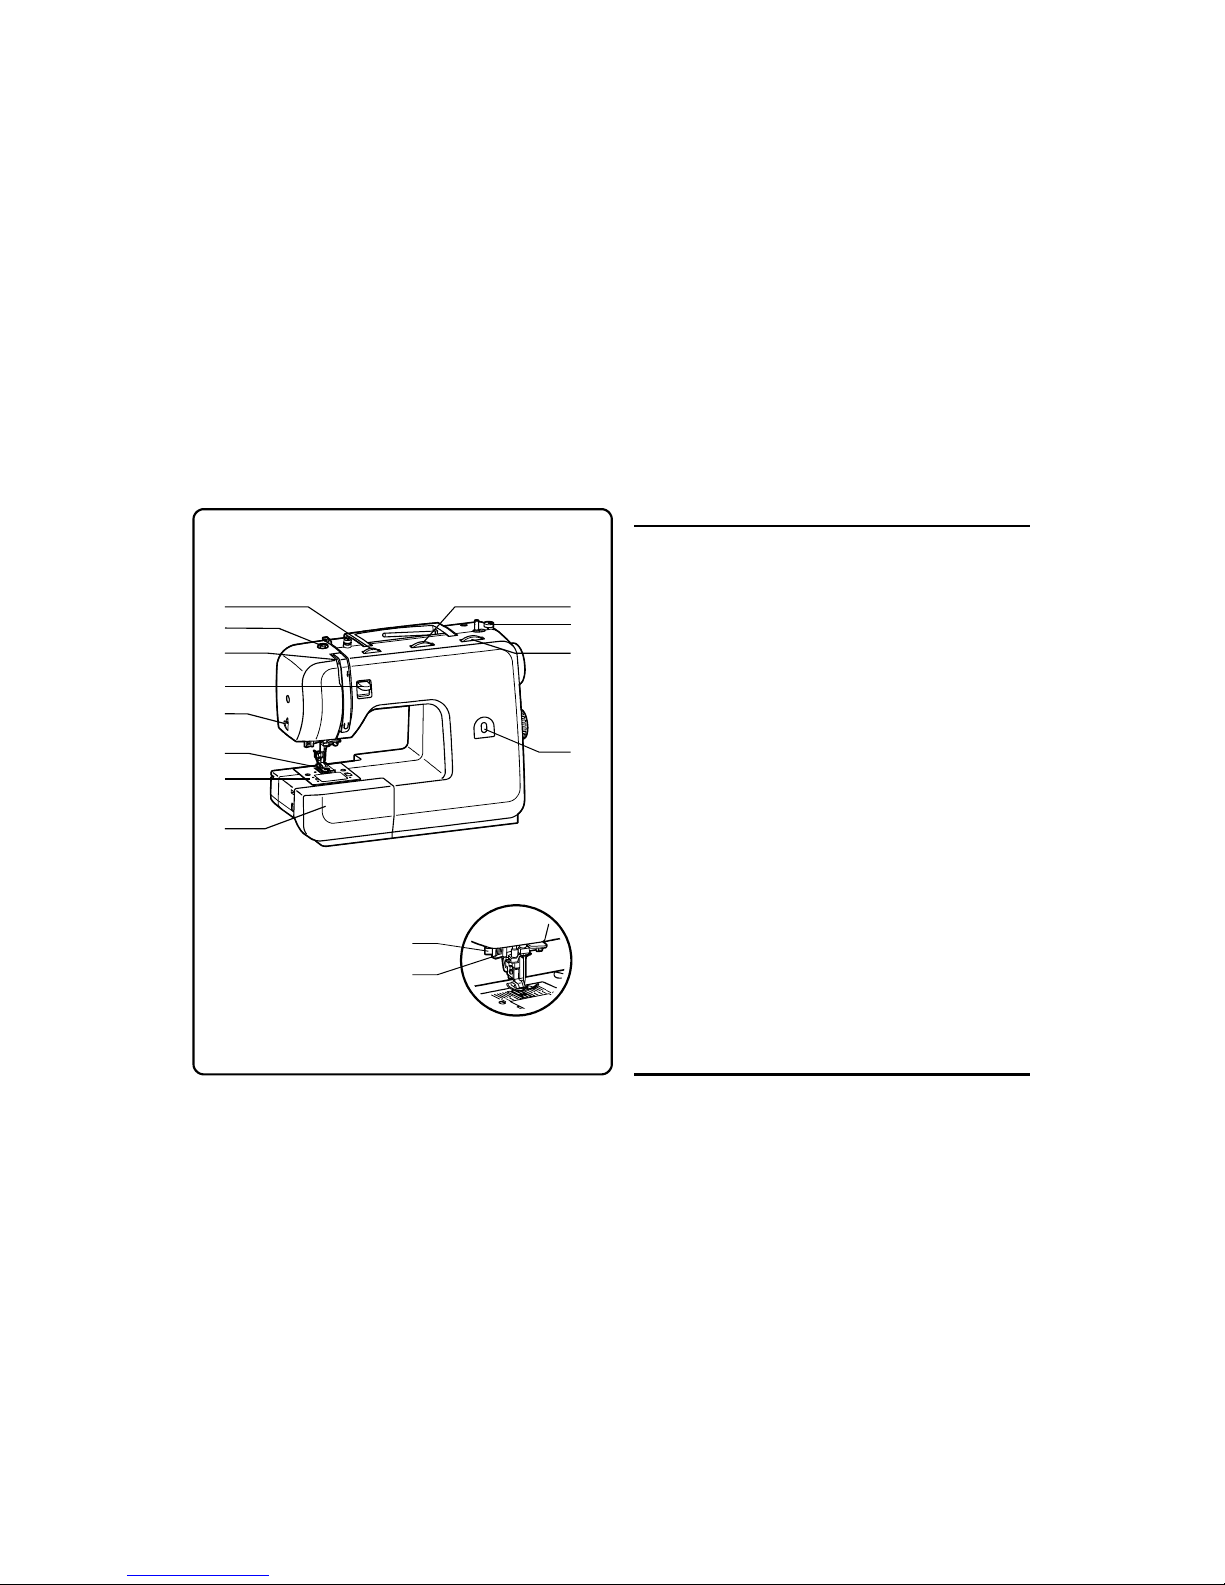
Details of the machine............................................................................2/3
Accessories...............................................................................................4
Fitting the snap-in sewing table.................................................................5
Connecting machine to power source.......................................................6
Changing the LED.....................................................................................7
Two-step Presser foot lever ......................................................................8
Adjusting presser foot pressure ................................................................8
Attaching the presser foot holder ..............................................................9
Winding the bobbin .................................................................................10
Inserting the bobbin.................................................................................11
Inserting the needle.................................................................................12
Threading the upper thread.....................................................................13
Automatic needle threader ......................................................................14
Thread tension ........................................................................................15
Bringing up the lower thread ...................................................................16
Reverse sewing/ Removing the work/
Cutting the thread/ Changing sewing directions......................................17
Matching needle/ fabric/ thread...............................................................18
How to choose your pattern ...................................................................19
Straight stitching and needle position .....................................................20
Stitch width dial & stitch length dial .......................................................21
Blind hem/ lingerie stitch .........................................................................22
Overcasting stitches................................................................................23
Sewing on buttons ..................................................................................24
How to sew buttonholes .........................................................................25
Zippers and piping...................................................................................26
Sewing with the optional Hemmer foot ...................................................27
Multi-stitch zigzag....................................................................................28
Straight stretch stitch and Ric Rac stitch.................................................29
Honeycomb stitch....................................................................................30
Sewing with the optional cording foot......................................................31
Free motion darning ................................................................................32
Practical stitches .....................................................................................33
Darning....................................................................................................34
Attaching lace..........................................................................................35
Applique ..................................................................................................36
Twin needle.............................................................................................37
Monogramming and embroidering with embroidery hoop.......................38
Quilting ...................................................................................................29
Gathering ................................................................................................40
Patch work ..............................................................................................41
The walking foot accessory.....................................................................42
Maintenance............................................................................................43
Trouble shooting guide............................................................................44
List of contents

2
Details of the machine
1. Tension dial
2. Presser foot pressure
3. Thread take up lever
4. Reverse sewing lever
5. Thread cutter
6. Presser foot
7. Needle plate
8. Sewing table and accessory box
9. Stitch width dial
10. Bobbin winder stopper
11. Stitch length dial
12. Stitch display
13. One step buttonhole lever
14. Automatic needle threader
3
4
5
9
8
6
7
11
14
13
12
10
1
2

3
15. Spool pin
16. Bobbin winder spindle
17. Hole for second spool pin
18. Handle
19. Handwheel
20. Pattern select dial
21. Power switch
22. Main plug socket
23. Bobbin thread guide
24. Upper thread guide
25. Presser foot lifter
26. Drop feed control
Details of the machine
17
15
16
19 25
24
20
21
22
23
26
18

4
Accessories
Standard accessories (1)
a. All purpose foot
b. Zipper foot
c. Buttonhole foot
d. Button sewing foot
e. L-screwdriver
f. Seam ripper / brush
g. Second spool pin
h. Spool pin felt
i. Pack of needles (3x)
j. Spool holder
k. Bobbin (3x)
l. Edge/quilting guide
1
abc
gi
j
eh
k
f
l
d

5
To fit the snap-in sewing table to the sewing machine, keep the snap-in
sewing table horizontal and slide it toward the sewing machine as
shown. (1)
(With the snap-in sewing table removed, the machine can be used for
free-arm sewing.)
The inside of the snap-in sewing table can be used as an accessory
box.
To open it, flip the cover down as shown. (2)
Fitting the snap-in sewing table
2
1

6
a
b
2
1
3
Connect the machine to a power source as illustrated. (1)
Where applicable, the sewing machine is equipped with a polarized plug
(one blade is wider than the other) that must be used with an
appropriate polarized outlet. (2)
Attention:
Unplug the power cord when the machine is not in use.
Foot control
The foot pedal regulates the sewing speed. (3)
Attention:
Consult a qualified electrician if in doubt as to how to connect the
machine to the local power source.
Unplug power cord when machine is not in use.
Sewing light
Flip the main switch to " I " to activate power and turn on the sewing
light. (1)
IMPORTANT NOTICE
For appliances with a polarized plug (one blade is wider than the other).
to reduce the risk of electric shock, the plug must be fitted CORRECTLY
to a polarized outlet. If it does not fit fully in the outlet, reverse the plug.
If it still does not fit, contact a qualified electrician to install the proper
outlet. Do not modify the plug in any way. (2)
a. Polarized attachment plug
b. Conductor intended to be grounded
Connecting machine to power source

7
Changing the LED
If the LED lamp is damaged or broken, it must be replaced by the
manufacturer or its service agent or a similarly qualified person, in order
to avoid a hazard.

When sewing several layers or thick fabrics, the presser foot can be
raised to its second step for easier positioning of the fabric. (A)
The presser foot pressure of the machine has ben pre-set and requires
no particular readjustment according to the type of fabric (light- or
heavy-weight).
However, if you need to adjust the presser foot pressure, turn the
presser adjusting screw with a coin.
For sewing very thin fabric, loosen the pressure by turning the screw
counter clockwise, and for heavy fabric, tighten the screw by by turning
it clockwise.
8
Two-step presser foot lever
Adjust presser foot pressure
2
1

Attaching the presser foot holder
Attention:
Turn the power switch to ("O") when carrying out any of these
operations!
Raise the presser foot lever (a). (1)
Attach the presser foot holder (b) as illustrated.
Attaching the presser foot
Lower the presser foot holder (b) until the cut-out (c) is directly above
the pin (d). (2)
Raise the lever (e).
Lower the presser foot holder (b) and the presser foot (f) will engage
automatically.
Removing the presser foot
Raise the presser foot. (3)
Raise the lever (e) to disengage the foot.
Attaching the Edge/quilting guide
Attach the edge/quilting guide (g) in the slot as illustrated.
Adjust according to need for hems, pleats, etc. (4)
3
1
4
2
b
a
e
g
a
c
d
e
f
b
9

Winding the bobbin
10
- Place the thread and spool holder onto the spool pin (1).
- For smaller spools of thread, position the spool holder with the small
side next to the spool (2).
- Snap the thread into thread guide (3).
- Wind the thread clockwise around the bobbin winder tension discs (4).
- Thread the bobbin as illustrated and place it on the spindle (5).
- Push the bobbin to the right (6).
- Hold the thread end (7).
- Press down on the foot pedal (8).
- Cut the thread (9).
- Press the bobbin to the left (10) and remove.
Please Note:
When the bobbin winder spindle is in "bobbin winding" position, the
machine will not sew and the hand wheel will not turn.
To start sewing, push the bobbin winder spindle to the left (sewing
position).
4
3
56
78 9 10
1
2

11
Attention:
Turn the power switch to ("O") before inserting or removing the
bobbin.
When inserting or removing the bobbin, the needle must be fully
raised.
1. Insert the bobbin in the bobbin holder with the thread running counter
clockwise (arrow).
2. Pull the thread through the slot (A).
3. Draw the thread at the arrow markings into the stitch plate thread
guide from (B) to (C).
4. To cut off excess thread, pull the thread back over the cutting blade at
point (C). Replace the bobbin cover.
Inserting the bobbin
3
1
4
2
A
C
B

12
Inserting the needle
Attention:
Turn power switch to "O" before removing or inserting a needle.
Change the needle regularly, especially if it is showing signs of wear or
causing sewing problems.
Insert the needle as shown:
A. Loosen the needle clamp screw, insert the new needle, and tighten
the screw. (1)
B. The flat side of the shaft should be towards the back.
C/D. Insert the needle as far up as it will go.
Needles must be in perfect condition. (2)
Problems can occur with:
A. Bent needles
B. Damaged points
C. Blunt needles
A CB
2
1
A
B
C
D

13
This is a simple operation, but it is important to perform it correctly, as
failure to do so could cause several different sewing problems.
Start by raising the needle to its highest point. Raise the presser foot to
release the tension discs. (1/2)
1. Lift up the spool pin. Place the spool of thread on the holder with the
thread coming off the spool as shown. (3)
For small thread spools, use the spool holder with the smaller end
toward the spool.
2. Draw thread from the spool to the upper thread guides. (4/5)
3. Bring the thread toward you and through the two tension discs in the
top front of the machine. (6)
4. Continue downward on the right side of the large vertical thread
guide, passing under and up the left side, allowing the thread to
engage with the check spring as it passes upward. (7)
5. At the top of this movement, pass it from right to left through the
slotted eye of the take-up lever and then downward again. (8)
6. Pass behind the flat, horizontal thread guide. (9)
7. Now take the thread behind the thin wire needle clamp guide and
then down to the needle, which should be threaded from front to
back. Pull about 6-8 inches of thread to the rear beyond the needle
eye. (10)
Threading the upper thread
345 6
7 8 9
10
2
34
5
6
7
8
9
10
1

14
Attention:
Turn power switch to "O" before threading the needle.
- Raise the needle to its highest position and lower the presser foot by
turning the handwheel toward you. Do not turn the handwheel
backward, as this may jam the machine.
Pass the thread around the thread guide. (1)
- Press the lever down as far as it will go.
The needle threader turns automatically to the threading position and
the hook pin passes through the needle eye. (2)
- Take the thread in front of the needle. (3)
- Hold the thread loosely and release the lever slowly. The hook will
turn and pass the thread through the needle eye, forming a loop. (4)
Pull the thread through the needle eye.
Automatic needle threader
3
1
4
2

15
Upper thread tension
Basic thread tension setting: "4".
To increase the tension, turn the dial to the next number up.
To reduce the tension, turn the dial to the next number down.
A. Normal thread tension
B. Thread tension too loose
C. Thread tension too tight
Thread tension
A
B
C
Table of contents
Other SPIEGEL Sewing Machine manuals
Popular Sewing Machine manuals by other brands

Singer
Singer 20U73 Illustrated parts list

JUKI
JUKI DDL-5550N Specifications

Baby Lock
Baby Lock Solaris 2 Instruction and reference guide

DURKOPP ADLER
DURKOPP ADLER M-Type Delta D867 Additional instructions

Singer
Singer 5500 instruction manual

Mitsubishi Electric
Mitsubishi Electric PLK-J4040R Technical manual