Spirella FUTURO User manual

1
Montageanleitung
Assembly Instructions
Instructions de Montage
Version: 1.3
05.09.2002
FUTURO
Drehtür mit schwenkbarer Seitenwand
Pivot door with swivelling side wall
Porte pivotante avec paroi latérale orientable
Artikel-Nr.:30.24986
2
123
1
2
3
1
2
3
1
2
3
1
2
3
1
2
3
1
2
3
1
2
3
1
2
3
1
2
3
123
12345
1
234
5
1
234
5
1
234
5
12345
12345
1
234
5
1
234
5
1
234
5
1
234
5
12345
12
12
12
12
12
12
12
12
12
12
12
12345
1
234
5
1
234
5
1
234
5
1
234
5
12345
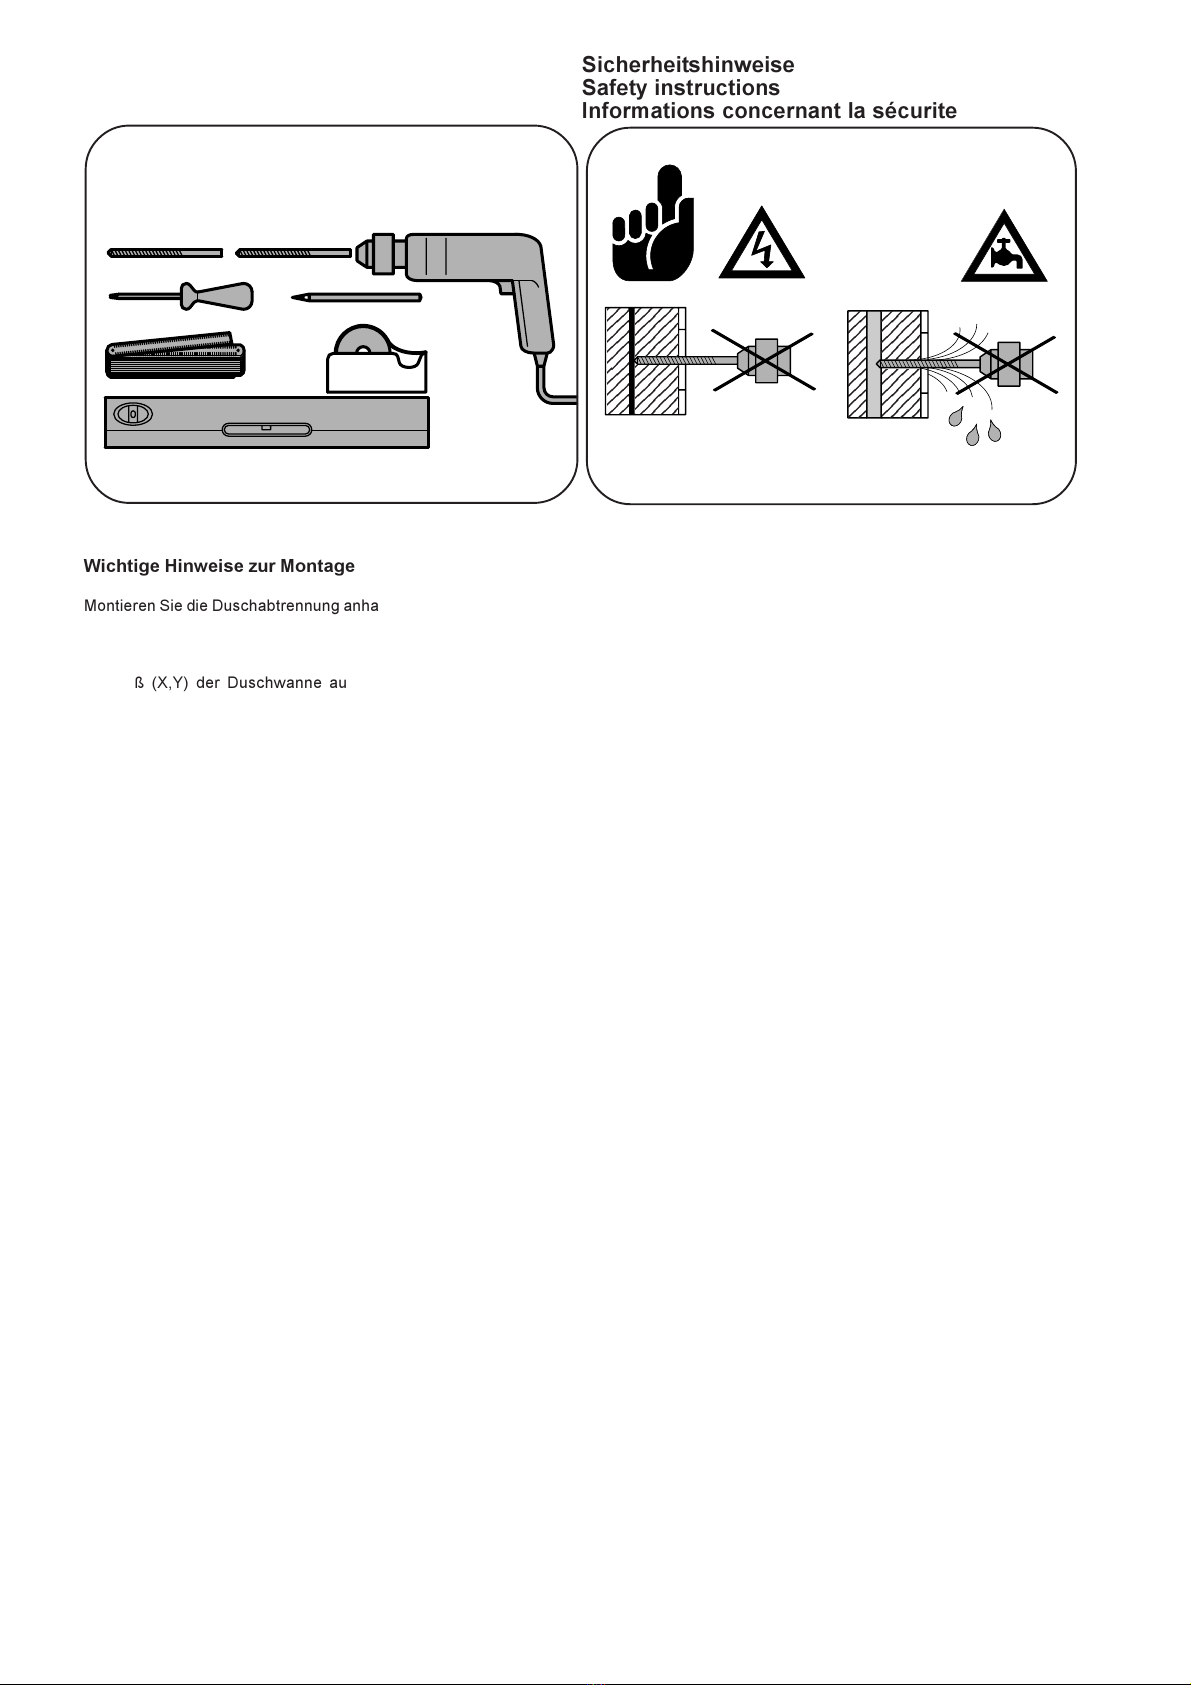
Sicherheitshinweise
Safety instructions
Informations concernant la sécurite
12345
1
234
5
1
234
5
1
234
5
12345
Wichtige Hinweise zur Montage
Montieren Sie die Duschabtrennung anhand
unserer Montageanleitung.
Überprüfen Sie vor Montagebeginn das Ein-
baumaß (X,Y) der Duschwanne auf Seite
4.
Überprüfen Sie vor der Montage die Dusch-
abtrennung auf Transportschäden, da wir
für bereits montierte Teile keine Haftung
übernehmen.
Die Wandanschlußprofile (Pos.5 + 6) befin-
den sich in den Aufnahmenuten der fest-
stehenden Elemente (Pos.3+4).
Fliesen und Wannenrand müssen staub-
und fettfrei sein.
Verschließen Sie vor Montagebeginn den
Abfluß Ihrer Duschwanne, damit keine
Schrauben in den Abfluß rutschen können.
Um Kratzer in der Duschwanne bei der
Montage der Duschabtrennung zu vermei-
den, legen Sie bitte ein Handtuch in die
Duschwanne.
Die Duschwanne muß exakt waagerecht
montiert sein.
Bei Montage der Duschabtrennung an
Hohlraumwänden oder Ständerwänden
müssen hierzu die im Handel erhältlichen
Hohlraumdübel verwendet werden.
Die oberen und unteren Lager können im
Bedarfsfall mit Vaseline gefettet werden.
Bei Reklamationen verwenden Sie bitte un-
ser beigelegtes Qualitätszertifikat.
Heben Sie diese Montageanleitung und Ihre
Rechnung für spätere Garantieansprüche
auf.
Important information on installation
Install the shower cubicle in accordance
with our assembly instructions.
Check the fitting dimension (X,Y) for the
shower tray on page 4, prior to commenc-
ing assembly work.
Check the shower cubicle for damage
caused in transit prior to installing the cu-
bicle, as we will be unable to accept any
claims for defects or damage after installa-
tion.
The wall-linking profiles (pos. 5 + 6) fit into
the support slots of the fixed elements.
Tiles and rim of shower tray must be free
of dust and grease.
Close the drain of your shower tray prior to
beginning installation work, to ensure that
no screws can drop into the drain.
Please place a towel in the shower tray to
prevent scratching during installation of the
shower cubicle.
The shower tray must be exactly horizon-
tal.
If necessary, the top and bottom bearings
can be greased with vaseline.
Should you have any complaints, please
use our enclosed quality certificate.
Keep these installation instructions and your
invoice for any guarantee claims.
Remarques importantes relatives au
montage
Monter la séparation de douche en se
réferant à nos instructions de montage.
Avant de commencer le montage, vérifier
la cote de montage (X,Y) du receveur de
douche, page 4.
Avant le montage, sassurer que la sépa-
ration de douche na pas subi de domma-
ges pendant le transport, car nous nas
sumons aucune responsabilité pour les élé-
ments ayant déjà été montés.
Le joint de connexion mural (Pos.5 + 6) se
trouve dans les fixations rainurées de
lélement fixe.
Les carrelages et le rebord du récepteur
de douche doivent être exempts de pous-
sière et de graisse.
Avant de commencer le montage, obturer
la bonde du receveur de douche afin dévi-
ter que des vis ne tombent dans lévacua-
tion.
Afin déviter les rayures lors du montage
de la séparation de douche, veuillez poser
une serviette sur le receveur de douche.
Le receveur de douche doit être parfaite-
ment horizontal.
Les paliers supérieur et inférieur peuvent
être graissés à la vaseline en cas de be-
soin.
En cas de réclamations, veuillez utiliser no
tre certificat de qualité joint.
Conserver les présentes instructions de
montage et votre facture en cas déven-
tuels recours ultérieurs en garantie.
Erforderliche Werkzeuge
Required Tools
Outils nécessaires
Stein- Ø 6mm
stone
pier
Metall- Ø 3 mm
metal
métal
3
Abbildungen sind nicht maßstabsgerecht
Diagrams are not to scale.
Les figures ne sont pas à léchelle
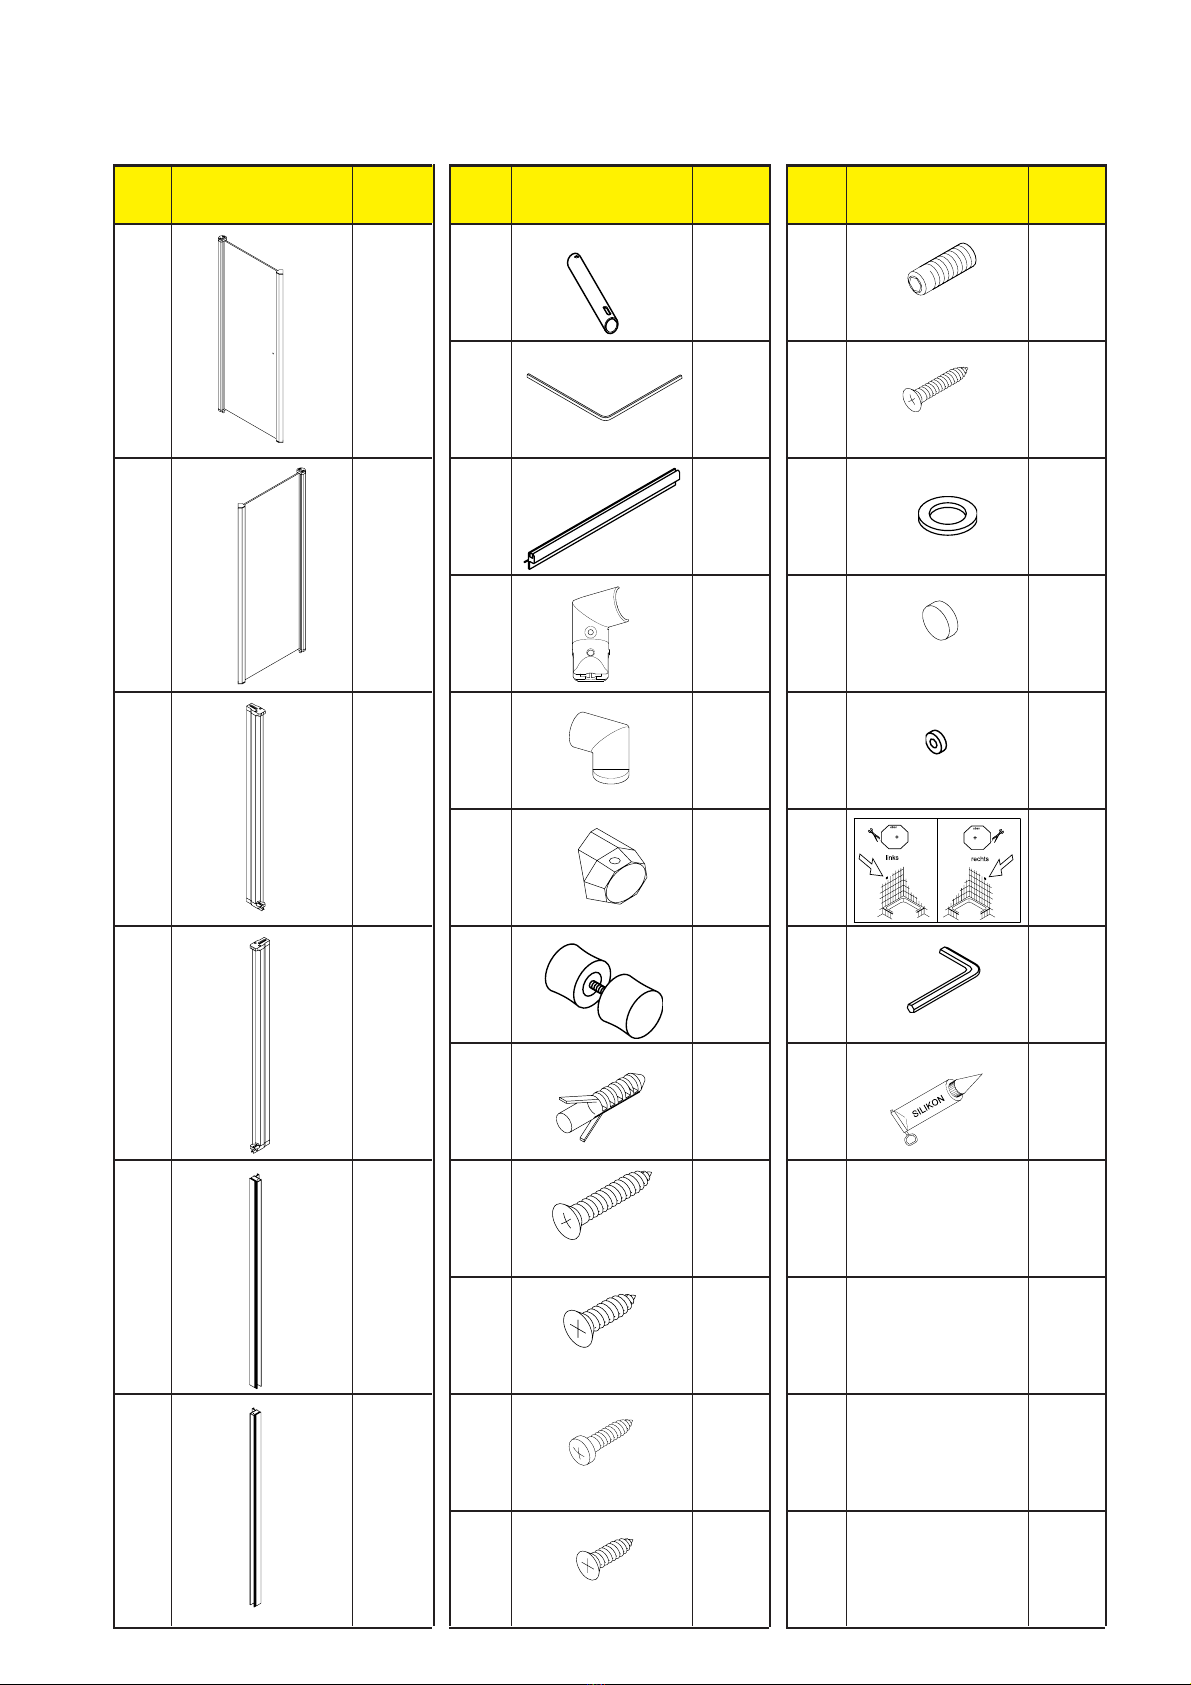
Teileliste - Parts list - Liste des pièces
Überprüfen Sie vor der Montage die Vollständigkeit des Zubehörs anhand der Teileliste.
Prior to commencing installation, check that all the parts have been supplied by reference to the parts list.
Avant le montage, contrôler à laide de la nomenclature que tous les accessoires sont bien présents.
Pos.
Item
Pos.
Anzahl
Quantity
Quantité
Pos.
Item
Pos.
Pos.
Item
Pos.
Anzahl
Quantity
Quantité
Anzahl
Quantity
Quantité
11
7119
2
grau
weiß
schwarz
grey
white
black
gris
blanc
noir
3,9 x 38
3,9 x 13
3,5 x 13
M4 x 10
M6 x 10
3,5 x 22
8120
1
21
9221
1
10 122
2
31
11 123
à 8
12 124 1
41
13 125 1
14 11
51
15 11
16 4
61
17
18
2
SW 3
1
transparent
1
26

4
1
Montage - Installation - Montage
2
3
45 mm
20 mm
6
800
900
1000
X
min.
X
max.
785
885
985
805
905
1005
Y
X
750 735 755
Y
min.
Y
max.
785
885
985
805
905
1005
735 755
linke Seite
left side
Côté gauche
rechte Seite
right side
Côté droit
Maßangaben in mm
Dimensions in mm
Cotes exprimées en mm
5
Markieren Sie die Position der Wandanschlussprofile (Pos.5 + 6) auf
dem Wannenrand. Verwenden Sie hierzu einen wasserlöslichen
Faserstift mit dünner Mine. Der Abstand des Wandanschlussprofils
für die Tür beträgt 20 mm, der Abstand der schwenkbaren Seiten-
wand 45 mm.
Mark the position of the wall channels (items 5 + 6) on the rim of the
tray. To do so, use an erasable fibre tip pen with a fine nib. The wall
channel spacing for the door is 20 mm, the spacing on the swivelling
side wall is 45 mm.
Marquez la position des profilés de raccord pour paroi (Pos.5 + 6) sur
le rebord du receveur, à laide dun stylo feutre à pointe fine pouvant
seffacer. Lécart du profilé de raccord au paroi pour la porte est de 20
mm, celui de la paroi latérale orientable de 45 mm.
3.1
3 mm
!
6
Beachten Sie, dass das Abstandsmaß zwischen Duschwanne und
Wandanschlußprofil (Pos.5 + 6) nicht mehr als 3mm beträgt. Die
Wandanschlußprofile so befestigen, dass das Klemmstück (A) sich
oben befindet.
Ensure that the dimension of the gap between the shower tray and
the wall channel (items 5 + 6) does not exceed 3mm. Secure the wall
channel such that the clamping piece (A) is at the top.
Veillez à ce que lécart compris entre le receveur de douche et le
profilé de raccord pour paroi (Pos.5 + 6) ne dépasse pas 3 mm. Fixez
les profilés de telle sorte que la pièce de serrage (A) se trouve en
haut.
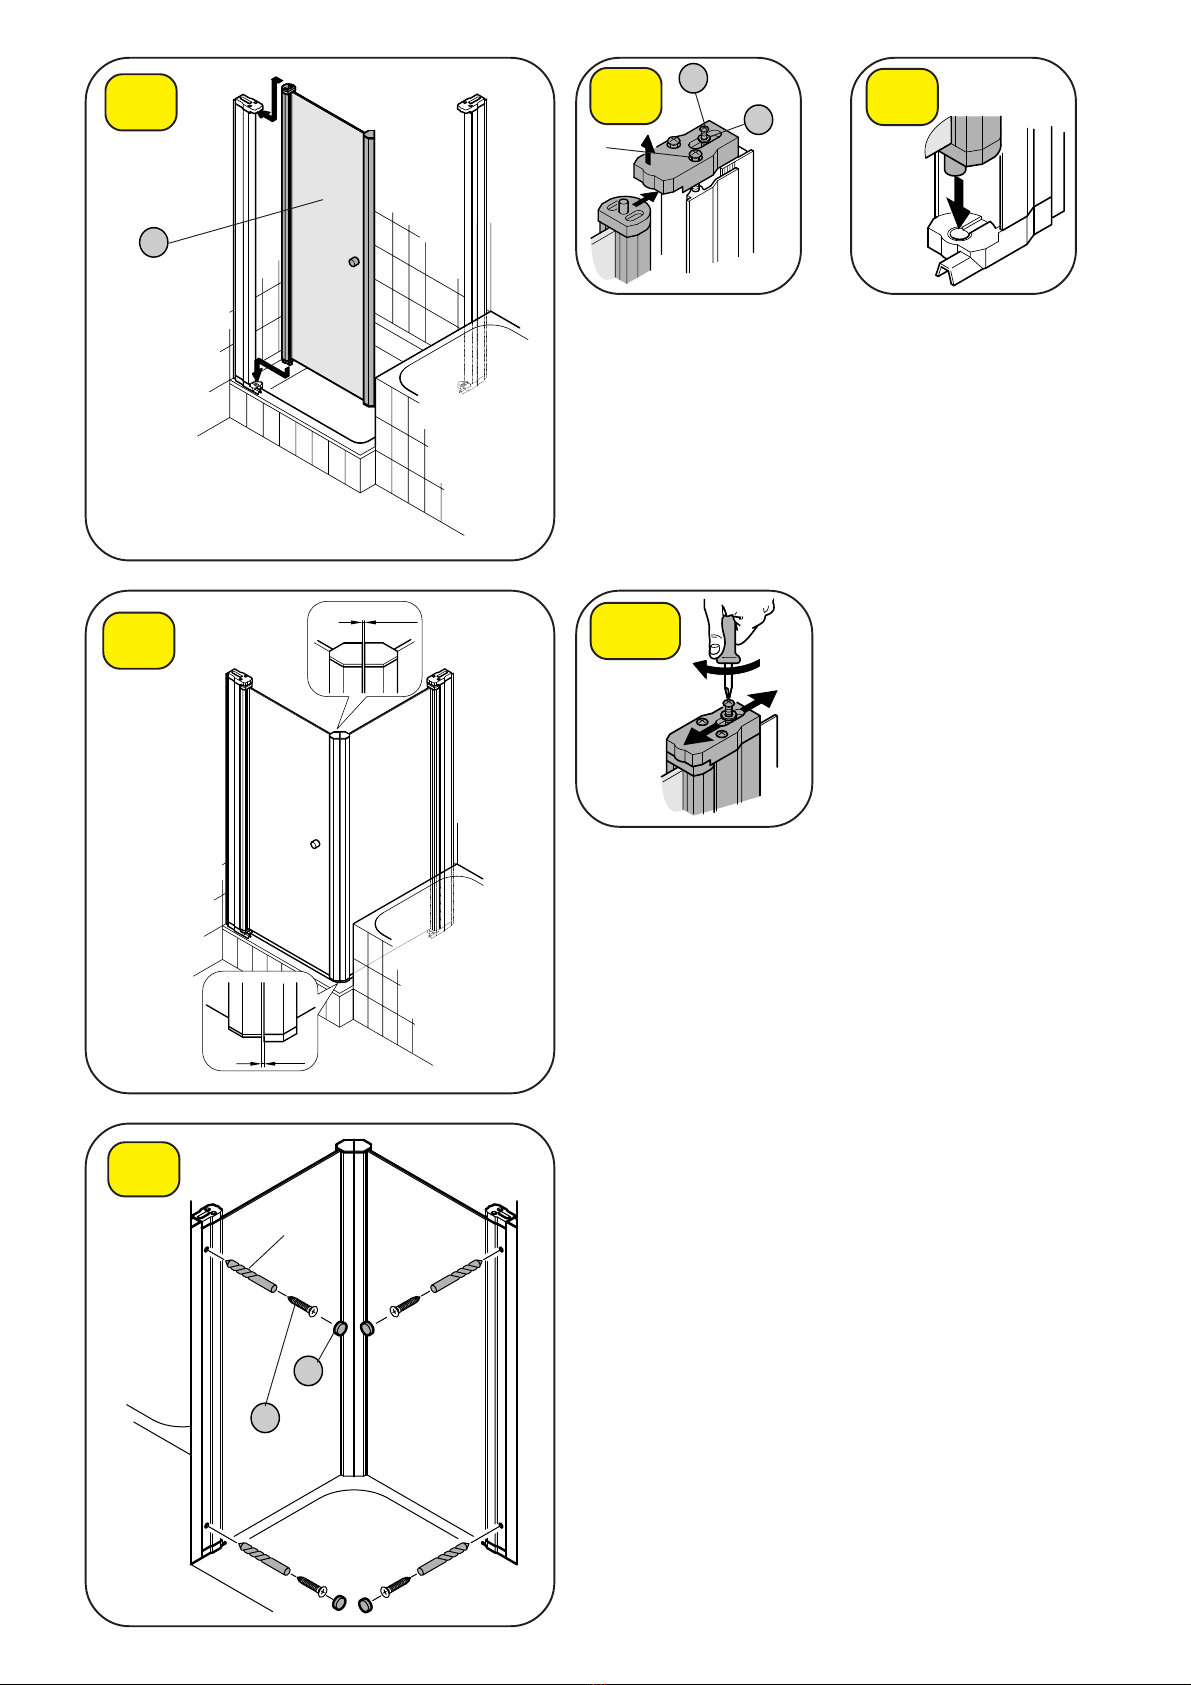
Montageanleitung ist für Seitenwand rechts dargestellt. Bei Seiten-
wand links spiegelbildlich montieren.
Achten Sie bei der Montage von Motiv- oder Strukturglas Duschab-
trennungen darauf, daß die Motiv- oder Strukturseite außen ist.
Installation procedure is shown for side panel on right. The mirror
image of the diagram applies for side panel on left.
When mounting shower partitions with motif or structure glass pay
attention to let the motif or structure side point outward.
Les instructions de montage sappliquent au montage avec paroi
latérale droite. Le montage seffectue de manière symétrique pour la
paroi latérale gauche.
Veillez, lors du montage de vitres à verre structuré ou à motif, à ce
que la face à motif ou structurée se trouve à lextérieur.

5
14
Ø 6 mm
4
5
6
4.2
4.1
3
22
15
14
3,9 x 38
4
3mm
Decken Sie die äußeren Schrauben mit den beiliegenden Kappen ab.
Cover the external screws with the enclosed caps.
Couvrez les vis à lextérieur avec les capuchons fournis.
5.1
17
21
3,5 x 13
Schieben Sie die Türwandprofile
(Pos.3 + 4) bis zum Anschlag auf die
Wandanschlussprofile und fixieren
sie mit den Unterlegscheiben
(Pos.21) und der Linsenschraube
3,5 x 13 (Pos.17) durch das obere
Kunststoffteil mit den Wand-
anschlussprofile (Pos.5 + 6). Ziehen
Sie die Schrauben fest an. Beim spä-
teren Ausrichten sind die Schrauben
gegebenenfalls noch einmal zu lö-
sen.
Finally slide the door profile (pos.3 + 4) to the stop onto the panel
connection profile and then lock it onto the connection profile (pos.5 +
6) through the upper plastic part using a washer (pos.21) and a lentil-
head screw 3.5 x 16 (pos.17). This screw may later be loosened
again if necessary for alignment.
Enfoncer le profil de la porte murale (Pos.3 + 4) jusquau taquet sur le
profilé de raccord pour paroi et fixer la rondelle (Pos.21) et la vis
cruciforme 3,5 x 16 (Pos.17) en la serrant bien (Pos.5+ 6). Pour
dautre opération dajustement desserrer au cas échéant la vis.
13
6
7
8
9
16
3,9 x 13
21
Ø 3
Richten Sie die Türelemente lotrecht aus. Achten Sie beim Ausrichten
der Türelemente darauf, daß das Spaltmaß parallel und die Duschab-
trennung parallel zum Wannenrand verläuft.
Perpendicularily align the door elements. When aligning the door ele-
ments make sure the door gap is uniformous and the shower partition
is parallel to the rim of the tray.
Ajustez les éléments de la porte. Lors de leur ajustage, veillez à ce
que la fente et la vitre de séparation soient parallèles au bord du bac.
8.1
3 mm
3 mm
Bohren Sie mit dem Bohrer Ø 3 durch die inneren vorgebohrten Lö-
cher vom Türwandprofil und verschrauben dieses mit den Schrau-
ben 3,9 x 13 (Pos.16) mit dem Wandanschlussprofil. Achten Sie vor
dem Bohren darauf, das Sie, dass in Bild 8 eingestellte Spaltmaß nicht
verändern.
Using the drill (Ø 3), bore through the internal pre-drilled holes on the
door-wall section and screw these to the wall channel using the 3.9
x 13 screws (item 16). Before drilling, ensure that you do not change
the gap size set in figure 8.
Avec une mèche de 3 mm de diamètre, percez aux endroits marqués
intérieurs du profilé de la porte qui sont prévus à cet effet et fixez-le
au profilé de raccord pour paroi avec les vis 3,9 x 13 (Pos. 16). Avant
de commencer à percer, veillez à ce que lécart indiqué sur la photo 8
nait pas été modifié.
21
17
1
7.2
7.1 3,5 x 13
Setzen Sie die Tür und Seitenwand (Pos.1 + 2) zwischen dem oberen
und unteren Lager ein. Ziehen Sie nur die beiden vorderen Schrauben
(A) vom oberen Lager fest an.
Insert the door and side wall (item 1 + 2) between the top and bottom
bearings. Tighten only the two front screws (A) on the top bearing.
Placez la porte et le mur latéral (Pos.1 + 2) entre le support du haut et
celui du bas. Ne serrez que les deux vis situées sur le devant du
support (A) du haut.
A

7
7
10
18
M4 x 10
18
M4 x 10
11.1
11
10
Schließen Sie die beiden Scheiben
bevor Sie den Eckverstärker auf die
Scheibe setzen.
Richten Sie den Eckverstärker wie
dargestellt aus und markieren den
äußeren Umriss des Wandhalters
(Pos12) auf den Fliesen.
Verwenden Sie hierzu einen
wasserlöslichen Faserstift mit
dünner Mine.
Close both panels before putting the
corner reinforcement on the panel.
Position the corner reinforcement, as shown, and mark the external
outline of the wall bracket (item 12) on the tiles. To do so, use an
erasable fibre tip pen with a fine nib.
Fermez les deux parties vitrées avant dy placer le renfort dangle.
Positionnez le renfort dangle comme lindique le schéma puis marquez
le contour du support mural (Pos.12) sur les carreaux. Vous utiliserez
pour cela un stylo feutre à pointe fine pouvant seffacer.
Schrauben Sie das Strebenrohr (Pos.7) mit der Schraube M4 x 10
(Pos.18) in die untere Hälfte (Pos.11) des Eckverstärkers, bevor Sie
dieses mit der zweiten Hälfte (Pos.10) abdecken und ebenfalls mit der
Schraube M4 x 10 verschrauben. Diese Schraube decken Sie mit dem
transparenten Stopfen (Pos.23) ab.
Screw the brace tube (item 7) to the bottom half (item 11) of the corner
reinforcement using the M4 x 10 screw (item 18), before covering the
reinforcement with the second half (item 10) and again screwing with
the M4 x 10 screw. Cover this screw with the transparent stopper
(item 23).
À laide de la vis de type M4 x 10 (Pos. 18), vissez le tube en V (Pos.7)
à la partie inférieure du renfort dangle (Pos. 11), avant de le couvrir
avec la partie supérieure du renfort dangle (Pos.10) et de le visser
avec le vis de type M4 x 10. Cachez cette vis avec le tampon transpa-
rent (Pos.23).
12.1 12.2
14
15
12
3,9 x 38
12.3
24
Ø 6 mm
Kleben Sie eine ausgeschnittene Schablone (Pos.24) auf die angerissene Kontur des Wandhalters (Pos.12). Nur so ist eine genaue
Positionierung der Bohrlöcher möglich.
Achten Sie darauf, daß die Schablonen in rechter und linker Ausführung beiliegen und entsprechend der Anleitung eingesetzt werden.
Die mit links beschriftete Schablone darf nur für den linken Eckverstärker, von außen gesehen, verwendet werden.
Stick a formerly cut-out pattern onto the sketched shape of the wall support (item 12). This procedure enables a precise positioning of the
drill holes.
Pay attention to the fact that patterns are given in differring right and left versions which need to be used according to the instructions.
The sketch indicated as links is to be used for the left edge reinforcement only (in outer view).
Collez un pochoir découpé (Pos.20) sur le contour dessiné du support mural (Pos.12). Un positionnement exact des orifices de perçage
est uniquement possible à cette condition.
Veillez à ce que le pochoir existe en exécution à droite et à gauche et à ce quil soit placé selon la notice. Le pochoir portant linscription
links doit uniquement être utilisé pour lélément de renforcement angulaire gauche, vu de lextérieur.
11
12
23

8
15.3
15.1 15.2
14
8
13
15
Die Duschabtrennung nur an den in der Skizze markierten Stellen mit
Silikon abdichten. Darüber hinaus kann weiteres Silikon dazu führen,
daß die Duschabtrennung undicht wird. Feuchten Sie zum Glätten der
Silikonfuge den Finger mit Spülmittel an. Benutzen Sie Ihre Duschab-
trennung erst 24 Stunden nach dem Abdichten.
The shower partition is to be sealed with silicone only at the points
indicated in the diagram. The use of additional silicone may cause the
shower partition to leak. Moisten your finger with washing-up liquid to
smooth the silicone joint. Wait 24 hours after sealing the joints before
using your shower partition.
Réaliser létanchéité de la séparation de douche avec du silicone uni-
quement aux endroits repérés sur le schéma. Lapplication de silicone
à dautres endroits risque dentraîner un défaut détanchéité de la sé-
paration de douche. Pour lisser le joint de silicone, humidifier le doigt
avec du liquide à vaisselle. Attendre 24 heures après lapplication du
silicone avant dutiliser votre séparation de douche.
innen
inside
intérieur
Kleben Sie das Schwallprofil auf
den Wannenrand. Geben Sie vor-
her in die Aufnahmenut etwas Sili-
kon.
Stick the swell profile guard to the
rim of the tray. Put some silicon into
the groove beforehand.
Collez le profilé dévacuation sur le
bord du receveur, après avoir mis
un peu de silicone dans lencoche
de positionnement.
12
7
13.1
Der Wandhalter kann wahlweise
von unten oder oben mit der
Schraube 3,5 x 22 (Pos.20)
verschraubt werden.
Den Gewindestift M6 x 10 (Pos19)
nur bei geschlossenen Türen
anziehen, denn nur dann ist der
Eckverstärker in der richten Posi-
tion.
The panel bracket can be screwed
either from above or from below
using the screw 3.5 x 22 (pos.20).
Only tighten the threaded pin M6 x 10 (item 19) when the doors are
closed, because only then is the corner reinforcement correctly posi-
tioned.
Le support mural peut être vissé depuis le haut ou depuis le bas à
laide de la vis 3,5 x 22 (pos.20).
Ne serrez la vis sans tête de type M6 x 10 (Pos.19) quaprès avoir
fermé les portes, le renfort dangle étant alors dans la position adap-
tée.
26
20
19
3,5 x 22
M6 x 10
25

9
16
Drücken Sie das Wasserabweisprofil (Pos.9) 24 Stunden nach dem
abdichten unten auf die Türglasscheibe. Die Abweislippe (A) muß hier-
bei nach innen zeigen.
Press the water repelling profile (item 9) 24 hours after having fin-
ished sealing onto the lower edge of the door pane. The repelling lip
(A) must point to the inside.
Comprimez le profilé délimination deau (Pos.9) 24 heures après
létanchéification en bas sur la vitre de la porte. La lèvre délimination
(A) doit être dirigée vers lintérieur.
24 h
9
17
außen
outside
extérieur
100 mm

10
Reinigungshinweis
Cleaning instructions:
Conseils dentretien :
Zum Reinigen der Duschabtrennung lösen Sie den Gewindestift an der Scheibenhalterung des Eckverstärkers und schwenken diesen
noch oben. Nun können Sie die Seitenwand nach innen wegschwenken und alles reinigen was vorher nicht für Sie erreichbar war.
Nach dem Reinigen bringen Sie die Seitenwand wieder in die Ausgangsposition und schließen die Tür. Erst jetzt ist es möglich den
Eckverstärker wieder an die richtige Position zu bringen und zu verschrauben.
To clean the shower screen, loosen the threaded pin on the panel bracket of the corner reinforcement and swivel this upwards. Now you
can swivel the side wall inwards away from yourself and clean everything that was not previously accessible to you.
After cleaning, put the side wall back into its original position and close the door. Only now is it possible to return the corner reinforcement
to its correct position and secure it.
Pour nettoyer la paroi de douche, défaites la vis sans tête de la fixation du renfort dangle puis orientez le renfort vers le haut. À présent, vous
pouvez faire basculer la paroi latérale vers lintérieur et nettoyer les endroits qui, en temps normal, sont inaccessibles.
Après le nettoyage, replacez la paroi latérale dans sa position dorigine puis fermez la porte. Cest seulement maintenant que le renfort dangle
peut être remis dans la bonne position et vissé.
11
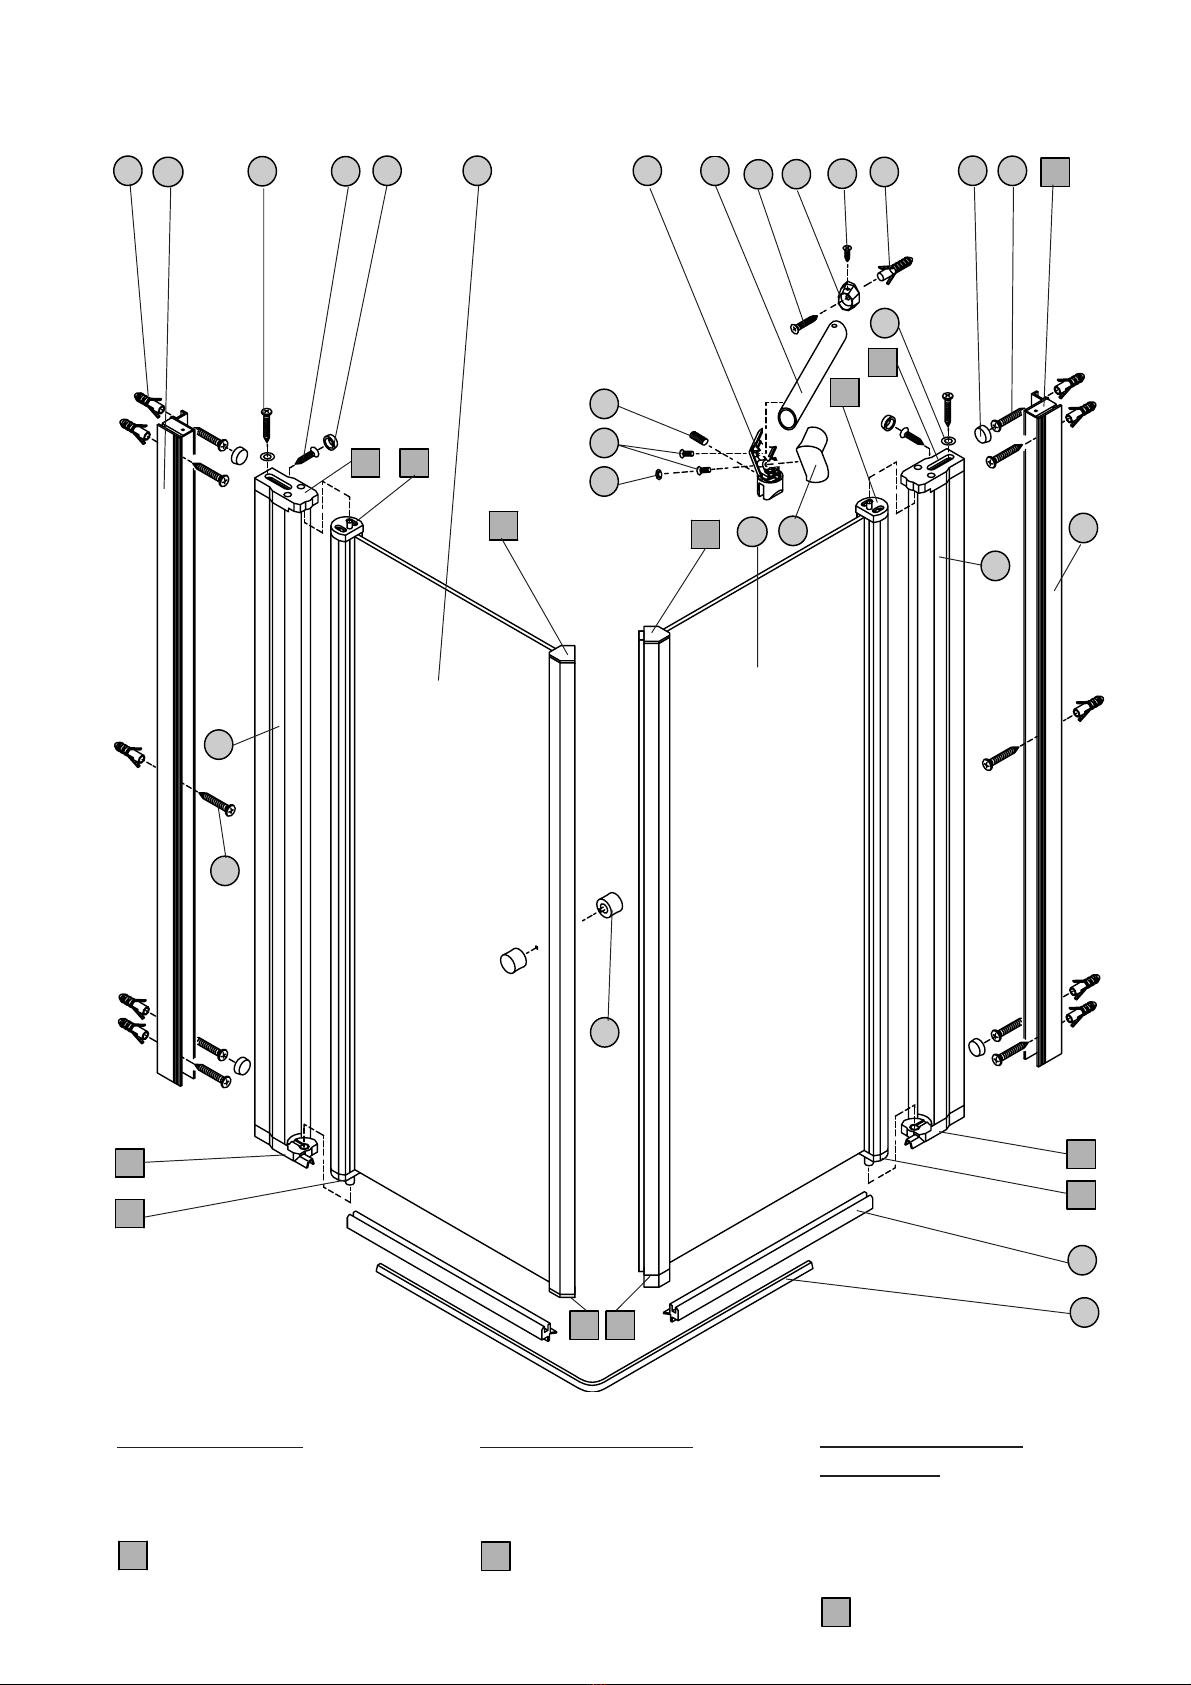
Explosionszeichnung - Exploded view - Eclaté
Bestellinformation
Ersatzteil bitte nur mit
der Angabe der
Pos.Nr. bestellen.
=bereits vormontiert
Ordering information
Please order replace-
ment parts by stating
the item no. only.
= preassembled
Informations pour la
commande
Pour la commande des
pièces de rechange,
indiquer systématiquement
le n° de pos.
= déjà préassemblé
1
2217
15
16
5
14
29
30
28
30
8
9
6
15
22
4
3
2
7
10
11
13
33 34
31 32
30
27
27 30
34
21
14
1215
23
19
20
18

12
Der Umwelt zuliebe: Aus 100% Recyclingpapier
Our contribution to the environment: This manual consists of 100% recycled paper.
Par souci pour lenvironnement, ce manuel est fabriqué en papier 100 % recyclé
Alle Angaben in dieser Druckschrift erfolgen nach bestem Wissen und Gewissen. Eine Gewährleistung kann daraus jedoch nicht abgeleitet werden. Technische Änderungen, die dem Fortschritt dienen bzw. fertigungstechnisch bedingt sind, behalten wir uns vor.
All statements given in this leaflet are to the best of our knowledge and belief. No claims for guarantee may be derived hereof. We reserve the right for technical modifications as called for by progress or production technique alterations.
Toutes les indications contenues dans cet imprimé sont fournies en toute âme et conscience. Aucune garantie ne peut toutefois en découler. Nous nous réservons le droit de procéder à des modifications techniques pour des raisons de production ou de progrès.
spirella GmbH
Postfach 10 17 54
52317 Düren
Hotline: ++49 / 2421 / 703177
Faxline: ++49 / 2421 / 703165
Email: [email protected]
Internet : www.spirella.de
spirella s.a.
Tannenstrasse 98
P.O.Box 138
CH-8424 Embrach
Tel. +49 1 866 24 24
Fax +49 1 866 24 90 CH
Fax +49 1 866 24 91 Export
Internet: www.spirella.ch
E-Mail: [email protected]
Garantiebestimmungen
Für diese Duschabtrennung gewährt spirella 10
Jahre Garantie (2 Jahre für definierte Aktions- und
Listungsartikel und die Glasbeschichtung supra-
clean) ab Kaufdatum. Die Garantie tritt nur in Kraft,
wenn ein Kaufbeleg Kauf und Kaufdatum innerhalb
der Garantiezeit bestätigt. Innerhalb dieser Garantie-
zeit beseitigt spirella unentgeltlich Mängel am Pro-
dukt, die eindeutig und nachweisbar auf Material-
oder Herstellungsfehler beruhen. spirella behält sich
vor, diese Mängel entweder durch Reparatur, Aus-
tausch von Teilen oder Austausch des Produktes
zu beseitigen. Transport, Fahrt und sonstige Ne-
benkosten, die durch eine Reklamation an spirella-
Duschabtrennungen entstehen, werden grundsätz-
lich nicht ersetzt.
Eine Duschabtrennung gewährleistet einen maxi-
malen Spritzschutz dar. Der Austritt von kleineren
Wassermengen kann nicht grundsätzlich verhin-
dert werden. Daher ist eine vollständige Dichtigkeit
der Duschabtrennung von der Garantie ausgenom-
men.
Von der Garantie ausgenommen sind:
1) Mängel, die den Wert oder die Gebrauchs-
tauglichkeit des Produktes nur unerheblich beein-
flussen.
2) Mängel, die z.B. durch kalkhaltiges Wasser oder
Seifenrückstände entstehen.
3) Mängel, die durch Gewaltanwendung, falsche
Montage, Bruch sowie falsche oder mangelhafte
Pflege entstehen (vgl. Reinigungshinweise).
4) Mängel an der Glasbeschichtung , die durch
unsachgemäße Behandlung entstehen.
5) Mängel an Verschleißteilen, die einem natürli-
chen Alterungsprozess unterliegen wie z.B. Dich-
tungen oder Wasserabweisprofile.
Auf Wunsch werden diese Verschleißteile so-
wie Kleinteile, die nicht unter die Garantie-
bestimmungen fallen, als Ersatz gegen Berech-
nung einer Pauschale von 9,95 inkl. MWST.
zugesandt.
Sollte sich im Rahmen eines Kundendiensteinsatzes
in Folge einer Produktbeanstandung herausstellen,
dass der Mangel auf eine unsachgemäße Behand-
lung des Produktes oder einen Montagefehler zu-
rückzuführen ist, wird der Serviceeinsatz mit 79,- E
inkl. MWST. in Rechnung gestellt
spirella-Duschabtrennungen sind grundsätzlich ste-
hend zu transportieren und zu lagern. Für Schäden
durch falsch transportierte oder falsch gelagerte
Duschabtrennungen wird keine Haftung übernom-
men. Die Garantie erlischt außerdem in jedem Fall
bei Eingreifen von Dritten, die nicht von spirella
autorisiert sind. Sonstige Ansprüche jeglicher Art
sind ausgeschlossen, soweit die Haftung nicht zwin-
gend vorgeschrieben ist. Gewährleistungsansprü-
che aus dem Kaufvertrag gegen den Verkäufer
werden durch diese Garantie nicht berührt.
Hinweise zum Sicherheitsglas
Bei Sicherheitsglas können Polarisationsfehler als
Muster sichtbar werden. Dieser Effekt ist physi-
kalisch bedingt, daher kein Fabrikationsfehler. Bei
feuchten Glasoberflächen kann die fertigungs-
bedingt unterschiedliche Benetzbarkeit der Glas-
oberfläche sichtbar werden. Diese Erscheinung ist
charakteristisch und nicht reklamationsfähig.
Reinigungshinweise
Wir empfehlen zur Reinigung der Duschabtrennung
den spirella-Duschabtrennungsreiniger Shower
Aktiv. Verwenden Sie niemals scheuernde, aggres-
sive oder säurehaltige Reiniger.
Die Glasbeschichtung verhindert weitgehend das
Anhaften von Schmutz und Kalk und bietet so den
Vorteil, dass die geringen Rückstände nach dem
Duschen leicht zu entfernen sind.
Warranty stipulations
The spirella warranty for this shower screen shall
be valid for ten years (2 years for defined cam-
paign and listed items and for the supra-clean glass
coating) from the date of purchase. This warranty
shall only be valid if the purchase and date of
purchase are confirmed, within the warranty pe-
riod, by means of a receipt. Within this warranty
period, spirella shall rectify product faults, which
are the clear and verifiable result of material or
manufacturing defects, free of charge. spirella re-
tains the right to rectify said faults by either repair-
ing the product, replacing parts or replacing the
entire product at its own discretion. Transport, travel
and other ancillary costs, incurred within the frame-
work of a complaint regarding a spirella shower
screen shall not, under any circumstances, be re-
imbursed.
A shower screen ensures maximum protection
against spray. It is not possible, however, to com-
pletely prevent small amounts of water from es-
caping. Consequently, the complete water-tight-
ness of the shower screen is not covered by the
warranty.
The following are excluded from the warranty:
1) Faults, which affect the value or the usability of
the product to only an insignificant extent.
2) Faults, which arise, e.g. due to hard water or
soap residues.
3) Faults caused by the use of force, incorrect
assembly, breakage or incorrect or poor mainte-
nance (cf. Cleaning instructions).
4) Faults to the glass coating that are caused by
improper handling.
5) Faults to wearing parts that are subject to a
natural aging process, such as seals or water-re-
pellant strips.
Upon request, these wearing and minor parts,
which are not covered by the warranty stipula-
tions, can be dispatched as spare parts upon
payment of a lump sum of 9.95 including VAT.
If, within the framework of a customer service
call-out due to a product complaint, it emerges that
the fault is due to improper handling or an assem-
bly fault, a call-out charge of 79.00 including VAT
shall be levied.
spirella shower screens should always be trans-
ported and stored in the upright position. No liabil-
ity shall be borne for damages caused by incorrect
transportation or incorrectly stored shower screens.
The warranty is invalidated by the intervention of
third parties that are not authorised by spirella.
Any other claims beyond those defined here shall
not be entertained, unless liability is mandatory.
Warranty claims vis-à-vis the seller, arising from
the purchase contract, are not affected by this
warranty.
Notes on tempered safety glass
Polarisation errors can be seen as patterns on
safety glass. This effect is a physical phenom-
enon and therefore not a manufacturing fault. When
the glass surface is wet, the variations in glass
surface wetting that result from the manufacturing
process can be visible. This appearance is charac-
teristic and no cause for complaint.
Cleaning instructions
We recommend that you use the spirella shower
screen cleaner Shower Aktiv to clean your shower
screen. Never use abrasive, aggressive or acidic
cleaners.
The glass coating prevents to a great extent
dirt and chalk deposits from building up and thus
offers the advantage of making the few residues
that are left after showering easy to remove.
Conditions de garantie
Pour cette paroi de douche, Spirella offre une garan-
tie de 10 ans à partir de la date dachat (2 ans pour
certains articles en promotion bien définis ou se
trouvant dans le catalogue, et pour le revêtement de
verre supra-clean). Cette garantie entre seulement
en vigueur, si la date dachat figurant sur la facture
confirme que le produit est toujours sous garantie.
Pendant cette période de garantie, Spirella sengage
à réparer sans frais les défauts constatés sur le
produit, sil est évident et démontrable quils sont
dus à un défaut du matériau ou à un vice de fabrica-
tion. Spirella se réserve la possibilité de remédier à
ces défauts par réparation de la paroi de douche, par
le remplacement de certaines pièces ou par léchange
complet du produit. Les frais de transport et autres
frais annexes engendrés par une réclamation con-
cernant les parois de douche Spirella ne seront pas
remboursés.
Une paroi de douche garantit une protection maxi-
male contre les éclaboussures. Dune manière gé-
nérale, la fuite de petites quantités deau ne peut
être totalement évitée. Cest pourquoi les presta-
tions de garantie ne comprennent pas une étan-
chéité totale de la paroi de douche.
La garantie ne comprend pas :
1) Les défauts qui ninfluencent que de manière
insignifiante la valeur ou la bonne utilisation du
produit.
2) Les défauts occasionnés, par exemple, par de
leau calcaire ou des dépôts de savon.
3) Les défauts engendrés par un recours à la vio-
lence, un montage incorrect ou par un entretien
non approprié ou insuffisant (voir conseils dentre-
tien).
4) Les défauts du revêtement en verre dus à une
utilisation non conforme.
5) Les défauts de pièces soumises à une forte
usure, comme les joints ou les profilés hydrofu-
ges.
Des pièces de rechange pour les pièces sou-
mises à une forte usure et les petites pièces
qui ne sont pas comprises dans les conditions
de garantie peuvent être expédiées, sur de-
mande, contre paiement dun forfait de 9,95 ,
TVA comprise.
Si, au cours de lintervention du service après-
vente suite à une réclamation concernant le pro-
duit, il savère que le défaut est consécutif à une
utilisation non conforme ou à une erreur de mon-
tage, la réparation sera facturée de 79,-, TVA com-
prise.
Les parois de douche Spirella doivent absolument
être transportées et entreposées en position verti-
cale. Spirella décline toute responsabilité pour les
dommages dus à un mauvais transport ou à un
mauvais entreposage des parois de douche.
Par ailleurs, la garantie prend fin dans le cas de
lintervention de tiers non autorisés par Spirella.
Les réclamations de tout type sont à exclure, tant
que la responsabilité du fournisseur nest pas sti-
pulée de manière impérative.
Cette garantie ne concerne pas les droits à la ga-
rantie du contrat de vente envers le vendeur.
Remarque concernant le verre de sé-
curité
Des défauts de polarisation sous forme de décor
peuvent apparaître sur le verre de sécurité. Il sagit
dun phénomène physique et non dun défaut de
fabrication. Leau adhère différemment sur les sur-
faces en verre humides, selon leur mode de fabri-
cation. Ces apparitions sont caractéristiques et ne
peuvent donner lieu à des réclamations.
Conseils dentretien
Pour le nettoyage de la paroi de douche, nous re-
commandons le nettoyant pour parois de douche de
Spirella Shower Aktiv. Nutilisez jamais de produits
nettoyants récurants, corrosifs ou acides. Le revê-
tement en verre empêche en général la crasse et le
calcaire de se déposer sur la paroi et permet denle-
ver facilement les quelques résidus deau après la
douche.
Popular Other manuals by other brands


BOERBOEL
BOERBOEL Heavy Duty 8" Double Strap Hinge installation instructions

Delta Electronics
Delta Electronics EXIO14RAE user guide

LOGOPAK
LOGOPAK Cleaning kit 5 Contents and Operating instructions

EMG
EMG X Series Installation information

TERASAKI
TERASAKI E630-NE instruction manual

jablotron
jablotron JA-80IR Prelimenary Manual


