SPITFIRE AUDIO APERTURE User manual

1APERTURE - THE STACK USER MANUAL
APERTURE
THE STACK
USER MANUAL

2APERTURE - THE STACK USER MANUAL
CONTENTS
INTRODUCTION 3
QUICK SPECS 3
DOWNLOADING & INSTALLING 4
THE SPITFIRE APP PREFERENCES 5
THE DEDICATED PLUGIN 6
HAVE A LOOK AROUND
PRESET SELECTOR 8
MAIN CONTROLS 10
SIGNALS AND EFFECTS 11
TOP MENU 12
MICROPHONE SIGNALS 15
APPENDIX A FAQS & TROUBLESHOOTING 16
APPENDIX B TECHNIQUES/MICS/MIXES 20
APPENDIX C DEFAULT CC MAPPINGS 21

3APERTURE - THE STACK USER MANUAL
INTRODUCTION
QUICK SPECS
A record breaking wall of sound comprised of 56 guitar amps, 4 subs on 4 levels
of rigging, with sources from an unbelievable selection of vintage synths, drum
machines, eurorack and guitars, all captured in the rarified space of AIR Lyndhurst
Hall. The sound of this library is truly one-of-a-kind.
• Single Aperture mix
• 13 presets
• Six controls
• NKS Compatible
• ~7.14GB
MAC SYSTEM REQUIREMENTS
Mac OS 10.10 to OS X 11
PC SYSTEM REQUIREMENTS
Windows 7, Windows 8, Windows 10 (latest
Service Pack, 64-bit) Windows 11
• Disk space required: 7.14GB
• Dedicated plugin (AU, VST2, VST3, AAX)
4APERTURE - THE STACK USER MANUAL-
DOWNLOADING & INSTALLING
If you are a total newbie to this kind of thing you can get up to speed here:
http://www.spitfireaudio.com/info/basics/
First though, grab the ‘Spitfire Audio App’ from this link, this app will enable
you to download the library: http://www.spitfireaudio.com/info/library-manager/
THE SPITFIRE AUDIO APP
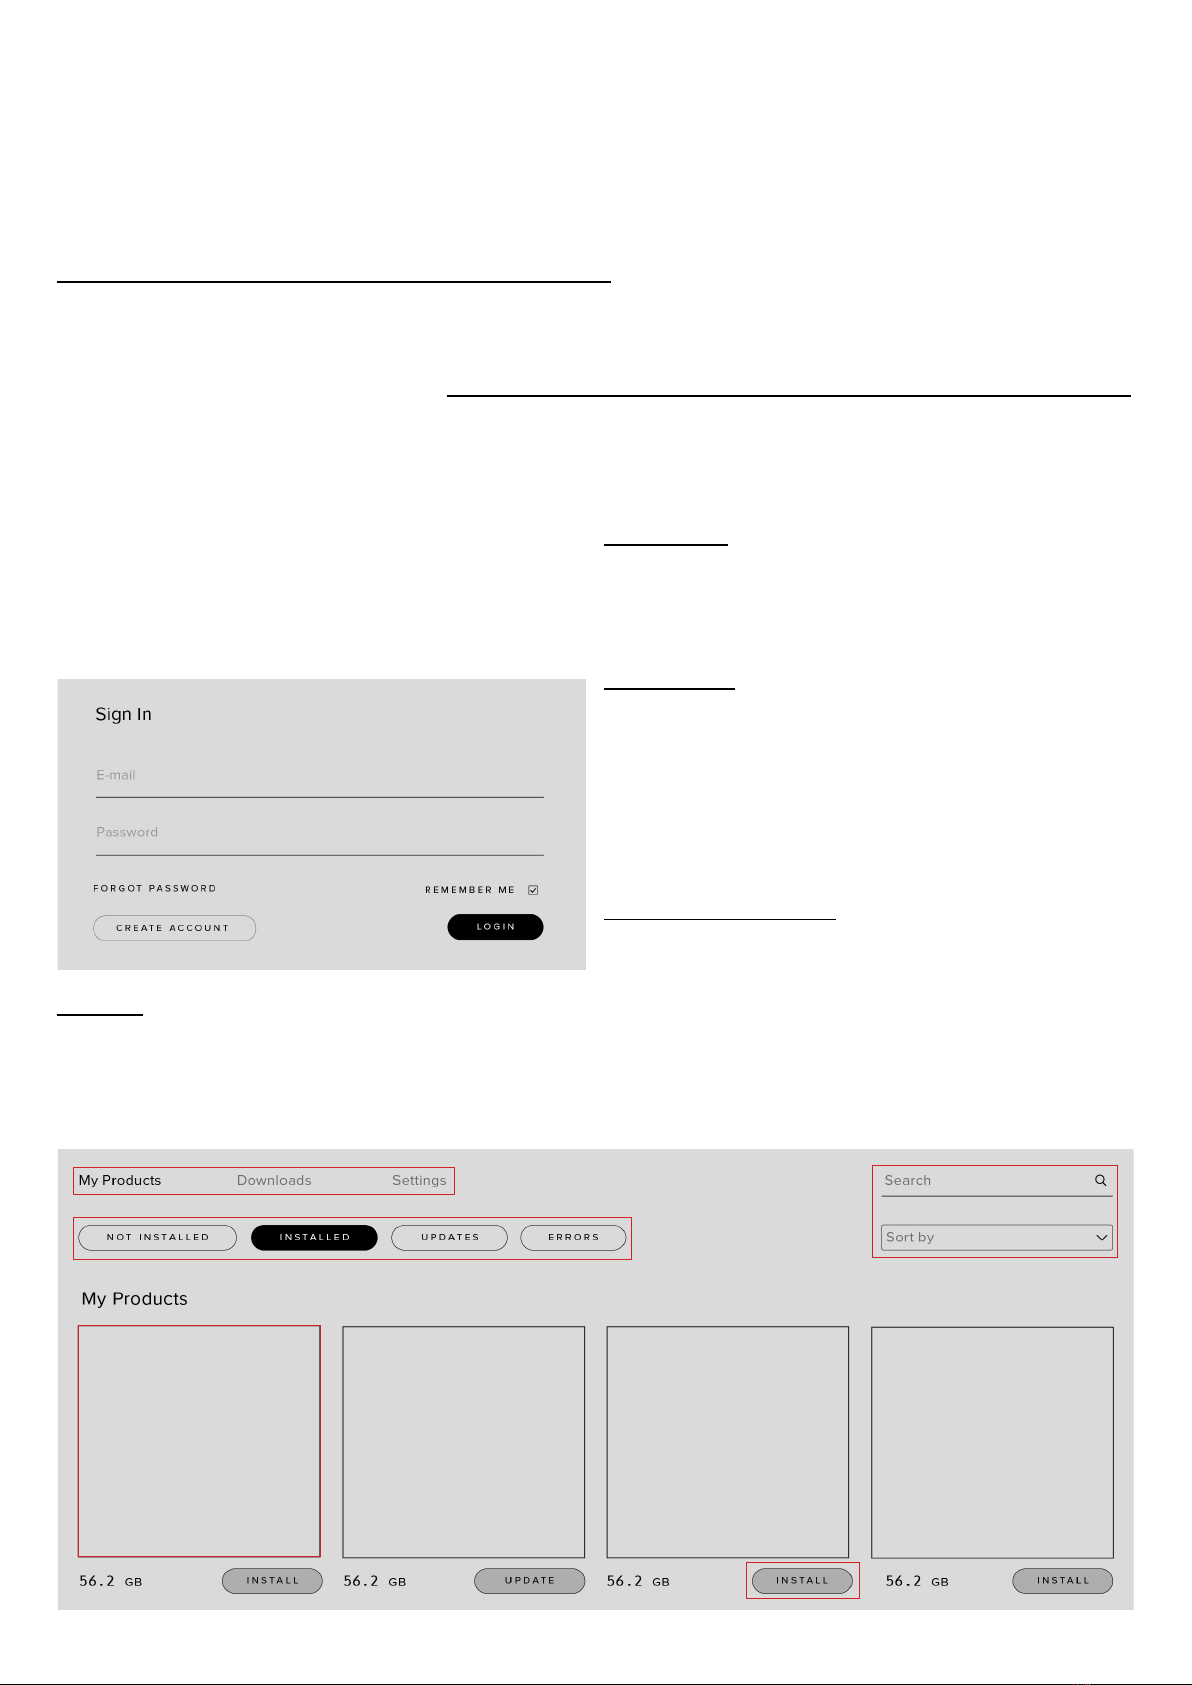
When you launch the app you will be
prompted to login using the same details
you use at our site. Then you’ll see the page
pictured below:
1. TABS the default tab is My Products, which
shows all of the libraries on your Spitfire
Account. Downloads will show currently
downloading products and Preferences
allows you to set default locations and
1
2
3
4
2
behaviours as described on the next page.
2. FILTERS clicking these filters will quickly
display products you’ve yet to install, those
already installed, and any available updates.
Clicking again will remove the filter.
3. LIBRARY All libraries and plugins in your
collection will appear with their artwork on
the My Products tab. Clicking this artwork
will open the product page. This is a great
place to find information such as system
requirements and instructions as well as
where to find Reset and Repair options.
4. INSTALL/UPDATE buttons allow you to
quickly start a download directly from the My
Products tab, instead of clicking through to
the Library. Next to the button the size of the
download is shown, you will need twice as
much available space to allow the download
to unzip correctly.
5APERTURE - THE STACK USER MANUAL
THE SPITFIRE APP PREFERENCES
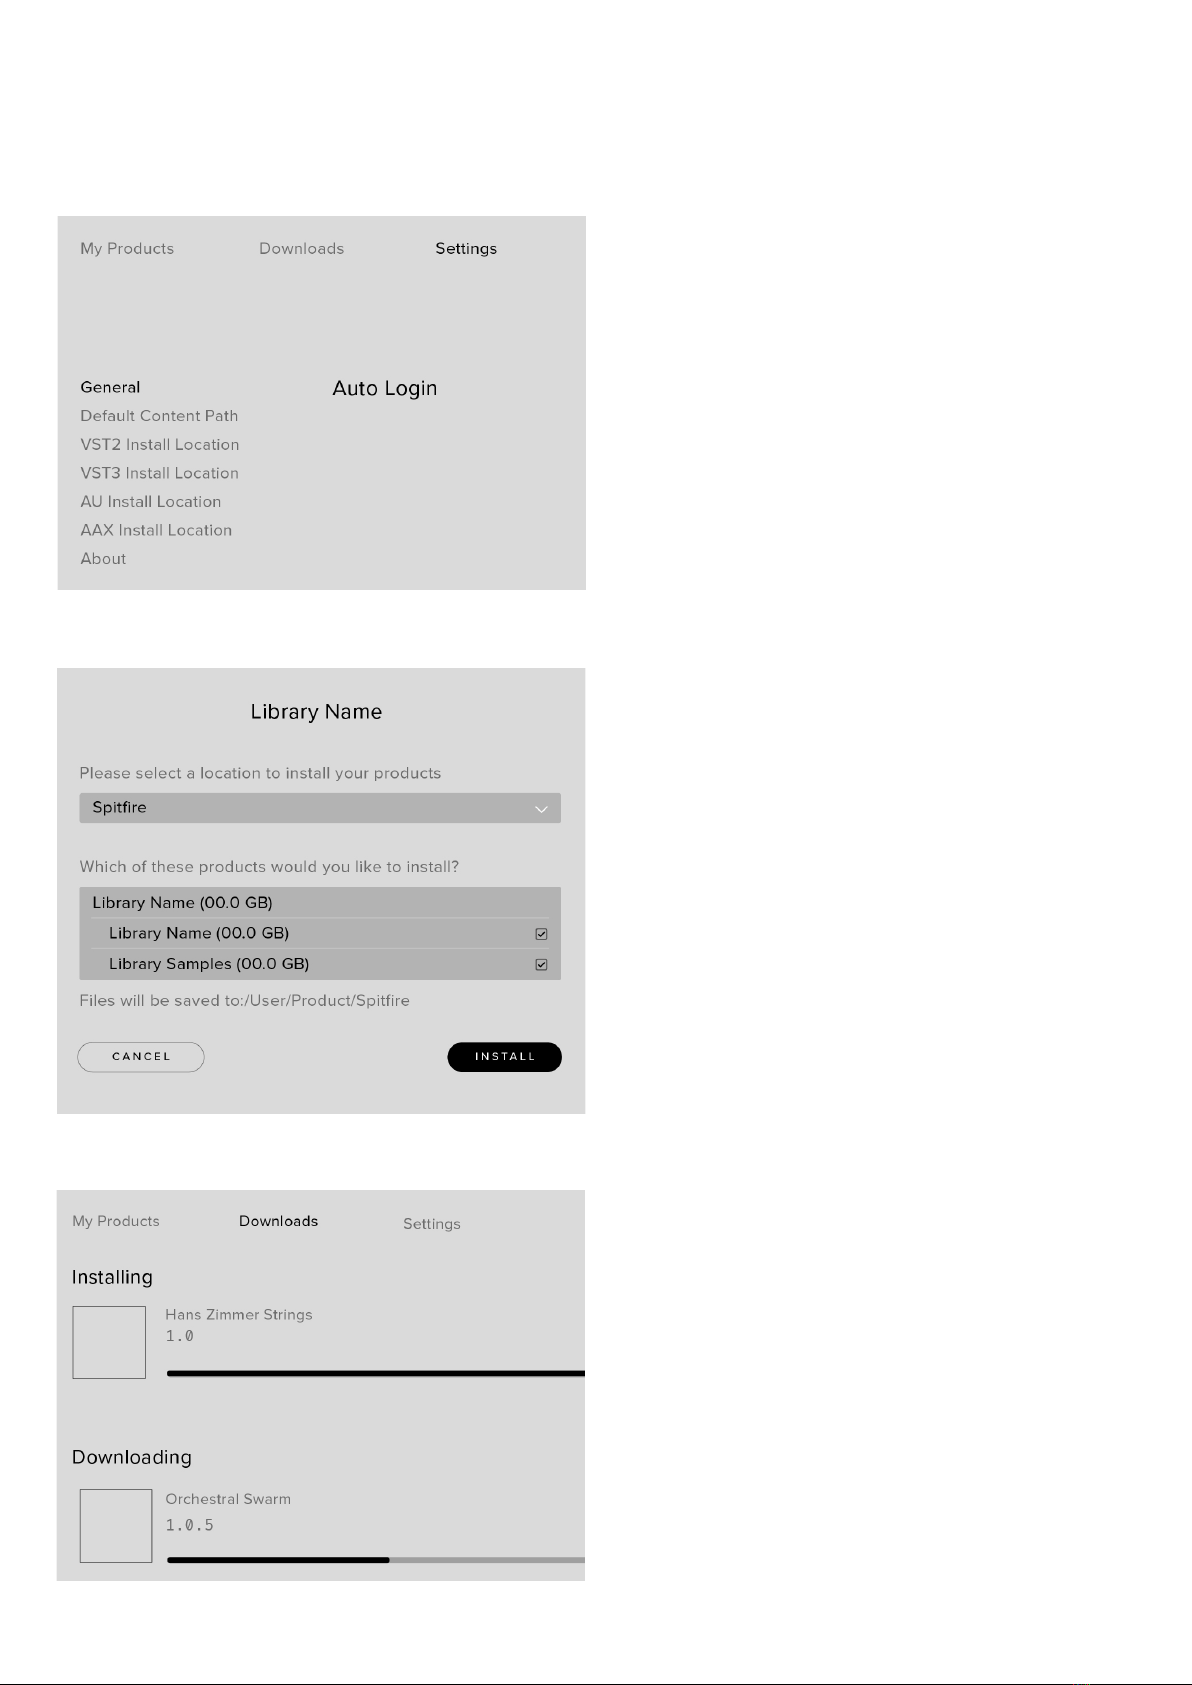
If this is your first time using the Spitfire
Audio App for a download you may wish to
first navigate to the Settings tab. Here you
can set the Default Content location as the
location where you wish to download your
libraries too. Also you can set the default
VST2 install location to the folder where your
DAW expects to find VST files.
Here you can also enable Auto Login to save
time in future.
Once you are happy with your preferences,
simply click the Install button for the library.
This is either directly on My Products tab
under the library artwork, or it can be found
by clicking on the library image and clicking
the install button on the page that appears.
Clicking either of these will prompt you for a
location, the default content location in your
preferences will be suggested but you can
select any suitable location.
Once you are happy with the location click
Download.
After clicking download you will be directed
to the Downloads tab where you can watch
the progress if you like. You can of course
leave the Downloads tab and start other
downloads but at this point you should leave
the Spitfire App open until the download
completes.

6APERTURE - THE STACK USER MANUAL-
THE DEDICATED PLUGIN
Unlike many Spitfire libraries, you don’t need
Kontakt Player or the full Kontakt to run this
library. Aperture - The Stack is its own, all
new, self contained plugin built for VST, AU
and AAX, so once you’ve downloaded and
installed you’re ready to go.
LOGIC PRO X
• On a fresh project, a track dialogue box will
automatically pop up
• Choose ‘Software Instrument’, and then
look beneath the ‘Instrument’ dropdown
• Select AU Instruments > Spitfire Audio >
Aperture - The Stack.
CUBASE
• Right-click the track window and choose
‘Add Instrument Track’
• Underneath the ‘Instrument’ dropdown,
choose Aperture - The Stack.
• Select ‘Add Track’
PRO TOOLS
• Go to the ‘Track’ menu at the top of the
screen, and select ‘New’
• In the pop-up, select Stereo and Instrument
Track, and press ‘Create’
• In the first Insert slot, select multichannel
plug-in and ‘Instrument’
• You should see the Aperture - The Stack
available as an option

7APERTURE - THE STACK USER MANUAL-
HAVE A LOOK AROUND
1. TOP MENU
2. PRESET SELECTOR
3. MAIN CONTROLS
4. TECHNIQUE SELECTOR
5. KEYBOARD & INFO
1
2
3
4
APERTURE THE STACK
OPENING YOUR FIRST PRESETS
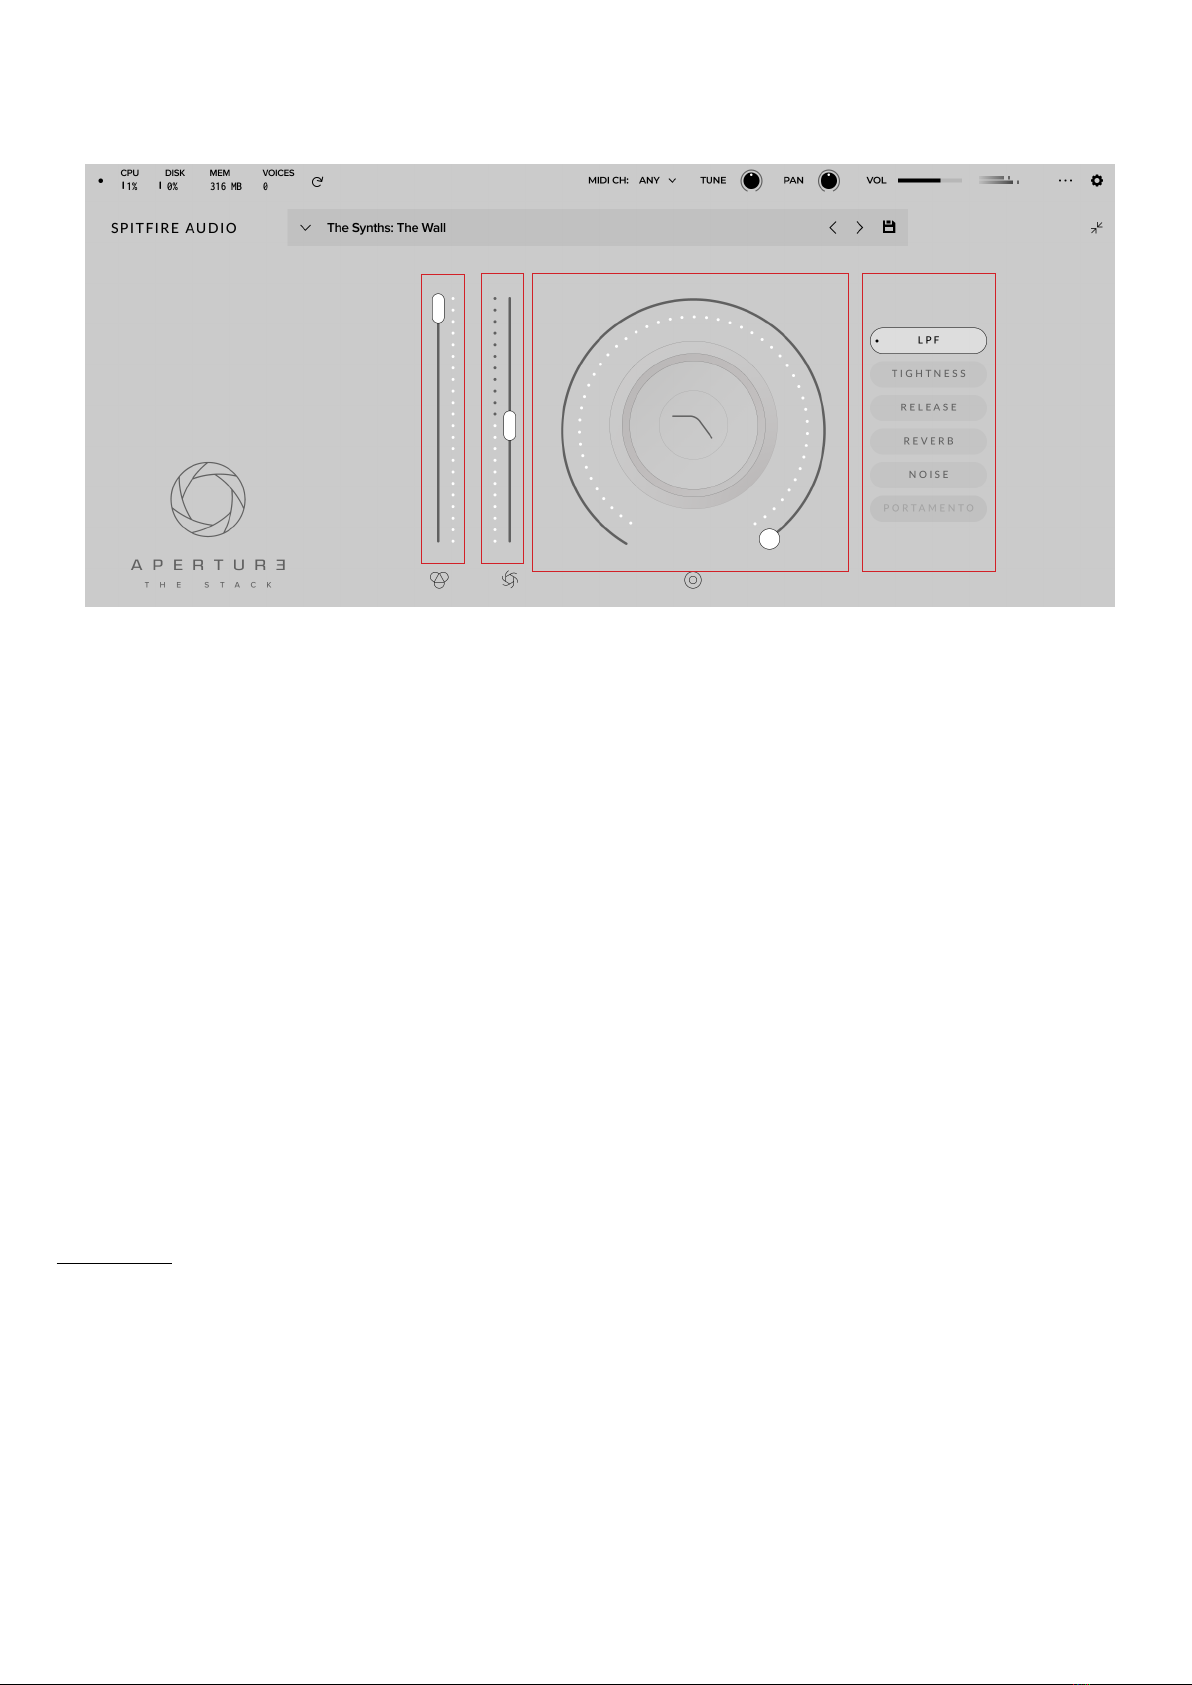
When you first open Aperture - The Stack,
this is similar to what you will see, It opens
on The Synths: The Wall.
5

8APERTURE - THE STACK USER MANUAL-
PRESET SELECTOR
1. PRESET NAME
Here you can see the currently selected
preset. Note that all presets are single
technique, like “Snare Hits”
2. FILTERS
Each filter sorts the patches based on how
they sound. The "Starred" filter will show
patches and presets that have had the star
to the left clicked.
3. NEXT, PREVIOUS AND SAVE
With the presets view collapsed, you will
be able to see the Next, Previous and Save
icons. Next and Previous will simply send
you to the next available preset - if you have
a filter enabled, you will scroll through the
filtered set of presets. Save allows you to
save your own preset, click save, name the
preset and it will appear under the “user”
filter.
1
2
3
4567
8

9APERTURE - THE STACK USER MANUAL-
4. STAR
Clicking this star icon will add the preset to
the “Starred” filter.
5. PREVIEW
Play back a short example of the preset
without having to load it! Enormously helpful
when choosing a sound.
6. PRESET LIST
Scroll through the list of presets here.
Double-click to load a preset or click the
‘Load’ button.
7. INFORMATION
Hover over on the “i” icon to see some
information about the preset.
8. LOAD
Select a preset and then press “load” (or
double-click the preset).
10APERTURE - THE STACK USER MANUAL-
1. VOLUME
Often referred to as “Expression” in our
Kontakt Libraries, this is a simple control that
adjusts the level of the technique.
2. DYNAMICS
Adjusts the size of the Aperture,
progressively adding more amps whilst
widening out to the full sound of The Hall.
3. KNOB
The configurable knob allows you to control
any of the other available parameters for the
particular technique.
Hover over the knob and it will light up
3.1 CLICK: Click in the center of the knob
and you will be able to assign any of the
remaining available controls to the knob.
Right click on any of these controls to assign
them to a MIDI controller. Remember that if
you assign a MIDI controller to a parameter
via the knob, the MIDI controller will follow
the parameter rather than being permanently
assigned to the knob.
MAIN CONTROLS
1233.1
11APERTURE - THE STACK USER MANUAL-
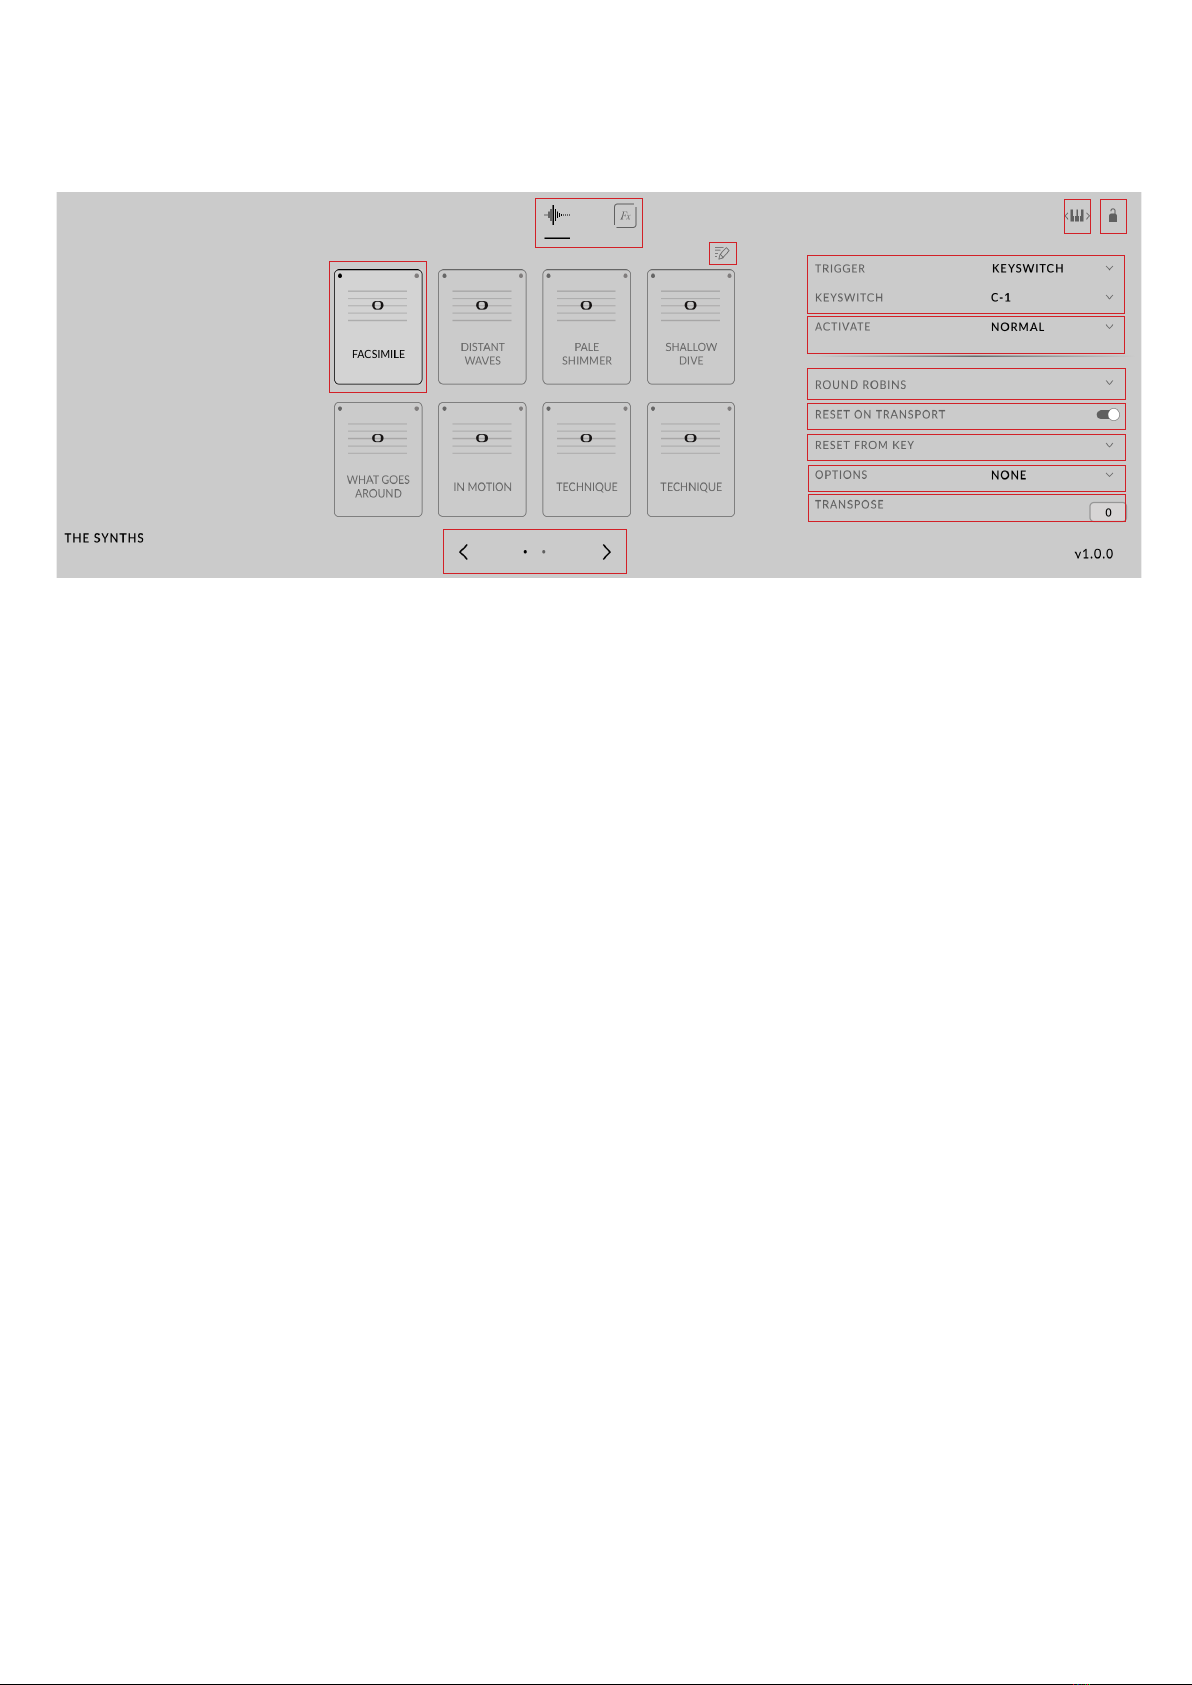
1. TECHNIQUE SWITCHER
Click to select a technique. Shift-Click to
select multiple techniques. The black dot
in the top left shows which technique(s)
will play, the black outline shows which
technique will be affected by any changes
you make to the other options in this page.
2. VIEW SELECT
Choose between the Technique Selector,
Mixer and Effects. The Mixer and Effects are
covered in different chapters of this manual.
3. TECHNIQUE NAVIGATION
Click the right arrow to access additional
techniques.
4. KEYSWITCH ADJUST
Click and drag to move the keyswitches to
the left or right on your keyboard.
5. LOCK
Click here to lock off the technique section
and prevent any unwanted changes.
6. TECHNIQUE TRIGGER
With the technique trigger section you can
choose to trigger techniques using various
parameters:
KEYSWITCH: Pick a key on the keyboard
that will select this technique. The selected
keys will show up in green for unselected
techniques and in orange for selected
techniques.
CC RANGE: Choose a CC# and a range of
values (or a single value) for the control that
you want to trigger this technique.
VEL. RANGE: Switch technique based on
how hard you are playing! You might want
to trigger longs when playing softly and
pizzicato when playing hard.
MIDI CHANNEL: Switch techniques based on
the incoming MIDI channel.
SPEED: Switch technique based on the
speed of playing. Specify the time interval
between notes to switch to a particular
technique.
TECHNIQUE SELECTOR
1
2
5
3
4
6
7
10
8
9
11
12
13

12APERTURE - THE STACK USER MANUAL-
7. ACTIVATE
Choose between “NORMAL” and “LATCH” for
your technique switching.
8. ROUND ROBINS
Round robins are a way to ensure that
repeated notes don’t sound robotic and
unnatural. We record the same note multiple
times and then cycle through them. Here you
can choose to reduce the number of round
robins that are being used.
9. RESET ON TRANSPORT
If you’re worried about the effect of the
round robins making each run through of
your session sound different, you can choose
to reset the round robins using the DAW
transport.
10. RESET FROM KEY
You can also reset the round robins using a
keyswitch. Choose that keyswitch here.
11. OPTIONS
LAYER +2: This option will play the round
robins from the tone above the key played
but transposed down so that it plays at the
right pitch.
LAYER -2: This option will play the round
robins from the tone BELOW the key played
but transposed UP so that it plays at the right
pitch.
12. TRANSPOSE
Transpose the instrument up or down in 1
semitone increments.
13. TECHNIQUE EDITOR
Opens the Techniques Editor, allowing you to
customise and edit your preset (see pg. 18)
TECHNIQUE SELECTOR
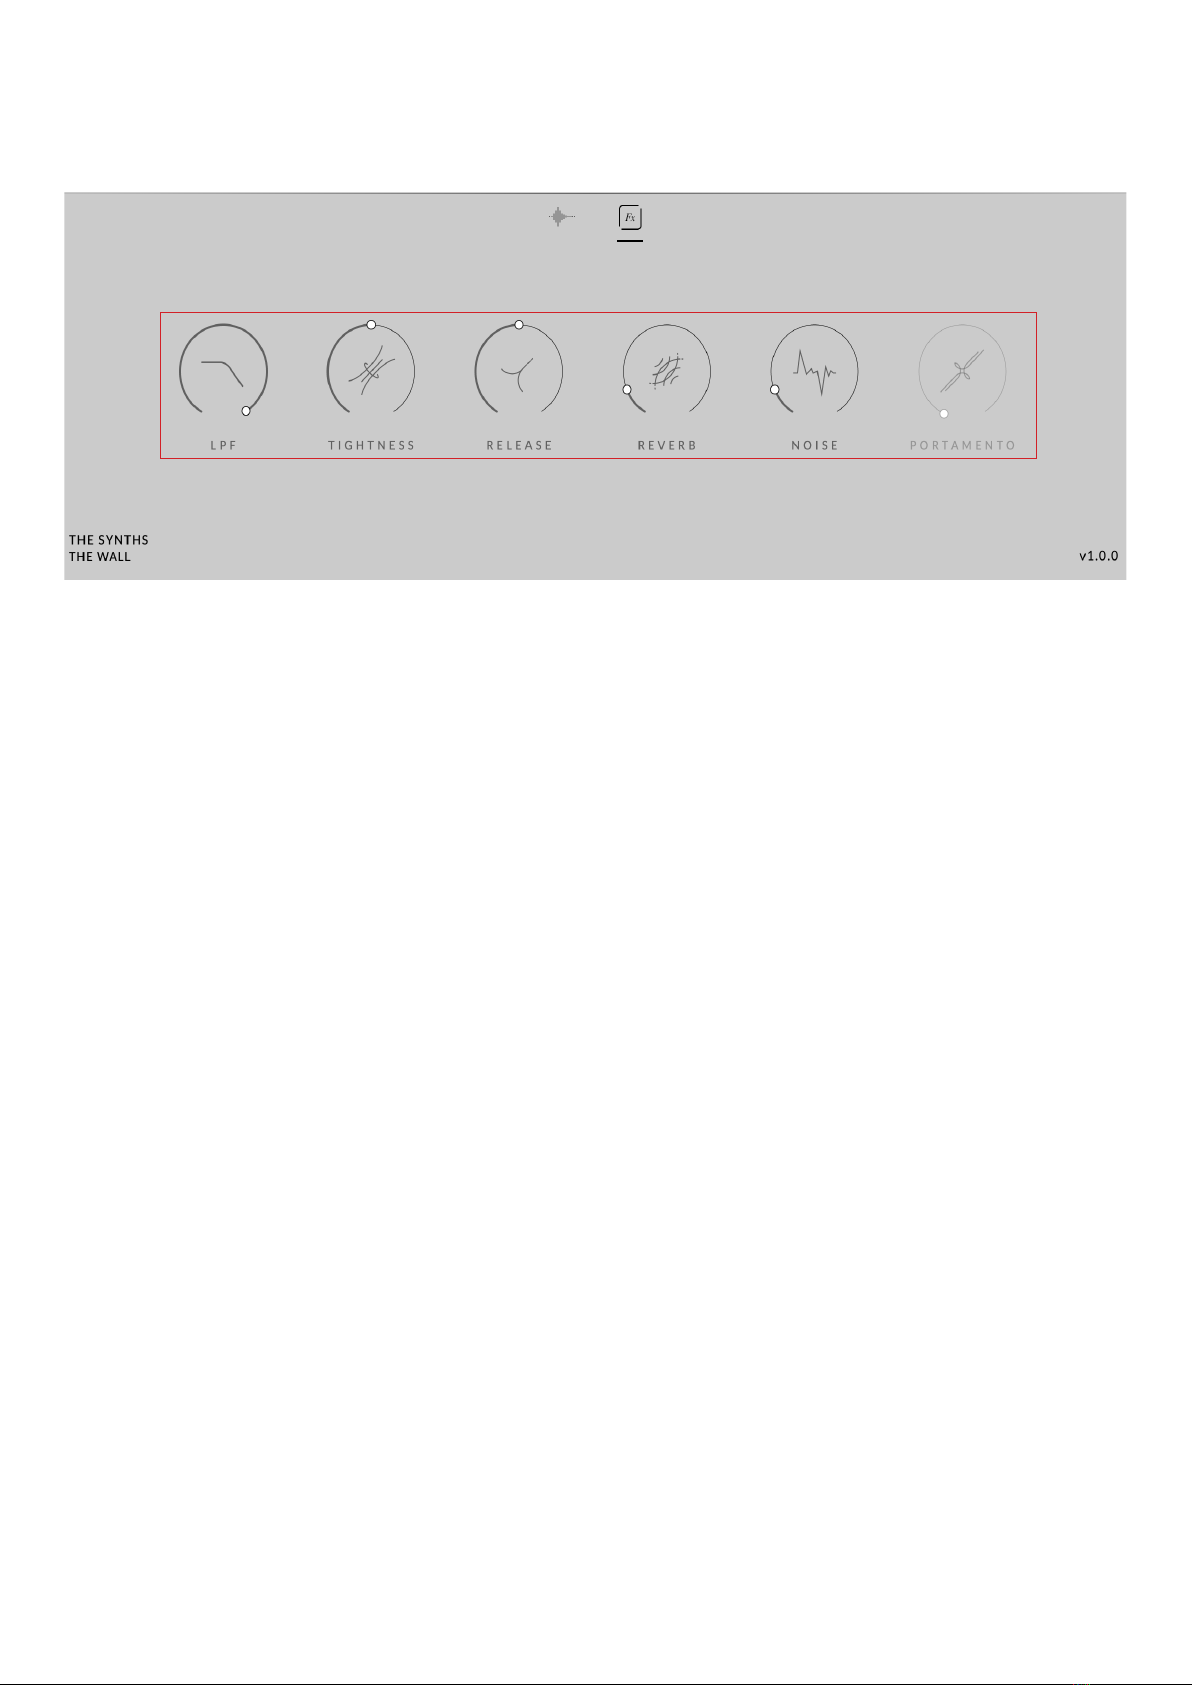
13APERTURE - THE STACK USER MANUAL-
1. CONTROLS
A. LPF
Adjusts the cutoff frequency of a Low Pass
Filter.
B. TIGHTNESS
This control cuts further into the note to
make it tighter, but does reduce realism.
Only applies to the Short patches.
C. RELEASE
Adjusts the amount of release trigger you
hear. Only applies to the Long patches.
D. REVERB
Adjusts the amount of reverb being added.
E. NOISE
Adjusts the amount of noise coming from
The Stack.
F. PORTAMENTO
Adjusts the amount of glide between two
overlapping notes. Only applies to the Mono
patches.
EFFECTS
1
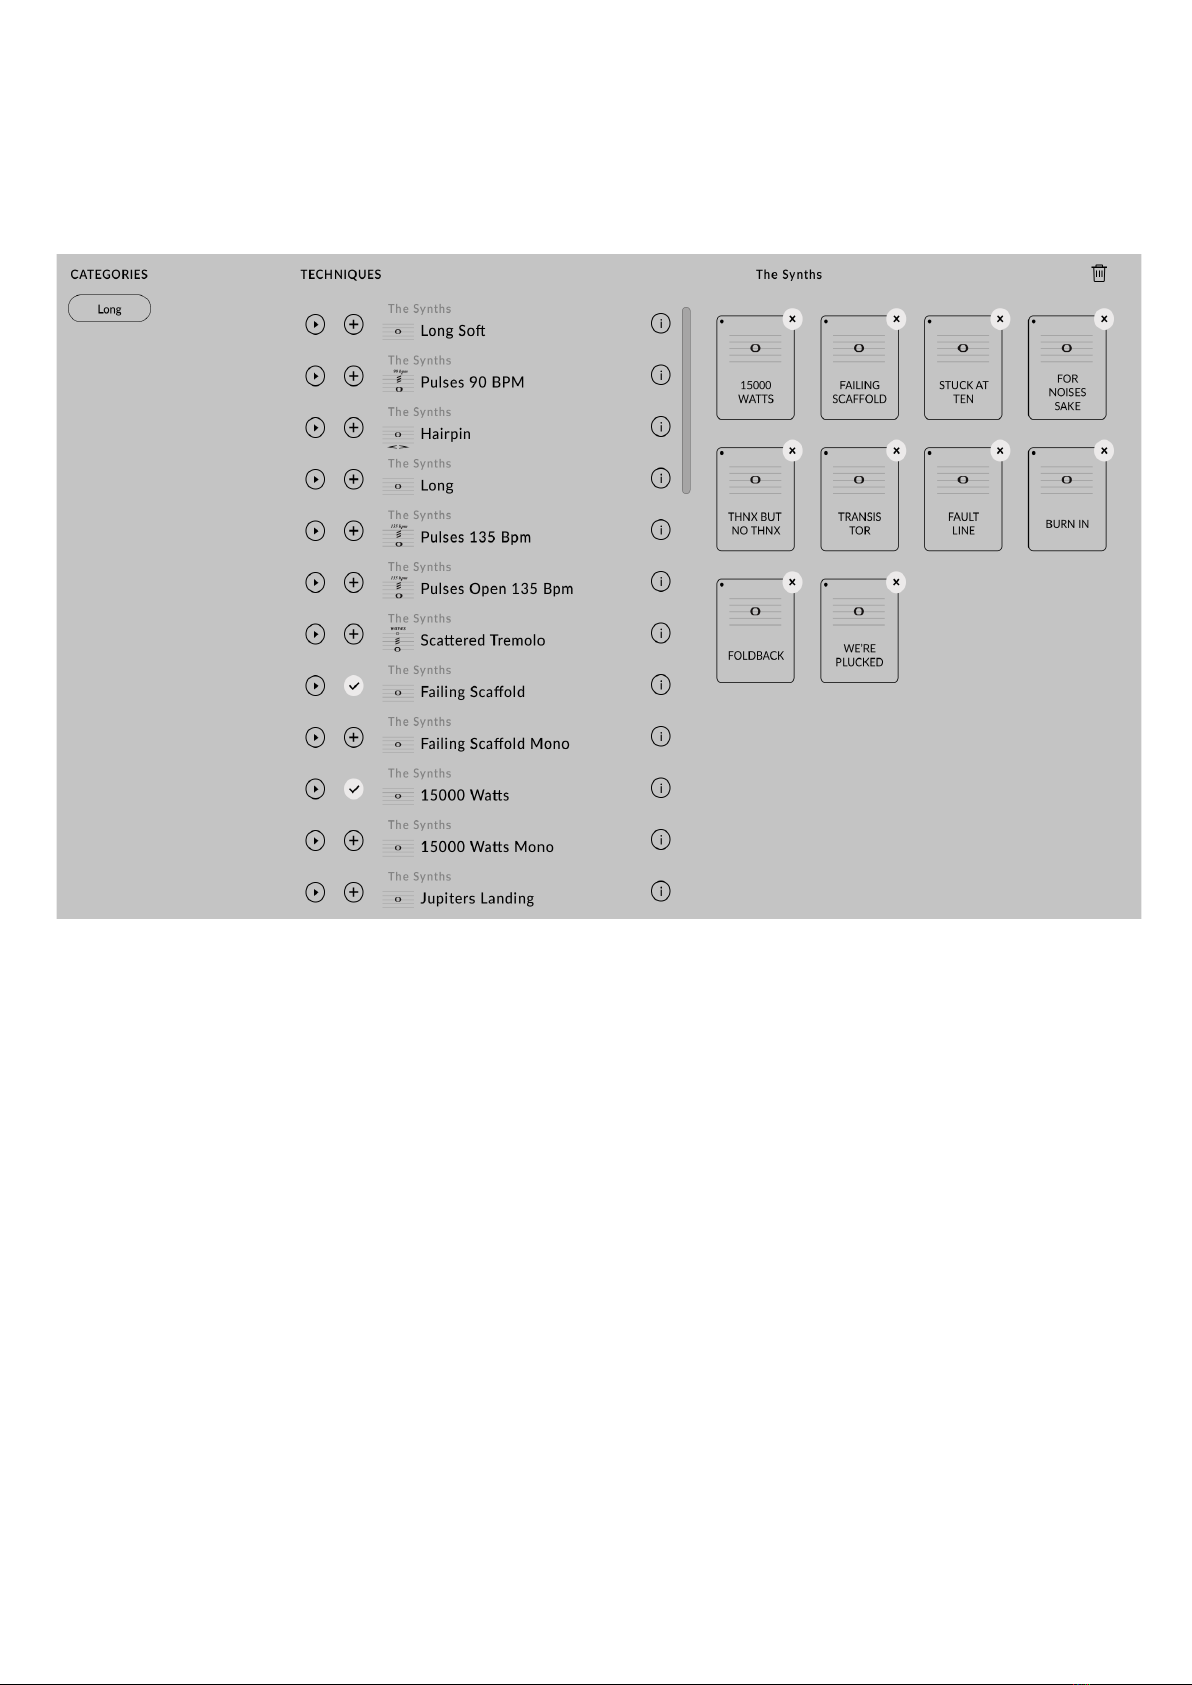
14APERTURE - THE STACK USER MANUAL-
• The left ‘Instruments’ panel allows you to
filter between all available techniques for
this specific preset.
• The central ‘Techniques’ panel shows all
available techniques for each preset. Click
the ‘+’ to add techniques back into your
current preset.
• The panel on the right is where your
current articulations are displayed. Click
and drag these to re-arrange the order. By
selecting the ‘x’ in the top-right corners, you
can remove a technique from your preset.
Click the ‘trash-can’ in the upper corner to
remove all techniques completely in a single
click.
• Once you’re done, click ‘Save’. If you have
made a mistake and don’t want to save,
choose ‘Cancel’ instead to go back to your
previous setting.
TECHNIQUE EDITOR
The Technique Editor will allow you to both add and remove techniques from your current
preset, as well as re-arranging the order of the techniques to your own personal preference.
This is opened by selecting the pencil icon (see pg. 13).
15APERTURE - THE STACK USER MANUAL
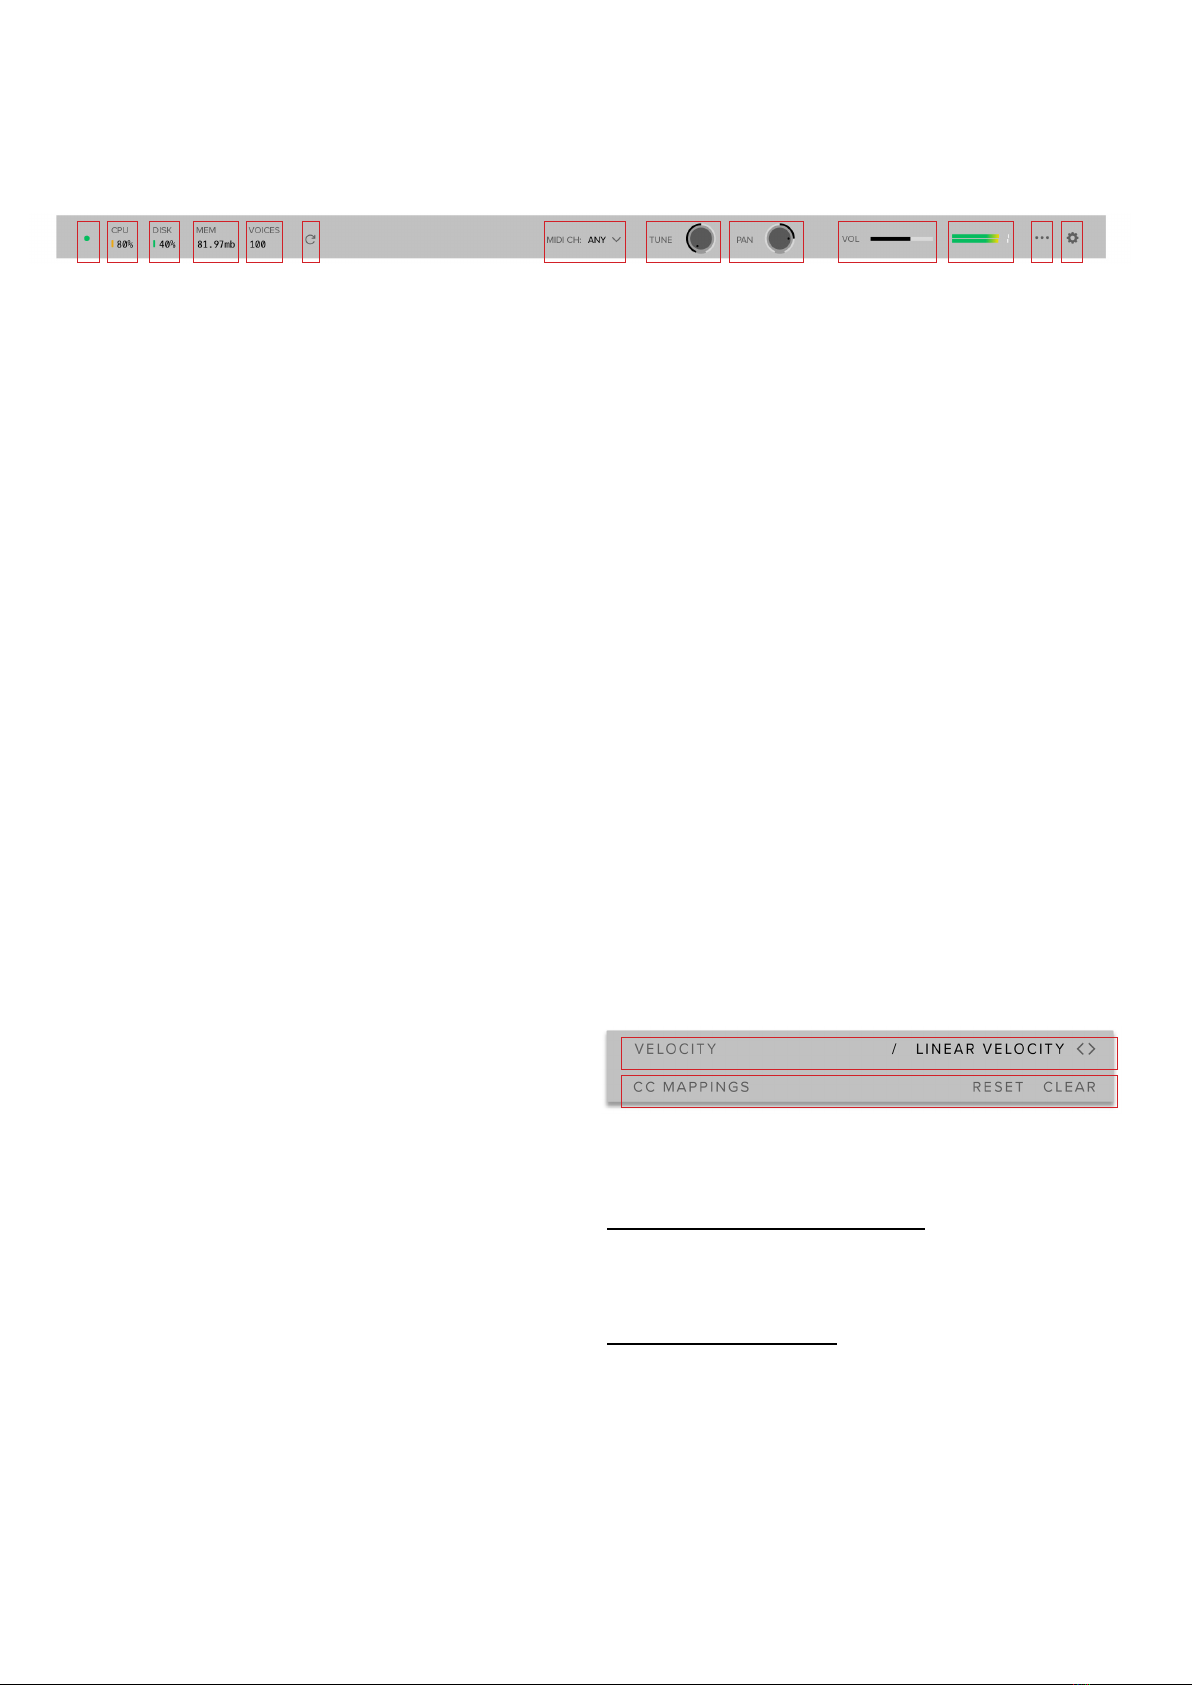
TOP MENU
1. LED
Shows when an instrument is loaded by
lighting solid green. If this is flashing, your
instrument is not loaded yet
2. CPU METER
An indication of how much your CPU is being
taxed, the green flash next to the CPU meter
will turn red when you are overloading it.
3. DISK METER
How hard are you taxing your hard drive? If
this is close to, or going over 100% it’s time
to consider a faster drive. See next page for
settings that can help get the most out of a
slower drive
4. MEMORY
This shows how much RAM you are currently
using in this instance of Aperture. While
the preset is loading, this will show the
instrument loading into memory.
5. VOICES
Shows how many voices are being used at
any one time.
6. REFRESH
Refresh the instrument, alt-click to refresh
the whole plug-in. This can be useful if you
have hanging MIDI notes or have moved
samples in your file system
7. MIDI CH
Set the MIDI channel that will control the
instrument here. If in doubt select “any” so
that the instrument will react to any incoming
MIDI messages.
8. TUNE
Move this knob to tune in semitone
increments, shift-click to move in increments
of 0.01 of a semitone. Alt-click to reset to
default
9. PAN
Pan the whole plug-in left and right in the
stereo field. Alt-click to reset to centre.
10. VOLUME
Control the overall volume of the instrument.
11. LEVEL
A visual indication of the level of the
instrument.
12. PRESET SETTINGS
A. VELOCITY RESPONSE Pick from
4 different velocity curves to suit your
controller.
B. CC MAPPINGS Clicking on Reset
will reset all of the CC mappings for this
instrument to the defaults - useful if you’ve
got yourself in a mess!
Clear CC Mappings - Delete all CC mappings
- this is good if you have a clear idea of what
parameters you want to control and want to
start from a clean slate
1 2 3 4 5 6 7 8 9 10 11 12 13
A
B
16APERTURE - THE STACK USER MANUAL
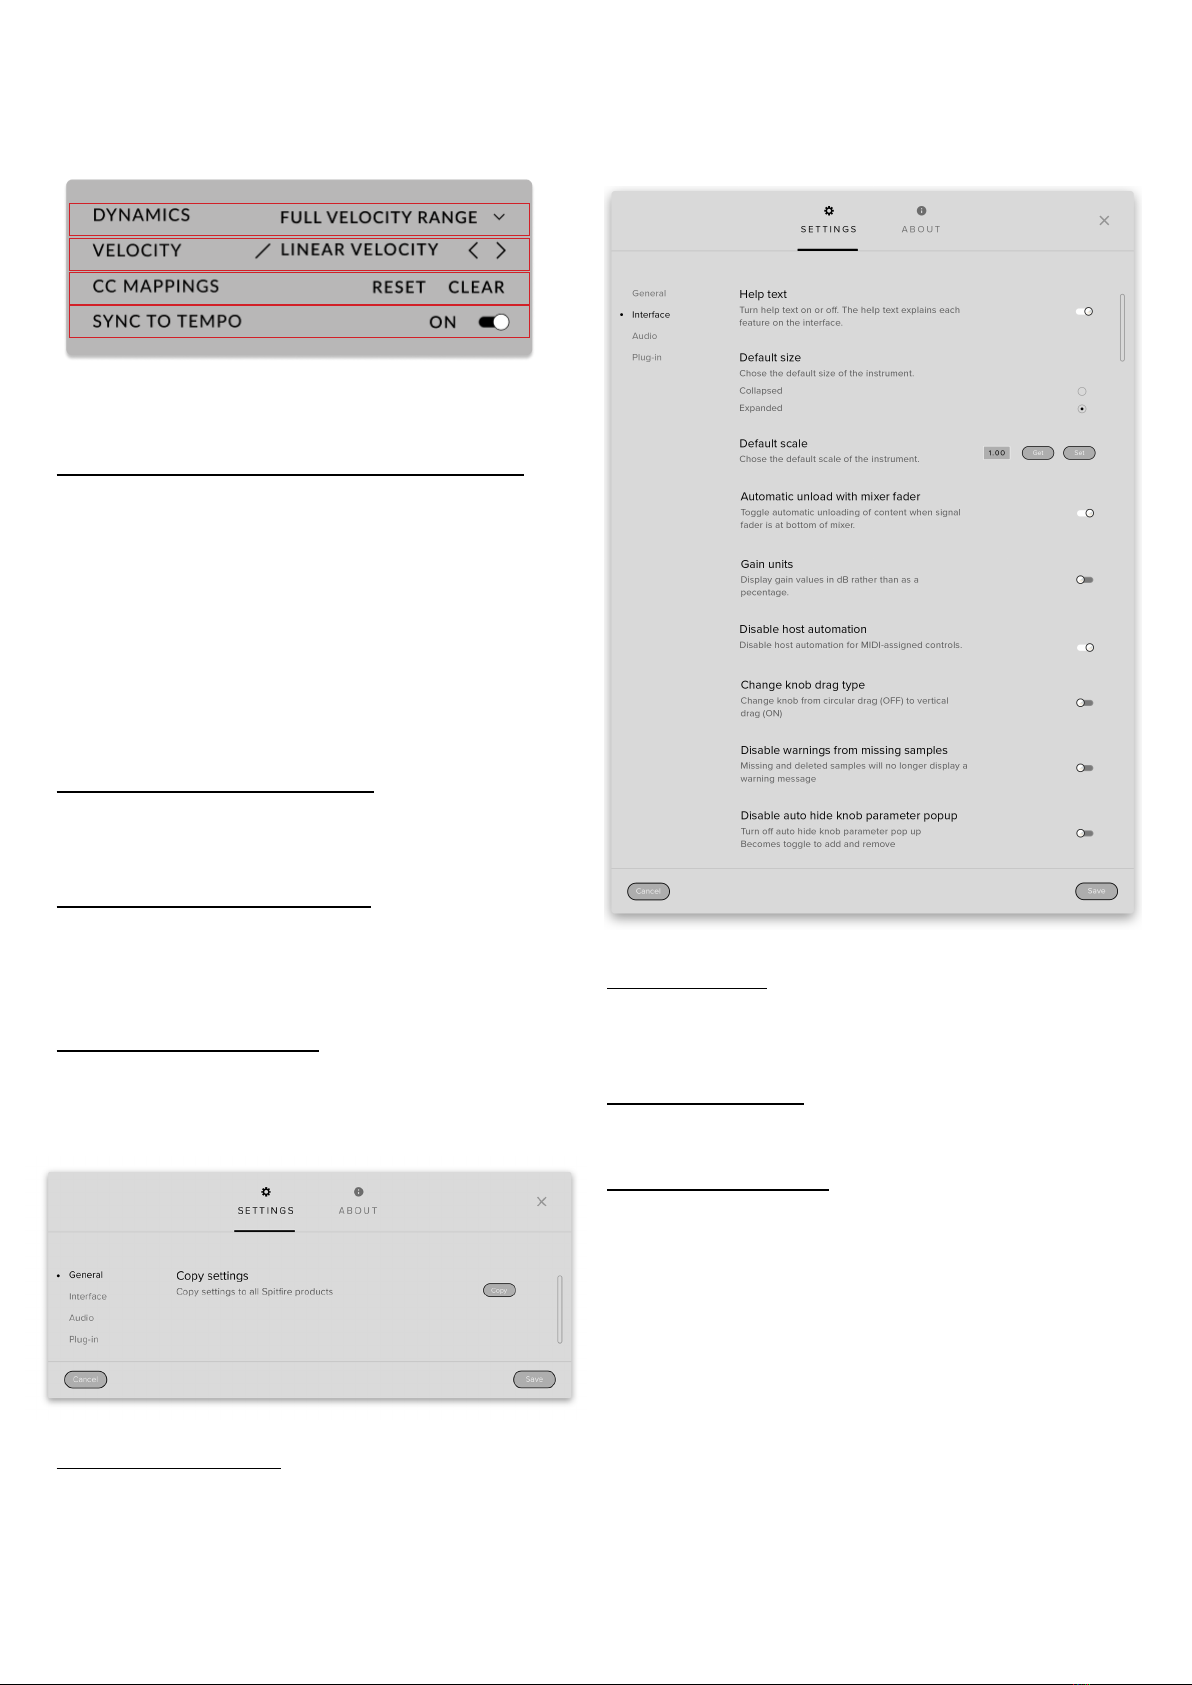
TOP MENU CONTINUED
12. PRESET SETTINGS
A. VELOCITY MAPPED TO DYNAMICS
Here you can choose from up to 4 different
behaviours for the Dynamics fader. 1) Full
Velocity Range. 2) Velocity Mapped to
Dynamics. 3) Compressed Velocity High. 4)
Compressed Velocity Low. These settings
will change how hard you need to hit the
keyboard to trigger different layers. Velocity
mapped to dynamics will allow you to control
short note velocity with the mod wheel.
B. VELOCITY RESPONSE Pick from
4 different velocity curves to suit your
controller.
C. RESET CC MAPPINGS — Clicking on this
will reset all of the CC mappings for this
instrument to the defaults - useful if you’ve
got yourself in a mess!
D. SYNC TO TEMPO — This option syncs to
your host BPM
13. PLUGIN SETTINGS
COPY SETTINGS Common Controller
values will transfer over to other Spitfire
Products
HELP TEXT Turn this on to display
parameter information in the bottom left
corner of the plug in.
DEFAULT SIZE Set whether the instrument
opens up collapsed or expanded by default.
DEFAULT SCALE How big the instrument is
when you open it as a fraction of its original
size. Here you can “get” the current scale of
the instrument or change the value and press
set to change the scale of the instrument.
Press “save” to save the current scale as
the default and press “reset” to change the
current scale to the default value..
A
B

17APERTURE - THE STACK USER MANUAL
SHOW KEYSWITCHES — When this option
is on, presets that have multiple techniques
will show available keyswitches in red and
the currently selected technique(s) in yellow.
AUTOMATIC UNLOAD WITH MIXER FADER
Toggle this to unload data from RAM when
fader is pulled down to the bottom.
GAIN UNITS Toggle this if you want your
gain to be displayed in dB instead of as a
percentage.
MAKE CONTROLS GLOBAL Common
Controller values will remain when switching
techniques.
DISABLE HOST AUTOMATION Turn this
on to enable the Host Automation from the
DAW.
CHANGE KNOB DRAG TYPE This option
changes how the knob interacts with your
computer mouse, turn it off for a circular
drag and on for vertical drag.
DISABLE WARNINGS FROM MISSING
SAMPLES This option will stop error
messages appearing when you are missing
samples, only enable this option if you
intentionally delete samples you are not
using.
DISABLE AUTO HIDE KNOB PARAMETER
GROUP Normally the Knob parameter list
will disappear when you click on another
control, enable this option to have it stay
visible instead.
MAXIMUM VOICES Enter the maximum
number of voices that can play at once. More
voices = More CPU and memory used.
PRELOAD SIZE The minimum number of
sample values preloaded into memory for
each audio recording. Increase for slower
hard drives. Default is 12888.
STREAM BUFFER SIZE The number of
sample values kept in memory for each audio
recording stream at any time. Increase for
slower hard drives. Default is 65536.
MASTER TUNING Change the default
tuning of the plugin. For example A = 440hz
or A = 432 HZ.
PITCH / STRETCH QUALITY This option
allows you to override the default pitch/time
quality to improve performance or improve
audio quality. Not used in this library at this
time.
MAXIMUM PITCH VOICES Limit the
number of voices triggered at any one time.
Lower values can aid CPU.
ENABLE MEMORY MAPPING Turn off for
windows machines for better performance
DEFAULT PRESET Choose a preset that
you wish the plug in to load by default on
launch

18APERTURE - THE STACK USER MANUAL-
APPENDIX A
FAQSAND TROUBLESHOOTING
Q: WHAT ARE THE SYSTEM
REQUIREMENTS?
MAC SYSTEM REQUIREMENTS: Mac OS X
10.10 to OS 11
Minimum: Intel Core 2 Duo
Machine must be connected to the internet
during install
PC SYSTEM REQUIREMENTS: Windows 7,
Windows 8, or Windows 10 (latest Service
Pack, 64-bit)
Minimum: 64-bit) Intel Core 2 Duo or AMD
Athlon 64 X2
Machine must be connected to the internet
during install
Q: I WANT TO RESET MY APERTURE
SETTINGS TO THE DEFAULT
You can delete the Aperture - The Stack.
settings file to reset the settings to default.
This is located at Users/username/Music/
Spitfire Audio/Settings on a Mac and C:\
Users\username\AppData\Roaming\Spitfire
Audio\Settings on a PC.
Q: MY LIST OF PRESETS IS EMPTY,
HOW DO I SOLVE THIS?
If you have moved your Aperture - The Stack
Library folder, you can solve this problem
by using the “Locate Library” feature in the
Spitfire Audio App.
If this does not solve the problem, the library
likely needs reauthorising, to do this, use the
“repair” feature in the Spitfire Audio App.
Q: I SEE A RED EXCLAMATION MARK
IN THE TOP LEFT OF APERTURE
THE STACK, WHAT DOES THIS
MEAN?
This means that there is an error, you can
click the exclamation mark to open a log
with further details. It is likely that using the
“Repair” and “Locate Library” features in the
Spitfire Audio App will solve the problem
but if not, contact our support team at
spitfireaudio.com/support and attach the log.
Q: CAN I INSTALL ON MORE THAN
ONE COMPUTER?
With our products you have two licenses.
This means that you are allowed to download
and install on two computers you own, say
your main rig and your mobile rig. If you have
purchased the library on a hard drive, you
should copy the contents of the drive on to
the destination machine before completing
the download with the Spitfire App. If you
downloaded Aperture - The Stack, you can
copy the library folder over to the second
machine and then use the “Repair” and
“Locate Library” features in the Spitfire Audio
App.
Q: I CAN’T SEE THIS IN THE
KONTAKT LIBRARIES PANE AND
WHEN I TRY AND LOAD IT INTO
KONTAKT IT SAYS NO LIBRARY
FOUND
This library does not run in Kontakt, it is a
standalone plug-in that you can run in your
chosen DAW.
Q: HOW DO I AUTHORISE THE STACK
ON A MACHINE NOT CONNECTED TO
THE INTERNET?
It is currently not possible to authorise
Aperture - The Stack on a machine not

19APERTURE - THE STACK USER MANUAL-
connected to the internet. Authorisation is
done with the Spitfire Audio App and an
internet connection is required.
Q: HOW CAN I REDOWNLOAD A
PRODUCT?
This can easily be done via your Spitfire
Audio App. To reset both your entire library
download or the latest update;
• Open up the Spitfire Audio App and log in
with your account email and password.
• Select the product artwork you wish to re-
download
• On this page is a “cog wheel”. Select this,
choose “reset” from the menu. Then “Reset
Entire Download” (for a full download) or
(Latest Update) for the latest update.
This will reset your latest update ready for
install again. You can repeat this process for
any of the libraries you own.
Note that there is a limit to how many times
you can reset your downloads in a certain
time frame. If you do exceed your reset limit
please get in touch.
Q: DIFFICULTIES IN DOWNLOADING /
INSTALLING
Customers may find that they have some
difficulties in the downloading process. If you
find that you are having some trouble, please
check the list below for possible causes:
• The formatting of your drive, if it is FAT32
this will cause errors, because there is a
maximum file size with this format of 4GB
and our download files will exceed this limit.
To solve this problem, reformat your drive or
use a different drive. We recommend NTFS
on PC andMac OS Extended(journalled)on
Mac.
Other possible issues:
• Spitfire App freezes in the “Extracting”
stage for hours. This may be because our
libraries are often very large files, and this
is the stage where the compressed files are
extracted and placed in their final locations
on the hard drive. There could be hundreds
of GB of content to unpack, so it really can
take hours. If you’re unsure whether it has
crashed or is simply extracting files, visit
the installation folder you chose when you
started the install. If everything is working
normally you’ll see various files appearing in
the folder (or one of its sub-folders).
• If you see a “Download interrupted”
message may be caused by a change in IP,
usually the case with people using a VPN,
or people who for some reason started a
download in one country and tried to resume
it in another. In this case, please submit a
support ticket and we can unblock you.
• If your download gets stuck and is
continually cycling and not resuming, please
get in touch with us, giving us as much detail
as possible about your set up. It would be
helpful if you can tell us your operating
system, where you are downloading from
(your country, and also whether you’re at
home or work), your ISP, and whether there
are any proxy servers or firewalls between
your computer and the internet.
Q: I HAVE FAST INTERNET, WHY IS
MY DOWNLOAD SLOW?
We have no direct influence on your actual
download speeds, our libraries are hosted
on Amazon S3 servers which are normally
very quick but it may well be that at certain
times of the day when traffic is particularly
busy, your ISP may throttle your connection
speeds.
We would advise you to leave your download
running overnight as speeds should ramp
up at less busy times. Our Spitfire App
downloader aims to use as much of the
available bandwidth as possible to give you
the quickest possible speeds, and may take
several minutes to reach its peak.

20APERTURE - THE STACK USER MANUAL-
Q: CAN I TRY BEFORE I BUY?
Yes! The Stack has a demo patch available
on the product page on spitfireaudio.com
If you go to our YOUTUBE CHANNEL you’ll
also see many walkthroughs containing
detailed info about all our products -- you
can hear them being played in real time with
no smoke and mirrors!
Q: MY LIBRARIES ARE NOT SHOWING
UP IN MY SPITFIRE APP
A handful of customers may find that when
they log into their Spitfire App, some of
their previously purchased products do not
show up in the ‘Installed’ section or in the
‘Download Ready’ section either. It may
be that you have purchased these under
another email address. Checking other
possible email addresses for your previous
purchases may help to find these missing
products. If this is not the case, and these
missing products were purchased a few
years ago, please create a support ticket
telling us your account email address, and
any serial numbers you may have to go
with these missing products. Our support
team can also merge one or more accounts
together if you’d like to consolidate all your
purchases in one place.
The more information we have, the quicker
we can get you back up and running!
Q: HOW DO I UPDATE MY
PRODUCTS?
The main premise of downloading our
products is that our Spitfire App downloads
into the folder you choose, so it is important
to choose the folder above where you want
the download to go. The best file path for
our products is something very simple, a
long file path will cause errors as there is a
character limit on how far the Spitfire App
can read. We advise a file path of something
along the lines of: Samples Drive > Spitfire
Audio
When it comes to downloading / updating
- if you have a folder called ‘Spitfire Audio’
always point the Spitfire App to the folder
Spitfire Audio - never go into this folder and
choose the actual library in question.
Q: HOW DO I REDOWNLOAD THE
LATEST UPDATE?
With the continuous improvements to our
Spitfire Audio App, we have incorporated the
ability to reset your own downloads.
This can easily be done via your Spitfire
Audio App.
Open up the Spitfire Audio App and log in
with your account email and password.
• Select the product artwork you wish to re-
download
• On this page is a “cog wheel”. Select this,
choose “reset” from the menu. Then “Reset
Entire Download” (for a full download) or
(Latest Update) for the latest update.
• This will reset your latest update ready for
install again.
You can repeat this process for any other
updates you wish.
If you do not see the option to reset your
download in your Spitfire Audio App, we
would advise to download the latest version
of the Spitfire App from spitfireaudio.com/
info/library-manager/.
Q: I’VE BEEN WAITING AGES FOR MY
DOWNLOAD LINKS...???
We run all our orders through a fraud
checking process. The automatic fraud check
takes 20 minutes (but can take up to an
hour during a very busy period, e.g... Black
Friday), but if your order gets caught at this
stage, we run a manual order check, and this
can delay the processing of your order for up
to 24 hours (though this would be a rare and
exceptional case).
You should however receive an order
confirmation email IMMEDIATELY upon
Table of contents


