SprintRay Pro Wash/Dry User manual
Level surface away from light and heat.
A C
B
Pro Wash/Dry™
Quick Start Guide
Congratulations!
Your new Pro Wash/Dry system is the most technologically
advanced system for cleaning 3D printed parts. Thanks to
its patented mechanical jetting system and onboard
computer, you’ll be saving time, money, and resources.
But before you get started, please read through this guide
and make sure to follow all procedures outlined herein when
using Pro Wash/Dry.
Training and Support
Your Pro Wash/Dry comes with complimentary phone and
email support. If you have questions, please get in touch:
Version 3.3
Updated on 05/20/21
Visit
Call
Email
support.sprintray.com
800-914-8004
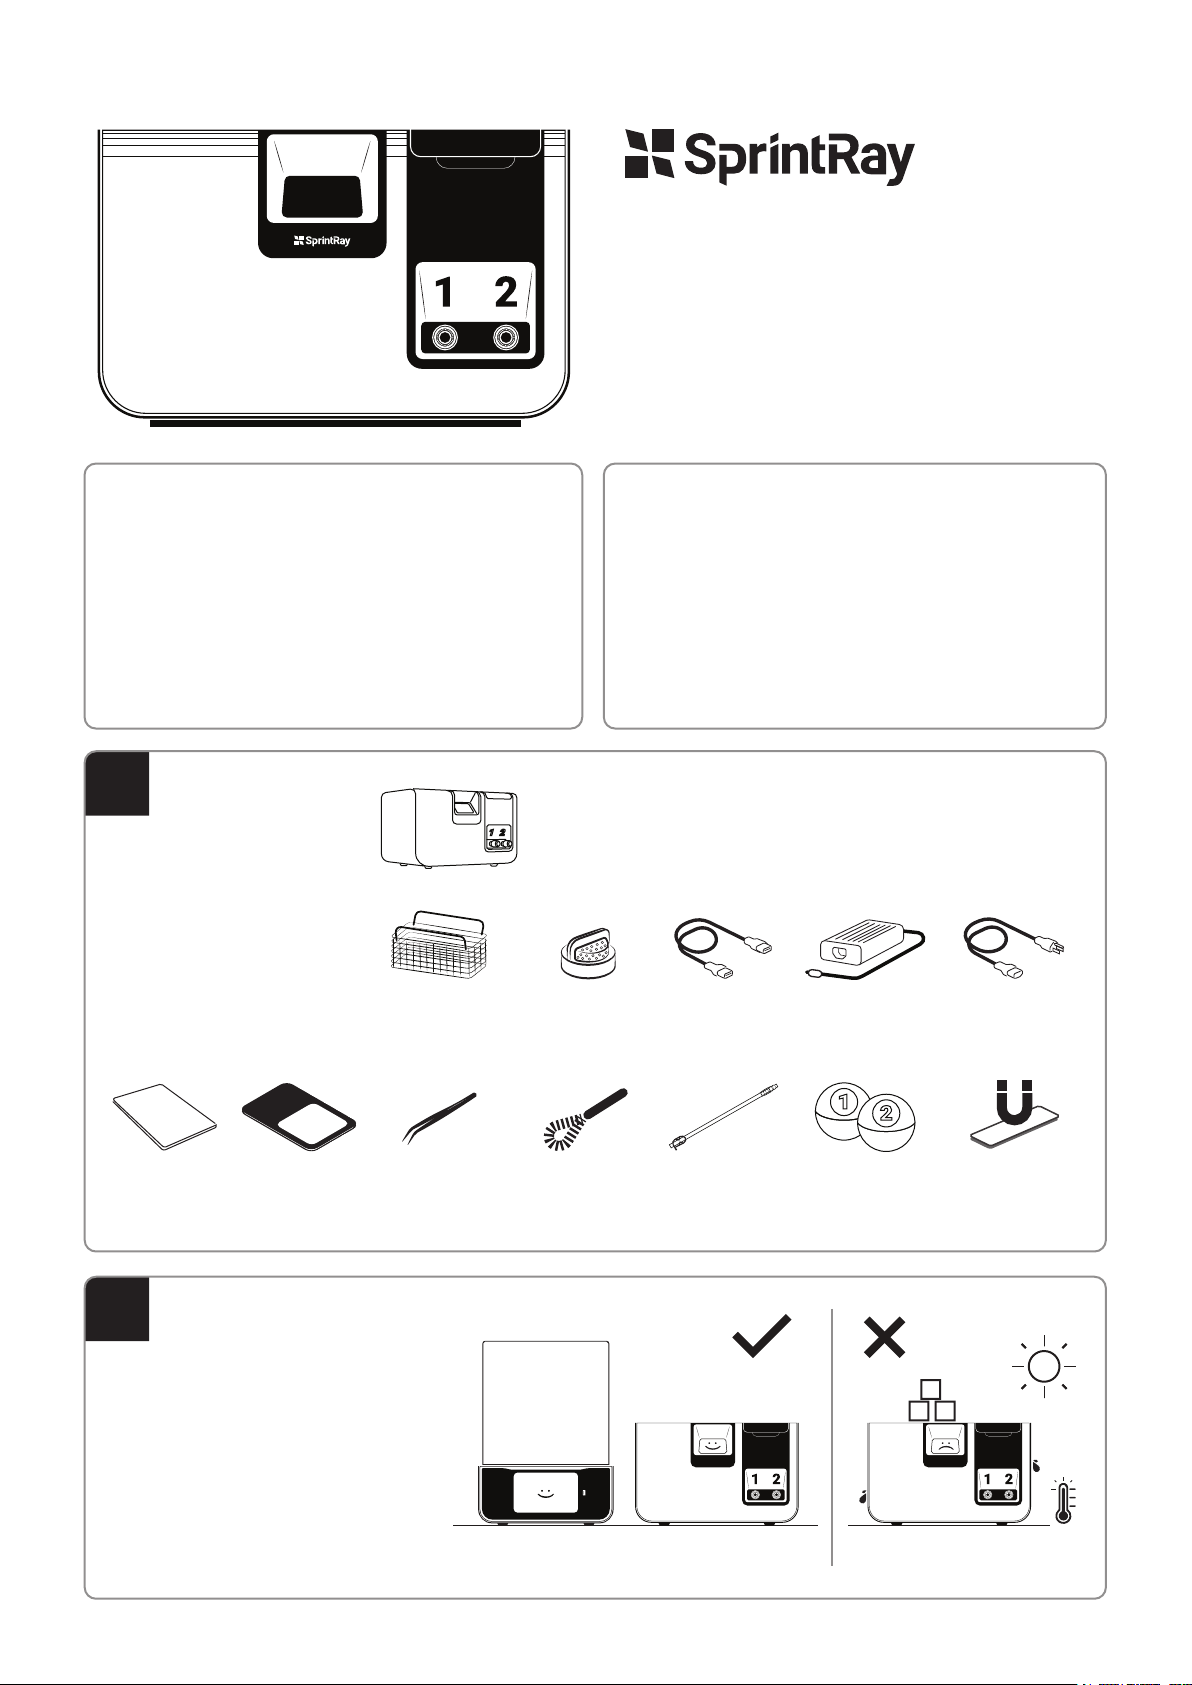
Pro Wash/Dry Unit
Drain Hose
Pre-installed
(See Section 7)
Cleaning
Brush
(See Section 8)
Basket
Pre-installed
(See Section 6)
Hydrometers
Pre-installed
(See Section 4)
Power CableUSB Cable
(See Section 12)
Wash Filter
(See Section 9)
Metal
Tweezers
(See Section 9)
Power Adaptor
Magnet Sticker
For Platform
(See Section 10)
Pro 55
Adaptor
(See Section 11)
Onboarding
Card
In the Box
Place your Pro Wash/Dry in a well-ventilated
area on a flat, level surface. Keep it away from
extreme temperatures, windows, bright light
sources, and direct sunlight.
Never set anything on top of Pro Wash/Dry.
Pro Wash/Dry comes out of the
box with most parts pre-installed.
The hydrometers are pre-calibrated
for each chamber to float when it’s
time to refresh solvent.
Where to Set Up
Hello!
1
2

MAX
Plug in Your Pro Wash/Dry
The Basics
Use the provided power cable and power adaptor
to plug your Pro Wash/Dry into a surge protector
or uninterrupted power supply.
If you need to perform a hard reset or disconnect
your Pro Wash/Dry from its power source, simply
unplug and then plug in the power cable.
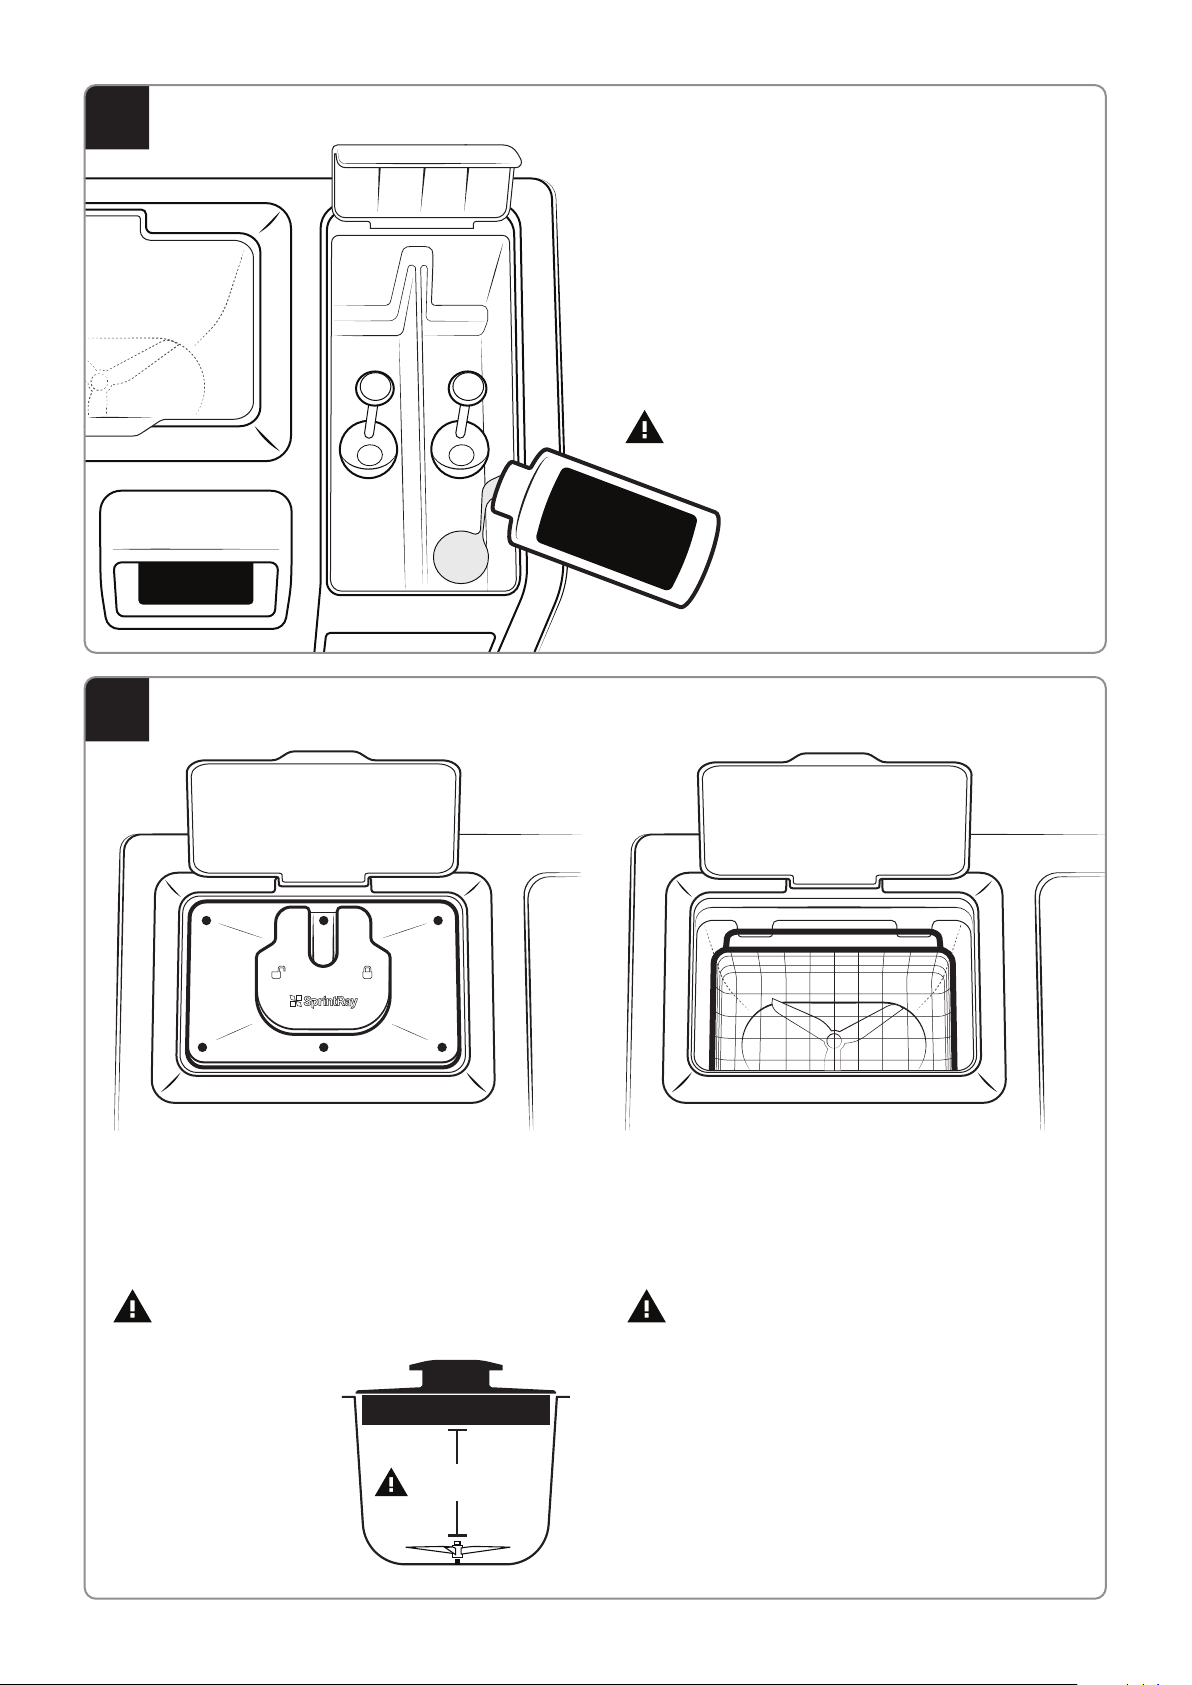
Wash Chamber
This chamber is where the washing and drying is performed.
There are two wash methods: direct platform and basket wash.
Solvent will automatically pump in and out of these reservoirs.
Never pour solvent directly into this chamber. It
should only ever be poured into the reservoirs.
Failure to replace IPA when hydrometer
floats will void warranty.
Reservoir
The reservoir consists of two chambers, each capable
of holding 2 liters. Pour solvent directly into the
reservoir chambers.
Chamber 1 performs the bulk wash.
The solvent in this chamber will need to be refreshed
more frequently.
Chamber 2 performs the fine wash.
The solvent in this chamber can be recycled into
Chamber 1 if desired.
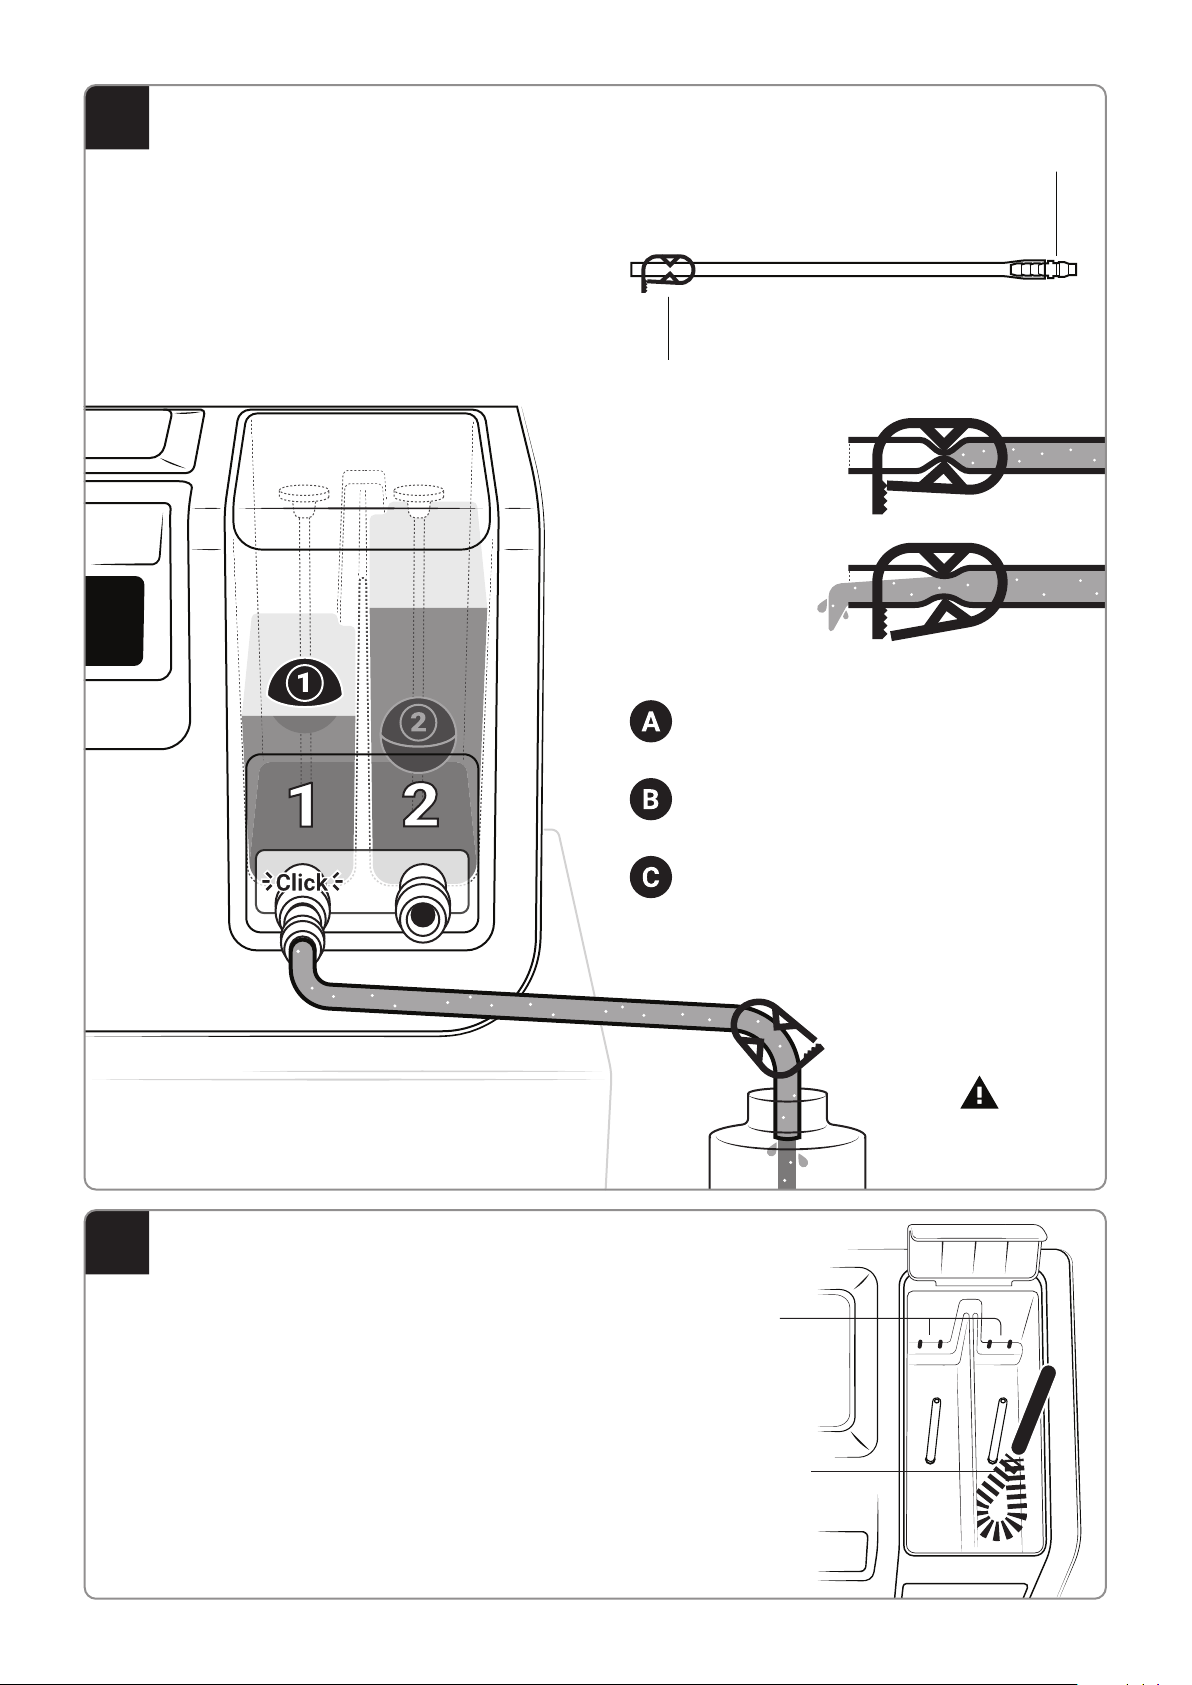
Quick Connect Ports
Each chamber has a quick connect port. When a hydrometer
floats to the top of the solvent, use the provided drain hose
(attached to the back of the machine) to drain the chamber as
shown in section 7.
Hydrometers
Hydrometers measure the resin saturation levels in each
chamber. When solvent becomes fully saturated, it will no longer
effectively clean 3D printed parts. Each hydrometer is specially
calibrated to float when the solvent has become saturated; when
this happens, it’s time to drain and refresh with clean solvent.
Submerged Hydrometer = Solvent Okay
When a hydrometer is submerged, it is acceptable for
use and will properly clean your printed parts.
Floating Hydrometer = Refresh Solvent
When a hydrometer floats, the solvent has become
saturated with resin and will no longer effectively clean
parts. Drain and replace with fresh solvent to continue.
USB Port
For Updates
Power Port
Drain Hose
Touchscreen
3
4
MAX
MIN 500 mL
12
MAX 4”
Minimum Required
Per Chamber
500 mL2 Liters
Recommended
Per Chamber
Isopropyl
Alcohol 91%
Recommended
How to Add Solvent to Pro Wash/Dry
How to Use Pro Wash/Dry
Wash with Print Platform
Pro Wash/Dry is designed with SprintRay Pro in mind.
Remove the basket and place the Pro95 print platform or
Pro55 print platform with adaptor (see Section 11) to wash
both parts and platform simultaneously.
Wash with Basket
To use the basket, place models inside, close the lid, and
select your preferred wash cycle from the touchscreen.
The system will not start washing until the lid is closed.
Recommended for:
- Models Taller than 4”
- Hollow/Shell Models
Recommended for:
- Models shorter than 4”
- Solid Models
- Models for Aligners
- Surgical Guides
- Night Guards
- Dentures
- Crowns
Do not stack models on top of each other or
crowd them together, as this can greatly
reduce wash efficiency.
When washing with the print platform,
remove the basket from the wash chamber.
Open the reservoir lid and add at least 500mL of the solvent
of your choice to each chamber. IPA 91% is recommended.
IPA 99% and ethanol can be used, but the chamber level
sensors may not be fully functional until after a few wash
cycles have been run.
If you haven’t added a sufficient volume of solvent, the
onboard computer will detect this and notify you.
Always ensure that the lid of the reservoir is closed in order
to preserve the life of your solvent to prevent evaporation.
Hydrometers may float when solvent is
refreshed, but will sink after a few minutes.
5
6
MAX
Unlocked
MAX
Unlocked
Solvent will flow
through the hose.
Locked
Solvent will not flow
through the hose.
How to Drain Solvent from Pro Wash/Dry
Pro Wash/Dry comes out of the box with the drain hose clipped to
the back. Gently pull to remove.
Locate the metal tip. This is the quick-connect inlet that mates to
the quick-connect ports on the front of each chamber. The outlet
has a plastic lock at the end.
To drain a chamber, press the inlet tip into the quick connect port
until it firmly clicks into place. When connected, solvent will begin
to run through the hose. To disconnect the drain hose, press the
outer ring of the quick connect port toward Pro Wash/Dry.
We recommend cleaning the wash chambers periodically, depending
on your usage.
To clean the chambers, remove the rubber caps from the tops of the
hydrometer rods, then remove the hydrometers. Use the provided
brush, a paper towel, and a solvent to remove all resin buildup and
residue from the walls and floor.
Make sure to clean the level sensor leads as well. If these sensors
become covered with resin, Pro Wash/Dry won't be able to detect
solvent levels.
The hydrometers are pre-calibrated for their reservoirs.
Return hydrometer 1 to chamber 1 and hydrometer 2 to chamber 2.
To drain a chamber, ensure the outlet clamp is in
the ‘locked’ position. Press the metal tip into the
quick connect port until it clicks into place.
Point the outlet of the hose into a disposable
container, then unlock the outlet clamp to open
the flow.
After draining, clean any residue left inside the
chamber using the provided brush and a paper
towel. Once clean, add fresh solvent. Repeat for
chamber 2 if necessary.
Liquid Stopper
The drain hose has a lock to prevent accidental drainage.
Quick Connect Metal Tip
The metal tip of the inlet port is designed to connect to
the quick connect ports on the front of Pro Wash/Dry.
Dispose of used wash
solvent responsibly.
Clean Sensors
Clean all resin and
residue buildup from
the level sensors.
Clean All Surfaces
Thoroughly scrub and
clean the walls and
floor of the chambers.
How to Clean the Wash Chamber and Reservoirs
7
8

How to Install Magnet on Print Platforms
How to Update Pro Wash/Dry
Pro Wash/Dry uses magnets to detect when a print platform is
present so that it can run the optimal cleaning program. To enable
this functionality, a magnet must be installed along the side of your
print platform.
To install, thoroughly clean and dry the right side of your print
platform, then adhere the magnet as indicated in the diagram below.
How to Clean the Wash Chamber Filter
Pro Wash/Dry has a mesh filter that prevents resin debris
from reaching the sensitive plumbing. This filter should be
regularly cleaned. If it cannot be sufficiently cleaned, the
filter should be replaced.
Remove
Clean the area around the filter
to ensure no debris falls into the
plumbing when it is removed.
Turn counter-clockwise by hand
to release the filter.
Clean
Flush the filter with solvent
to remove resin debris.
Use provided tweezers to
remove any additional
debris from the mesh.
Install
Replace the filter and turn
clockwise to hand tighten.
SprintRay will periodically update Pro Wash/Dry to improve
system functionality and add new wash profiles.
Visit sprintray.com/software to check for updates and to
view update instructions,
1/4 inch
1/2 inch
Center
Magnet
Pro 95
Print Platform
Place magnet on the right side.
Pro 55
Print Platform
Place magnet on the right side.
Locate Filter
Find the filter near the
wash propeller.
USB Port
For Updates
How to Use Pro55 Adaptor
If using a Pro55 with Pro Wash/Dry, place the
included adaptor atop the wash chamber so that
the opening is on the right. Place the Pro55 print
platform and start the wash process as normal. Label
Center
Magnet
Right Side
Right Side
10
9
12
11
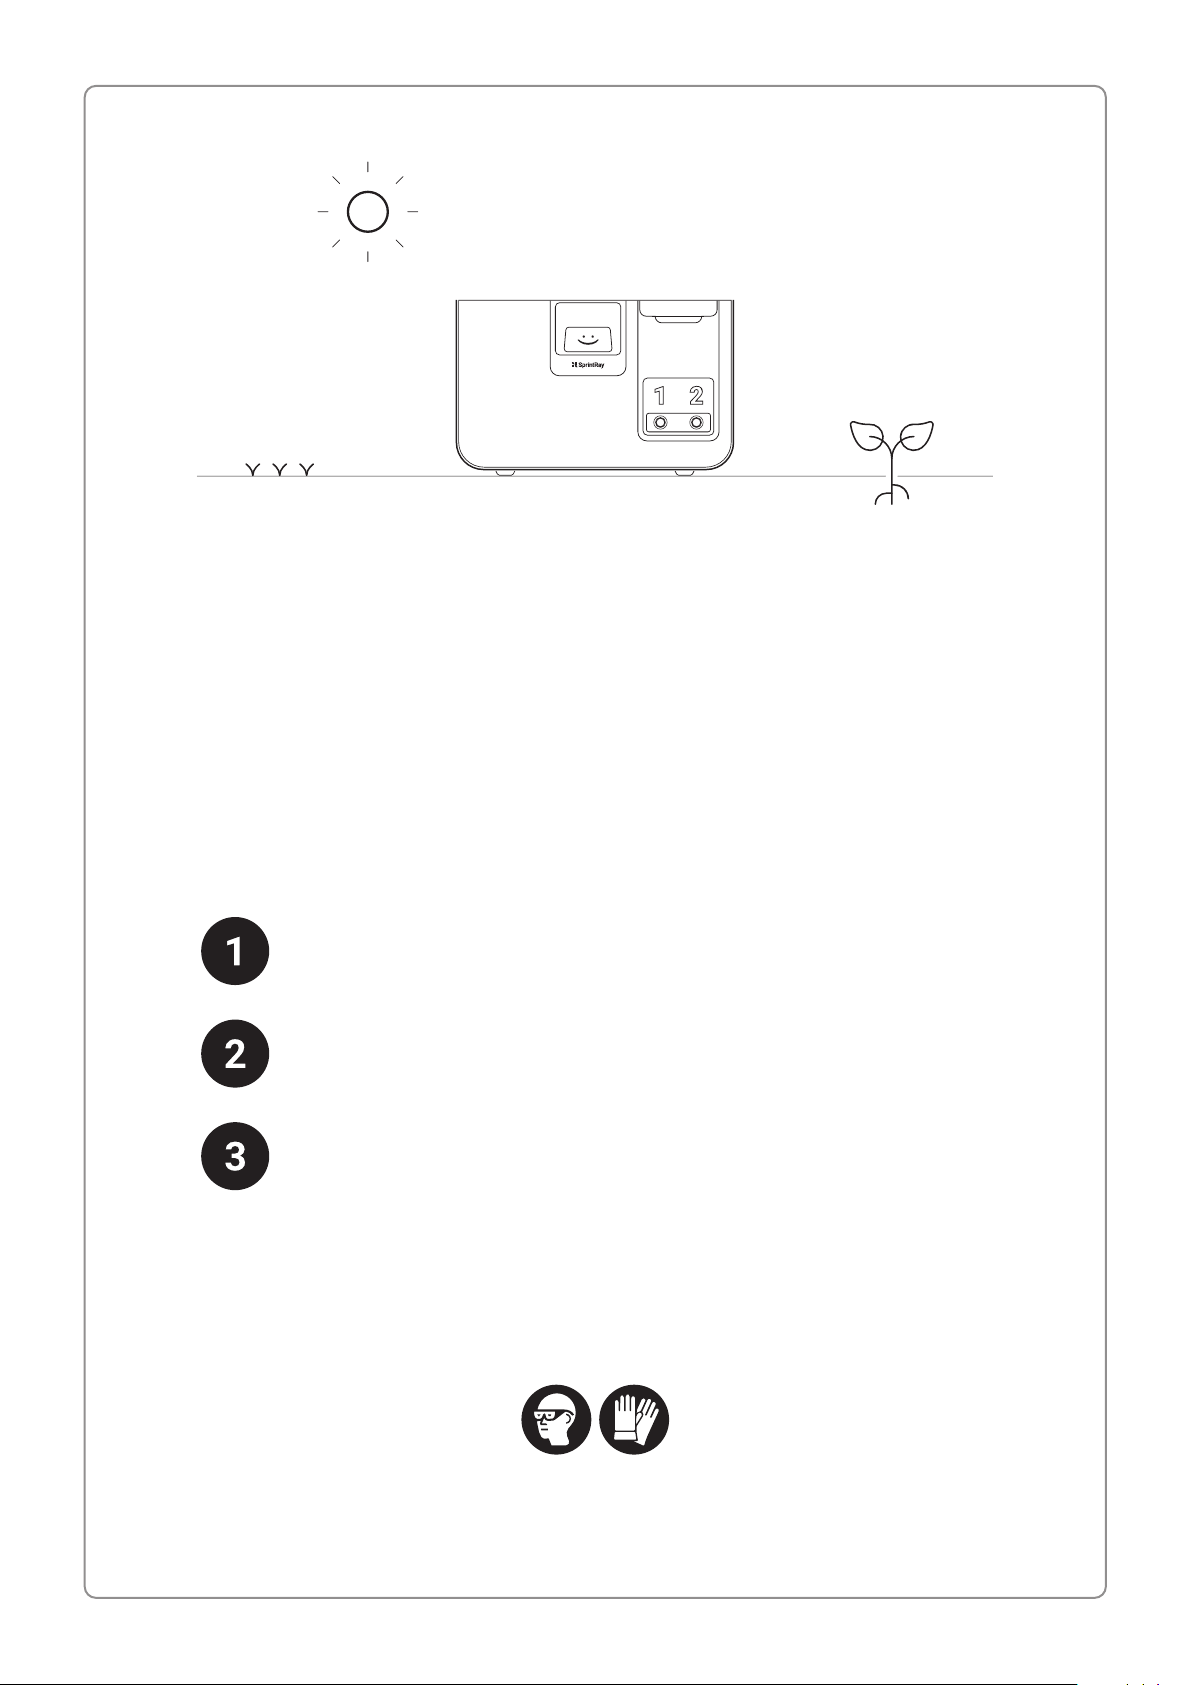
Cleaner parts, less waste.
SprintRay Pro Wash/Dry uses patented technology to improve the
efficiency of the washing and drying processes. It’s better for your
pocketbook and better for the environment. Nice choice.
Here are three easy tips to help you go the extra environmental
mile with your used isopropyl alcohol (IPA):
For additional information, visit support.sprintray.com
Never flush IPA down the drain
Keep all IPA packaging for storing used IPA
Set up IPA recycling with a materials disposal company
Always wear gloves and proper eye protection.


