Stage right 600059 User manual

200-Channel UHF Dual Wireless Microphone
P/Ns 600059, 600060, 600061
User's Manual

2
SAFETY WARNINGS AND GUIDELINES
Please read this entire manual before using this device, paying extra
attention to these safety warnings and guidelines. Please keep this
manual in a safe place for future reference.
•This device is intended for indoor use only.
•Do not expose this device to water or moisture of any kind. Do
not place drinks or other containers with moisture on or near the
device. If moisture does get in or on the device, immediately
remove it from its power source and allow it to fully dry before
reapplying power.
•Do not touch the device, the power cord, or any other connected
cables with wet hands.
•Do not install this device on an unstable surface where it could fall
and cause either personal injury or damage to the device and/or
other equipment.
•Do not expose this device to excessive vibration or extreme force,
shock, or fluctuations in temperature or humidity.
•Do not expose this device to excessively high temperatures. Do
not place it in, on, or near a heat source, such as a fireplace, stove,
radiator, etc. Do not leave it in direct sunlight.
•This device ventilates excessive heat through the slots and
openings in the case. Do not block or cover these openings.
Ensure that the device is in an open area where it can get
sufficient airflow to keep from overheating.

3
•Do not place or install this device in an area where it can be
exposed to excessive amounts of dust, humidity, oil, smoke, or
combustible vapors.
•Use only in a well-ventilated area. Do not use in close, confined
spaces.
•Prior to operation, check the unit and power cord for physical
damage. Do not use if physical damage has occurred.
•Unplug this device from the power source when not in use.
•Take care to prevent damage to the power cord. Do not allow it
to become crimped, pinched, walked on, or become tangled with
other cords. Ensure that the power cord does not present a
tripping hazard.
•Never unplug the unit by pulling on the power cord. Always grasp
the connector head or adapter body.
•Ensure that power is turned off and disconnected before making
any electrical connections.
•Remove the batteries from the microphones/bodypacks if they
will go unused for a lengthy period of time.
•Do not mix new and old batteries or batteries of different types.
•Clean using a soft, dry cloth only. Do not use chemical cleaners,
solvents, or detergents. For stubborn deposits, moisten the cloth
with warm water.
•This device has no user serviceable parts. Do not attempt to open,
service, or modify this device.

4
CUSTOMER SERVICE
The Monoprice Customer Service department is dedicated to ensuring
that your ordering, purchasing, and delivery experience is second to none.
If you have any problem with your order, please give us an opportunity to
make it right. You can contact a Monoprice Customer Service
representative through the Live Chat link on our website
www.monoprice.com or via email at s[email protected]. Check the
website for support times and links.
PACKAGE CONTENTS
Please take an inventory of the package contents to ensure you have all
the items listed below. If anything is missing or damaged, please contact
Monoprice Customer Service for a replacement.
1x Receiver
2x Receiver Antennas
2x Handheld Microphones (600059 only)
2x Bodypack Transmitters (600060 and 600061 only)
2x Headset Microphones (600060 only)
2x Lavalier Microphones (600061 only)
1x AC Power Adapter
1x User's Manual
5
PRODUCT OVERVIEW
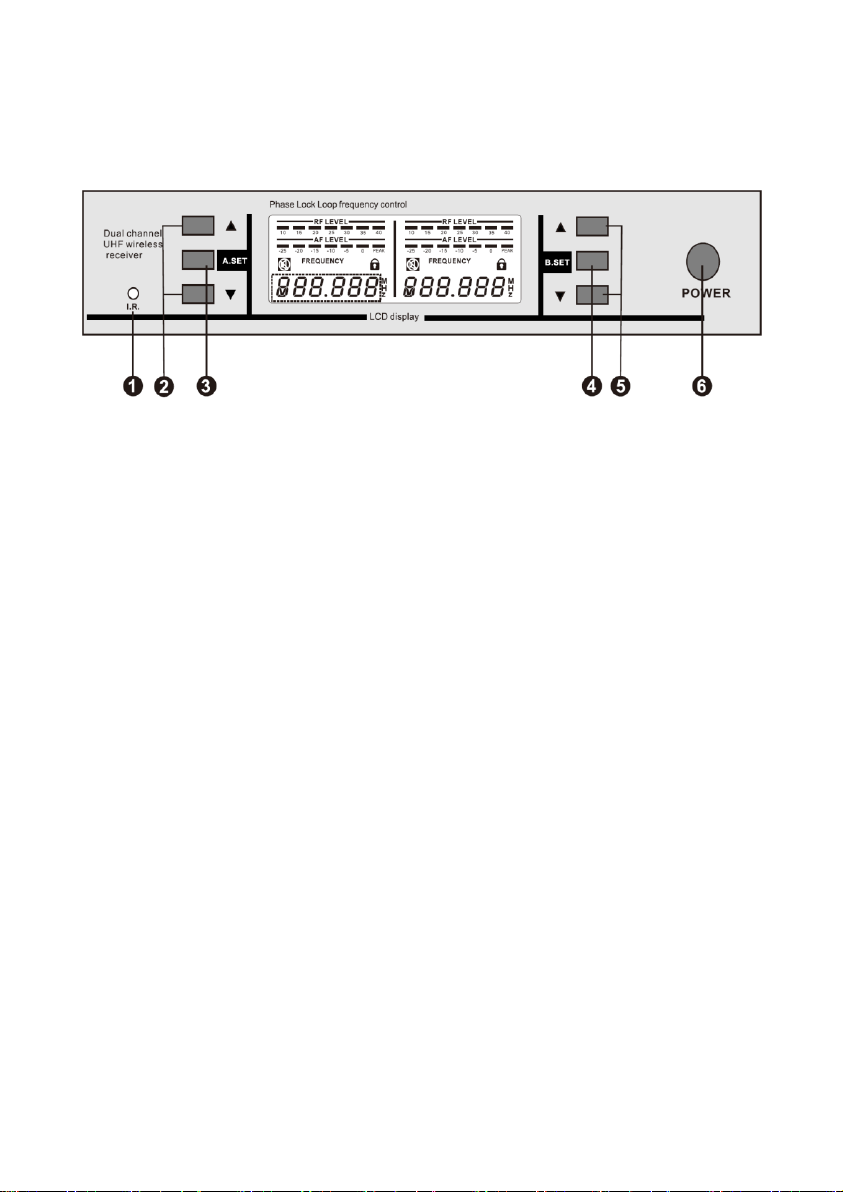
Receiver Front Panel
1. I.R.: IR receiver.
2. A▲/▼: Up and Down buttons for Channel A. Momentarily press
either button to increase or decrease the volume level. Press the
SET Abutton and the A▲button at the same time to lock or
unlock the front panel controls for Channel A.
3. A SET: SET button for Channel A. Press the button one time to
initiate IR synchronization. Press the button two times to scan for
available frequencies. Press the button three time to manually set
the frequency. Press the SET A button and the A▲button at the
same time to lock or unlock the front panel controls for Channel A.
4. B SET: SET button for Channel B. Press the button one time to
initiate IR synchronization. Press the button two times to scan for
available frequencies. Press the button three time to manually set
the frequency. Press the SET B button and the B▲button at the
same time to lock or unlock the front panel controls for Channel B.
5. B▲/▼: Up and Down buttons for Channel B. Momentarily press
either button to increase or decrease the volume level. Press the

6
SET B button and the B▲button at the same time to lock or
unlock the front panel controls for Channel B.
6. POWER: Momentarily press the POWER button to turn the
Receiver on. Press and hold the POWER button for 2 seconds to
turn the Receiver off.
Receiver Rear Panel
7. ANT B/ANT A: Antenna BNC connector for Channel B and Channel
A.
8. BALANCED B/BALANCED A: The XLR jacks output a balanced
signal for Channel B and Channel A.
9. MIX OUT: The 1/4" TRS jack outputs an unbalanced signal with a
mix of Channel A and Channel B.
10. DC INPUT: DC barrel connector for connecting the included AC
power adapter.

7
Receiver Display
1. RF LEVEL: The meter displays the strength of the RF signal from
the Handheld Microphone (600059 only) or the Bodypack
Transmitter (600060 and 600061 only).
2. AF LEVEL: The meter displays the audio signal level in decibels
(dB). The loudest signals should hit the 0element. If the PEAK
element illuminates, the signal is being distorted and the volume
level should be reduced using the ▲/▼buttons on the Receiver.
3. MUTE: The output of the Handheld Microphone (600059 only) or
the Bodypack Transmitter (600060 and 600061 only) is muted
when the icon is displayed.
4. FREQUENCY: Displays the frequency being used to communicate
with the Handheld Microphone (600059 only) or the Bodypack
Transmitter (600060 and 600061 only).
5. LOCK: All settings are locked when the icon is displayed.

8
Handheld Microphone (600059 only)
1. Microphone Head
2. Microphone Body
3. IR: IR interface.
4. Display
5. Power/Mute Button: Momentarily press the button to turn the
Handheld Microphone on or off. Press and hold the button for
several seconds to turn MUTE on or off.
6. Battery Cover: Unscrew the cover and remove it to access the
battery compartment.
7. Battery Compartment Cover: Open the cover to access the
Battery Compartment.

9
Handheld Microphone Display (600059 only)
1. Frequency: Displays the frequency being
used to connect to the Receiver.
2. Battery: Displays the battery charge level.
Bodypack Transmitter (600060 and 600061 only)
1. MIC/LINE: 3.5mm jack for connecting
the microphone.
2. MUTE: Slide the switch to turn audio
mute on or off.
3. Antenna
4. Display
5. Power LED: Illuminates green when
the Bodypack Transmitter is powered
on.
6. Battery Level LED: Illuminates red
when the battery level is low.
7. Power Button: Press the button to
turn the Bodypack Transmitter on or off.
8. I.R.: IR interface.
9. ▲/▼: Up and Down rocker button.
10. SET Button
11. Battery Compartment
10
12. Battery Compartment Cover
13. Battery Compartment Cover Release Buttons: Press the buttons
on each side of the Battery Compartment Cover to open it.
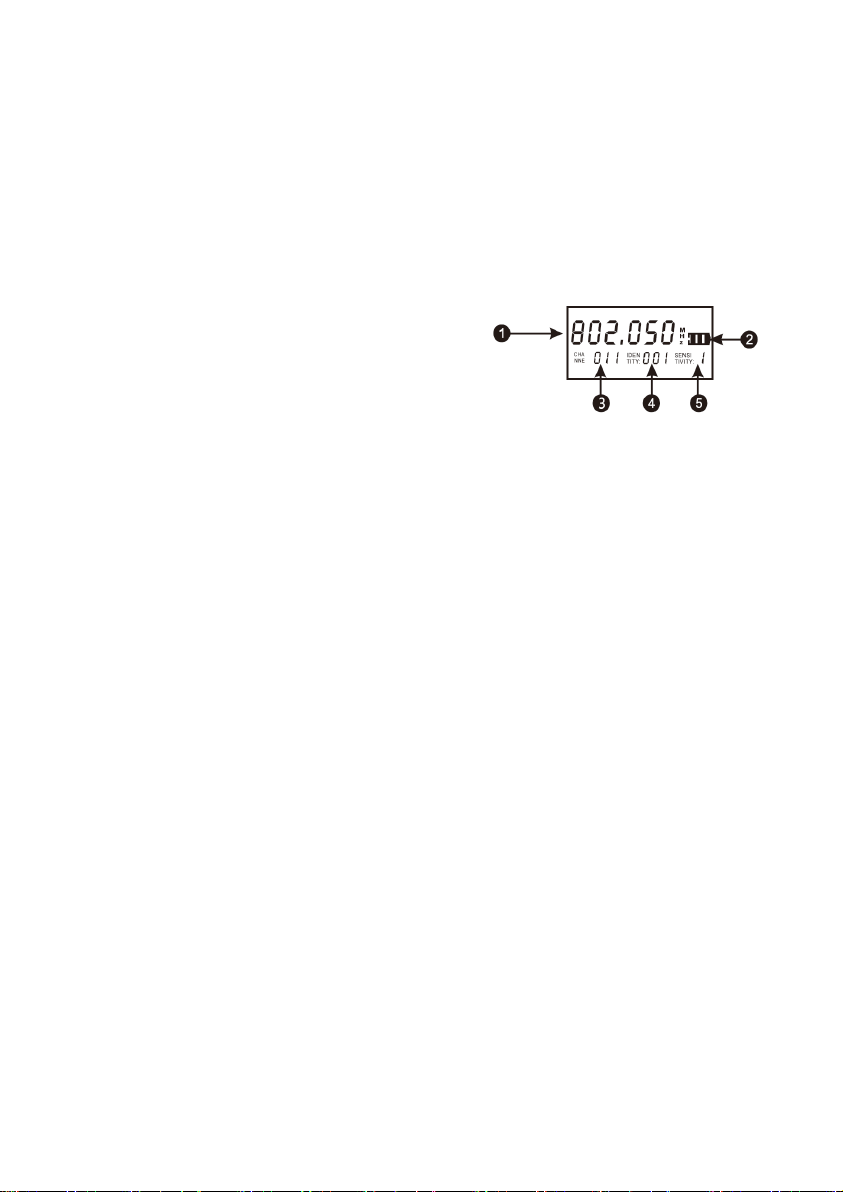
Bodypack Transmitter Display (600060 and 600061 only)
1. Frequency: Displays the
frequency used to connect to the
Receiver.
2. Battery: Displays the battery
charge level.
3. Channel: Displays the Channel used to connect to the receiver.
4. Identity: Displays the ID used to identify the Bodypack
Transmitter.
5. Sensitivity: The Sensitivity is set at the factory and cannot be
changed.
SETUP AND OPERATION
Receiver
1. Place receiver in a location close to where the performance will
take place. Ensure that it is at least 5 feet (1.5 meters) from any
large metal objects or wall/ceiling structure to ensure a strong RF
signal.
2. Connect the two antennas to the ANT A and ANT B connectors on
the rear panel.

11
3. Plug one end of the included AC Power Adapter into the DC
INPUT jack on the rear panel, then plug the other end into a
nearby AC power outlet.
4. Momentarily press the POWER button to turn the Receiver on.
Handheld Microphones
Perform the following steps for each Handheld Microphone to prepare it
for use.
1. Turn the Battery Cover counterclockwise to unscrew it, then pull
it off the Microphone Body.
2. Press the latch on the Battery Compartment Cover to open it to
reveal the Battery Compartment.
3. Install two AA batteries (available separately) into the Battery
Compartment. Take care to match the polarity on the batteries
with the polarity markings in the Battery Compartment.
4. Close the Battery Compartment Cover.
5. Slide the Battery Cover onto the Microphone Body, then turn it
clockwise to screw it into place.
6. Momentarily press the POWER/MUTE Button to turn the Handheld
Microphone on.

12
Bodypack Transmitters
Perform the following steps for each Bodypack Transmitter to prepare it
for use.
1. Press the two Battery Compartment Cover Release Buttons on
each side of the Battery Compartment Cover to open it.
2. Install two AA batteries (available separately) into the Battery
Compartment. Take care to match the polarity on the batteries
with the polarity markings in the Battery Compartment.
3. Plug the included Headset Microphone (600060 only) or Lavalier
Microphone (600061 only) into the MIC/LINE jack on the Bodypack
Transmitter.
4. While the Battery Compartment Cover is open, momentarily press
the Power Button to turn the Bodypack Transmitter on. Note that
the Power Button, I.R. interface, and SET Button are under the
Battery Compartment Cover when it is closed.
Manually Setting the Receiver Frequency
You can manually set the frequency used to communicate with the
Handheld Microphone or Bodypack Transmitter, or you can automatically
scan for an available frequency. The latter is useful when using multiple
Receivers. Perform the following steps to manually set the frequency.
1. If the Receiver is not already powered on, momentarily press the
POWER button to turn it on.
2. Press the SET button three times. The FREQUENCY display will
start flashing.

13
3. Use the ▲/▼buttons to change the displayed FREQUENCY.
4. When the desired FREQUENCY is displayed, press the SET button
to save the displayed FREQUENCY. The FREQUENCY display will
stop flashing.
Automatically Setting the Receiver Frequency
You can manually set the frequency used to communicate with the
Handheld Microphone or Bodypack Transmitter, or you can automatically
scan for an available frequency. The latter is useful when using multiple
Receivers. Perform the following steps to automatically set the frequency.
1. If the Receiver is not already powered on, momentarily press the
POWER button to turn it on.
2. Press the SET button two times. The FREQUENCY display will
change to show SC.An.
3. Press the ▲button start scanning for an available frequency.
4. When an available frequency is found, the display will change to
show the FREQUENCY flashing. Either press the SET button to save
the displayed FREQUENCY or press the ▲button again to
continue scanning. When the FREQUENCY is saved, the
FREQUENCY display will stop flashing.

14
Manually Setting the Bodypack Transmitter Frequency
As with the Receiver, you can either manually set the frequency used to
communicate with the Receiver or configure it automatically by
synchronizing the Receiver with the Transmitter. Perform the following
steps to manually set the frequency.
1. If you have not already set the frequency on the Receiver, perform
the steps in the
Manually Setting the Receiver Frequency
or
Automatically Setting the Receiver Frequency
section above
before setting the frequency on the Bodypack Transmitter.
2. Press the two Battery Compartment Cover Release Buttons on
each side of the Battery Compartment Cover to open it.
3. If the Bodypack Transmitter is not already powered on,
momentarily press the Power Button to turn it on.
4. Press the SET button on the Bodypack Transmitter one time. The
displayed Frequency will start flashing.
5. Use the ▲/▼Button to change the displayed Frequency. Ensure
that you set it to the same frequency displayed on the Receiver.
6. Press the SET Button to save the displayed Frequency setting.
7. Press the SET Button on the Bodypack Transmitter two times. The
Identity on the Display will start flashing.
8. Use the ▲/▼Button to change the displayed Identity.
9. Press the SET Button to save the displayed Identity setting.

15
Synchronizing the Handheld Microphone with the Receiver
Rather than manually setting the frequency used to communicate with
the Receiver, you can synchronize the Handheld Microphone with the
Receiver's frequency using the I.R. interface.
1. If you have not already set the frequency on the Receiver, perform
the steps in the
Manually Setting the Receiver Frequency
or
Automatically Setting the Receiver Frequency
section above
before synchronizing the frequency.
2. If it is not already powered on, momentarily press the
Power/Mute Button on the Handheld Microphone to turn it on.
3. Press the SET button on the Receiver. The FREQUENCY display will
show IR.--.
4. Position the I.R. interface on the Handheld Microphone in front of
the I.R. interface on the Receiver to begin synchronization.
5. When synchronization is complete, the FREQUENCY display on the
Receiver will change to display the FREQUENCY in use.
Synchronizing the Bodypack Transmitter with the Receiver
Rather than manually setting the frequency used to communicate with
the Receiver, you can synchronize the Bodypack Transmitter with the
Receiver's frequency using the I.R. interface.
1. If you have not already set the frequency on the Receiver, perform
the steps in the
Manually Setting the Receiver Frequency
or
Automatically Setting the Receiver Frequency
section above
before synchronizing the frequency.

16
2. Press the two Battery Compartment Cover Release Buttons on
each side of the Battery Compartment Cover to open it.
3. Press the SET button on the Receiver. The FREQUENCY display will
show IR.--.
4. Position the I.R. interface on the Bodypack Transmitter in front of
the I.R. interface on the Receiver to begin synchronization.
5. When synchronization is complete, the FREQUENCY display on the
Receiver will change to display the FREQUENCY in use.
Control Lock
•Press the SET A Button and the A▲button on the Receiver at the
same time to lock or unlock the front panel controls for Channel A.
The LOCK icon will show on the A Display when the controls for
Channel A are locked
•Press the SET B button and the B▲button on the Receiver at the
same time to lock or unlock the front panel controls for Channel B.
The LOCK icon will show on the B Display when the controls for
Channel B are locked.

17
TECHNICAL SUPPORT
Monoprice is pleased to provide free, live, online technical support to
assist you with any questions you may have about installation, setup,
troubleshooting, or product recommendations. If you ever need
assistance with your new product, please come online to talk to one of
our friendly and knowledgeable Tech Support Associates. Technical
support is available through the online chat button on our website
www.monoprice.com or through email by sending a message to
[email protected]. Check the website for support times and links.
To download the latest drivers, firmware, manuals, etc., go to
www.monoprice.com and type the P/N into the search bar. If available,
support files are linked at the bottom of the product page.
SPECIFICATIONS
Receiver
Frequency Range
590 ~ 890 MHz
Channel Number
100 frequencies
Bandwidth
30MHz
Oscillation Mode
PLL frequency synthesis
Frequency Stability
±10ppm
RF Sensitivity
-95 ~ -60 dBm
Audio Frequency Response
60Hz ~ 15kHz
Total Harmonic Distortion
≤ 0.5%

18
Signal-to-Noise Ratio
≥ 150dBA
Audio Outputs
2x XLR (balanced),
1x TRS (unbalanced)
Receiving Distance
about 262 feet (80 meters)
Input Power
12 ~ 24 VDC, 1A
AC Adapter Input Power
100 ~ 240 VAC, 50/60 Hz
Maximum Power Consumption
≤ 8 watts
Handheld Microphone/Bodypack Transmitter
Frequency Range
590 ~ 890 MHz
Receiving Frequencies
200 frequencies
Frequency Stability
±100ppm
Modulation
Wideband FM
Radio Frequency Power
≤ 10 milliwatts
Audio Frequency Response
60Hz ~ 15kHz
Total Harmonic Distortion
≤ 0.5%
Input Power
2x AA batteries (available separately)

19
REGULATORY COMPLIANCE
Notice for FCC
This device complies with Part 15 of the FCC rules. Operation is subject to
the following two conditions: (1) this device may not cause harmful
interference, and (2) this device must accept any interference received,
including interference that may cause undesired operation.
Modifying the equipment without Monoprice's authorization may result
in the equipment no longer complying with FCC requirements for Class B
digital devices. In that event, your right to use the equipment may be
limited by FCC regulations, and you may be required to correct any
interference to radio or television communications at your own expense.
This equipment has been tested and found to comply with the limits for a
Class B digital device, pursuant to Part 15 of the FCC Rules. These limits are
designed to provide reasonable protection against harmful interference in
a residential installation. This equipment generates, uses and can radiate
radio frequency energy and, if not installed and used in accordance with
the instructions, may cause harmful interference to radio communications.
However, there is no guarantee that interference will not occur in a
particular installation. If this equipment does cause harmful interference
to radio or television reception, which can be determined by turning the
equipment off and on, the user is encouraged to try to correct the
interference by one or more of the following measures:
•Reorient or relocate the receiving antenna.
•Increase the separation between the equipment and receiver.

20
•Connect the equipment into an outlet on a circuit different from
that to which the receiver is connected.
•Consult the dealer or an experienced radio/TV technician for help.
Radio Notice for FCC
Caution
This FCC Part 15 radio device operates on a non-interference basis with
other devices operating at this frequency. Any changes or modification to
said product not expressly approved by Monoprice, including the use of
non-approved antennas, could void the user's authority to operate this
device.
This device complies with Part 15 of the FCC Rules. Operation is subject to
the following two conditions: (1) this device may not cause harmful
interference, and (2) this device must accept any interference received,
including interference that may cause undesired operation.
Monoprice™, Stage Right™, the Stage Right logo, and all Monoprice logos
are trademarks of Monoprice Inc.
This manual suits for next models
2
Table of contents
Other Stage right Microphone manuals

Popular Microphone manuals by other brands

Starkey Hearing Technologies
Starkey Hearing Technologies Mini Remote Microphone Operation manual

Beyerdynamic
Beyerdynamic MC 910 Product information

Bosch
Bosch VHM 300 operating instructions

Audio Technica
Audio Technica AT4033 Specifications

Panasonic
Panasonic WM-530E Specification sheet

chinavasion
chinavasion CVSB-G524 instruction manual


