Stagg CLASSICPAR 36 User manual

!
User Manual
CLASSICPAR 36
SLI-CLPA36

!

!
Unpacking: Thank you for purchasing this product, it has been thoroughly
tested and has been shipped in perfect operating condition. Carefully check the
packaging for damage that may have occurred during shipping. If the packaging
appears to be damaged, carefully inspect your fixture for any damage and be
sure all equipment necessary to operate the unit has arrived intact. If damage
has been found or parts are missing, please contact your vendor or our
customer support number for further instructions.
Power Supply: This product can be used on power outlets providing
100V-240V 50-60HZ, please confirm your power source is compatible before
connecting the product to it. The product should never be used on a power
source with a dimmer.
Warning! To prevent or reduce the risk of electrical shock or fire, do not expose
this unit to rain or moisture.
Warning! This product may cause severe eye damage. Avoid looking directly
into the light source at all times!
Safety Instructions
•Always make sure the product is connect to an earthed power source and has
been installed correctly before using.
•Always check the cabling for wear or damage. If damage is found, replace
them before connecting them to the product.
•Never look directly into the light source at all times, this can cause severe eye
damage.
•The distance between the product and any surface should be at least 0.5m
•Never open, repair or modify this product. All repairs or modification should be
done by a skilled technician, always contact your vendor should repairs be
necessary.
•Maximum ambient operating temperature : 40°C
•Never expose this product to rain or moisture

!
Specifications:
•Voltage: AC100V~240V, 50~60HZ
•Power Consumption: 44W
•LED Quantity: 3x 8W 4 in 1 RGBW
•Beam Angle: 25°
•IP Grade: IP20
•DMX channels: 7
•Packaging Size: 185*185*270 mm
•Net weight: 3,16Kg
•Gross weight: 4,53Kg
Features
• 3PIN plug DMX in and out
•Black/White Aluminium housing
• 10-dial dipswitch for address and function selection
•7 DMX channels
• RGBWColour Mixing with or without DMX512
• 5 Operating Modes: Auto Program, Color Macros, DMX512, Auto Sound,
Slave
!
Installation
1. Theproduct can be hung or placed on a solid surface with the double
mounting brackets
2. If you install the light in a hanging position, always use a suitable mounting
position and a clamp or screw that is strong enough to hold the product without
stress. Always use a safety wire to secure the light.
3. Always keep a distance of minimum 0.5m to all objects or persons
4. Installation should always be done by a trained professional.
5. Make sure the light always has good ventilation
Power Connection
Please make sure the rated voltage and frequency comply with your local
voltage.
Brown
Positive
3
Blue
Negative
2
Green/Yellow
Ground
1
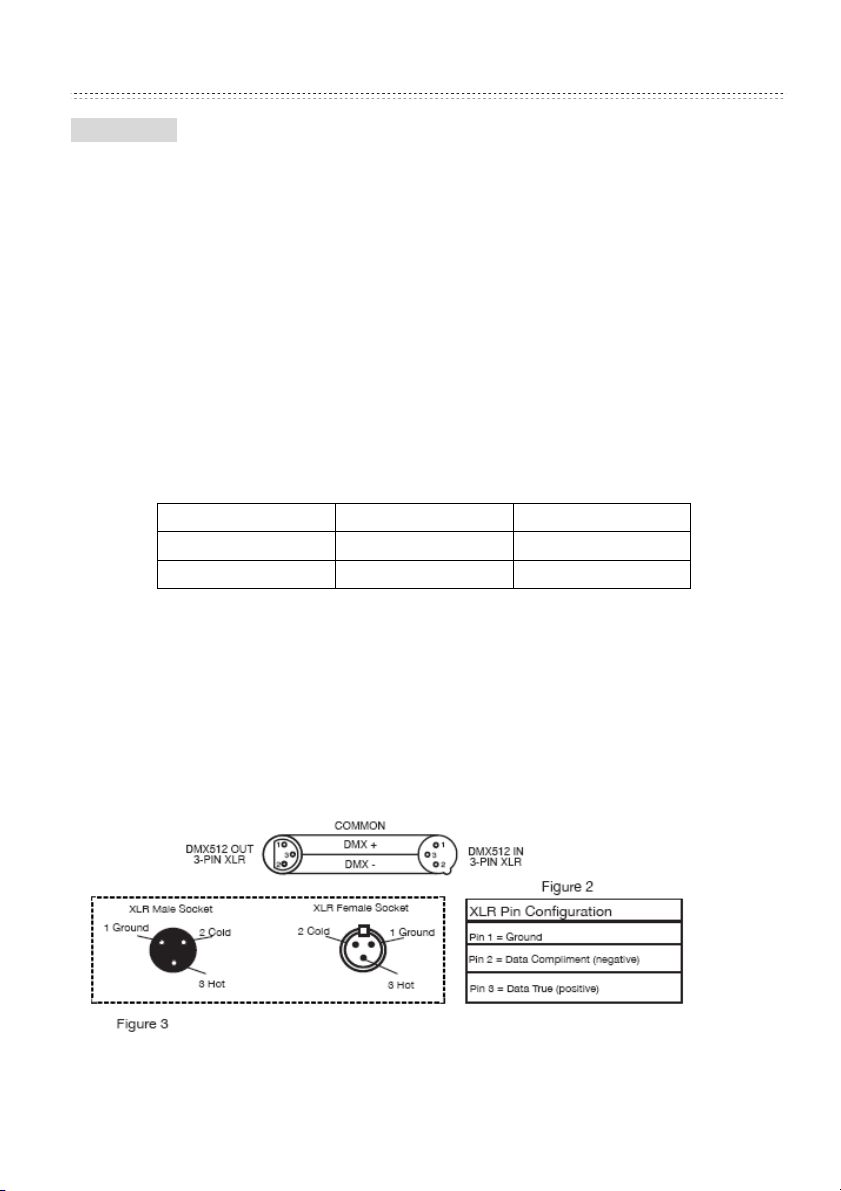
DMX 512 Connection
The DMX512 signal of the controller is connected to the Input and (1 Earth, 2
Negative, 3 Positive). The length of the signal cable should never exceed 100
meters in order to avoid the interference. Please refer to the details in following
pictures.

!
Operation
Dipswitch functions
1 Slave mode:
When put into slave position, this light will follow the settings of the "master"
light. This master light can be put into either AUTO, Sound Active or Fixed
Color modes. The master light is always the first light, from here use DMX cable
to connect the output to the input of the next light.
SWITCH
FUNCTION
STATUS
1
Red
OFF
2
Green
OFF
3
Blue
OFF
4
White
OFF
5
Dimmer1
OFF
6
Dimmer2
OFF
7
Sound
OFF
8
Auto
OFF
9
Slave
ON
10
Master
ON
2 AUTO mode:
When dipswitch 8 and 10 are on, the light will run auto programs as master.
The speed of the auto mode can be controlled with dipswitches 1 and 2.

!
SWITCH
FUNCTION
STATUS
1
Red
Speed1
2
Green
Speed2
3
Blue
OFF
4
White
OFF
5
Dimmer1
OFF
6
Dimmer2
OFF
7
Sound
OFF
8
Auto
ON
9
Slave
OFF
10
Master
ON
3 Sound control mode:
When dipswitch 7 and 10 are on, the light is in Sound Control mode as master.
SWITCH
FUNCTION
STATUS
1
Red
OFF
2
Green
OFF
3
Blue
OFF
4
White
OFF
5
Dimmer1
OFF
6
Dimmer2
OFF
7
Sound
ON
8
Auto
OFF
9
Slave
OFF
10
Master
ON

!
4:Static Colour
A:Red
When dipswitch 1 and 10 are on, the light is in Static Color mode as master with
Red as selected color. The light can be dimmed with dipswitches 5 and 6.
SWITCH
FUNCTION
STATUS
1
Red
ON
2
Green
OFF
3
Blue
OFF
4
White
OFF
5
Dimmer1
ON
6
Dimmer2
ON
7
Sound
OFF
8
Auto
OFF
9
Slave
OFF
10
Master
ON
B:Green
When dipswitch 2 and 10 are on, the light is in Static Color mode as master with
Green as selected color. The light can be dimmed with dipswitches 5 and 6.

!
SWITCH
FUNCTION
STATUS
1
Red
OFF
2
Green
ON
3
Blue
OFF
4
White
OFF
5
Dimmer1
ON
6
Dimmer2
ON
7
Sound
OFF
8
Auto
OFF
9
Slave
OFF
10
Master
ON
C:Blue
When dipswitch 3 and 10 are on, the light is in Static Color mode as master
withBlue as selected color. The light can be dimmed with dipswitches 5 and 6.
SWITCH
FUNCTION
STATUS
1
Red
OFF
2
Green
OFF
3
Blue
ON
4
White
OFF
5
Dimmer1
ON
6
Dimmer2
ON
7
Sound
OFF
8
Auto
OFF
9
Slave
OFF
10
Master
ON

!
D:White
When dipswitch 4 and 10 are on, the light is in Static Color mode as master with
White as selected color. The light can be dimmed with dipswitches 5 and 6.
SWITCH
FUNCTION
STATUS
1
Red
OFF
2
Green
OFF
3
Blue
OFF
4
White
ON
5
Dimmer1
ON
6
Dimmer2
ON
7
Sound
OFF
8
Auto
OFF
9
Slave
OFF
10
Master
ON
5 DMX address set up
When dipswitch 10 is set to the off position, the light is in DMX mode.
The adress selection is done with dipswitches 1 to 9. DMX is a binary protocol
with an adress ranging from 1 to 512. To choose the desired adress, you need
to make the sum of the adress dipswitches you put in the "on" position.
FE: Switches 1, 4 and 6 are in on position: 1 + 8 + 32= Adress 41.
Switches 3, 7 and 9 are in on position: 4 + 64 + 256 = Adress 304.

!
SWITCH
FUNCTION
DMX ADDRESS
1
ADDR1
1
2
ADDR2
2
3
ADDR3
4
4
ADDR4
8
5
ADDR5
16
6
ADRR6
32
7
ADDR7
64
8
ADDR8
128
9
ADDR9
256
10
Master
OFF
DMX Channels & Value
Channel
Value
Function
ch1
0--255
dimmer(0%--100%)
ch2
0--255
red (0%--100%)
ch3
0--255
green (0%--100%)
ch4
0--255
blue (0%--100%)
Ch6
0--255
white (0%--100%)
Ch6
0--255
Strobe/auto speed(slow -- fast)
Ch7
0 --15
no function
16--37
Program 1
38--60
Program 2
61--83
Program 3
84--106
Program 4
107--129
Program 5
130--152
Program 6
153--175
Program 7
176--198
Program 8
199--221
Program 9
222--244
Sound Active 1
245--255
Sound Active 2

!
!
IMPORTANT SAFETY INSTRUCTIONS
READ AND KEEP THESE INSTRUCTIONS. HEED ALL WARNINGS.
• If, after you have followed the instructions outlined above, this device fails to function, please
contact your dealer. Under no circumstances should this device be opened. Leave all servicing to
qualified personnel.
•Electrical appliances must never be used in conditions of high humidity or heat. To prevent any risk
of fire or electric shock, never spill or splash liquids on this device. Should this happen, unplug the
power cable from the mains outlet and switch off the mixer immediately.
MARKING & CONFORMITY
1. The CE mark on this product means it conforms to the EMC Directive (2004/108/CE), CE marking
Directive (93/68/EEC) and Low Voltage Directive (2006/95/EC).
2. The «Crossed-out Wheeled Bin» is to draw your attention to the WEEE (Waste Electric &
Electronic Equipment) Directive (2002/96/EC). It means this apparatus must be collected separately
for recycling.
3. «RoHS compliant» means this device conforms to the Directive (2002/95EC) on the restriction of
the use of certain hazardous substances in electrical and electronic equipments, such as: Mercury,
Lead, Cadmium, Hexavalent Chromium, Polybrominated Buphenyl (PBB) and Polybrominated
Diphenyl Ethers (PBDE).
24-10-2012
!
!
Table of contents
Other Stagg Dj Equipment manuals


