Stahl EC-910-AFZ User manual

EN
English - Instruction manual
IT
Italiano - Manuale di istruzioni
FR
Français - Manuel d’instructions
DE
Deutsch - Bedienungsanleitung
RU
Русский - Руководство по эксплуатации
PT
Português - Manual de instruções
KO
- 지침 설명서
ENGLISH
EC-910-AFZ
Flameproof FULL HD camera in a compact design


EN
English - Instruction manual
ENGLISH
EC-910-AFZ
Flameproof FULL HD camera in a compact design


Instruction manual - English - EN
3MNTCMMX_2040_EN
Contents
ENGLISH 1
1 About this manual ....................................................................................................................5
1.1 Typographical conventions ................................................................................................................................................ 5
2 Notes on copyright and information on trademarks.............................................................5
3 Safety rules................................................................................................................................5
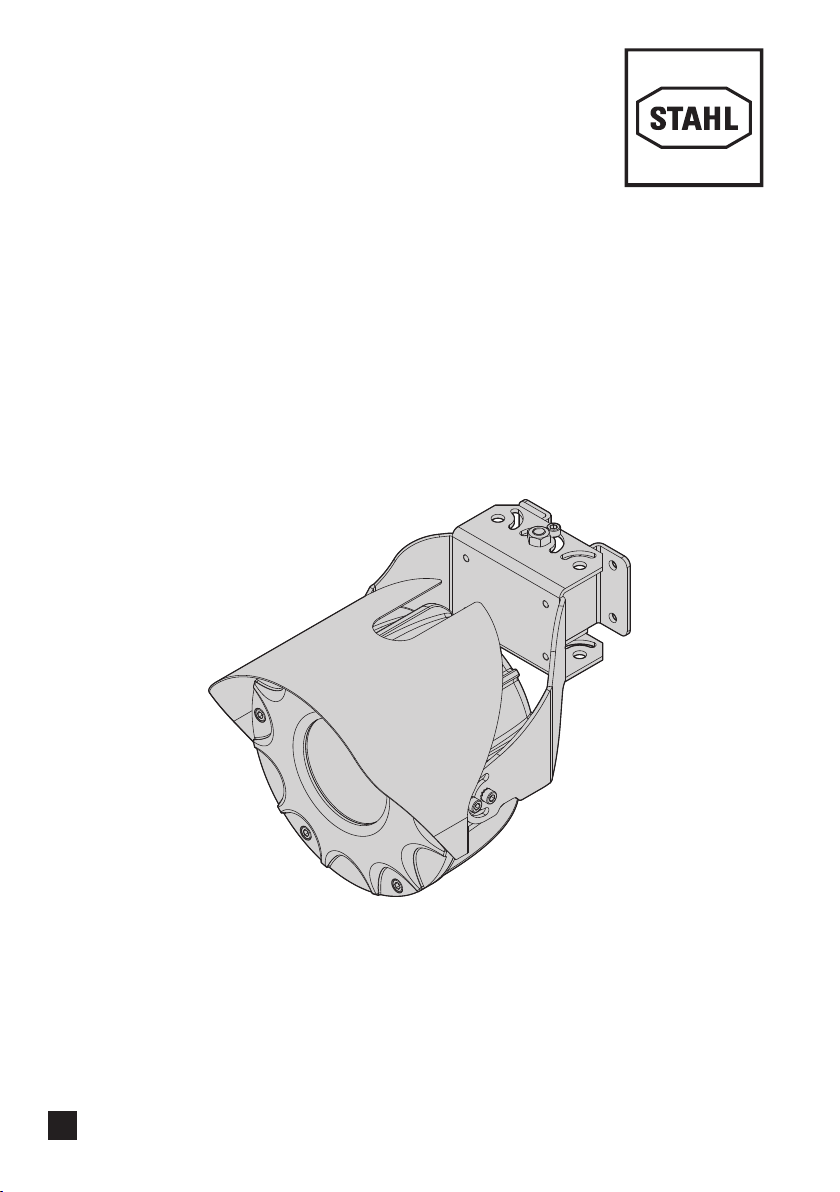
4 Product description and type designation.............................................................................8
4.1 Product overview ................................................................................................................................................................... 8
4.2 Range of use............................................................................................................................................................................. 9
4.3 Specific use conditions......................................................................................................................................................... 9
4.4 Gas Group, Dust Group and Temperatures ................................................................................................................... 9
4.5 Cable entry................................................................................................................................................................................ 9
4.6 Product marking label........................................................................................................................................................10
4.7 For UL/CSA standard reference only..............................................................................................................................11
Important safety instructions ......................................................................................................................................................................11
Marking label.....................................................................................................................................................................................................11
Connections.......................................................................................................................................................................................................12
Regulation references.....................................................................................................................................................................................12
4.8 Model identification............................................................................................................................................................13
5 Preparing the product for use ...............................................................................................14
5.1 Unpacking...............................................................................................................................................................................14
5.2 Contents ..................................................................................................................................................................................14
5.3 Safely disposing of packaging material .......................................................................................................................14
6 Installation ..............................................................................................................................14
6.1 Installation options..............................................................................................................................................................15
6.1.1 Fixing to parapet or ceiling mount..................................................................................................................................................16
6.1.2 Wall mounting.........................................................................................................................................................................................17
6.2 Sunshield mounting............................................................................................................................................................17
6.3 Housing opening..................................................................................................................................................................18
6.4 Slide removal .........................................................................................................................................................................18
6.5 Housing board description...............................................................................................................................................18
6.6 Connection of the power supply line............................................................................................................................19
6.6.1 Connection of the power supply line, 24Vac/24Vdc (version of the product not cabled)..........................................19
6.6.2 Connection of the power supply line, PoE+ (version of the product not cabled)..........................................................19
6.6.3 Connection of the power supply line, 24Vac/24Vdc (version of the product cabled)..................................................19
6.6.4 Connection of the power supply line, PoE+ (version of the product cabled)..................................................................19
6.7 Connection of the Ethernet cable..................................................................................................................................20
6.7.1 Connection of the Ethernet cable (cabled version of the product).....................................................................................20
6.8 Earthing equipotential connection ...............................................................................................................................20
6.9 Housing closure ....................................................................................................................................................................21
7 Switching on ...........................................................................................................................22
8 Configuration..........................................................................................................................22
8.1 Default IP address.................................................................................................................................................................22

EN - English - Instruction manual
4 MNTCMMX_2040_EN
8.2 Web interface.........................................................................................................................................................................22
8.2.1 First access to the web pages............................................................................................................................................................22
9 Maintenance ...........................................................................................................................23
9.1 Routine maintenance .........................................................................................................................................................23
9.1.1 Inspecting the cables ...........................................................................................................................................................................23
9.2 Extraordinary maintenance..............................................................................................................................................23
9.2.1 Fuses replacement.................................................................................................................................................................................23
9.2.2 Replacing the gasket............................................................................................................................................................................24
9.2.3 Factory Default .......................................................................................................................................................................................24
10 Cleaning ................................................................................................................................25
10.1 Cleaning the glass window ............................................................................................................................................25
10.2 Cleaning the product .......................................................................................................................................................25
11 Information on disposal and recycling...............................................................................25
12 Troubleshooting ...................................................................................................................26
13 Technical data .......................................................................................................................26
13.1 Mechanical ...........................................................................................................................................................................26
13.2 Cable glands ........................................................................................................................................................................26
13.3 Housing's window.............................................................................................................................................................26
13.4 Electrical................................................................................................................................................................................26
13.5 Network.................................................................................................................................................................................26
13.6 Cameras.................................................................................................................................................................................27
13.7 Environment........................................................................................................................................................................28
13.8 Certifications........................................................................................................................................................................28
13.9 Certifications - Explosion-proof applications...........................................................................................................28
13.10 Certifications - Marine applications..........................................................................................................................28
14 Technical drawings ...............................................................................................................29

Instruction manual - English - EN
5MNTCMMX_2040_EN
1 About this manual
Read all the documentation supplied carefully before
installing and using this product. Keep the manual in
a convenient place for future reference.
1.1 Typographical conventions
DANGER!
Explosion hazard.
Read carefully to avoid danger of explosion.
DANGER!
High level hazard.
Risk of electric shock. Disconnect the
power supply before proceeding with any
operation, unless indicated otherwise.
CAUTION!
Medium level hazard.
This operation is very important for the
system to function properly. Please read
the procedure described very carefully and
carry it out as instructed.
INFO
Description of system specifications.
We recommend reading this part carefully
in order to understand the subsequent
stages.
Underlined titles
Information is subject to certifications.
2 Notes on copyright and
information on trademarks
The mentioned names of products or companies are
trademarks or registered trademarks.
ONVIF® is a trademark of Onvif, Inc.
3 Safety rules
DANGER!
Explosion hazard.
Read carefully to avoid danger of explosion.
• Installation and maintenance of the appliance
must be carried out by specialist technical staff in
compliance with the applicable reference standard
EN/IEC 60079-14, EN/IEC 60079-17 and national
standards.
• Do not open the device when powered and in
explosive atmosphere.
• Use appropriate tools for the installation. The
particular nature of the site where the device is to
be installed may mean special tools are required
for installation.
• Make all connections, installation and maintenance
work in a non-explosive atmosphere.
• The equipotential connection is mandatory to
avoid the risk of ignition of products installed in
potentially explosive environments.
• Before powering the product in an explosive
atmosphere, ensure it is closed correctly.
• The temperature of the surfaces of the device
is increased by exposure to direct sunlight.
The surface temperature class of the device
was determined only with ambient ambient
temperature, without taking into consideration
direct sunlight.
• Make sure that all the equipment are certified for
the application and for the environment in which
they will be installed.
• Any change that is not expressly approved by the
manufacturer will invalidate the guarantee.

EN - English - Instruction manual
6 MNTCMMX_2040_EN
DANGER!
High level hazard.
Risk of electric shock. Disconnect the
power supply before proceeding with any
operation, unless indicated otherwise.
• Make sure that the power is off when installing or
carrying out maintenance, with the circuit-breaker
open.
• A power disconnect device must be included
in the electrical installation, and it must be very
quickly recognizable and operated if needed.
• The electrical system to which the unit is
connected must be equipped with a 10A max
automatic bipolar circuit breaker. The minimum
distance between the circuit breaker contacts must
be 3mm (0.1in). The switch must be equipped with
protection against overcurrent (circuit breaker).
• The device can only be considered to be switched
off when the power supply has been disconnected
and the connection cables to other devices have
been removed.
• Be careful not to use cables that seem worn or old.
• All the cables must comply with IEC60332-1-2, IEC
60332-1-3 and IEC/EN60079-14.
• When commencing installation make sure that
the specifications for the power supply for the
installation correspond with those required by the
device.
• For continued protection against risk of fire,
replace only with same type and rating of fuse.
Fuses must be replaced only by service personnel.
• This equipment is not suitable for use in locations
where children are likely to be present.
CAUTION!
Medium level hazard.
This operation is very important for the
system to function properly. Please read
the procedure described very carefully and
carry it out as instructed.
• Make sure that the installation complies with local
regulations and specifications.
• Make connections and tests in the laboratory
before carrying out installation on site.
• Check that the power supply socket and cable are
adequately dimensioned.
• Use suitable cables that can withstand the
operating temperatures.
• All disconnected cables must be electrically
isolated.
• The product can be installed in any position.
• Make sure the product is to be secured to building
before operation.
• The manufacturer declines all liability for damage
to any of the apparatus mentioned in this
handbook, when resulting from tampering, use of
non-original spare parts, installation, maintenance
and repairs performed by non-authorised, non-
skilled personnel.
• Only use original STAHL spare parts. Strictly adhere
to the maintenance instructions attached to each
replacement kit.
• For technical services, consult only and exclusively
authorized technicians.
• This product must only be repaired by suitably
trained personnel or under the supervision of
STAHL personnel in accordance with the foreseen
terms and conditions: IEC/EN60079-19.
• TNV-1 installation type. The installation is type
TNV-1, do not connect it to SELV circuits.
• Handle the product with care to avoid accidental
contacts, sharp edges and corners.

Instruction manual - English - EN
7MNTCMMX_2040_EN
INFO
Description of system specifications.
We recommend reading this part carefully
in order to understand the subsequent
stages.
• Before proceeding with installation, check the
supplied material to make sure it corresponds
to the order specification by examining the
identification labels.
• The equipment is intended for installation in a
Restricted Access Area by specialist technical staff.
• The manufacturer declines all responsibility
for any damage caused by an improper use
of the appliances mentioned in this manual.
Furthermore, the manufacturer reserves the right
to modify its contents without any prior notice.
The documentation contained in this manual has
been collected and verified with great care. The
manufacturer, however, cannot take any liability
for its use. The same thing can be said for any
person or company involved in the creation and
production of this manual.
• Since the user is responsible for choosing the
surface to which the unit is to be anchored, we
do not supply the fixing devices for attaching the
unit firmly to the particular surface. The installer is
responsible for choosing fixing devices suitable for
the specific purpose on hand. Use methods and
materials capable of supporting at least 4 times the
weight of the device.
• For all maintenance interventions, we recommend
you return the product to the laboratory that will
perform all required operations.
• This is a Class A product. In a domestic
environment this product may cause radio
interference. In this case the user may be required
to take adequate measures.
• To comply with the main supply voltage dips and
short interruption requirements, use a suitable
Uninterruptable Power Supply (UPS) to power the
unit.
• Device shall be supplied by PS2 energy source
• To feed the product use a safety transformer
and/or a voltage isolated power supply with the
appropriate characteristics. The characteristics
of output power must not exceed the following
values. Supply voltage: 24Vac (±10%) or 24Vdc
(±5%).
• In the case of a 24Vac power supply, you must
provide for adequate separation from the AC
power supply line using double or reinforced
insulation between the main power supply line
and the secondary circuit.

EN - English - Instruction manual
8 MNTCMMX_2040_EN
4 Product description and
type designation
The EC-910-AFZ flameproof housing was designed
for installation in potentially explosive environments,
manufactured in AISI 316L shot peened and electro-
polished stainless steel. The housing can be powered
24Vac, 24Vdc or using an Ethernet (PoE+) cable.
The housing is equipped with a 1/2" NPT input The
EC-910-AFZ housing has an IP66/IP68/IP69 level of
protection and can be installed, according to the
class, in an ambient with temperatures that vary
between -40°C up to +70°C.
4.1 Product overview
The main parts of the product are illustrated below.
01. Fastening support.
02. Reinforcement support.
03. Housing support.
04. Spacer.
05. M8x80 screw.
06. Sunshield.
07. Housing.
06
03
05
07
02
01
04
Fig. 1

Instruction manual - English - EN
9MNTCMMX_2040_EN
4.2 Range of use
The unit is designed for use in a fixed location, for
surveillance of areas classified as zone 1-21 and zone
2-22 with potentially explosive atmospheres.
The unit has been built and certified in compliance
with directive 2014/34/UE and with the international
standards IECEX, which define its range of application
and minimum safety requirements.
4.3 Specific use conditions
The external surface of the product must never be
covered by more than 5 mm of dust.
To avoid accumulation of electrostatic loads during
cleaning, the device must be cleaned using a damp
cloth.
The cameras to be installed shall not be
electromagnetic or contain lasers, continuous wave
sources or ultrasonic energy radiating equipment.
The cameras to be installed shall not contain cells or
batteries.
The cameras must have basic geometric shapes.
Ambient temperature and surface temperature - see
the instructions.
Contact the manufacturer for information on the
dimensions of the flameproof joint.
4.4 Gas Group, Dust Group and
Temperatures
The device is certified for group IIB (Gas) and group
IIIC (Dust).
Ambient temperature: -40°C/+65°C or +70°C.
TEMPERATURE CLASS MAXIMUM AMBIENT
TEMPERATURE
T6 / T85°C +65°C
T5 / T100°C +70°C
Tab. 1
4.5 Cable entry
All cable glands shall be Ex certified, as appropriate,
with protection type "db" and "tb", suitable for the
conditions of use and installed correctly.
When conduit is used, a suitable Ex certified stopping
box shall be used, as appropriate, with protection
type "db" and "tb", suitable for the conditions of use
and installed correctly.
The stopping box must be fitted within 50mm
(1.97in) from the enclosure entry.
The cable entry temperatures are specified in the
marking.
To maintain the IP level of product use cable glands
with appropriate IP level and apply to threads a
sealant compliant with standard IEC/EN60079-14.

EN - English - Instruction manual
10 MNTCMMX_2040_EN
4.6 Product marking label
0203 01
05
08
06
07
10
09
04
11
Fig. 2
1. The number of the accredited body that
provides the quality assessment.
2. Manufacturer’s name and address.
3. Model.
4. Ambient temperature of use.
5. The serial number consists in 12 numeric
characters, the second and third digits
define the last two numbers of the year of
manufacture.
6. Electrical characteristics (voltage V, frequency
Hz, current A, power W).
7. Type, size and number of cable entries
8. ATEX marking. The Class temperature depends
on the electronics installed inside and the
ambient temperature.
9. IECEX marking. The Class temperature depends
on the electronics installed inside and the
ambient temperature.
10. Warnings.
11. IP protection degree.

Instruction manual - English - EN
11MNTCMMX_2040_EN
4.7 For UL/CSA standard reference only.
The flameproof joints are not intended to be repaired.
In the USA, the National Electrical Code (NEC) and in Canada the Canadian Electrical Code (CEC)
apply to electrical equipment used on hazardous industrial premises. These Codes contain
the installation regulations for electrical facilities in all areas and refer to a number of further
standards of other institutions with specifications for the construction and installation of suitable
equipment.
Important safety instructions
WARNING: CONDUIT RUNS MUST HAVE A SEALING FITTING CONNECTED WITHIN 50MM OF THE ENCLOSURE.
AVERTISSEMENT: LE CONDUIT DOIT ÊTRE SCELLÉ AU CAISSON DANS 50 MM DE L’ENTRÉE DU CONDUIT.
WARNING:“CABLE ENTRY AND BRANCHING POINT IS 83.2°C AT +65°C AMBIENT AND 88.2°C AT +70°C AMBIENT.
USE SUITABLE CABLE AND CABLE GLANDS”.
AVERTISSEMENT: LA TEMPÉRATURE DE L’ENTRÉE DE CÂBLE ET DU POINT DE BRANCHEMENT EST DE 83.2°C
JUSQU'À + 65°C AMBIANT ET DE 88.2°C JUSQU'À + 70°C AMBIANT. UTILISEZ LE CÂBLE ET LES PRESSE-ÉTOUPES
APPROPRIÉS.
WARNING: DO NOT OPEN WHEN EXPLOSIVE ATMOSPHERE IS PRESENT.
AVERTISSEMENT - NE PAS OUVRIR EN PRÉSENCE D’UNE ATMOSPHÈRE EXPLOSIVE
WARNING: POTENTIAL ELECTROSTATIC CHARGING HAZARD – SEE INSTRUCTIONS.
AVERTISSEMENT - DANGER POTENTIEL DE CHARGES ÉLECTROSTATIQUES - VOIR INSTRUCTIONS
Marking label
Fig. 3
NEMA Types: TYPE 4X, TYPE 6P

EN - English - Instruction manual
12 MNTCMMX_2040_EN
Connections
The choice of connection must comply with local legislation in force.
Cable glands:select a cable gland in compliance with UL2225 with the following protection AEx d IIC and C22.2
with the following protection Ex d IIC in compliance with the marking of the product.
Conduit:it is necessary to install a sealing device within 50mm of the product input when the conduit is used.
Regulation references
UL 60950-1, 2nd Edition, 2019-05-09 (Information Technology Equipment - Safety - Part 1: General
Requirements)
CAN/CSA C22.2 No. 60950-1-07, 2nd Edition, 2014-10 (Information Technology Equipment - Safety - Part 1:
General Requirements)
UL 62368-1, 2nd Ed, 2014-12-01 (Audio/video, information and communication technology equipment Part 1:
Safety requirements)
CAN/CSA C22.2 No. 62368-1-14, 2nd Ed, Issued: 2014-12-01 (Audio/video, information and communication
technology equipment Part 1: Safety requirements)
UL 60079-0, 7th Edition, Explosive atmospheres - Part 0: Equipment - General requirements
UL 60079-1, 7th Edition, Explosive Atmospheres - Part 1: Equipment Protection by Flameproof Enclosures“d”
UL 60079-31, 2nd Edition, Explosive Atmospheres - Part 31: Equipment Dust Ignition Protection by Enclosure“t”
CSA C22.2 No. 60079-0:19, Explosive atmospheres - Part 0: Equipment - General requirements
CSA C22.2 No. 60079-1:16, Explosive Atmospheres - Part 1: Equipment Protection by Flameproof Enclosures“d”
CSA C22.2 No. 60079-31:15, Explosive Atmospheres - Part 31: Equipment Dust Ignition Protection by Enclosure
“t”

Instruction manual - English - EN
13MNTCMMX_2040_EN
4.8 Model identification
EC910AFZ CONFIGURATION OPTIONS
Video Output Camera Voltage Connections
EC-910-AFZ I With video
encoder pre-
installed by the
manufacturer
03 Day/Night
camera 3X zoom,
FullHD
P24Vdc/
24Vac, PoE+
00 Without cable, without
cable gland
0D Day/Night ca-
mera 10X zoom,
FullHD
04 Cable gland Ex d 1/2" NPT
and 4m (13ft) armoured
cable
10 Cable gland Ex d 1/2" NPT
and 10m (32.8ft) armou-
red cable
Tab. 2
EC910AFZ CERTIFICATIONS AND MARKINGS WITH CABLE
Certification Marking Ambient temperature Cable input tempe-
rature
ATEX II 2 G Ex db IIB T6...T5 Gb
II 2 D Ex tb IIIC T85°C...T100°C Db
-40°C ≤ Ta ≤ +65°C or
+70°C
+83.2°C with Ta ≤ +65°C
+88.2°C with Ta ≤ +70°C
IECEx Ex db IIB T6...T5 Gb
Ex tb IIIC T85°C...T100°C Db
EAC Ex 1Ex d IIB T6...T5 Gb X
Ex tb IIIC T85°C...T100°C Db X
Tab. 3
EC910AFZ CERTIFICATIONS AND MARKINGS WITHOUT CABLE
Certification Marking Ambient temperature Cable input tempe-
rature
ATEX II 2 G Ex db IIB T6...T5 Gb
II 2 D Ex tb IIIC T85°C...T100°C Db
-40°C ≤ Ta ≤ +65°C or
+70°C
+83.2°C with Ta ≤ +65°C
+88.2°C with Ta ≤ +70°C
IECEx Ex db IIB T6...T5 Gb
Ex tb IIIC T85°C...T100°C Db
EAC Ex 1Ex d IIB T6...T5 Gb X
Ex tb IIIC T85°C...T100°C Db X
Hazardous Location
America
Class I, Zone 1, AEx db IIB T6...T5 Gb
Zone 21, AEx tb IIIC T85°C...T100°C Db
Class I, Div 2 Group C, D T6...T5
Class II, Div 2, Group F and G T6...T5
Hazardous Location
Canada
Ex db IIB T6...T5 Gb X
Ex tb IIIC T85°C...T100°C Db X
Class I, Div 2 Group C, D T6...T5
Class II, Div 2, Group F and G T6...T5
Tab. 4

EN - English - Instruction manual
14 MNTCMMX_2040_EN
5 Preparing the product for
use
Before carrying out any type of
intervention, read the "Safety rules"
chapter of this manual.
5.1 Unpacking
When the product is delivered, make sure that the
package is intact and that there are no signs that it
has been dropped or scratched.
If there are obvious signs of damage, contact the
supplier immediately.
When returning a faulty product we recommend
using the original packaging for shipping.
Keep the packaging in case you need to send the
product for repairs.
5.2 Contents
Check the contents to make sure they correspond
with the list of materials as below:
• Flameproof housing
• O-ring replacement part kit
• Bracket kit
• Instruction manual
5.3 Safely disposing of packaging
material
The packaging material can all be recycled. The
installer technician will be responsible for separating
the material for disposal, and in any case for
compliance with the legislation in force where the
device is to be used.
6 Installation
Before carrying out any type of
intervention, read the "Safety rules"
chapter of this manual.
We strongly recommend using only approved
brackets and accessories during installation.

Instruction manual - English - EN
15MNTCMMX_2040_EN
6.1 Installation options
The M8 axis must always be in the vertical
position.
The brackets supplied allow installation of the
product in the positions illustrated below.
Fig. 4Example of wall installation, vertical rotation, -90°.
Fig. 5Example of wall installation, vertical rotation, +30°.
Fig. 6Example of wall installation, horizontal rotation, from
26° up to 80°.
Fig. 7Example of ceiling installation, vertical rotation, -90°.
Fig. 8Example of ceiling installation, vertical rotation, +30°.

EN - English - Instruction manual
16 MNTCMMX_2040_EN
6.1.1 Fixing to parapet or ceiling mount
The product can be installed on a parapet or on the
ceiling.
Fasten the fastening support (01) to its final
installation surface.
Tighten the screws.
Attach the reinforcement support (02) to the housing
support (03) using the M5 screws and the 5 washers
supplied. Fasten the 2 supports assembled as such to
the fastening support (01) using the M8 screw (05),
the 8 toothed washers and a relevant spacer (04).
Once the final position of the product is defined, fully
tighten the M8 screw (05) and fasten the M5 screw
(08) to block rotation.
The cable connected to the housing could hinder
operations You can, by dismantling the sunshield,
rotate the housing 180° (6.2 Sunshield mounting,
page 17).
08
05
03
02
04
01
Fig. 9Ceiling mounting (housing in normal position).
08
05
03
02
04
01
Fig. 10 Ceiling mounting (housing in overturned position).
Fig. 11 Rear view of completed installation.
Fastening to a parapet or to the ceiling depends on
the position of the fastening support.
Fig. 12 Parapet mounting.
Fig. 13 Ceiling mounting.
Pay attention to the fixing. Tightening
torque: M5 screws, 9Nm (±0.5Nm). M8
screw, 16.5Nm (±0.5Nm).

Instruction manual - English - EN
17MNTCMMX_2040_EN
6.1.2 Wall mounting
The product can be installed on a wall.
Fasten the fastening support (01) to its final
installation surface.
Tighten the screws.
Attach the housing support (03) to the fastening
support (01) using the M8 screw (05), washers and
nut. Once the final position of the product is defined,
fully tighten the M8 screw (05) and fasten the M5
screws (08) to block rotation.
The cable connected to the housing could hinder
operations You can, by dismantling the sunshield,
rotate the housing 180° (6.2 Sunshield mounting,
page 17).
01
08
03
05
08
Fig. 14 Housing in normal position.
01
08
03
05
08
Fig. 15 Housing in overturned position.
Fig. 16 Rear view of completed installation.
Pay attention to the fixing. Tightening
torque: M5 screws, 9Nm (±0.5Nm). M8
screw, 16.5Nm (±0.5Nm).
6.2 Sunshield mounting
The product is supplied with the sunshield already
installed.
For installation or maintenance needs, the sunshield
can be dismantled. Unscrew the sunshield screws and
remove it.
Re-assemble the sunshield before fastening the
housing to the housing support.
Pay attention to the fixing. Tightening
torque: 6Nm (±0.5Nm).
Fig. 17

EN - English - Instruction manual
18 MNTCMMX_2040_EN
6.3 Housing opening
Before carrying out any type of
intervention, read the "Safety rules"
chapter of this manual.
Unscrew the fastening screws and remove the front
cover from the housing body.
Screws properties
• Diameter/Screw pitch: M5x0.8
• Material: A4
• Screw head: ISO 4762
• Length: 8mm (0.3in)
• Yield stress (min): 450N/mm²
Fig. 18
6.4 Slide removal
Unscrew the 3 M4 screws to remove the slide. Before
removing the slide, check that cables are not fastened
with a clip.
Fig. 19
6.5 Housing board description
BOARD DESCRIPTION
Connector/
Terminal
Function
J1 Power supply line (24Vac/24Vdc)
J4 Heater
J5 Board test
J6 Blower
J7 Connection to the video encoder
J8 Ethernet, PoE+ power supply
F1 Fuse
SW1 Reset dip-switch
Tab. 5
J6 J4
F1 J8J1 J7J5 SW1
Fig. 20
This manual suits for next models
1
Table of contents
Languages: