Starnex CamBall SG-30 User manual

CamBall
SG-30/SG-31
User Manual
World’s Smallest Camcorder
REV 00 – 20090709
2
Notice
[Legal Disclaimer]
yUse of this product for illicit purposes, including invasion of personal privacy, is punishable by law
and Starnex disclaims any and all responsibilities resulting thereof.
[EMC Registration]
yThis device is a B grade EMC-registered device that’s safe for residential use in all regions.
Safety Precautions
[Handling]
yCamBall is a precision hardware that is vulnerable to excessive impact. Please study and comply
with the safety precautions below.
yYour warranty does not cover any damage resulting from mishandling or negligence by the user.
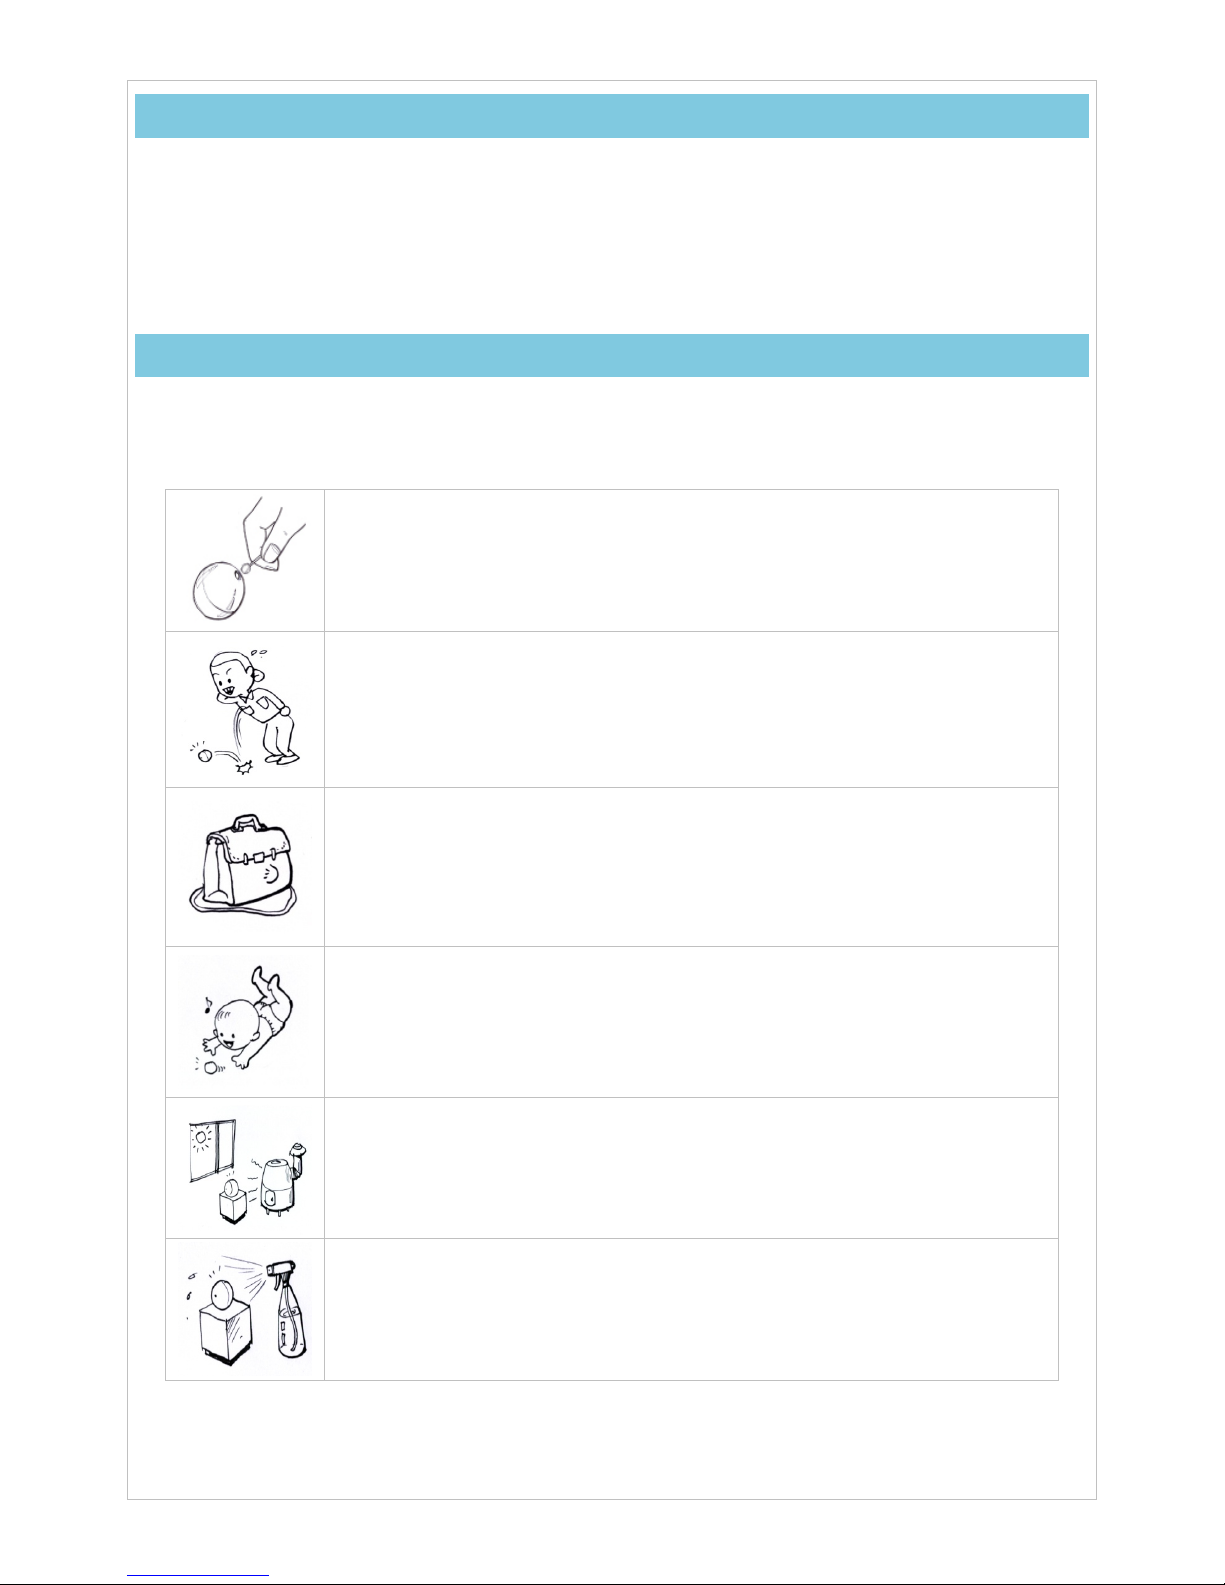
Using excessive force to clean the lens surface can damage the lens itself or
cause CamBall to malfunction. Dust and buildup on the lens can cause poor
recording quality. Use a dust remover or lens cleaning cloth to clean the lens.
Do not drop your CamBall or subject it to strong impact. Remember that
CamBall can easily fall out of your pocket and on to the ground.
When carrying CamBall in a bag, make sure the device is not vulnerable to
excessive force and impact.
Keep CamBall and its parts and accessories away from reach of children. If
swallowed, immediately seek medical attention.
Leaving your CamBall under direct sunlight or in the vicinity of a fireplace and
other sources of heat can cause it to malfunction.
Protect your CamBall from fluids and moisture.
3
Do not attempt to disassemble or repair the device yourself. If you experience
a problem with the product, contact a Starnex retailer or an authorized service
center for repair.
Do not use your CamBall near bodies of water without the waterproof case or
allow it to get wet. Moisture and water cause malfunctions and can even lead
to electrocution. If you need to use your CamBall outdoors in rain/snow or at a
beach/swimming pool, please use the waterproof case.
[Copyright]
yUnauthorized reproduction and distribution of copyrighted material is direct violation of copyright
laws and international treaties. Furthermore, distribution of unauthorized content to third parties via
Internet is also violation of international treaties, regardless of whether or not the distribution is free
or paid.
[Important Notice]
yThe content of this manual is subject to change without prior notice.
yStarnex shall not be held responsible for disputes or issues resulting from the use of this manual.
yStarnex shall not be held responsible for third party disputes or issues concerning CamBall use.
yStarnex shall not be held responsible for any loss or damage incurred due to product malfunction
or data loss. Please keep a backup of all your important data.
yExamples used in this manual may differ from actual product recordings and images.
yButtons and functionalities not described herein exist for future product improvement purposes.
yStarnex reserves the right to make design and/or functional changes to the product for
performance improvement purposes without prior notice.

4
Table of Content
1. Product Overview ...................................... 5
1.1 Standard Pack of CamBall(SG30/31) ......... 5
1.2 Optional Accessories ......................................... 6
1.2.1 Surveillance Pack (SG-SVP) ............................. 6
1.2.2 Vehicle Pack (SG-VHP) ..................................... 6
1.2.3 Sport Pack (SG-SPP) .......................................... 6
1.2.4 LCD Monitor Pack (SG-LMP) ......................... 7
1.3 Feature Comparison .......................................... 7
1.4 Front ......................................................................... 8
1.5 Rear .......................................................................... 8
2. Connecting Your CamBall ........................ 9
2.1 Charging the Battery .......................................... 9
2.2 Inserting a Micro SD Card ............................... 9
2.3 Connecting to an External Display Device 9
2.4 Earphone Connection ...................................... 10
2.5 Using Accssories ............................................... 10
3. Basic Operation ........................................ 12
3.1 Preparations ........................................................ 12
3.2 Basic Operation and Status Check ............ 12
3.3 Indication Lamps ............................................... 13
4. CamBall Operation by Mode ................ 14
4.1 Taking Snapshots (Standby Mode) ............ 14
4.1.1 Snapshots without an External Display
Device ................................................................................. 14
4.1.2 Snapshots utilizing an External Display
Device ................................................................................. 16
4.1.3 Viewing and Editing Photos ........................ 16
4.2 Recording Video (Recording Mode) .......... 19
4.2.1 Recording without an External Display
Device ................................................................................. 19
4.2.2 Recording utilizing an External Display
Device ................................................................................. 19
4.2.3 Video Playback and Edit ................................ 20
4.3 Special Video Recording Types with
CamBall SG-31 ............................................................... 24
4.3.1 Selection of Recording Type ....................... 24
4.3.2 Instructions by Recording Type ................. 24
4.3.3 Motion Detection Recording in Detail
(SG31 Only) ...................................................................... 27
4.4 MP3 Mode ............................................................ 28
4.4.1 Enabling/Disabling MP3 Mode ................... 28
4.4.2 Editing MP3 Files .............................................. 29
5. Initial Configurations .............................. 31
5.1 Overview ............................................................... 31
5.1.1 What are Initial Configurations? ................ 31
5.1.2 What is Upgrading? ......................................... 31
5.1.3 What are Basic Configurations? ................. 31
5.1.4 Initial Configuration Guide ........................... 31
5.2 Upgrading ............................................................. 31
5.2.1 CamBall Manager ............................................. 31
5.2.2 CamBall Firmware ............................................. 32
5.3 Basic Configurations ........................................ 33
5.3.1 CamBall Manager Configurations ............. 33
5.3.2 Language Selection ......................................... 33
5.3.3 Monitor Type Selection .................................. 33
5.3.4 Date/Time Settings .......................................... 34
6. CamBall Configurations ......................... 36
6.1 Configurations using an External Display
Device ................................................................................ 36
6.1.1 Language ............................................................. 36
6.1.2 Camera Settings ................................................ 36
6.1.3 Recording Settings .......................................... 38
6.1.4 Playback Settings ............................................. 4 0
6.1.5 Date/Time ............................................................ 41
6.1.6 Memory Settings .............................................. 41
6.1.7 Other ...................................................................... 42
6.2 From CamBall Manager ................................. 45
6.2.1 Language ............................................................. 45
6.2.2 Camera Settings ................................................ 45
6.2.3 Recording Settings .......................................... 46
6.2.4 Playback Settings ............................................. 4 9
6.2.5 Date/Time ............................................................ 49
6.2.6 Memory Setting ................................................ 4 9
6.2.7 Other ...................................................................... 50
7. Video Playback using CamBall (PMP) . 53
8. YouTube .................................................... 54
8.1 Upload ................................................................... 54
8.2 Multiple Uploads ................................................ 54
9. Reference Information ........................... 55
9.1 Default Settings ................................................. 55
9.2 Product Specifications .................................... 56
10. Tips on Use ............................................... 57
10.1 Safe Hardware Removal ................................ 57
10.2 Using CamBall in a Vehicle .......................... 57
5
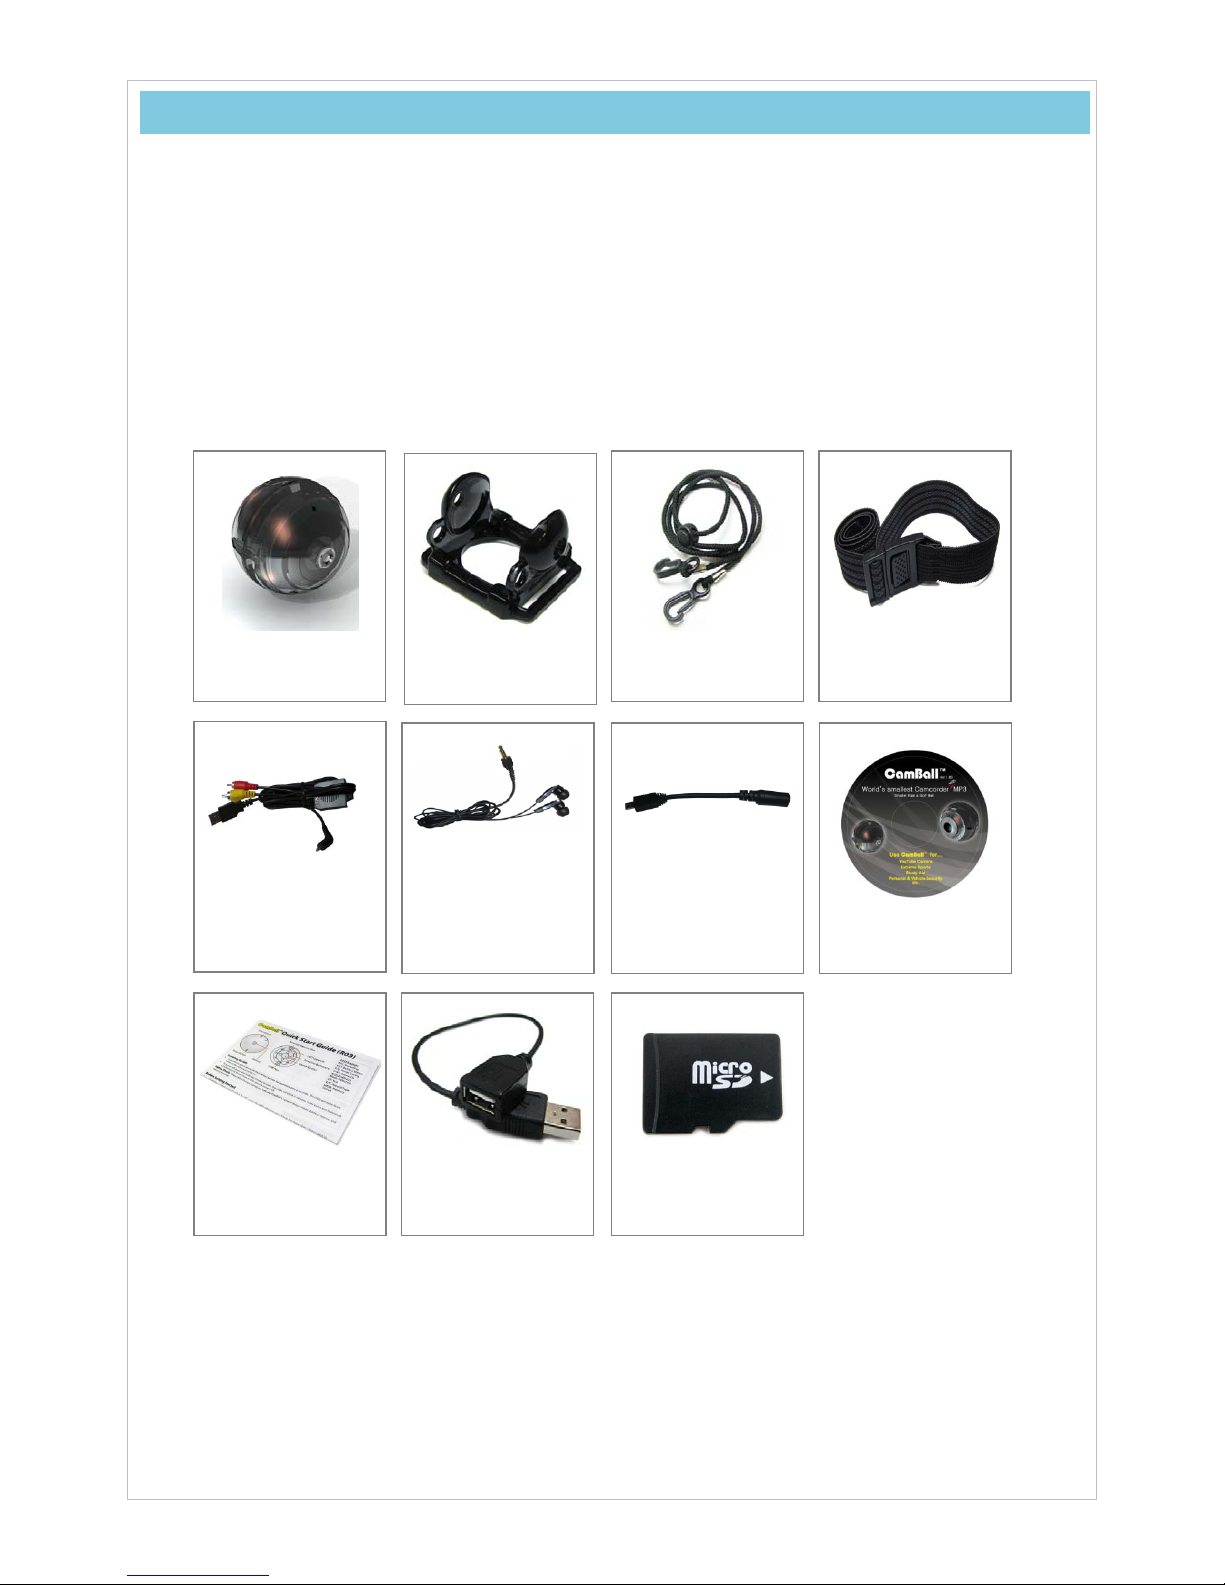
CamBall
(SG-30/31)
CamBall Holder
(SG-93)
Neck Strap
(SG-71)
Sport Band
(SG-70)
USB Cable
(SG-99)
Earphones
(SG-82)
Earphone Gender
(SG-83)
CD-ROM
USB Adapter Gender
(SG-73)
Micro SD Card
(2GB)
Quick Start Guide
1. Product Overview
1.1 Standard Pack of CamBall(SG30/31)
yCamBall is a miniature electronic device and therefore needs to be unboxed with care.
yCheck to make sure all of the following items are included in the standard package of CamBall.
Contact your retailer if any of these items are missing.
yApplication
Generation of User Contents,Conference Recording, Vehicle Drive Recording, Travel
Recording, Class Recording, Baby Diary Recording, Hands-Free Recording of Outdoor
Activities (Bicycle Riding, Motorcycling, Hang Gliding, Skate Boarding, Scuba Diving, Wind
Surfing, Water Surfing, Water skiing, Snorkeling, Mountain Climbing, Remote-Controlling of Model
Plane/Car)

6
Handle Mount
(SG-84)
Waterproof Case
(SG-91)
Car Adapter
(SG-87)
Car Adapter Cable
(SG-88)
Car Mount
(SG-80)
USB Adapter
(SG-95x)
Box Mount
(SG-97)
USB Extension
Cable
(SG-74)
1.2 Optional Accessories
1.2.1 Surveillance Pack (SG-SVP)
yWhen you use CamBall for the surveillance of home, office or small business, this pack(SG-SVP)
will be helpful in supplying CamBall with continuous electric power and placing it where you want to.
1.2.2 Vehicle Pack (SG-VHP)
yWhen you use CamBall for vehicle drive recording (like kind of a vehicle black box) or vehicle
security, this pack(SG-VHP) will enable you to continuously supply CamBall with the electric power
from vehicle battery and help you in mounting it easily on the dashboard.
1.2.3 Sport Pack (SG-SPP)
yWith the help of this pack(SG-SPP), your CamBall will record how you enjoy bicycle riding,
motorcycling, or any kinds of water sports. Waterproof Case(SG-91) stands 40M(136ft) water
pressure.
7
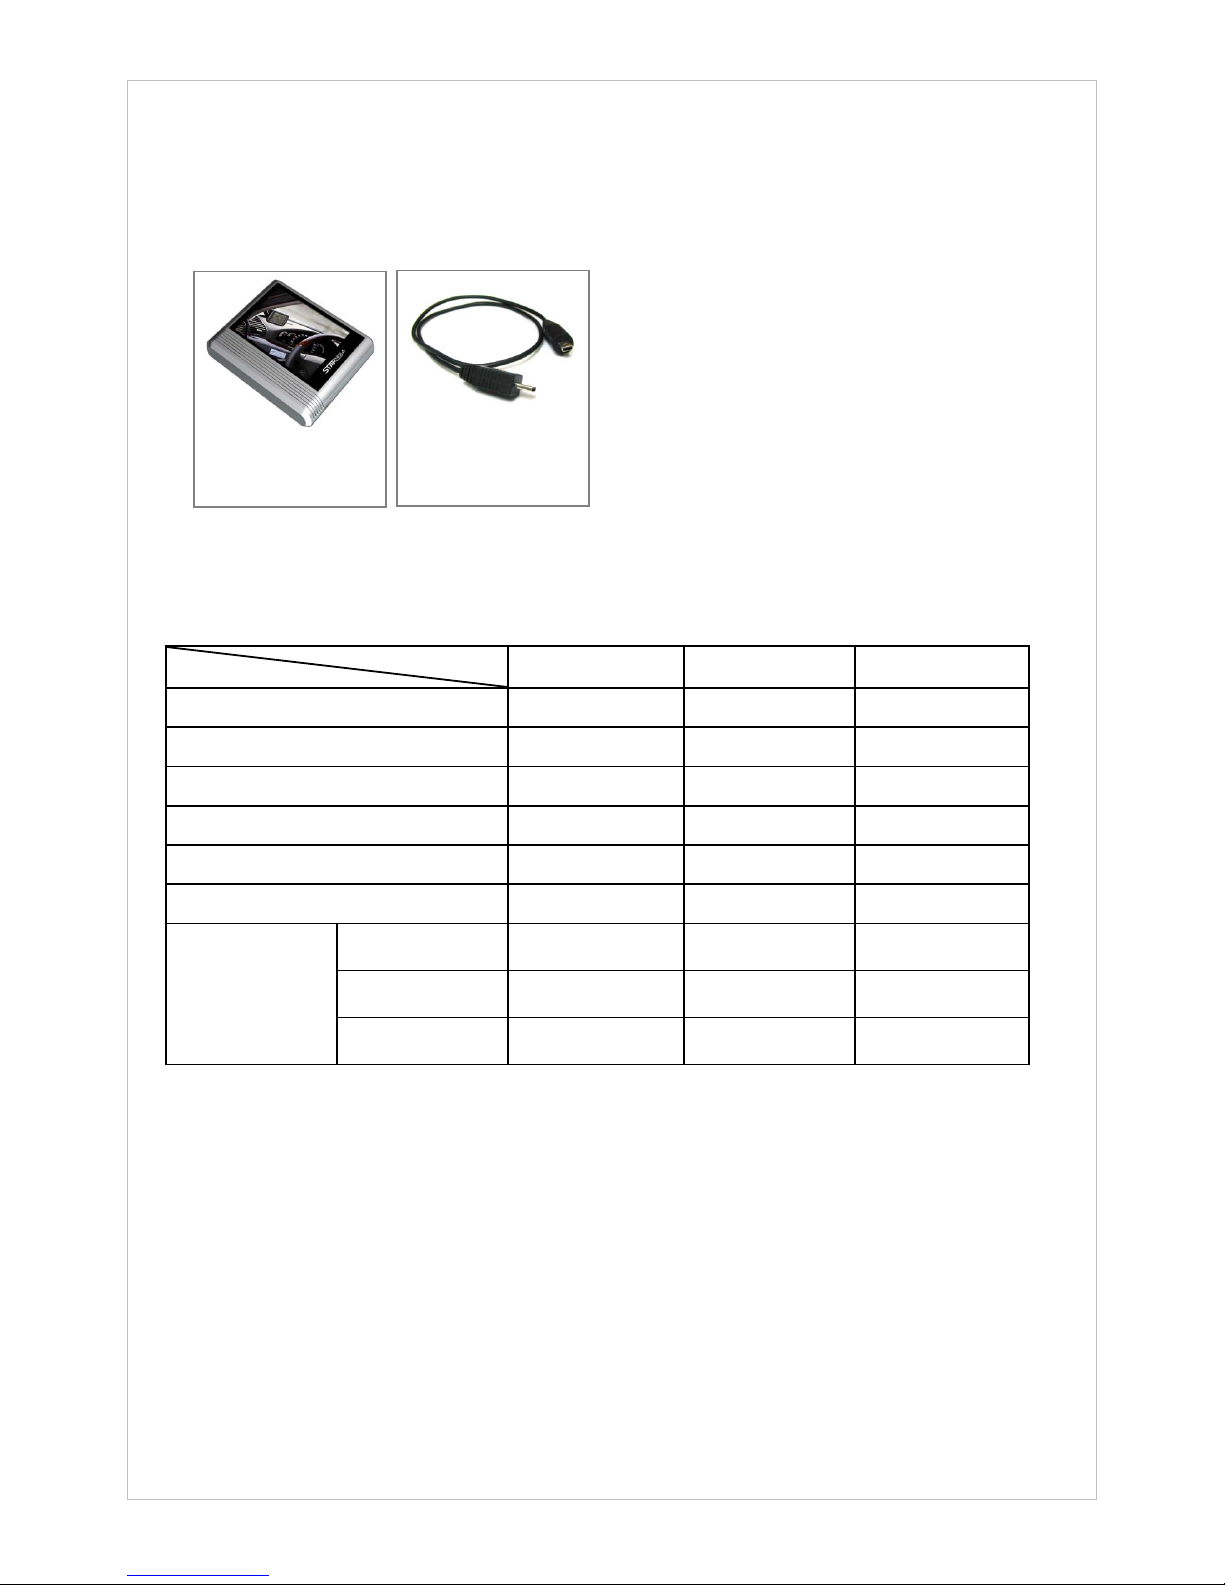
LCD Monitor
(SG-94)
CamBall/LCD
Connection Cable
(SG-72)
1.2.4 LCD Monitor Pack (SG-LMP)
yWith CamBall LCD Monitor, you can view CamBall’s field of frame when you take a snapshot or
record a moving picture, and it is also used for playing back and editing of them.
yYou can use it as an external monitor screen when you change the configuration of your CamBall
and also as an external battery(3.7V-700Ma) for supplying electric power for your CamBall.
1.3 Feature Comparison
Feature Model SG-30 SG-31 Note
Video Recording √√
Audio Recording √√
Monitor Display √√
Snapshot √√
USB √√
MP3 √√
Motion
Detection
Surveillance
Recordin
g
√
Vehicle
Recordin
g
√
A
ngel
Recordin
g
√

8
1.4 Front
1.5 Rear
LED Lamps (8)
Direction
Buttons (4)
Center Button
External Memory
Slot
USB Port
Line of Sight
Microphone
Camera
Reset Button

9
2. Connecting Your CamBall
2.1 Charging the Battery
yConnecting your CamBall to a computer (USB port) using the USB cable(SG-99) will activate
CamBall’s REC, MP3, TV, and TYPE lamps in a cross shape and automatically start charging the
device’s battery. It takes approximately 2 hours and 30 minutes to completely charge the battery.
yOnce CamBall is connected to a computer via the USB cable, CamBall will start charging but will
not be able to record video. To record while charging the battery, use the USB Adapter Gender
(SG-73).
yIt’s also possible to charge the battery and record at the same time by using the USB Adaptor(SG-
95) in the Surveillance Pack (SG-SVP, sold separately).
2.2 Inserting a Micro SD Card
yCamBall supports Micro SD cards (up to 16GB).
yInsert the Micro SD card completely into the external memory slot
(see picture on the left – not completely inserted).
yPush the card in until it’s flush with the slot.( Please refer to 6.1.6
Memory Settings).
2.3 Connecting to an External Display Device
yYou can display the recorded videos on a TV monitor, a PC monitor, a satellite navigation screen
or CamBall LCD monitor(SG94) by connecting CamBall directly to one of those.
yYou can also monitor what is being recorded through TV monitor LCD Monitor(SG94) or a satellite
navigation screen if you connect one of them to CamBall while you record video.

10
2.4 Earphone Connection
yWhen the MP3 mode enabled, connect the earphones to CamBall’s USB port using the earphone
gender(SG-83), as shown below:
2.5 Using Accssories
yCamBall Holder: Push CamBall in until you hear a click.
CamBall Holder allows you to fixate CamBall’s camera angle and position.
It also allows you to mount CamBall on the table or even on the wall using double-side adhesive
tape.
yNecklace: Necklace connects to both sides of CamBall Holder and the length can be adjusted to
the chest level, which reduces shaking and wobbling.
ySport Band: Rubber lining inside the band prevents the band from slipping off helmets and other
objects with smooth surfaces.

11
ySport Band + CamBall Holder:

12
3. Basic Operation
3.1 Preparations
-Plug CamBall into USB port of your computer using USB Cable(SG99) or into the wall socket using
USB Cable(SG99) and USB Adapter(SG95), and leave it for at least two and half hours to fully
charge CamBall’s battery
-Insert the external memory card (Micro SD) into the external memory slot. (Refer to 6.1.6 Memory
Settings of this manual)
-Refer to 5. Initial Configurations of this manual and before start, change the configurations.
3.2 Basic Operation and Status Check
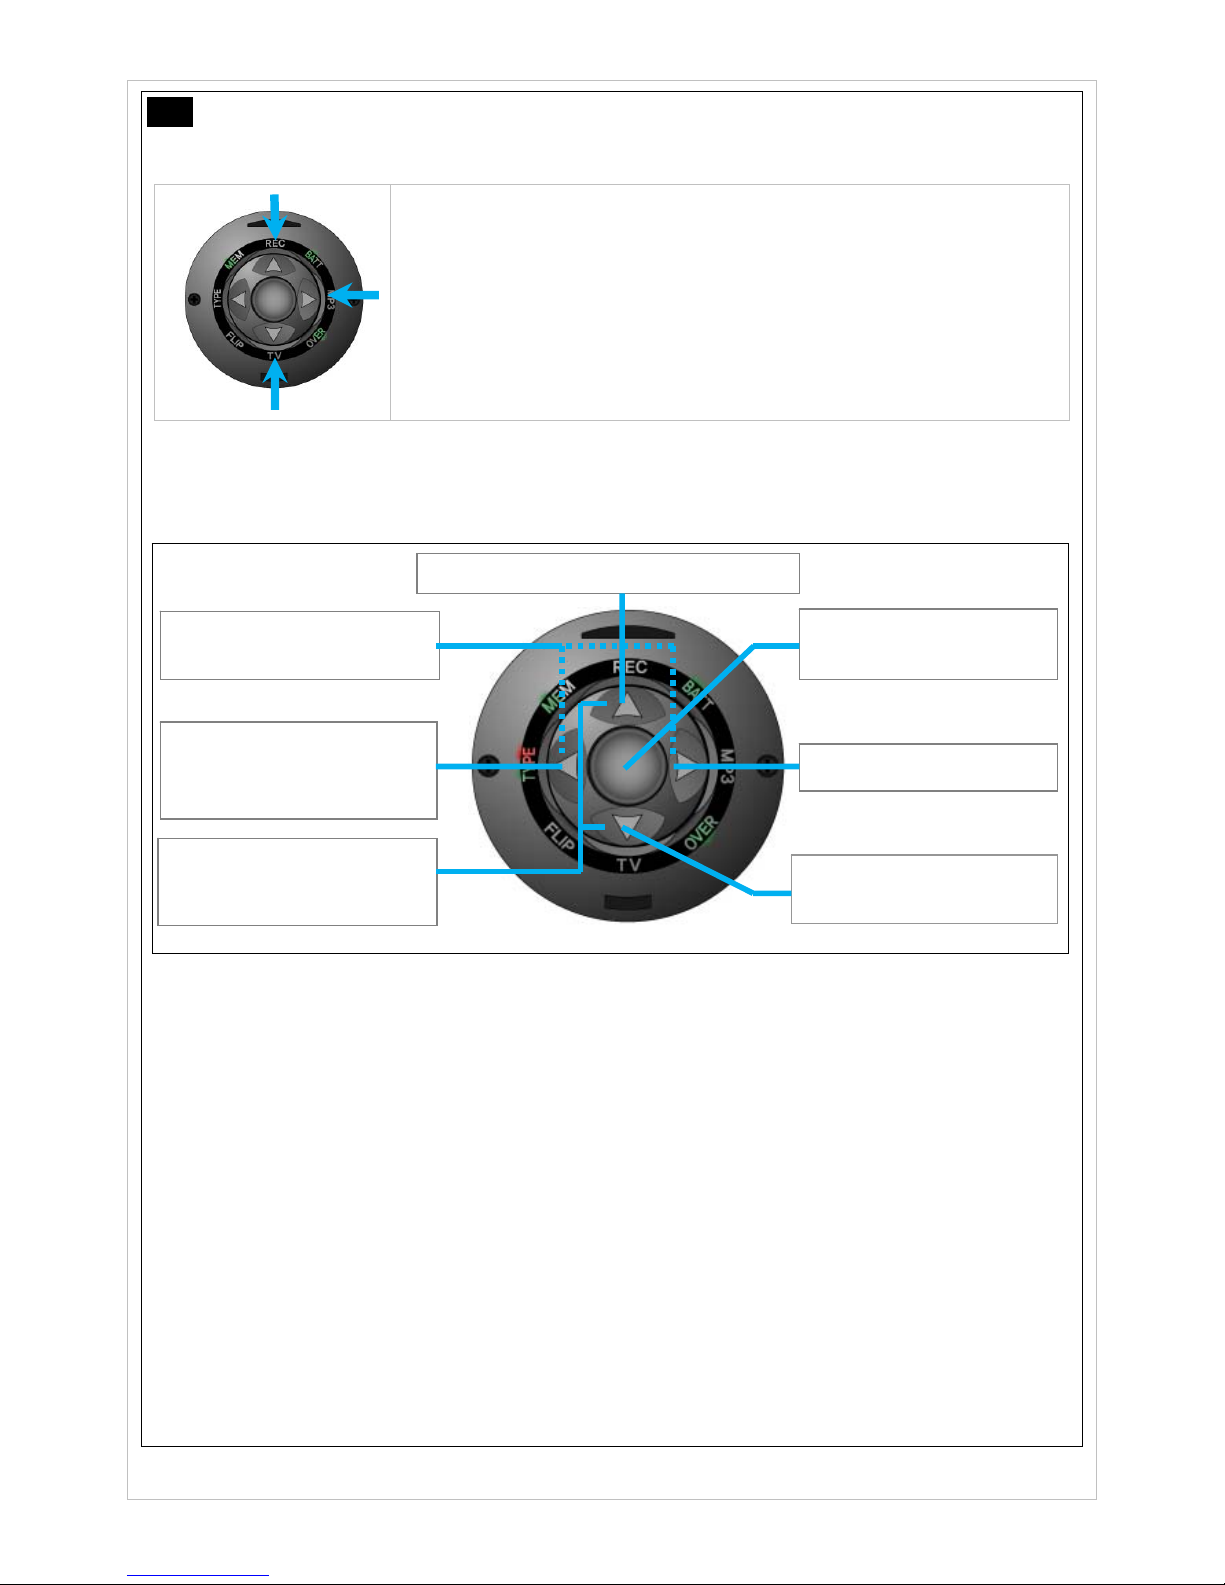
yCamBall Buttons
The external memory slot is positioned at the top and the USB port at the
bottom of CamBall.
yPowering On/Off
Press and hold the Center button over two seconds to power CamBall on. All
the indication lamps will blink three times as the CamBall powers up.
Press and hold the Center button over two seconds to power CamBall off.
The indication lamps will blink in rotation three times as the CamBall powers
down.
yStatus Check
When you power on CamBall, it is operating normally if three indication lamps
(BATT, MEM, and OVER) turn on. These indication lamps indicate CamBall’s
status (battery reserve, memory status, and overwrite setting). Note that
CamBall can be configured so that these lamps automatically turn off in five
seconds (pressing the [▼]button under this configuration displays CamBall
status for five seconds).
yLock
All buttons can be locked by pressing and holding the [◀] and [▶]buttons
simultaneously for two seconds. All the indication lamps will blink once before
they are locked. Unlock the in the same manner. The indication lamps blink
twice before they are unlocked. Pressing any of the buttons while they are
locked will cause all lamps blinking in Red+Green once but no operation of
CamBall at all.

13
yReset
The Reset button is located deep inside CamBall and can be accessed using
a clip or another sharp, long object. Reset if CamBall is malfunctioning and/or
cannot be powered off.
Pressing the Reset button powers down CamBall. To restart it, press and
hold the Center button.
3.3 Indication Lamps
yIndication lamps and their colors indicate CamBall’s operating and configuration status.
Note Overwrite (selectable from CamBall Manager or in TV mode)
[On]: When the memory is full , CamBall starts to overwrite on the oldest existing file.
[Off]: When the memory is full, CamBall stops recording automatically (If Memory Full Indication
option is enabled, the MEM indication lamp blinks in red five times). In order to continue recording,
the recorded flies need to be erased (You can save the recorded files on a separate storage, if
necessary).
TYPE: (SG-31 only)
Off: Normal
Red: Surveillance
Green: Vehicle
Red+Green: Angel
REC: Off: Recording Stopped
Red: Video Recording only
Green: Audio Recording only
Red+Green: Recording (Audio+Video)
BATT:
Green: More than 70% Reserve
Red+Green: 30%~70% Reserve
Red: Less than 30% Reserve
Green (blinking): Charging
MP3:
Off: MP3 Mode Off
Green: MP3Mode On
OVE
R
:
Off: Overwrite Off
Green: Overwrite On
MEM:
Green: More than 70% Available
Red+Green: 30%~70% Available
Red: Less than 30% Available
Red (blinking): Memory Full
TV:
Off: TV Mode Off
Green: TV Mode On
FLIP:
Off: Normal
Green: Vertical Flip

14
4. CamBall Operation by Mode
Indication lamps change colors depending on the selected modes.
(1) Standby Mode (REC, MP3, and TV Indication Lamps: Off): Standby or taking snapshot.
(2) Recording Mode (REC Indication Lamp: Red + Green): Recording video.
(3) MP3 Mode (MP3 Indication Lamp: Green): Playing MP3.
(4) TV Mode (TV Indication Lamp: Green): Recording/Playing/Setting with connection of monitor.
4.1 Taking Snapshots (Standby Mode)
-With CamBall, you can take snapshots. You can utilize an external display device like TV monitor or
CamBall LCD monitor(SG94).
Note Before taking Snapshots…
Read carefully 5. Initial Configurations and 6. CamBall Configurations of this manual
and configure the date/time, monitor, and memory settings before taking snapshots.
4.1.1 Snapshots without an External Display Device
(1) Setting CamBall on Standby Mode
-Press and hold the Center button to power CamBall on. If all the
indication lamps of REC, MP3, and TV are off, CamBall is in
standby mode.
-If any of the three indication lamps are on(CamBall is not in the
standby mode), turn them off by pressing and holding the related
direction buttons over 2 seconds.
(2) Taking Snapshots
-When CamBall is in the Standby Mode, press the Center button to take a snapshot . Each press of
the Center Button will take a single snapshot. All the indication lamps on CamBall will blink in
rotation when every snapshot is taken.
15
Note Standby Mode
(1) Overview
-Standby mode is when REC, MP3, and TV indication lamps are all
off.
-From the Standby mode, you can change modes into the
Recording mode, the MP3 mode, or the TV mode and even
change the recording type.
-By pressing the Center button while in the standby mode you can
take snapshots.
(2) Standby Mode Buttons
-Standby mode is when REC, MP3, and TV indication lamps are all off.
-The following button functions are available in the Standby mode:
1. Center:Press to take single snapshots.
2. ▲:Press and hold over 2 seconds to set CamBall on/off Recording mode.
3. ◀: Press and hold over 2 seconds to change the recording types (Normal, Surveillance,
Vehicle, and Angel).
4. ▶: Press and hold over 2 seconds to set CamBall on/off MP3 mode.
5. ▼: Press to check the status of CamBall features (if “Lamp Indication Time” configured to
five seconds in setting menu.).
6. ▼: Press and hold over 2 seconds to set CamBall on/off TV mode.
7. ▲+▼: Simultaneously press and hold over 2 seconds to activate/deactivate the
vertical flip feature (FLIP lamp on/off).
8. ◀+▶: Simultaneously press and hold over 2 seconds to lock/unlock all the indication
buttons.
Long: Recording Mode On/Off
Short: Lamp Status Check
Long: TV Mode On/Off
Long: Select recording type
(Normal / Surveillance /
Vehicle / Angel)
Short: Snapshot
Long: Power On/Off
Long: MP3 Mode On/Off
Press and hold ▲and ▼
buttons to turn vertical flip
on/off.
Press and hold ◀and ▶
buttons to lock/unlock.
16
4.1.2 Snapshots utilizing an External Display Device
-It’s possible to connect your CamBall to a TV monitor a CamBall LCD monitor (SG-LMP, sold
separately) and take pictures while viewing CamBall’s field of vision on the screen. (computer may
not be used as external display devices).
○
1Connect CamBall to an external display device using the USB cable. Please note that the video
plug is yellow and the audio plug red.
○
2Make sure CamBall is in standby mode (Refer to 4.1.1 Setting CamBall on Standby Mode).
○
3From standby mode, press and hold the [▼] button for over 2 seconds to turn on. The TV
indication lamp green , which means CamBall mode has been changed to TV mode with the
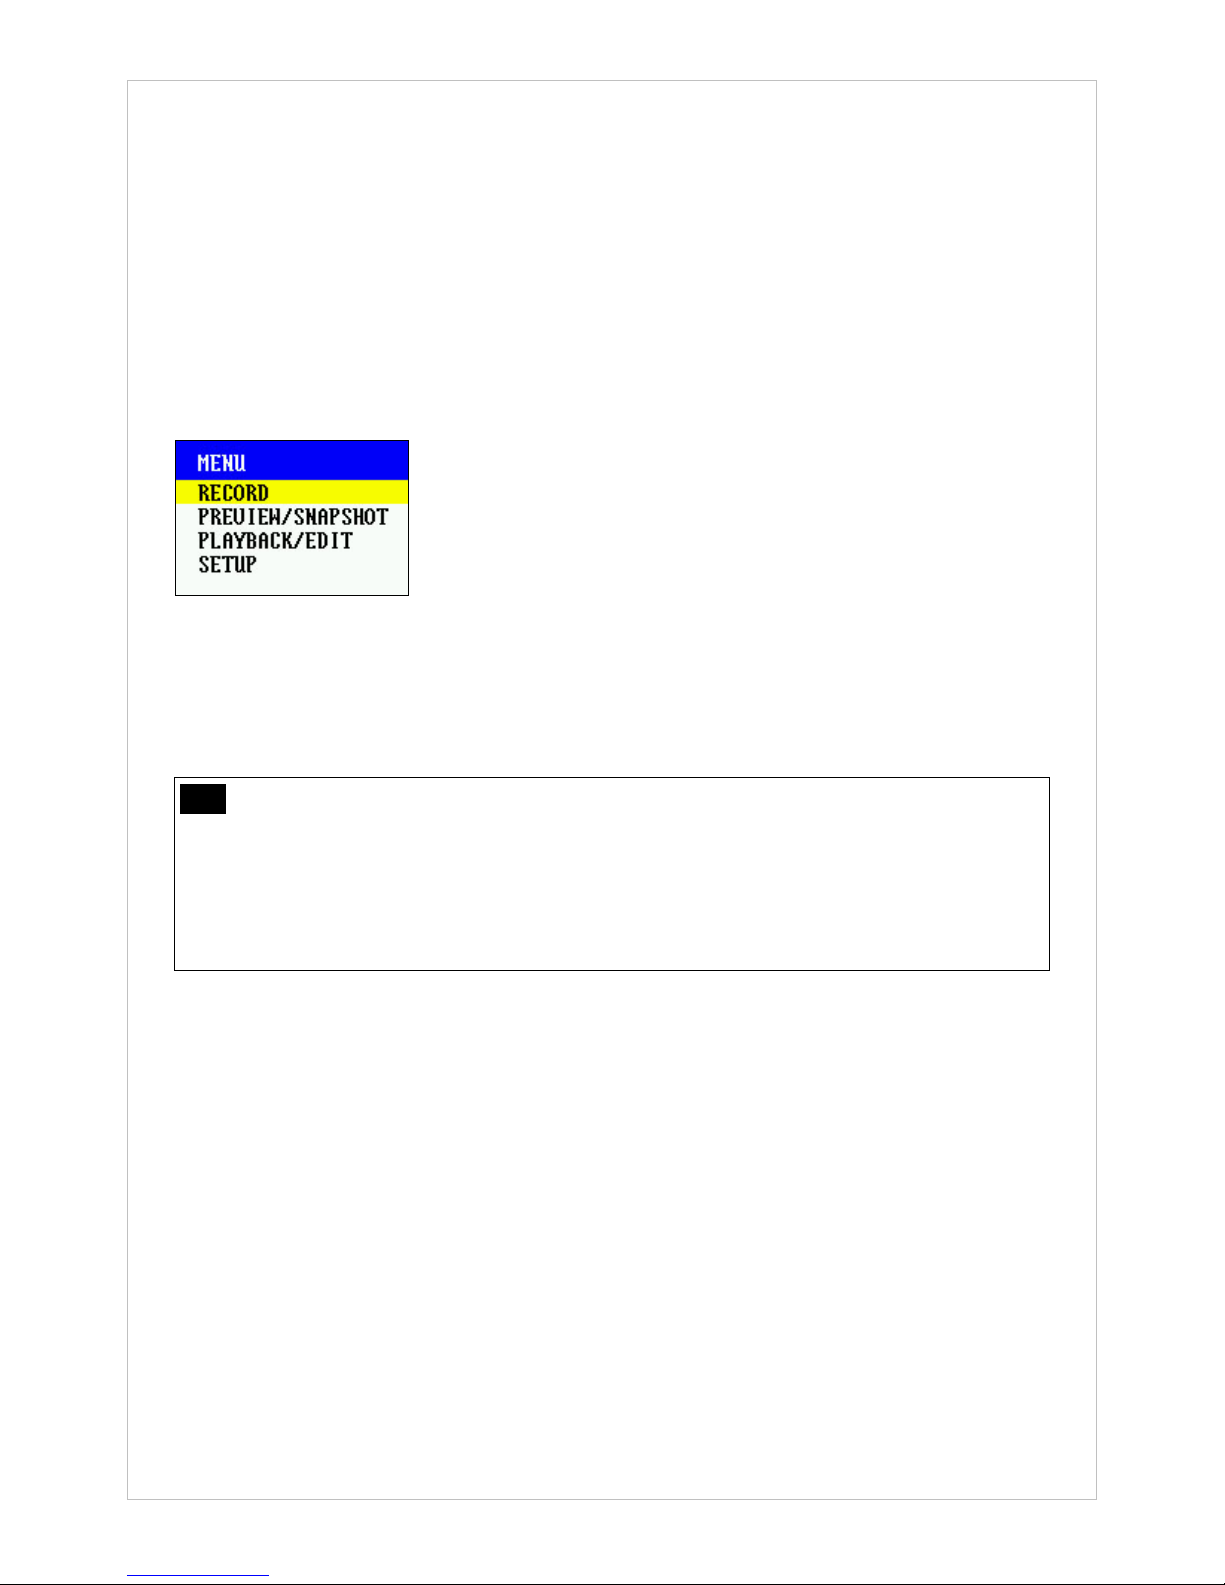
display of the following four menu options on the external display device:
○
4Select Preview/Snapshot and then press the Center button to view CamBall’s field of vision on
the screen of the external display device.
○
5Press the Center button to take a picture. A status message will appear on screen as CamBall
takes the picture. To return to the previous menu, press the [◀] button.
Note Taking Pictures when Memory is Full
You will not be able to take additional pictures any more when the memory is full.CamBall
reaches full memory capacity and if you have the overwrite feature turned off. If you try to
taking picture, the MEM indication lamp will blink in red five times when you attempt to take a
snapshot, indicating that there is not enough storage space available and that you need to
delete some files to free up space.
4.1.3 Viewing and Editing Photos
-Snapshots can be viewed and edited either by connecting CamBall to a computer or an external
display device.
4.1.3.1. Viewing and Editing Photos on a computer
○
1Connect CamBall to your compuer using the USB cable.
○
2CamBall’s REC, MP3, TV, and TYPE indication lamps will turn on in a cross shape, which
means your PC has recognized CamBall.
○
3Click the icon of My Computer on your PC to find the two new disk drives generated by CamBall.
The new disk drive from, CamBall’s built-in memory is generally named “CamBall” and that from the
Micro SD Card “CamBall_SD” or “Removable Disk Drive”, depending on the computer’s
configuration.
○
4The new disk drive from built-in memory is differentiated from that from the external memory in
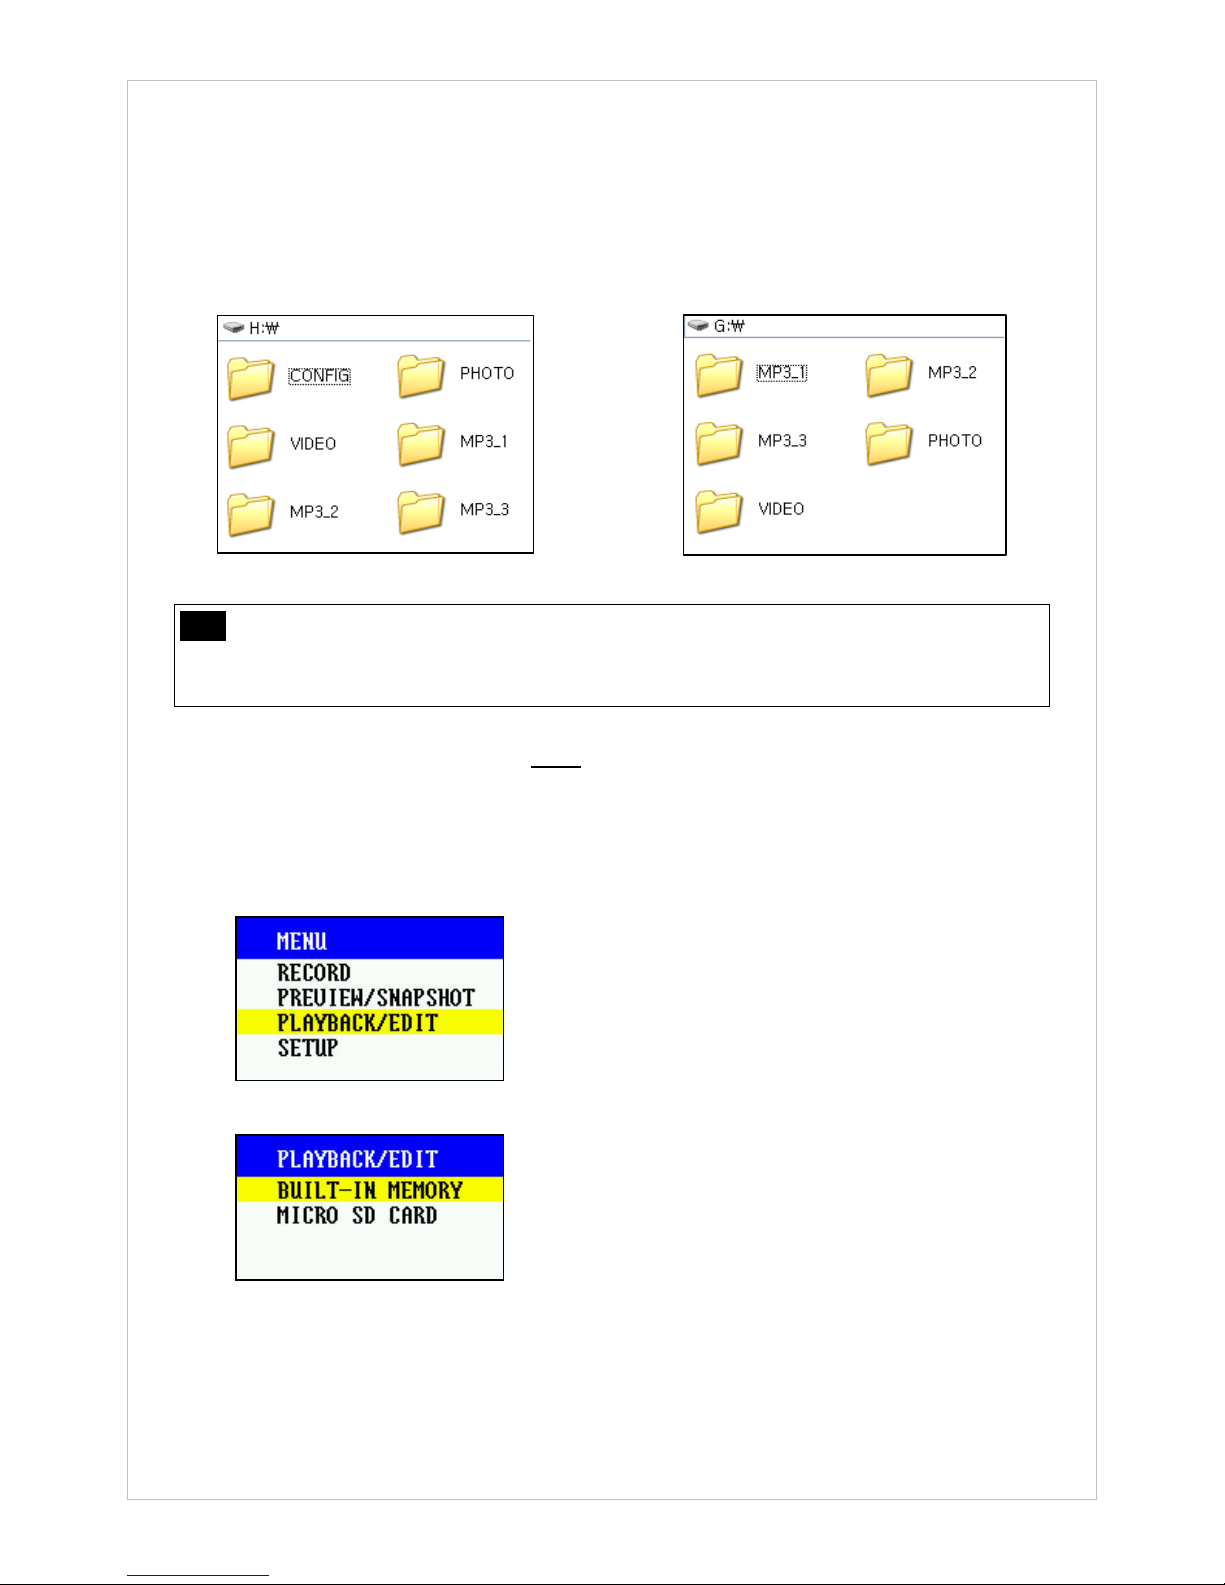
17
that it contains a CONFIG folder, as shown below.
○
5Snapshot files are saved in the PHOTO folders in both disk drives
○
6Open the PHOTO folder and select photo files to view or edit the pictures using StarEncoder
(included in the CD-ROM).
Built-inMemory ExternalMemory
Note Disk Naming of Micro SD card
Formatting the Micro SD card from CamBall renames the disk name on the PC to
‘CamBall_SD’. Otherwise, the disk name will display as ‘Removable Disk Drive’.
4.1.3.2. Viewing and Editing Photos from on an External Display Device (TV or CamBall
LCD)
(1) Viewing Photos
○
1Set CamBall on TV mode and connect it to an external display device (refer to section
4.1.2.). Then place the curser on Playback/Edit in the menu and then press the Center button.
○
2Select Built-in Memory or Micro SD Card and press the Center button.
○
3Place the curser on Photo and press the Center button.

18
○
4Place the curser on the file you wish to view and press the Center button.
○
5While a photo is being displayed, press the [◀] button to view the previous file and the [▶]
button to view the next file.
○
6To end photo viewing and return to the file selection menu, press and hold over two seconds
the [◀] button.
○
7To return to the previous menu, press the [◀] button.
(2) Editing of Photos
○
1From the file selection menu, press the [▶] button to access the edit options at the bottom of
the menu.
○
2Place the cusor on the desired edit option and press the Center button to edit.
Previous/Next: Opens the previous/next page (if there are multiple pages of files).
Delete/Delete All: Delete selected file or files.
Copy/Copy All: Copy selected file or files from the built-in memory to the external memory
or vice versa.
○
3After you’ve finished editing, press the [▲] button to exit the edit menu. To return to the
previous menu, press the [◀] button.

19
4.2 Recording Video (Recording Mode)
-With CamBall, you can record video and audio. You can also utilize an external display device
like TV monitor or CamBall LCD monitor(SG94) when you record with CamBall.
Note Before recording Video…
Carefully read 5. Initial Configurations and 6. CamBall Configurations of this manual and
configure the date/time, monitor, and memory settings before recording video and audio.
4.2.1 Recording without an External Display Device
(1) Setting CamBall on Standby Mode
-Press and hold the Center button to power CamBall on. If all the
indication lamps of REC, MP3, and TV are off, CamBall is in
standby mode.
-If any of the three indication lamps are on(CamBall is not in
standby mode), turn them off by pressing and holding the related
direction buttons over 2 seconds.
(2) Start Recording
-When CamBall is in standby mode, press and hold the [▲] button over 2 seconds. This turns on
the REC indication lamp and gets CamBall to start recording. If the REC indication lamp is
turned on in both green and red, this indicates that both video and audio are being recorded. To
record video or audio only, you have to change the configurations (Refer to section 6. CamBall
Configurations.)
(3) End Recording
-To stop recording, press and hold the [▲] button over 2 seconds. The REC indication lamp will
turn off and CamBall will stop recording.
4.2.2 Recording utilizing an External Display Device
-It is possible to connect your CamBall to a TV monitor or CamBall LCD monitor(SG-LMP, sold
separately) and record video while viewing CamBall’s field of vision on the screen. (computer may
not be used as external display devices).
○
1Connect CamBall to an external display device using the USB cable. Please note that the video
plug is yellow and the audio plug red.
○
2Make sure CamBall is in standby mode (Refer to 4.1.1 Setting CamBall on Standby Mode).
○
3From standby mode, press and hold the [▼] button for over 2 seconds to turn on. The TV
indication lamp green, which means CamBall mode has been changed to TV mode with the display
of the following four menu options on the external display device:

20
○
4From the menu displayed on screen, select Record and then press the Center button. This turns
on the REC indication lamp, and CamBall starts displaying its field of vision on the screen, and
commences to record video.
○
6Press the [◀] button or press and hold the [▲] button over 2 seconds to stop recording.
Note Recording Video when Memory is Full
You will not be able to record additional footage when CamBall reaches full memory capacity
and if you have the overwrite feature turned off. If you try to record video, the MEM indication
lamp will blink in red five times to indicate that there’s not enough storage space available and
that you need to delete some files to free up space.
4.2.3 Video Playback and Edit
4.2.3.1. Playback and Edit on a PC
○
1Refer to section 4.1.3.1 for connecting CamBall to your computer.
○
2Recored video files are saved in the VIDEO folders.
○
3Open the VIDEO folder and select video files to playback or edit.
Note To Playback Video on a PC
-Video files created by CamBall can be played back from Windows Media Player, DivX
Player and other media player. However, the MPEG4 codec must be installed on the PC.
-StarEncoder (included in the CD-ROM) makes it unnecessary to install additional codecs
on to your system in order to view CamBall video files. With StarEncoder you can
convert non-CamBall format video files into those viewable on a PC with CamBall and
vice versa.
-Starnex’s web site(www.starnexinternational.com) provides free download of the latest
version of StarEncoder.
-If you are unable to playback video using Windows Media Player or DivX Player, use
StarEncoder.
Note Connecting CamBall to a PC while Recording and Playing Back Recorded Files
-If you connect CamBall to a PC while recording is in progress, CamBall stops recording.
The recorded files can then be played back or edited on the PC. Disconnecting CamBall
from the PC resumes the recording.
This manual suits for next models
1
Table of contents


