STAYHOT Classic 1224 User manual
www.stayhot.se
SESE
Instruktionsmanual
Stayhot Classic Värmelist
Modeller 1224 /1224 Trattoria /1223 /1223 Trattoria /1222 /1250
Instruction Manual
Stayhot Classic Strip Heater
Models 1224 / 1224 Trattoria / 1223 / 1223 Trattoria / 1222 / 1250
EN

2 3
Innehållsförteckning
1 Säkerhetsinformation 4
2 Allmän information 6
3 Installation
8
4 Montering
10
Instruktionsmanual Svenska
Stayhot Classic Värmelampa
Svensk design och produktion.
Tack för ert inköp av Stayhot Classic värmelampa!
Här hittar du monteringsinstruktioner, elscheman,
säkerhetsriktlinjer och annan värdefull information.
Vi hoppas ni får mycket användning av denna produkt i
många år framöver.
Om ni någon gång i framtiden behöver hjälp med er
värmelampa eller har några frågor så tveka inte att
höra av er.
Våra Stayhot Classic värmelampor är svensktillverkade
med bas från vår fabrik i Sollentuna. Detta ger oss full
kontroll över material, leverantörer och återvinning, där vi
endast nöjer oss med den högsta kvaliteten.
Varje lampa som tillverkas testas individuellt och
inspekteras noggrant av vårt produktionsteam innan de
packas och levereras.
Originalmanual
Instruktionsmanual
210316 V5.0
Vi förbehåller oss rätten till
förändring av tekniska ändringar
när som helst och utan förvarning.
Stayhot AB
Telefon +46 8 35 79 15
Email info@stayhot.se
Web www.stayhot.se
Adress Knistavägen 1B
191 62 Sollentuna
SE

4 5
Läs säkerhetsinstruktionerna noga innan installation och användning av
produkten. Tillverkaren ansvarar ej för skador eller personskador till följd av
felaktig installation eller användning som bryter mot dessa instruktioner.
Spara bruksanvisningen för framtida bruk.
1.1 Allmänt
Produkten skall ej användas av barn under 15 år, personer med en nedsatt
fysisk, sensorisk, eller mental förmåga eller av personer med bristande
erfarenhet eller kunskap. Produkten skall placeras oåtkomlig för husdjur och
barn under 8 år. Produkten skall ej användas som leksak.
1.2 Installation
Varning! Risk för skador, brännskador, brand och elektriska stötar.
Elektriska anslutningar skall alltid utföras av behörig elektriker.
Elektrisk anslutning av produkten skall ske enligt de anvisningar som
ges i Kapitel 3, “Installation”.
Montering av produkten skall ske fackmannamässigt enligt de anvisningar
som ges i Kapitel 4, “Montering”.
Produktens strömkälla skall överensstämma med given märkdata.
Produkten skall jordas. Installera eller använd aldrig en skadad eller på annat
sätt defekt produkt. Avlägsna allt förpackningsmaterial innan installation.
Produkten skall föregås av en allpolig strömbrytare. Produkten skall ej
installeras i utrymmen där den kan komma i direktkontakt med vatten.
Varning! Om denna strålningsvärmare är placerad intill andra ytor
eller apparater rekommenderas det att dessa ytor eller apparater
består av ej lättantändliga material inom området för värmestrålning.
Lättantändliga material som befinner sig inom området för
värmestrålningen skall täckas med ett värmeisolerande material och
brandskyddsåtgärder skall vidtas.
1.3 Användning
Varning! Risk för skador, brännskador, brand och elektriska stötar.
Varning! Varm yta.
Produktens yta blir varm under användning och skall hanteras med
försiktighet. Eventuella reparationer eller ändringar av produkten skall
endast göras av godkänd servicetekniker i samverkan med tillverkaren.
Vid eventuell service eller byte av komponenter skall produkten kopplas
från elnätet.
Varning! Vid skada på produkten eller produktens elkabel skall den
omedelbart kopplas bort från elnätet och tas ur bruk.
Varning! Produkten innehåller elektriska anslutningar och skall ej
komma i kontakt med vatten.
Produkten skall skyddas från fukt, vattenstrålar och regn. Produkten får
ej doppas i vatten eller annan vätska.
Vid rengöring, koppla från produkten från elnätet och se till så att den
har hunnit svalna från senaste användning. Produkten får ej rengöras
med högtryckstvätt. Följ de instruktioner för skötsel och rengöring
som finns i Kapitel 2, “Allmän information”. Installerad produkt får ej
övertäckas.
1.4 Avfallshantering
Klipp av produktens elkabel nära produkten innan kassering.
Kassera produkten enligt gällande regler/anvisning på den plats där
produkten kasseras.
1. Säkerhetsinformation SE

6 7
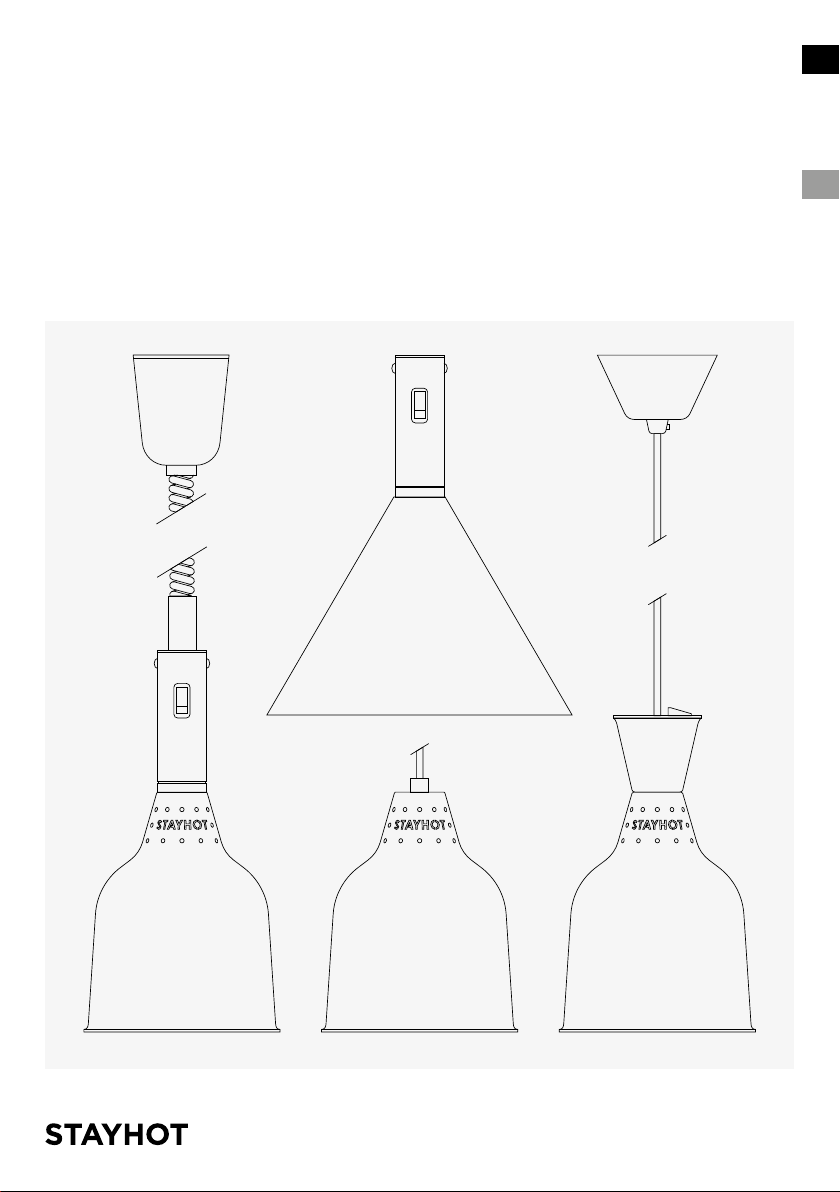
Modeller
1224 Takmontering med hissfunktion
1223 Takmontering
1224 Trattoria Takmontering med hissfunktion
1223 Trattoria Takmontering
1222 Takmontering
1250 Takmontering
Allmän information
För att på bästa sätt kunna utnyttja din Stayhot Värmelampa Classic,
läs noga igenom dessa instruktioner och bevara manualen för
framtida behov.
Stayhot Värmelampa Classic är designad att användas tillsammans
med en Edison-gängad, E27 infraröd (hårdglas) värmelampa
(inkluderad).
2. Allmän information
Specifikation
Spänning 230 V
Eekt 250 W
Frekvens 50 Hz
Typ av lampa Använd endast 250 W röda eller klara volframlampor
med infrarött hårdglas.
Viktigt! Produkten är endast anpassad för inomhusbruk.
Denna värmelampa är en elektrisk produkt av klass 1
och måste jordas.
Användningstips
Varning! Lampskärmen och glödlampan blir varma
under användning.
– Undvik att ta på värmelampan när denna används.
– Rör inte vid värmelampan med våta händer.
– Torka alltid av vätska & matstänk på värmelampan så
snart som möjligt.
Skötsel & rengöring
– Stäng av strömmen innan rengöring av produkten.
– Undvik slipande rengöringsmedel som kan skada värmelampans yta.
– Produkten får ej komma i kontakt med vatten.
– Produkten får ej spolas med vatten.
– Produkten får ej rengöras med högtryckstvätt.
SE

8 9
3. Installation
Färgkodning av kablar
OBS! Kablarna är färgkodade på följande sätt:
Grön / Gul Jord
Blå Neutral
Brun Fas / Spänningsförande
Elektrisk anslutning
Varning! Installationen av produkten skall utföras av en
behörig elektriker.
OBS! Innan påbörjad installation skall produktens strömkälla
kopplas från elnätet.
– Installation måste utföras i enlighet med IEE installationsföreskrifter
– BS7671 (motsvaras av IEC 364) samt bifogade instruktioner.
– Eventuella kanaler eller lyftverk måste vara jordade.
– Efter eventuell justering, tillförsäkra att alla takrosetter är ordentligt
säkrade. Elektriska anslutningar får inte friläggas.
– Produkten skall föregås av en allpolig strömbrytare.
Elscheman
L1 S1
N
L1
N
Modeller 1224, 1223, 1222 Modell 1250
L1 S1
N
L1
N
SE
10 11
Allmänna monteringsanvisningar
Varning! Dessa värmelampor är inte lämpliga för montering på
en normalt antändbar yta.
Alla modeller bör monteras för användning vid 300 mm till 400 mm
från lampskärmens undre kant till underlag. Vid montering av flera
lampor i rad bör avståndet mellan lamporna vara 450 mm.
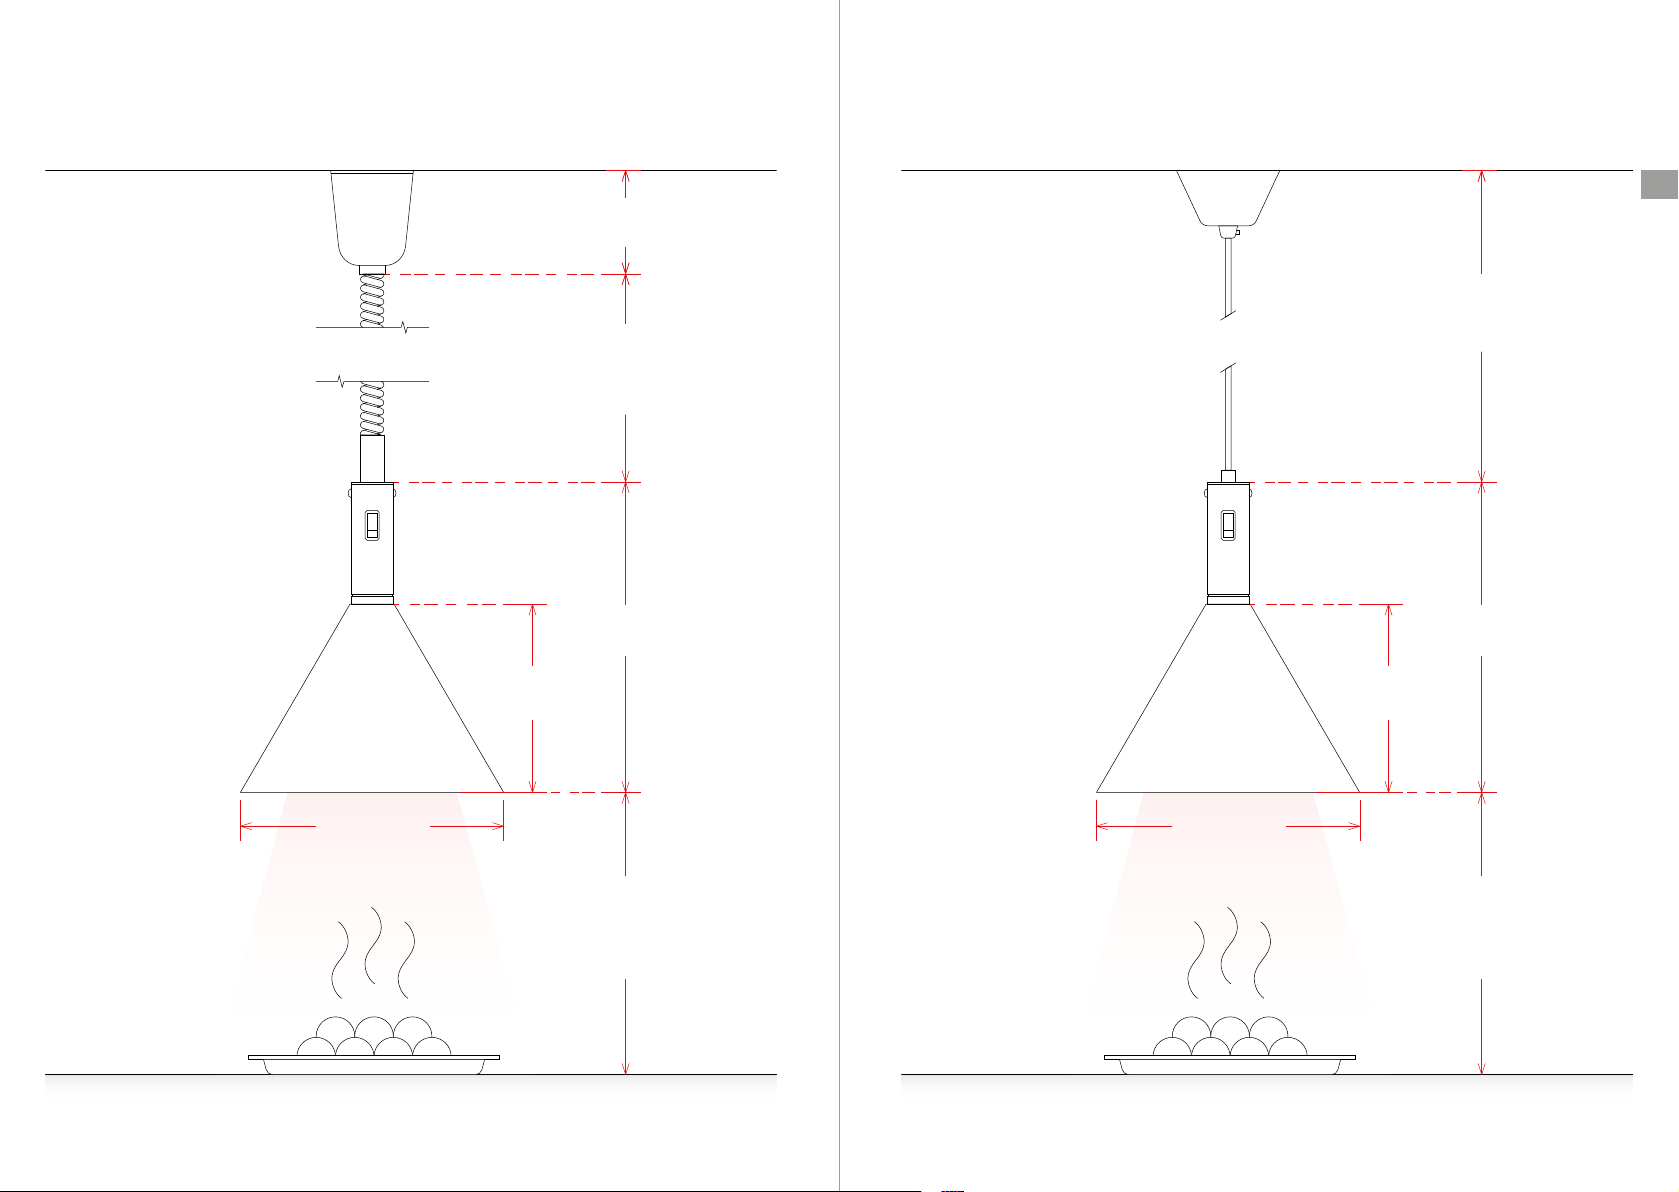
4. Montering
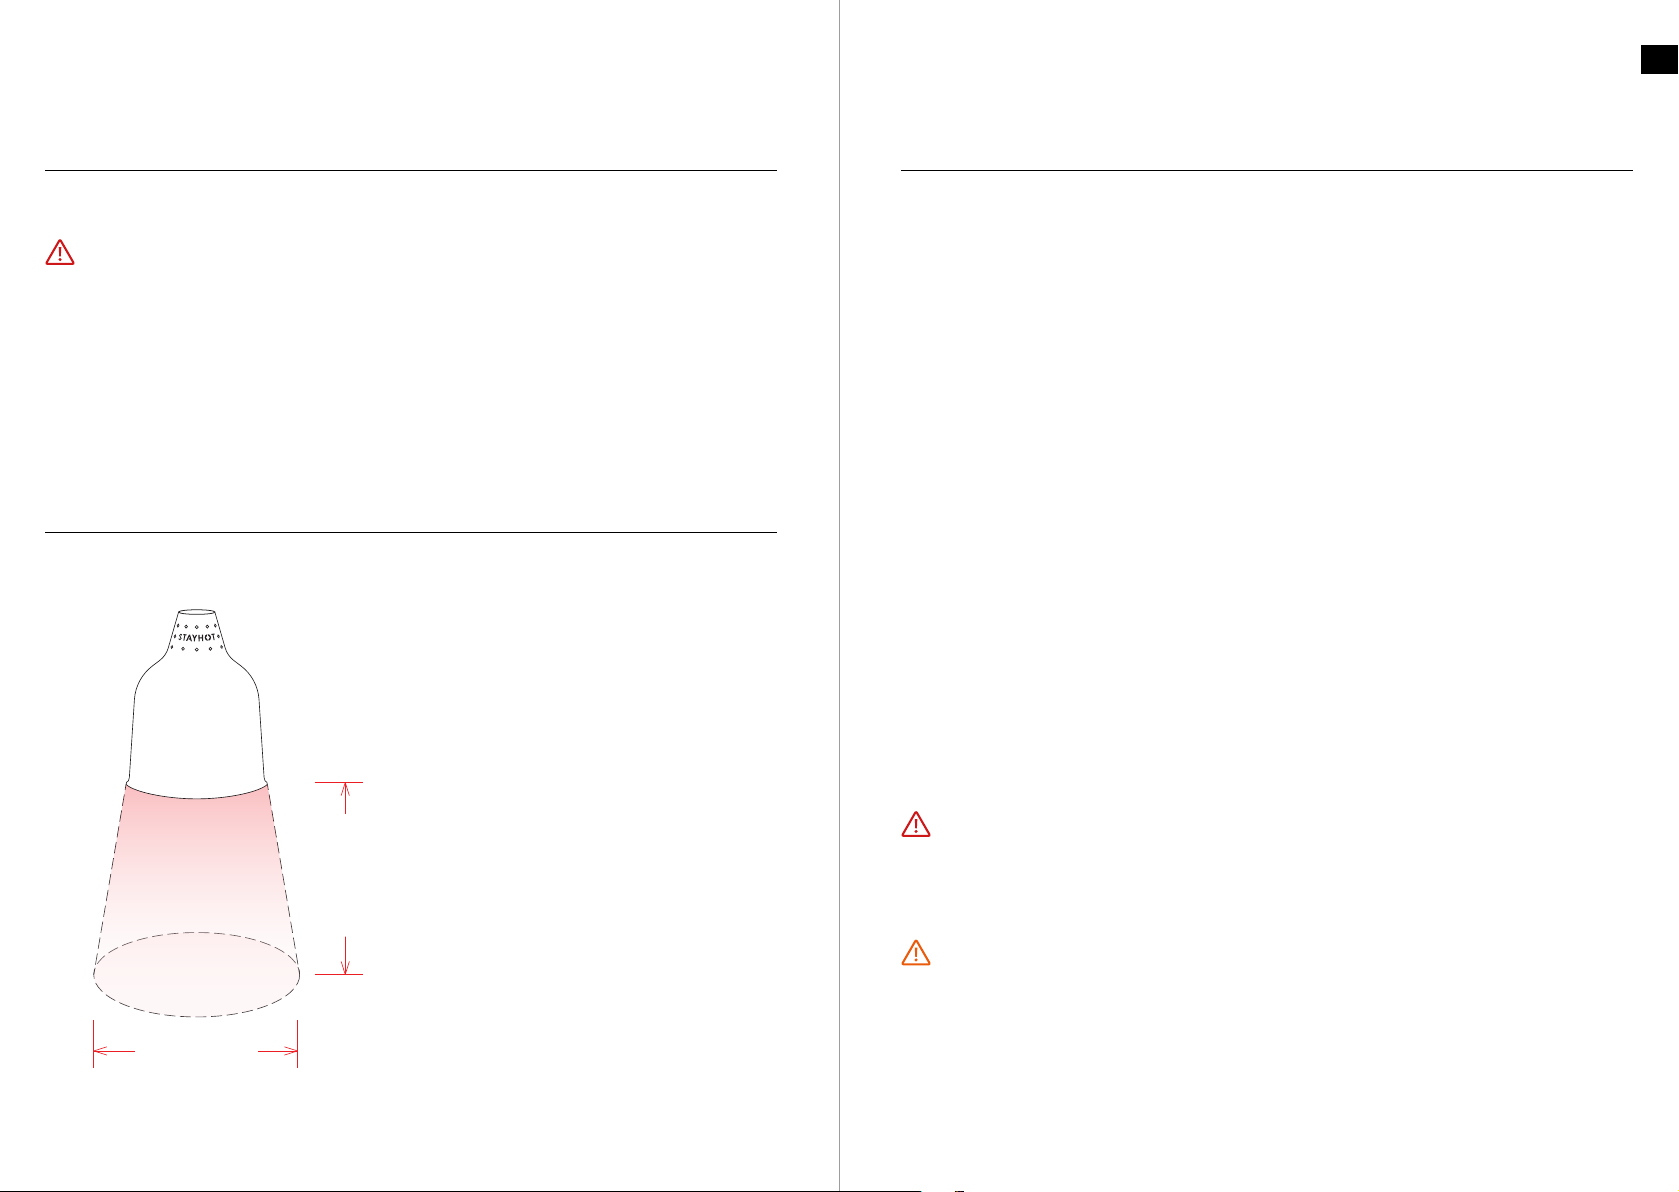
Illustration – värmespridning
Ø 350.0 mm
350.0 mm
Modell 1250
Modell 1250 består av en 2 meter lång värmebeständig, svart
flerledningskabel (3 ledningar) med dragavlastare.
A Markera värmelampans position och fäst ordentligt i taket.
B För att justera kabellängden på modell 1250, stäng av strömmen,
lossa på dragavlastarens överdel och skruva åt igen.
Modeller 1222 / 1223 / 1223 Trattoria
Modeller 1222, 1223 och 1223 Trattoria har en kabellängd på 2 meter.
För justering av kabellängd se sida 13.
Modeller 1224 / 1224 Trattoria
Modell 1224 och 1224 Trattoria är utrustad med hissfunktion.
När den höj- och sänkbara värmelampan är helt indragen är produktens
totala längd från tak ca 990 mm. Fullt utdragen är längden 1990 mm.
Varning! Produktens strömkälla skall alltid kopplas från
elnätet innan tak-kåpan avlägsnas från sin position. Anslut inte
strömkällan till elnätet förrän tak-kåpan är återmonterad i sin
ursprungliga position.
OBS! Om värmelampan lämnas i utdraget tillstånd under en
längre tid så kan fjädern i hissmodulen behöva spännas för att
lampan ska kunna återgå till sin högsta position.
För mer information om hur man justerar fjädern i hissmodulen,
se sida 20. Samtliga mått är ungefärliga.
SE

12 13
4. Montering
Varning! Elanslutningar skall utföras av behörig elektriker.
Varning! Installerad produkt skall alltid vara jordansluten.
Varning! Lampan skall monteras enligt angivelse.
OBS! Krok medföljer ej.
Monteringsanvisning värmelampa 1224 och 1224 Trattoria
1. Häng upp hissmodulen på kroken i tak/monteringsyta.
2. Anslut nolla, jord och fas i kopplingsplinten enligt angivelse,
se Kapitel 3, “Installation”.
3. Dra upp tak-kåpan tills gängorna får kontakt med hissmodulen.
4. Skruva tak-kåpan medsols tills kanten ligger mot
tak/monteringsyta och alla elanslutningar är täckta.
Varning! Elanslutningar skall utföras av behörig elektriker.
Varning! Installerad produkt skall alltid vara jordansluten.
Varning! Lampan skall monteras enligt angivelse.
OBS! Krok medföljer ej.
Monteringsanvisning värmelampa 1222, 1223 och 1223 Trattoria
1. Justera bygeln för önskad sladdlängd och häng den på kroken
i tak/monteringsyta.
2. Anslut nolla, jord och fas i kopplingsplinten enligt angivelse,
se Kapitel 3, “Installation”.
3. Dra upp tak-kåpan mot tak/monteringsyta så den täcker kablar
och elanslutningar.
4. Fäst tak-kåpan genom att skruva in skruven på dragavlastaren.
1
2
4
3
1
2
4
3
1
2
4
3
1
2
4
3
1
2
4
3
1
2
4
3
SE
14 15
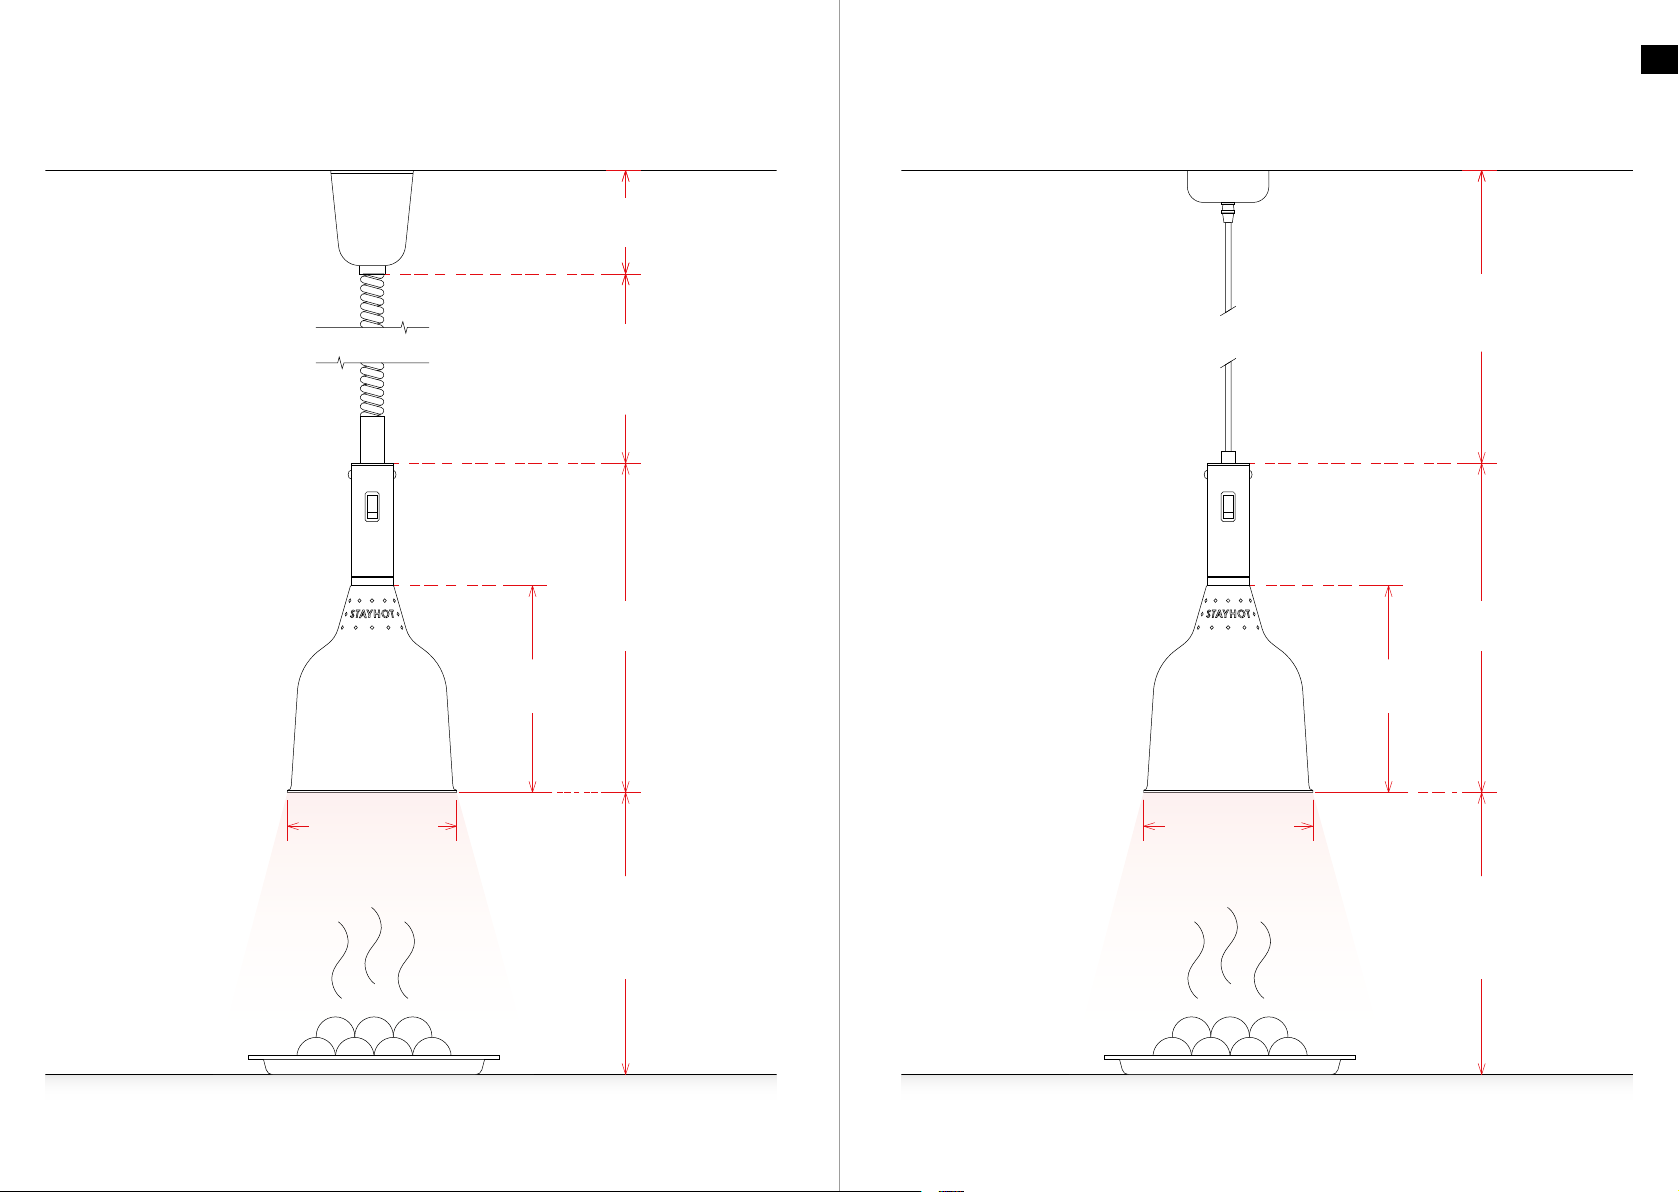
Modell 1224
Takmontering med hissfunktion
Modell 1223
Takmontering utan hissfunktion
350.0 mm
220.0 mm
110.0 mm
Ø 180.0 mm
MIN 550 mm
~
MAX 1550 mm
300 mm
~
400 mm
Ø 180.0 mm
350.0 mm
220.0 mm
CORD MAX
2000 mm
300 mm
~
400 mm
SE

16 17
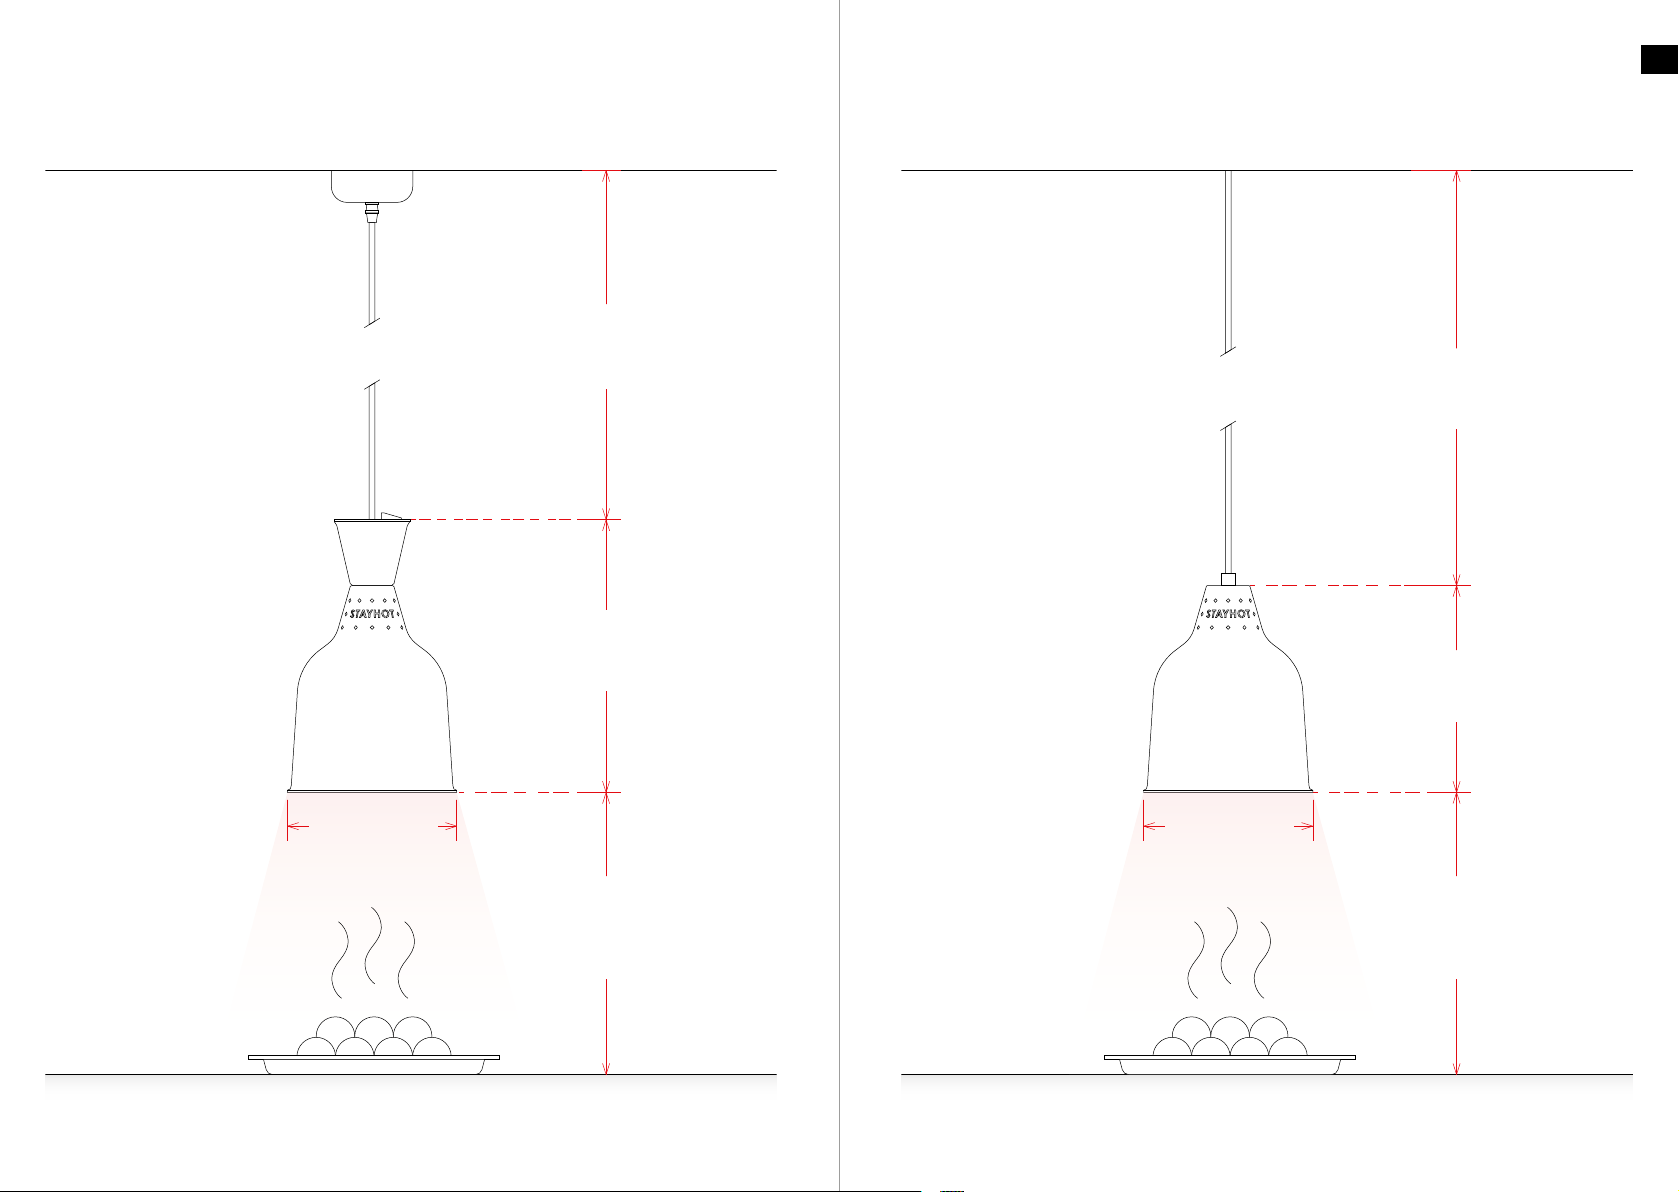
Modell 1224 Trattoria
Takmontering med hissfunktion
Modell 1223 Trattoria
Takmontering utan hissfunktion
Ø 280.0 mm
330.0 mm
200.0 mm
110.0 mm
300 mm
~
400 mm
MIN 550 mm
~
MAX 1550 mm
Ø 280.0 mm
330.0 mm
200.0 mm
CORD MAX
2000 mm
300 mm
~
400 mm
SE
18 19
Modell 1222
Takmontering utan hissfunktion med strömbrytare
Modell 1250
För fast takmontering med sladd & dragavlastare
290.0 mm
Ø 180.0 mm
300 mm
~
400 mm
CORD MAX
2000 mm
220.0 mm
Ø 180.0 mm
300 mm
~
400 mm
CORD MAX
2000 mm
SE

20 21
Detaljskiss
Hissfunktion modell 1224
Detaljskiss
Modell 1222
3-kärning ytkabel
Metallhållare som
används för montering
måster vara jordade.
Längdjustering
Takrosett av plast
Skyddad
anslutningsplint
(Ingår ej)
Värmelampa
Stayhot Värmelampa 1224 Höj- och Sänkbar Modell
Tillse att takrosetten
omplaceras och säkras
HÖJ- OCH
SÄNKFUNKTION
NED
UPP Värmebeständig
silikonskyddad och
böjlig flerledningskabel
(3 ledningar)
Takrosett
Dragavlastare
3-kärnig ytkabel
N L
Dragavlastare
Strömbrytare
Jordad
SE
Detaljskiss
Modell 1250
N L
Dragavlastare
Jordad

22 23
Instruction Manual English
Stayhot Heat Lamp Classic
English
24 25
Table of Contents
Instruction Manual English
Stayhot Heat Lamp Classic
Made in Sweden.
Thank you for your purchase of our Stayhot Classic
heat lamp!
In this manual you will find installation instructions, wiring
diagrams, safety guidelines and other valuable information.
We hope you will get a lot of use from this product for
many years to come.
If you ever need any assistance with your lamp or have any
questions, please don’t hesitate to get in touch.
Our Stayhot Classic heat lamps are manufactured right
here in our Swedish factory. This gives us full control over
materials, suppliers and recycling, where we only settle for
the highest quality.
Each lamp manufactured is individually tested and
carefully inspected by our production team before they are
packed and shipped.
Translated from
Original Manual
Instruction Manual
210316 V5.0
Subject to technical modifications
at any time and without notice.
Stayhot AB
Telefon +46 8 35 79 15
Email info@stayhot.se
Web en.stayhot.se
Adress Knistavägen 1B
191 62 Sollentuna
Sweden
1 Safety Information 26
2 General Information 28
3 Installation
30
4 Assembly Instructions 32
EN

26 27
1.3 Use
Warning! Risk of injuries, burns, fire and electrical shock.
Warning! Hot Surface
The surface of the product becomes hot during use and should be handled
with caution. Any repairs or changes to the product may only be made by
an approved service technician in cooperation with the manufacturer.
In case of service or replacement of components, disconnect the product
from the power supply.
Warning! In case of damage to the product or power cord, it should
immediately be disconnected from the power supply and be taken
out of use.
Warning! The product contains electrical connections and should
not come into contact with water.
Protect this appliance from moisture, water spray and rain. Do not
immerse the product in water or other fluids. When cleaning, disconnect
the product from the power supply and ensure that it has cooled from the
last use. Do not use jet water to clean this product. Follow the instructions
for maintenance and cleaning in Chapter 2, “General Information”.
An installed product should not be covered.
1.4 Waste disposal
Cut power cord close to the product before disposal.
Dispose of the product according to the applicable regulations and
instructions at the place where the product is disposed of.
1. Safety Information
Read the safety instructions carefully before installation and use of the
product. The manufacturer will not take responsibility for injuries or damage
as a result of incorrect installation or use. Save this instruction manual for
future use.
1.1 General
The product should not be used by children of less than 15 years old, people
with reduced physical, sensory or mental capabilities or people lacking
experience and knowledge. The product should be placed out of reach of pets
and children of less than 8 years old. The product should not be used as a toy.
1.2 Installation
Warning! Risk of injuries, burns, fire and electrical shock.
Electrical connections shall be made by a certified electrician. Electrical
connections shall be made according to the instructions in Chapter 3,
“Installation”.
Mounting of the product should be of professional standard according to the
instructions in Chapter 4, “Mounting”.
The power source must conform to the product’s specified label data. The
product should be connected to a socket with earthing connection. Do
not install or use a damaged or in other ways faulty product. Remove all
packaging material before installation. The product should be preceded by an
all pole electrical switch. The product should not be installed in an area where
it may come in direct contact with water.
Warning! If this radiant heater is positioned adjacent to other
areas or appliances, it is recommended that, within the range
of the radiation, these areas or appliances be made of
non-combustible material, otherwise, they shall be clad with
a noncombustible heat-insulating material, and attention is to be
paid to fire prevention regulations.
EN
28 29
Models
1223 Pendant, ceiling mounted
1224 Pendant, ceiling mounted with rise and fall function
1223 Trattoria Pendant, ceiling mounted
1224 Trattoria Pendant, ceiling mounted with rise and fall function
1222 Pendant, ceiling mounted
1250 Pendant, ceiling mounted
General Information
To optimize the use of your Classic Stayhot heat lamp, please read
these instructions carefully and keep the manual for future use.
Our Stayhot Classic Heat Lamps are designed for use with a threaded
Edison, E27 infrared (hard glass) heat lamp (included).
2. General Information
Technical Specifications
Voltage 230 V
Power 250 W
Frequency 50 Hz
Lamp type You may use either red or clear tungsten filament
infra-red hard glass 250 W lamps only
Important: This appliance is for indoor use only.
This luminaire is a Class 1 electrical product and must be earthed.
Operational Tips
Warning! The lamp shade surface and light bulb becomes
hot during use.
– Avoid touching shades and lamps when in use.
– Do not operate the heat lamp with wet hands.
– Always wipe liquid and food splashes o lamp and shade
as soon as possible.
Maintenance & Repairs
– Avoid abrasive detergents since it may damage the surface
of the heat lamp.
– The product shall not come in contact with water
– Do not rinse the product with water
– Do not use jet water to clean this product.
EN

30 31
3. Installation Instructions
Cable Colour Codes
Important: The wires are coloured in accordance
with following code:
Green & Yellow Earth
Blue Neutral
Brown Live
Electrical Connection
Warning! The installation of the heat lamp should be carried
out by a qualified electrician.
Important! Before commencing installation power to the
relevant circuit must be switched o at the main circuit breaker
or fuse panel.
– Installation must follow IEE Wiring Regulations – BS7671
(IEC 364 a related standard) and also instructions attached.
– Please refer to your national wiring regulations.
– Any channels or gantries used must be grounded.
– Ensure all ceiling roses are properly secured after any height
or tension adjustments are made. Do not leave electrical
connections exposed.
– The product should be preceded by an all pole electrical switch. Wiring Diagrams
Models 1224, 1223, 1222 Model 1250
L1 S1
N
L1
N
L1 S1
N
L1
N
EN

32 33
General Assembly Instructions
Warning! These luminaires are not suitable for mounting on a
normally flammable surface.
All models should be mounted for use at 300 mm to 400 mm between
the bottom edge of the lamp shade and the workspace below. For
multiple mounting suspend at approximately 450 mm.
4. Assembly Instructions
Heat Distribution
Model 1250
Model 1250 is comprised of 2 metres of 3-core heat resisting black
cable. Bale grips are fitted to both ends.
A Mark out and securely attach to ceiling.
B To adjust the cable length, switch o power and simply loosen the
top cord grip and re-tighten to suit.
Models 1222 / 1223 / 1223 Trattoria
Models 1222, 1223 and 1223 Trattoria has a cord length of 2 meters.
For adjustments of the cable length, see page 12.
Models 1224 / 1224 Trattoria
Models 1224 and 1224 Trattoria are equipped with a rise and fall
function. The total length of the product ranges between 990 mm
and 1990 mm.
Warning! Always switch o the relevant circuit at the main circuit
breaker or fuse panel before deattaching the ceiling canopy. Do
not turn the power back on until the ceiling canopy is re-attached.
Note! If the heat lamp is left in an extracted state for a long time
the spring in the rise and fall module may have to be tightened to
be able to reach its highest state again. For more information on
how to adjust the rise and fall module see page 18. All dimensions
are approximate.
Ø 350.0 mm
350.0 mm
EN

34 35
Warning: The installation of the heat lamp should be carried out by
a qualified electrician.
Warning! An installed product should always be grounded.
Warning! The product should always be mounted according to
these instructions.
NOTE! Ceiling hook not included.
Assembly instructions for heat lamp 1223 and 1223 Trattoria
1. Adjust the cord strain hanger for the desired cord length and hang it on
the ceiling hook.
2. Connect the neutral, ground and phase conductor to the block terminal
according to the circuit diagram, see Chapter 3, “Installation”.
3. Push the ceiling canopy along the cord until the edge touches the
ceiling so that it covers the electrical connections.
4. Attach the ceiling canopy with the screw on the strain relief.
Warning: The installation of the heat lamp should be carried out by
a qualified electrician.
Warning! An installed product should always be grounded.
Warning! The product should always be mounted according to these
instructions.
NOTE! Ceiling hook not included.
Assembly instructions for heat lamp 1223 and 1223 Trattoria
1. Hang the rise and fall module on the ceiling hook.
2. Connect the neutral, ground and phase conductor to the block terminal
according to the circuit diagram, see Chapter 3, “Installation”.
3. Push the ceiling canopy along the cord until the threaded part on the
ceiling canopy connects with the threaded part on the rise and fall module
4. Screw the ceiling canopy clockwise until the edge touches the ceiling so
that it covers the electrical connections.
4. Assembly Instructions
1
2
4
3
1
2
4
3
1
2
4
3
1
2
4
3
1
2
4
3
1
2
4
3
EN

36 37
Model 1224
Pendant with rise and fall function
Model 1223
Pendant without rise and fall function
350.0 mm
220.0 mm
110.0 mm
Ø 180.0 mm
MIN 550 mm
~
MAX 1550 mm
300 mm
~
400 mm
Ø 180.0 mm
350.0 mm
220.0 mm
CORD MAX
2000 mm
300 mm
~
400 mm
EN
38 39
Model 1223 Trattoria
Pendant without rise and fall function
Model 1224 Trattoria
Pendant with rise and fall function
Ø 280.0 mm
330.0 mm
200.0 mm
110.0 mm
300 mm
~
400 mm
MIN 550 mm
~
MAX 1550 mm
Ø 280.0 mm
330.0 mm
200.0 mm
CORD MAX
2000 mm
300 mm
~
400 mm
EN
This manual suits for next models
5
Table of contents
Languages:
Other STAYHOT Heater manuals


Popular Heater manuals by other brands


Atlantic
Atlantic TIMELIS CHROME Installation and operating manual

Danfoss
Danfoss Akva Lux II VXe Instructions for installation and use

REVENTON
REVENTON AERIS 100E-1P Technical documentation

Qlima
Qlima TECTRO R236 operating manual

MILL
MILL JA200 Assembly and instruction manual

Easy@Home
Easy@Home DF1018 user manual

HearthPro
HearthPro QFH-5000 instruction manual

Perenio
Perenio Joule quick start guide

SOLIS
SOLIS DECO HEATER user manual

Riello
Riello NUOVO ACU Series TECHNICAL INFORMATION ASSEMBLY, USE AND MAINTENANCE INSTRUCTIONS

Honeywell
Honeywell UberHeat HCE200 Series user manual

Chromalox
Chromalox CAF-12 Installation, operation and maintenance