HearthPro QFH-5000 User manual

- 1 -
GARAGE CEILING HEATER
5000 W/240 V
QFH-5000
INSTRUCTION
MANUAL
Toll Free Helpline 1-844-455-4621

- 2 -
IMPORTANT SAFETY
INSTRUCTONS
WARNING: When using electrical appliances, basic precautions
should always be followed to reduce the risk of fire, electric shock, and
injury to persons, including the following:
Recommended Heating Capacity: 1.25 watts / ft3(0.03m3)
1) Read all instructions before using this heater.
2) This heater is hot when in use. To avoid burns, do not let bare skin touch hot
surfaces. If provided, use handles when moving this heater. Keep combustible
materials, such as furniture, pillows, bedding, papers, clothes, and curtains at
least 3’(0.9 m) from the front of the heater and keep them away from the sides
and rear.
3) Extreme caution is necessary when any heater is used by or near children or
invalids and whenever the heater is left operating and unattended.
4) Always switch off the heater when not in use.
5) Do not operate any heater with a damaged cord or after the heater malfunctions,
has been dropped or damaged in any manner. Return heater to authorized
service facility for examination, electrical or mechanical adjustment, or repair.
6) Do not use outdoors.
7) Do not run cord under carpeting. Do not cover cord with throw rugs, runners, or
similar coverings. Arrange cord away from traffic area and where it will not be
tripped over.
8) To disconnect heater, turn controls to off.
9) Do not install less than 8’(2.4m) from the floor and closer than 12” (305mm) to
any vertical surfaces or walls.
10) Do not insert or allow foreign objects to enter any ventilation or exhaust opening
as this may cause an electric shock or fire, or damage the heater.
11) To prevent a possible fire, do not block air intakes or exhaust in any manner. Do
not use on soft surfaces, like a bed, where openings may become blocked.
12) A heater has hot and arcing or sparking parts inside. Do not use it in areas where
gasoline, paint, or flammable liquids are used or stored.
13) Use this heater only as described in this manual. Any other use not
recommended by the manufacturer may cause fire, electric shock, or injury to
persons.
14) This heater is not intended for use with an extension cord.
15) This product must be installed by a certified electrician, in accordance with local
codes.
SAVE THESE INSTRUCTIONS
- 3 -
CAUTION:ALTHOUGH THIS DEVICE IS
PROVIDED WITH WHICH REDUCES THE RISK OF
ELECTRIC SHOCK, THIS PRODUCT SHOULD NEVER BE
USED NEAR WATER.
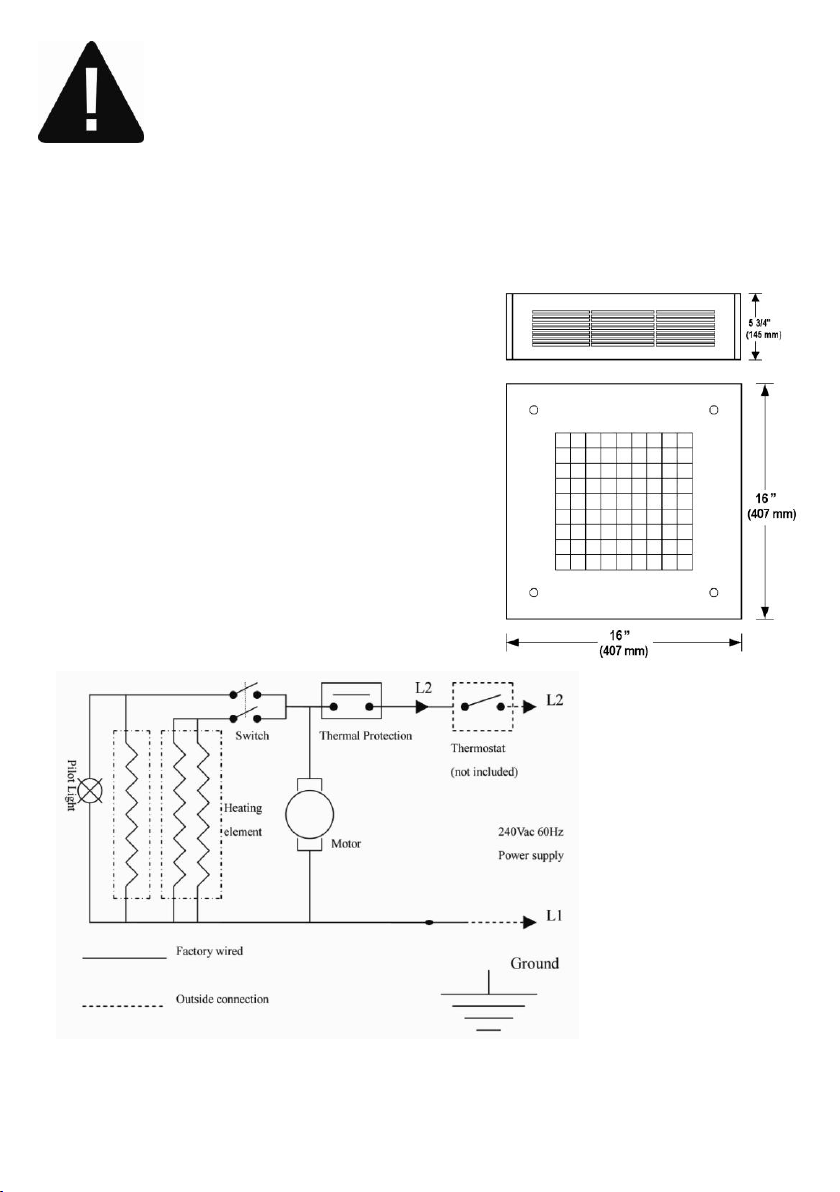
SPECIFICATIONS
Garage Ceiling Heater
Volt: 240 V
Watts: 5000 W
Frequency: 60 Hz
Amps: 20 A
BTU/h: 17060
This heater is intended to be a ceiling-mounted heater. It has a thermal cut-off
protection. If the thermal cut-off protection trips, then, switch off the power. The
unit should reset automatically after 10 minutes. If the thermal cut-off protection
trips again, determine the reason for overheating.

- 4 -
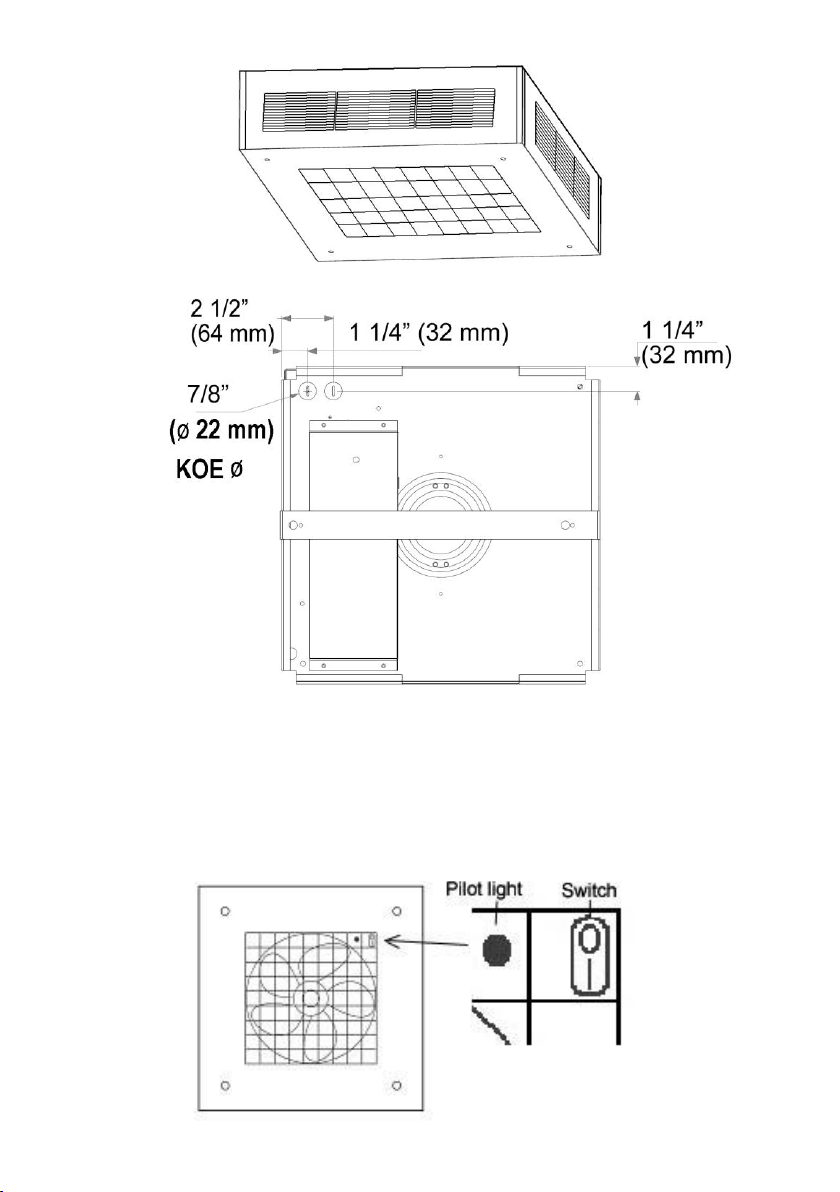
INSTALLATION INSTRUCTION
1. Loosen the 4 screws to remove the grill box of the unit.
2. Loosen 1 screw to remove the mounting bracket.
3. Keep the unit at least 8’ (2.4m) away from the floor. This minimum distance
must be maintained.
4. Once the mounting position is decided, mark the drill-hole positions in the
ceiling for the mounting bracket.
5. Drill the required holes with diameter fit for the anchor provided for positioning
the mounting bracket.
6. Insert the anchors.
7. Attach the mounting bracket to the ceiling and secure with mounting screws.
8. Loosen 2 screws to remove the wiring compartment cover.
9. Hook the unit to the mounting bracket and let the unit hang from the mounting
bracket.
10. Run the electrical supply cable to the wiring compartment of the unit. Connect
the grounded wire to the grounding screw and connect the electrical wires with
provided wire connectors.
WARNING: All wiring must be installed by a certified
electrician according to the electrical safety. The ceiling heater must be
grounded in accordance with all national and local building codes.
11. Replace the wiring compartment cover and lock in place with 2 screws.
12. Secure the unit to the bracket with screw.
13. Replace the grill box and secure with screws.
- 5 -
OPERATION
Press the switch button to switch ON/OFF the heater. The pilot light and the fan will
be turned on when the heater is working

- 6 -
MAINTENANCE
WARNING: To reduce the risk of fire or electric shock,
always switch off the unit and wait 10 minutes to allow it to cool
before attempting any maintenance or cleaning. It is recommended
that the heater is cleaned periodically, in order to avoid dust from
blocking the grill or ventilation.
CLEANING
1. Wipe the unit with a soft, damp cloth.
2. Do not use abrasive cleaners or spray liquids on the unit surfaces.
3. Remove the filter from the back of insert and remove the dust. Make sure to
reinstall it on the unit in order to protect the heating element against the dust and
dirt.
WARRANTY
This HearthPro product carries a one (1) year replacement warranty against
defects in workmanship and materials. HearthPro provides free
replacement within the stated warranty period, when returned by the original
purchaser with proof of purchase. This product is not guaranteed against
wear or breakage due to misuse and/or abuse.
Imported by
Source Pro Industries Ltd.
Workshop No. 18, 10/F, Metro Centre
No 32 Lam Hing Street, Kowloon, Hong kong
Made in China

- 7 -
RADIATEUR DE PLAFOND
DE GARAGE
5 000 W/240 V
QFH-5000
GUIDE D’UTILISATION
Service d’assistance téléphonique sans frais :
1 844 455-4621

- 8 -
CONSIGNES DE SÉCURITÉ
IMPORTANTES
AVERTISSEMENT: dans le but de réduire les risques
d’incendie, de chocs électriques et de blessures, lors de l’utilisation
d’appareils électriques, vous devez prendre des mesures de sécurité
élémentaires dont les suivantes :
Capacité de chaleur recommandée: 1.25watts / ft3(0.03m3)
1) Lisez toutes les instructions avant d’utiliser le radiateur.
2) Lorsqu’il est en marche, les surfaces du radiateur sont chaudes. Pour éviter les
brûlures, évitez tout contact entre la peau nue et les surfaces chaudes.
Servez-vous des poignées pour déplacer l’appareil. Tenez à une distance d’au
moins 3 pi (0,9 m) du devant de l’appareil, et éloignez des côtés et de l’arrière,
toute matière combustible (meubles, oreillers, literie, papiers, vêtements et
draperies).
3) Agissez en tout temps avec prudence tout en assurant une bonne surveillance
lorsqu’un radiateur doit fonctionner en présence d’enfants ou de personnes
handicapées. Évitez de laisser fonctionner l’appareil sans surveillance.
4) Mettez toujours le radiateur hors fonction lorsqu’il ne sert pas.
5) Ne faites pas fonctionner un radiateur si le cordon d’alimentation ou la fiche
sont endommagés, si le radiateur a fait l’objet d’une chute, s’il a mal fonctionné
dans le passé ou s’il a été endommagé de quelque façon que ce soit. Envoyez le
radiateur dans un centre de réparation agréé pour une vérification, une mise au
point électrique ou mécanique ou une réparation.
6) Évitez d’utiliser à l’extérieur.
7) Évitez de passer le cordon sous un tapis ou de le dissimuler sous une carpette,
un tapis de couloir ou tout autre revêtement similaire. Disposez le cordon à
l’écart des endroits passants où il ne risque pas de provoquer des
trébuchements.
8) Pour débrancher le radiateur, placez la commande à HORS TENSION « OFF ».
9) Branchez l’appareil uniquement dans une prise à la terre adéquate.
10) Évitez d’insérerou de laisser pénétrer tout objet étranger dans les prises d’air et
les sorties de ventilation, ce qui pourrait causer un choc électrique, un incendie
ou des dommages au radiateur.
11) Pour prévenir le risque d’incendie, évitez de boucher les entrées et les sorties
d’air de quelque façon que ce soit. Évitez d’utiliser l’appareil sur des surfaces
molles comme un lit; cela pourrait obstruer les ouvertures.
12) On trouve à l’intérieur d’un radiateur des pièces chaudes pouvant produire des
étincelles et des arcs électriques. Évitez de l’utiliser dans des endroits où il y a

- 9 -
de l’essence, de la peinture ou des liquides inflammables.
13) Servez-vous du radiateur uniquement comme décrit dans le présent manuel.
Toute autre utilisation non conseillée par le fabricant pourrait causer un
incendie, un choc électrique, des blessures corporelles et des dommages
matériels.
14) Ce radiateur n’a pas été conçu pour être utilisé avec une rallonge.
15) Cet article doit être installé par un électricien agréé conformément aux codes
locaux.
CONSERVEZ CES DIRECTIVES
ATTENTION : BIEN QUE CET APPAREIL SOIT MUNI
D’UNE PROTECTION QUI RÉDUIT LES RISQUES DE CHOC
ÉLECTRIQUE CET ARTICLE NE DOIT JAMAIS ÊTRE UTILISÉ
PRÈS DE L’EAU.
SPÉCIFICATIONS
Radiateur de plafond de garage
Tension: 240 V
Puissance en watts : 5 000 W
Fréquence : 60 Hz
Ampères : 20 A
BTU/h : 17060
Ce radiateur est conçu pour être installé au plafond. Il est muni d’un circuit de
protection thermique. Si le circuit de protection thermique se déclenche, mettez

- 10 -
l’appareil hors tension. L’appareil devrait se remettre en marche après 10 minutes. Si
le circuit de protection thermique se déclenche à nouveau, déterminez la raison de la
surchauffe.
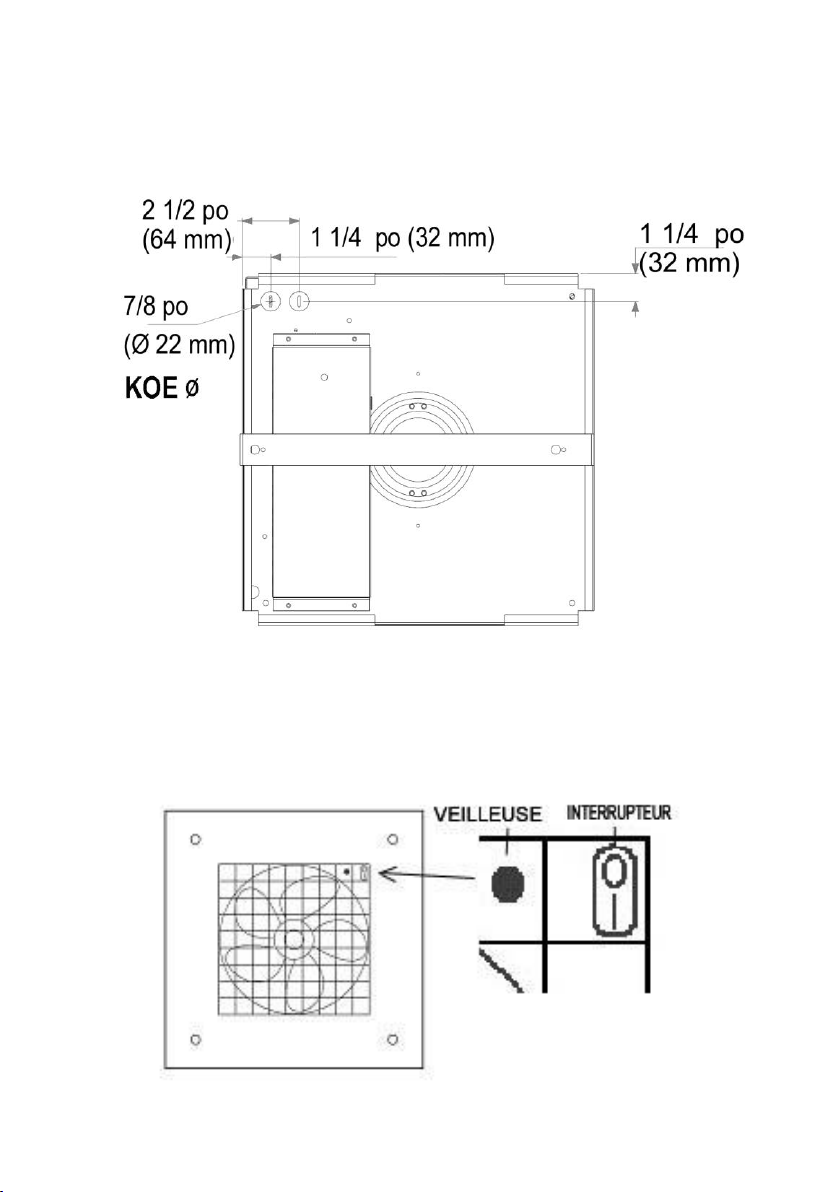
INSTRUCTIONS D’INSTALLATION
1. Desserrez les 4 vis pour retirer la boîte grillagée de l’appareil.
2. Desserrez 1 vis pour retirez le support de fixation.
3. Gardez l’appareil à une distance d’au moins 8 pi (2,4 m) du plancher. Cette
distance minimale doit être maintenue.
4. Une fois que vous aurez décidé de l’endroit de l’installation, marquez
l’emplacement des trous au plafond pour le support de fixation.
5. Percez les trous nécessaires d’un diamètre qui correspond aux ancrages
fournis pour mettre en place le support de fixation.
6. Insérez les ancrages.
7. Installez le support de fixation au plafond et fixez-le avec les vis de
montage.
8. desserrez 2 vis, retirez le couvercle du boîtier des fils.
9. Ne pas installer à moins de 8 pi (2,4m) du sol et de 12 po (305mm) d’une
surface murale verticale
10. Amener le fils d’alimentation électrique au boîtier des fils de l’unité.
Raccordez le fil relié à la terre à la vis de mise à la terre. Raccordez les fils
électriques à l’aide des capuchons de connexion.
AVERTISSEMENT : tout le câblage doit être installé par
un électricien agréé conformément à la sécurité électrique. Le radiateur
de plafond doit être mis à la terre conformément aux codes du bâtiment
national et local.
11. Replacez le couvercle du boïtier à fils et sécuriser le tout avec les 2 vis.
12. Fixez l’appareil au support avec des vis.
13. couvercle du boîtier à fils.
- 11 -
FONCTIONNEMENT
Appuyez sur le bouton interrupteur pour mettre le radiateur EN FONCTION/HORS
FONCTION. La veilleuse et le ventilateur seront en fonction lorsque le radiateur
sera en marche.
ENTRETIEN

- 12 -
AVERTISSEMENT: afin de réduire les risques
d’incendie ou de choc électrique, éteignez toujours l’appareil et
attendez 10 minutes pour lui permettre de refroidir avant toute
tentative d’entretien ou de nettoyage. Il est recommandé de nettoyer
périodiquement le radiateur, afin d’empêcher la poussière de
bloquer la grille ou les prises d’air.
NETTOYAGE
1. Essuyez l’appareil avec un linge doux et humide.
2. N’utilisez pas de nettoyants abrasifs et ne vaporisez aucun liquide sur les
surfaces de l’appareil.
3. Retirez le filtre du derrière de la pièce rapportée et enlevez la poussière.
Assurez-vous de le réinstaller sur l’appareil afin de protéger l’élément
chauffant contre la poussière et la saleté.
GARANTIE
Déclaration de garantie – Cet article HearthPro comprend une garantie de
remplacement de un (1) ans contre les défauts de fabrication et de
matériau(x). Remplacement HearthPro fournit gratuitement au
cours de la période de garantie, restitués par l'acheteur initial avec une
preuve d'achat. Cet article n’est pas garanti contre l’usure ou les bris
causés par un usage abusif ou inapproprié.
Importé par
Source Pro Industries Ltd.
Workshop No. 18, 10/F, Metro Centre
No 32 Lam Hing Street, Kowloon, Hong kong
Fabriqué en Chine
Table of contents
Languages:
Other HearthPro Heater manuals

Popular Heater manuals by other brands

SunStar
SunStar SC18T installation instructions

Firesense
Firesense 62232 instructions

EasyHeat
EasyHeat CH Series installation instructions

Dura Heat
Dura Heat TT-360 User's manual and operating instructions

Thermo Sphere
Thermo Sphere PH-950N owner's manual

MrHeater
MrHeater MH11Q Operating instructions and owner's manual


