Steak Locker SL-150 User manual
The Art of Dry Aged Steak
U S E R
MANUAL
SL-150
Enhanced Flavor
Tenderized Meat
Charcuterie Functionality
Fan Forced Air-Flow
Germicidal UV Light
Smart App Controlled
Temperature & Humidity
Patented Technology
w w w . s t e a k l o c k e r . c o m
INSTRUCTION MANUAL FOR
STEAK LOCKER - HOME EDITION SL150 US & EU
I
MODEL
SL-150

CONTENT
1........................................................................................Construction
2........................................................................................Important Safety Instructions
3........................................................................................Power Supply Connection
4........................................................................................Installation
5........................................................................................Temperature Setting
6........................................................................................Handle Bar - Installation
6A......................................................................................Cut In Dimensions
7........................................................................................How to Sync to Smart App
8........................................................................................Maintenance
9........................................................................................Troubleshooting - Refrigerator
ForAssistance;Visitwww.steaklocker.com/support

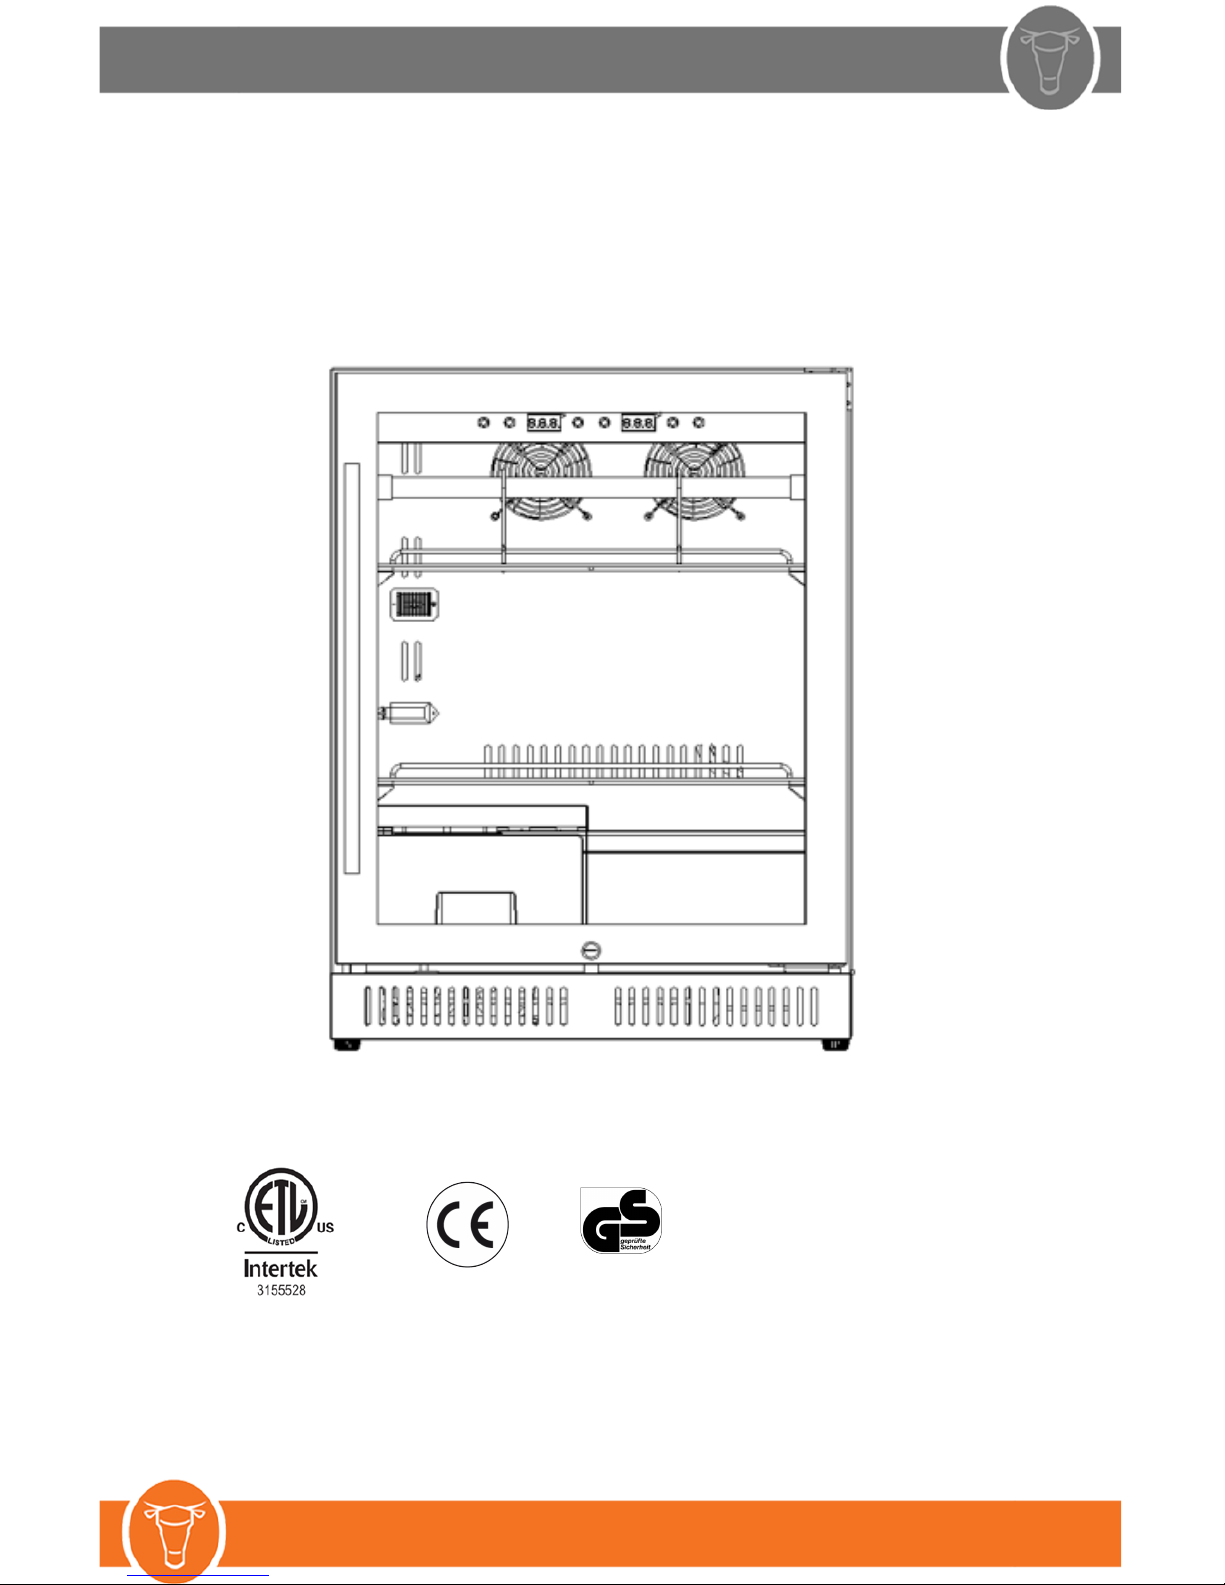
1. CONSTRUCTION OF STEAK LOCKER
(1)SteakLockerBody
(2)Digital Display Panel
(3)HangingFrame
(4)Stainless Steel Door Frame
(5) Door Handle
(6) Chrome Shelves
(7) Security Lock
(8) Smart Controller
Installation Drawing
PER WARRANTY: MUST RETAIN ORIGINAL PACKAGING AND PALLET
FOR RETURNED OR REPAIRED SL UNITS FOR UP TO ONE YEAR.
8

2. IMPORTANT SAFETY INSTRUCTION
You must always observe basic precautions when using your Steak Locker, including:
(1)Only use your Steak Locker for its intended purposes, as described in this guide.
(2)Never unplug it by pulling out the power cord, grip the plug firmly and pull straight out from wall.
(3)Immediately repair or replace any worn or damaged cord, never use a cord that is split or which shows signs
of wear along its length or on its ends.
(4)Do not allow children to climb on,sit on or stand on it, nor hang from its shelves.
(5)Do not use an extension cord.
(6) Ensure you use a dedicated 15 amp circuit to power your Steak Locker.
(7)This appliance is not intended for use by persons (including children) with reduced physical, sensory or
mental capabilities, or lack of experience and knowledge, unless they have been given supervision or
instruction concerning use of the appliance by a person responsible for their safety.
(8)Children should be supervised to ensure that they do not play with the appliance.
(9)Warning: Before you throw away your used refrigerator or freezer:
A. Take off the doors
B. Leave the shelves in place so that children may not easily climb inside.
(10) WARNING: Keep ventilation openings, in the appliance enclosure or in the built-in structure, clear of
obstruction.
(11) WARNING: Do not use mechanical devices or other means to accelerate the defrosting process,
other than those recommended by the manufacturer.
(12) WARNING: Do not damage the refrigerant circuit.
(13) WARNING: Do not use electrical appliances inside the food storage compartments of the appliance,
unless they are of the type recommended.

4. INSTALLATION
3. POWER SUPPLY CONNECTION
(1) This Steak locker requires a standard 115VAC, 60HZ or (220 VAC, 50HZ) electrical outlet.
(2)Standard socket with earth connection (12~16A,115V~)
(3)The appliance should always be plugged into its own individual electrical outlet which has a voltage rating that
matches the rating label on the appliance. IT IS HIGHLY RECOMMENDED THAT A SURGE PROTECTOR
BE INSTALLED BETWEEN THE OUTLET AND THE SL UNIT.
This provides the best performance and also prevent overloading house wiring circuit that could cause a fire
hazard from overheated. Never unplug the appliance by pulling the power the power cord. Always grip the
plug firmly and pull straight out from the receptacle. Repair or replace immediately all power cords that have
become frayed or otherwise damaged. Do not use a cord that shows cracks or abrasion damage along its
length or at either end. When moving the appliance, be careful not to damage the power cord.
(4) Plug in the Smart App Controller into the cable provided
inside the SL Unit.
(1)Make sure when you unpack it there is no defect in its external appearance when you receive your
Steaklocker.
(2) Open the door and check to see that the inside is complete (walls, shelves, hinges, Control panel, etc.)
(3)Place your Steak Locker in its operating location after going through the previous steps checking. Ensure the
the following requirements below:
A. Allow at least 50 mm between the back and sides of the Steak Locker; and leave a minimum space of
50 mm between the back cabinet and the wall.
B. Place your Steak Locker on a floor that is strong enough to support it when it is fully loaded. Adjust the four
adjustable legs to ensure proper leveling of your Steak Locker.
(4)Locate your Steak Locker away from direct sunlight and sources of heat and high humidity areas, such as
hot garages, patios, laundry room and bathroom, etc.
(5)Do not tilt the Steaklocker at an angle of more than 45° when moving it. Allow a minimum 10 minutes
interval between transit and re-starting.
(6)PleaseensureplentyofnaturalventilationaroundyourSteakLocker, otherwise, it will reduce the
effect of usage.
(7) Water Reservoir:
Prior to Powering On SL Unit;
- add DISTILLED water to the reservoir
drawer at least to the Minimum Line.
- avoid opening the drawer past the
orange filter (approximately 4 inches)
- remove plastic from filter prior to use.
When low on water, an audible alarm
will sound and the code E6 will
display in the digital window.
Add more water at that time.

5. Temperature Setting
1. Temperature setting range is 1‐22 C (33‐72 F ).
Alter button, when press this button, the display screen of temperature will start to blink,
then, you can set the temperature.
Up setting, press one time, the temperature increase 1 degree
Down setting, press one time, the temperature decrease 1 degree
The system will save the current setting temperature after did not set for 3 seconds and quit the
temperature setting mode.
2. Humidity setting:
Humidity adjusting range is 50% ~ 85%,
Alter button, when press the alter button under two consecutive, the humidity display screen will
start to blink, then, you can set the humidity.
Up setting, press one time, the humidity increase 1%
Down setting, press one time, the humidity decrease 1%
The system will save the current setting humidity after did not set for 3 seconds and quit the humidity
setting mode.
3. Conversion of Celsius and Fahrenheit:
Press the Alter button and UV light button at the same time for 3 seconds to convert from
Celsius and Fahrenheit.
Light button, control the ON/OFF of LED light
UV Light button, control the ON/OFF of UV light
Switch, control the ON/OFF of the whole system
4. Sound alarm:
The alarm will sound when the door open after 1 minute; and the appliance will stop after the alarm
sound last for 3 minutes, press the switch button, the appliance will re-start.
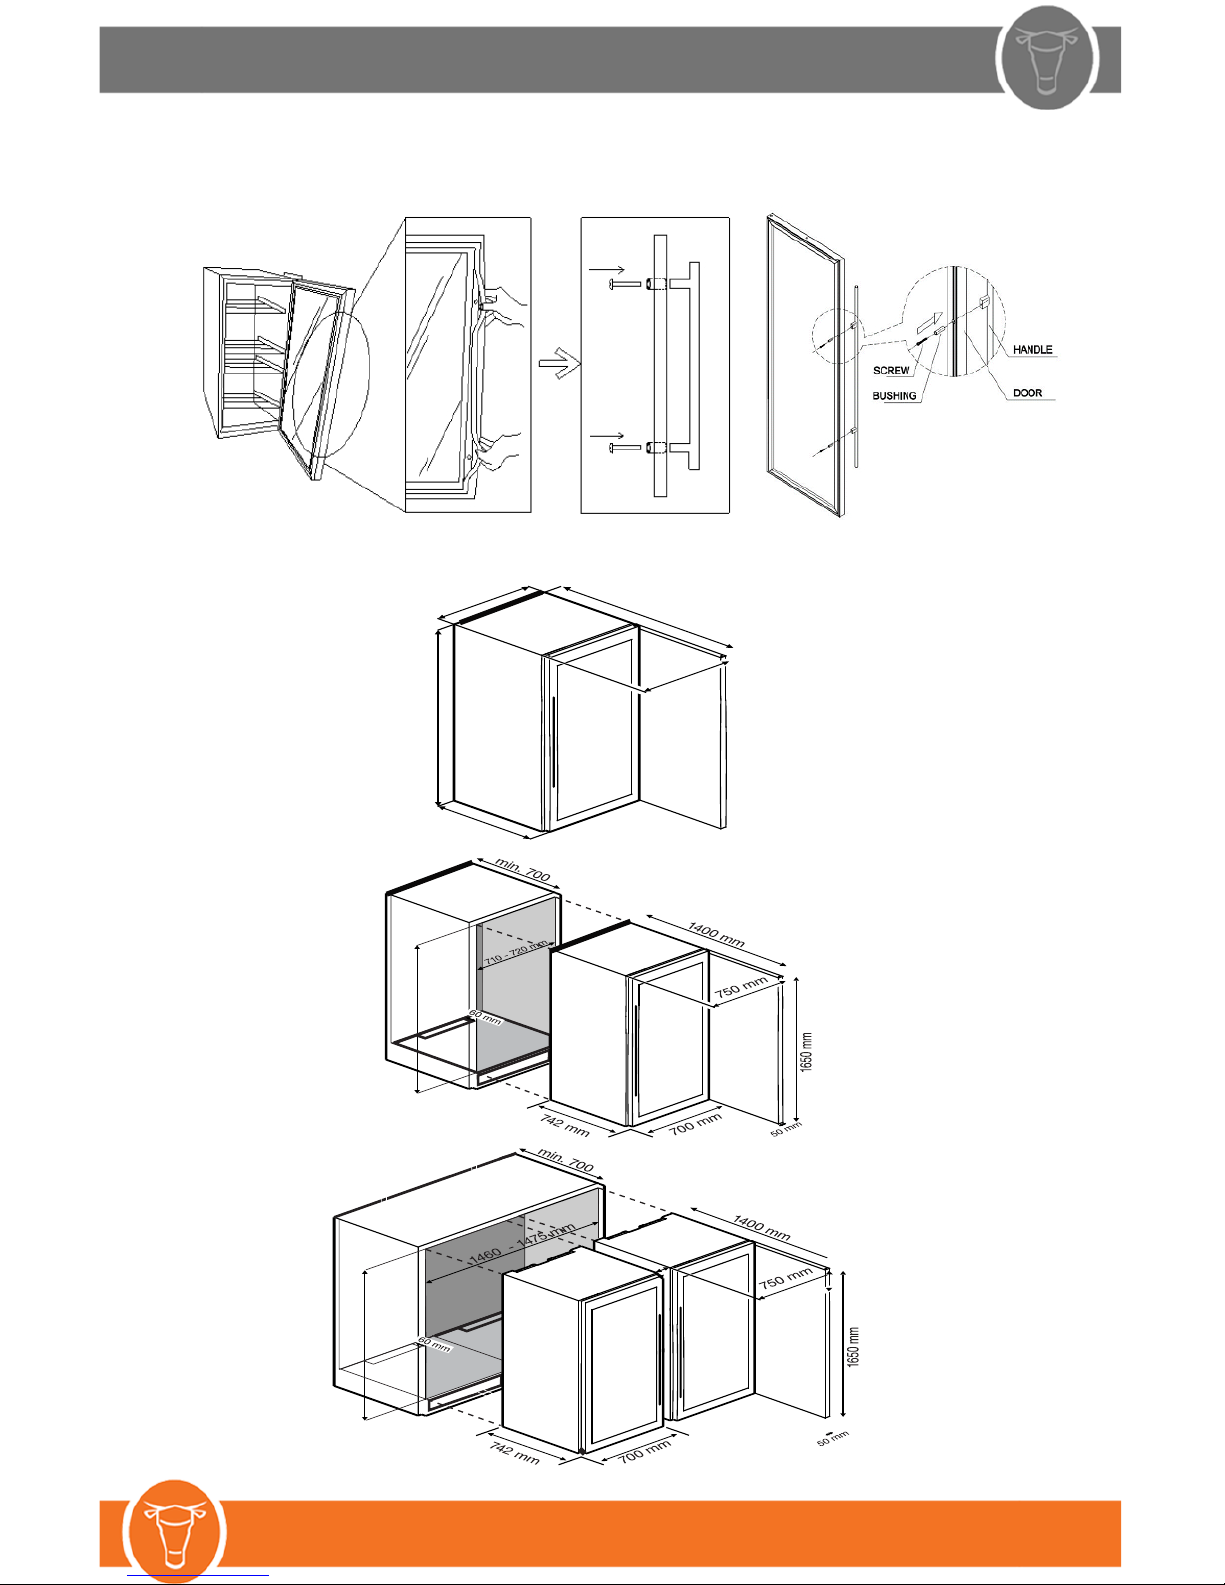
6. Handle Bar: INSTALLATION
5 cm distance
595 mm
1280 mm
820 mm
680 mm
mm
645
6A. Cut In
Dimensions
900 mm
900 mm

7. HOW TO SYNC THE SMART APPLICATION:
1. Download the Steak Locker application
from: Apple - iOS, Google Play - Andriod
2. Sign Up With Email OR
Continue with Facebook
3. Enable Notification:
Without enabling notification,
safety alerts will not be received.
4. After you created your account and selected either the SL150
or SL520 you’ll see this screen which will ask you to connect to
our Steak Locker WiFi that is being broadcast from your controller
located inside your unit. Go and had tap Connect at the bottom of
the screen and locate the network called “Steak Locker” in your
iOS network settings.
Ensure to Use the 2.4ghz on the WiFi Router, the controller will not operate on 5.0ghz.
5. Tap on the network that says “Steak Locker”
and wait for the blue check mark to confirm
that you are connected. Once connected tap
the top left text that reads “Back to Steak Locker”
6. Now that we are connected to your Steak Locker
let’s enter your home networks name and password.
It’s important that you enter the correct capitalization
for both the username and password, so be sure to
double check that. Once your ready go ahead and tap
the “Finish” button on the bottom.
7. This next step can take a minute or two for your
Steak Locker to get setup. Once complete you’ll
be redirected to your dashboard.

8. MAINTENANCE
Your Steak Locker is easy to operate and will provide long-lasting operations if you follow the simple maintenance
and cleaning operations listed below:
1 Pull the plug before cleaning
2 General parts can use the wet soft cloth to wipe, if the stain is hard to clean, can use the neutral detergent
wipes, but do not let any liquid enter the fan, the wind hole.
3 Door gasket can disassemble to clean and use the mild cleaning product to clean. When install the door gasket,
fix four corners at first, then, inset into the groove.
4 Do not use boiling water, detergents, acid and alkaline detergent, soap, abrasive power, gasoline, olefin,
alcohol, benzene and organic solvent to clean.
5 Do not water the surface directly to prevent electrical failure.
6 Check the power cord and plug whether damage or not. If there is any damage or malfunction, please do not
repair it without authorization. Maintenance and repairing must be executed by qualified experts.
7 Please cut off power supply when stopped for a long time, then, clean the casing refer to the above cleaning
method and open the door for 2 ~ 3 days. Put the activated carbon inside the unit after the internal fully dry,
prevent mildew and peculiar smell.
8 UV light is quick-wear part, in order to use this appliance better; replace the UV light annually is recommended.
Contact Steak Locker via Support Tab on Website to re-order the light.
9 Replace the activated charcoal filter in the upper ventilation hole of the cabinet every two years. Twist cartridge
located in between fans, remove top, empty contents, then return into same space.
****REPLACEMENT CARBON FILTER FILLER IS PROVIDED IN GREEN BAG*******
10 Remove the dust from the condenser (metal screen on the back of the cabinet) twice a year.
11 Make sure the power cord is unplugged before cleaning the back of your cabinet or before moving it.
12 Clean the inside of your cabinet thoroughly once a year, after unplugging and unloading it (use water and
a mild cleaning product, then rinse carefully).
To assure that your cabinet provides long-lasting service, you should check it regularly and inform
your dealer if you note anything unusual.

9. TROUBLESHOOTING - REFRIGERATOR
When you check the below item, the product still cannot use normally, please contact the
service center immediately.
No. Phenomenon Solution
1Did not have any
display
Check the socket whether suitable for the required power supply; Check
the plug whether wired up properly; Check the switch and power
2 Hear the sound which
is similar to the airflow
or running water
(Gurgling-gurgling)
This is a normal phenomenon, is caused by the refrigerant flow in the
pipeline.
3 Occasionally heard the
sound of dripping or
“bang-bang”
The dripping sound is caused by defrosting of evaporator, the water
drops into the sink from the evaporator. The sound of “bang-bang “is
caused by the evaporator surface ice break off. Both of them are normal
phenomenon, will not affect the normal using.
4 The heating of the side
and the top of casing
This is a normal phenomenon, because there are radiating pipes inside
the casing.
5 Have abnormal sound
and the noise is a little
big
Check the floor whether flat and strong; Check the back of appliance
whether too close to the wall. The sound will be a little big when the
compressor is on or off.
6Condensation of the
casing and door
This is a normal phenomenon. When the temperature sets too low or the
humidity is too big, the casing and door is easy to have condensation.
7 Cooling speed is too
slow Check the appliance whether away from direct sunlight and sources of
heat and high humidity areas, such as laundry room and bathroom, etc.
Check the door whether close well; Check the door whether open
frequently; Whether put too much meat in the steak locker at one time
8The fog appears inside
casing or the air outlet
This is a normal phenomenon, because the atomizer will occur the water
spray when they work
9 UV light will be off,
and the fan will stop
when open the door
This is a normal phenomenon. It is for reducing the cold air goes out and
save the energy and protect you from ultra-violet rays damage.
10 Beep sound and display
the "E6"
Because the water tank lacks of water. Add the drinking water into the
water tank to its height of the two-thirds.
Table of contents
Other Steak Locker Refrigerator manuals


