Steak Locker SL-103 User manual


INSTRUCTION MANUAL FOR
STEAK LOCKER
I
Foreword
This Instruction Manual is the universal-purpose version for the models of steak locker manufactured
by our company. The appearance of the units that you purchase might be slightly different from the
Manual, but it does not affect your proper operations and usage.
Please read carefully the sections corresponding to the specific model you choose, and keep the
manual properly so as to facilitate your reference at later time.
MODEL
SL-103
w w w . s t e a k l o c k e r . c o m

CONSTRUCTION
OF STEAK LOCKER
(1)Control Panel and Temperature Setting
(2)Glass Door
(3)Door Handle
(4)Storage Shelf
CONTENT
1- Construction ----------------------------------------------------------
2- Important safety instructions--------------------------------------
3- Power supply connection------------------------------------------
4- Installation------------------------------------------------------------
5- Temperature setting-------------------------------------------------
6- Change the position of shelf --------------------------------------
7- Routine maintenance-----------------------------------------------
8- Operating problems-------------------------------------------------
9-Dry Age Historically--------------------------------------------------
10- Flavour and texture of Dry Aged Beef------------------------
11-Where to buy Sub primal cuts-----------------------------------
12-Preparation to Dry Age Sub-------------------------------------
13-Preparation to cook Dry Aged Steaks------------------------
14-Terminology --------------------------------------------------------
15-STEPS----------------------------------------------------------------
STEP-1-FRONT PANEL-----------------------------------------
STEP-2-HANDLE BAR------------------------------------------
STEP-3-CONTROLLER AND ATOMIZER------------------
STEP-4-BLINK UP SYNC--------------------------------------
STEP-5-TROUBLESHOOTING-------------------------------
STEP-6-SMART APP--------------------------------------------
1
2
3
3
4
5
6
7
8
10
12
13
13
14
15
15
15
17
18
19
20
1 w w w . s t e a k l o c k e r . c o m

(6)This appliance is not intended for use by persons (including children) with reduced physical, sensory or
mental capabilities, or lack of experience and knowledge, unless they have been given supervision or
instruction concerning use of the appliance by a person responsible for their safety.
(7)Children should be supervised to ensure that they do not play with the appliance.
(8)Warning: Before you throw away your used refrigerator or freezer:
A. Take off the doors
B. Leave the shelves in place so that children may not easily climb inside.
(9) WARNING: Keep ventilation openings, in the appliance enclosure or in the built-in structure, clear of
obstruction.
(10) WARNING: Do not use mechanical devices or other means to accelerate the defrosting process, other than
those recommended by the manufacturer.
(11) WARNING: Do not damage the refrigerant circuit.
(12) WARNING: Do not use electrical appliances inside the food storage compartments of the appliance, unless
they are of the type recommended.
POWER SUPPLY
CONNECTION
(1) This Steak locker requires a standard 115VAC, 60HZ electrical outlet.
(2)Standard socket with earth connection (12~16A,115V~)
(3)The appliance should always be plugged into its own individual electrical outlet which has a voltage rating that
matches the rating label on the appliance. This provides the best performance and also prevent overloading
house wiring circuit that could cause a fire hazard from overheated. Never unplug the appliance by pulling the
power the power cord. Always grip the plug firmly and pull straight out from the receptacle. Repair or replace
immediately all power cords that have become frayed or otherwise damaged. Do not use a cord that shows
cracks or abrasion damage along its length or at either end. When moving the appliance, be careful not to
damage the power cord.
INSTALLATION
(1) Make sure when you unpack it there is no defect in its external appearance when you receive the wine
cabinet.
(2)Open the door and check to see that the inside is complete(walls, shelves, hinges, control panel, etc.)
(595mm Width Installation Drawing)
IMPORANT
SAFETY INSRUCTION
You must always observe basic precautions when using the unit, including:
(1)Only use your machine for intended purposes, as described in this guide.
(2)Never unplug it by pulling out the power cord, grip the plug firmly and pull straight out to remove from wall
socket.
(3)Immediately repair or replace any worn or damaged cord, never use a cord that is split or which shows signs
of wear along its length or on its ends.
(4)Do not allow children to climb on,sit on or stand on it, nor hang from its shelves. They could damage the
cabinet.
(5)Do not use an extension cord.
2 3 w w w . s t e a k l o c k e r . c o m
5.4. Tips of temperature display malfunction:
In order to prevent the machine from abnormity, following are some tips for you to maintain:
E1: upper sensor short circuit E2:upper sensor open circuit
5.5. The control of cooling system
The compressor will stop working when the cooling system in the cabinet reaches the presetting temperature,
and re-start working until the desired temperature is achieved. Allow a minimum 5 minutes’ interval before
re-starting.
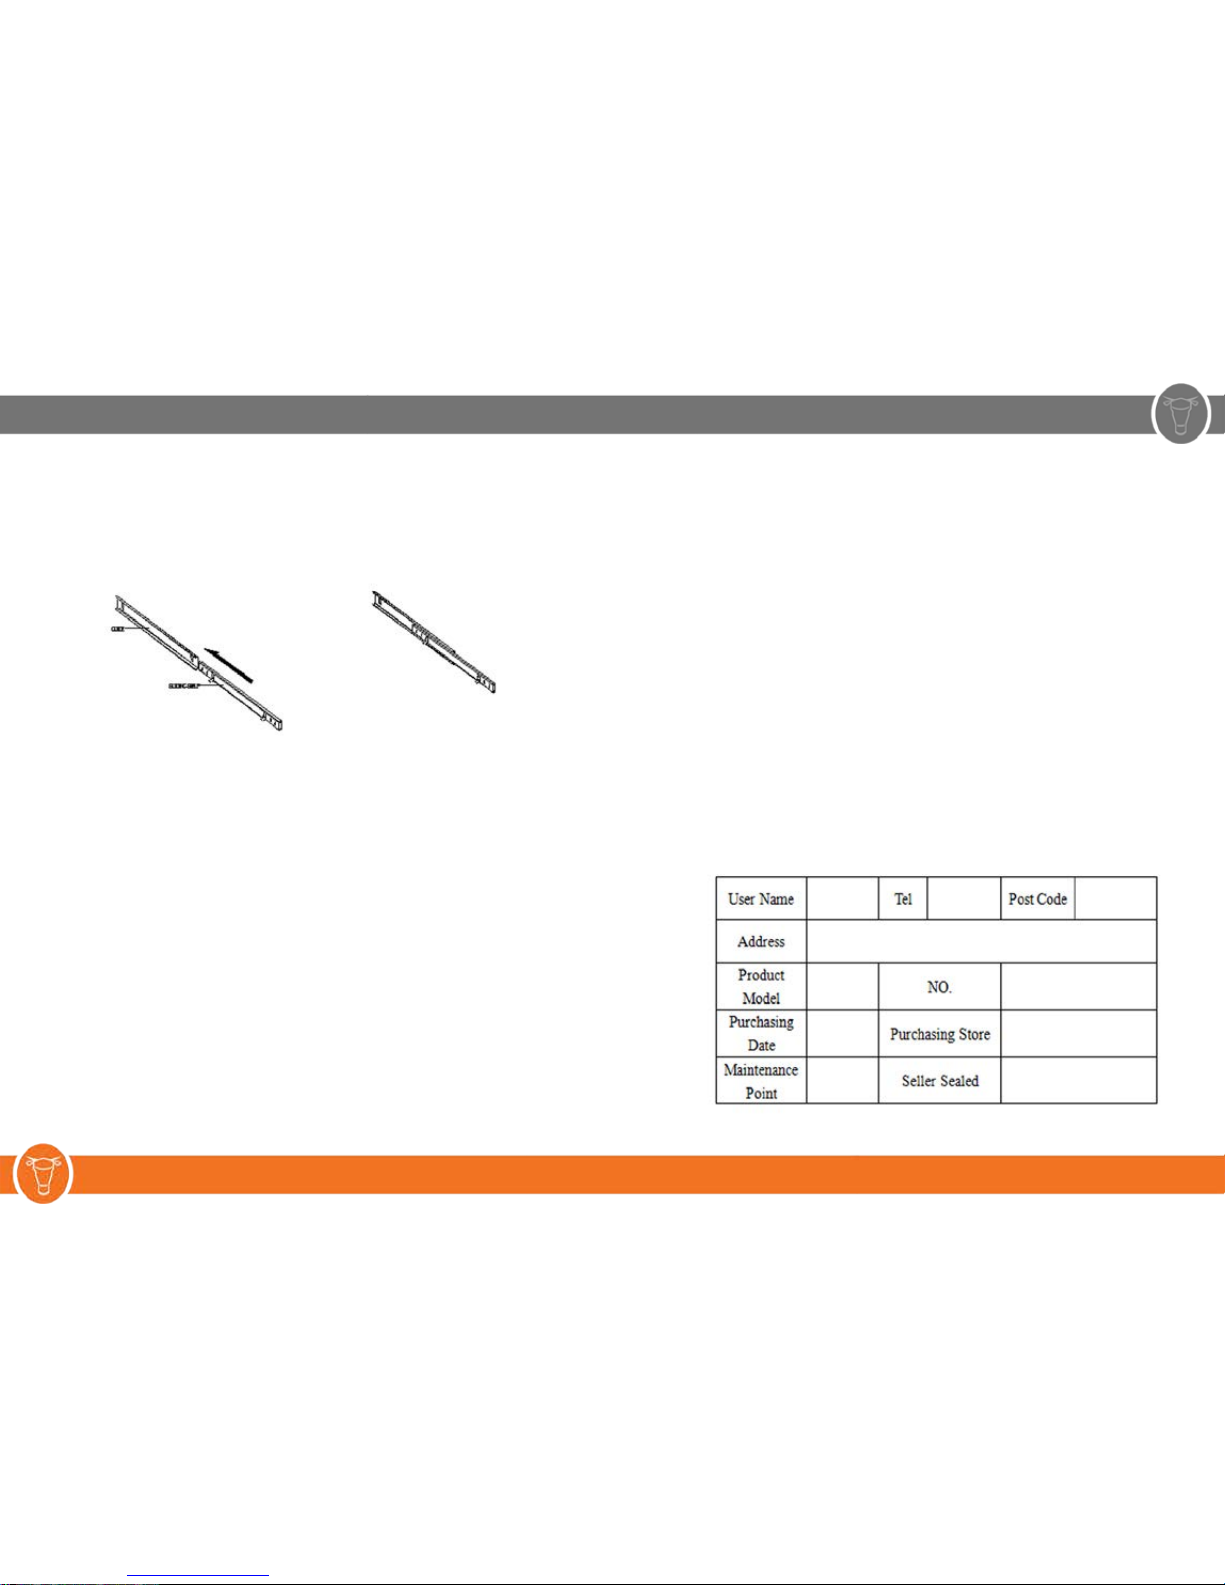
CHANGE THE POSITION OF THE SHELF
Read the following carefully if change
the position of shelf: To move a sliding shelf,
first remove all bottles, then move the sliding
shelf by sliding guides from walls, while
making sure not to mix up the right and left
guides. Installation diagram of sliding shelf:
Diagram of fixed and sliding shelf:
(3)Move your unit to the final place if there is no problem with it after checking. Observe the following when
placed:
A. Allow at least 5 cm between the back and sides of the machine; and leave a minimum space of 8cm
between the back cabinet and the wall.
B. Place your machine on a floor that is strong enough to support it when it is fully loaded. Adjust the four
underneath the cabinet so that your cabinet is level..
(4)Locate the steak locker away from direct sunlight and sources of heat and high humidity areas, such as
laundry room and bathroom, etc.
(5)Do not tilt the cabinet at an angle of more than 45° when moving it. Allow a minimum 10 minutes’ interval
between transit and re-starting.
(6)Make sure the ventilation is free if you wish to install your cabinet into a workable, otherwise, it will reduce the
effect of usage.
Temperature Setting
The temperature setting
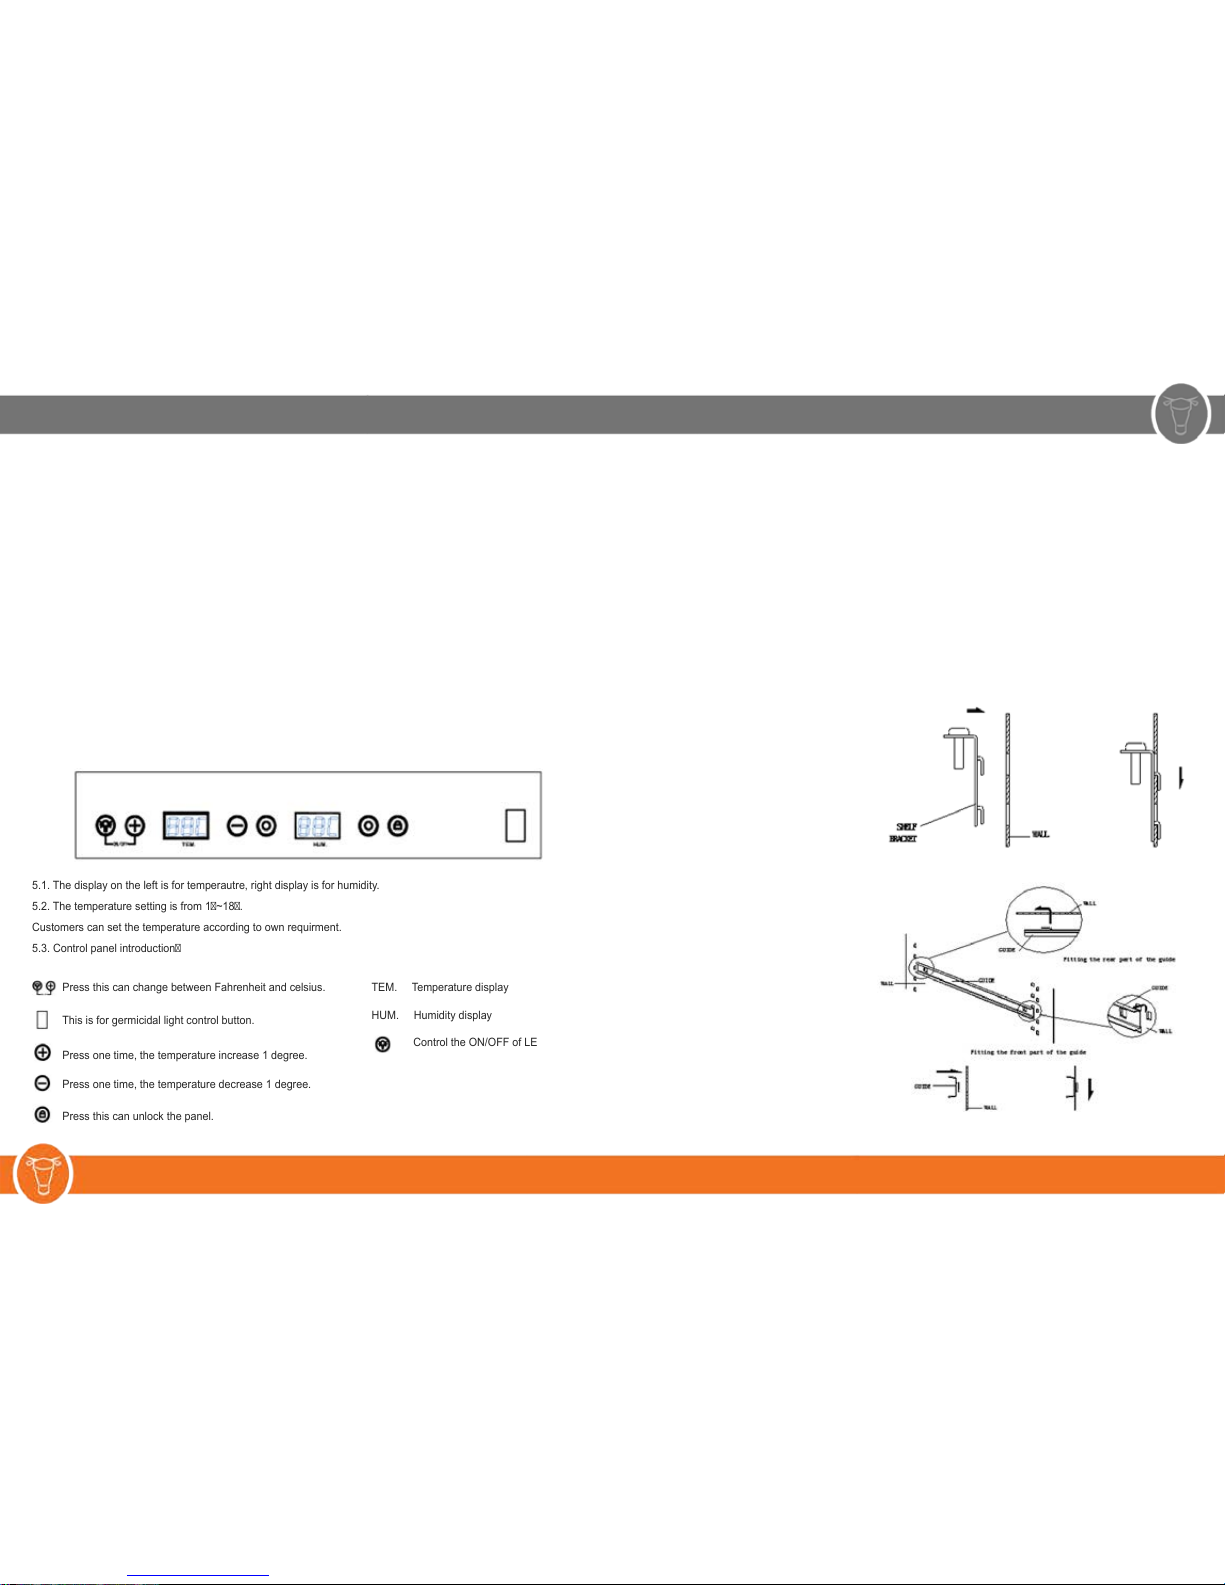
5.1. The display on the left is for temperautre, right display is for humidity.
5.2. The temperature setting is from 1~18.
Customers can set the temperature according to own requirment.
5.3. Control panel introduction
Press this can change between Fahrenheit and celsius.
This is for germicidal light control button.
Press one time, the temperature increase 1 degree.
Press one time, the temperature decrease 1 degree.
Press this can unlock the panel.
TEM. Temperature display
HUM. Humidity display
Control the ON/OFF of LED light
4 5 w w w . s t e a k l o c k e r . c o m
OPERATING PROBLEMS
8.1 Start-Up:
Compressor does not start even though the desired temperature is lower than the temperature in the room, do
the following steps:
1. Check the wall socket by plugging in any type of electrical device,
2. Unplug the socket and contact your dealer if the compressor still not starts.
8.2 Dew on the surface of cabinet
The surface of cabinet especially the glass door will appear some frost if the cabinet is installed in a damp room.
This is due to the moisture in the air coming into contact with the cabinet. Please wipe it away with dry cloth.
8.3 Liquid sound
1. The sound of compressor when starts or stops working.
2. The rattling noise may come from the flow of the refrigerant, which is normal.
3. As each cycle ends, you may hear gurgling sounds caused by the flow of refrigerant in your machine.
8.4 Condensation formed inside the cabinet
If the machine is in the environment with high level of humidity or the door of your cabinet has been left open for a
long period or opened frequently, wipe off the door and the cabinet walls and leave the door closed as long as
possible.
ROUTINE MAINATINENCE
Your cabinet is easy to operate and has proven its reliability; it will provide long-lasting satisfaction if you follow
the simple maintenance and cleaning operations listed below:
---Replace the activated charcoal filter in the upper ventilation hole of the cabinet half a year (Your dealer keeps
this accessory in stock).
---Remove the dust from the condenser (metal screen on the back of the cabinet) twice a year.
---Make sure the power cord is unplugged before cleaning the back of your cabinet or before moving it.
---Clean the inside of your cabinet thoroughly once a year, after unplugging and unloading it (use water and a
mild cleaning product, then rinse carefully).
To assure that your cabinet provides long-lasting service, you should check it regularly and inform
your dealer if you note anything unusual.
Refittheslidingshelfasshownbelow:
6 7 w w w . s t e a k l o c k e r . c o m
21 days 28 - 35 days 45 + days
bold blue
cheese notes
Subtle nuttiness slight mushroom
& umami avors
As beef ages, the enzymes present in the meat begin to break down the proteins into amino acids and fats, yielding a
rich and savory avor. The longer it ages, the more intense and complex the avors become, ranging from a subtle
nuttiness to bold blue cheese notes.
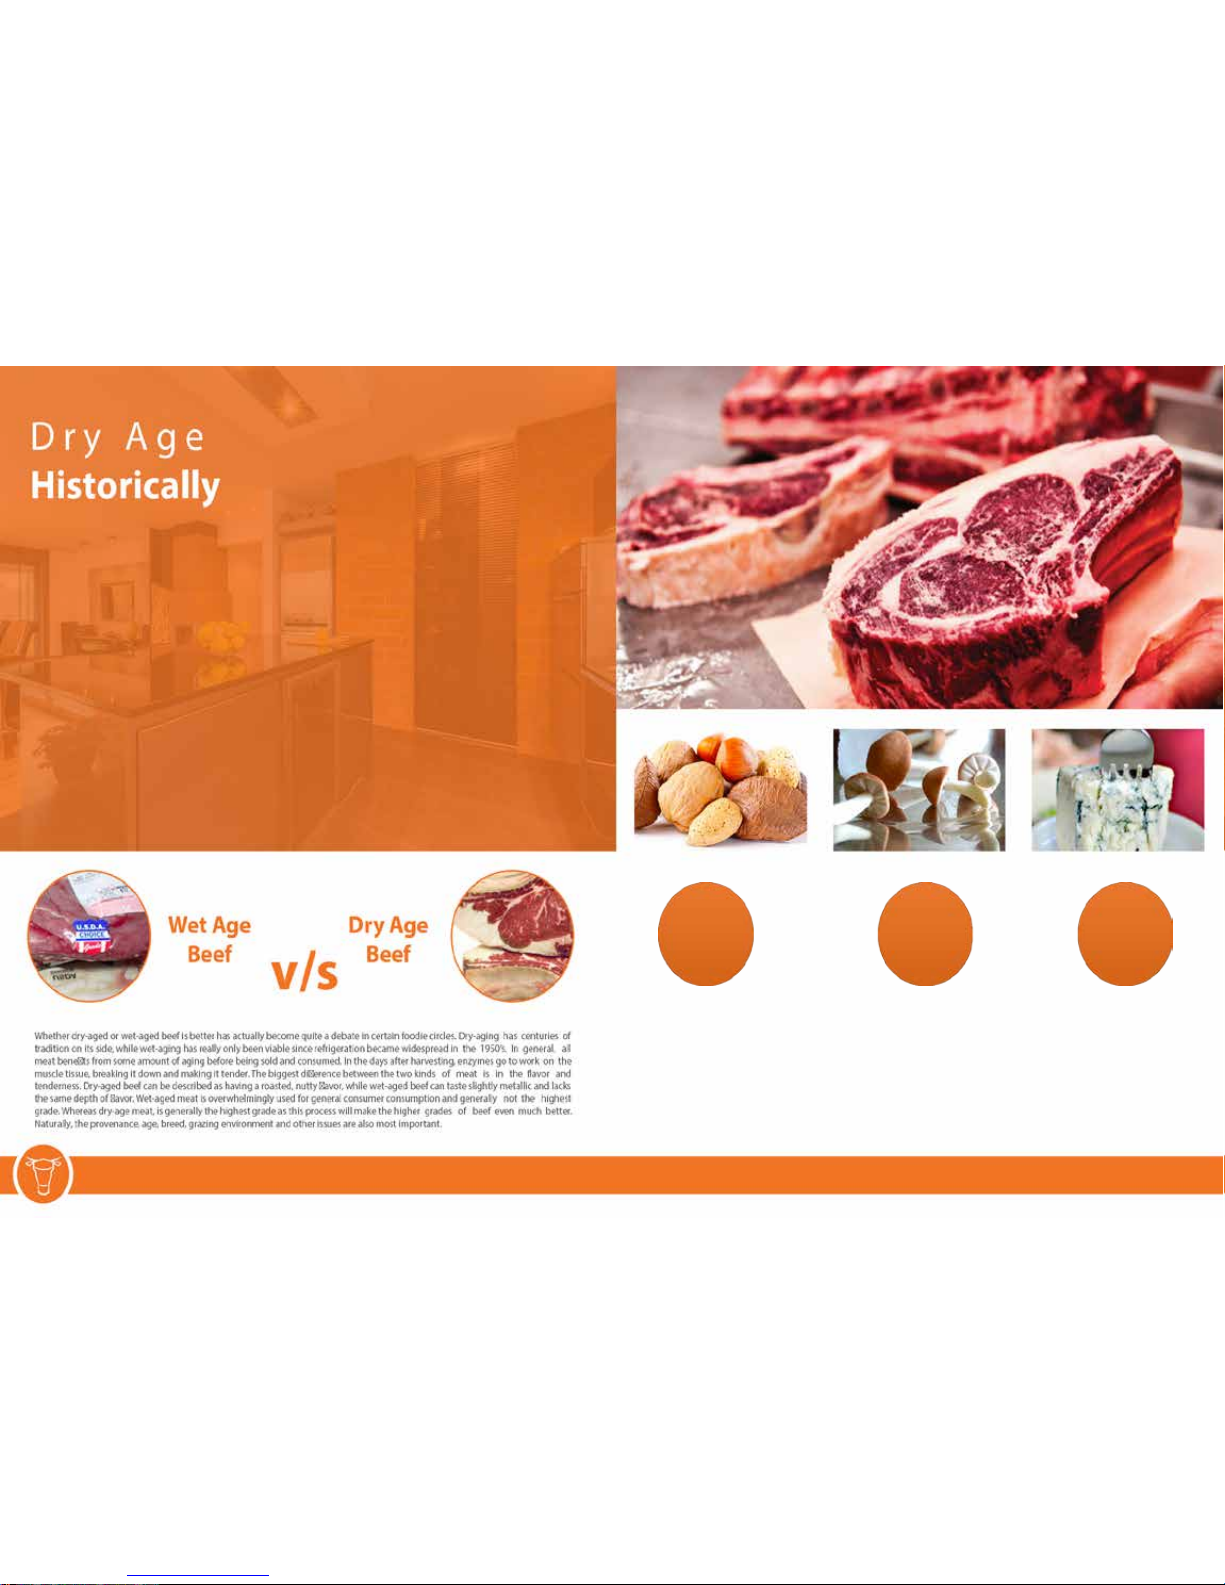
Dry Aging Meat is an old artesian process that dates
back to the middle ages. It used to be the only way to preserve
meat longer than a few days, was to cellar it, before it would spoil.
Before refrigeration was introduced in the mid 1940 almost
all meat was dry aged. Cellars and caves were popular choices
as they generally were cool and kept a relatively steady humidity.
Very similar to historic (and in some places still today) cheese
making and charcuterie production.
Dry-Aged
Beef
For dry-aging, whole sides of beef or primal cuts are
hung in constant air ow and kept at a temperature just above
freezing and left to age for several weeks or even several months.
Those cuts are usually the larger muscle cuts that should be on
the bone and still have their natural fat cap intact. This
environment will allow the natural enzymes working on the
muscle tissues and permits the cuts to slowly dehydrate. This
concentrates the meat avor and changes the texture, avor
and tenderness. The benet of this process is very tender meat
with an intense avor. The downside is that a certain weight loss
occurs due to moisture loss, which decreases the yield and
increases the cost per pound. Also, the surface of the meat
usually needs to be trimmed away before the beef is portioned
and sold, resulting in further loss of volume.
8 9 w w w . s t e a k l o c k e r . c o m
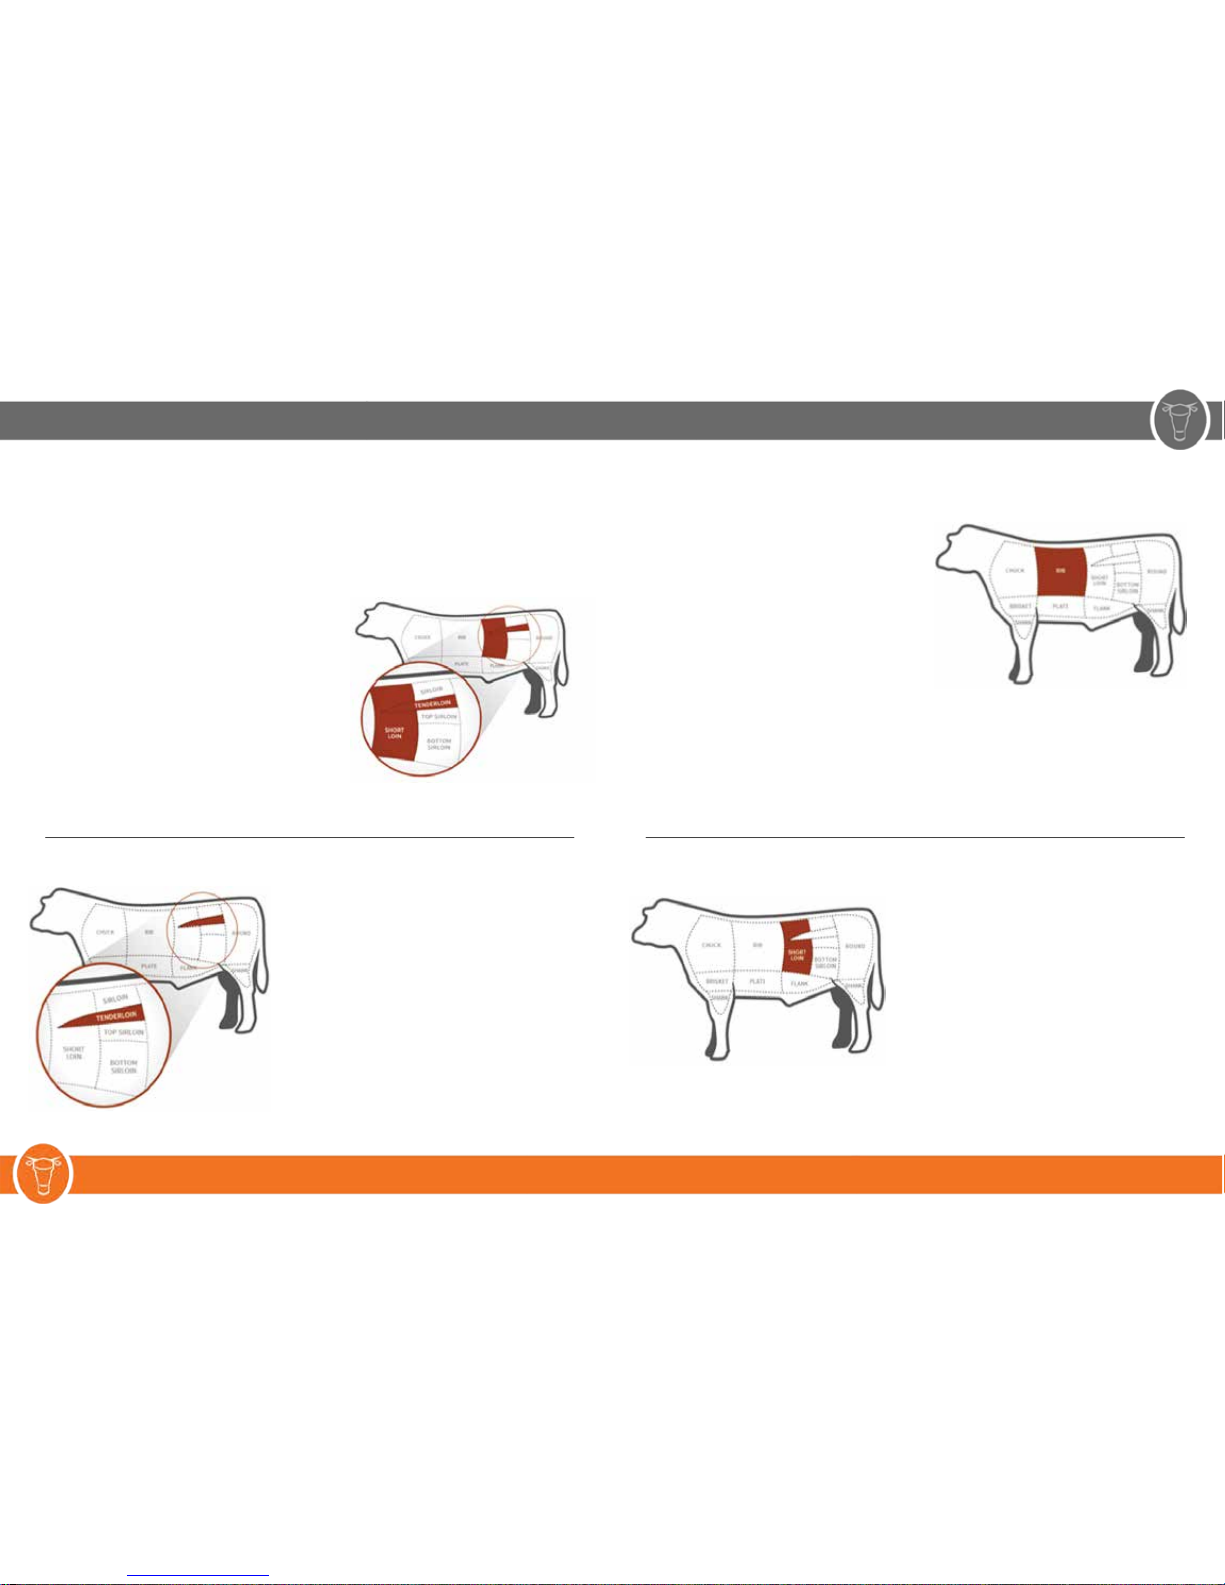
Beef Porterhouse is cut from a primal cut called the short
loin. This primal cut is located just after the rib primal and is one
of the most well known parts of the animal. The porterhouse
steak is from the portion of the short loin that is closest to the
sirloin section. The North American Meat Processors (NAMP)
Meat Buyers Guide denes the porterhouse as having a
tenderloin that measures at least 1.25 inches in width parallel to
the backbone of the steak (the “T”portion of the bone).
The T-bone steak is what the rest of the steaks from the short
loin are called. This name comes from the bone resembling a
capital “T”.
This steak is highly prized in leading steakhouses because
this porterhouse cut is comprised of the largest portions of a
tenderloin and New York steak. There are many dierent stories
of how this beautiful cut came to be named the Porterhouse.
One story is that roadhouses in the early 1800’s would advertise
beef steaks served with a pint of porter. Another is that an
establishment in Manhattan named “Porterhouse” started to
serve large T-bone steaks. As they grew in popularity, the cut
they served picked up the name Porterhouse. Regardless of the
name’s origin, everyone agrees that the porterhouse steak is
one of a kind and great for grilling or broiling.
Flavor & Texture of Dry Aged Beef
Beef Tenderloin - NAMP # 189
Beef Filet, or Tenderloin. This is a muscle in the loin primal and
is in two dierent sub-primals, the short loin and sirloin,
creating its unique oblong shape.
This muscle is not used by the animal much thus resulting in
the tenderloin being the most tender cut in the animal. Flavor
in beef is derived from how much a muscle is used and because
of the lack of use, the tenderloin has a very subtle beef avor.
Because it is such a lean steak, the tenderloin is best cooked
no more than medium-rare. You should use this cut in its
“full” format. It should have a fat layer around most of the loin
lessening toward the tip end of the loin. Do not cut away the
fat as it protects the tenderloin.
This cut does not have a bone attached to it so it will shrink
a little more intensively than a sub primal cut which
contains a bone.
Beef Rib, Oven Prepared Bone In
- NAMP # 107
This cut, Bone-in Ribeye is found in the primal
section known as the rib. The rib primal is located from rib six
through twelve right behind the chuck section. Frenching is a
technique where the butcher trims the meat to expose the rib
bone, showing o its unique cut. This cut is one of the most
well known cuts, primarily from the popularity of the bone-in
rib roast, also known as prime rib. This section of the animal is
known for its marbling, avor and tenderness. This primal
section has an abundance of all three of these characteristics.
The bone-in ribeye steak is also referred to as, Ribeye
steak, Cowboy steak, Spencer steak, Prime Rib steak or
Saratoga Steak. The Cowboy steak is generally used to describe
the Bone-in Rib Steak where the rib bone has been frenched
down to the eye of the steak. At least once in your life you
should have a bone-in rib steak grilled to medium-rare, lightly
seasoned and savor the juicy, melt-in-your mouth, true beef
avor of this gorgeous steak imparts.
Beef Loin, Strip Loin Bone In
- NAMP # 175
We suggest Natural Angus or Prime for this sub primal.
Choice is also a good alternative but slightly less marbled than
Prime. The strip loin comes from the loin primal in the animal.
It is the long narrow piece on a t-bone or porterhouse steak.
This cut has many aliases, New York steak, Kansas City steak,
Boneless Club steak or Ambassador steak to name a few.
This steak generally has a fair amount of marbling (tiny ecks of
fat interlaced in the muscle) which gives the cut a good avor
prole and tenderness.
In the 1800’s the famed Delmonico’s Restaurant in
New York City featured a steak that is thought to be the
precursor to the boneless strip loin steak and it picked up the
name of Delmonico. This cut has also been linked to a boneless
rib-eye steak so it is believed that the original Delmonico was
cut from the portion of the strip loin closest to the rib. Because
the restaurant was located in New York City it is thought that
this is how the cut picked up the name of New York steak.
Beef Porterhouse -
NAMP # 174
10 11 w w w . s t e a k l o c k e r . c o m
http://lindyandgrundy.com
http://thelocalbutchershop.com
www.avedanos.com
www.harveysgussmeat.com
www.oliviersbutchery.com
www.huntingtonmeats.com
http://www.oliviersbutchery.com
http://www.nimanranch.com
http://www.belcampomeatco.com
http://www.estanciabeef.com
http://www.crystalrivermeats.com
https://craftbutchery.com
http://www.pinestreetmarket.com
http://thebutcherandlarder.com
www.publicanqualitymeats.com
www.gepperthsmarket.webs.com
http://www.allenbrothers.com
www.smokinggoose.com
www.porterandyork.com
http://www.goosethemarket.com
http://www.kansascitysteaks.com
http://www.creekstonefarms.com
http://www.dartagnan.com
http://the-meathook.com
www.dicksonsfarmstand.com
www.espositomeatmarket.com
http://www.nycotto.com
www.japanpremiambeef.jimdo.com
www.schallerweber.com
www.vincentsmeatmarket.com
http://www.thecannibalnyc.com
http://www.heritagefoodsusa.com
www.savenorsmarket.com/web
http://www.lacensebeef.com
http://www.lafrieda.com
http://www.greensburymarket.com
http://www.lobels.com
www.gartnersmeats.com
http://chopbutchery.com
http://www.olympicprovisions.com
http://martysmarket.com
www.prbutcher.com
www.revivalmarket.com
www.saltandtime.com
www.caputosdeli.com
www.theorganicbutcher.com
http://belmontbutchery.com
http://www.blackrivermeat.com
www.swinerymeats.com
www.billthebutcher.com
http://www.debragga.com
https://www.aglocal.com
http://www.grassfedbeef.org
http://www.eabradys.com
Where to buy sub primal cuts: USA ONLY
First: Make friends with your best butcher or meat source and order a cut as described earlier.
Ensure it is “Bone In” and a Prime or Choice sub primal.
Second: Unpack the beef and pat it dry with paper towels. Do not trim. (You may wrap the cut loosely in
a triple layer of cheesecloth – it is a little cleaner but a lot more labor intensive as you have to change
the cloth every week). Set it on the Steak Locker rack with all sides exposed to the forced air flow.
Ensure the UV (Germicidal Light) is always on while the meat is in the Steak Locker.
Third: Let the cut rest for at least 28 days or up to 75 day; the longer the beef ages, the tastier it gets.
dried areas of fat, but leave behind as much of the good fat as possible. You are now ready to grill
(cook) your dry aged steak. You can place the remainder of the primal cut back nto the Steak
Locker for additional dry aging time. Alternatively, if you do not desire additional dry aging time,
cut the entire sub primal into steaks and freeze them individually. We recommend using vaccum
sealed machine and bags to prevent freezer burn.
Loss due to the dry aged process: As your sub primal cut is dry aging, slowly dehydrating and losing
beef.
Preparation to dry age sub primals:
Preparation to cook dy aged steaks:
Depending on your choice of cut and due to the nature of the dry aging process, it is almost always preferred to cut at least
1.5 inch thick steaks.
How to cook the best steak Once you are ready to cook your steak, ensure that the meat is dry and fully trimmed of all hard
dried out layers as well as any dark areas from the dry aging process. Your dry aged steak will cook in about half the time
compared to a non-dry aged steak, mainly due to the reduced moisture within the muscle of the steak. Also, we have
found that electronic and analog thermometers can be unreliable. As most things delicate, one gets better with practice. It
is best to always undercook dry aged steaks and then, if desired, have additional cooking time. You can never un-cook a
steak but always have the opportunity to add more cooking time.
ENJOY!
12 13 w w w . s t e a k l o c k e r . c o m
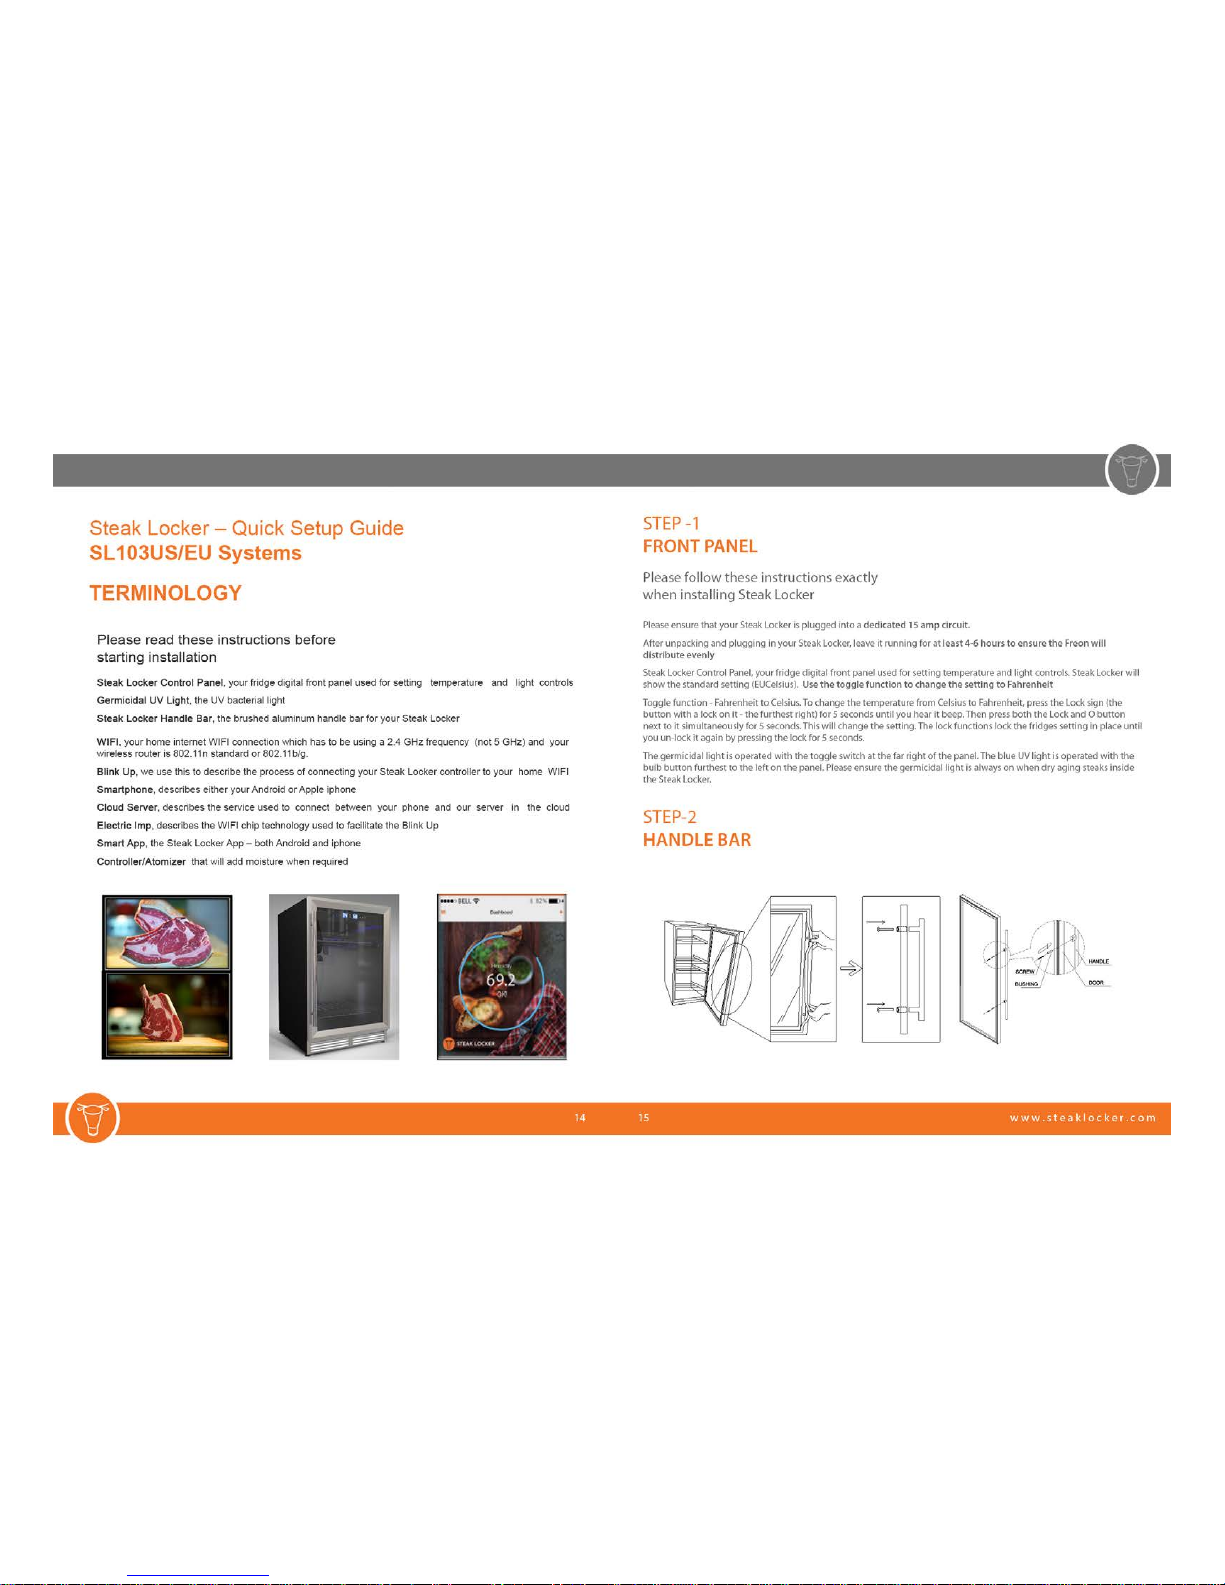
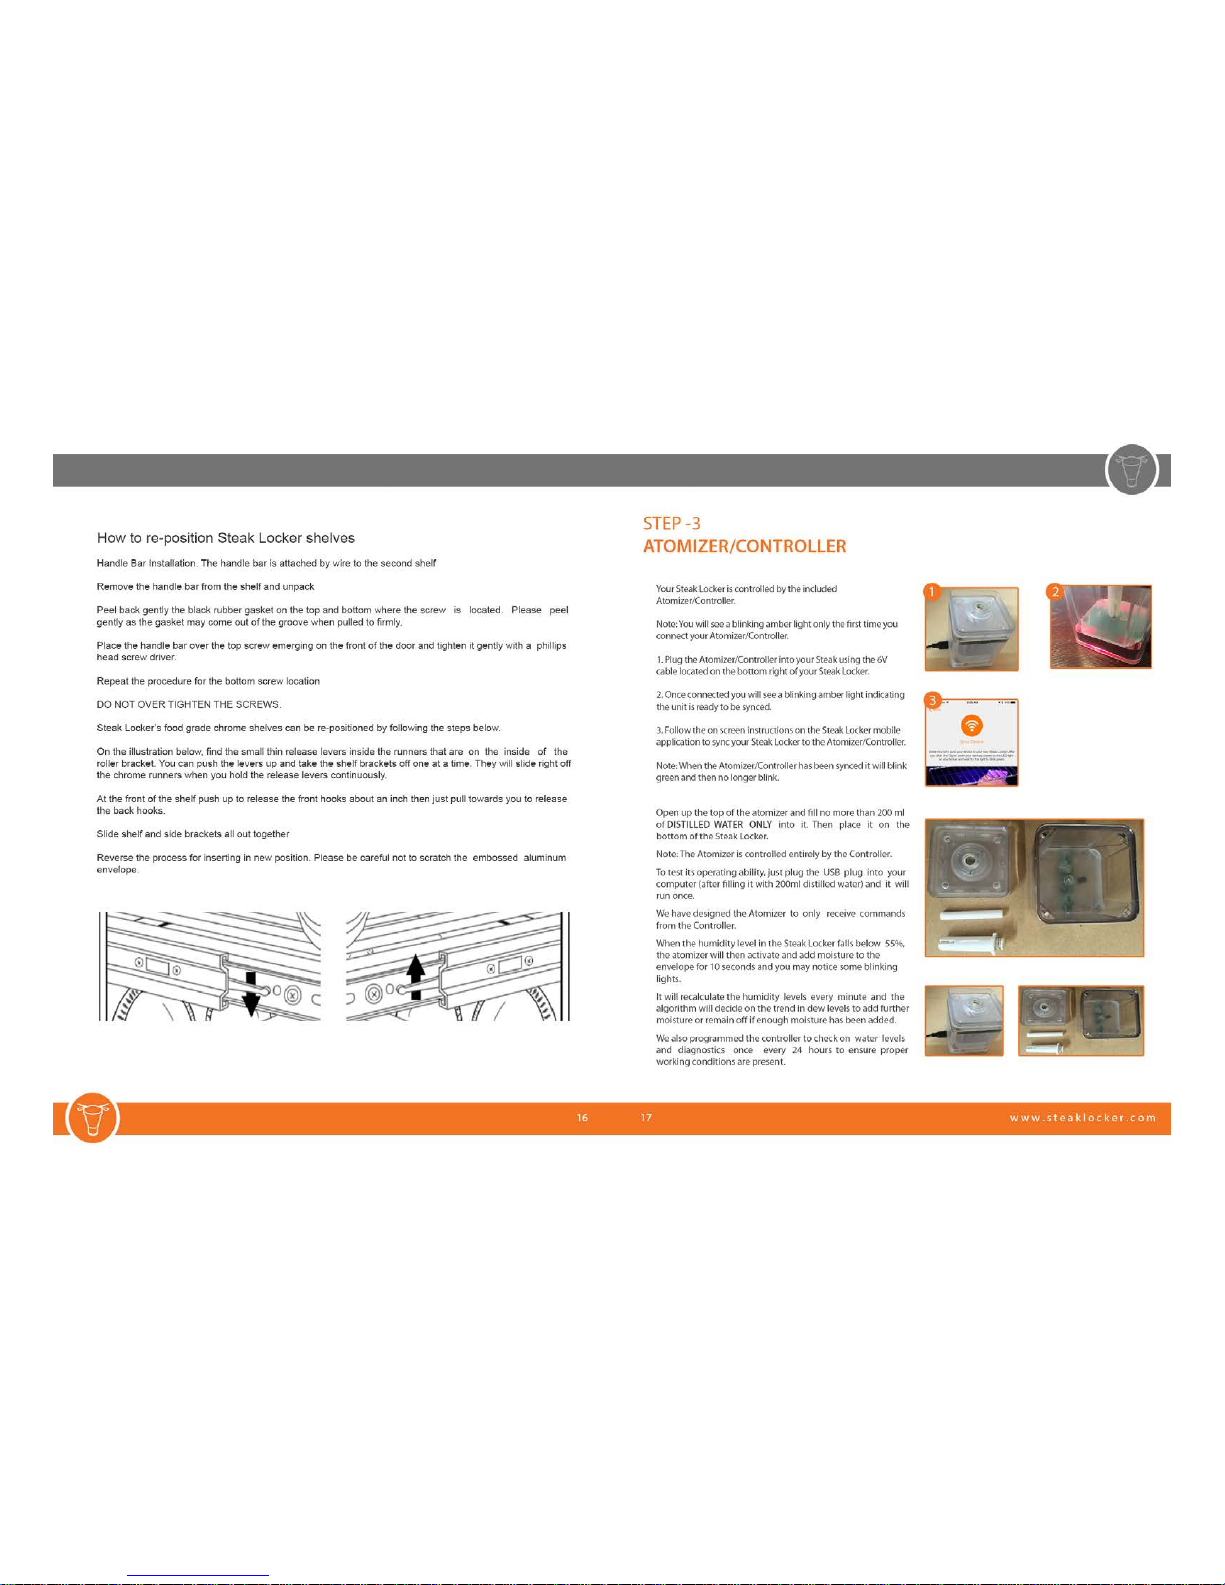


Table of contents
Other Steak Locker Refrigerator manuals


