Stelvision STELESCOPE 70 User manual

STELESCOPE 70STELESCOPE 70
70 mm Altazimuth Refractor Telescope
ASSEMBLY AND OPERATING INSTRUCTIONS
Version 2

TABLE OF CONTENTSTABLE OF CONTENTS
2
4Presentation of the STELESCOPE 70
in Images
6Assembling the Telescope
6Tripod Set Up
7Optical Tube Assembly
7 Accessory Assembly
8Initial Settings and Things You Need to
Know
9Motion
9Pointing
9Eyepiece Assembly and Focusing
10 Understanding Image Orientation
10 Aligning the Red Dot Finder
10 Understanding the Field and Magnification
12 Preparing and Beginning Observation
12 Preparations and Selecting an Observation Site
13 Pointing the Telescope at a Celestial Object
14 Focusing on a Celestial Object
14 Choice of Magnification
15 End of Observation
16 What Can Be Observed?
18 Maintenance and Adjustments
18 Storage and Routine Maintenance
18 Adjusting the Optical Tube
19 Optional Accessories
20 Waste Disposal
20 Additional Information
20 Warranty
20 Contact
20 Technical Characteristics of STELESCOPE 70
Congratulations on your purchase of this STELESCOPE 70 telescope!
Stelvision's STELESCOPE range has been designed to make quality sky
observations as simple as possible. This manual will give you the explanations
you need to simply and easily learn about your telescope and make your first
observations. Read it carefully. We are at your service for any questions that
may remain after you’ve read these pages (see p. 20).
Happy observing,
The Stelvision Team
This instruction manual is to be considered an integral part of the telescope. Please read it carefully,
making sure to understand the safety instructions before use. Keep this manual for the entire service
life of the telescope and attach it to the telescope in the event of resale or transfer.
CAUTION: RISK OF PERSONAL INJURY
RISK OF BLINDNESS: Never look directly at or near the Sun through the telescope without a
specific sun filter, as this may cause irreversible damage to your eyes. Children should only use the
telescope under adult supervision.
DANGER OF SUFFOCATION: Keep packaging materials (plastic bags, rubber bands, etc.) out of the
reach of children.
FIRE HAZARD: Never leave the telescope, especially the lenses, exposed to direct sunlight. The
magnifying glass could cause fires.
3
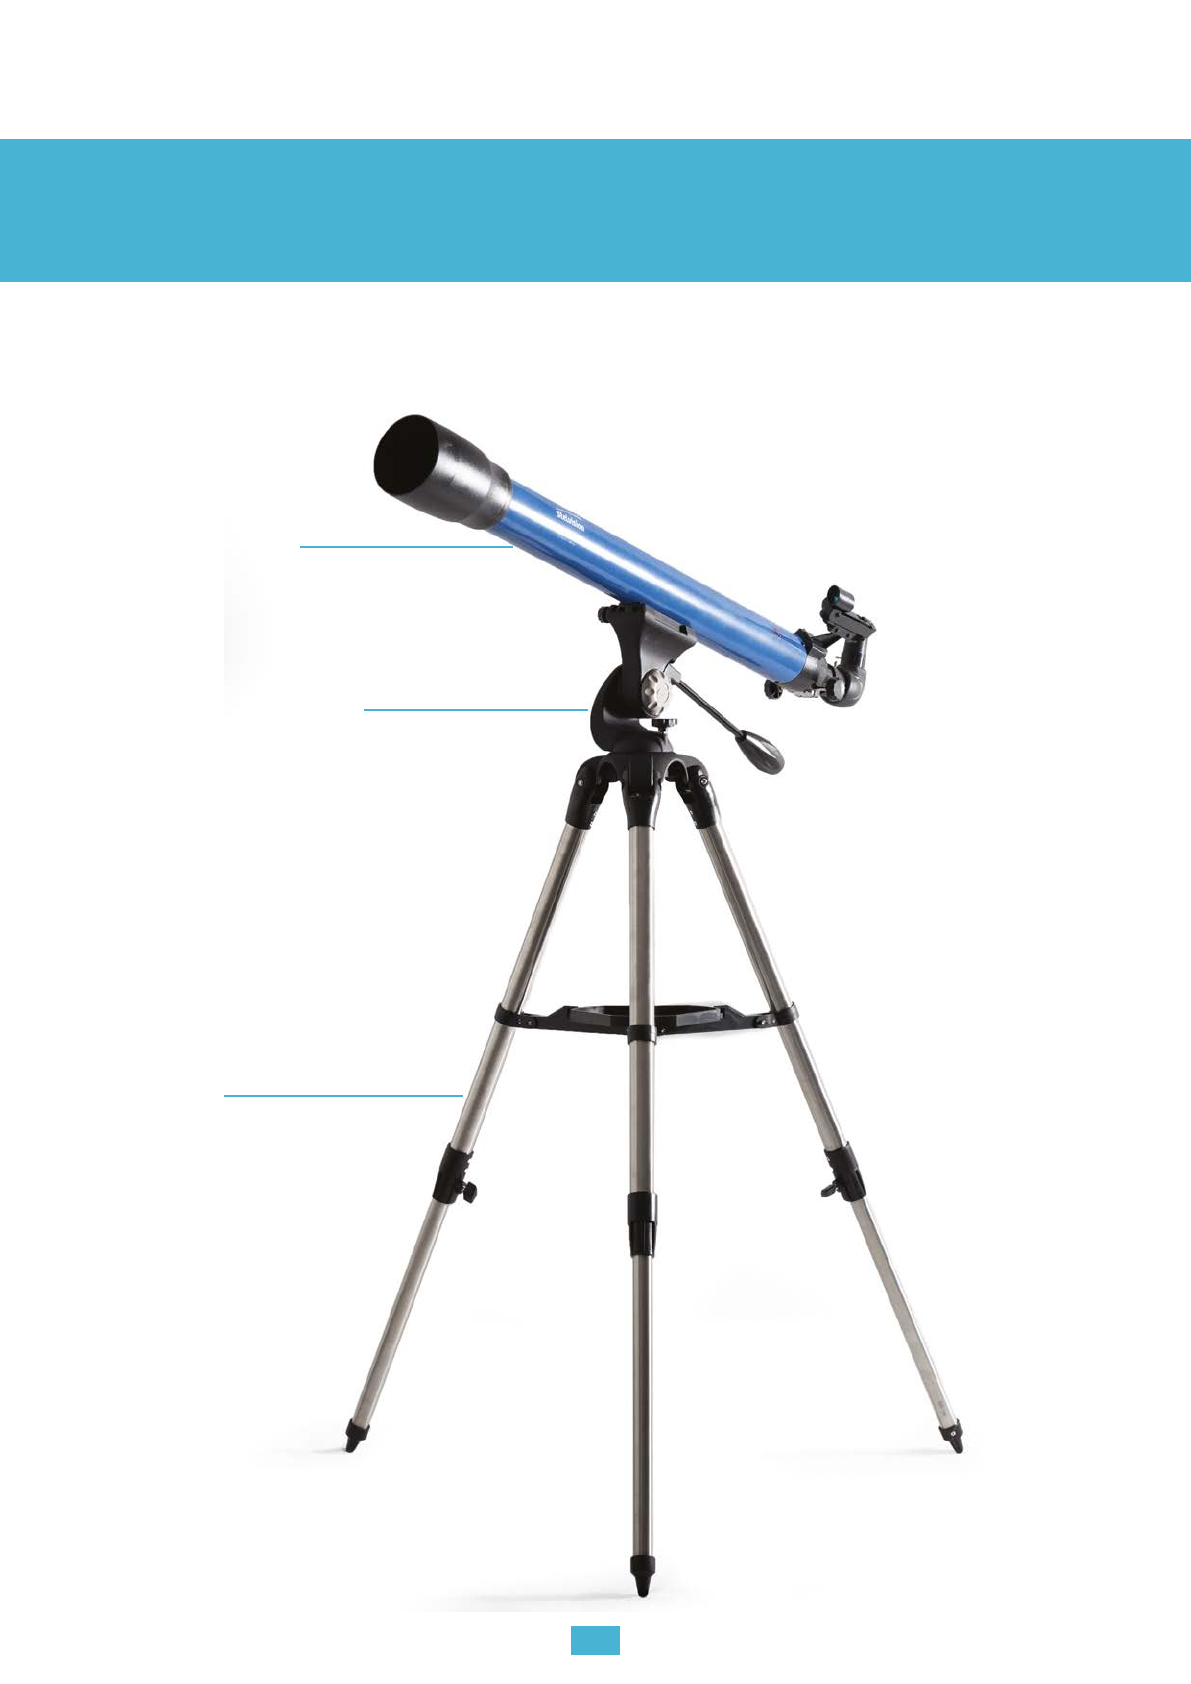
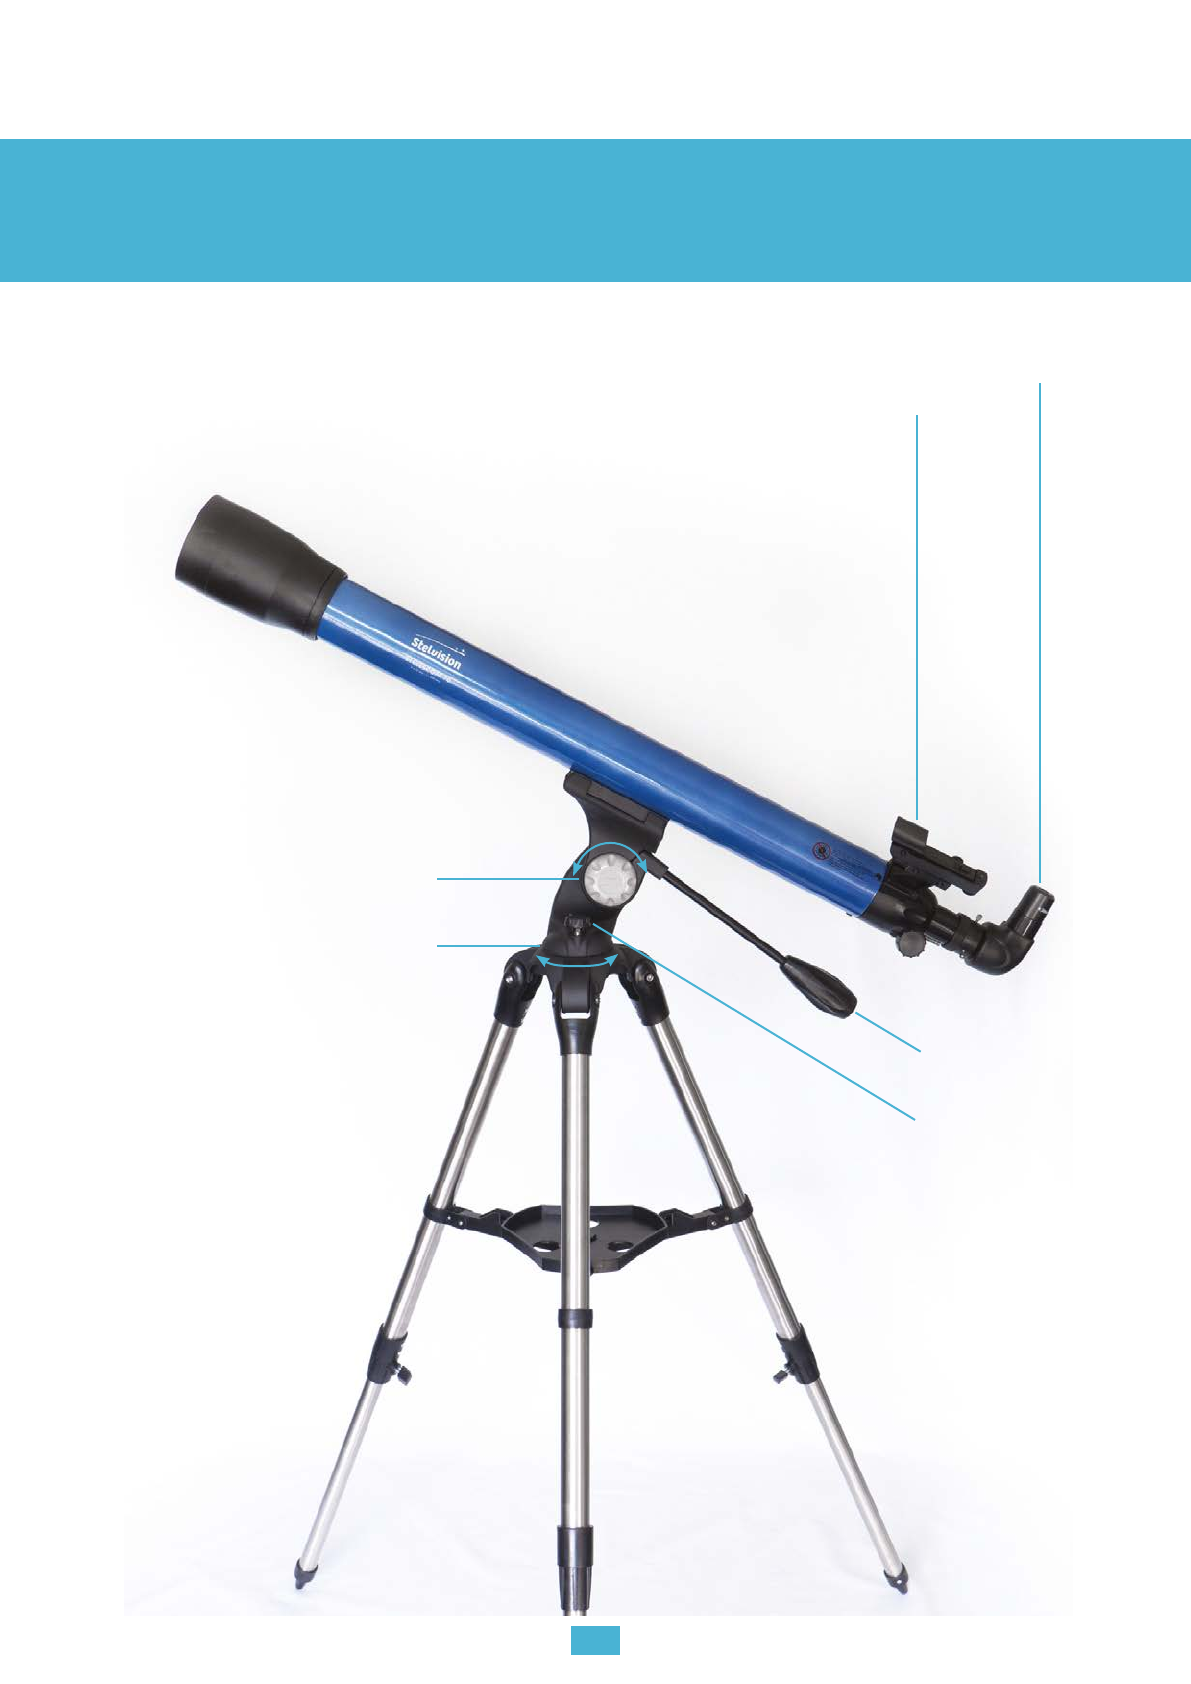
Presentation ofPresentation of
the STELESCOPE 70the STELESCOPE 70
IN IMAGES
Optical Tube
Altazimuth Mount
Tripod
4
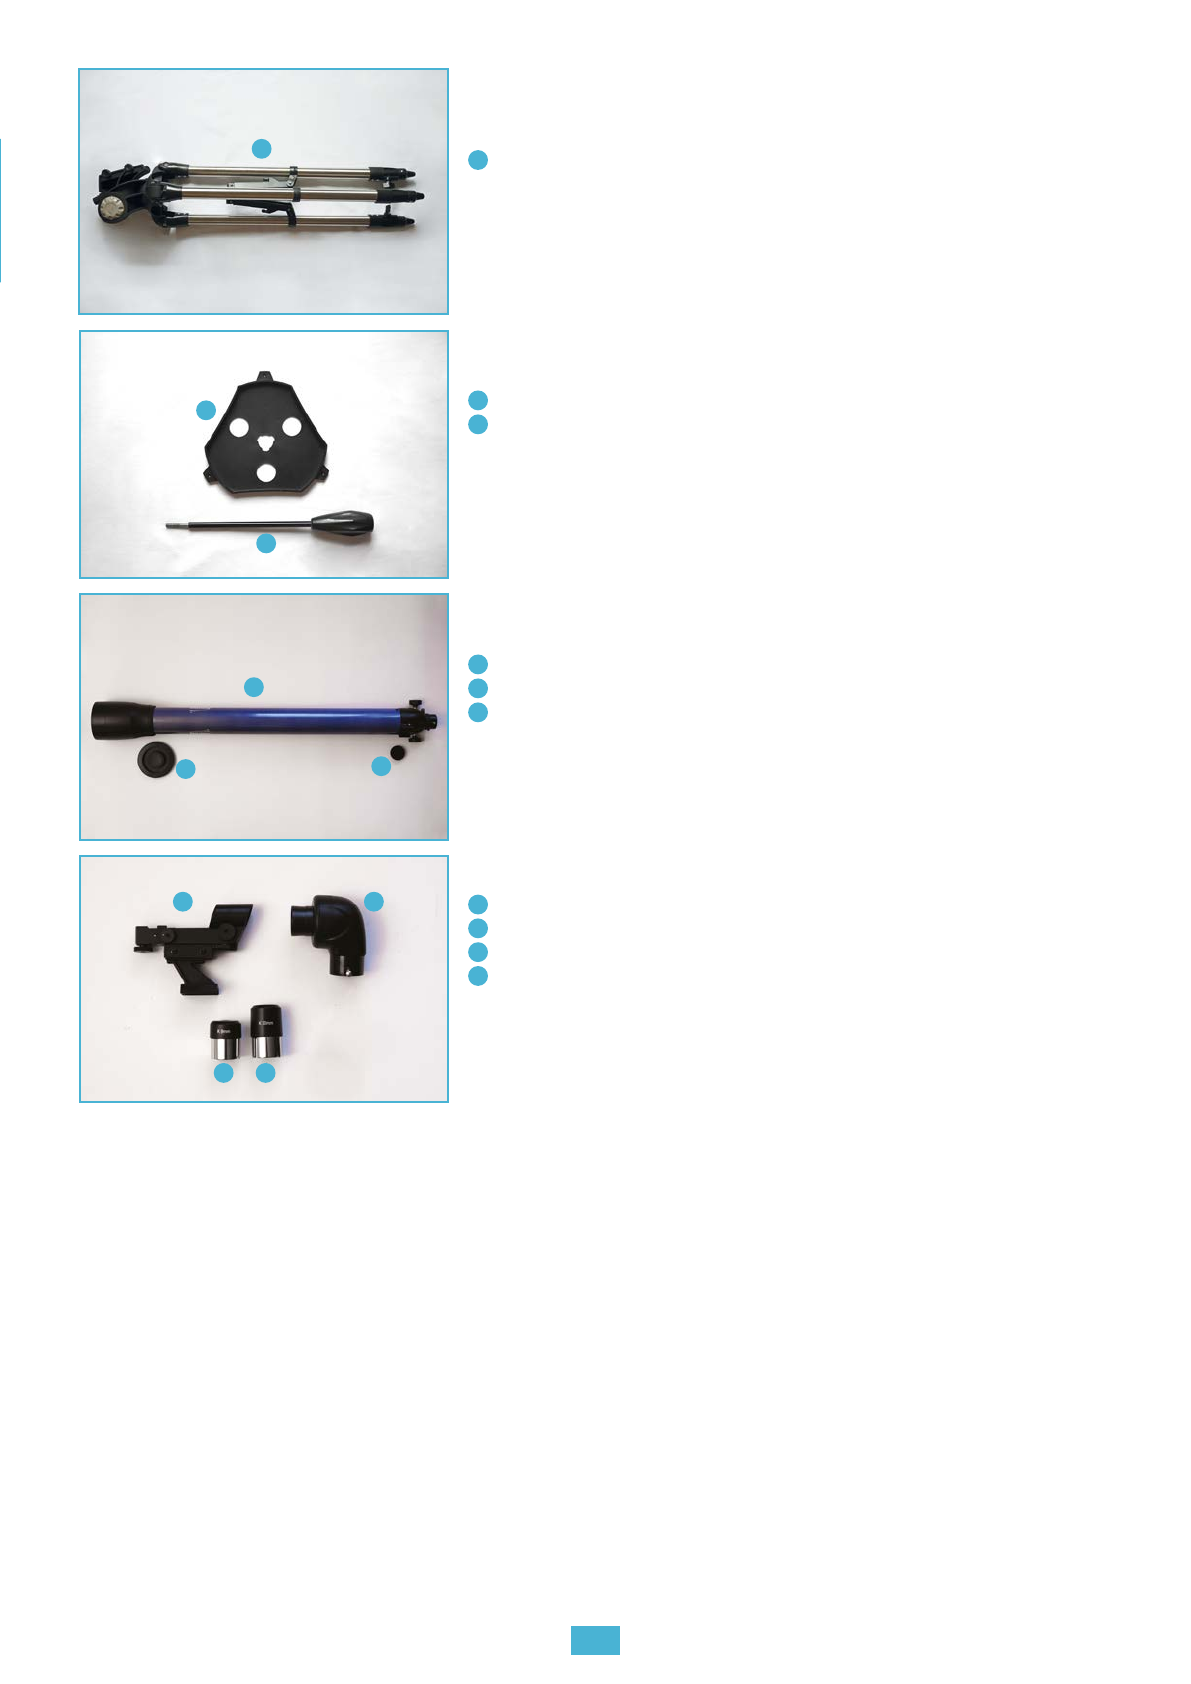
WHAT’S IN THE BOX
Tripod with adjustable legs and azimuth mount
Accessory tray
Height adjustment clamp
Optical Tube
Eyepiece holder cap
Optical tube dust cap
Red dot finder
Amici prism star diagonal
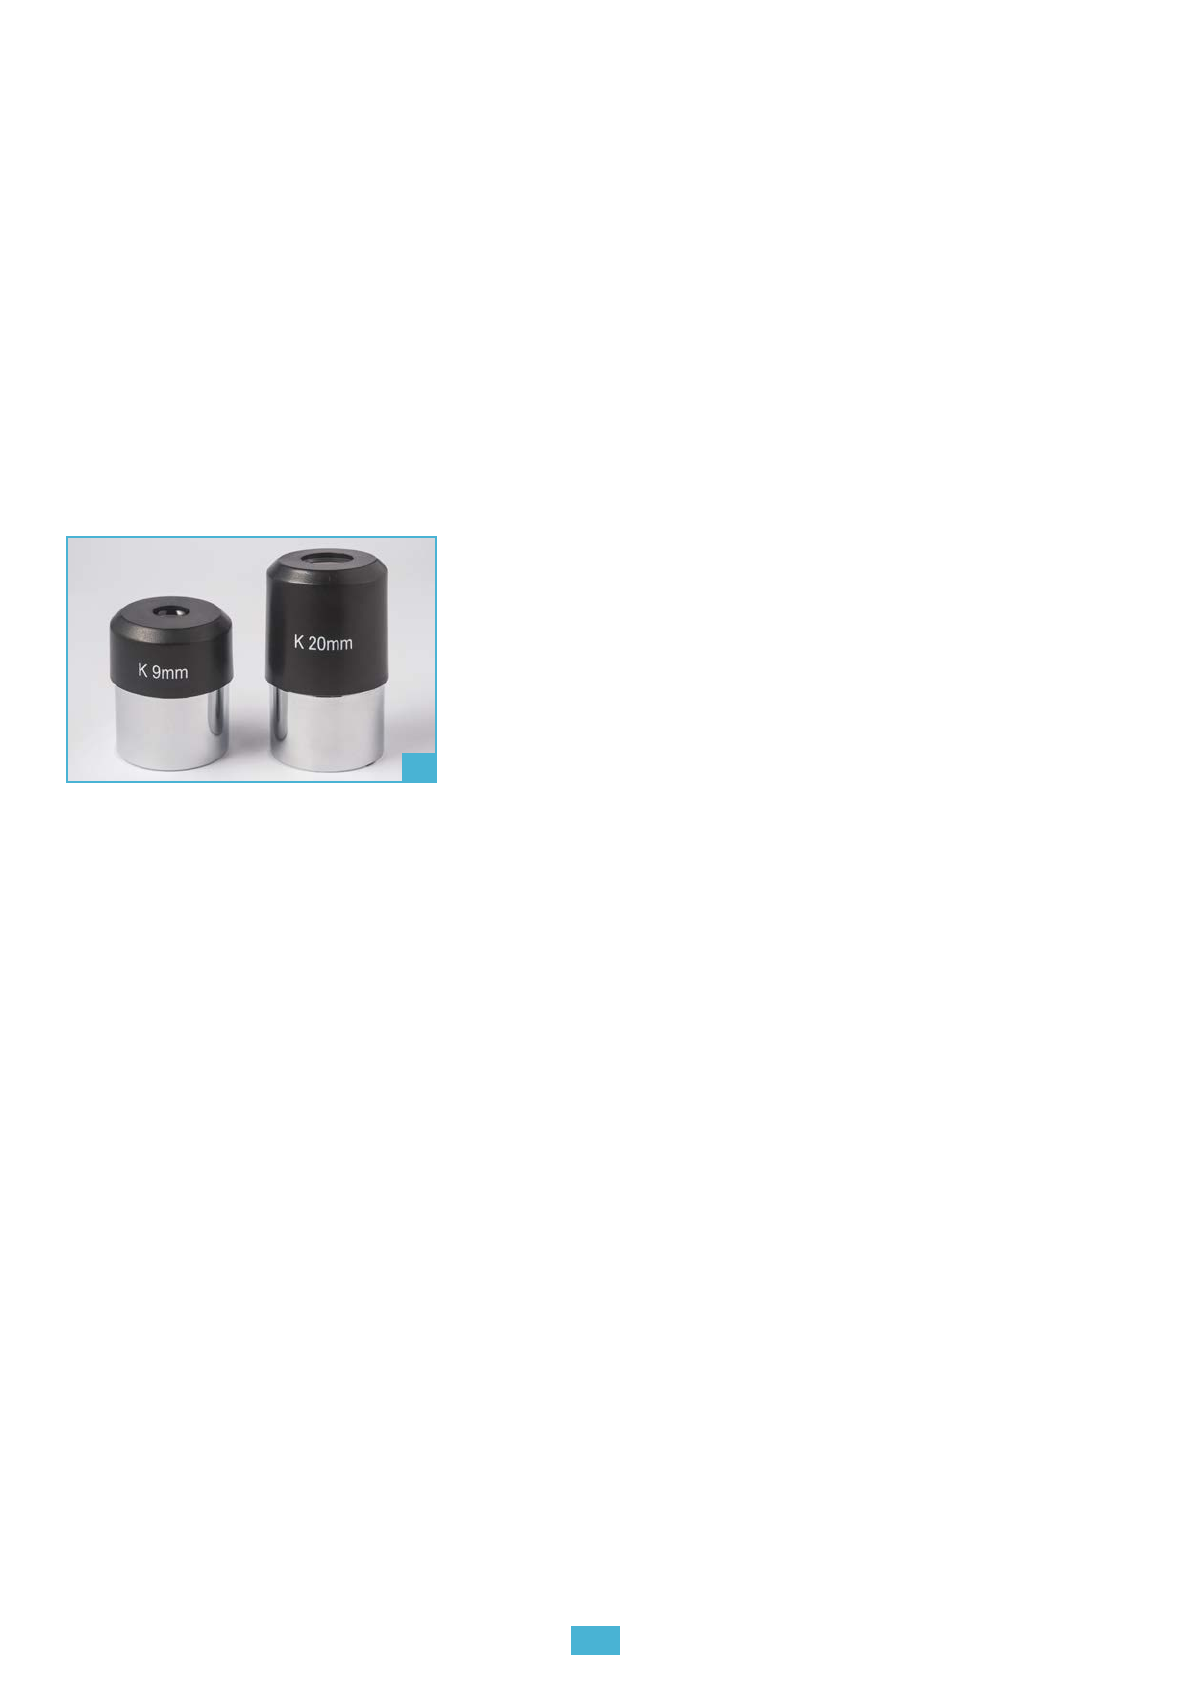
Kellner eyepiece 9 mm
Kellner eyepiece 20 mm
A
C
B
G H
I
D
F
J
J
A
B
C
D
E
F
G
H
I
E
5

Assembling theAssembling the
TelescopeTelescope
CHAPTER 1
6
2
The letters refer to the indications in the images on the left of each
page. The capital letters also refer to the description of the items
on page 5.
TRIPOD SET UP
1. The telescope mount includes the tripod with adjustable
legs, its mount and accessory tray . Extend the legs of the
telescope and lock them in place by tightening the knobs
.
Stand the tripod upright and gently pull the tripod legs
apart until the center brace snaps into place horizontally. Adjust
the length of the feet if necessary.
2. Position the accessory tray so that its central hole can be inserted
over item at the center brace line.
3. Rotate the tray until the tabs clip into the pins on the three
leg braces.
6. Screw the panning handle onto the mount.
3
1
4
PLEASE NOTE: Although not essential, the accessory tray helps
reinforce the telescope and increases the stability of the images
provided by the optics.
AB
a
b
b
c
c
e
d
de
A
B
a
C
C
9
7
6
5
8
f
h
i
7
OPTICAL TUBE PLACEMENT
The optical tube is attached to the mount by means of a dovetail
bar. This trapezoid-shaped metal part is inserted into the slide rail
located on the telescope clamp at the top of the mount.
5. Loosen the two knobs of the slide rail until the passage is
completely free.
6. Position the telescope clamp horizontally and tighten the
panning handle and the azimuth tension knob . Insert the
dovetail bar of the tube into the slide rail and tighten the
knobs .
INSTALLING THE ACCESSORIES
The Red Dot Finder
The STELESCOPE 70 is equipped with a red dot finder which
helps point celestial objects.
7. Set up the red dot finder lens so that it is positioned towards the
front of the tube. Insert the finder on the base found at the rear of
the optical tube and tighten the clamp screw. Remove the plastic
tab under the battery cover before use.
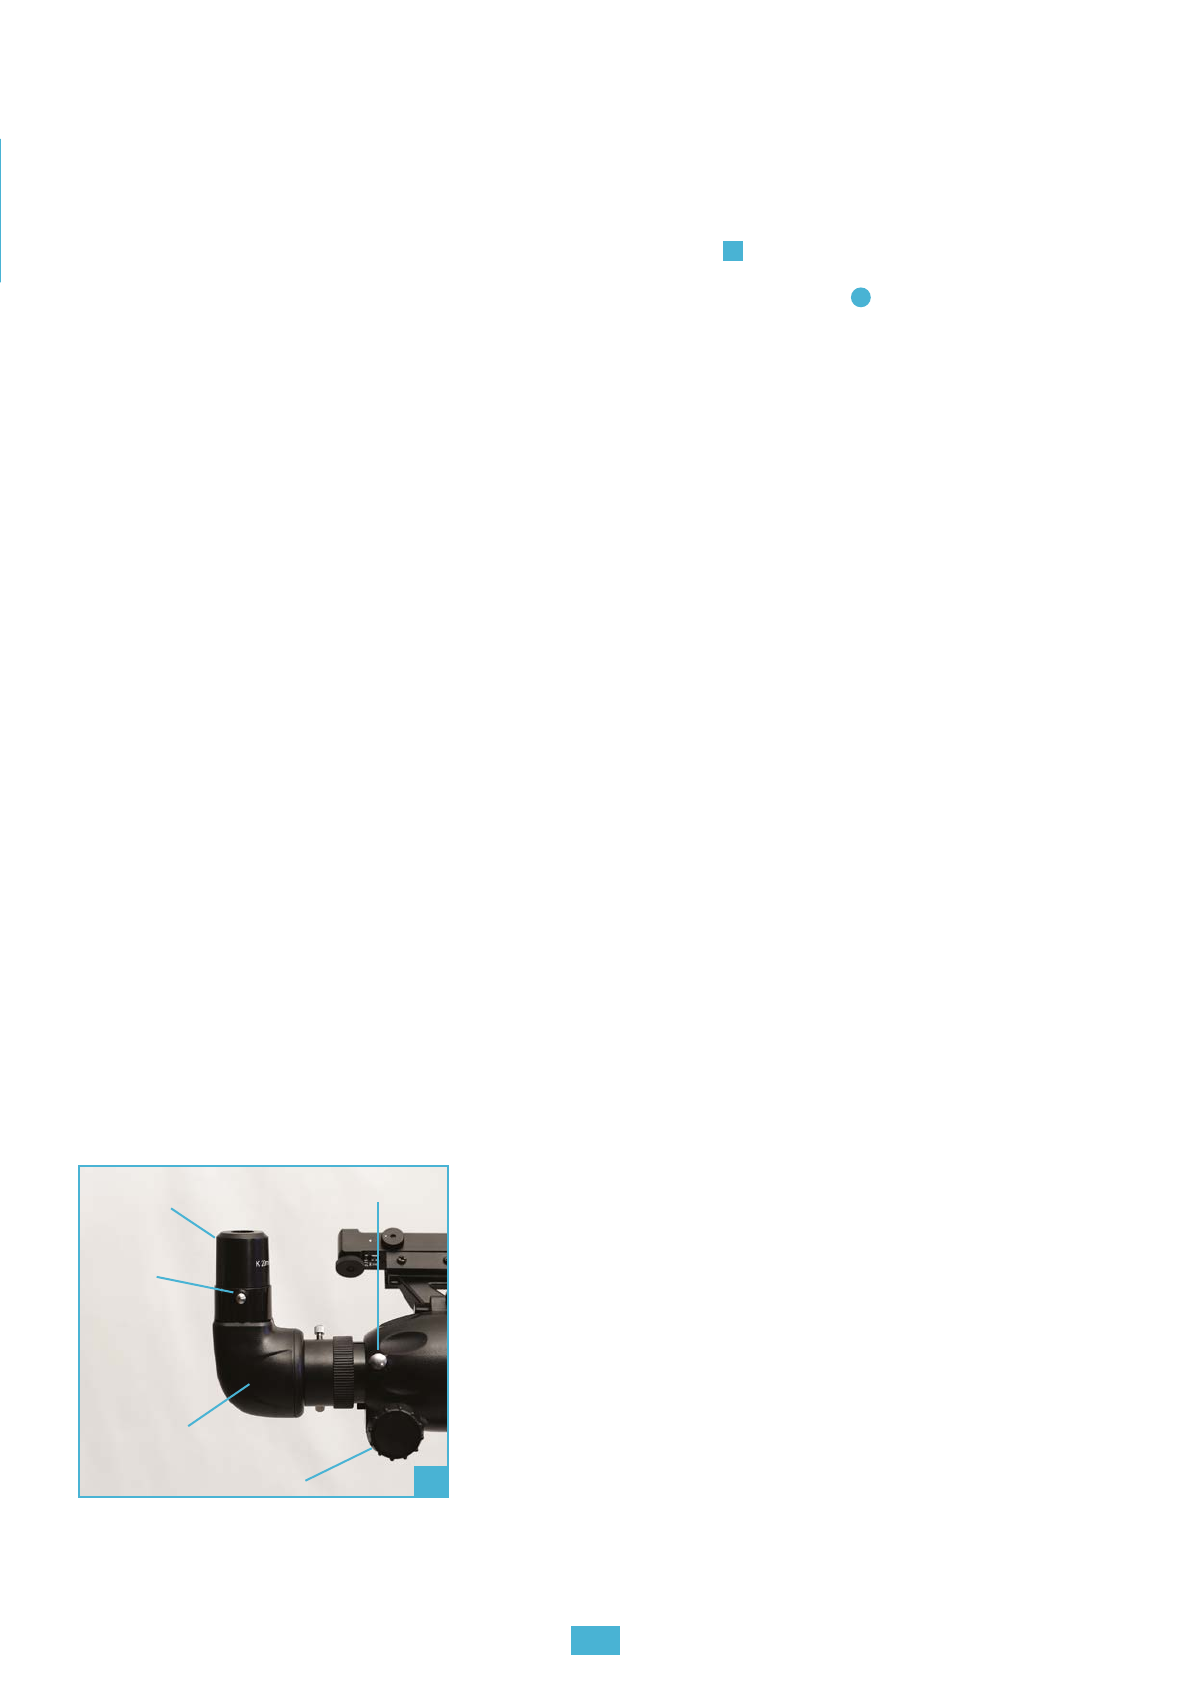
The Eyepiece Holder and Star Diagonal
8. Remove the cap from the eyepiece holder and insert the Amici
prism star diagonal . Tighten the clamp screws .
Dust Caps
9. Dust caps must always be in place when STELESCOPE 70 is
not in use in order to limit dust deposits on the optics as much as
possible. There are two caps: the eyepiece holder cap which can
also be used on the star diagonal in the absence of an eyepiece
(see picture) and the optical tube cap to be placed at the front
of the tube.
f
g
f
D
G
C
C
h
g
D
G
E
F
H
H
E
i
Initial Settings andInitial Settings and
Things to KnowThings to Know
CHAPTER 2
panning handle
star diagonal and
eyepiece holder
red dot finder
azimuth tension
knob
azimuth axis
altitude axis
8
Before you use your STELVISION 70 for the first time, carry out
the following adjustments in day light for the best results. You
will be able to do this at night just before observations once you
have a better understanding of your telescope.
MOTION
The azimuth tension knob must be just tight enough to allow for
smooth, frictionless movement from left-right. Once this tightness
has been adjusted, the panning handle can be used to maneuver
the STELESCOPE 70. This handle, located on the altitude axis that
moves up-down, makes swiveling the optics possible. The handle
should be unscrewed when maneuvering the telescope. It must be
tightened (without over-tightening) before release to ensure that
the tube remains stationary.
POINTING
Always use the eyepiece with the lowest magnification, i.e., the one
with the longest focal length (20 mm), to make pointing easy.
Pointing can be done by moving the tube via the panning handle.
To do this, aim at the target by placing your eye along the tube or
by using the red dot finder. (Make sure that the red dot finder is
correctly aligned: see Aligning the Red Dot Finder paragraph on
p.10).
Tighten the panning handle to lock the tube in place.
Twist the knob until focus is reached (see the following section),
and then center on
the target in the eyepiece with more precision
by operating the height adjustment lever.
EYEPIECE PLACEMENT AND FOCUSING
To guarantee the quality of the images delivered by
STELESCOPE 70, the focus, i.e. the sharpness of the image, must
be properly administered. This can be done by turning the knob
located at the rear of the eyepiece holder. Choose a distant object
and point the telescope at this object to focus your eyepiece for the
first time (if the distance is too short, focusing will be impossible).
10. Insert an eyepiece and tighten the clamp screw.
Place your eye on
the eyepiece and turn the focus adjustment dial
gently in one direction
until you find the sharpness range. If this does not work, turn the
dial in the other direction.
Once you find the sharpness range, you can refine the focus quality.
To do this, turn the dial back and forth to "frame" the area. Each
overshoot in either direction will be gradually reduced until you
stop at the sharpest point. This method will prevent your eye from
getting used to an otherwise blurry image. It naturally compensates
for an approximate focusing, but it makes the observation much
less comfortable and leads to faster eye fatigue. The back and
forth movement of the eyepiece holder's dial deceives the eye
and makes it easy to find the right focus.
Please note that the eyepiece holder is equipped with a clamp screw
which must be tightened just enough to allow smooth focusing.
9
10
focus knob
ocular lens
clamping
eyepiece holder
clamping
eyepiece
star diagonal
g
C

UNDERSTANDING IMAGE ORIENTATION
11. The STELESCOPE 70 telescope is a refractor, which means
that it made up of lenses. Light passes through these lenses and
then through the eyepiece, which is also composed of lenses.
You can insert an eyepiece
directly behind the optical
tube. In this case, the image
will appear inverted (both
upside-down and left-right
direction).
It is better to add a star
diagonal to the telescope,
which makes viewing much
more comfortable. This
accessory is equipped with
an Amici prism optical
system which flips the image on both ends. This is particularly useful
if STELESCOPE 70 is used for daytime terrestrial observing.
RED DOT FINDER ALIGNMENT
The red dot finder is necessary to center on the celestial objects
in the telescope. It therefore must be perfectly aligned with the
optical tube to work.
12. The red dot finder does not magnify the image. It is made up of
a window which displays an illuminated red dot. Stand behind the
finder while keeping both eyes open to use it.
Aim the tube at an easily recognizable object, such as the top of
a pole, which should be as far away as possible (at least twenty
meters).
Once the target is in the 20 mm eyepiece, center on the top of the
pole via the panning handle. Then repeat this by replacing the 20
mm eyepiece with the 9 mm eyepiece.
Turn on the red dot finder and look through (set the intensity to its
maximum level if you are in a lit area).
13. The red dot must be placed on your target. If this is not the
case, use the two knobs to adjust it.
Check that the target is still centered in the eyepiece's field of view
after adjusting the finder. If not, repeat steps 12 and 13.
12
13
j
10
switch
j
11

UNDERSTANDING THE FIELD AND
MAGNIFICATION
The STELESCOPE 70 eyepieces make it possible to alter the
magnification and field of vision.
Magnification
To calculate the magnification of a given telescope and eyepiece
combination, take the focal length F of the telescope and divide it
by the focal length f of the eyepiece. The resulting number is the
magnification factor.
M = F/f
The STELESCOPE 70 comes with two Kellner eyepieces of 20 mm
and 9 mm focal length. The focal length of the optical tube is
900mm, which allow eyepiece magnifications of:
• 900/20 = 45 times for the 20 mm eyepiece;
• 900/9 = 100 times for the 9 mm eyepiece.
The range of eyepieces can be extended to provide a wider
choice of magnifications. Any given telescope aperture has a limit
magnification. Any additional detail beyond this limit magnification
is not visible and the image quality will even deteriorate
significantly. This maximum magnification is about twice the scope
aperture. STELESCOPE 70 with a 70 mm aperture recommends
a magnification that does not exceed 140 to 150 times. Such
a magnification can only be used under conditions of perfect
atmospheric stability (absence of turbulence), i.e. very rarely.
A magnification of about 100 times (obtained with the 9 mm
eyepiece) will often be the maximum.
True Field of the Eyepiece
The true field of view of the eyepiece makes it possible to know
the surface area of the sky observed and therefore estimate the
size of the objects. It is calculated with the apparent field of view of
the eyepiece (this value is provided by the manufacturer) and the
magnification M obtained with this eyepiece on a specific telescope.
The true field is expressed in degrees and arc-minutes.
True field = Apparent field / M
The eyepieces supplied with the STELESCOPE 70 have an
apparent field of view of 45°. Their true fields when used with
STELESCOPE70 are therefore:
• 45/45 = 1° for the 20 mm Kellner eyepiece;
• 45/100 = 0° 27' for the 9 mm Kellner eyepiece.
11

Preparing andPreparing and
Beginning ObservationBeginning Observation
CHAPTER 3
PREPARATIONS AND SELECTING AN
OBSERVATION SITE
Meteorological Conditions
Good conditions for observing are:
• clear skies;
• dry weather, for moisture quickly deposits on the optics, which
makes it difficult to focus and affects the quality of the images;
• little wind, for this otherwise shakes the telescope and alters
the images;
• transparency (such as after a good rainfall because the sky has
been "washed” and rid of debris), especially for observing
fainter deep-sky objects;
• a stable atmosphere, especially when observing the Moon and
the planets at high magnification. Highly magnified images
through the telescope are often blurred by atmospheric
turbulence, which is caused by eddies in the atmosphere and is
similar to the haziness that can be seen over a hot asphalt road.
Observation Site
Observing through a window is not recommended because the
window glass will distort images considerably. Also avoid observing
from an open window, for the difference in temperaturebetween
the room where you are located and outside will inevitably generate
turbulence and distort the images.
The STELESCOPE 70 optical tube must be cooled down to the
same temperature as outside to guarantee the best image quality.
It is therefore recommended that you take out your telescope
about ½ hour before beginning observation.
14. Move away as much as possible from any source of light pollution.
Lit windows, street lighting, or private outdoor lights will prevent
your eyes from properly adjusting to night vision. If you are unable
to escape these light sources (if you are observing in a backyard,
for example), position yourself so they are behind a wall or plants.
Light pollution in the city generally only allows you to observe the
Moon, the planets, and a few bright objects in the deep sky. The
country sky is more appropriate for any kind of observation target.
Carefully choose the surface where you place your telescope.
Avoid concrete slabs or tiles in the summer, for these surfaces
accumulate heat during the day and release it at night, which
generates turbulence and blurs the images. However, these types
of surfaces may be suitable in winter and cooler weather. Grass and
clay surfaces are ideal in all seasons.
12
14
Milky Way and light pollution
Photo Aurélien Chapron

Avoid observing over a roof, parking lot, or metal building when
it is hot during the day, for these surfaces also release heat, which
alters the images.
Basic Observer Equipment
Equip yourself appropriately to ensure observation is as pleasant as
possible. Some essentials include:
• warm clothing (hat, thick-soled shoes, parka, gloves...);
• a table to place accessories and a chair;
• a flashlight with a red light, for this color appropriately illuminates
while preserving night vision.
POINTING THE TELESCOPE AT A CELESTIAL
OBJECT
Which eyepiece is used for pointing at objects?
To locate a target more easily, it is recommended to always use the
lowest available magnification. For the STELESCOPE 70, use the
20mm Kellner eyepiece. When the object is located and centered
on at low magnification, the eyepiece can then be changed to
magnify the image if necessary.
There are different methods of pointing that depend on how
difficult a particular celestial object may be to locate.
Pointing by Direct Aiming (easy)
Direct pointing is the simplest and fastest method. When the object
is visible to the naked eye or its position is specifically known, simply
align the telescope directly on the object or star with the red dot
finder.
This method is ideal for the Moon, bright planets (Mercury, Venus,
Mars, Jupiter, Saturn), deep sky objects visible to the naked eye or
easy to locate (Andromeda Galaxy M31, Orion Nebula M42, etc.),
or any other object visible to the naked eye (bright comet, etc.).
Pointing from Star to Star (easy to difficult)
When the object is not visible to the naked eye, it can be located
from the surrounding stars by using a sky map. The goal is to
find a star path on the map that begins with an easy-to-spot star
with the naked eye. This star is first located with the telescope by
direct aiming (see previous paragraph). Then, either with the red
dot finder or by directly looking through the eyepiece, move the
telescope’s target field to follow the starry path, which then leads
to the desired target. Compare it with the star map (use an infrared
flashlight to avoid too bright of a light).
13
FOCUSING ON A CELESTIAL OBJECT
Focusing on a celestial object is similar to focusing on an earthly
object, except that it is always moving. Therefore, when focusing
on an object, adjustment can not always be repeated for the next
target. We recommend that you adjust focus regularly, as it can
easily be modified by various factors (temperature changes of the
optics, movements of the telescope, unintentional changes by the
observer, etc.).
To make observation easier, adjust the focus at the very beginning
by aiming at a bright object, such as the Moon, a planet, or a bright
star. It can be difficult for beginners to directly find the focus range
for faint objects in the deep sky and / or for those located in a field
with few or faint stars.
MAGNIFICATION CHOICE
15. The choice of magnification depends on the type of object being
observed and the technical specifications of the telescope. The
STELESCOPE 70 comes with two eyepieces with focal lengths of 20
and 9 mm, which deliver magnifications of 45 and 100 times (see also
p.11 for magnification calculations). It can withstand magnifications
of up to about 150 times, provided that the appropriate eyepieces
are obtained and that the quality of the sky allows it.
As a general rule:
• the lowest magnification is used when searching for a target;
• the target is well centered in the eyepiece before changing to a
higher magnification;
• magnifying beyond the maximum value accepted by the
telescope has no purpose;
• the highest magnification is not necessarily the best for quality
observation;
• magnification tends to darken the image and reduce the field
of view;
• when the atmosphere is turbulent (stars are twinkling), there
is no purpose for increased magnification, as this only leads to
blurred images.
In order to choose the right magnification according to the star
being observed, keep in mind that:
• the Moon, the planets, and all bright targets can more easily
withstand high magnifications (when the atmosphere is
sufficiently stable and they are not too low on the horizon);
• deep sky objects are best viewed at low to medium
magnifications, unless they are very small.
14
15

END OF OBSERVATION
In order to keep your STELESCOPE 70 in good working order, here
are a few tips to follow at the end of each observation:
• turn off the red dot finder;
• remove the eyepiece from the eyepiece holder;
• place the STELESCOPE 70 in a dry and dust-free room without
putting the dust caps back on. This will allow the moisture
deposited on the optics to disappear quickly. The caps are to
be put in place once the telescope is dry;
• allow the eyepieces to also air dry for a few hours before storing
them in their protective boxes.
15

What can BeWhat can Be
Observed?Observed?
CHAPTER 4
16
The Moon
16. Observing the Moon is simple and always spectacular! This
satellite is easy to locate and accessible all year round. The Moon
is essentially observed along its terminator, which is the division
between the daylight side and the dark night side of the planetary
body. Observing this area easily reveals a surface studded with
craters, rilles, and various formations. The closer you are to the
terminator, the more visible the relief of these formations is due
to the shadows cast by the Sun. However, the full moon is of little
interest to observe, since the entire surface of this satellite is
illuminated from the front and therefore does not have any shadows.
The Stars
17. With the exception of our own star, the Sun (see next page),
the stars are too far away to see their surfaces. No matter how
magnified a star is, it will always appear as a bright spot.
However, stargazing can still be quite interesting. Stars offer a
whole range of colors (white, yellow, blue, red, orange, etc.), their
brightness can change, they can evolve alone or in groups, and we
now even know that some of them are surrounded by planets! It
might be quite fun to try and understand what you observe. For
example, you might want to learn why one particular star is red or
why another star is part of a triple star system. You can discover a
world of knowledge!
The Planets
The various planets, thanks to their ever-changing appearance, are
great to observe. They should preferably be observed when they
are highest in the sky, i.e. when they cross the meridian (to the
south), in order to limit atmospheric disturbances. The layer of air
to isthicker for the stars close to the horizon. The atmosphere must
be calm for quality observations.
Amongst the planets of our solar system, four planets are really
worth observing.
18. Venus is the closest planet to the Sun. It is to be observed
after sunset in the west or before sunrise in the east, since it is
closer to the Sun than the Earth. With a telescope, it is fairly easy
to see its phases like with the Moon. Venus’ surface detail cannot
be observed.
19. Mars, orange in color, is interesting to observe when it is closest
to the Earth (about every two years). During this time, a few large
formations and its white polar caps can be observed on its surface.
Mars also has phases.
20. Jupiter is one of the most spectacular planets. Its interesting
angular diameter and evolutionary cloud formations make it a fun
subject to observe. It is also accompanied
16
17
18
19
20
The Moon
Photo Sébastien Brangbour
The double star Albireo
Photo Nicolas Aguilar
Venus
Photo Eric Mattern
Mars
Photo Jean Christophhe
Jupiter
Photo Didier Auberget
17
by numerous moons. The four brightest, Io, Europe, Ganymede
and Callisto, regularly move in front of and behind the giant planet
for remarkable obsersvation.
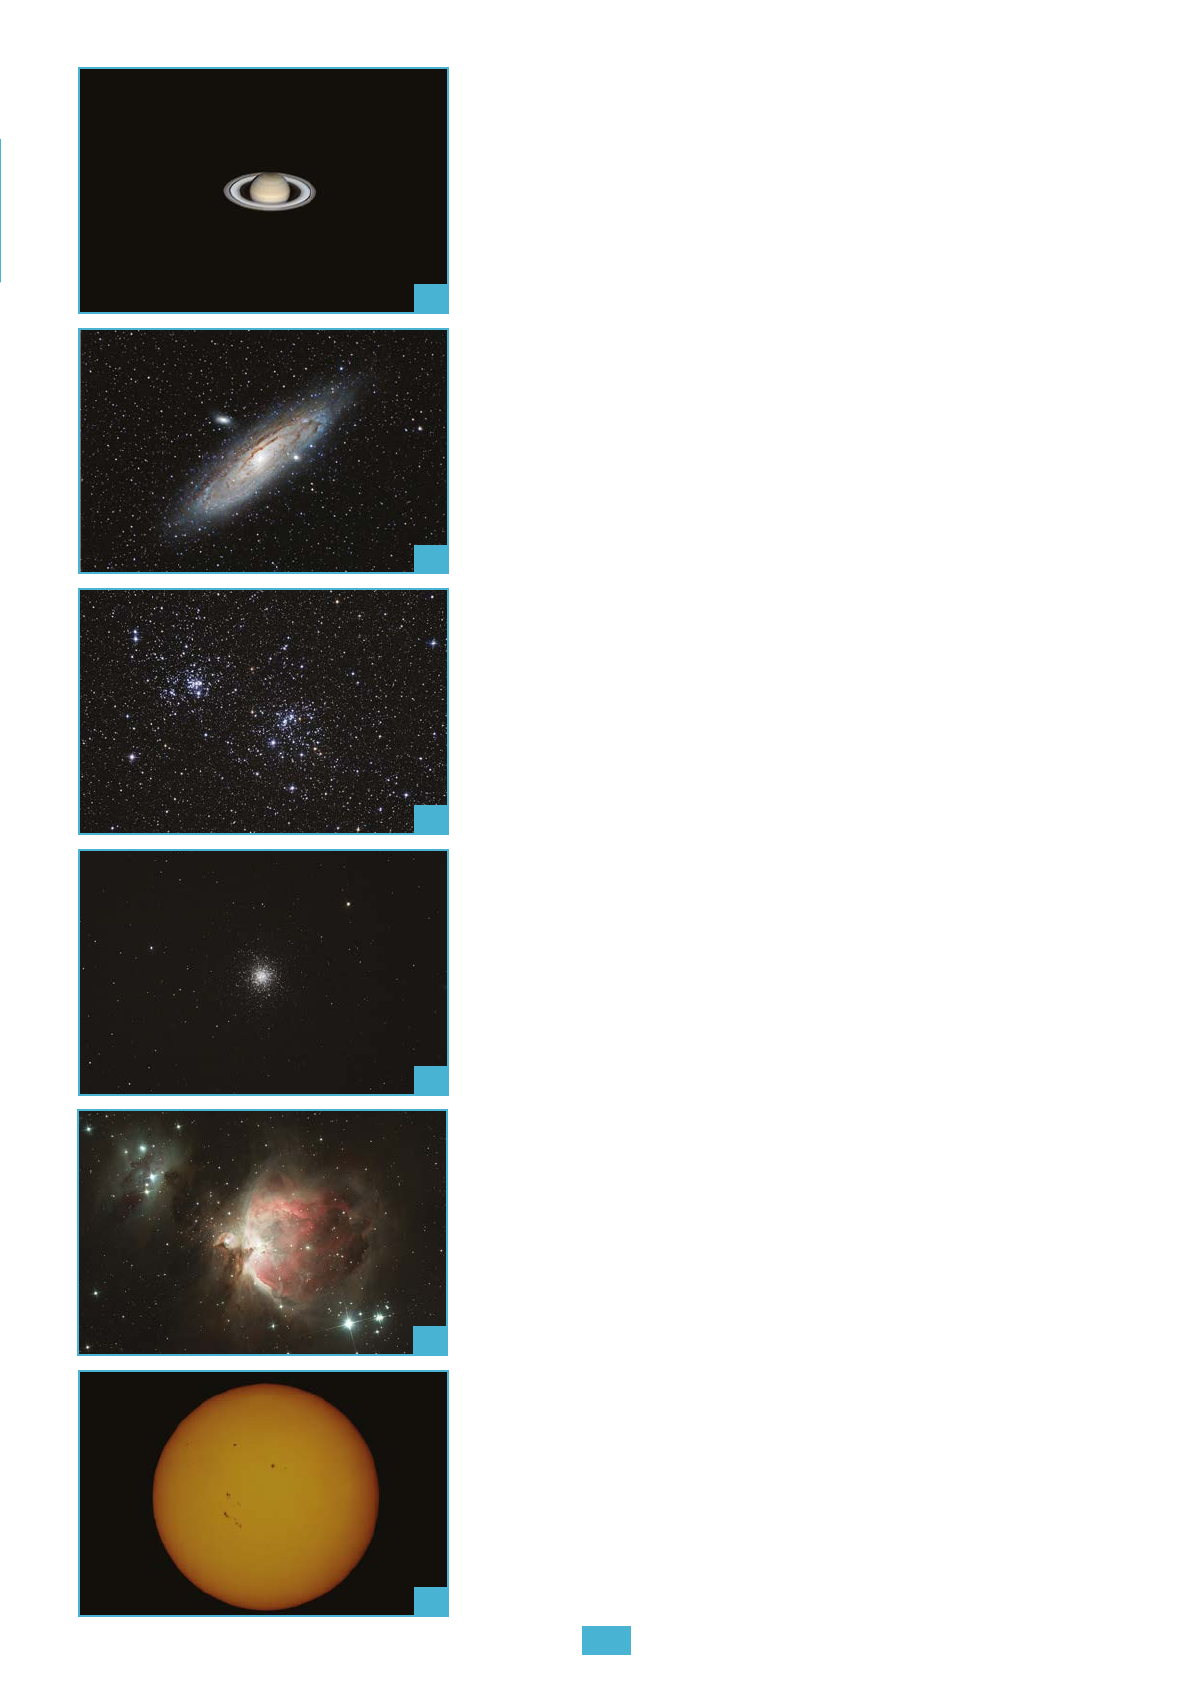
21. Saturn is also spectacular because of its surrounding rings. They
are easily visible as soon as magnification exceeds 40 times. With
a magnification of more than 100 times and a stable atmosphere,
Saturn’s Cassini division between the two main rings can be faintly
made out. The rings’ tilt changes over the years.
Because of its proximity to the Sun, Mercury is difficult to observe
and not of much interest. Uranus and Neptune, which are very
distant, are observable but are only of interest because of their blue
/ green color.
The Objects of the Deep Sky
22 to 25 Galaxies, open clusters, globular clusters and nebulae of
gas and dust form the bulk of what amateur astronomers call deep
sky objects. All these objects are located outside our Solar System,
or even outside our galaxy, the Milky Way. Some deep objects are
bright and can sometimes even be visible to the naked eye, but
most can only be revealed with the help of a telescope. They also
vary greatly in size, and can be almost stellar in appearance or have
surfaces much larger than the full moon.
Observing deep sky objects can be disappointing at first glance,
for what the eye sees is very different from what can be seen in
photographs. These objects often reveal few or no colors and details
can be quite obscured. But it is important to persevere, because
these objects can be fascinating to observe after working on your
observing skills. These distant but visible objects via even a small
telescope also allow us to think about our place in the Universe!
Thanks to its aperture, STELESCOPE 70 gives you a chance to
see the most beautiful and brilliant objects in the deep sky. The
great Andromeda Galaxy, the Double Cluster in Perseus, the
Hercules Globular Cluster, and the large Orion Nebula are just
a few examples. If you’d like to discover more deep sky objects,
pick up an observation book or consult the Internet, which is full of
resources, especially stelvision.com.
The Sun
26. The Sun is the closest star to the Earth and the only one whose
surface can be observed. But be careful, because its observation is
dangerous if adequate precautions are not taken. You must install
a special filter (not provided) on the front of your telescope! Never
look at the Sun directly through a telescope. It is important to
only use filters that are specifically designed for this use, which are
available from specialist astronomy vendors.
Once this precaution has been taken, observing our star is in many
ways exciting. Its surface, observed in visible light, regularly shows
dark spots of varying size, areas where the temperature is lower and
whose shape changes from day to day. These spots also change
position on the surface of the Sun due to its rotation. Beginning
astronomers can monitor these changes from day to day because it
is very simple to do.
Observing the Sun is one of the few things that can be done during
the day. For better image quality, observe in the morning when the
atmosphere is not too turbulent.
21
22
23
24
25
26
Saturn
Photo Stéphane Gonzales
The Andromeda Galaxy M31
Photo Bernard Tassy
The Double Cluster of Perseus
Photo Corinne Yahia
The Hercules Globular Cluster M13
Photo Gérard Bauza
The Great Orion Nebula
Photo Gérard Bauza
The Sun
Photo Didier Auberget

MaintenanceMaintenance
and Adjustmentsand Adjustments
CHAPTER 5
18
STORAGE AND ROUTINE MAINTENANCE
STELESCOPE 70 must be stored in a dust-free, dry room that’s
protected from high temperatures. In case of prolonged non-use,
cover it with a cover or a sheet or take it apart and store it in its
packaging.
If metal or plastic parts become soiled, clean with a soft, slightly
damp cloth.
The optical surfaces (front lens, star diagonal, eyepiece lenses) are
fragile and can easily be scratched. A small amount of dust on the
surface will generally not affect image quality. If some dust has
settled on the surface, gently remove it with a soft bristle brush
working from the center outward, or use a rubber bulb to diagonally
blow the dust off from the surface of the optics.
When the eyepiece lenses are dirty, use a soft cloth (such as a
microfiber cloth) and possibly a photo lens cleaner.
ADJUSTING THE OPTICS
The optics of the STELESCOPE 70 are factory set before shipment.
Except in the event of a severe shock, it cannot be adjusted and
therefore does not require any intervention on your part.

AdditionalAdditional
AccessoriesAccessories
CHAPTER 6
3119
27
28
29
30
Your STELESCOPE 70 is ready to use, but you can complete it with
the following accessories available on the Stelvision online shop
(https://stelvision.com/astro/en/shop/).
Super Plossl Eyepiece 32 mm
27. This very low magnification eyepiece provides a wider field of
view. It makes targeting easier and produces beautiful images of
large objects, such as the Pleiades Cluster.
UW 15 mm Wide Angle Eyepiece
28. This eyepiece provides an intermediate magnification of
60 times and offers a wider field of view (apparent field 68°).
Great for deep sky observations (Orion Nebula M42, Messier 13,
Andromeda Galaxy M31, etc.).
UW 6 mm Wide Angle Eyepiece
29. This eyepiece provides a high magnification of 150 times and
offers a wider field of view (apparent field 68°). Perfect for planets
and the Moon close-up.
Stelvision 365 Sky Map
30. Essential for learning about the sky and making your first
sightings of stars, planets and deep sky objects.
Stelvision Map of the Moon
31. This map makes discovering the Moon easy thanks to its three
maps for different observation situations. Observe with the naked
eye / binoculars, with a refractor telescope, or with a reflector
telescope. It also presents nine spectacular lunar formations to
explore as well as the location of the Apollo mission landing sites.
31
20
Aperture 70 mm
Focal 900 mm
Mount azimuth, manual motions
Magnitude visual limit 11.2
Tube length 94.5 cm
Separating power 1.7”
Accessories included 20 mm and 9 mm Kellner eyepieces, 31.75 mm, star diagonal (Amici
prism); red dot finder
Magnifications with the supplied
eyepieces
45 times and 100 times
Maximum magnification possible with
other eyepieces purchased separately
140-150 times (with 6 mm eyepiece)
Optical Treatments multi-layer
Tripod steel tube aperture 31.75 mm, height adjustable
Total weight of the equipped telescope 5 kg
TECHNICAL CHARACTERISTICS OF STELESCOPE 70
WASTE REMOVAL
Electrical and electronic parts (red
dot finder) must be disposed of in an
authorized collection area for recycling.
ADDITIONAL INFORMATION
Observation ideas, introductory articles, news,
practical information sheets:
stelvision.com/en/
Subscribe to our newsletter to learn about new
online content:
stelvision.com/astro/en/shop/
Forum of amateur astronomers (advice and
suggestions):
cloudynights.com (US)
stargazerslounge.com (UK)
WARRANTY
This Stelvision product is guaranteed parts and
labor for two years from the date of purchase. For
more information, visit our website stelvision.com.
In the event of a defect covered by the warranty,
we will repair or replace the product. This warranty
does not cover damage caused by mishandling.
All returns must be accompanied by the following
items:
• name and address of the recipient for the return
of the product;
• description of the problem;
• proof of date of purchase.
The product must be properly packaged in a sturdy
box to prevent damage during shipping. Before
shipping, please notify us by e-mail (contact@
stelvision.com) and we will confirm the mailing
address to be used.
You may also have other rights that may vary from
country to country.
CONTACT
Do not hesitate to contact us for any question,
suggestion, or remark:
STELVISION
2 rue d'Austerlitz
31000 TOULOUSE - FRANCE
Stelvision - Reproduction prohibited without express permission - March 2020
Table of contents
Popular Telescope manuals by other brands


ORION TELESCOPES & BINOCULARS
ORION TELESCOPES & BINOCULARS Observer 60mm EQ instruction manual

ORION TELESCOPES & BINOCULARS
ORION TELESCOPES & BINOCULARS SpaceProbe 4.5 EQ instruction manual

Celestron
Celestron Travel Scope 70DX instruction manual

Celestron
Celestron PowerSeeker 114EQ Quick setup guide

SKY-WATCHER
SKY-WATCHER 15075EQ3-2 instruction manual

ORION Images
ORION Images Explorer 9029 instruction manual


