Streamit Lisa LCD User manual

Lisa LCD
Updated on 13-6-2014
for software version 1.16
User Manual

Lisa LCD 2
Contents
1. Getting started 7
................................................................................................................................................. 71.1 Introduction
................................................................................................................................................. 71.2 Unpacking your device
................................................................................................................................................. 71.3 References
................................................................................................................................................. 81.4 Device appearance
2. Installation 10
................................................................................................................................................. 102.1 Rack mount
................................................................................................................................................. 122.2 Table mount
................................................................................................................................................. 122.3 Connecting the Lisa
3. Using the Lisa 14
................................................................................................................................................. 143.1 Switching on the Lisa for the first time
................................................................................................................................................. 143.2 Device activation
................................................................................................................................................. 153.3 The configuration wizard
................................................................................................................................................. 173.4 Static IP during the configuration wizard
................................................................................................................................................. 193.5 Keylock setting during the configuration wizard
................................................................................................................................................. 193.6 Playing a stream
................................................................................................................................................. 203.7 Playing from card
................................................................................................................................................. 213.8 Using a proxy server
................................................................................................................................................. 223.9 Device configuration methods
4. On-board menu 24
................................................................................................................................................. 244.1 Enter the setup menu
................................................................................................................................................. 254.2 Menu language
................................................................................................................................................. 254.3 Network
................................................................................................................................................. 264.4 Proxy
................................................................................................................................................. 274.5 Date and time
................................................................................................................................................. 274.6 Volume
................................................................................................................................................. 274.7 Bass

Lisa LCD 3
................................................................................................................................................. 284.8 Treble
................................................................................................................................................. 284.9 Remote control
................................................................................................................................................. 284.10 Keylock
.......................................................................................................................................................... 294.10.1 Turning keylock on
.......................................................................................................................................................... 294.10.2 Turning keylock off
.......................................................................................................................................................... 304.10.3 Forcing keylock off
.......................................................................................................................................................... 304.10.4 Changing the keylock PIN code
5. Troubleshooting 31
................................................................................................................................................. 315.1 Enter the service menu
................................................................................................................................................. 315.2 Self test
................................................................................................................................................. 315.3 Connection test
................................................................................................................................................. 325.4 Identify device
................................................................................................................................................. 335.5 Reset to default settings
................................................................................................................................................. 335.6 Forcing an update when RSU is disabled
................................................................................................................................................. 335.7 Update content on the card
................................................................................................................................................. 345.8 Manual device activation
................................................................................................................................................. 345.9 Monitoring logging on the platform
................................................................................................................................................. 345.10 LCT logging
................................................................................................................................................. 355.11 Error codes
................................................................................................................................................. 405.12 Support
6. The Lisa family of internet radio devices 41
................................................................................................................................................. 416.1 Lisa product range
................................................................................................................................................. 416.2 Applications
................................................................................................................................................. 426.3 Useful tools
.......................................................................................................................................................... 436.3.1 Lisa Configuration Tool
.......................................................................................................................................................... 436.3.2 Streamit Card and Scheduler Toolkit
7. Using the SD card 44
................................................................................................................................................. 447.1 Supported cards
................................................................................................................................................. 447.2 Storing content on the card
................................................................................................................................................. 457.3 Updating the content on the card
8. Background knowledge 47

Lisa LCD 4
................................................................................................................................................. 478.1 Configuration update
................................................................................................................................................. 478.2 The flow in Lisa devices
.......................................................................................................................................................... 488.2.1 Startup
.......................................................................................................................................................... 508.2.2 Play from Internet
.......................................................................................................................................................... 508.2.3 Play from SD card
.......................................................................................................................................................... 518.2.4 Fallback in case of stream failure
.......................................................................................................................................................... 538.2.5 Playing of playlists
................................................................................................................................................. 538.3 Power off
................................................................................................................................................. 538.4 Requirements for playlists
................................................................................................................................................. 558.5 Random playback
................................................................................................................................................. 558.6 Supported audio formats and streams
.......................................................................................................................................................... 568.6.1 MP3 formats
.......................................................................................................................................................... 568.6.2 WMA formats
.......................................................................................................................................................... 578.6.3 OGG Vorbis formats
.......................................................................................................................................................... 588.6.4 AAC formats
................................................................................................................................................. 588.7 Ports used by Lisa devices
.......................................................................................................................................................... 598.7.1 Ports used for device-related activities (configuration, monitoring, etc.)
.......................................................................................................................................................... 608.7.2 Ports used for streaming and Store-and-Forward audio
.......................................................................................................................................................... 608.7.3 Extracting the port from a URL
................................................................................................................................................. 608.8 HTTP Basic Authentication
9. Remote software update (RSU) 61
................................................................................................................................................. 619.1 Streamit Device Portal
................................................................................................................................................. 619.2 When will Lisa device(s) update automatically
................................................................................................................................................. 619.3 Forcing an update to a particular version
................................................................................................................................................. 629.4 Forcing an update when RSU is disabled
................................................................................................................................................. 629.5 Best practice
10. Monitoring 63
................................................................................................................................................. 6310.1 Using Lisa Configuration Tool for monitoring and control
................................................................................................................................................. 6310.2 Remote Monitoring
................................................................................................................................................. 6410.3 Example log message
................................................................................................................................................. 6410.4 Periodic log messages
................................................................................................................................................. 6610.5 Event-driven log messages

Lisa LCD 5
................................................................................................................................................. 7110.6 Implementation tips for a custom platform
11. Controlling the Lisa with commands 72
................................................................................................................................................. 7211.1 Task scheduling
.......................................................................................................................................................... 7311.1.1 Tasks and interruptions
.......................................................................................................................................................... 7511.1.2 Handling task execution failure
................................................................................................................................................. 7611.2 Remote control from monitoring server
................................................................................................................................................. 7611.3 Telnet
................................................................................................................................................. 7711.4 Command overview list
................................................................................................................................................. 8211.5 Examples of sending commands
12. Protecting device and content 84
................................................................................................................................................. 8412.1 Locking the hardware keys on the Lisa
................................................................................................................................................. 8412.2 Card track encryption
.......................................................................................................................................................... 8512.2.1 Generating an encryption key
.......................................................................................................................................................... 8512.2.2 Loading the encryption key into the Lisa
Lisa LCD 6
EU Declaration of Conformity
This product carries the CE-Mark in accordance with the related European Directives. CE marking is the
responsibility of Streamit B.V. The Netherlands.
This is a class A product. In a domestic environment this product may cause radio interference in which case
the user may be required to take adequate measures.
FCC Compliance Statement
NOTE: This device complies with Part 15 of the FCC limits for Class B digital devices FOR HOME OR
OFFICE USE (“home or office” interference requirements are more stringent than “outdoor” requirements). Operation
of this device is subject to the following conditions:
1. This device may not cause harmful interference, and
2. this device must accept any interference received, including interference that may cause undesired operation.
The Streamit internet radio device does not contain any user-serviceable parts. Repairs should be made only by an
authorized Streamit service center. Unauthorized repairs or modifications could result in permanent damage to the
equipment, and void your warranty and your authority to operate the device under Part 15 regulations.
Understanding of Instructions
WARNING: These are instructions which can cause harm to people or damage to the device if not followed
properly. It is important to read and follow these instructions carefully.
IMPORTANT: These instructions are important in order to understand the correct behavior of the device.
Notices about trademarks
The Lisa family of devices is a registered trademark of Streamit
Streamit is a registered trademark
All other trade names that are used in this manual are owned by their respective owners
Disclaimer
This manual has been validated and reviewed for accuracy. The instructions and descriptions it contains are
accurate for the Streamit internet radio devices at the time of this manual’s production. However, later Streamit
internet radio devices and manuals are subject to change without notice. Streamit assumes no liability for
damages incurred directly or indirectly from errors, omissions or discrepancies between the internet radio and the
manual.

Lisa LCD 7
1Getting started
This manual applies to Lisa software version 1.16.
1.1 Introduction
Thank you for purchasing the Streamit internet audio player Lisa LCD. The Lisa LCD is a modern device
and we strongly recommend you to read this manual thoroughly before you start installing and using the
device for the first time.
The Lisa is a fully autonomous working IP-audio receiver, able to tune in to web casts of internet radio
stations and audio distributors. The different versions deliver the right set of features for your application.
For more information on Streamit products and technologies, we invite you to visit our website http://
www.streamit.eu.
Finally, we wish you a lot of pleasure using your Lisa LCD.
1.2 Unpacking your device
Carefully take out of the package the device and the supplied materials. Make sure that all of the
following components are included:
1x Lisa LCD
Power supply
Power plug adapters (see IEC world-wide power plug overview):
oUnited States: US (Type B)
oNon-USA countries: EU (Type C), UK (Type G), US (Type B)
oOther types can also be order, please ask your sales contact for more information
Ethernet cable
1.3 References
In addition to this manual, the following sources are available for your reference:
Streamit support site with knowledge base: http://streamit.eu/en/support
Streamit site with additional manuals, including the Lisa Quick Start Guide, : http://streamit.eu/
The Lisa Technical Manual site for customers with a support contract for a custom platform
Lisa LCD 8
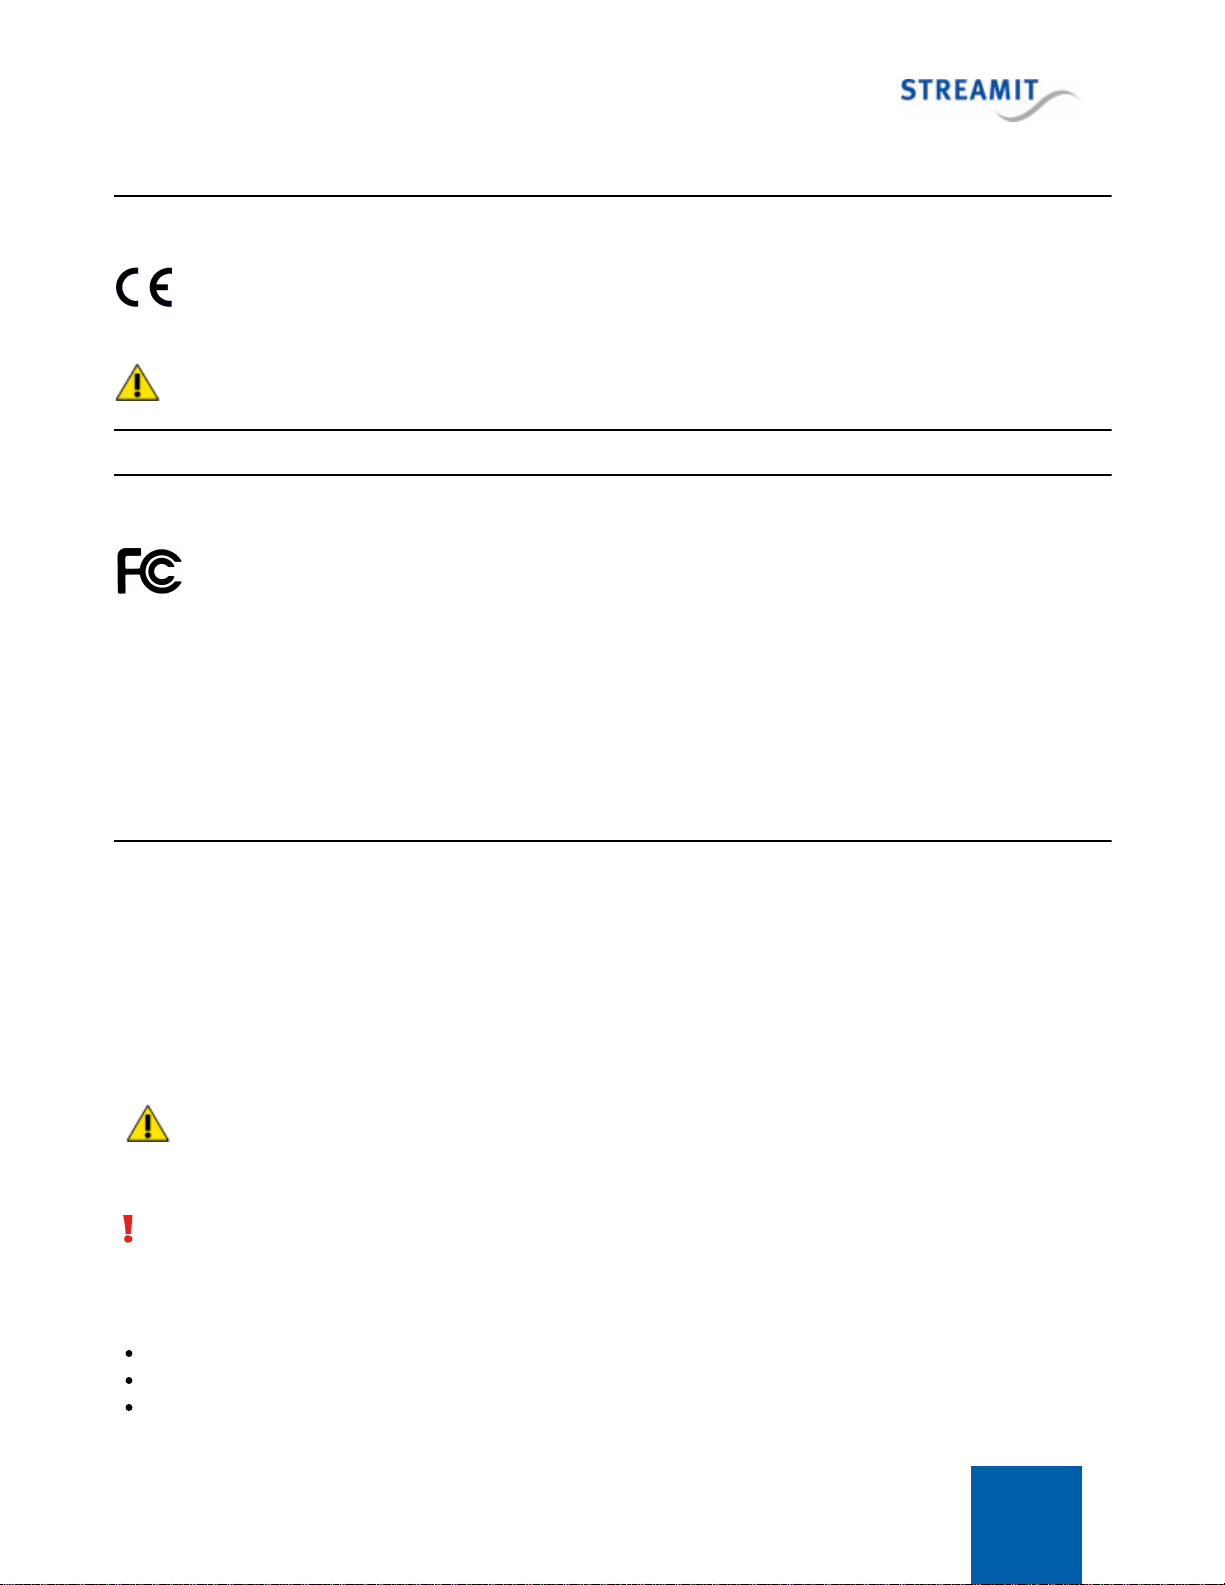
1.4 Device appearance
Front view
The front view of the Lisa LCD device is depicted below. Lisa LCD features a two lines display, a power
button, a slot for the SD memory card, IR receiver, status LED and a number of preset and functional
buttons.
The power button is used to switch the device on and off, while the “Alt” will toggle between streaming
and playing from card.
The numbered preset buttons (1-5) can be used to quickly switch between the first five presets when
playing from the internet or between the first five playlists when playing from card.
The function of the buttons on the right side of the keypad depend on the state of the Lisa. While
playing, and can be used to select different stations/playlist, while and will change the
volume level.
Back view
With an RCA to female jack converter cable the RCA connectors can also be used for headphones.

Lisa LCD 9
Bottom view
Lisa LCD 10
2Installation
This section of the manual will cover the installation of your Lisa internet radio starting from how to mount
and connect your device, to configuration.
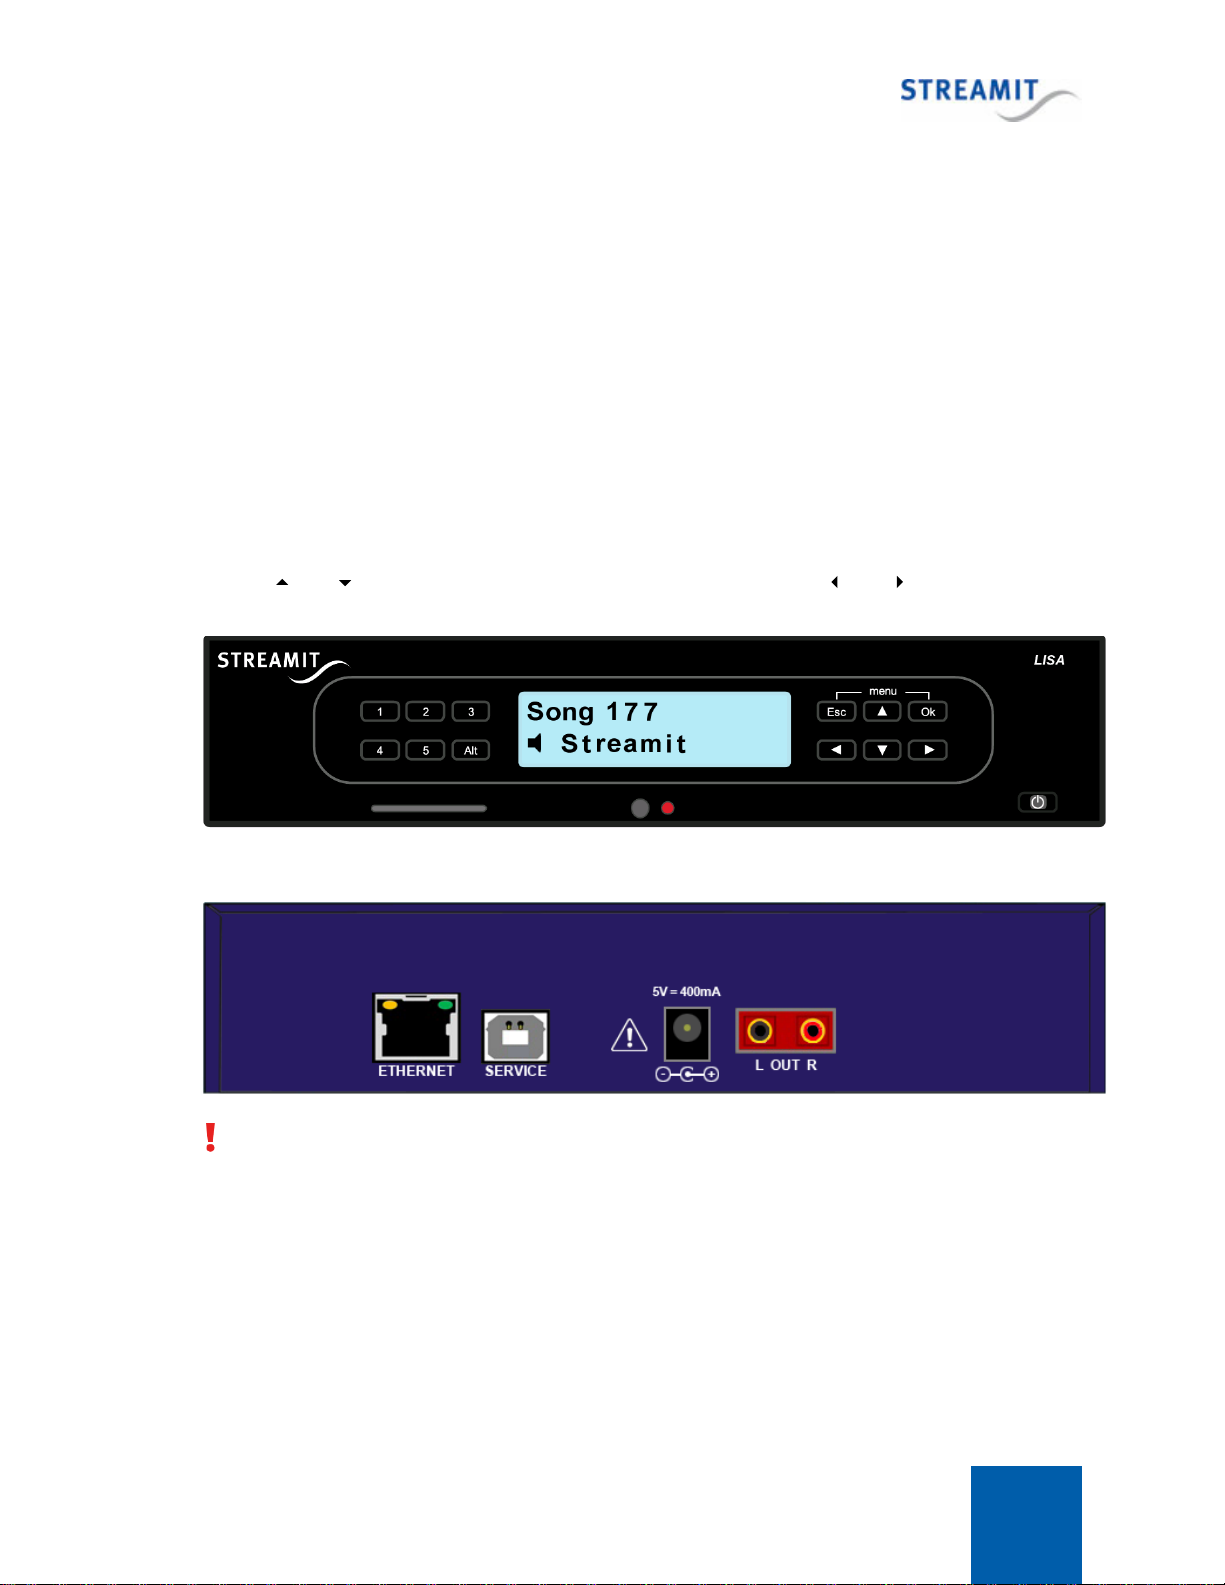
2.1 Rack mount
The Lisa LCD internet radio is designed for easy mounting in conventional 19 inch racks. For rack
mounting, the Lisa rack-mounting kit is required. This kit can be ordered from Streamit or official
Streamit dealers and contains 5 mounting plates in total as shown below. Using combination of these
plates, it is possible to mount either one or two Lisa devices in a 19 inch rack.
Mount a single Lisa in a 19" rack
To mount a single Lisa device in an 19’’ rack, we only make use of the large side mounting plate and one
of the small side mounting plates. The sides of the Lisa has two screws and two small slot-looking
openings in each.
1. Start with one sides of your Lisa and remove the Phillips-head screws using an appropriate
screwdriver.
2. Place the large side mounting plate as shown below. The holes of the mount plate will match those of
the Lisa.
3. Carefully fasten the screws back on to bind the Lisa together with the mounting plate.
The same is done for the other side, but in this case one of the small side mounting plates is used.

Lisa LCD 11
At this point the whole setup can be mounted in the rack by bolting the sides to the frame of the rack. It
is recommended to connect the Lisa before mounting. All connections of the Lisa are located in the back
and once mounted, the Lisa will not be as easy to access. Connecting the device is described in
Connecting the Lisa.
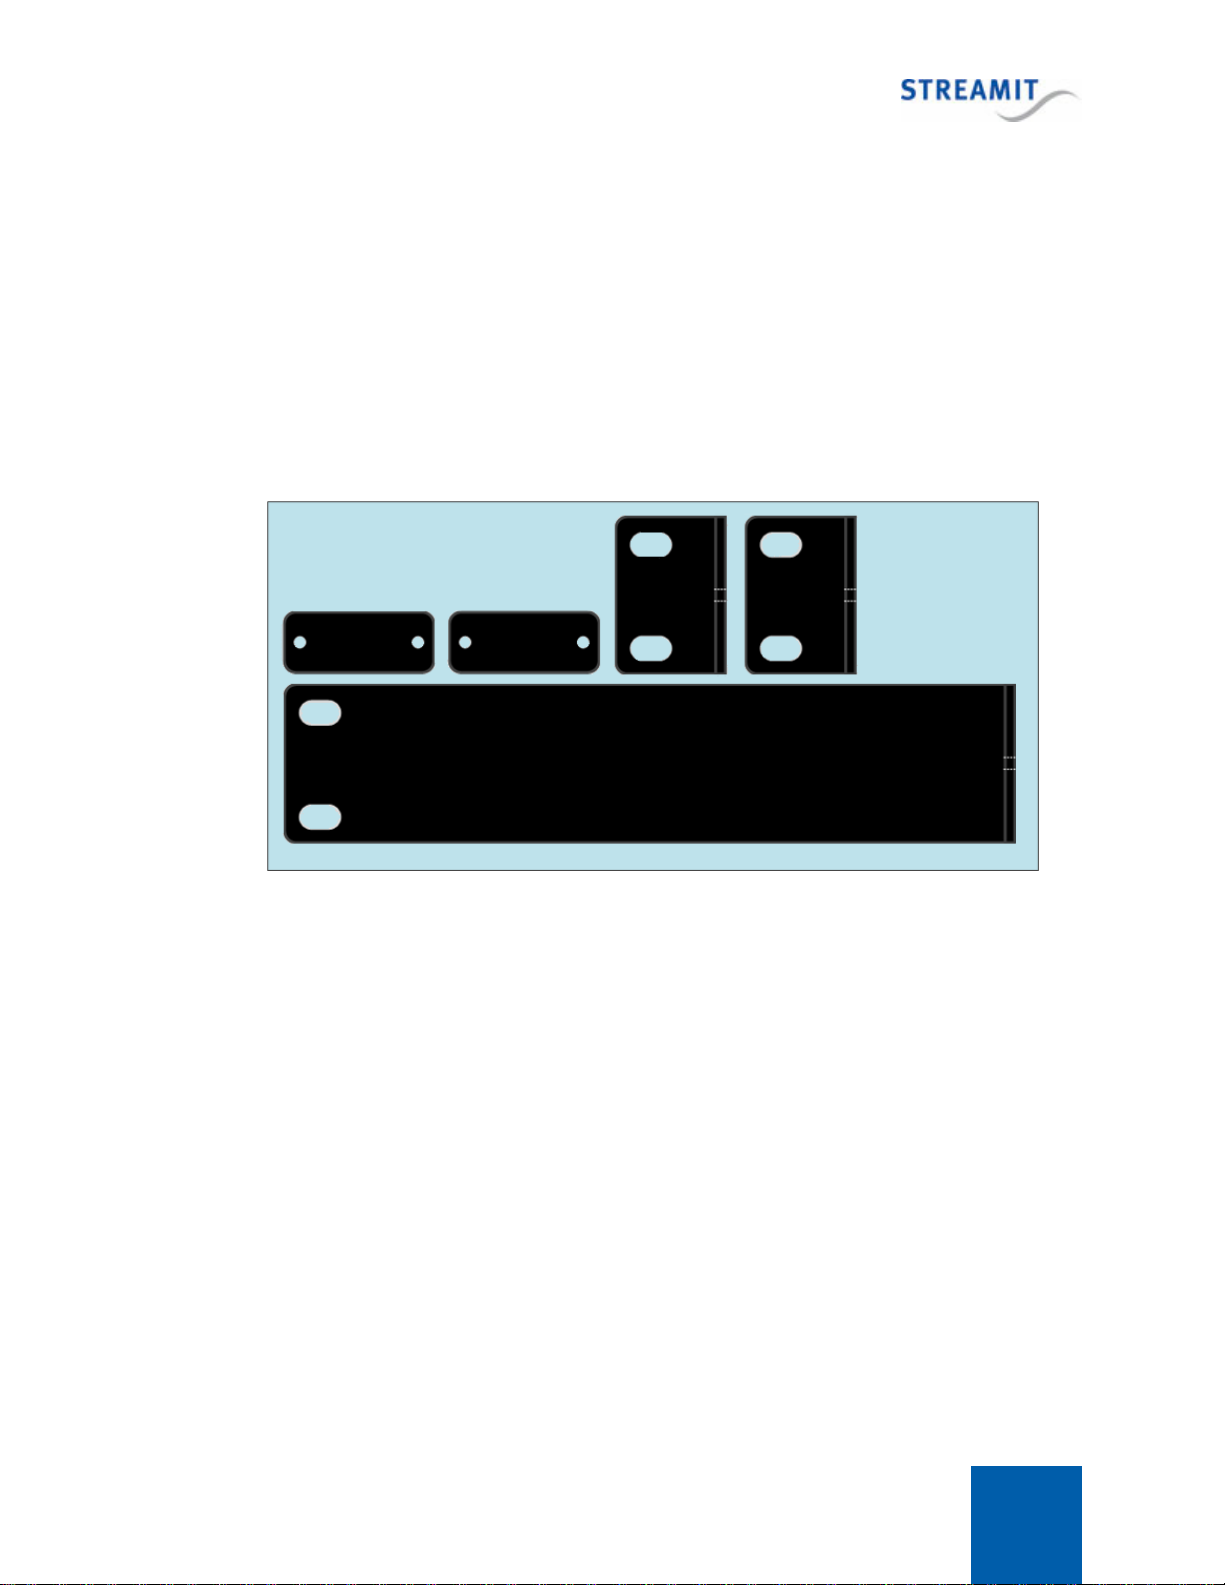
Mount two Lisa devices in a 19" rack
Mounting two Lisa devices in a 19’’ rack requires using the two Lisa-to-Lisa mounting plates and the two
small side mounting plates. Mounting the side plates is done in the same way as when mounting a
single Lisa (please see above). You have to make sure that the plates are oriented from outside as
shown below.
Next, connect the two devices together using the Lisa-to-Lisa mounting plates:
1. Turn the first device over. You will see it has four Phillips-head screws with black rubber feet, two for
each side.
2. Using an appropriate screwdriver, remove the two feet on the side opposing the side mounting plate.
The openings of the side now form slots with the same width as the Lisa-to-Lisa mounting plates and
depth of half the length of the Lisa-to-Lisa mounting plates.
3. Fit the Lisa-to-Lisa mounting plates in the slots, the holes match with those of the device.
4. Carefully screw the rubber feet back on.
Lisa LCD 12
Now take the second device and remove the rubber feet just like you did with the first one then connect
the two devices together by screwing the rubber feet of the second device back on. When properly done,
the resulting setup will look same as the one shown below.
At this point the whole setup can be mounted in the rack by bolting the sides to the frame of the rack. It
is recommended to connect the Lisa devices before mounting. All connections of the Lisa are located in
the back and once mounted, the Lisa devices will not be as easy to access. Connecting the device is
described in Connecting the Lisa.
2.2 Table mount
When used in an office environment the Lisa can be placed on your office desk, next to your PC, while in
a professional environment your Lisa would typically be mounted in a rack.
2.3 Connecting the Lisa
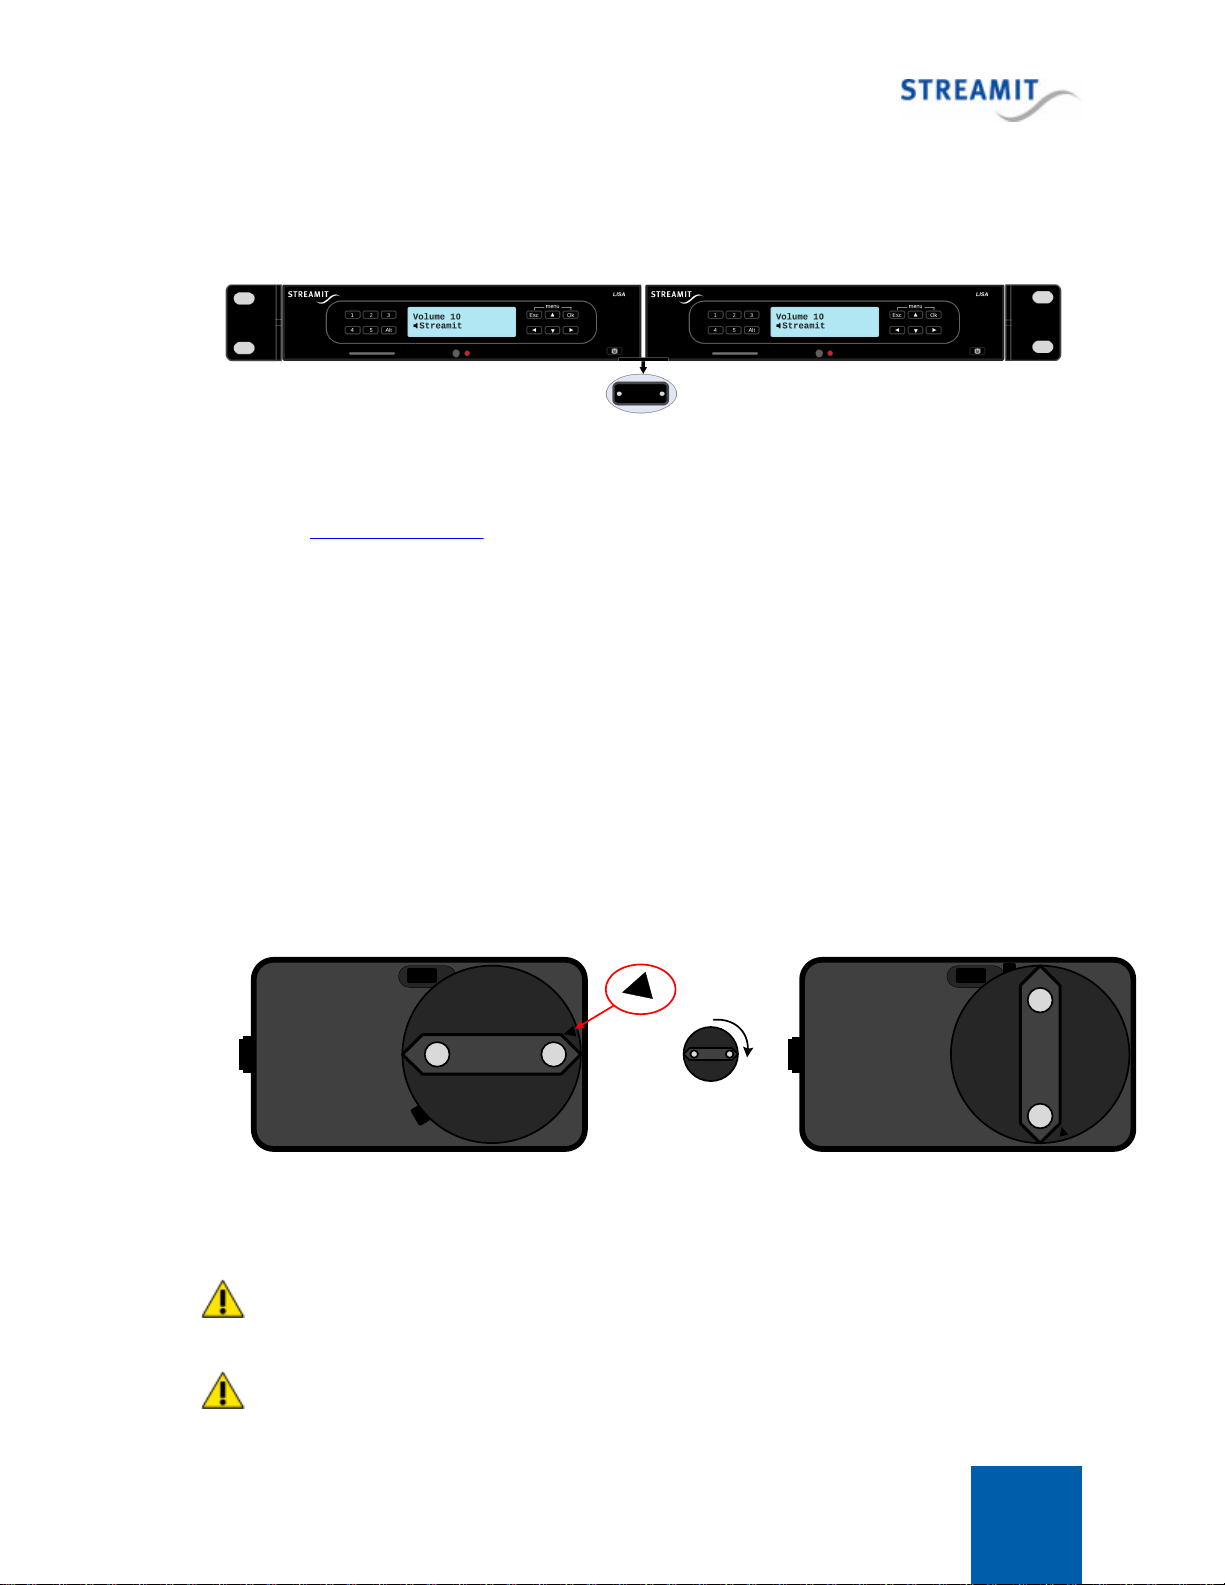
Connecting the power supply
Select the correct power plug adapter for your mains socket and mount this to the Lisa power adapter.
Start at the position where the small triangle marking points to the top of the power supply, opposite to
the side of the cord. Press down slightly and rotate the plug 90° clockwise as depicted below. You will
hear a click and the adapter will be locked in place.
90°
Start position End position
Plug the power adapter to the mains outlet and plug the other side in the Lisa. In the process we ask
that you careful attention to the following instructions:
Never use wet hands when plugging the power adapter in the mains and never remove the power
adapter from the mains with wet hands.
Do not cut or damage the cord of the power adapter; do not place heavy objects on the cord. This
can cause short-circuit, resulting in electrical shocks or even fire.

Lisa LCD 13
Pulling the cord can also damage the wire and/or isolation causing electrical shocks or fire.
Using power adapters other than the one recommended for your Lisa, can result in overheating and
damage you device. This can cause fire, electrical shocks and other hazards. Only use the supplied
power adapter.
Applying your Lisa to situations with rapid changing temperatures can result in condensation
(small amount of water) on the inner and outer surface of your device. To ensure a long lifetime of your
Lisa, this should be prevented. In case of such a scenario, wait until you device is ‘dry’ before you use it
again.
Connecting the Ethernet cable
Use the provided Ethernet cable to connect your Lisa with your local network. If everything is OK (and
the power supply has also been connected) the yellow led of the Ethernet connector will blink randomly.
The other led will either light up green (100Mbps connection) or remain dark (10 Mbps connection).
Connecting the audio output
The audio output of the Lisa will be connected to the line input of the audio installation. No audio cables
are included with the Lisa. The type of cable that should be used to connect the Lisa is on the Lisa-side
RCA, the other end depends on the type of connector in your audio installation.
Connecting the USB service cable
The USB connection is used for service purposes, which include programming your device, software
update, and monitoring of the communication between the Lisa and the internet. The B-connector of the
USB cable is plugged in the device, while the A-connector is intended for connection to your Windows
PC. Before making this connection we recommend that the Lisa Configuration Tool is first installed.

Lisa LCD 14
3Using the Lisa
3.1 Switching on the Lisa for the first time
The first time the Lisa LCD is powered on, it will start in the configuration wizard mode.
1. The configuration wizard will ask the user for the most important configuration settings. Enter the
correct information during the configuration wizard, especially with regard to IP settings. The Lisa
requires valid IP settings to be able to connect to the provisioning platform, software update server and
activation server. For networks employing a proxy, you must use the Lisa Configuration Tool to
configure the correct proxy details.
2. After the configuration wizard is complete, the device will try to connect to the default provisioning
platform (Streamit Device portal) . Shortly after that, it will look whether a new version of the software
is available and update if required.
3. Register and assign the correct configurations for this device in the chosen provisioning platform. The
default provisioning platform is the Streamit Device portal. When a different provisioning platform is to
be used, please use LCT to configure the correct platform location.
4. Reboot the device once, to get configurations from the provisioning platform.
During startup, the device activation is executed. The Lisa device will receive code from the activation
server, enabling the capabilities on the device that correspond to the purchased edition. For more
information, please see Device activation.
3.2 Device activation
All Lisa devices are shipped with Basic edition capabilities. The Basic edition only supports streaming of
content in MP3 format. If you have purchased a device of a different edition, this will only be enabled after
the device has been activated.
Activation is done during startup. During activation, the Lisa device receives code from the activation
server, enabling the capabilities on the device that correspond to the purchased edition (e.g. Ultimate).
Please note that it is not possible to upgrade/downgrade to a different edition after the purchase is made.
The activation process for a Lisa device running up-to-date software is automatic and transparent to the
user. During startup, a non-activated Lisa device will connect to the activation server. For this to
succeed, internet connectivity is required, the device needs to be connected properly and correct
network settings have to be programmed.
All Lisa devices need to be connected at least once to the public internet for activation, before it can
be used in a private network.

Lisa LCD 15
3.3 The configuration wizard
English
Language setting
As default the wizard will start with [English]. Press OK to
confirm the language preference (in this case [English]). You
can also choose one of the other languages by using the menu
up/down buttons.
DHCP
Network setting
It is possible to set the Lisa to get its IP address from a DHCP
server or to use a Static IP and manually enter the network
settings. We recommend that DHCP is used (when available)
which is also default in the wizard. Press OK for the [DHCP]
option. This will ensure that the IP address of the Lisa is unique.
The scenario of using Static IP is covered in Static IP via the
configuration wizard.
Proxy setting
The Lisa supports the use of a proxy server (see Using a proxy
server). By default the use of a proxy server is disabled. Use the
Menu-up, Menu-down keys to choose between enabling and
disabling the use of a proxy server.
Only the use of the proxy is enabled (or disabled). The URL
and authentication for the proxy server are not set via the
configuration wizard. Without URL and authentication for the
proxy server, the Lisa will not be able to make internet
connections. See Using a proxy server for details.
15:53 15/11/2008
Time/date setting
The time and date can be set for executing time-scheduled
tasks. Just set the time and date with the Menu-up, Menu-
down, Menu-Left and Menu-Right keys. Press button OK when
ready.
Volume: 31
¦¦¦¦¦¦¦¦¦¦¦¦¦¦¦
Volume setting

Lisa LCD 16
The output volume level of the Lisa is represented in numerical
format as 0-31 with a change step of 1. The numerical value 0
corresponds to the minimum volume level, while 31 corresponds
to the maximum. It is recommended to set the volume to the
maximum (31), which is also the default value, while you can
control the actual “heard” volume from the audio equipment the
Lisa is connected to. Menu-Left and Menu-Right are used to
decrease and increase the volume respectively. Press button
OK when ready.
Bass: 8
¦¦¦¦¦¦¦¦
Bass setting
It is also possible to set the bass output level of the Lisa, which
is numerically represented from values 0-15 with 0 as the
minimum and 15 as maximum. It is recommended to use the
default value 0. Menu-Left and Menu-Right are used to decrease
and increase the bass respectively. Press OK button when
ready.
Treble: 0
¦¦¦¦¦¦¦¦
Treble setting
Same as for the bass, the treble output level can be adjusted.
Between -8 and +7. The default is set to 0. Menu-Left and
Menu-Right are used to decrease and increase the treble
respectively. Press OK button when ready.
Keylock OFF
Keylock setting
The Lisa features a keylock option, which enables the protection
of the settings and operation of your device from being altered
by other individuals. By default the keylock feature is OFF.
Press OK button to complete the wizard. The scenario to switch
the keylock on is covered in Keylock setting via the
configuration wizard.
Setup ready
Congratulations! You have completed the startup wizard. The
device will automatically restart and the wizard settings will be
set up as default. On start up the Lisa will connect to the
selected database and load from there an up to date list of
presets (and other settings when available).
After the configuration wizard is completed the Lisa will restart and ask which source to use. The two
options are internet and card.
Internet
Select source
Using Menu-Up/Menu-Down buttons you can browse the two
available choices. OK button will select the desired source. In
case [Internet] is chosen, the Lisa will start to look for updates.

Lisa LCD 17
The first update check is performed on the software. If a newer version is available from the update server,
the Lisa will update to this version. You do not need to do anything in the meanwhile, but wait for the
update to finish. The Lisa will then restart and update the list of presets.
3.4 Static IP during the configuration wizard
The following steps describe how static IP settings can be configured during the configuration wizard.
The configuration wizard is started when the Lisa is powered on for the first time or after a reset (see
Reset to default settings).
Static IP
Network settings
If DHCP is not available or you have reason not to use DHCP, then
choose for Static IP.
You have to ensure that the IP address you will assign to the Lisa,
is reserved for the Lisa. It must not be in use by any other device in
your network. It must be unique for the Lisa and remain unique for
the Lisa.
Once you decided to start this step of the wizard you will have to go
complete it, until the end. It is not possible to use the Escape or the
directional menu buttons. Press OK button to the [Static IP] option.
IP-address:
[OK] to edit
IP-address setting – Info
This step of the wizard informs you that you are about to edit the IP-
address of the Lisa. Press OK.
255.255.255.255
IP-address setting
Enter the IP address you would like to assign the Lisa. Use the
Menu-Left/Menu-Right to move the cursor and the Menu-Up/Menu-
Down to respectively increase or decrease the values. Press OK
button to confirm.
Network Mask:
[OK] to edit
Network Mask setting – Info
This step of the wizard informs you that you are about to edit the
netmask of the Lisa. Press OK button.
255.255.255.255
Network Mask setting
Enter the netmask you would like to assign to the Lisa. The default
(255.255.255.0) is recommended. Use the Menu-Left/Menu-Right to
move the cursor and the Menu-Up/Menu-Down to respectively
increase or decrease the values. Press OK button to confirm.

Lisa LCD 18
Default Gateway:
[OK] to edit
Default Gateway setting – Info
This step of the wizard informs you that you are about to edit the
Default Gateway of the Lisa. Press OK button.
255.255.255.255
Default Gateway setting
Enter the default gateway of your network. Use the Menu-Left/Menu-
Right to move the cursor and the Menu-Up/Menu-Down to
respectively increase or decrease the values. Press OK button to
confirm.
DNS 1:
[OK] to edit
DNS 1 setting – Info
This step of the wizard informs you that you are about to edit the
address of your DNS server. Press OK button.
255.255.255.255
DNS 1 setting
Enter the address of your DNS server. Use the Menu-Left/Menu-
Right to move the cursor and the Menu-Up/Menu-Down to
respectively increase or decrease the values. Press OK button to
confirm.
DNS 2:
[OK] to edit
DNS 2 setting – Info
This step of the wizard informs you that you are about to edit the
address of your second DNS server (if available). Press OK button.
255.255.255.255
DNS 2 setting
When a second DNS server is available you can enter its address.
Use the Menu-Left/Menu-Right to move the cursor and the Menu-Up/
Menu-Down to respectively increase or decrease the values. Press
OK button to confirm.
Ready.Press [OK]
Network setting ready
At this point you have entered all required network settings
parameters. Press OK button to confirm.

Lisa LCD 19
3.5 Keylock setting during the configuration wizard
The following steps describe how the keylock can be configured during the configuration wizard. The
configuration wizard is started when the Lisa is powered on for the first time or after a reset (see Reset to
default settings).
Keylock ON
Keylock setting
To enable the keylock feature choose the [Keylock ON] option
and press OK button to confirm.
Enter new PIN
[OK] to edit
Enter new PIN – Info
This step of the wizard informs you that you are about to enter a
PIN code for locking your device keypad. Press OK button.
PIN: ----
Enter new PIN
To lock your device’s keypad a four digits PIN has to be
entered. Every digit will have the value 1-5 because the preset
buttons are used to enter the pin. After entering you PIN code,
press OK button to confirm.
KeyLock is ON
[OK]
Keylock is ON
You have successfully locked the keypad of your device with a
PIN code. Press OK to continue with the wizard.
Setup ready
[OK]
Press OK to finish. The device will automatically restart.
3.6 Playing a stream
By default the Lisa will connect to the Streamit Device portal. If the Lisa is registered on the Streamit
Device portal, the device will get a list of stations. When powered on the first time, the Lisa will start to
play the stream of the first preset.
Change which stream is played
There are several options to change the stream that is played by the Lisa:
On the device itself:

Lisa LCD 20
My station
Select station
Using Menu-Up/Menu-Down buttons you can browse through
the available stations. Press OK button to select the desired
station.
You will see that the status shown in the LCD will change to ‘Connecting…’, which indicates that the
Lisa is trying to connect with the selected station. When the connection succeeds the status will change
to ‘Buffering…’, indicating that audio data is being streamed to the Lisa. The connecting and buffering
time take up to about 10 seconds.
No audio is sent to the output yet. This is related to the advanced buffering techniques that the Lisa uses
to ensure that variations in the transfer rate do not affect the audio output.
Metadata here
My Station
After a few seconds, the Lisa will start playing the stream and
you will hear audio coming out of your audio installation. The
station name with a speaker animation in front will be shown on
the lower row of the LCD, while on the upper row metadata of
the audio stream when available.
If a stream is playing and you want to switch to another station, just browse to the desired station using
Menu-Up/Menu-Down and press OK button to connect. When you do not press OK, the Lisa will
automatically connect to the station after 10 seconds. If at the last moment you decide not to change
station, just press Escape to return. The preset buttons can be used to jump to any of the first five
stations in the list.
Using a task (see Task scheduling)
Using a command, for example via Lisa Configuration Tool or the monitoring server (see Remote
control from monitoring server). See Controlling the Lisa with commands for a complete overview.
3.7 Playing from card
The Lisa also can play audio from an SD card. Fill the card with your favorite music and plug it in the
card connector. See Storing content on the card for details on how to place content on the card.
There are several options to make the Lisa play a playlist from the card:
On the device itself:
1.pls
Select playlist
When playing from internet, you can switch to card by using the
Alt button (the opposite is also possible); on the lower row of
the LCD, the text “Select playlist” is shown, while on the upper
row, the name of the playlist.
Use Menu-Up/Menu-Down to browse the available playlist and press OK to select the playlist you would
like to play (When you do not press OK, the Lisa will automatically switch to the card after 10 seconds).
The Lisa will start to play the first entry of the chosen playlist.
Other manuals for Lisa LCD
1
Table of contents


