MediaPoint DMR HD User manual
An Advanced Media Design Technology
DigitalMediaRecorderHD
User Manual
DMR HD

DMR HD | i
Digital Media Recorder HD
©2009, Advanced Media Design, Inc
All rights reserved. This document contains information that is proprietary to Advanced Media Design, the manufac-
turer of all MediaPOINTE® products. No part of this publication may be reproduced, stored in a retrieval system, or
transmitted, in any form, or by any means, electronically, mechanically, by photocopying, or otherwise, without the
prior written permission of Advanced Media Design, Inc. Nationally and internationally recognized trademarks and
trade names are the property of their respective holders and are hereby acknowledged.
MediaPOINTE® is a registered trademark of Advanced Media Design, Inc.
Disclaimer
The information in this document is believed to be accurate and reliable; however Advanced Media
Design, Inc. assumes no responsibility or liability for any errors or inaccuracies that may appear in this
document, nor for any infringements of patents or other rights of third parties resulting from its use. No
license is granted under any patents or patent rights of Advanced Media Design, Inc.
This document was written by the Development Department of Advanced Media Design, Inc. We are fully
committed to, and take pride in maintaining high quality documentation. We welcome and appreciate
any comments or suggestions you may have regarding content, presentation, structure and distribution of
this document. Please use the contact information below for all correspondence:
Development Department
Advanced Media Design, Inc.
667 Rancho Conejo Blvd.
Newbury Park, CA 91320
USA
suppor[email protected]
Version 3.2

ii | DMR HD User Manual 3.2 January 2009
Safety Precautions
For your protection, please read all related safety instructions, observe all warnings and precautions, and exercise common sense
while operating this electronic equipment.
• Always place the unit on a stable cart, stand or table.
• Do not use the unit near water or sources of heat.
• Do not drop or shake the unit. Do not place or install the unit in environments where it can be dropped or shaken.
Make sure the unit is powered off while being moved even for short distances.
• Observe the power requirements of the unit; if you are not sure of the power available, consult your local dealer or power company.
• Whenpluggingintoapoweroutlet,inserttheplugrmlyintotheoutlet.Routethepowercordsoastoavoidanyactivitythatmayresultin
fraying or other damage to the cord or the plug.
• Under no circumstances should you attempt to override the polarization or grounding protection on the plug.
• Do not overload wall outlets, integral convenience receptacles or extension cords.
• Unplug the unit from the wall before cleaning. Do not use liquid or aerosol cleaners.
• For proper ventilation, do not block the slots and openings. Do not install the unit in a location where the ventilation slots and openings can be
plugged during everyday use.
• Donotplaceorinstalltheunitunder,ontopofornearanyheat-producingequipment(i.e.radiators,stoves,orampliers),
or in a heated place.
• Unplug the unit during lightning storms, when it will not be used for extended periods of time, or before you have a
scheduled power outage.
If the unit is visibly damaged either by not observing the precautions above or for any other reason, contact your local dealer
immediately. If the unit does not operate to the specications set forth in this user guide, or exhibits a distinct change in per-
formance, this may be an indication of a problem needing repair.
Environmental Operating Limits of DMR HD
OperatingTemperature:0°Cto32°C(32°Fto90°F)
RelativeHumidity:10%to90%non-condensing
Storage & Transport Temperature: -20°C to 80°C
(-4°Fto140°F)
Electrical requirements
Input:100-240V~50/60Hz
Service Support and Training
MediaPOINTE®, Inc. is committed to providing the service support and training needed to install, manage, and
maintain your MediaPOINTE® equipment.
All MediaPOINTE® products are sold through a wide network of Authorized MediaPOINTE® Dealers. For help
withyourproducts,contactyourlocaldealerforassistancerst.Ifforanyreason,youwouldliketocontact
MediaPOINTE® directly for information regarding service programs and extended warranty information, training,
installation or usage, we are glad to be of assistance. You can contact us at the phone number listed below, or
visit our website.
MediaPOINTE® Technical Support
Hours: 8:30 a.m. – 5:30 p.m. Pacic Standard Time
(866) 709-0444 TOLL FREE
(805) 214-7911 INTERNATIONAL
suppor[email protected]

DMR HD | iii
DMR HD Package Contents
•1-MediaPOINTEDMRHD
• 2–RCAVideoCable
• 2–S-VideoCable
• 1–MaleVGA(RGBHV)Cable
• 1-CAT-5eLANCable
• 1-RCAStereoAudioCable
• 1-ACPowerCable
• 1–MaleDVI-DCable
• 1–IRRemoteControlplus2AAAbatteries
• 1–RackMountKit
• DocumentationCD-ROM
• Warranty Document
• RegistrationSheet

iv | DMR HD User Manual 3.2 January 2009
Document Conventions
The following conventions are used throughout this user’s guide.
The hand symbol indicates a note, containing special instructions, and
in some cases, circumstances that require caution.
The light bulb symbol highlights suggestions or hints.
The high voltage symbol is intended to alert the user to the presence of un-insulated, dangerous
voltages.
Warranty
MediaPOINTEwarrantsthattheDMRHD(excludingsparepartsifapplicable,externalperipheraldevices
andconsumables)willbefreefromanydefectinmaterialsorworkmanshipandshallperforminaccordance
withitsspecicationforaperiodof30daysforMediaPOINTEsoftwareand1yearforhardware,startingon
shipment date of the initial purchase of the equipment. MediaPOINTE disclaims any and all implied warranties
ofmerchantabilityortnessforaparticularpurpose.MediaPOINTE’ssoleliabilityforbreachofthiswarranty
willbe(atitsoption)toprovideaccesstosoftwarefordownloadortorepairorreplacethedefectiveunit
or component after customer has shipped the product to MediaPOINTE for return-to-factory repair. Customer
mustobtainanRMA(returnmaterialauthorization)numberfromMediaPOINTEpriortoreturningequipment.
Replacementpartsmaybeneworequivalenttonew.Part(s)replacedwillbecoveredfortheremaining
termofthewarranty.MediaPOINTEshallnotbeliableforanylossofprotsorincidentalorconsequential
loss for whatever reason. This warranty will be void if the equipment has been subject to any unauthorized
modications,improperoperation,usernegligence,servicebyanunauthorizedperson,accident,neglect,
misuse,tampering,actsofGod,oranyeventotherthanordinaryuse.

Table of contents | v
Table Of Contents
About this guide
Disclaimer . . . . . . . . . . . . . . . . . . . . . . . . . . . . . . . i
Safety Precautions. . . . . . . . . . . . . . . . . . . . . . . . . . . . ii
Services & Support . . . . . . . . . . . . . . . . . . . . . . . . . . . ii
Package Contents . . . . . . . . . . . . . . . . . . . . . . . . . . . . iii
Warranty . . . . . . . . . . . . . . . . . . . . . . . . . . . . . . . . iv
Document Conventions . . . . . . . . . . . . . . . . . . . . . . . . . iv
1 Introduction, Overview & Requirements
Introduction . . . . . . . . . . . . . . . . . . . . . . . . . . . . . . . . 1
Key Features . . . . . . . . . . . . . . . . . . . . . . . . . . . . . . 1
How It works . . . . . . . . . . . . . . . . . . . . . . . . . . . . . . 1
Front Panel . . . . . . . . . . . . . . . . . . . . . . . . . . . . . . . . 2
Optical Drive . . . . . . . . . . . . . . . . . . . . . . . . . . . . . . 2
Front Keypad . . . . . . . . . . . . . . . . . . . . . . . . . . . . . . 2
LED Status . . . . . . . . . . . . . . . . . . . . . . . . . . . . . . . 2
IR Receiver . . . . . . . . . . . . . . . . . . . . . . . . . . . . . . . 2
Reset Button . . . . . . . . . . . . . . . . . . . . . . . . . . . . . . 2
Power Switch . . . . . . . . . . . . . . . . . . . . . . . . . . . . . . 3
USB Port . . . . . . . . . . . . . . . . . . . . . . . . . . . . . . . . 3
Back Panel . . . . . . . . . . . . . . . . . . . . . . . . . . . . . . . . . 4
Inputs/Outputs . . . . . . . . . . . . . . . . . . . . . . . . . . . . . 4
Setup & Application Diagrams . . . . . . . . . . . . . . . . . . . . . . . . 5
2 Setting Up the DMR HD 8
Logging In . . . . . . . . . . . . . . . . . . . . . . . . . . . . . . . . . 8
Web Portal Access . . . . . . . . . . . . . . . . . . . . . . . . . . . . 8
As an Administrator . . . . . . . . . . . . . . . . . . . . . . . . . . . 8
Changing Administrator Password. . . . . . . . . . . . . . . . . . . . . 8

vi | TABLE OF CONTENTS
As a User . . . . . . . . . . . . . . . . . . . . . . . . . . . . . . . . 9
User Login Security . . . . . . . . . . . . . . . . . . . . . . . . . . . 9
As an Author . . . . . . . . . . . . . . . . . . . . . . . . . . . . . . 9
Date & Time. . . . . . . . . . . . . . . . . . . . . . . . . . . . . . . 9
Network Conguration. . . . . . . . . . . . . . . . . . . . . . . . . . 10
System Name . . . . . . . . . . . . . . . . . . . . . . . . . . . . . . 10
IP Settings . . . . . . . . . . . . . . . . . . . . . . . . . . . . . . . 10
Conguring Static IP Address . . . . . . . . . . . . . . . . . . . . . . . 10
Conguring DHCP IP Address . . . . . . . . . . . . . . . . . . . . . . . 10
USB Network Conguration . . . . . . . . . . . . . . . . . . . . . . . . . 10
SMTP Mail . . . . . . . . . . . . . . . . . . . . . . . . . . . . . . . 11
Command Line . . . . . . . . . . . . . . . . . . . . . . . . . . . . . 11
Telnet (TCP/IP) . . . . . . . . . . . . . . . . . . . . . . . . . . . . . 11
RS-232 . . . . . . . . . . . . . . . . . . . . . . . . . . . . . . . . . 11
3 Control & Operation
Web Portal . . . . . . . . . . . . . . . . . . . . . . . . . . . . . . . . . 12
Overview. . . . . . . . . . . . . . . . . . . . . . . . . . . . . . . . . . 12
Toolbar . . . . . . . . . . . . . . . . . . . . . . . . . . . . . . . . . 12
Folder Management Table . . . . . . . . . . . . . . . . . . . . . . . . 12
On-Screen Menu/ Front Control Panel . . . . . . . . . . . . . . . . . . . 13
External Control. . . . . . . . . . . . . . . . . . . . . . . . . . . . . . . 13
RS-232 . . . . . . . . . . . . . . . . . . . . . . . . . . . . . . . . . 13
Telnet . . . . . . . . . . . . . . . . . . . . . . . . . . . . . . . . . 14
Infra-Red . . . . . . . . . . . . . . . . . . . . . . . . . . . . . . . . 14
Remote Contact Closure (relay) . . . . . . . . . . . . . . . . . . . . . . 14
4 Recording, Archiving & Streaming
Recording & Streaming . . . . . . . . . . . . . . . . . . . . . . . . . . . 15
Changing Proles . . . . . . . . . . . . . . . . . . . . . . . . . . . . . . 15
Recorded Content Detail . . . . . . . . . . . . . . . . . . . . . . . . . . . 16
Playback on DMR HD . . . . . . . . . . . . . . . . . . . . . . . . . . . . 16
Archiving. . . . . . . . . . . . . . . . . . . . . . . . . . . . . . . . . . 16
Mail Attachment . . . . . . . . . . . . . . . . . . . . . . . . . . . . 16
Download Manager . . . . . . . . . . . . . . . . . . . . . . . . . . . 17

Table of contents | vii
Disk Burning . . . . . . . . . . . . . . . . . . . . . . . . . . . . . . 17
USB Ooad/Upload . . . . . . . . . . . . . . . . . . . . . . . . . . . 17
Streaming . . . . . . . . . . . . . . . . . . . . . . . . . . . . . . . 17
5 Management & System Tools 5
Proles . . . . . . . . . . . . . . . . . . . . . . . . . . . . . . . . . . 18
Prole List . . . . . . . . . . . . . . . . . . . . . . . . . . . . . . . 18
Creating/Modifying a Prole . . . . . . . . . . . . . . . . . . . . . . . 19
Capture Settings. . . . . . . . . . . . . . . . . . . . . . . . . . . . . 19
Stream Settings . . . . . . . . . . . . . . . . . . . . . . . . . . . . . 19
Archive & Custom Settings . . . . . . . . . . . . . . . . . . . . . . . . 19
Titles & Credits . . . . . . . . . . . . . . . . . . . . . . . . . . . . . . . 20
AV Controls . . . . . . . . . . . . . . . . . . . . . . . . . . . . . . . . . 20
Display Settings . . . . . . . . . . . . . . . . . . . . . . . . . . . . . 20
AV Test . . . . . . . . . . . . . . . . . . . . . . . . . . . . . . . . . . . 20
LiveVideo Test . . . . . . . . . . . . . . . . . . . . . . . . . . . . . . . 20
Notications . . . . . . . . . . . . . . . . . . . . . . . . . . . . . . . . 21
Storage Limits . . . . . . . . . . . . . . . . . . . . . . . . . . . . . . . 21
Logging . . . . . . . . . . . . . . . . . . . . . . . . . . . . . . . . . . 21
Update. . . . . . . . . . . . . . . . . . . . . . . . . . . . . . . . . . . 21
Upgrade System Software . . . . . . . . . . . . . . . . . . . . . . . . . . 21
Reset Conguration . . . . . . . . . . . . . . . . . . . . . . . . . . . . . 22
System Info. . . . . . . . . . . . . . . . . . . . . . . . . . . . . . . . . 22
Shutdown . . . . . . . . . . . . . . . . . . . . . . . . . . . . . . . . . 22
Reboot. . . . . . . . . . . . . . . . . . . . . . . . . . . . . . . . . . . 22
6 Options
Installing Package Upgrades . . . . . . . . . . . . . . . . . . . . . . . . . 23
Studio Package . . . . . . . . . . . . . . . . . . . . . . . . . . . . . . . 23
Video Source Inputs . . . . . . . . . . . . . . . . . . . . . . . . . . . 23
Custom Video Templates . . . . . . . . . . . . . . . . . . . . . . . . . 23
Video-On-Demand Option. . . . . . . . . . . . . . . . . . . . . . . . . . 24
Viewing a Video-On-Demand Channel . . . . . . . . . . . . . . . . . . . 24
AESOP External Storage Option . . . . . . . . . . . . . . . . . . . . . . 24
Blu-Ray Hardware Upgrade Option . . . . . . . . . . . . . . . . . . . . 24

DMR HD | 1
1 DMR HD Introduction & Overview
Introduction
Welcome to the user’s guide for the MediaPOINTE®
DMRHD.TheDMRHDisoneoftheeasiesttouse,most
cost-effective and reliable archiving and streaming
products on the market today. It can archive important
audio, video, and graphical data while simultaneously
transmitting it anywhere on your network.
This user’s guide describes how to set up and use
theDMRHDtorecordandtransportgraphics,video
and audio content over IP networks. As with all
MediaPOINTEAV-over-IPproducts,youcancontrolthe
DMRHDbydifferentmethods.Thesemethodsinclude,
Web Portal interface, remote control, contact closure,
RS-232serialport,Telnet,orfromtheconvenientfront
keypad controls.
This guide is written for units running 3.0 software.
IftheDMRHDisoperatingonadifferentversionof
software, some capabilities and screenshots may be
different.
Key Features
TheDMRHDmaybeusedinavarietyofsituationsfor
live communication and collaboration.
Youcanstartanarchiving/streamingsessionto:
Archive media content from multiple independent
sources.
Share visual information, designs, and concepts
with dispersed groups of people to gather input
during a video conference.
Stream important videoconferences to other
locationssuchasoverowroomsorremote
conference locations over your corporate network.
•
•
•
Conduct customer or employee training across vast
geographical areas.
Discuss research, engineering, architecture, product
design, or process analysis when the participants
are not able to meet in one central location.
Access a centralized data bank of expertise from a
eldlocation.
How ItWorks (Method of Operation)
TheDMRHDcanarchiveandstreamvideoandaudio
media.TheDMRHDacceptsDVI-D,analogRGBHV,
S-Video,compositevideo,andunbalancedlinelevel
stereo audio inputs. The selected input source along
withtheassociatedaudioiscapturedintoanMPEG-4
AdvancedSimpleProle(ASP)lewhich,ifdesired,
can be simultaneously streamed live over your network
during the archival process.
Userscanselectfromseveralcongurableparameters
(proles)forcapturingandsubsequentplayback
oftherecordedmaterial.Theseprolesarefully
congurable,allowingtheusertospecifytheinput
source, capture resolution, bit and frame rates.
ThearchivedrecordingsarestoredontheDMRHD’s
harddrive.Therecordedlecanthenbeviewedon
yourPCorreplayeddirectlyfromtheDMRHDonalocal
monitor if desired. The content can also be copied to
aUSBmemorystick,burnedtoDVD-R,DVD+RorCD-R
disk, downloaded to a PC, attached to an e-mail, or
automaticallytransferred(FTP)toaserverafterthe
lehasbeenindexed.
TheDMRHDrecordscontentinstandardMPEG-4ASP,
which can be played on a variety of desktop client
players including Quicktime®.
•
•
•

2| DMR HD User Manual 3.2 January 2009
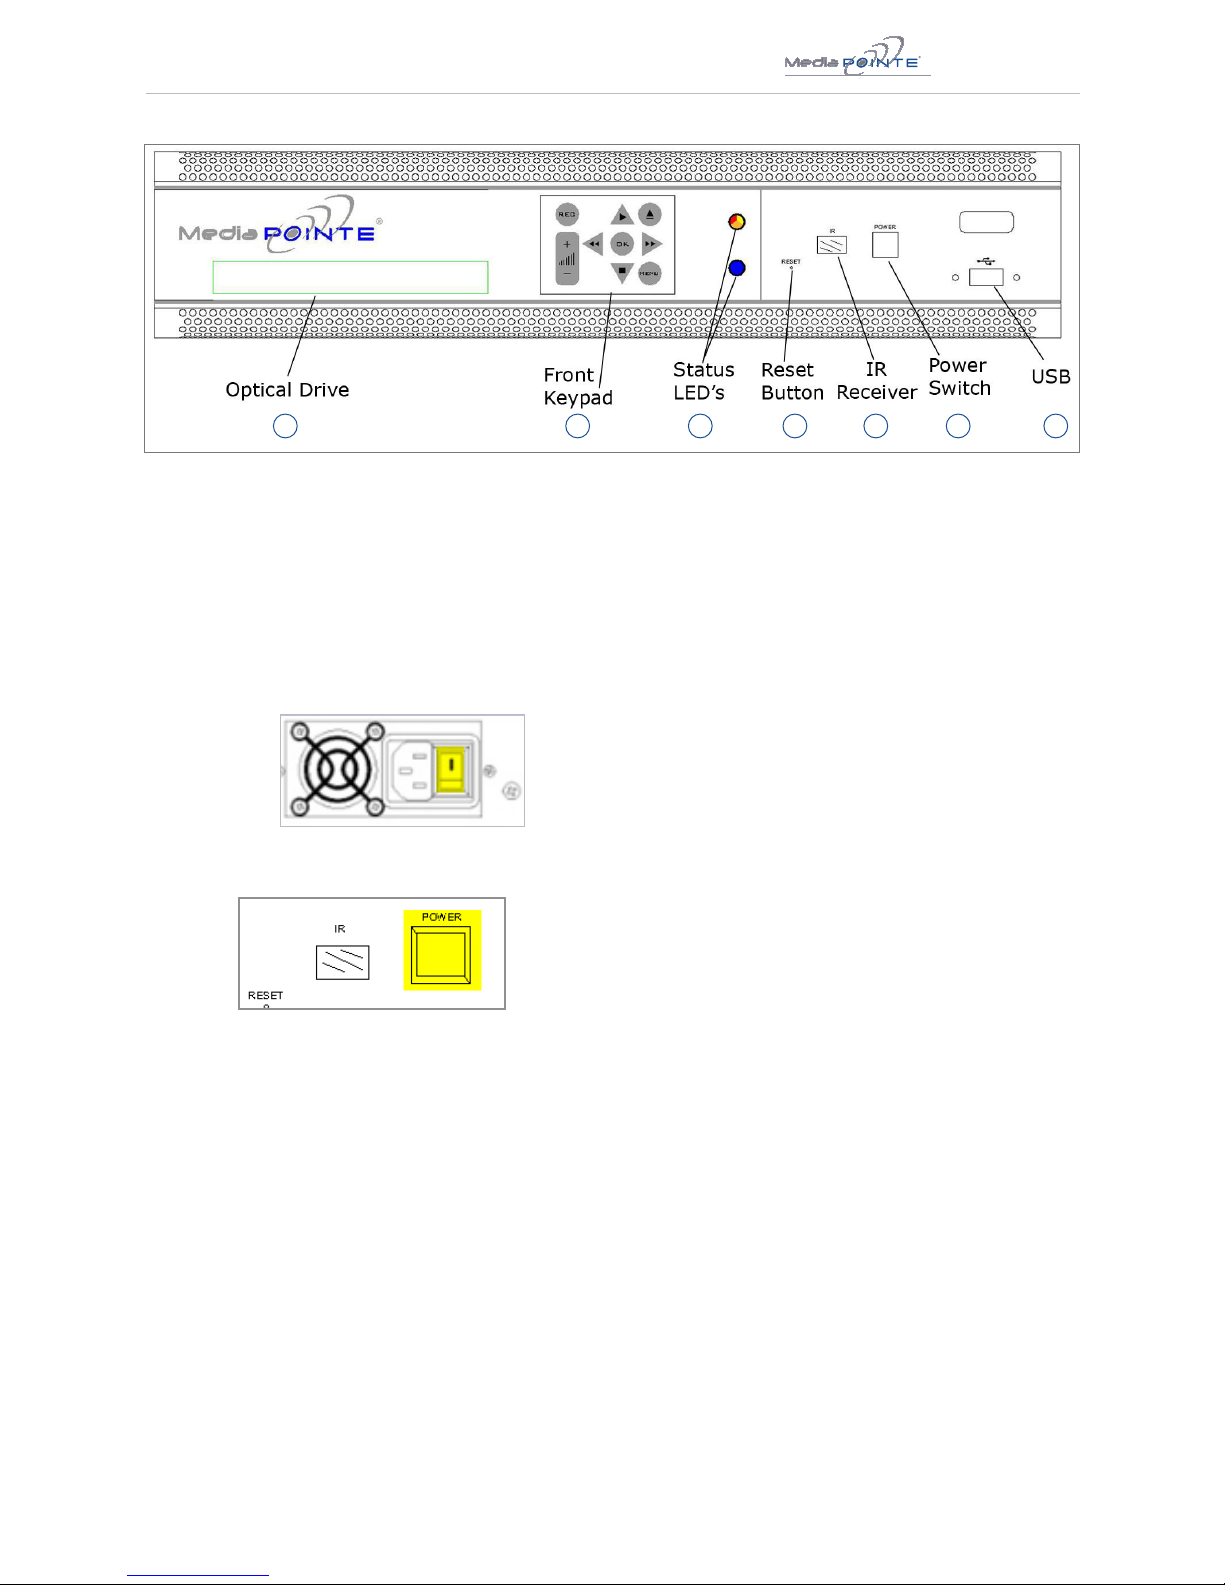
Front Panel View
The front panel consists of an Optical Drive, the main
operationKeypad,twostatusLEDs,asmallRESET
button,IRreceiver,apowerswitchandaUSBport.
The following is a brief description of each of these
components.
1. Optical Drive
TheDMRfeaturesanopticaldrivecapableofrecording
toDVD-R,DVD+R,andCD-Rmedia.
2. Front Keypad
TheDMRHDhasafrontkeypadthatallowstheuser
to start and stop recording as well as navigate the on
screen menus without using the remote control. When
theRECbuttonispressedamenuwillappearonthe
displaysoyoucandeterminewhichrecordingproleto
use; a monitor is required to use this feature.
DMR HD Front Panel
3. LED Status
TheLEDindicatorsareusedtodescribesystem
states,actionsanderrorconditions.ThevalidLED
states are described in the table below.
4. RESET Button
TheRESETbuttonishiddenbehindatinyholein
the front panel and requires activation using a small
device such as a pin or paperclip. This is done to
avoid inadvertent resetting of the system. Pressing
theRESETbuttonwillresettheAdministrator
Password and return the IP settings back to the
default network settings.
5. IR Receiver
TheIRReceiverisusedwiththeincludedremote
control.
LED 1 (top)
RED/YELLOW/ ORANGE
LED 2 (bottom)
BLUE
Powering On Orange OFF
Ready OFF ON
Record/Stream RED ON
Indexing RED Fast Blink ON
Play/ OFF Slow Blink
Error YELLOW Fast Blink OFF
Disk Burn RED Slow Blink ON
Mute
(not record)
OFF Fast Blink
1 2 3 4 5 6 7
DMR HD | 3
6. Power Switch
ThisPOWERbuttononthefrontoftheunitwillturnthe
unit on and off. It is used in conjunction with the main
power switch on the rear of the unit.
1.EnsurepowersupplyswitchisintheONposition
(onbackpanel)
2.StarttheunitbypressingthePOWERbutton
7. USB Port
TheUSBportcanbeusedtoofoadmediafromandto
theDMRHD.ItcanalsobeusedtosetorcaptureanIP
address.SeetheNetworkCongurationsectionforUSB
IPaddressconguration.
DMR HD Front Panel
1 2 3 4 5 6 7

4| DMR HD User Manual 3.2 January 2009
Back Panel View
AUDIO/ VIDEO INPUTS
Connector Function Description
1
Stereo Audio Pair
Unbalanced Line level stereo audio inputs that use standard RCA connectors.
2 Composite
CompositeVideo input 1 on the DMR HD can be selected from theWeb Portal.
3 S-Video
S-Video input 1 on the DMR HD can be selected from the Web Portal.
4 DVI
The DVI-I connector is for digital signals only. Although a DVI-I connector is used,
the analog pins are not active, but will allow DVI-D and DVI-I cables to be used.
DVI input 1 on the DMR HD can be selected from the Web Portal.
5
VGA (RGBHV)
The HD15 connector is used to connect a analog computer signal to the DMR HD.
DVI input 1 on the DMR HD can be selected from the Web Portal.
AUDIO/ VIDEO OUTPUTS
Connector Function Description
6
Stereo Audio Pair
Unbalanced Line level stereo audio outputs that use standard RCA connectors.
7
DVI
The DVI-I connector is for digital signals only. Although a DVI-I connector is used,
the analog pins are not active but will allow DVI-D and DVI-I cables to be used.
8
VGA (RGBHV)
The HD15 connector is used for local monitor playback of les directly from the
DMR HD or when using the On Screen Menu to control the unit. This output can
also be sent back to your AV display system.
2 3
45
6 7
1
8
9
10
13
11
12

DMR HD | 5
ALL OTHER CONNECTIONS
Connector Function Description
9
LAN
The RJ45 connector allows the included standard 10/100Mb CAT-5e LAN cable to
connect the DMR HD to a network.
10
Remote Relay Closure
The standard 3.5 mini mono connector allows a remote switch (contact closure) to
start/stop a session of the DMR HD.
11
USB
The USB port on the back of the unit can be used for upload or ooad of video
content and for network conguration of the DMR HD. For more information on
USB network conguration, see Appendix B.
12
RS-232
This standard serial DB9 connector allows connection for serial control (note: a
null-modem serial cable is required).
13
AC Power
The IEC connector allows the included IEC cable to connect the DMR HD to AC
power. Make sure the power on/o switch is in the o position before plugging in
the power cable.
Setup & Application Diagrams

6| DMR HD User Manual 3.2 January 2009
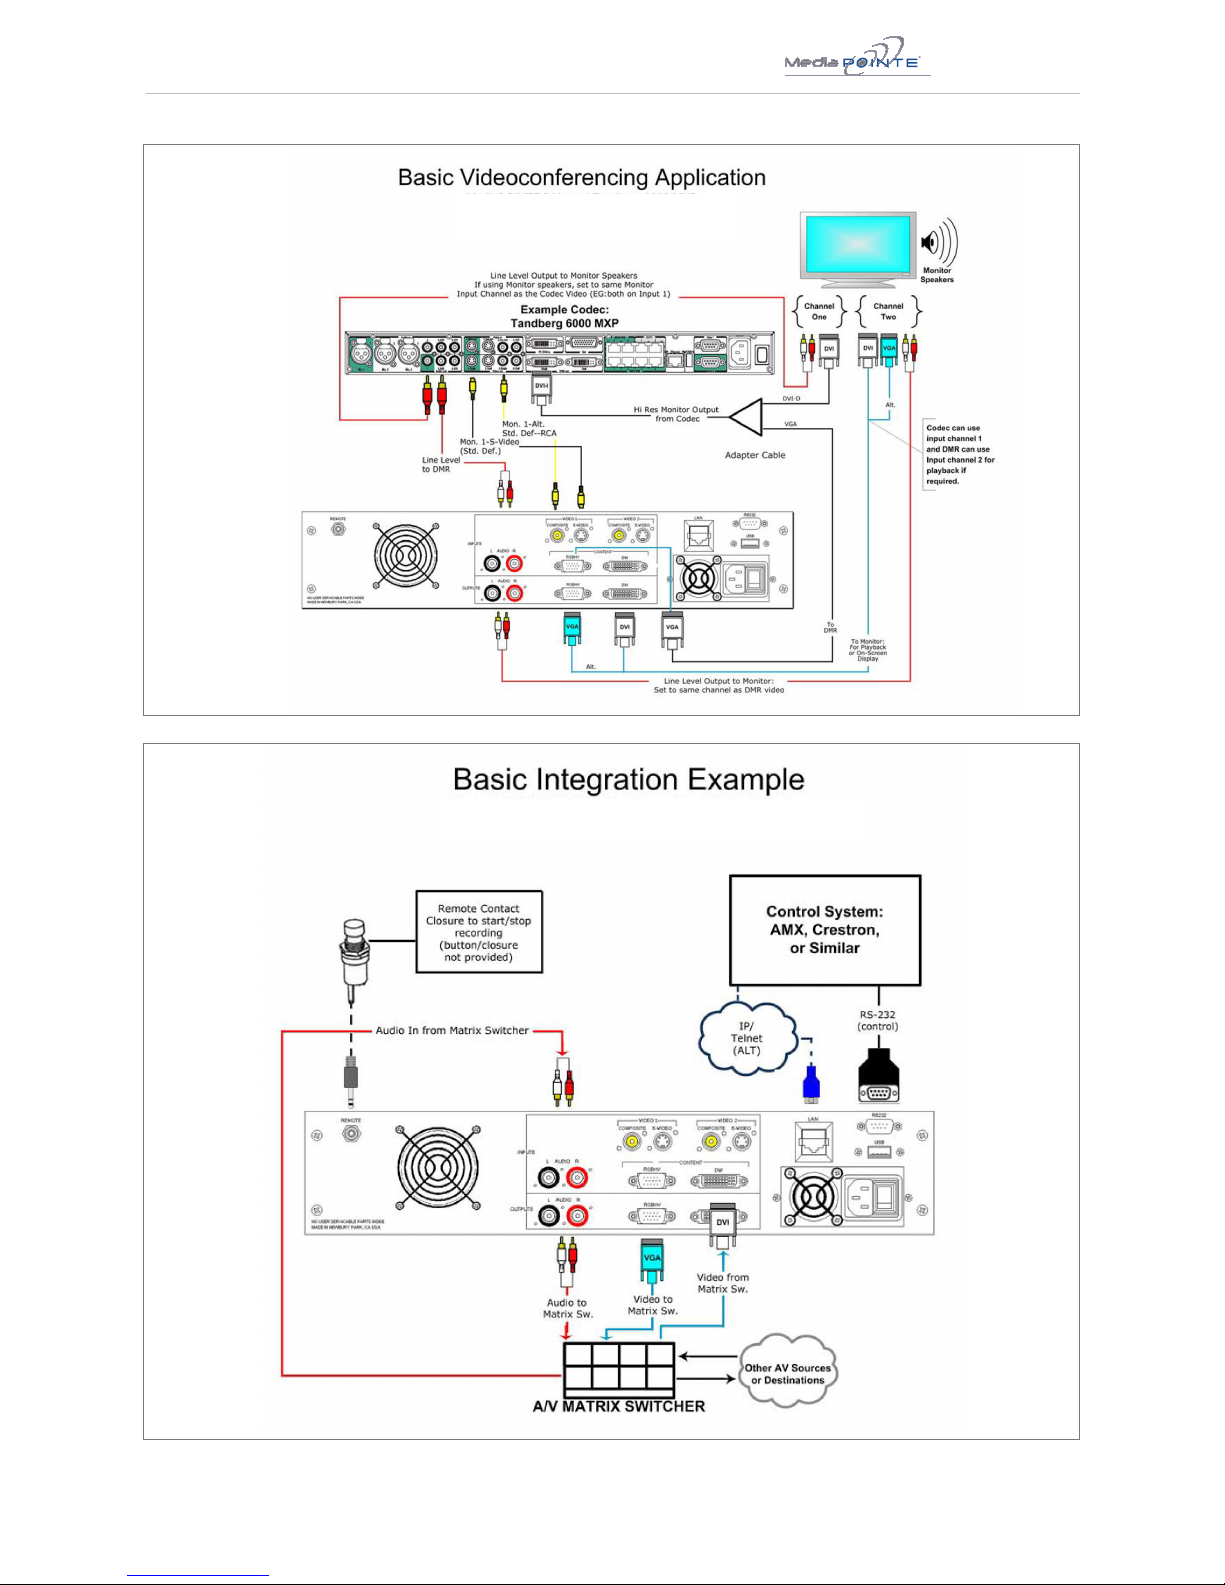
DMR HD | 7
8| DMR HD User Manual 3.2 January 2009
2 Setting Up the DMR HD
Setup
Use this information when you rst purchase the DMR HD and
when you are ready to install the hardware at your site. This
section shows the back panel and explains how to connect the
separate input connections to the unit.
Use this information when you rst purchase the DMR HD and
when you are ready to install the hardware at your site. To
turn on the unit ensure the power supply switch is in the ON
position then start the unit by pressing the POWER button.
Logging In
Thissectiondescribestheprocedureforarsttime
login,andtheDMRHDaccessrights.
The default IP address is:
192.168.1.253
Web Portal Access:
When the unit is initially accessed, it will default to a
“guest” user access however, you’ll need to click on the
LOGINmenuitemtoinitiateanotherloginlauncher.
TologintotheDMRHD,browsetoitsIPaddressusing
your Internet browser. There are three levels of access
rights. There is a “user” login, an “author” login, and a
system “admin” login.
As an Administrator
TheAdministratormaintainsallrightstotheDMRHD.
1.IfyouarealreadyloggedintotheDMRHDasauser
orauthor,clickontheLOGINselectionatthetop
of the main menu. You will be prompted to enter a
username and password.
2. Use the login id “admin”. The default password
is “MediaPOINTE”. Note that the login id and the
password are case sensitive.
3. From the Security selection of the main menu, the
Administrator can enable or disable logins for users and
authors and can change the admin password.
Changing the Administrator Password
Administrator rights are required to access or change
anyofthesettingsunderthe“Congure”and“Manage”
sections in the main menu. These sections include:
CongIP,Security,Update,andSystemInformation.
Bydefault,theAdministratorIDandpasswordareset
to “admin” and “MediaPOINTE” respectively. It is not
possible to change the Administrator ID. It will always
be “admin”.
DMR HD | 9
To change the Administrator password, enter a new
Administrator password in the “New admin Password”
eld(10charactersmaximum)andconrmitby
clicking Change Admin Password button. The next time
theDMRHDisaccessed,thenewadminpasswordwill
take effect.
Besuretowritedownthenewadministratorpassword
and keep it in a safe place. If you forget the admin
password,theDMRHDwillhavetoberesetbacktothe
factory defaults to enable an administrator to access
the“Congure”and“Manage”sectionsoftheunit.
As a User
The user has the ability to view existing content on the
DMRHD.
1.Onceyouhavenavigatedtothesite,youwillbe
presented with the default menu page. Anyone who
logsintotheDMRHDisconsidereda‘Guest’useruntil
they complete the admin login. Administrative login is
required to make changes to the system settings under
the“Congure”and“Manage”sectionsofthemenu.
IfallyouwishtodoisplaybackcontentfromtheDMR
HDyouwillnotneedadministratorrights.Nopassword
isrequiredforthestandardGuestuserloginasa
default.However,theadministratorhastheabilityto
modify this feature to require a password for viewers to
login.
2.InordertochangethedefaultIPsettingsoftheDMR
HDoranyoftheothercongurationsettings,youmust
log in with administrator rights.
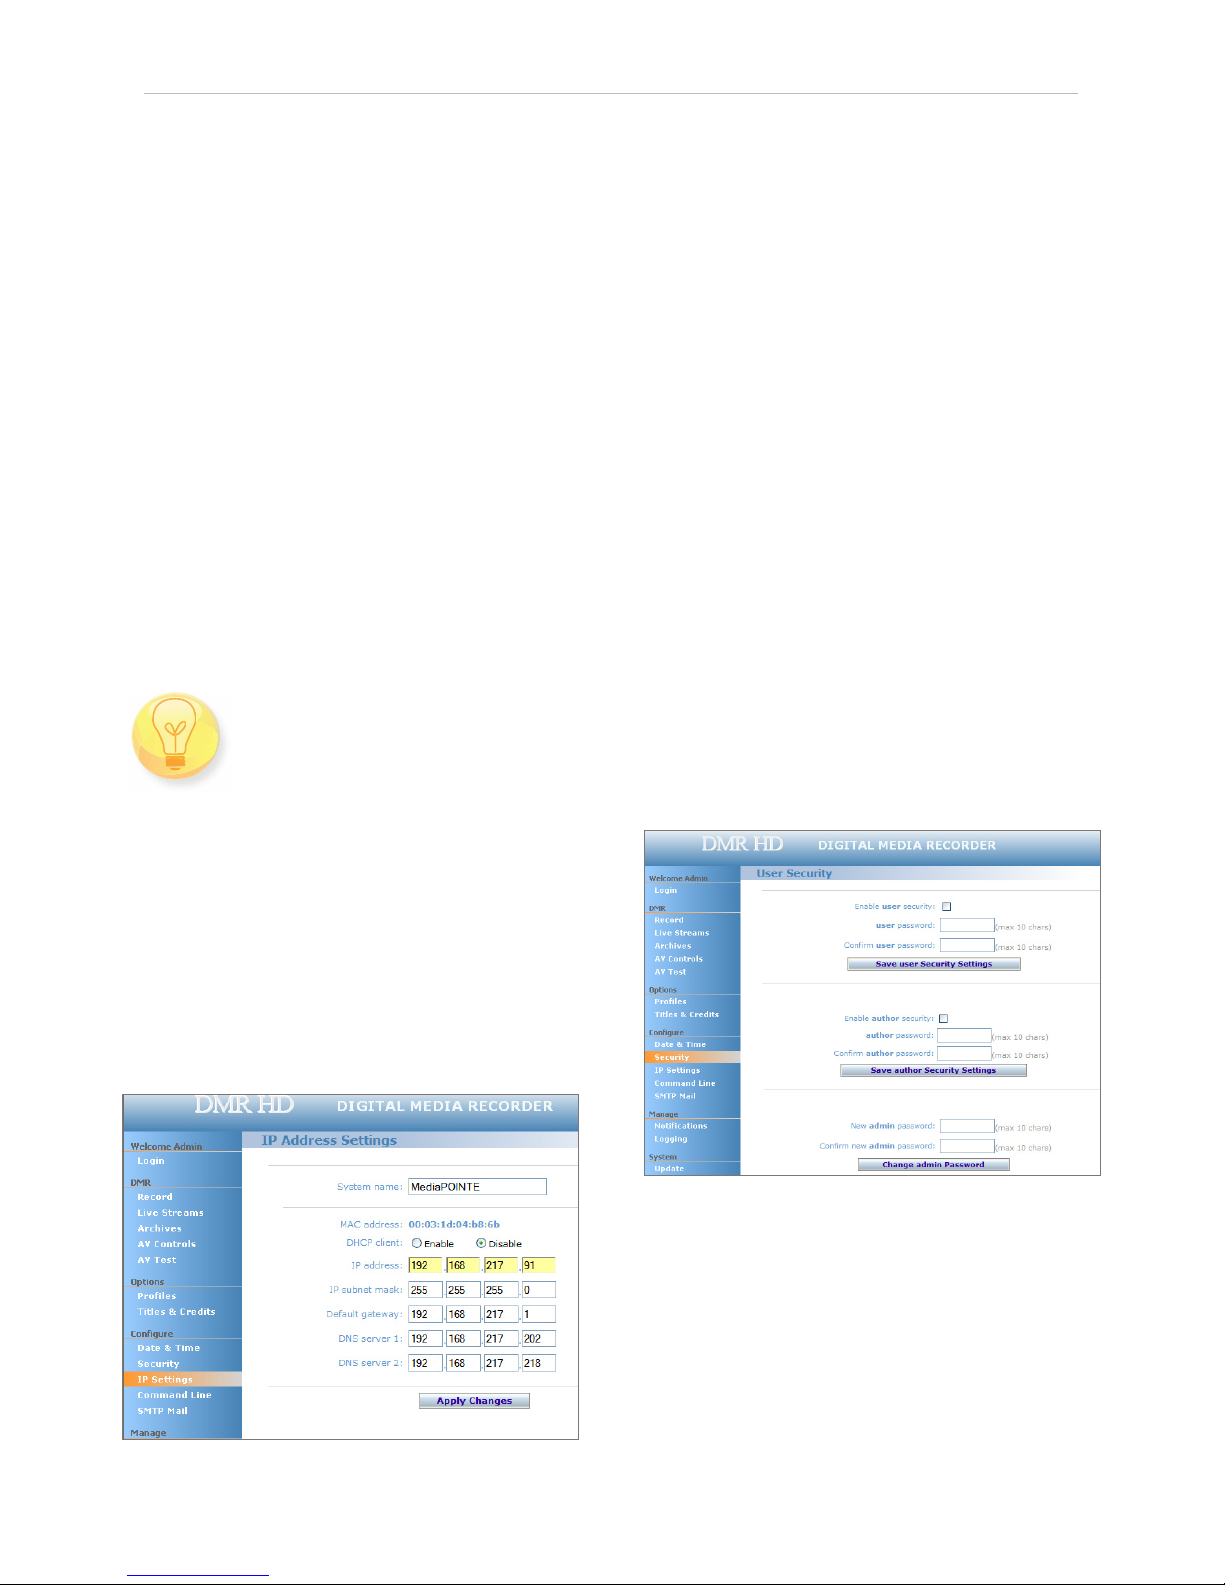
User Login Security
Bydefault,usersecurityisturnedoff.Anyonecan
LOGINtotheDMRHDwithoutbeingaskedforalogin
ID or password. Checking the Enable user security
checkbox will enable security for the user. This will
require all users to have an ID of “user” and the
passwordcreatedinthe“userpassword”eld.
Enterauserpasswordinthe“userpassword”eldand
conrmitbyclickingtheSaveuserSecuritySettings
button.ThenexttimetheDMRHDisaccessed,anyone
logging in will be presented with a login box asking for
the ID “user” and a password.
Un-checking the Enable user security checkbox will
restore the default settings.
As an Author
The Author maintains content creation rights on the
DMRHD.TheAuthorcansetrecordingoptionsbut
doesnothaveaccesstothe“Congure”and“Manage”
sections of the menu.
1.IfyouarealreadyloggedintotheDMRHDasauser
oradmin,clickontheLOGINselectionatthetop
of the main menu. You will be prompted to enter a
username and password.
2. Use the login id “author”. The password will be
userdenedintheUserSecuritysectionofthemain
menu. Note that the login id and the password are case
sensitive.
Author Login Security
Author rights are required to access or change any
of the settings under the “Options” section in the
mainmenu.Bydefault,theauthorloginpasswordis
disabled. Checking the Enable author checkbox will
enable the author login security. Enter an author
passwordinthe“authorpassword”eldandconrmit
by clicking save author Security Settings button.
Un-checkingtheEnableauthorLOGINcheckboxwill
deactivate the need for an author login password
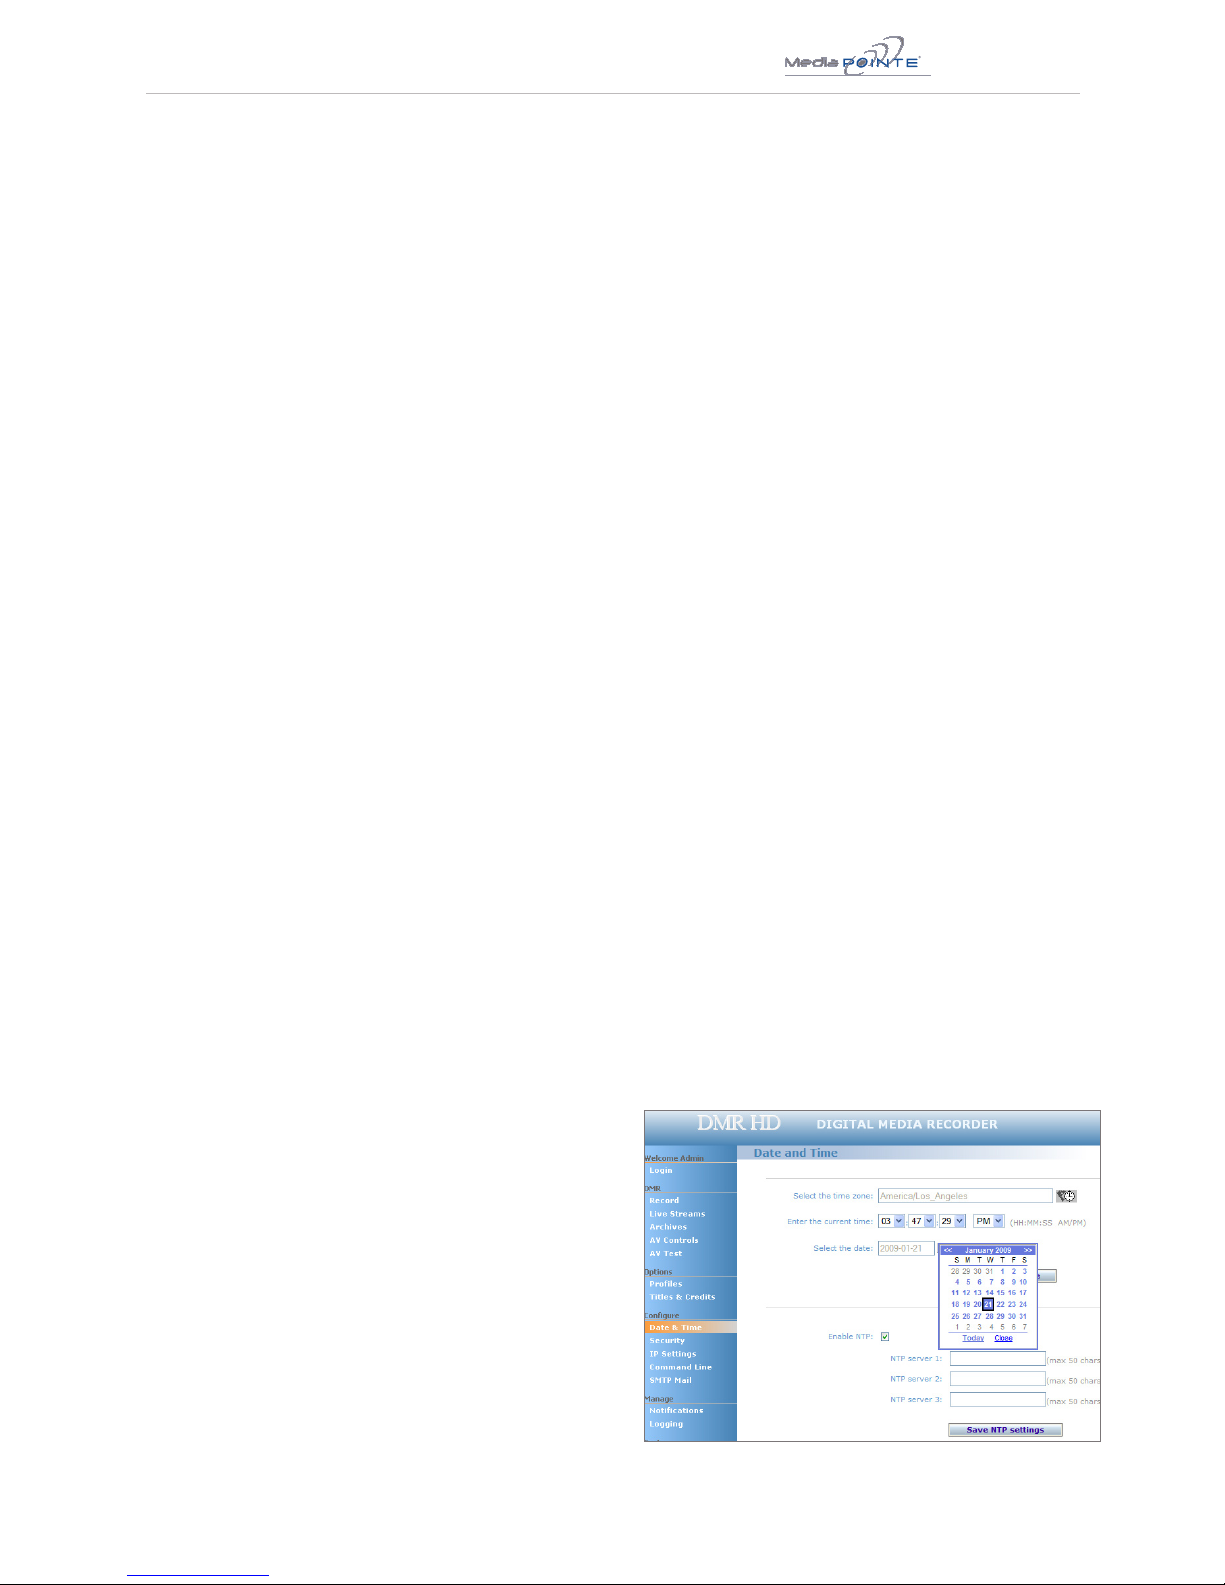
Date & Time
WhencontentisrecordedusingtheDMRHD,itisgiven
a time and date stamp. These can be set in the Date
& Time section of the main menu. The date can be
selectedfromapop-upcalendar.Conrmanychanges
by clicking on the Set Date & Time button. If desired,
theNTP(NetworkTimeProtocol)featurecanbe
enabledtosynchronizetheclockoftheDMRHDtoan
NTP server; click on the “Enable NTP” box and enter
the server information, then click on Save NTP settings

10 | DMR HD User Manual 3.2 January 2009
IP address, follow the procedure below.
Conguring Static IP Address
1.ConnecttheEthernet/LANcableandpowerupthe
DMRHD.
2. On your Internet browser, enter the current IP
addressoftheDMRHD.(Note:Iftheunithasfactory
settings,thedefaultstaticIPaddressis:192.168.1.253)
3.LogintotheDMRHDusingtheprocedureshowninthe
LoggingInsection.
4. Navigate to the network settings page by selecting IP
Settings.
5.InordertochangetoaFixedorStaticIPaddress,set
theDHCPClientcheckboxto“Disable”.FillintheIP
Address,IPSubnetMaskandDefaultGatewayelds.
6.Onceyouhavecompletedalloftheabovesteps,
select the Apply Changes button. You will receive a
pop-up window warning you to use this option with
caution as you are changing the default address and
should remember the new settings.
Conguring DHCP IP Address
1.Followthesamestepsasabove(1thru4)
2.ToallowtheDMRHDtopickupanIPaddress,setthe
DHCPClientcheckboxto“Enable”.
3. If you have made any changes to the network
settings, select the Apply Changes button. You will
receive a pop-up window warning you that you to use
this option with caution as you are changing the default
address and should remember the new settings.
USB Network Conguration
ThissectiondescribeshowtoconguretheDMRHD.
ChangesintheConguresectionoftheMainMenu
require Administrator privileges and cannot be accessed
byusersloggedinwithauthororuserproles.
ThenetworkparametersoftheDMRHDcanbesetvia
aspecialcongurationtextleonaUSBmemorystick.
InsertthememorystickintooneoftheDMRHDUSB
ports at any time. The unit will look for the presence
ofthiscongurationleandwillimplementthesettings
fromthele.UseasimpleASCIItexteditortocreate
thele.
Network Conguration
System Name
The factory set system name is the unit build number.
You can change the name in the IP setting menu page
byenteringanewnameinthetexteld.Arebootis
required for the new name to take effect. The name
canbeupto15characterslongandconsistofalpha-
numeric characters. No special characters or symbols
will be accepted except for a hyphen.
IP Settings
The System Name and all network settings can be set
in the IP Settings section of the main menu. Network
settingsmayalsobeconguredviaUSBmemorystick
conguration.
Toquicklyndthesystem’sIPAddress,connectaVGA
(RGBHV)orDVImonitortotheoutput.Usethekeypad
to navigate to the System Info page of the on screen
menu.
IPaddressesmaybeassignedtotheDMRHDbytwo
ways:DHCPandFixed(Static)IP.Ifyournetworkis
conguredforDHCP,theIPaddresswillbeprovided
automaticallyandwillbevisibleontheDVIorVGA
(RGBHV)outputoftheDMRHD.TosetaFixed(Static)
Network Conguration
Setting Description
DHCP Client Enable DHCP settings for automatic address retrieval f rom
DHCP Server. Disabling the DHCP client will require a static IP
address (with subnet mask and default gateway) to be entered.
IP Address Assign a static IP address to DMR HD. This eld will also display
the currently assigned IP address
IP Subnet
Mask
Assign subnet mask to DMR HD. This eld will also display the
currently assigned subnet mask
Default
gateway
Assign a default gateway to the DMR HD. This eld will also
display the currenty assigned default gateway
DNS server If the network supports DNS, enter the DNS Server Address(es)
here.

DMR HD | 11
ThislemustbeplacedontherootoftheUSBdrive.
Thislemustbenameddmx_ip_conf.txtandmusthave
thefollowingformat(note:theeldsinREDshouldbe
conguredforyournetworksettings).
dhcp=(bool)0
dns_1=(string)192.168.0.2
dns_2=(string)192.168.0.3
ethernet=(string)auto
gateway=(string)192.168.1.1
ipaddress=(string)192.168.1.253
netmask=(string)255.255.255.0
Ifthedmx_ip_conf.txtleis
intentionally left blank with no text of
anytypewithinthebodyofthele,the
DMRHDwillwriteitsnetworksettingsto
thisle.Thisisaneasywaytoobtain
the unit’s network settings.
SMTP Mail
TheDMRHDhastheabilitytosendemailmessagesto
a remote SMTP server. Enter the address of the SMTP
server in the appropriate text box (use the IP address
ifDNSsettingsarenotset).TheEmaileldwillsetthe
default“From”eldtotheenteredemail.Leavethis
eldblanktoallowtheusertoentertheirown“From”
emailaddress.ConrmanychangestotheSMTPmail
congurationbyclickingSaveSMTPsettingsbutton.
Command Line
TheDMRHDhasaCommandLineinterfacethatcanbe
accessedfromTelnetorRS-232.Alistofcommandscan
be found in the External Control section of this manual.
Telnet (TCP/IP)
The Telnet port by default is not enabled. To turn on
Telnet control, set the Telnet port number (typically
Port23)andchecktheTCP/IPportenablecheckbox.
A password for the Telnet session can be enabled
byenteringapasswordinthePasswordforTCP/IP
connection text box. If a password is not desired on the
Telnet session, leave the text box blank.
RS-232
OnthebackoftheDMRHDthereisaserialcontrolport
conguredasaDTEthatsupportstheRS-232protocol.A
Null-ModemcableshouldbeusedbetweentheDMRHD
and the COM port on your PC.
TerminalsessionsettingsrequiredforRS-232control
are:9600,8,None,1withNoFlowControl.
There is no password protection on this interface
and,bydefaulttheRS-232portisenabled.The
administrator has the ability to disable the port by un-
checking the COM port enable checkbox.
12 | DMR HD User Manual 3.2 January 2009
3 Control & Operationud ea Toolbar
The DMR HD can be controlled by several different methods.
These include, a Web Portal interface, IR remote control, con-
tact closure, RS-232 serial port, Telnet, or by the convenient
button panel (Keypad) on the front of the unit. This section
will cover each of these control interfaces in detail.
Web Portal
Overview
TheDMRHDhasafullyfeaturedWebPortalthatcanbe
accessed via a web browser. Enter the unit’s IP address
in the web browser’s address bar. From this screen you
can start and stop a recording session, play or download
previously archived material, set recording preferences
andmovecontentofforwithintheDMRHD.
Selecting the Archives selection from the main menu
willshowalistofallcurrentrecordingsintheRoot
directory.
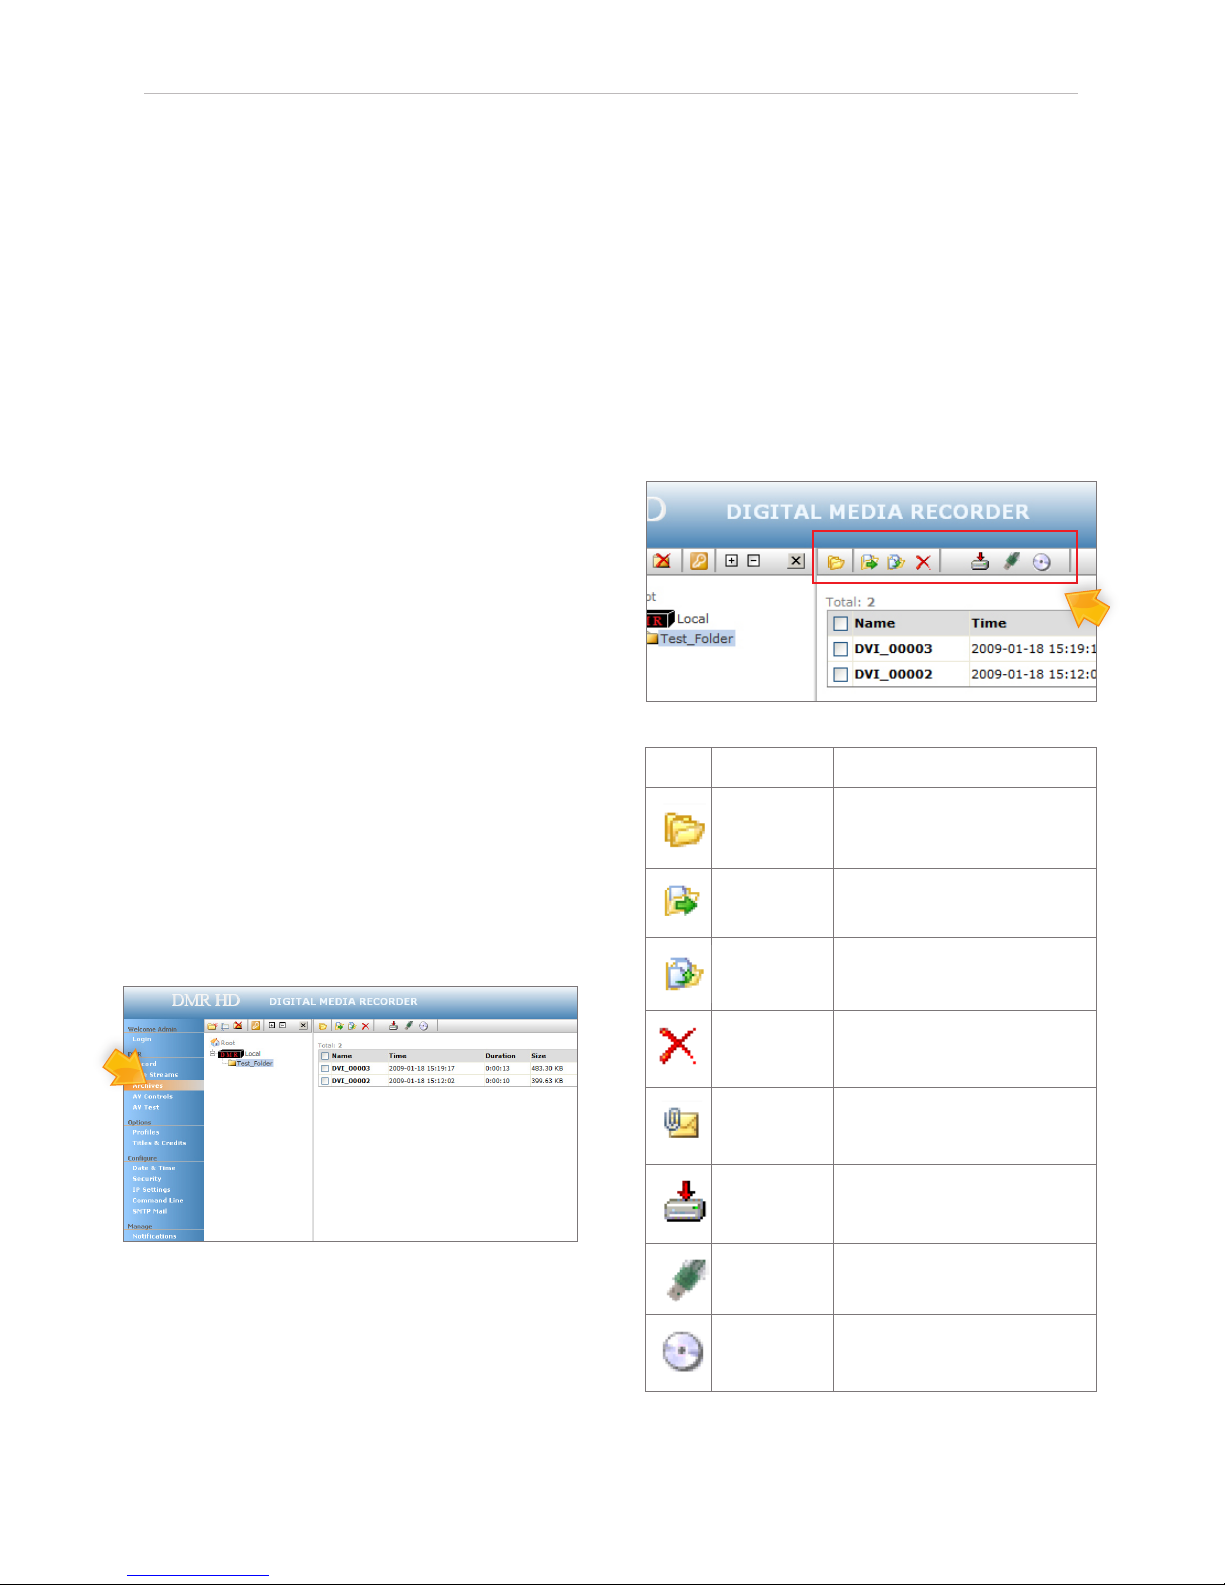
Toolbar
When logged in as either author or admin selecting the
Archives selection from the main menu will provide the
main system Toolbar.
Icon Function Description
Expand Folder
View Will display the folder management tree.
Move to Will allow content to be moved from one
folder to another.
Copy to Will allow a copy of a media le to be
created in a dierent folder.
Delete
Will delete the selected content.There is no
recycle bin or recovery process for content
that has been deleted.
Mail Attachement
Mangaer
Will open the Mail Attachment Manager to
allow content to be emailed.
Download
Manager
Will open the Download Manager to allow
content to be moved to the local PC.
USB Manager Will open the USB Manager to allow content
to be moved to and from USB stick.
Disk Manager Will open the Disk Manager to allow content
to be burned to a DVD-R, DVD+R or CD-R.
Table of contents


