Meicheng PV-330 User manual

M
Me
ei
ic
ch
he
en
ng
g
PV-330
USER MANUAL
www.meicheng.com.tw
®

Warning ........................................................................................................................ 3
PRECAUTIONS ............................................................................................................. 4
General Precautions ................................................................................................... 4
Precautions When Using the Device ............................................................................. 5
IDENTIFYING THE PARTS ............................................................................................. 6
Standard Accessories ................................................................................................. 6
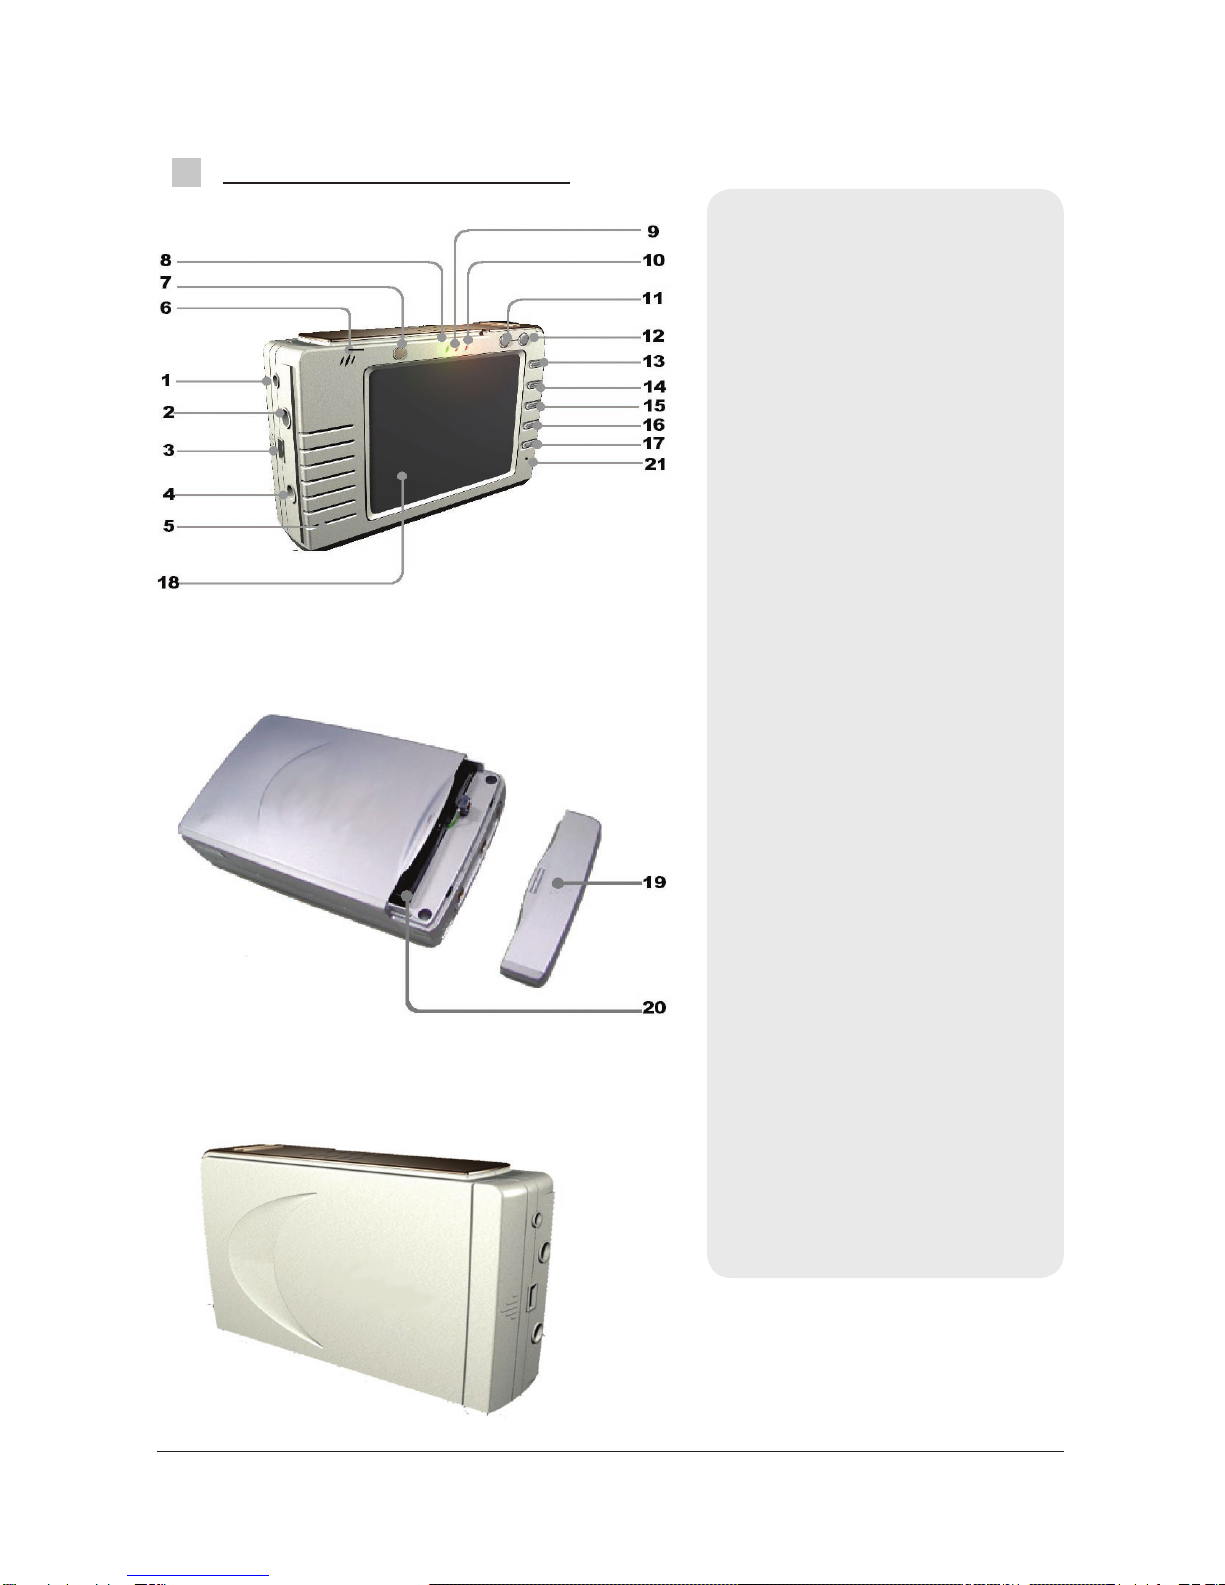
Names and Functions of Parts ..................................................................................... 7
Illustration of Remote Control ....................................................................................... 8
OPERATION INSTRUCTIONS ........................................................................................ 9
Loading the Battery ..................................................................................................... 9
Using an AC/DC Adaptor ............................................................................................. 9
Turn On/Off the Power ................................................................................................ 9
Using a Earphone ...................................................................................................... 9
REC MODE .................................................................................................................. 10
Recording Sources to the Device ................................................................................. 10
Recording Voice ......................................................................................................... 11
PLAY MODE ................................................................................................................. 12
Playing Back Movies on the LCD Panel ........................................................................ 12
Playing Back Voice ..................................................................................................... 15
Viewing Photos .......................................................................................................... 18
MP3 MODE .................................................................................................................. 20
Playing Back MP3 Music ............................................................................................. 20
SETUP MODE .............................................................................................................. 23
LINK MODE .................................................................................................................. 26
Connecting the device to a Computer ........................................................................... 26
Removing USB Cable ................................................................................................. 27
Real 1 MODE ................................................................................................................ 28
Playing Back Real Audio Music ................................................................................... 28
TROUBLESHOOTING ................................................................................................... 30
FIRMWARE UPDATE .................................................................................................... 32
SPECIFICATION ........................................................................................................... 34
Table of Contents

Quick Function Browser
REC
Video
Movie
Voice
Voice
Photo
PLAY
MP3
SETUP
LINK
Rename
Delete
Rename
Delete
Repeat
Rename
Delete
Repeat
Delete
Auto Slide
Video Out
Date & Time
Auto Power Off
Firmware Version
Disk Reformat
USB Connection
Remove USB Connection
Repeat
P.10
P.15
P.11
P.18
P.21
P.23
P.24
P.24
P.23
P.23
P.27
P.26
P.13
P.19
P.19
P.17
P.17
P.16
P.15
P.14
P.21
P.22
Play P.20
Rename
Delete
Repeat
P.28
P.29
P.29
Play P.28
Check Memory
Video Quality
Playback Time
P.24
P.25
P.25
P.12

3
IMPORTANT NOTICE
Disclaimer of Warranty
Our company makes no representations or warranties, either expressed or implied, by
or concerning any content of these written materials or software, and in no event shall
be liable for any implied warranty of merchantability or tness for any particular pur-
pose or for any consequential, incidental or indirect damages (including but not limited
to damages for loss of business prots, business interruption and loss of business in-
formation) arising from the use or inability to use these written materials or software.
Some states do not allow the exclusion or limitation of liability for consequential or
incidental damages, so the above limitations may not apply to you.
Safety Considerations
To prevent re or shock hazard, do not expose the unit to rain or moisture.
Warning
Note :
This equipment has been tested and found to comply with the limits for a Class B digi-
tal device, pursuant to Part 15 of the FCC Rules. These limits are designed to provide
reasonable protection against harmful interference in a residential installation. This
equipment generates, uses, and can radiate radio frequency energy and, if not in-
stalled and used in accordance with the instructions, may cause harmful interference to
radio communications. However, there is no guarantee that interference will not occur
in a particular installation. If this equipment does cause harmful interference to radio
or television reception, which can be determined by turning the equipment off and on,
the user is encouraged to try to correct the interference by one or more of the following
measures:
1. Reorient or relocate the receiving antenna.
2. Increase the separation between the equipment and receiver.
3. Connect the equipment into an outlet on a circuit different from that to which the
receiver is connected.
4. Consult the dealer or an experienced radio/TV technician for help.
The supplied interface cable must be used with the equipment in order to comply with
the limits for a digital device pursuant to Subpart B of Part 15 of FCC Rules.
CAUTION :
You are cautioned that any changes or modications not expressly approved in this
manual could void your authority to operate this equipment.
(For the customers in the U.S.A)

4
Declaration of Conformity
Model No. : PV330
This device complies with Part 15 of the FCC Rules. Operation is subject to the fol-
lowing two conditions :
(1) This device may not cause harmful interference
(2) This device must accept any interference rceived, including interference that may
cause undesired operation.
Copyright Notice
All rights reserved. No part of these written materials or software may be reproduced
or used in any form or by any means, electronic or mechanical, including photocopying
and recording and the use of any kind of information storage and retrieval system, with-
out prior permission in writing from our company. No liability is assumed with respect to
the use of the information contained in these written materials or software, or for dam-
ages resulting from the use of the information contained in these written materials or of
the software. Our company reserves the right to alter the features and contents of this
publication or software without obligation or advance notice.
PRECAUTIONS
Do not open or modify
Do not disassemble the device, as it may cause damage to the unit. For internal re-
pairs, consult your dealer or an Authorized Service Centre.
Protect from humidity
1. The device is not water-resistant. Do not put it in water and be careful to protect it
from rain, sea water, etc.
2. If liquid or some foreign object has entered the unit, do not use it, but consult your
dealer or and Authorized Service Centre. Do not touch the internal parts. These are
high tension circuits that may cause sever electric shock.
3. To avoid damage or mis-operation of the device, only use it where the humidity is
30 ~ 90%.
General Precautions

5
Protect from high temperatures
1. Do not leave the device in a closed car, etc., in the sun, as temperature may rise
and cause damage.
2. To avoid damage or mis-operation of the device, only use it where the temperature
is 0 ~ 40 degree.
3. Do not bring the device suddenly from a hot to a cold place, or vice versa. This may
cause the formation of condensation inside the unit that may damage it. To prevent
the formation of condensation, put the device in a plastic bag, etc., to protect it and
wait until the device has reached the ambient temperature before taking it out.
4. If used under low temperature conditions, the batteries will have a shorter life than
normal.
Trial recording
1. Before recording one-tie events, make a trial recording to make sure that the
Joycoder is working properly.
2. We decline all responsibility concerning the loss of data down time, loss of revenue
or any other direct or indirect damage or claims caused by the device.
Precaution on copyright
1. Television programs, lms, video tapes, and other materials may be copyrighted.
Unauthorized recording of such materials may be contrary to the provision of the
copyright laws.
LCD screen
1. The LCD screen is manufactured using extremely high-precision technology so
over 99.99% of the pixels are operational for effective use. However, there may be
some tiny black points and/or bright points (white, red, blue or green in color) that
constantly appear on the LCD screen. These points are normal in the
manufacturing process and do not affect the recording in anyway.
Precautions When Using the Device

6
IDENTIFYING THE PARTS
Standard Accessories
1. AC/DC adaptor
7. Carrying case 3. USB2.0 cable
6. AV cable x 22. Lithium-ion battery
5. Reomte control
4. Stereo earphone
6
(The pictures below is for your reference only. Actual objects are subject to change
without notice.)

7
7
Names and Functions of Parts
Front View
Rear View
Back View
1. DC In Jack
2. AV Output/Speaker/Earphone
Jack
3. USB Jack
4. AV Input
5. Heat Release Outlet
6. Built-in Microphone
7. IR Receiver
8. Power On/Off Status Lamp
9. Power Charging Status Lamp
10. PC Link Status Lamp
11. Left/Rewind Button
12. Right/Forward Button
13. Up/Volume Up Button
14. Play/Pause/Record Button
15. Down/Volume Down Button
16. Stop/Esc Button
17. Power/Selection Button
18. LCD Screen
19. Battery Compartment Cover
20. Li-ion Battery Slot
21. Reset Hole

8
Illustration of Remote Control
M
Menu/Selection
Up
Down
Right/Forward
Stop/Exit
/Zoom Out
Play/Record
/Enter/Pause
/Zoom In
Volume down
Volume up
Power
Left/Rewind

9
OPERATION INSTRUCTIONS
Loading the Battery
Using an AC/DC Adaptor
Turn On/Off the Power
1. Press for about 5 seconds.
2. The status lamp lights in green, and the power
is on.
To turn off the power
1. Press for about 5 seconds.
2. The status lamp goes out, and the device turns
off.
Using a Earphone
Plug-in the earphone (supplied) into the AV output
jack.
1. Open the battery compartment cover.
2. Insert the battery with label facing upward as
shown.
3. Close the battery compartment cover.
An AC/DC adaptor allows you to power the device
from a common AC wall outlet.
1. Connect the AC adaptor to the DC IN jack of
the device.
2. Connect the power cord to that AC adaptor and
to a wall outlet.
3. Start charging power and red status lamp
appears.
4. Complete charging power when status lamp
turns to green.
Note :
For the rst time usage,
charge the battery for 8-12
hours. Make sure the power is
off while charging the battery.

10
REC MODE
Recording Sources to the Device
AV (audio/video) INPUT is for recording sources coming
from TV, VCR, and DVD/VCD player.
a) Using the AV cable, connect the AV Input jack of the
device and the AV Output jacks to the TV set.
b) Press to turn on the power.
c) Select REC mode and press to enter.
d) Select the VIDEO and press to enter.
e) If input device is not connected, NO SIGNAL
message appears.
f) If AV cable is connected, live image appears on the
panel.

11
g) Press to enter REC DURATION mode.
h) Press / to select record duration.(If not
sure about the recording length or do not need
to set up the recording duration, select
CONTINUE.)
i) Press to start recording video.
j) Press to pause recording video.
k) Press to resume recording video.
l) Press to stop recording video.
a) Select REC mode and press to enter.
b) Select VOICE and press to enter.
c) VOICE RECORDING STANDBY message
appears.
Recording Voice

12
d) Press to enter REC DURATION mode.
e) Press / to select record duration. (If not sure
about the recording length or do not need to set up
the recording duration, select CONTINUE.)
f) Press to start recording voice.
g) Press to pause recording voice.
h) Press to resume recording voice.
i) Press to stop recording voice and exit.
PLAY MODE
Playing Back Movies on the LCD Panel
You can view movies on the built-in panel of the
device and hear sounds via a earphone.
a) Select PLAY mode and press to enter.
b) Select VIDEO and press to enter.
c) Select a le you want to play.
**Press / to select between previous/next les.
**Press / to select between previous/next
pages.

13
d) Press to start playing back movies.
e) Press / to adjust volume.
f) Press to pause playing back movies.
g) Press to resume playing back movies.
h) Press to fast forward the movies.
i) Press to stop forwarding the movies.
j) Press to fast rewind the movies.
k) Press to stop rewinding the movies.
l) Press to switch between full screen view
or RealOne Player view.
m) Press to stop playing back and exit .
**Renaming a File (8 word le name allow only)
a) Select a le as shown and press .

14
b) Select RENAME and press to enter.
c) Press / / / to start changing the character.
d) Press to conrm the modication and jump to
the next character.
e) Press to exit after completing renaming the le.
f) Press to stop renaming and exit .
**Deleting a File
a) Select a le as shown and press .
b) Select DELETE and press / to change to YES.
c) Select OK and press to delete the le.

15
**Repeating a File
a) Select a le as shown and press .
b) Select REPEAT and press / to choose
from ONE or NO.
Playing Back Voice
You would need to plug in an earphone to hear
sounds.
a) Select PLAY mode as shown.
b) Select VOICE and press to enter.
c) Select a le you want to play.

16
d) Press to start playing back voice.
e) Press / to adjust volume.
f) Press to pause playing back voice.
g) Press to resume playing back voice.
h) Press to stop playing back voice and exit.
**Renaming a File (8 word le name allow only)
a) Select a le as shown and press .
b) Select RENAME and press to enter.
c) Press / / / to start changing the
character.
d) Press to conrm the modicationand jump
to the next character.
e) Press to exit after completing renaming the
le.
f) Press to stop renaming.

17
**Deleting a File
a) Select a le as shown and press .
b) Select DELETE and press / to change
to YES.
c) Select OK and press to delete the le.
**Repeating a File (8 word le name allow only)
a) Select a le as shown and press .
b) Select REPEAT and press / button to
choose from ONE or NO.

18
Viewing Photos
You can store digital pictures in the device.
a) Select PLAY mode as shown.
b) Select PHOTO and press to enter.
c) Photo index with 6 pictures is displayed.
d) Press / / / to select a photo.
**Press / to select between previous/next les.
**Press / to select between previous/next pages.
e) Press to select the photo you want to enlarge .
f) Press / to view previous/next photo.
g) Press to zoom in the photo, continued up to 3 x
zoom in.
h) Press to zoom out the photo and exit.
Note: Unknown Photo File
Please refer to the page 31 for detail informations.

19
**Deleting a File
a) Select a le as shown and press .
b) Select DELETE and press / to change to
YES.
c) Select OK and press to delete the le.
**Auto Slideshow
a) Select a le as shown and press .
b) Select AUTO SLIDE and press / button to
choose from 2 seconds, 5 seconds, or NO.
c) Press to start slideshow.
d) Press to stop slideshow.
Table of contents
Other Meicheng Media Player manuals