Studio Evolution EVOBOX User manual
Quick Start Guide

Thank you for choosing Studio Evolution solutions.
Follow the steps below to wire up your EVOBOX.
You have become the proud owner of the EVOBOX karaoke system.
Let's start!
Quick connection
Congratulations!
1. Connect one end of the HDMI cable to the HDMI port on your TV. Connect the other end of the HDMI cable to
the EVOBOX HDMI port .
2. Use the RCA cable to connect EVOBOX to the audio system .
3. Use TRS cables to connect wired microphones or a wireless microphone receiver to the appropriate Mic1 and
Mic2 inputs .
4. Connect EVOBOX to a power outlet .
5. Turn on the TV and select the HDMI input to which your karaoke system is connected.
6. Follow the on-screen instructions to connect the remote control, select a language, time zone, and configure
Internet connection.
WARNING! Failure to follow these instructions can result in a fire, electric shock, personal injury, or equipment damage.
Power outlet TV Internet USB drive Microphones Audio system
AC/DC Adapter Network cable
TRS cables RCA cable
HDMI cable

Please activate your EVOBOX system so it could operate at its full potential. Without activation, EVOBOX will run in
demo mode only. In the demo mode, the song duration is limited to 45 seconds.
To activate your karaoke system, use the instructions on the screen of your TV.
Karaoke system activation
Remote control
Navigation.
7
The block of playback control keys.
8
Keyboard and search filters.
9
Tone adjustment — from -6 to +6 units.
Tempo adjustment — from -12 to + 12%.
5
Turn on/cancel performance recording.
6
Select a background image (photo/video).
1
Catalog, Favorites, Queue, and Genre selection.
2
Adjust the volume and effects.
4
Function keys.
Catalog, Favorites, Queue and Genre selection:
yellow — open/close the background music player;
blue — information about the song;
red — open/close the performance recording player;
green — enable/disable LiveFX.
3
7
8
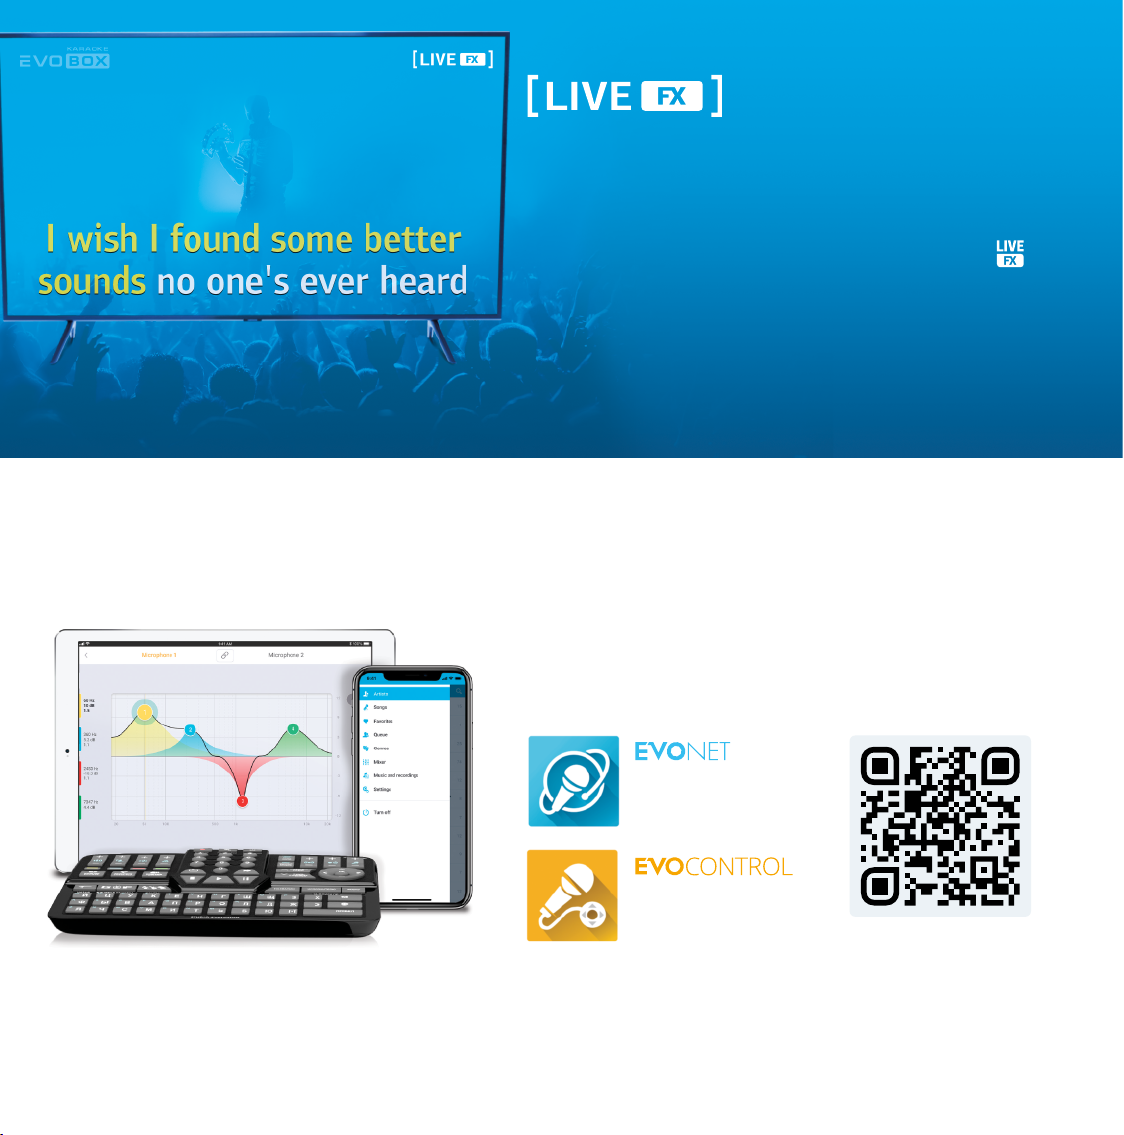
The live concert effect
LiveFX is created individually for each song, so you can feel the
special atmosphere of a live concert.
LiveFX is available for tracks marked with the special icon .
Use the green function key to enable/disable the effect.
Smart control
You can control the EVOBOX karaoke system using its Bluetooth
remote control with a full-size keyboard, as well as rely on our
official applications.
To control from a
smartphone.
Scan the QR code
To control from a
tablet.

Record your concerts
Record your performances with EVOBOX in studio quality. To
enable it, press the Record key on the remote control or tap a
similar button in the application interface.
You can easily copy the recordings to a USB drive or instantly
share them with your friends and family members via instant
messengers or social networks, with the application.
For a more voluminous and spectacular sound of your
voice, we recommend adjusting the microphones.
Go to EVOBOX's Settings, select the Audio section
and go to the Microphones subsection .
Adjust the EQ for your voice, select the gain level for
microphones and choose the following effect types:
Deley, Reverb. Use the remote control or app to adjust
the effects.
Microphone Settings

How to buy songs
At any moment, you can purchase individual tracks
from the Studio Evolution full karaoke catalogue.
Studio Evolution Catalogue is updated several
times a week with just-outs and trendy songs.
In the Catalogue, the songs available for purchase
are marked grey. You have an opportunity to play a
song in a demo mode before buying it. To buy a
song, please, charge up your Balance.
You can charge up your Balance and
buy songs only when your karaoke
system is connected to the Internet.
What's inside
EVOBOX
Karaoke system
Bluetooth
remote control
Audio cables
RCA-RCA (2 pc.)
HDMI Cable AC/DC Adapter 2×АА Batteries Quick
Start Guide
The terms HDMI, HDMI High-Definition Multimedia Interface, and the HDMI logo are registered trademarks of HDMI Licensing
Administrator, Inc.
The Bluetooth logo and the term itself are registered trademarks owned by Bluetooth SIG Inc. Any use of the trademark/term is
licensed.

Specifications
Visit support.studio-evolution.com to learn more about the way you can use the EVOBOX karaoke system.
Please note that the appearance and interface of the equipment may differ from those described in this manual.
Casing colors available
Dimensions and weight
Control
Black, Graphite, Silver, Ocean, Gold, Ruby
Height 49 mm, width 198 mm, length 198 mm, weight 1140 g
Bluetooth remote control, mobile applications for smartphones
(EVONET) and tablets (EVOCONTROL)
Audio inputs
Microphone inputs: Balanced TRS 6.3 (Jack) (2 pc.)
Maximum microphone input gain: 32.5 dB
Maximum input amplitude: +0.14 dBu (0.788 Vrms)
Input signal/noise ratio: -95.9 dB (A-weighted)
Dynamic range: 95.7 dB
Harmonic distortion + noise: 0.0011%
Bandwidth (+/- 0.5 dB): 50 Hz - 20 kHz
Cross-channel penetration: -95.3 dB
Input resistance: 25 kOhm
Audio ADC: Asahi Kasei Microdevices AK5703
Audio outputs
Stereo outputs: RCA, (2pc.)
Input signal/noise ratio: 99.3 dB (A-weighted)
Dynamic range: 99.4 dB
Harmonic distortion + noise: 0.005%
Bandwidth (+/- 0.5 dB): 20 Hz - 20 kHz
Cross-channel penetration: -98.3 dB
Maximum output amplitude: +4.7 dBu (1.34 Vrms)
Output resistance: 470 Ohm
Audio DAC: Asahi Kasei AK4430
The maximum screen resolution: 4K UHD (3840 × 2160)
Video
Video: MOV, AVI, MP4, MKV
Audio: WAV, OGG, MP3
Graphic: PNG, JPG, JPEG
Karaoke: EK2
Supported file formats
Wi-Fi 802.11ac.; Two ranges:
2.4 GHz and 5 GHz
Bluetooth 4.1 Low Energy
HDMI 2.0
USB Type-A (2 pc.)
Gigabit LAN (RJ45)
Power connector
Connectors and Interfaces
EVOBOX: 120 GB (SSD)
EVOBOX Plus: 960 GB (SSD)
Drives
Processor: Quad-Core Cortex-A53
RAM: 2 GB DDR4
Graphics and multimedia processors:
Mali-T820 MP3 GPU
System
Other
Power: 12 V / 2 А
Power consumption: 24 W
Temperature range: 0-50 ºC
Transport box size
(W × H × L), mm: 333 × 134 × 324
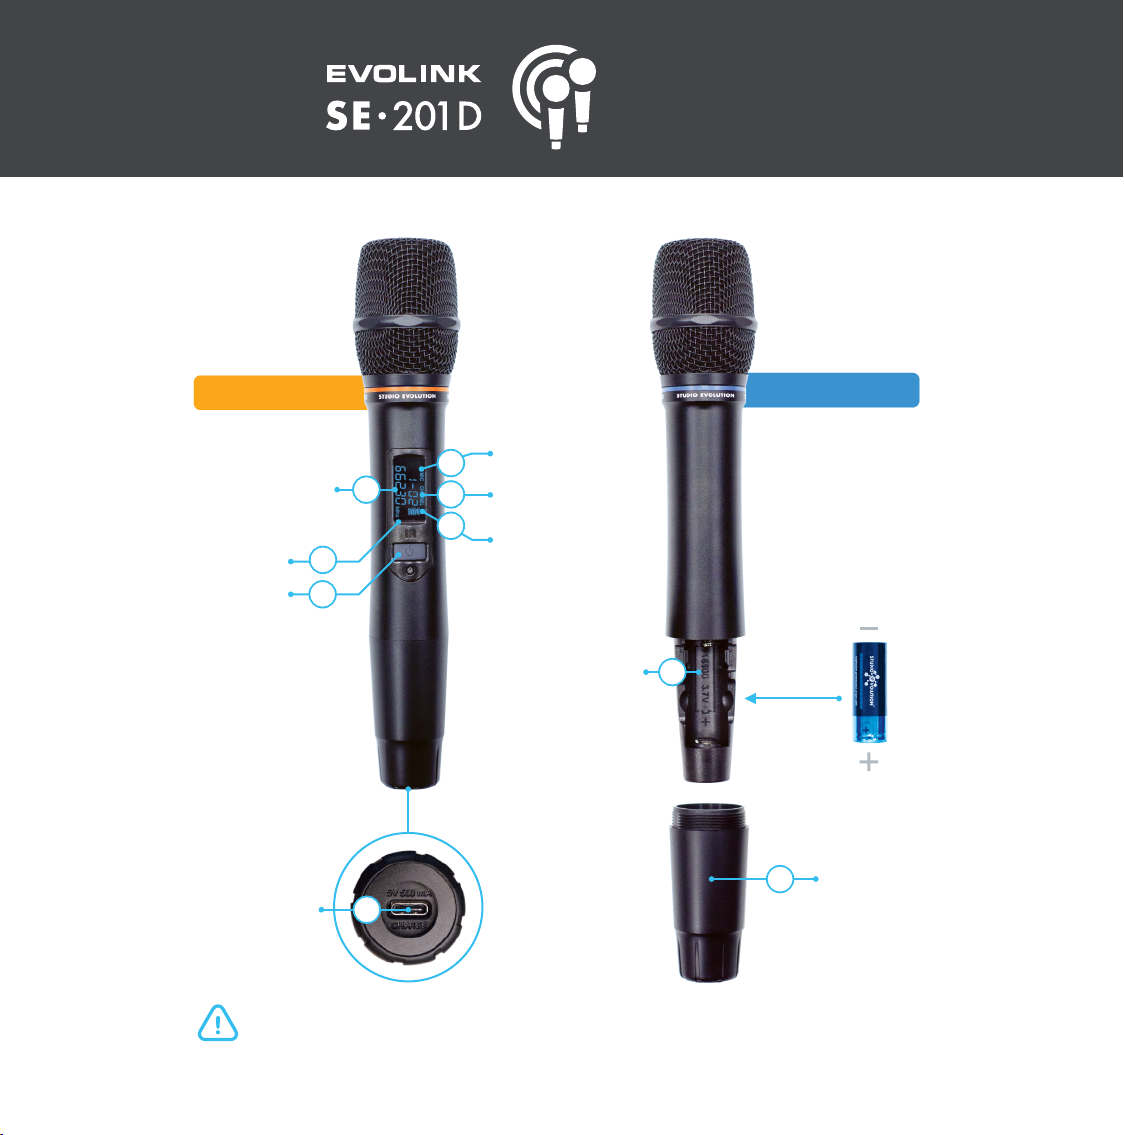
Microphone 1
WIRELESS
DIGITAL
MICROPHONES
Button
Switch
Display
Microphone number
Channel
operational
frequency Channel
Power level
Battery case
Protection
cap
Battery
Microphone 2
USB Type-C
charging port
3
4
5
2
9
6
7
8
1
Use only external USB power adapter*
(5V⎓1А or 5V⎓2А) to charge the microphones.
*USB power adapter not included.
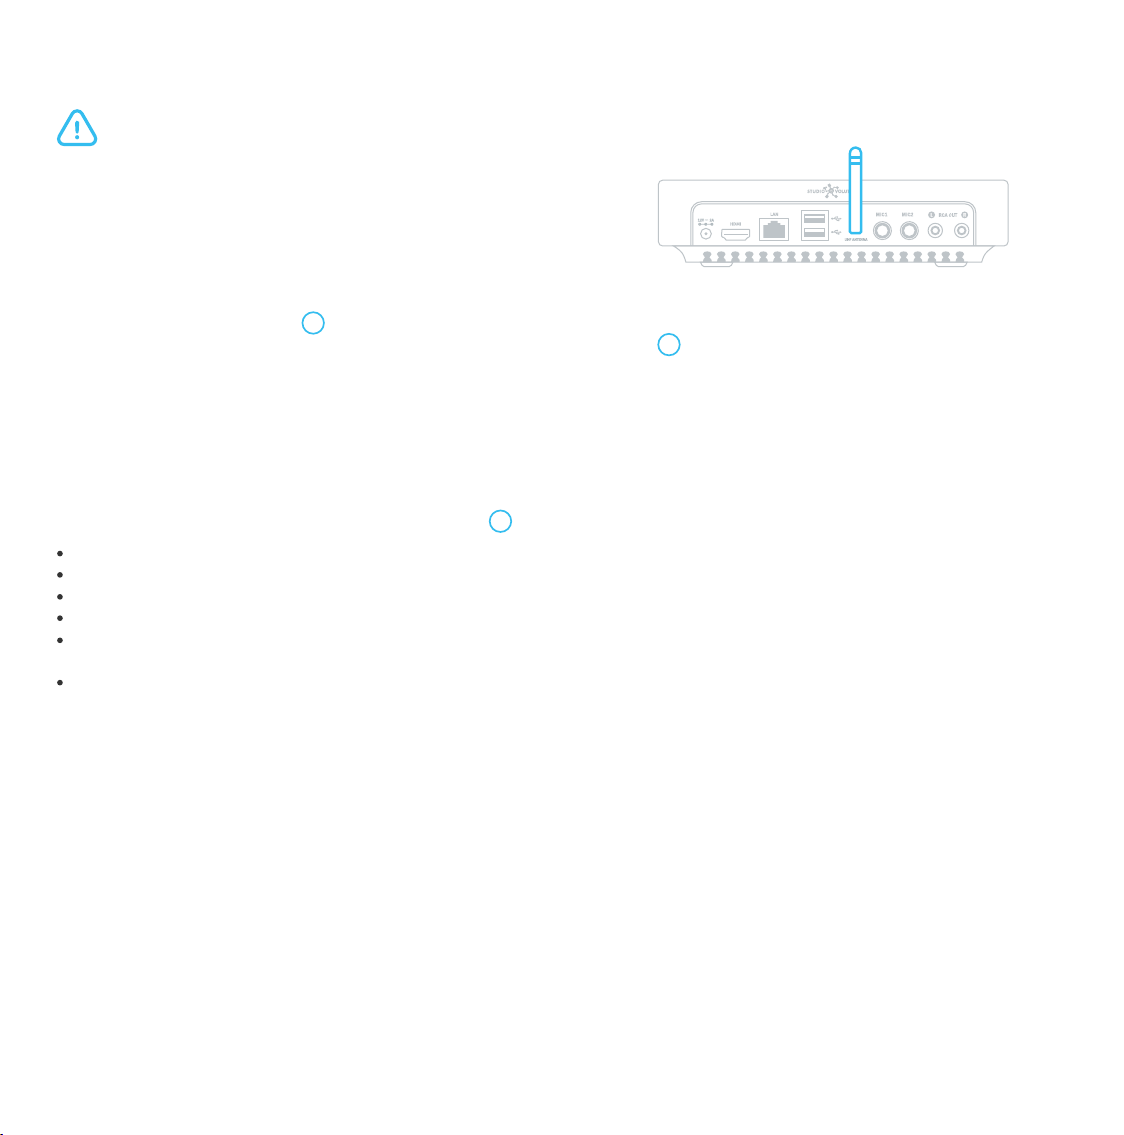
Starting operation
*For efficient and correct microphones operation, the antenna should be installed vertically, and the karaoke system should be placed at least 0.5 meters away
from walls, floor, and metal surfaces.
Connect the supplied antenna to the UHF ANTENNA socket at the
back panel of the karaoke system*.
1.
Connect the karaoke system to the mains.2.
Unscrew the protective cap 3on the microphone and place the battery with the pole "+" downward. Screw the
cap back and switch the microphone on by pressing the "Button Switch" 1briefly. Repeat the same for the
Microphone 2.
3.
The microphones are now ready for use.
Before starting, make sure the karaoke system is unplugged.
A brief press switches the microphone on.
A brief press with the microphone on switches the microphone to the "MUTE" mode.
3 brief presses with the microphone on switch it to the channel-changing mode.
A long press (~2 sec) switches the microphone off.
A prolonged press (~ 6 sec) with the microphone off switches it to the mode of the microphone interfacing with the
karaoke system.
A very long press (~10 sec) with the microphone off changes the microphone number.
Microphone control with the "Button Switch" 1:
Recommendations
We recommend that you follow the rules below:
Hold a microphone in its middle. If you hold it at its lower part, you interfere with its built-in antennas.
Keep the microphone in the almost horizontal, slightly downward position.
Direct the sound to the center of the microphone membrane.
Do not move the microphone toward the loudspeakers.
The best distance between the microphone and your lips is 2-5 cm.
Bring the microphone closer to your lips several seconds before you start singing to ensure the first phrase is
complete.
Mute your microphone when it is not in use.
1.
2.
3.
4.
5.
6.
7.
To connect the microphone to the karaoke system, follow the steps below:
Make sure the microphone accumulator is properly placed and charged.
Open the karaoke system settings and go to the "Audio" section.
Select "Microphones", subsection "Connection".
Follow the tips on the display.
1.
2.
3.
4.
Connection
When the microphone is on, press the "Button Switch" 1for 10 seconds. Once the microphone number is changed,
connect the microphone to the karaoke system.
Changing the microphone number 6
Each microphone has 16 connection channels. To switch to the channel changing mode, Switch the microphone on
and press the "Button Switch" 1three times. The microphone will display the sign . A brief press of the "Button
Switch" changes the current channel number. Once the channel is selected, the microphone will exit this mode
automatically after 5 seconds.
Changing microphone channel 7
Learn more about EVOBOX microphones at support.studio-evolution.com.
The exterior of the device can differ from what it is in this manual.
Microphone connection
The microphone signal receiver is integrated into the
karaoke system
Transmission of digitized sound
Maximum noise immunity
Dynamic microphone type
Digital audio processing sampling frequency 48 kHz
Ultra-short audio latency
Frequency response: 30 – 20000 Hz
Setting up with one button, placed on the
microphone
High-capacity lithium batteries are charged without
removing them from the microphone
Battery level monitoring on both microphone display
and TV screen
Working time after a full charge — over 10 hours
Operational distance — up to 30 m
SE 201D Advantages
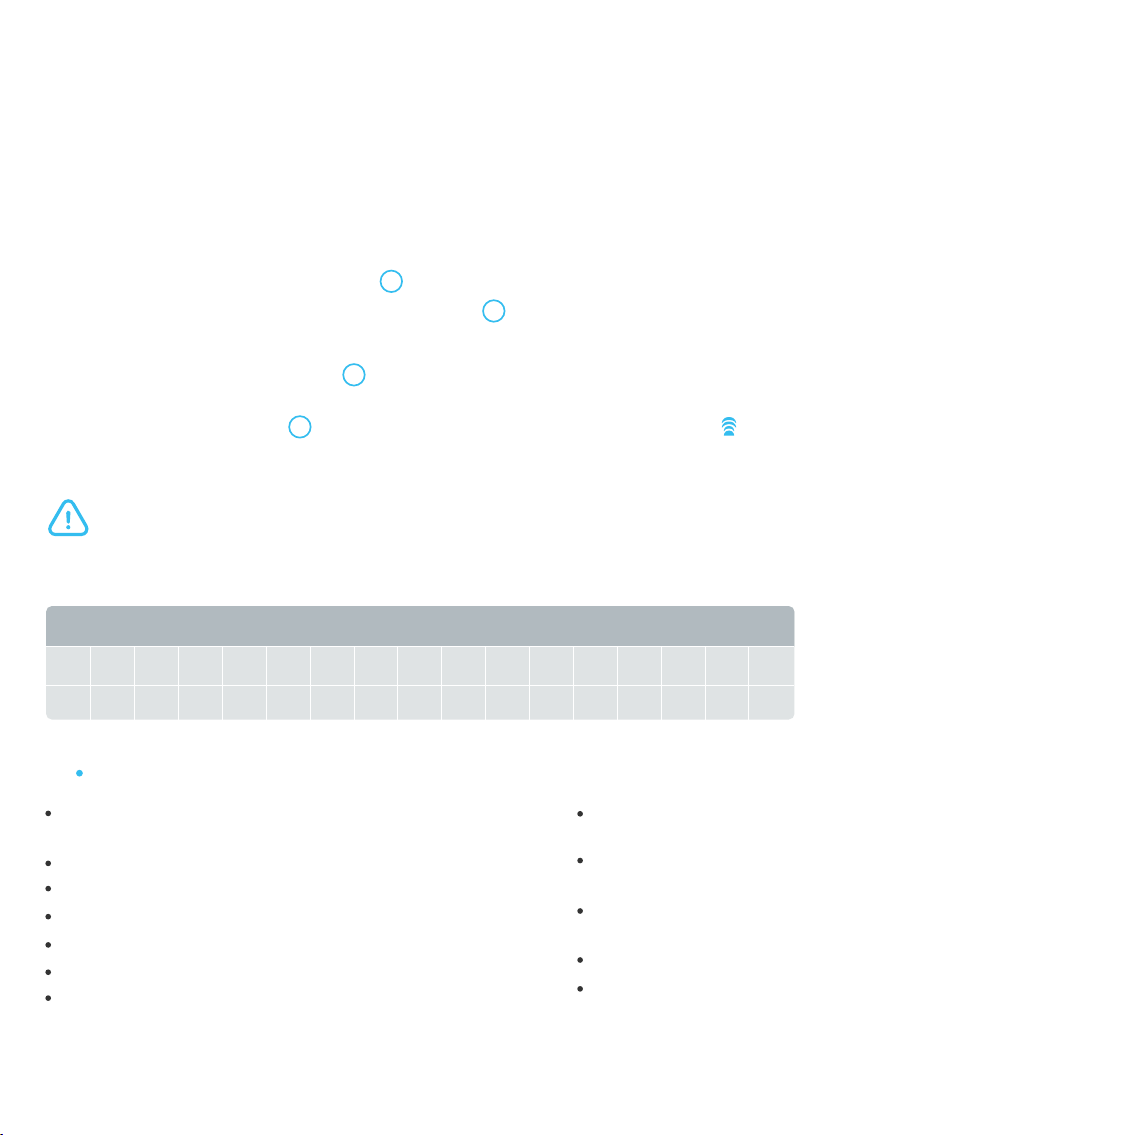
Table of useful frequencies, MHz
CH
MIC 1
MIC 2
01
661.500 662.300 663.100 663.900 664.700 665.500 666.300 667.100 667.900 668.700 669.500 670.300 671.100 671.900 671.700 673.500
676.500 677.300 678.100 678.900 679.700 860.500 681.300 682.100 682.900 683.700 684.500 685.300 686.100 686.900 687.700 688.500
02 03 04 05 06 07 08 09 10 11 12 13 14 15 16
IMPORTANT NOTICE! To ensure the connection to the karaoke system, change the channels when EVOBOX is on, and the microphone
is connected to the karaoke system.
Table of contents
Other Studio Evolution Karaoke System manuals


