Suavinex Link Electric Milk Pump User manual

manual de instrucciones
instruction manual
manuel d’instructions
manuale d’istruzioni
gebrauchsanweisungen
manual de instruções
uživatelský manuál
manuál pre používateľov
руководство по эксплуатации
brugermanual
gebruikshandleiding
ΕγχΕιριδιο χρησησ
kullanim kilavuzu
ES
EN
FR
IT
DE
PT
CS
SK
RU
DA
NL
EL
TR
AR
24 - 31
32 - 39
40 - 47
48 - 55
56 - 63
64 - 71
72 - 79
80 - 87
88 - 95
96 - 103
104 - 111
112 - 119
120 - 127
128 - 135

EN: SAFETY ADVICE
- Only use the breast pump for its intended purpose and follow
the instructions in this manual.
- This product is not a toy. Keep out of reach of children. It must
NOT be used by children, people with impaired physical, sensory
or mental capabilities or people with learning diculties, unless
they are supervised or have been properly informed about
how to handle the product correctly and they are aware of the
potential hazards. It must be used, cleaned and maintained by
an adult.
- Check that the voltage is compatible with the power adapter or,
if using batteries, always use appropriate batteries.
- Only use the power adapter supplied with the product.
- After using it, always switch o the breast pump and unplug it
from the mains.
- Never use the breast pump while bathing or under any
other conditions where it could get wet, e.g. in the vicinity of
vaporisers, sprinklers, sprays, etc.
- Should it accidentally fall into a liquid, always ensure that the
breast pump is unplugged before trying to take it out.
- Keep the cables away from heat sources.
- Do not expose the breast pump to very high temperatures or to
direct sunlight.
-Siga las instrucciones de mantenimiento
-Los aparatos electrónicos no deben ser desechados como
basura doméstica. Por favor, recuerde que existe una legislación
local a este respecto: el consumidor tiene la obligación de llevar
los aparatos electrónicos al nal de su vida útil a un punto limpio/
punto de reciclaje.
-El embalaje es reciclable. Reciclando y reutilizando materiales
está ayudando al medio ambiente.
-Las pilas y baterías hay que sacarlas del aparato antes
de desecharlo. Tírelas por separado a su correspondiente
contenedor, y no como basura doméstica por favor. Tenga en
cuenta su legislación local a este respecto. Cuidemos el medio
ambiente.
ES / EN - 3
ES: CONSEJOS DE SEGURIDAD
- Utilice el extractor únicamente para el uso para el que ha sido
diseñado y siguiendo las instrucciones de este manual.
-Este producto no es un juguete. Mantener fuera del alcance de
los niños. No permita que los niños jueguen con el aparato. NO
debe ser utilizados por niños, por personas cuyas capacidades
físicas, sensoriales o psíquicas estén reducidas o por personas
con algún tipo de dicultad de aprendizaje, a no ser que estén
supervisados o se les haya dado información previa sobre el
correcto manejo del producto y estén al corriente de los posibles
peligros. Tanto su uso, como limpieza y mantenimiento deben ser
llevados a cabo por un adulto.
- Compruebe que la tensión de corriente es compatible con
el adaptador de red o, en su caso, utilice siempre las pilas
adecuadas.
- Utilice sólo el adaptador eléctrico que viene con el producto.
- Después de utilizarlo, apague siempre el extractor y
desenchúfelo de la red eléctrica.
- Nunca utilice el extractor mientras se baña o en cualquier
otra condición de humedad elevada: en la proximidad de
vaporizadores, aspersores, pulverizadores…
- En caso de caída accidental dentro de un líquido, asegúrese
siempre de que el extractor está desenchufado antes de intentar
extraerlo.
- Mantenga los cables alejados de fuentes de calor.
- No exponga el extractor a temperaturas muy elevadas ni a la luz
directa del sol.
- No abra ni intente reparar por sí mismo las partes eléctricas.
Utilice un servicio de reparación autorizado (Laboratorios
Suavinex).
- No utilice el extractor si observa daños en los cables o en las
partes eléctricas, ni si estos han caído al agua o han estado
sumergidos en un líquido.
- No intente retirar el extractor del pecho mientras esté en
funcionamiento. Apáguelo antes de retirarlo.
- No utilice nunca agua ni líquidos para la limpieza de las partes
eléctricas del extractor: bomba eléctrica, adaptador de red,
cables…
- Siempre retire el extractor del pecho rompiendo el vacío creado:
apriete el pecho con el dedo por debajo de la campana; de este
modo entrará aire entre la campana y el pecho y el vacío se
romperá.
-Si no va a usar las pilas es recomendable quitarlas del aparato.

FR: CONSEILS DE SÉCURITÉ
- Utilisez le tire-lait uniquement pour l’usage pour lequel il a été
conçu et en suivant les instructions de ce manuel.
-Ce produit n’est pas un jouet. Tenir à l’écart des enfants. Il NE
doit PAS être utilisé par des enfants, des personnes dont les
capacités physiques, sensorielles ou psychiques sont réduites,
ou par des personnes ayant des dicultés d’apprentissage, sauf
si elles sont supervisées ou ont été formées au préalable, sur
l’utilisation correcte du produit et sont au courant des dangers
possibles. Son utilisation, son nettoyage et sa maintenance
doivent être eectués par un adulte.
- Vérier que la tension de courant est compatible avec
l’adaptateur de réseau ou utilisez toujours les piles appropriées.
- Utilisez uniquement l’adaptateur électrique fourni avec le
produit.
- Après utilisation, éteignez toujours le tire-lait et débranchez-le
du réseau électrique.
- N’utilisez jamais le tire-lait pendant le bain ou dans toute
autre situation d’humidité élevée : à proximité de vaporisateurs,
asperseurs, pulvérisateurs, etc.
- En cas de chute accidentelle dans un liquide, assurez-vous que
le tire-lait est débranché avant de le retirer.
- Maintenez les câbles à l’écart de sources de chaleur.
- N’exposez pas le tire-lait à des températures très élevées ni à la
lumière du soleil.
- N’ouvrez pas et n’essayez pas de réparer vous même les
parties électriques. Faites appel à un service de réparation
autorisé. (Suavinex)
- N’utilisez pas le tire-lait si vous observez des dommages
sur les câbles ou sur les parties électriques, ni si ceux-ci sont
tombés ou ont été immergés dans un liquide.
- N’essayez pas de retirer le tire-lait pendant qu’il est marche.
Éteignez-le avant de le retirer.
- N’utilisez jamais d’eau ni de liquides pour le nettoyage des
parties électriques du tire-lait: pompe électrique, adaptateur de
réseau, câbles, etc.
- Retirez toujours le tire-lait du sein en cassant le vide créé :
appuyez sur le sein avec le doigt, sous la coquille. Ainsi, l’air
entrera entre la coquille et le sein, et le vide se cassera.
- Si vous n’allez pas utiliser les piles, il est recommandé de les
retirer de l’appareil.
- Suivez les instructions de maintenance
EN / FR - 5
- Do not open it or try to repair the electrical components
yourself. Use an authorised repair service. (Suavinex)
- Do not use the breast pump if you notice any damage to
cables or electrical components, or if they have fallen in water
or been submerged in a liquid.
- Do not try to detach the breast pump while in use. Switch it
o before removing it.
- Never use water or liquids to clean the electrical components
of the breast pump: pump unit, power adapter, cables, etc.
- Always detach the pump from the breast by breaking the
suction. To do this press the breast and insert a nger under the
breastshield, thus letting air in and breaking the vacuum.
- If you are not intending to use batteries, it is advisable to
remove them from the pump unit.
-Follow the maintenance instructions.
-Do not forget to use designated recycling points to dispose of
electrical equipment. WEEE explanation: Please remember to
respect the local regulations: hand in the non-working electrical
equipments to an appropriate waste disposal centre.
-The packaging material is recyclable. Dispose of the packaging
in an environmentally friendly manner and make it available for
the recyclable material collection-service.
-Batteries should be removed from the appliance before
disposing of it. Please dispose of them separately in the
corresponding container, and not as household waste. Bear in
mind the local regulations that apply. Please help look after the
environment.

- Tenere i cavi lontano da fonti di calore.
- Non esporre il tiralatte a temperature molto elevate, né alla
luce solare diretta.
- Non smontare, né tentare di riparare autonomamente i
componenti elettrici. Contattare il servizio tecnico autorizzato
(Suavinex).
- Non utilizzare il tiralatte in caso si osservino danni ai cavi o
alle parti elettriche, né se questi sono caduti in acqua o sono
stati immersi in un liquido.
- Non rimuovere il tiralatte mentre è in funzione. Spegnerlo
prima di rimuoverlo.
- Non utilizzare acqua, né liquidi per la pulizia delle parti
elettriche del tiralatte: pompetta elettrica, adattatore di rete,
cavi…
- Rimuovere sempre il tiralatte dal seno interrompendo il
vuoto d’aria creato: stringere il seno con il dito nella parte
inferiore della campana; in questo modo entrerà aria tra la
campana e il seno interrompendo il vuoto d’aria.
-Se non si utilizzano le pile, si consiglia di rimuoverle
dall’apparecchio.
- Seguire le istruzioni di manutenzione.
- Gli apparecchi elettronici non devono essere smaltiti con
i riuti domestici. Si prega di tenere presente che esiste una
legislazione locale in materia: il consumatore ha l’obbligo di
smaltire gli apparecchi elettronici, alla ne della loro vita utile,
in un punto di raccolta/ecocentro.
- L’imballaggio è riciclabile. Riciclando e riutilizzando i
materiali, sta proteggendo l’ambiente.
- Rimuovere le pile e le batterie dall’apparecchio prima di
smaltirlo. Smaltirle separatamente utilizzando l’apposito
contenitore e non come riuti domestici. Rispettare la
legislazione locale in materia. Tutelare l’ambiente.
FR / IT - 7
- Les appareils électroniques ne doivent pas être jetés avec les
ordures ménagères. N’oubliez pas qu’il existe une législation
locale à ce sujet : le consommateur a l’obligation d’emporter les
appareils électroniques à un centre de tri sélectif à la n de leur vie
utile.
- L’emballage est recyclable. En recyclant et en réutilisant les
matériaux, vous aidez l’environnement.
- Avant de mettre l’appareil au rebut, retirez les piles et batteries.
Jetez-les dans les conteneurs correspondants, et non pas avec
les ordures ménagères. Observez la législation locale à ce sujet.
Prenons soin de l’environnement.
IT: CONSIGLI DI SICUREZZA
- Utilizzare il tiralatte per il solo uso a cui è stato destinato e
seguendo le istruzioni contenute in questo manuale.
-Questo prodotto non è un giocattolo. Tenere fuori dalla portata
dei bambini. NON dev’essere utilizzato da bambini, da persone
le cui capacità siche, sensoriali o psichiche siano ridotte o da
persone con un qualsiasi tipo di dicoltà di apprendimento,
salvo che siano sotto supervisione, siano state loro fornite le
informazioni preliminari sulla corretta manipolazione del prodotto
e siano state messe al corrente dei possibili rischi. Sia l’uso,
sia la pulizia e la manutenzione, devono essere eettuati da un
adulto.
- Vericare che il voltaggio della corrente sia compatibile con
l’adattatore di rete o, se del caso, utilizzare sempre le pile
adeguate.
- Utilizzare esclusivamente l’adattatore di rete compreso nella
confezione.
- Dopo l’uso, spegnere sempre il tiralatte e disconnetterlo dalla
rete elettrica.
- Non usare il tiralatte durante il bagno o in qualunque altro
ambiente con umidità elevata: in prossimità di vaporizzatori,
aspersori, polverizzatori…
- In caso di caduta accidentale in un liquido, assicurarsi che
il tiralatte sia stato disconnesso dalla rete elettrica prima di
procedere al recupero.

- Schalten Sie das Gerät vor dem Verstauen aus.
- Verwenden Sie niemals Wasser oder Flüssigkeit, um die
elektrischen Teile der Pumpe zu reinigen. Stromadapter,
Kabel....
- Entfernen Sie immer den Trichter durch Abbrechen des
Vakuums: drücken Sie die Brust mit dem Finger unterhalb des
Trichters; dadurch dringt die Luft zwischen den Trichter und
die Brust und das Vakuum löst sich auf.
- Sollten Sie die Batterien nicht verwenden, wird empfohlen,
diese vom Gerät zu entfernen.
- Befolgen Sie die Wartungsanleitungen.
- Vergessen Sie nicht, die Recyclingstellen zu benutzen, wenn
Sie das Gerät wegwerfen. Elektronik und elektronische Geräte
dürfen nicht mit dem Hausmüll gleich behandelt werden.
Nach dem Gesetz haben Verbraucher die Verpicht, Elektronik
und elektronische Geräte am Ende ihrer Lebensdauer an
den öentlichen Sammelstellen oder an die Verkaufstelle
zurückzubringen. Detailierte Information sehen Sie bitte das
nationale Recht des jeweiligen Landes.
- Das Symbol, die Anleitung und die Verpackung vom Produkt
zeigt, dass es sich der Regulierung unterwirft. Durch Recycling
und Wiederverwendung der Materialien oder anderen Formen
der Verwertung von älteren Geräten leisten Sie einen wichtigen
Beitrag zum Schutz unserer Umwelt.
-Akkus und Batterien sind vor der Entsorgung des Gerätes zu
entnehmen und getrennt vom Gerät zu entsorgen. Im Sinne
des Umweltschutzes dürfen Batterien und Akkus nicht über
den normalen Hausmüll entsorgt werden, sondern müssen an
entsprechenden Sammelstellen abgegeben werden. Beachten
Sie ausserdem die geltenden gesetzlichen Regelungen zur
Batterieentsorgung.
DE - 9
DE: SICHERHEITSEMPFEHLUNGEN
- Verwenden Sie den Absaugtrichter ausschließlich für den
angegebenen Zweck und gemäß den Gebrauchsanweisungen.
-Dieses Produkt ist kein Spielzeug. Außerhalb der Reichweite
von Kindern aufbewahren. Das Gerät sollte NICHT von
Kindern benutzt werden oder von Personen mit körperlicher,
sinnlicher oder psychischer Behinderung oder von Personen
mit Lernschwierigkeiten, es sei denn sie werden beaufsichtigt
oder sie wurden über den korrekten Umgang mit dem Produkt
informiert und sind sich der möglichen Gefährdung bewußt.
Sowohl die Nutzung als auch die Reinigung und Pege des
Geräts sind von einem Erwachsenen vorzunehmen.
- Kinder sollen nicht mit dem Gerät spielen.
- Reinigung und Wartung dürfen nicht von Kindern ohne
Aufsicht durchgeführt werden.
- Vergewissern Sie sich, dass die Stromspannung und der
Adapter kompatibel sind, oder nutzen Sie gegebenenfalls die
dafür vorgesehenen Batterien.
- Verwenden Sie ausschließlich den Stromadapter, der mit dem
Produkt geliefert wird.
- Schalten Sie nach dem Gebrauch die Pumpe immer aus, und
ziehen Sie das Kabel aus dem Stecker.
- Benutzen Sie die Pumpe niemals beim Baden oder
unter starken feuchten Bedingungen, d.h. in der Nähe von
Zerstäuber, Sprinkler, Besprüher.....
- Sollte das Gerät durch Unfall in eine Flüssigkeit fallen,
vergewissern Sie sich, dass die Pumpe nicht mehr an
das Stromnetz angeschlossen ist, bevor Sie das Gerät
herausnehmen.
- Lassen Sie die Pumpe außerhalb der Reichweite von Kindern
und insbesondere, erlauben Sie nicht, dass diese damit spielen.
- Bewahren Sie die Kabel nicht in der Nähe von Wärmequellen.
- Setzen Sie die Pumpe nicht hohen Temperaturen oder direkt
der Sonne aus.
- Versuchen Sie nicht, eigenhändig elektrische Teile zu zerlegen
oder zu reparieren. Verwenden Sie einen zugelassenen
Reparaturservice (Suavinex).
- Verwenden Sie die Pumpe nicht, wenn sie defekte Kabel oder
Elektroteile feststellen oder, wenn diese ins Wasser gefallen
sind oder in Flüssigkeit getaucht wurden.
- Versuchen Sie den Absaugtrichter nicht während des
Betriebes zu entfernen.

CS: SKLADOVÁNÍ ODSÁTÉHO MLÉKA
- Odsávačku používejte výhradně k účelům, kle kterým byla
navržena a při dodržení pokynů uvedených v tomto manuálu.
-Tento spotřebič není hračka. Udržujte mimo dosah dětí.
Přístroj NESMÍ být používán dětmi, osobami se sníženými
fyzickými, smyslovými či psychickými schopnostmi nebo
osobami se zhoršenou schopností chápání bez dohledu
nebo bez předběžného poskytnutí dostatečných informací o
správném fungování zařízení a možných rizicích vyplývajících
z jeho nesprávného provozu. Použití, čištění a údržba musí být
provedeny dospělou osobou.
- Ujistěte se, že je elektrický adaptér kompatibilní s Vaší
elektrickou instalací , v opačném případě použijte vhodné
baterie.
- Používejte výhradně elektrický adaptér dodaný s výrobkem.
- Po použití, odsávačku vždy vypněte a odpojte ze zdroje
elektrického napájení.
- Nikdy nepoužívejte odsávačku při koupeli či v jiných
podmínkách se zvýšenou vlhkostí: V blízkosti vodních
rozprašovačů, odpařovačů apod.
- V případě nechtěného pádu přístroje do kapaliny se, před
jeho vytažením ujistěte, že je přístroj odpojený od elektrického
napájení.
- Os aparelhos eletrónicos não devem ser eliminados como
resíduos domésticos. Por favor, recorde que existe uma
legislação local a este respeito: o consumidor tem a obrigação
de levar os aparelhos eletrónicos no nal da sua vida útil a um
ponto limpo/ponto de reciclagem.
- A montagem é reciclável. Reciclando e reutilizando materiais
está a ajudar o meio ambiente.
- As pilhas e baterias devem ser retiradas do aparelho antes
de o eliminar. Elimine-as por separado no seu contentor
correspondente e não como resíduo doméstico. Ter em conta
a sua legislação local a este respeito. Cuidemos do meio
ambiente.
PT / CS - 11
PT: CONSELHOS DE SEGURANÇA
- Utilize o extrator apenas para o uso para o qual foi desenhado
e seguindo as instruções deste manual.
-Este produto não é um brinquedo. Manter fora do alcance
das crianças. Não deve ser utilizado por crianças, por pessoas
cujas capacidades físicas, sensoriais ou psíquicas estejam
reduzidas ou por pessoas com algum tipo de diculdade de
aprendizagem, a não ser que estejam supervisionadas ou lhes
tenha sido proporcionada informação prévia sobre o correto
manuseamento do produto e estejam ao corrente dos possíveis
perigos. Quer a sua utilização quer a sua limpeza e manutenção
devem ser levadas a cabo por um adulto.
- Comprove que a tensão de corrente seja compatível com o
adaptador de rede ou, se for caso disso, utilize sempre as pilhas
adequadas.
- Utilize apenas o adaptador elétrico que vem com o produto.
- Depois de o utilizar, apague sempre o extrator e desligue-o da
rede elétrica.
- Nunca utilize o extrator enquanto toma banho ou em qualquer
outra condição de humidade elevada: na proximidade de
vaporizadores, aspersores, pulverizadores...
- No caso de queda acidental dentro de um líquido, assegure-
se sempre de que o extrator esteja desligado antes de o tentar
extrair.
- Mantenha os cabos afastados de fontes de calor.
- Não exponha o extrator a temperaturas muito elevadas nem à
luz direta do sol.
- Não abra nem tente reparar por si mesmo as partes elétricas.
Utilize um serviço de reparação autorizado (Suavinex).
- Não utilize o extrator se observar danos nos cabos ou nas
partes elétricas, nem se estes tiverem caído à água ou tiverem
estado submergidos num líquido.
- Não tente retirar o extrator enquanto estiver em funcionamento.
Apague-o antes de o retirar.
- Nunca utilize água ou líquidos para a limpeza das partes
elétricas do extrator: bomba elétrica, adaptador de rede, cabos...
- Retire sempre o extrator do peito rasgando o vácuo criado:
aperte o peito com o dedo por baixo da campanha; deste modo
irá entrar ar entre a campana e o peito e o vácuo irá romper-se.
-Se não for usar as pilhas é recomendável retirá-las do aparelho.
- Siga as instruções de manutenção

- Odsávačku používajte výhradne za účelom ku ktorému bola
navrhnutá a pri dodržaní pokynov uvedených v tomto manuále.
- Tento spotrebič nie je hračka. Udržujte z dosahu detí. Prístroj
NESMIE byť používaný deťmi, osobami so zníženými fyzickými,
zmyslovými či psychickými schopnosťami alebo so zhoršenou
schopnosťou chápania, bez dozoru alebo bez predbežného
poskytnutia dostatočných informácií o správnom fungovaní
zariadenia a možných rizikách vyplývajúcich z jeho nesprávnej
prevádzky. Použitie, čistenie a údržba musí byť vykonané
dospelou osobou.
- Uistite sa, či je elektrický adaptér kompatibilný s Vašou
elektrickou inštaláciou, v opačnom prípade použite adekvátne
batérie.
- Používajte výhradne elektrický adaptér dodaný s výrobkom.
- Po použití, odsávačku vždy vypnite a odpojte zo zdroje
elektrického napájania.
- Nikdy nepoužívajte odsávačku pri kúpeli či v iných
podmienkach so zvýšenou vlhkosťou. V blízkosti vodných
rozprašovačov, odparovačov a podobne.
- V prípade nechceného pádu prístroja do kvapaliny sa.
pred jeho vytiahnutím uistite, či je prístroj odpojený zo zdroja
elektrického napájaní.
- Kabely prístroja udržujte z dosahu zdrojov požiarov.
- Odsávačku nevystavujte vysokým teplotám ani priamemu
slnečnému svetlu.
- Neotvárajte elektrické komponenty prístroja ani sa sami
nepokúšajte o ich opravy. Obráťte sa na autorizovaný servis
(Suavinex).
- Pri prípadnom zistení poškodených kabelov či iných
elektrických komponentov či v prípade, že tieto boli po dlhší čas
ponorené vo vode, odsávačku nepoužívajte.
- Nesnažte sa odsávačku odtrhnúť počas premávky. Pred
odstránením odsávačku vypnite.
- Nepoužívajte vodu ani iné kvapaliny na čistenie elektrických
komponentov prístroja, ako sú: elektrický adaptér, kabely a
podobne.
- Odsávačku odstraňujte z prsu len v okamihu kedy je vákuum
narušené. Pre narušenie vákua stlačte prs najlepšej v oblasti
pod zvonom. Týmto spôsobom môže vstúpiť vzduch a narušiť
vákuum.
- V prípade že batérie nepoužívate, je najlepšie ich z aparátu
vybrať.
CS / SK - 13
- Kabely přístroje udržujte z dosahu zdrojů žáru.
- Odsávačku nevystavujte vysokým teplotám ani přímému
slunečnímu světlu.
- Neotvírejte elektrické součásti přístroje ani se sami
nepokoušejte o jejich opravy. Obraťte se na autorizovaný servis
(Suavinex).
- Při případném zjištění poškozených kabelů či jiných
elektrických komponentů nebo v případě, že tyto byly delší
dobu ponořeny ve vodě, odsávačku nepoužívejte.
- Nesnažte se odsávačku odstranit, je-li v provozu. Před
odstraněním odsávačku vypněte.
- Nepoužívejte vodu ani jiné kapaliny při čištění elektrických
komponentů přístroje, jako jsou: elektrické čerpadlo, elektrický
adaptér, kabely apod.
- Odsávačku odstraňujte z prsu pouze je-li vakuum narušeno.
Pro narušení vakua stiskněte prs nejlépe v oblasti pod zvonem,
čímž umožníte vzduchu dostat se dovnitř a narušit tak vakuum.
- Pokud baterie nepoužíváte, je nejlepší je z aparátu vyndat.
- Držte se pokynů pro údržbu
- Elektronické přístroje by neměly být vyřazovány stejným
způsobem jako komunální odpad. Uvědomte si prosím, že v
tomto ohledu existuje jistá místní legislativa: Spotřebitel je po
vyřazení spotřebičů povinen je zanést na místo určené k jejich
recyklaci.
- Obal výrobku je recyklovatelný. Recyklace materiálů
napomáhá ochraně životního prostředí.
- Před vyřazením je nutné vyjmout z přístroje baterie. Baterie
je nutno vyhodit zvlášť do k tomu účelu určeného kontejneru.
Mějte na paměti relevantní místní legislativu. Chraňme naše
životní prostředí.
насос отключен от сети перед тем как его извлечь.
- Держите провода подальше от источников тепла.
- Не храните сцеживатель при очень высоких температурах
и держите его подальше от прямого солнечного света.
- Не открывайте и не пытайтесь
отремонтировать электрические части прибора.
Пользуйтесь только официальными ремонтными
службами. (Suavinex)
- Не используйте сцеживатель, если вы заметили
повреждение проводом или электрических частей, или,
если они упали в воду или были
- Не пытайтесь отсоединять сцеживатель во время его
работы. Выключите его перед удалением.
- Никогда не используйте воду или любую другую
жидкость для очистки электрических частей сцеживателя:
адаптера питания, проводов ...
- Всегда снимайте сцеживатель с груди, нарушая
созданный вакуум: для этого нужно прижмать грудь
пальцем под воронкой; таким образом, воздух будет
проникать между воронкой и грудью и вакуум нарушится.
- Если вы не используете аппарат, рекомендуется удалить
из него батарейки.
-Следуйте инструкциям по техническому обслуживанию.
-Электронные устройства не должны утилизироваться
как бытовые отходы. Пожалуйста, помните, что в этом
отношении существует местный закон: потребитель
обязан отнести электронное оборудование в конце
срока его полезного использования в центр утилизации /
переработки.
-Упаковка пригодна для переработки. Переработка и
повторное использование материалов помогает сохранить
окружающую среду.
-Батарейки должны быть извлечены из устройства
перед утилизацией. Пожалуйста, выбрасывайте их
отдельно в соответствующий контейнер, а не вместе с
бытовыми отходами. Принимайте во внимание местное
законодательство в этом отношении. Сбережем
окружающую среду.
SK / RU - 15
- Držte sa pokynov pre údržbu.
- Elektronické prístroje by nemali byť vyhadzované rovnakým
spôsobom ako bežný komunálny odpad. Uvedomte si prosím,
že v tomto ohľadu existuje istá miestna legislatíva: Spotrebiteľ
je po vyrazení spotrebičov z prevádzky povinný ich zaniesť na
miesto určené k ich recyklácii.
- Obal výrobka je recyklovateľný. Recyklácia materiálov
napomáha ochrane životného prostredia.
- Pred vyradzením je nutné vybrať baterie z prístroja. Baterie
je nutné vyhodiť samostatne, do k tomu účelu určeného
kontejnera. Majte na pameti relevantnú miestnu legislatívu.
Chráňme naše životné prostredie.
- Используйте вентилятор только в целях, для которых он
предназначен в данном случае и, следуйте инструкциям.
- Этот продукт не является игрушкой. Хранить в недоступном
для детей месте. Устройство не должно использоваться
детьми и людьми, чьи физические, сенсорные или
умственные способности ограничены, или людьми с какими-
то трудностями в обучении, если они не находятся под
контролем или не получили предварительную информацию
о правильном обращении с продуктом, и осведомлены о
возможных опасностях. Чистка и техническое обслуживание
должны выполняться взрослым.
- Убедитесь, что напряжение в сети совместимo с сетевым
адаптером. При необходимости, всегда используйте
соответствующие батарейки.
- Используйте только адаптер питания, который
поставляется вместе с продуктом.
- После использования всегда отключайте сцеживатель
от электросети.
- Никогда не используйте сцеживатель во время купания
или в помещении с повышенной влажностью: в
непосредственной близости от оросителей и опрыскивателей.
- В случае случайного попадания в жидкости, проверьте, что
NL: VEILIGHEIDSTIPS
- Gebruik de borstkolf enkel voor het bedoelde gebruik en in
overeenstemming met de aanwijzingen van deze handleiding.
-Dit product is geen speelgoed. Bewaar buiten het bereik van
kinderen. Dit apparaat mag NIET worden gebruikt door kinderen,
personen met beperkte lichamelijke, zintuiglijke of geestelijke
vermogens of personen met leerstoornissen, tenzij onder
toezicht of na informatie te hebben gekregen over het juiste
gebruik van het product en de eventuele risico’s. Het mag enkel
worden gereinigd en onderhouden door volwassenen.
- Controleer dat de stroomspanning compatibel is met de
netwerkadapter of, in voorkomend geval, gebruik steeds de
juiste batterijen.
- Gebruik enkel de elektrische adapter die bij het product is
geleverd.
- Zet de borstkolf na gebruik steeds uit en trek de adapter uit het
stopcontact.
- Gebruik de borstkolf nooit onder de douche, in het bad
of in andere vochtige omstandigheden: in de buurt van
luchtbevochtigers, sprinklers, stoomapparaten, enz.
- Als u het toestel per ongeluk in een vloeistof laat vallen, trek
dan eerst de adapter uit het stopcontact voordat u de borstkolf
- Følg vedligeholdelsesinstruktionerne
- Elektroniske apparater må ikke kasseres som
husholdningsaald. Husk, at der foreligger lokal lovgivning på
dette område: forbrugeren har pligt til ved udløbet af sådanne
apparaters funktionslevetid at bortskae dem ved at aevere
dem på en dertil egnet genbrugsstation.
- Emballagen er udført i genbrugsmateriale. Ved at genbruge og
genanvende, hjælper man miljøet.
- Tag batterierne ud af apparatet, før det bortskaes. Indlever
batterierne separat til genbrug, og smid dem ikke ud sammen
med husholdningsaaldet. Overhold de lokale bestemmelser.
Pas på miljøet.
DA / NL - 17
- Benyt kun brystpumpen til den brug, den er beregnet til, og følg
anvisningerne i vejledningen.
-Dette produkt er ikke legetøj. Holdes uden for børns
rækkevidde. Dette apparat må IKKE anvendes af børn eller
personer med nedsatte fysiske, sansemæssige eller mentale
evner, eller af personer med indlæringsvanskeligheder,
medmindre de overvåges eller forudgående er blevet instrueret
i anvendelsen af apparatet og er bekendt med de eventuelle
farer forbundet hermed. Såvel anvendelse som rengøring og
vedligeholdelse skal foretages af en voksen.
- Kontroller, at strømspændingen passer til strømnets-adapteren
eller benyt eventuelt altid batterier, der passer til apparatet.
- Benyt kun den elektriske adapter, som leveres sammen med
apparatet.
- Efter brug skal udmalkningsapparatet altid slukkes og frasluttes
el-nettet.
- Brug aldrig brystpumpen, mens du er i bad, eller under
andre forhold med høj fugtighed: i nærheden af for eksempel
fordampere, sprinklere og forstøvere.
- Falder apparatet ved et uheld ned i en væske, skal man altid
sørge for, at brystpumpen er frasluttet strømmen, før man
forsøger at tage den op af væsken.
- Hold kablerne væk fra varmekilder.
- Brystpumpen må ikke udsættes for for høje temperaturer eller
for direkte sollys.
- Forsøg ikke selv at åbne for eller reparere de elektriske dele. Få
apparatet repareret hos en autoriseret serviceafdeling (Suavinex).
- Brug ikke brystpumpen, hvis du har konstateret skader på
kabler eller elektriske dele, eller hvis disse har været faldet ned i
vand eller har ligget nedsunket i en væske.
- Forsøg ikke at fjerne brystpumpen, mens denne arbejder. Sluk
først for apparatet, før du fjerner det.
- Benyt aldrig vand eller væsker til rengøring af brystpumpens
elektriske dele: strøm-adapter, kabler osv.
- Fjern altid brystpumpen fra brystet ved at bryde det skabte
vakuum: tryk på brystet med ngeren under brysttragten;
således kommer der luft ind mellem brysttragten og brystet, og
hermed brydes tomrummet.
- Hvis man ikke benytter batterierne, anbefales det at tage dem
ud af apparatet.
- Χρησιμοποιήστε τη συσκευή αποκλειστικά για τη χρήση για
την οποία σχεδιάστηκε και ακολουθήστε τις οδηγίες αυτού του
εγχειριδίου.
-Αυτό το προϊόν δεν είναι παιχνίδι. Φυλάσσεται μακριά από τα
παιδιά. ΔΕΝ πρέπει να χρησιμοποιείται από παιδιά, άτομα με
μειωμένες φυσικές, αισθητηριακές ή διανοητικές ικανότητες
ή από άτομα με μαθησιακές δυσκολίες, εκτός εάν το κάνουν
υπό επίβλεψη ή έχουν ενημερωθεί προηγουμένως για τον
σωστό χειρισμό του προϊόντος και έχουν επίγνωση των πιθανών
κινδύνων. Τόσο η χρήση της συσκευής, όσο και ο καθαρισμός και
η συντήρησή της πρέπει να γίνονται από κάποιον ενήλικο.
- Βεβαιωθείτε ότι η τάση ρεύματος είναι συμβατή με τον
προσαρμογέα ρεύματος ή, κατά περίπτωση, χρησιμοποιήστε τις
κατάλληλες μπαταρίες.
- Χρησιμοποιήστε μόνο τον ηλεκτρικό προσαρμογέα που σας
χορηγείται με το προϊόν.
- Μετά τη χρήση, να σβήνετε πάντοτε τη συσκευή και να την
αποσυνδέετε από το ηλεκτρικό ρεύμα.
- Μην χρησιμοποιείτε ποτέ τη συσκευή όταν κάνετε μπάνιο ή
σε πολύ υγρό περιβάλλον: κοντά σε βαποριζατέρ, εκτοξευτές
νερού, ψεκαστήρες, κλπ.
- Σε περίπτωση που η συσκευή πέσει κατά λάθος μέσα σε κάποιο
υγρό, πριν προσπαθήστε τη βγάλετε, βεβαιωθείτε ότι έχει βγεί
από την πρίζα.
- Τα καλώδια δεν πρέπει να βρίσκονται κοντά σε πηγές
θερμότητας.
- Μην εκτίθετε τη συσκευή σε υψηλές θερμοκρασίες ή στον ήλιο.
- Μην προσπαθήσετε να διορθώσετε μόνοι σας τα ηλεκτρικά
μέρη. Ανατρέξτε στο εξουσιοδοτημένο τεχνικό προσωπικό
(Suavinex).
- Μην χρησιμοποιήσετε τη συσκευή εάν παρατηρήσετε φθορές
στα καλώδια ή τα ηλεκτρικά μέρη, καθώς επίσης και αν αυτά
έχουν πέσει στο νερό ή σε κάποιο υγρό.
- Μην προσπαθήσετε να σβήσετε τη συσκευή όταν βρίσκεται σε
λειτουργία. Σβήστε την πριν την αποσυνδέσετε από το ηλεκτρικό
ρεύμα.
- Μην χρησιμοποιείτε ποτέ νερό ή άλλα υγρά για τον καθαρισμό
των ηλεκτρικών μερών της συσκευής: προσαρμογέα ρεύματος,
καλώδια, κλπ. …
- Αφαιρέστε το θήλαστρο πιέζοντας με το δάχτυλο το στήθος
σας κάτω από τη χοάνη· με αυτό τον τρόπο θα εισέλθει αέρας
NL / EL - 19
uit de vloeistof haalt.
- Houd de kabels uit de buurt van warmtebronnen.
- Stel de borstkolf niet bloot aan erg hoge temperaturen of
rechtstreeks zonlicht.
- Open de elektrische onderdelen niet en probeer deze niet zelf
te repareren. Neem contact op met een erkende reparatiedienst
(Suavinex)
- Gebruik de borstkolf niet als u schade aan de kabels of
de elektrische onderdelen vaststelt, of als deze in water zijn
gevallen of zijn ondergedompeld in een vloeistof.
- Probeer de borstkolf niet van de borst te halen terwijl deze in
werking is. Zet het toestel uit voordat u het wegneemt.
- Gebruik nooit water of vloeistoen om de elektrische
onderdelen van de borstkolf te reinigen: elektrische pomp,
netwerkadapter, kabels, enz.
- Haal de borstkolf steeds van de borst door het gecreëerde
vacuüm te doorbreken: druk met een vinger op de bost
onder het borstschild; op die manier komt er lucht tussen het
borstschild en de borst en wordt het vacuüm doorbroken.
-Als u de batterijen niet gebruikt, is het raadzaam deze uit het
toestel te verwijderen.
- Volg de onderhoudsaanwijzingen.
- Elektronische toestellen mogen niet bij het huishoudelijk
afval worden gegooid. Gelieve er rekening mee te houden dat
hiervoor plaatselijke voorschriften gelden: de consument is
verplicht elektronische toestellen na aoop van de levensduur
naar een inzamelpunt te brengen voor recycling.
- De verpakking is recyclebaar. Door materialen te recyclen en
te hergebruiken, draagt u bij tot het behoud van het milieu.
- Haal de batterijen uit het toestel voordat u het afdankt.
Gelieve ze in een hiertoe bestemde afvalbak te doen en niet bij
het huisvuil te gooien. Neem uw plaatselijke wetgeving op dit
gebied in acht. Draag zorg voor het milieu.

koşulları altında asla kullanmayın: buhar cihazları, süzgeçler,
pulverizatörler…
- Bir sıvı içerisine kazara düşürülmesi halinde, sıvının içerisinden
almadan önce süt sağma cihazının elektrikle olan bağlantısının
kesilmiş olduğunu daima kontrol edin.
- Kabloları ısı kaynaklarından uzak tutun.
- Süt sağma cihazını aşırı yüksek sıcaklıklara veya doğrudan güneş
ışığına maruz bırakmayın.
- Elektrikli parçaların içini açmayın veya bunları kendiniz onarmaya
teşebbüs etmeyin. Yetkili bir tamir servisi kullanın (Suavinex).
- Kabloların veya elektrikli parçaların üzerinde hasar gözlenmesi,
suya düşmüş olmaları veya bir sıvıya batırılmaları halinde süt
sağma cihazını kullanmayın.
- Çalışma halinde iken süt sağma cihazını memeden ayırmayı
denemeyin. Memeden ayırmadan önce cihazı kapatın.
- Süt sağma cihazının aşağıdaki elektrikli parçalarının temizliği için
asla su veya sıvıları kullanmayın: ağ adaptörü, kablolar…
- Daima oluşmuş olan hava boşluğunu ortadan kaldırarak
süt sağma cihazını memeden ayırın: başlık kısmının altından
parmağınızla memeye bastırın; bu sayede başlık kısmı ile meme
arasına hava girer ve hava boşluğu alınır.
- Eğer pilleri kullanmayacaksanız, bunları cihazdan çıkarmanız
tavsiye edilir.
- Bakım talimatlarını uygulayın.
- Elektronik cihazlar normal evsel atıklar gibi elden çıkarılmamalıdır.
Lütfen, bu konu ile ilgili yerel bir yasa veya yönetmelik mevcut
olması halinde tüketicinin, kullanım ömrü sona eren elektronik
cihazları bir temiz noktaya/yeniden dönüşüm noktasına teslim
etme zorunluluğu bulunduğunu unutmayın.
- Ambalaj yeniden dönüştürülebilir özelliktedir. Malzemeleri
yeniden dönüştürerek ve yeniden kullanarak, doğal çevreye
yardımcı olmaktasınız.
- Cihazın bertaraf edilmesinden önce, pillerin ve bataryaların
cihazdan çıkarılması gerekmektedir. Lütfen bunları ilgili atık
kutularına ayrı olarak atın ve evsel atıklarla birlikte bertaraf etmeyin.
Bununla ilgili yerel yönetmelikleri göz önünde bulundurun. Doğal
çevreyi koruyalım.
EL / TR - 21
μεταξύ χοάνης και στήθους και θα σπάσει το κενό που έχει
δημιουργηθεί.
- Εάν δεν χρησιμοποιήσετε τις μπαταρίες σας συνιστούμε να τις
αφαιρέσετε από τη συσκευή.
- Ακολουθήστε τις οδηγίες χρήσης και συντήρησης.
- Οι ηλεκτρονικές συσκευές δεν πρέπει να απορρίπτονται ως
οικιακά απορρίμματα. Σας υπενθυμίζουμε την ύπαρξη της
σχετικής νομοθεσίας: με τη λήξη του ωφέλιμου βίου τους,
ο καταναλωτής υποχρεούται να μεταφέρει τις ηλεκτρονικές
συσκευές στο ειδικό σημείο / κάδο ανακύκλωσης.
- Η συσκευασία είναι ανακυκλώσιμη. Η ανακύκλωση και
επαναχρησιμοποίηση των υλικών συμβάλλει στην προστασία
του περιβάλλοντος.
- Πριν πετάξετε τη συσκευή πρέπει να αφαιρέσετε τις
μπαταρίες. Παρακαλούμε να τις πετάξετε ξεχωριστά στο
ειδικό δοχείο απορριμμάτων, και όχι στο δοχείο οικιακών
απορριμμάτων. Λάβετε υπόψη σας την σχετική τοπική
νομοθεσία. Φροντίζουμε το περιβάλλον.
- Süt sağma cihazını yalnızca üretici tarafından amaçlanmış olduğu
şekliyle ve bu kılavuzdaki talimatları izleyerek kullanın.
-Bu ürün bir oyuncak değildir. Çocuklardan uzak tutunuz.
Denetim altında değillerse, veya önceden cihazın doğru kullanımı
konusunda bilgilendirilmemişlerse ve meydana gelebilecek
tehlikeler konusunda bilgi sahibi değillerse, çocuklar tarafından,
ziksel veya zihinsel olarak engelli olan veya öğrenme güçlüğü olan
kişiler tarafından kullanılmamalıdır. Kullanımı, temizliği ve bakımı bir
yetişkin tarafından gerçekleştirilmelidir.
- Elektrik voltajının elektrik şebekesindeki voltajla uyumlu olduğunu
kontrol edin veya uygun piller kullanmaya özen gösterin.
- Yalnızca ürünle birlikte sunulan adaptörü kullanın.
- Kullandıktan sonra, daima süt sağma cihazını kapatın ve şini
elektrik prizinden çekin.
- Süt sağma cihazını, yüzerken veya diğer yüksek nem
AR - 23
:AR
)Suavinex

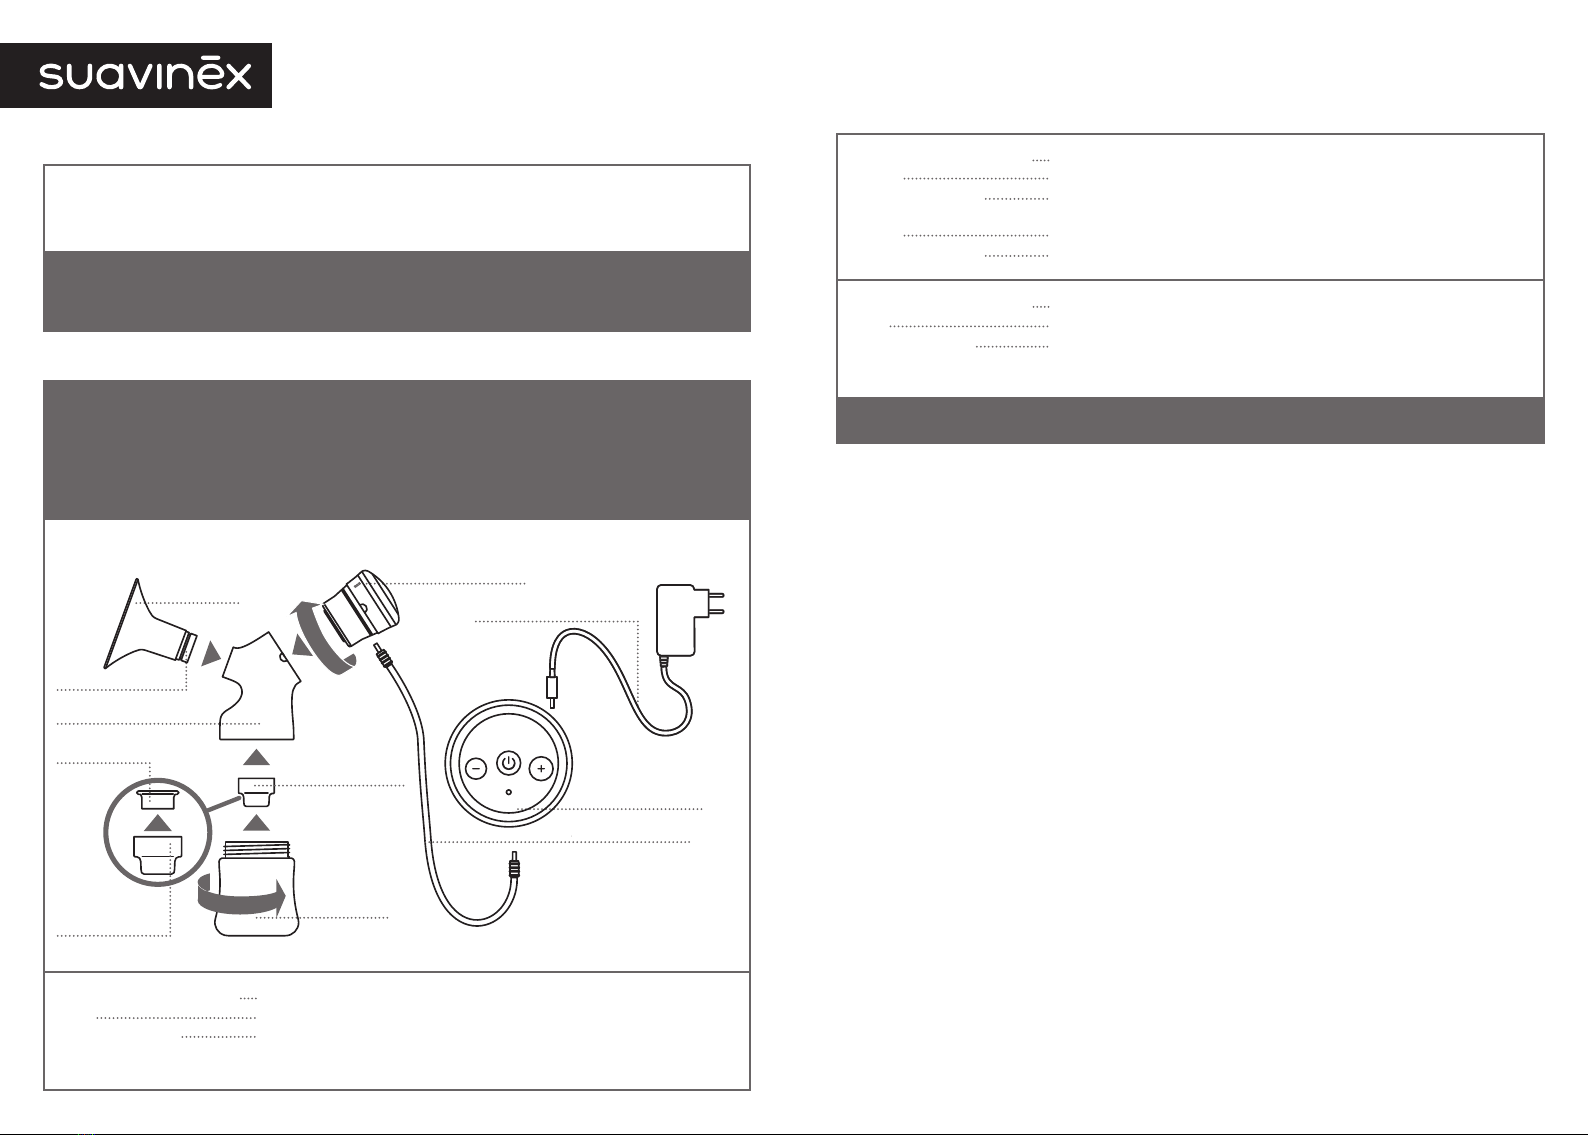
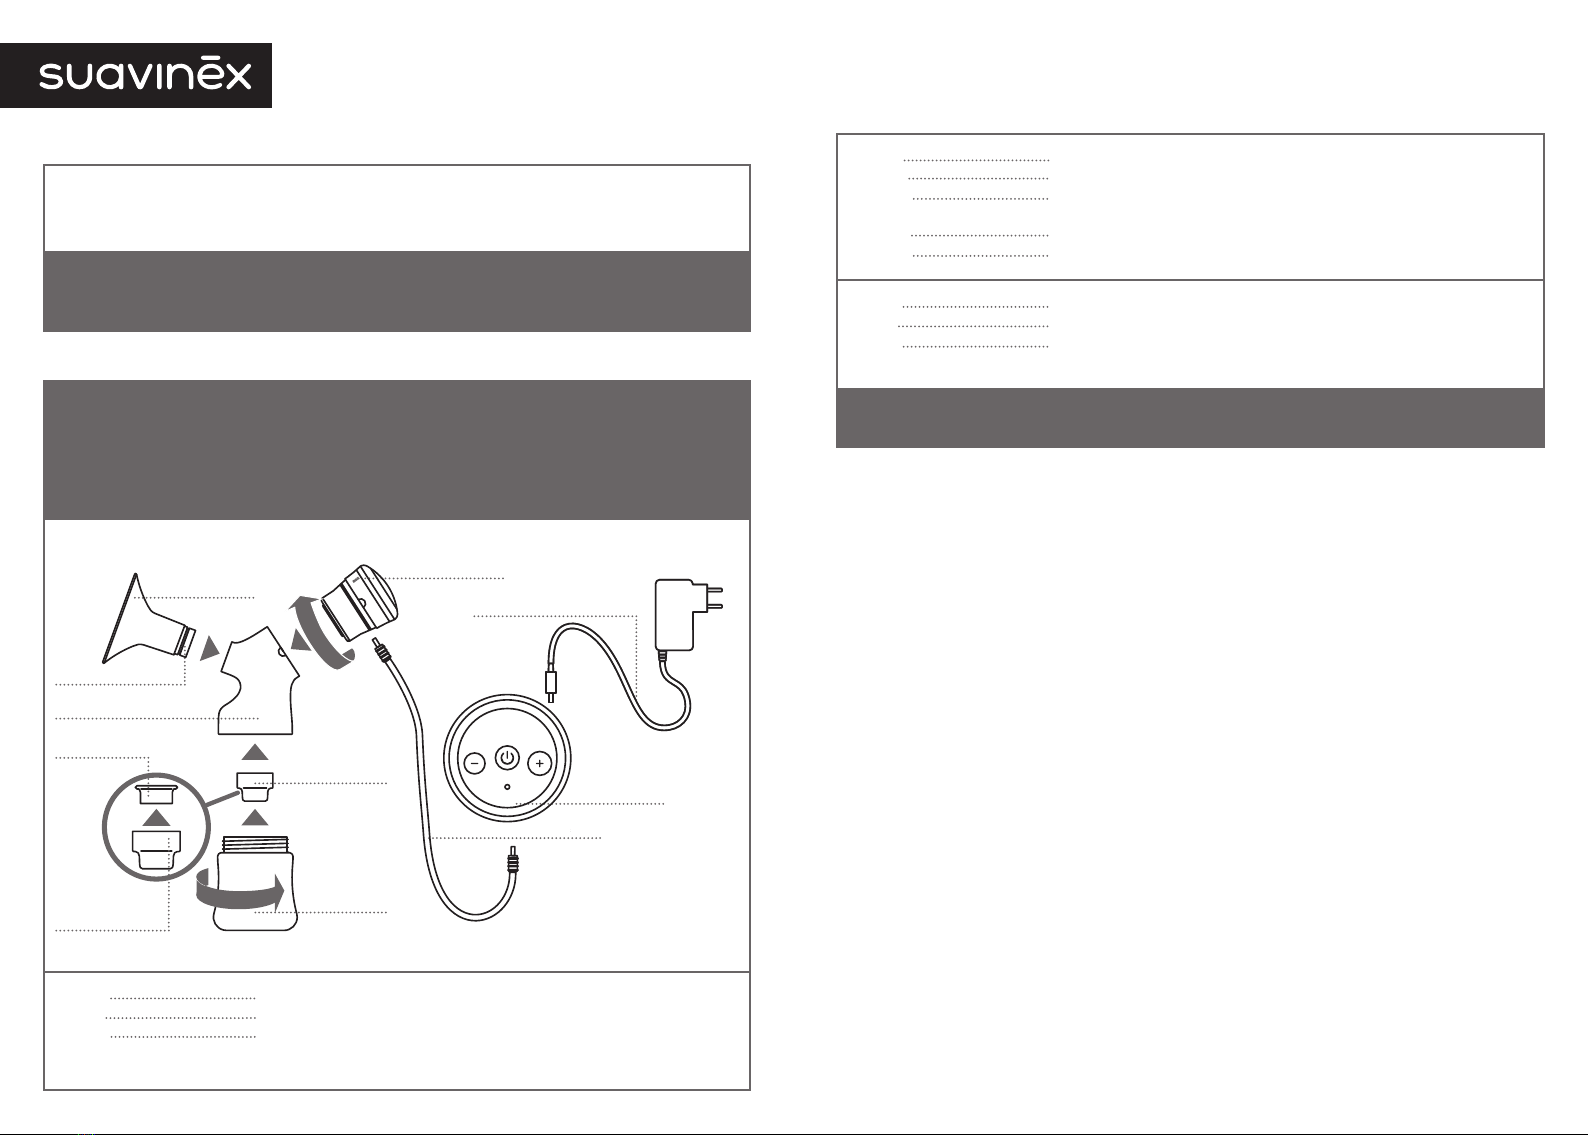
1. PIEZAS QUE COMPONEN EL EXTRACTOR
2. LIMPIEZA E HIGIENE
2.1. LIMPIEZA ANTES DEL PRIMER USO:
Todos los componentes del extractor por los que uye la leche deben ser esterilizados: cuerpo central (1),
campana (4), válvula de cierre (3) y biberón (2).
Utilice uno de los siguientes métodos de esterilización:
Cubra y hierva las piezas del extractor con agua de 3 a 5 minutos.
Sumerja las piezas del extractor en una solución esterilizante. Recomendamos
utilizar las tabletas esterilizantes de Suavinex.
Utilice un esterilizador para microondas. Recomendamos el esterilizador de microondas
de Suavinex.
2.2. LIMPIEZA DESPUÉS DE CADA USO:
-Lavar con agua y jabón suave todos los componentes que hayan estado en contacto con la leche.
-No utilice productos abrasivos o agresivos como lejía, disolventes o similares, ya que éstos podrían dañar
el producto.
-Se recomienda limpiar con un paño húmedo, y sólo en caso de que entren en contacto con la leche, el
cuerpo superior, el tubo de vacío, la bomba eléctrica y el adaptador de corriente.
-Se pueden lavar en lavavajillas sólo las piezas que hayan estado en contacto con la leche. Este método de
limpieza acelera el proceso de envejecimiento del producto.
-Es importante que el extractor esté completamente seco antes de montarse, de esta forma evitaremos el
desarrollo de agentes patógenos, como por ejemplo el moho.
· IMPORTANTE:
- Nunca introduzca agua dentro del tubo de vacío, ya que podría llegar a la bomba y estropearse.
· NOTA:
ya que éste no suele entrar en
contacto con la leche. Puede limpiar esta pieza con un trapo húmedo.
Sin embargo, le explicamos cómo desmontarlo en caso de necesitarlo. Siga los pasos del punto 2.3.
14. Bomba eléctrica
13. Tubo de vacío
Adaptador de corriente
11. Pieza rígida
12. Pieza blandita
(de silicona)
6. Goma
Cuerpo superior
4. Campana
2. Biberón
FIG A
1. Cuerpo central
max
3. Válvula de cierre
ES - 25
ES: MANUAL DE INSTRUCCIONES
Este manual de instrucciones puede descargarse en formato digital en www.suavinex.com
La línea de lactancia materna Link™ de Suavinex te ayuda si por incorporación al trabajo, cuestiones de
salud, involucración de otros miembros de tu entorno en la alimentación del bebé u otros motivos tienes que
extraerte leche.
· EXTRACTOR ELÉCTRICO LINK™
El extractor eléctrico Link™ de Suavinex proporciona un bombeo que extrae la leche sin esfuerzo, imitando
el ritmo de succión que el bebé adopta cuando es amamantado. Su sistema de doble regulación único en
el mercado permite ajustar, por un lado, la frecuencia de succión y, por otro, la intensidad del vacío. Podrás
comenzar por una succión muy suave e ir variando en rapidez e intensidad según la sensibilidad de tu
pecho, consiguiendo así un control total sobre tu propia extracción. El extractor se acopla perfectamente al
pecho gracias a la copa anatómica sin piezas adicionales de silicona que consigue un mejor agarre y con
ello un mejor vacío. Con posibilidad de utilizarlo con pilas, la solapa en la parte trasera de la bomba permite
colocártelo en la cintura para moverte con libertad y extraerte la leche donde y cuando quieras. Su bolsita
está pensada para guardarlo o llevártelo fuera de casa de manera higiénica. Diseñado para utilizar con
cualquiera de los biberones de Suavinex.
-Extractor eléctrico
-Bomba eléctrica
-Tubo de vacío
-Adaptador de corriente
-Base para botella de biberón
-5 bolsas de almacenaje de leche materna desechables
-Biberón 150ml con tetina 3 posiciones de silicona
-Bolsita transporte
-Piezas de recambio: junta de goma de la campana (6) y junta de goma del cuerpo superior (5)
BP-061
Entrada adaptador: 100V – 240V ˜ ; 50Hz / 60 Hz; 0,5A; Tipo de protección II
Entrada extractor: 6V ; 1,5A
· NOTA PARA LA MAMÁ:
Es normal que la leche no salga rápidamente nada más comenzar la extracción; muchas
veces es necesario estimular el pecho previamente. En ocasiones, incluso, la extracción
se ve afectada por factores externos como el estrés, nerviosismo, etc lo que provoca que
la leche no uya. No te preocupes, puede pasar y es perfectamente normal. En ese caso
déjalo y retoma la extracción en otro momento en el que estés más tranquila.
1. PIEZAS QUE COMPONEN EL EXTRACTOR
2. LIMPIEZA E HIGIENE:
2.1 LIMPIEZA ANTES DEL PRIMER USO
2.2 LIMPIEZA DESPUÉS DE CADA USO
2.3 LIMPIEZA DEL CUERPO SUPERIOR
3. MONTAJE DEL EXTRACTOR DESPUÉS DE LAVARLO
4. EXTRACCIÓN DE LECHE MATERNA
6. CONSERVACIÓN DE LA LECHE MATERNA
7. RESOLUCIÓN DE PROBLEMAS DEL EXTRACTOR DE LECHE ELÉCTRICO
· INDICE
25
25
25
26
26-27
28-29
29
30
30-31

ES - 27
· NOTA:
El ensamblaje es vital para el correcto funcionamiento del extractor. Asegúrese de que todas las piezas
estén perfectamente ajustadas unas con otras. Un mal anclaje de estas puede provocar fugas de aire que
imposibiliten la realización del vacío; si el extractor no realiza vacío en el pecho, la leche no uye. Fíjese sobre
todo en el correcto ensamblaje de la válvula de cierre (3), la campana (4), el tubo de vacío (13) y, en especial, el
cuerpo superior (5).
FIG E
FIG F
FIG G
Encaje el cuerpo
superior (5) en el
cuerpo central (1).
Asegúrelos enroscando
en sentido a las agujas
del reloj hasta que la
marca en forma de
semicírculo de ambas
piezas conguren un
círculo y suene “click”.
(FIG E)
Conecte la bomba
eléctrica (14) al cuerpo
superior (5) mediante
el tubo de vacío (13).
(FIG F)
Enchufe la bomba
(14) a la red eléctrica
mediante el adaptador de
corriente (15), o retire la
tapa del alojamiento de
las pilas y coloque 4 pilas
AAA (1,5 V) en la posición
que se indica en este.
En la tapa del alojamiento
de las pilas hay un clip
para poder colgar la
bomba en la cintura (17)
(FIG G)
Cuerpo
superior
Cuerpo
superior
13. Tubo
de vacío
14. Bomba eléctrica
OPEN CLOSE
max
max
Adaptador
de corriente
17. Clip cinturón
16. Pilas (AAA)
1. Cuerpo
central
2.3. LIMPIEZA DEL CUERPO SUPERIOR
Separe el cuerpo superior (5) del cuerpo central (1)
desenroscando ligeramente en el sentido opuesto a
las agujas del reloj.
Una vez separado el cuerpo superior (5) del
cuerpo central (1), tire fuertemente del regulador (9)
para separarlo del cuerpo de acople (7). (FIG B)
Tire de la válvula de silicona (8) y de la junta (10).
Todas las piezas quedan ahora separadas y listas
para limpiar/ esterilizar. Lavar con agua y jabón o
esterilizar.
Para su proceda a realizar la operación a la
inversa. Tenga en cuenta lo siguiente:
Coloque la pestaña de la válvula de silicona (8) en
el hueco rectangular del círculo interior del regulador
(9) mediante suave presión. (FIG C)
A la hora de encajar el regulador (9) con el
cuerpo de acople (7) será más fácil si coloca el
saliente interior (9.1) del regulador (9) sobre el hueco
rectangular que queda en el exterior del cuerpo de
acople (7)
Asegúrese de que la marca (rayita) de intensidad
de vacío del regulador (9) quede entre la posición
MIN y MAX del cuerpo de acople (7).
Coloque la junta (10) en el hueco circular del
cuerpo de acople (7)
9. Regulador
10. Junta
9.1. Saliente interior
del regulador
8. Pestaña de la
válvula de silicona
9. Regulador
8. Válvula de silicona
regulación vacío
Cuerpo
superior
3. Válvula de cierre
11. Pieza rígida
12. Pieza blandita
(de silicona)
6. Goma
Cuerpo
superior
4. Campana
2. Biberón
7. Cuerpo de acople
3. MONTAJE DEL EXTRACTOR DESPUÉS DE LAVARLO
FIG B
FIG C
FIG D
Inserte la campana (4)
presionando en el cuerpo central
(1) con ayuda de la goma (6). Esta
goma (6) logra un cierre totalmente
hermético.
Introduzca la pieza 11 (rígida)
dentro de la pieza 12 (blandita,
de silicona) hasta que quede
completamente encajada. Tenga
en cuenta que el agujero con forma
de estrella de la pieza 11 debe
quedar cubierto por la membrana
de silicona móvil de la parte inferior
de la pieza 12. De esta manera se
conforma la válvula de cierre (3).
Introduzca la válvula de cierre (3)
en el interior del cuerpo central y
enrosque el biberón (2) en el mismo
hasta obtener un cierre seguro.
1. Cuerpo central
max
max

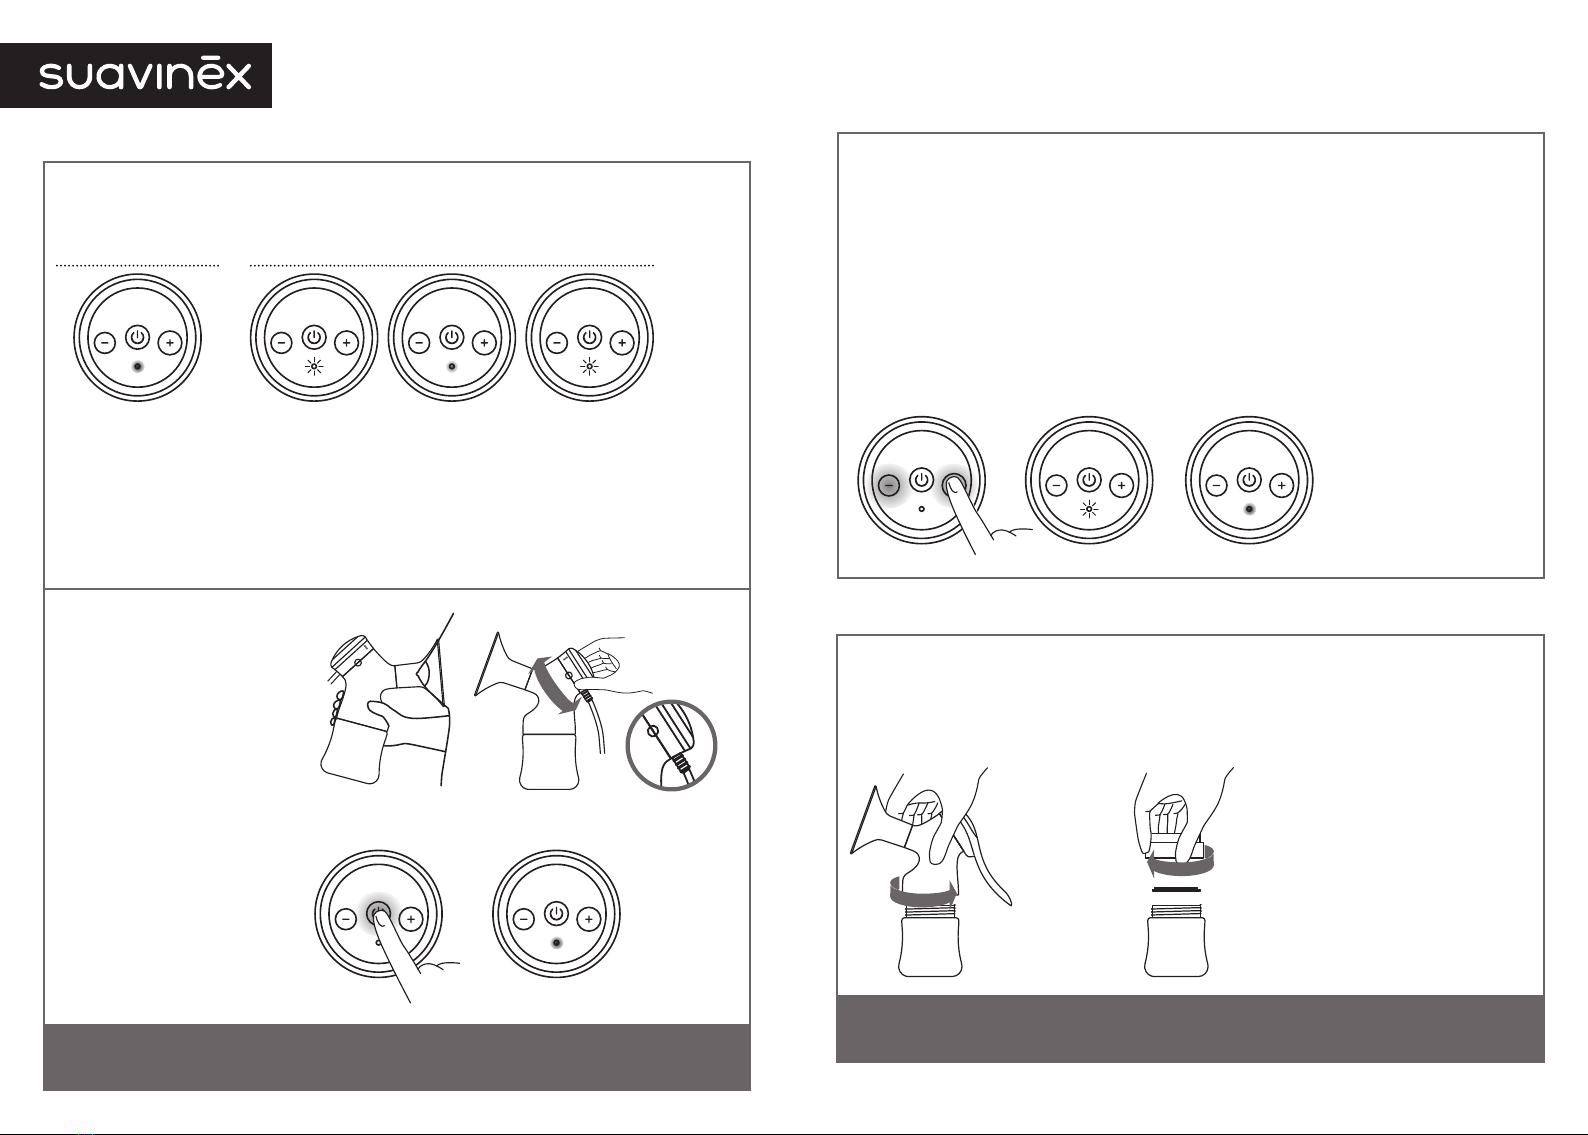
Al poner en marcha el extractor se inicia la fase de estimulación. Esta dura 2 minutos, o hasta que
comience a uir la leche.
Puede variar la intensidad del masaje girando el regulador del cuerpo superior (FIG J). En esta fase de
estimulación la regulación de la frecuencia de succión (botones +/- de la bomba eléctrica) no funciona.
Si requiere de más tiempo de masaje, una vez terminada la fase de estimulación seleccione con 2
pulsaciones cortas el botón de encendido y esta volverá a empezar de nuevo.
Una vez comienza a uir la leche, seleccione el botón de encendido mediante una pulsación corta (FIG
K1). De esta manera provocamos que la fase de estimulación termine y comience la de extracción (el led
cambiará de color azul a color verde intermitente). Esta fase se inicia con la frecuencia de succión más
rápida (nivel 1).
Aumente o disminuya la frecuencia de succión seleccionando los botones (+ /-) hasta encontrar el ritmo
más conveniente (FIG L3). El led verde permanecerá con luz ja (del nivel 2 al 10) hasta llegar a la máxima
velocidad, momento en el que volverá a parpadear de nuevo para indicar así su nivel máximo (FIG L4 – L5)
Regule la intensidad de vacío (o fuerza de succión) con el regulador del cuerpo superior (5), hasta llegar a
la posición más cómoda y adecuada (FIG J).
FIG L3 FIG L4
Una vez realizada la extracción de la leche proceda a su almacenaje:
Desenrosque el biberón del extractor. (FIG M)
Coloque la tapa blanca del biberón entre la botella y la rosca del biberón y enrosque hasta el tope. (FIG N)
Si lo preere puede almacenar la leche en las bolsas de almacenaje de leche materna. Para ello vierta
la leche en una bolsita de almacenaje en vez de guardarla en el biberón.
Puede almacenar la leche en el frigoríco o en el congelador, en el mismo biberón o en las bolsas de
almacenaje de leche materna de Suavinex.
· NOTA:
A la hora de dar de comer a su bebé utilice primero la leche que lleve más tiempo en conservación. Para saber
qué bolsita de almacenaje utilizar le recomendamos apuntar la fecha de extracción en la misma.
FIG M FIG N
ES - 29
Led azul Led verde intermitente
Nivel 1 mínimo Led verde jo
Niveles 2-10 Led verde intermitente
Nivel 11 máximo
Una vez el extractor está limpio y seco, y todas sus partes correctamente ensambladas, puede procederse a
la extracción de leche conectando el extractor a la red o colocándole las pilas.
Recomendamos colocarse en posición cómoda y relajada.
El proceso de extracción de leche consta de (FIG H)
tiene como nalidad masajear suavemente el pecho para que la leche comience a
uir hacia el exterior (led color azul)
una vez la leche comienza a uir, mantiene este proceso de forma continuada imitando
el ritmo de succión del bebé (led color verde)
La luz led de la bomba eléctrica le ayudará a saber en qué fase o niveles de extracción se encuentra.
El extractor eléctrico tiene 11 niveles de extracción, siendo el nivel 1 el más bajo y el nivel 11 el máximo.
Para su correcto funcionamiento
coloque el extractor en posición
vertical.
Apoye la campana sobre el
pecho de modo que este se acople
perfectamente sin dejar huecos que
permitan la entrada de aire, y que así
el vacío se realice correctamente.
(FIG I)
Coloque el regulador del cuerpo
superior en la posición “0” (MIN)
(FIG J)
Ponga en marcha la bomba
eléctrica presionando el botón de
encendido mediante una pulsación
larga (unos 3 segundos) (FIG K1)
El led color azul se activará (FIG K2)
· IMPORTANTE:
Nunca tumbe el extractor durante la extracción para evitar que la leche retorne hacia el cuerpo superior (5) y se
meta por el tubo de vacío (13); el extractor podría estropearse.
4. EXTRACCIÓN DE LECHE MATERNA
FIG I
FIG K1 FIG K2
FIG J
FIG H
max
max
0
max
Molestias en el pecho mientras se extrae leche
Fuerza de succión excesiva.
Ajuste el nivel de intensidad -o fuerza de succión- con el regulador de
intensidad (9) del cuerpo superior (5).
Ciclo de succión excesivamente rápido.
Pruebe a seleccionar una frecuencia de succión más lenta con el
regulador de frecuencia de la bomba eléctrica (14).
r 1
r 2
El extractor no responde
Falta de corriente eléctrica
C o m p r u e b e q u e e l a d a p t a d o r d e r e d ( 1 5 ) e s t á c o r r e c t a m e n t e c o n e c t a d o .
Comprueba que las pilas (16) están bien colocadas y con carga.
Si sigues teniendo dudas estaremos encantados de ayudarte en nuestro teléfono de Atención al cliente +34
965107010 (para España) o en nuestra dirección de correo electrónico [email protected].
ES - 31
Falta de succión del extractor
Ensamblaje incorrecto.
Compruebe que todas las piezas están bien ajustadas y no exista la
posibilidad de que se escape aire a través de alguna de ellas: válvula de
cierre (3), campana (4), membrana (9), cuerpo central (1) y, en especial, que
el cuerpo superior (5) esté correctamente ensamblado.
r
· NOTA:
El ensamblaje es vital para el correcto funcionamiento del extractor. Asegúrese de que todas las piezas estén
perfectamente ajustadas unas con otras. Estos son los anclajes clave:
-cuerpo central (1) con válvula de cierre (3)
-pieza rígida (11) con pieza blandita (12)
-campana (4) con cuerpo central (1)
-cuerpo superior (5) con cuerpo central (1)
-tubo de vacío (13) con cuerpo superior (5) y con bomba eléctrica (14)
7. RESOLUCIÓN DE PROBLEMAS DEL EXTRACTOR DE LECHE ELÉCTRICO
Guarde la leche materna en el frigoríco o en el congelador, dentro del biberón o de la bolsa de almacenaje
desechable, cerrada herméticamente.
-Conservación en : entre 3 y 4 días a 4º C.
-Conservación en : hasta 6 meses a –18 º C.
· IMPORTANTE:
• Anote siempre la fecha de extracción en el recipiente de almacenaje.
• No utilice nunca el microondas para descongelar, ya que no es adecuado para la leche materna.
• Una vez descongelada la leche no vuelva a congelarla de nuevo.
6. CONSERVACIÓN DE LA LECHE MATERNA
14. Bomba eléctrica
Adaptador de corriente
11. Pieza rígida
12. Pieza blandita
(de silicona)
6. Goma
Cuerpo superior
4. Campana
2. Biberón
FIG A
1. Cuerpo central
max
3. Válvula de cierre
13. Tubo de vacío

EN - 33
1. PARTS OF THE BREAST PUMP
2. CLEANING AND HYGIENE
2.1. CLEANING BEFORE FIRST USE:
All the parts of the breast pump through which milk ows must be sterilised: central body (1), breastshield
(4), valve (3) and bottle (2).
Use one of the following methods of sterilisation:
Cover the breast pump parts with water and boil for 3 to 5 minutes.
Submerge the breast pump parts in a sterilising solution. We recommend using
Suavinex sterilising tablets.
Use a microwave steriliser. We recommend the Suavinex microwave steriliser.
2.2. CLEANING AFTER EACH USE:
-Wash all the parts that have been in contact with milk in soapy water.
-Do not use abrasive or aggressive products like bleach, solvents or suchlike, as these products could
damage the breast pump.
-It is recommended that the upper body, tubing, pump unit and power adapter should be cleaned with a
damp cloth, but only if they come into contact with milk.
-Only the parts that have been in contact with the milk can be washed in the dishwasher. This method of
cleaning increases the rate of wear and tear of the product.
-It is important to ensure that the parts are completely dry before assembling them to prevent the growth of
pathogens such as mould.
· IMPORTANT:
-Never let water enter the tubing, as it could reach the pump unit and damage it.
· NOTE:
as it does not usually come into contact
with milk. This part can be cleaned with a damp cloth.
However, for an explanation of how to disassemble it if necessary, follow the steps in point 2.3.
14. Pump unit
13. Tubing
Power adapter
11. Rigid part
12. Soft silicone
part
6. Rubber seal
Upper body
4. Breastshield
2. Bottle
3. Valve
FIG A
1. Central body
max
EN: INSTRUCTION MANUAL
This instruction manual can be downloaded in digital format from www.suavinex.com
Suavinex’s Link™ breastfeeding range helps you if you need to express milk because you are going back
to work, for health reasons or because you want to involve other people in feeding the baby, among other
reasons.
· LINK™ ELECTRIC BREAST PUMP
The Suavinex Link™ electric breast pump allows you to express milk eortlessly, mimicking the rate at which
the baby sucks when nursing. Its unique double regulation system allows you to adjust not only the speed
but also the strength of suction. You can start gently and gradually change the speed and strength according
to how your breast feels, thus giving you complete control when expressing milk. The pump ts your breast
perfectly thanks to the anatomical breastshield with no additional silicone parts, which grips better and
therefore improves suction. It can be used with batteries and there is a belt clip on the back of the pump
that allows you to move around and express milk wherever and whenever you want. Its bag is designed for
storing or carrying it hygienically when you are out and about. Designed for use with any Suavinex bottles.
-Electric breast pump
-Pump unit
-Tubing
-Power adapter
-Bottle stand
-5 disposable breast milk storage bags
-150 ml bottle with 3-position silicone teat
-Carrying bag
-Spare parts: rubber seal of the breastshield (6) and rubber seal of the upper body (5)
BP-061
Power adapter input: 100V – 240V ˜; 50Hz / 60Hz; 0.5A; Insulation Class II
Breast pump input: 6V ; 1.5A
· NOTE FOR THE MOTHER:
It is normal if the milk does not start owing quickly as soon as you start pumping; it is often
necessary to stimulate the breast rst. Sometimes, pumping is even aected by external
factors such as stress, nerves, etc., which stop the milk from owing. Don’t worry, it is just
something that happens and it is perfectly normal. If that happens to you, stop pumping
and try again later when you are feeling calmer.
1. PARTS OF THE BREAST PUMP
2. CLEANING AND HYGIENE:
2.1 CLEANING BEFORE FIRST USE
2.2 CLEANING AFTER EACH USE
2.3 CLEANING THE UPPER BODY
3. ASSEMBLING THE BREAST PUMP AFTER WASHING IT
4. EXPRESSING BREAST MILK
6. KEEPING BREAST MILK
7. TROUBLESHOOTING
· CONTENTS
33
33
33
34
34-35
36-37
37
38
38-39

EN - 35
· NOTE:
To ensure the breast pump works properly it is essential that it is assembled correctly. Make sure that all the
parts are tted together properly. A poor connection can cause air to enter, breaking the vacuum, and if the
pump does not suction the breast, the milk will not ow. In particular, ensure correct assembly of the valve (3),
breastshield (4), membrane (9), tubing (13) and, especially, the upper body (5).
FIG E
FIG F
FIG G
Fit the upper body
(5) onto the central
body (1). Secure it by
twisting clockwise until
the semicircular mark
on each piece forms a
circle and it clicks into
place. (FIG E)
Connect the pump
unit (14) to the upper
body (5) with the
tubing (13). (FIG F)
Plug the pump unit
(14) into the mains
socket using the power
adapter (15), or remove
the cover of the battery
compartment and insert
four AAA batteries (1.5 V)
as shown.
There is a clip (17) on
the cover of the battery
compartment to attach
the pump unit to your
belt. (FIG G)
Upper
body
Upper
body
13. Tubing
14. Pump unit
OPEN CLOSE
max
max
Power adapter
17. Belt clip
16. Batteries
(AAA)
1. Central body
2.3. CLEANING THE UPPER BODY
Separate the upper body (5) from the central body
(1) by twisting it gently anticlockwise.
Having separated the upper body (5) from the
central body (1), pull hard on the regulator (9) to
separate it from the connector (7). (FIG B)
Remove the silicone valve (8) and the connection
plate (10).
All the parts are now separate and ready to be
cleaned/sterilised. Wash with soapy water or sterilise.
To, the process is the same but in reverse.
Bear in mind the following points:
Insert the tab on the silicone valve (8) into the
rectangular space in the inner circle of the regulator
(9), pressing gently. (FIG C)
When tting the regulator (9) to the connector (7), it
is easiest to place the inner ridge (9.1) of the regulator
(9) onto the outer tab of the connector (7)
Ensure that the suction level mark on the regulator
(9) is positioned between MIN and MAX on the
connector (7).
Insert the connection plate (10) into the circular
space in the base of the connector (7)
9. Regulator
10. Connection plate
9.1. Inner ridge of
the regulator
8. Tab on the
silicone valve
9. Regulator
8. Silicone suction
regulator valve
3. Valve
11. Rigid part
12. Soft silicone
part
6. Rubber seal
Upper
body
4. Breastshield
2. Bottle
7. Connector
3. ASSEMBLING THE BREAST PUMP AFTER WASHING IT
FIG B
FIG C
FIG D
Insert the breastshield (4) and
press it into the central body (1) with
the aid of the rubber seal (6). This
rubber seal (6) ensures a completely
airtight closure.
Insert part 11 (rigid) into part
12 (soft silicone), ensuring that it
ts tightly. Bear in mind that the
star-shaped hole in part 11 must
be covered by the movable silicone
membrane in the base of part 12.
This forms the valve (3).
Insert the valve (3) into the central
body and screw the bottle (2) on
tightly.
1. Central body
max
max
Upper
body
EN - 37
When the pump is switched on, the stimulation phase begins. It last for 2 minutes, or until milk starts to
ow.
You can change the massage suction strength by turning the regulator on the upper body (FIG J). During
the stimulation phase the suction speed (+/- buttons on the pump unit) cannot be changed.
If you need a longer massage time once the stimulation phase has ended, it can be started again with two
short presses of the power button.
Once the milk starts to ow, select the power button with one short press (FIG K1). This ends the
stimulation phase and starts the expression phase (the LED will change colour from blue to ashing green).
This phase starts with the fastest suction speed (level 1).
The suction speed can be increased or decreased by pressing the (+ /-) buttons until you reach the most
comfortable rate (FIG L3). The green light will remain constant (level 2 to 10) until you reach the fastest speed,
when it will start ashing again to show that you have reached the maximum level (FIG L4 – L5).
Regulate the suction strength using the regulator on the upper body (5) until you reach the most
comfortable position that best suits your needs (FIG J).
FIG L3 FIG L4
Having expressed the milk, it needs to be stored:
Unscrew the bottle from the breast pump. (FIG M)
Place the white sealing disc on the bottle between the bottle and the screw ring and screw on tightly. (FIG N)
If you prefer, the milk can be stored in breast milk storage bags. To do this pour the milk into a storage
bag instead of keeping it in the bottle.
The milk can be stored in the fridge or freezer, in the bottle itself or in Suavinex breast milk storage bags.
· NOTE:
When feeding your baby, use the milk that has been kept for longest rst. We recommend making a note of the
expression date on the storage bag so that you know which one to use rst.
FIG M FIG N
Blue LED Flashing green LED
Level 1 minimum Constant green LED
Levels 2-10 Flashing green LED
Level 11 maximum
Once the breast pump is clean and dry and all its parts are correctly assembled, it can be used to express
milk by connecting it to the mains or inserting batteries.
We recommend adopting a relaxed, comfortable position.
The expression process consists of 2 phases (FIG H):
the purpose is to gently massage the breast to encourage milk let-down (blue LED)
once the milk starts to ow, this process is kept up continually, mimicking the rate of
the baby’s sucking (green LED)
The LED on the pump unit will indicate the phase or pumping level.
The electric breast pump has 11 pumping levels, level 1 being the lowest and level 11 the maximum.
For the pump to work properly it
must be in an upright position.
Place the breastshield on the
breast so that it ts perfectly without
leaving any gaps that might let air in,
thus creating a vacuum. (FIG I)
Turn the regulator on the upper
body to the “0” position (MIN)
(FIG J)
Start the electric pump with a
long press of the power button (hold
for about 3 seconds). (FIG K1)
The blue LED will come on. (FIG K2)
· IMPORTANT:
Never lay the breast pump down while pumping, as milk could ow back into the upper body (5), entering the
tubing (13) and damaging the pump unit.
4. EXPRESSING BREAST MILK
FIG I
FIG K1 FIG K2
FIG J
FIG H
max
max
0
max
EN - 39
Discomfort in the breast while pumping
Suction too strong.
Adjust the suction strength using the regulator (9) on the upper body (5)
Suction cycle too fast.
Try selecting a slower suction speed using the speed regulator on the pump
unit (14).
The pump does not respond
Lack of power
Check that the power adapter (15) is properly connected.
Check that the batteries are inserted correctly and are suciently charged.
If you still have problems, contact our Customer Services helpline on +34 965107010 (for Spain) or by e-mail
at [email protected] and we will be happy to help you. If you still have problems, contact the ocial
Suavinex distributor in your country. We will be happy to help you.
Lack of suction.
Incorrect assembly.
Check that all the parts t together securely and there is no possibility of
air leaking through any of them: valve (3), membrane (9), breastshield (4),
tubing (13) and especially that the upper body (5) is correctly assembled.
· NOTE:
To ensure the breast pump works properly it is essential that it is assembled correctly. Make sure that all the
parts are tted together properly. These are the key connection points:
-central body (1) to valve (3)
-rigid part (11) to soft part (12) of the valve (3)
-breastshield (4) to central body (1)
-upper body (5) to central body (1)
-tubing (13) to upper body (5) and pump unit (14)
7. TROUBLESHOOTING
Keep breast milk in the fridge or freezer, in the bottle itself or in a sealed disposable storage bag.
-Keep in the for up to 3 to 4 days at 4º C.
-Keep in the freezer: for up to 6 months at -18º C.
· IMPORTANT:
· Always make a note of the expression date on the storage container.
· Never defrost it in the microwave, as this is not suitable for breast milk.
· Once the milk has been defrosted, do not refreeze it.
6. KEEPING BREAST MILK
14. Pump unit
13. Tubing
Power adapter
11. Rigid part
12. Soft silicone
part
6. Rubber seal
Upper body
4. Breastshield
2. Bottle
3. Valve
FIG A
1. Central body
max
Table of contents
Languages:


