Subaru Legacy/Outback User manual

2012
Legacy/Outback
Navigation System
Quick Reference Guide

Table of Contents
Safety
Navigation Introduction
Emergency Screen
Finding an Address
Finding a Point of Interest
Home Registration
Additional Quick Tips
Notes
2
3
4 - 5
6 - 9
10 -11
12 - 13
14 - 15
16

2
Safety
Your Navigation System will assist you in reaching your destination and, if
used properly, can do so with speed and ease. To use the system as safely
as possible, follow all safety directions.
tBefore attempting to use this system while driving, learn how to use it.
Make sure you read the entire Navigation System Owner’s Manual Supplement.
Do not allow others to use this system until they read the manual and understand
the instructions.
t:PVDBOQSPHSBNZPVSEFTUJOBUJPOBOETFMFDUZPVSSPVUFPOMZXIFOZPVSWFIJDMF
is not moving. While driving, listen to the voice instructions as much as possible
and only glance at the screen briey and when it is safe to do so.
t5IFEBUBJOUIFTZTUFNNBZPDDBTJPOBMMZCFJODPNQMFUFBTSPBEDPOEJUJPOTBOE
driving restrictions (no left turns, road closures, etc.) change. Before you follow
system instructions, make sure to check whether you can comply with the
instruction legally and safely. Do not be distracted by the navigation screen.
Failure to keep your attention on the road could lead to an accident.
t5IFTZTUFNDBOOPUXBSOZPVPGFOWJSPONFOUBMPSTUSFFUIB[BSETPSUIFBWBJMBCJMJUZ
of emergency systems. If you are unsure about the safety of an area, don’t drive
into it.
t6TFUIJTTZTUFNPOMZXIFSFJUJTMFHBMUPEPTP4PNFTUBUFTQSPWJODFTNBZIBWF
laws prohibiting video screens within the driver’s sight.
And remember, this system is never a substitute for the driver’s personal judgment.
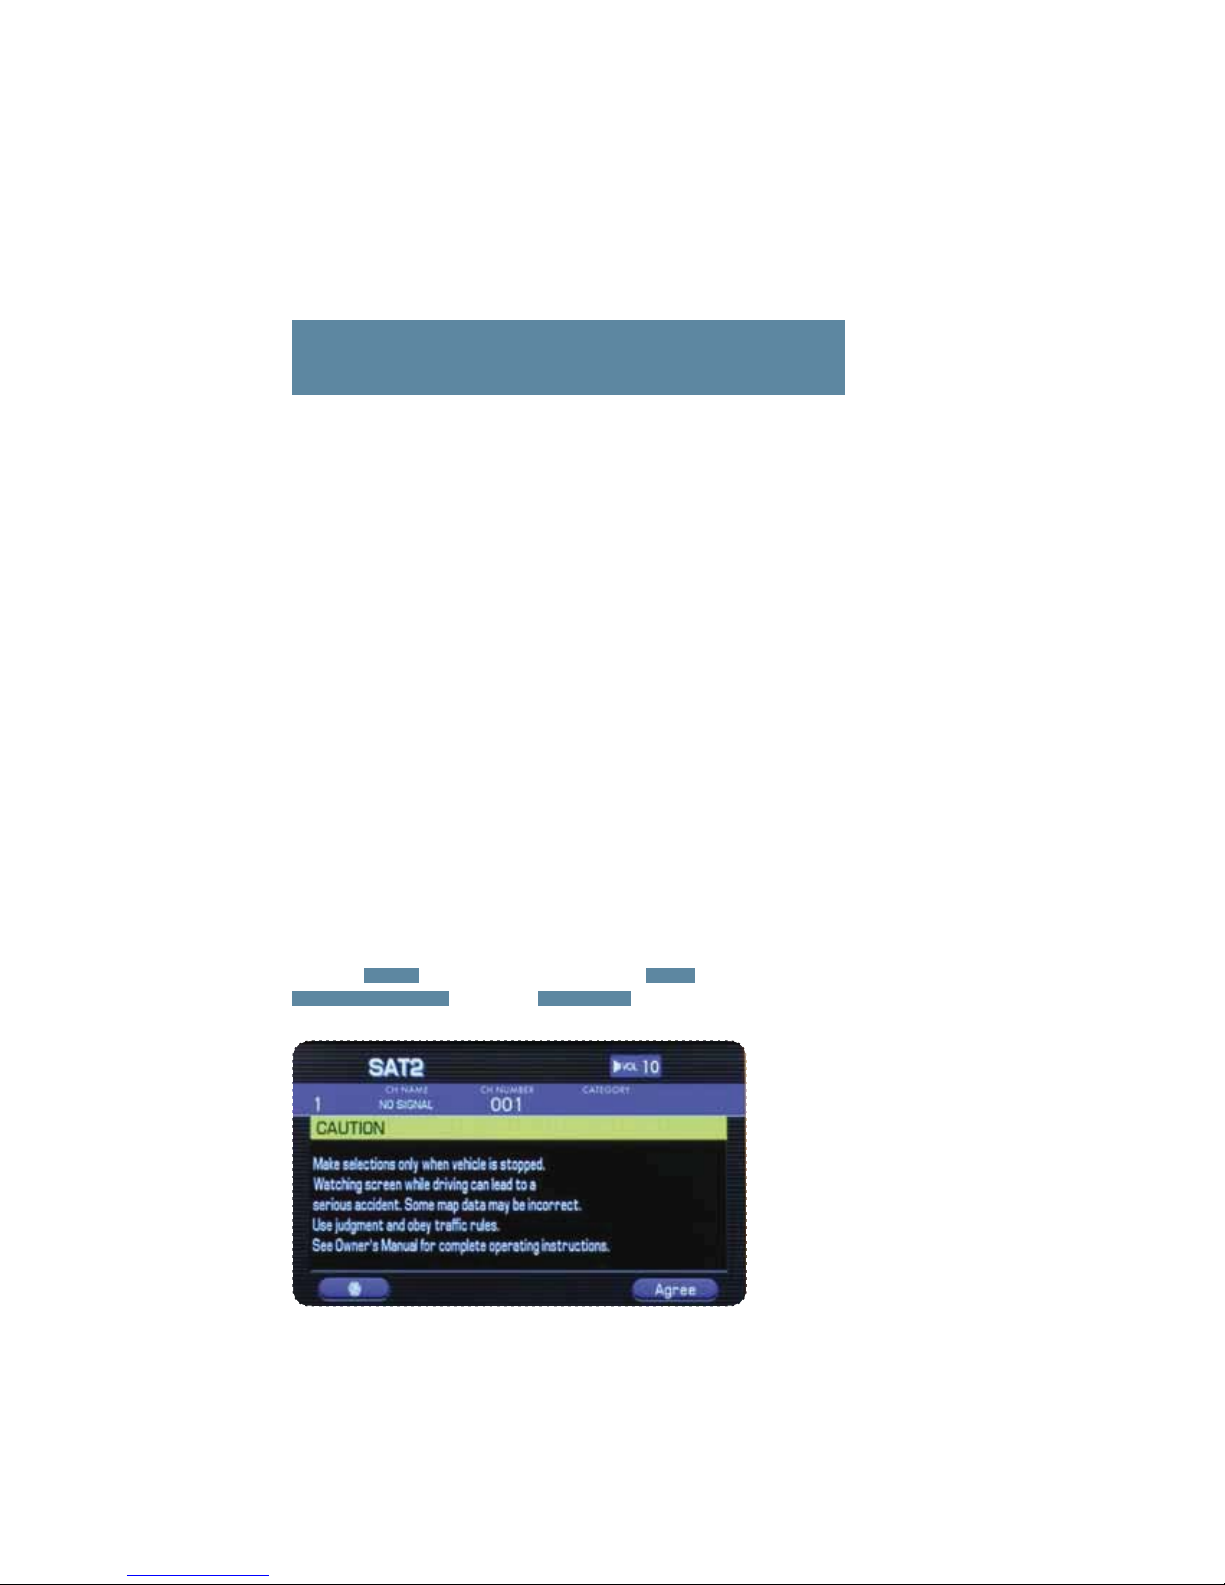
To start the Navigation System, start the engine. The opening screen will
appear, followed by the CAUTION screen. Read the instructions on the screen
and press AGREE . To select a language, press the MENU button, then select
NAVIGATION SET UP , then select LANGUAGE and then select English, French
or Spanish by touching the screen.

3
Safety & Navigation
Information
Emergency
Screen
Finding an
Address
Finding a Point
of Interest
Home
Registration
Additional
Quick Tips
3
Saf
S
S
ety
&
Nav
iga
tio
n
n
n
Information
Eme
E
rge
ncy
Screen
Fin
Fi
din
di
g an
A
ddres
s
Fin
Fi
din
di
g a
Po
P
int
it
of Interes
t
Hom
H
e
Registration
Add
Add
iti
iti
ona
l
l
Quick Tips
Safety &
Navigation
Introduction
Navigation Introduction
Your Navigation System helps you nd travel routes, create maps, store
addresses, and more. Prior to using the system, be sure to read the full Navigation
System Owner’s Manual Supplement so you have a complete understanding of
the system. For your convenience, this Quick Reference Guide offers a quick guide
for regularly used features.
Your control panel is your access to the Navigation System. You must
stop your vehicle in a safe place before operating the system. Some of
the controls and functions cannot be used unless the vehicle is stationary.
1
2
3
4
5
Map
Press this to switch the screen to
the Navigation System map screen
from any other screen.
Dest
Press this to display the destination
screen of your Navigation System.
Menu
Press this to display the menu
screen of your Navigation System.
Info
Press this to display the
vehicle information screen.
1
2
3
4
5Navigation System
Map Disc Location
The main unit is located
below the CD slot behind a
cover. To remove the cover,
hold the upper side of the
cover while pulling out the
bottom of the cover using
the notch located on the
center underside. Load a
map DVD-ROM disc into the
system’s main unit through
the slot. Press the eject
button to eject the disc.
When nished, push the
slot cover back in place.

4
Emergency Screen
To access the emergency screen, press the DEST button, then select EMERGENCY .
Select between POLICE STATION or HOSPITAL .

5
Safety & Navigation
Information
Emergency
Screen
Finding an
Address
Finding a Point
of Interest
Home
Registration
Additional
Quick Tips
The screen now displays several options:
Use to display the ve previous suggestions.
Use to display the previous suggestion.
Use to display the next suggestion.
Use to display up to ve of the next suggestions.
DIST. SORT sorts the list by distance.
NAME SORT sorts the list alphabetically.
Then select (destination) or (waypoint).
The system will route you to the nearest location automatically.
5
Saf
Sf
ety
t
&
&
Nav
N
iga
i
tio
ti
n
Information
Eme
rgency
Screen
Fin
Fi
din
di
g an
A
ddres
s
Fin
Fi
din
di
g a
Po
P
int
it
of Interes
t
Hom
H
e
Registration
Add
Add
iti
iti
ona
l
l
Quick Tips
Emergency
Screen

6
Finding an Address
1
2
To nd an address, press the DEST button. Make sure you are in the desired search
area and touch ADDRESS to access the address input screen.
Enter a house number using the keypad on the house number input screen and
then select OK .
3Enter the street name and then select LIST .

7
Safety & Navigation
Information
Emergency
Screen
Finding an
Address
Finding a Point
of Interest
Home
Registration
Additional
Quick Tips
4
5If the same street name exists in more than one city, a list of these towns will
be shown. Select the correct town from the list.
Select the desired street from the list.
7
Saf
Sf
ety
t
&
&
Nav
N
iga
i
tio
ti
n
Information
Eme
E
rgency
Scr
een
Fin
din
g an
A
ddres
s
Fin
Fi
din
di
g a
Po
P
int
it
of Interes
t
Hom
H
e
Registration
Add
Add
iti
iti
ona
l
l
Quick Tips
Finding an
Address
Then select (destination) or (waypoint).
t4FMFDUEFTUJOBUJPOUPTFUUIFBEESFTTFOUFSFEJOUIFBCPWFTUFQTBTUIFýOBMEFTUJOBUJPO
The system will calculate the route and display the entire route on the map.
t4FMFDUXBZQPJOUJGZPVXBOUUPTFUUIFBEESFTTFOUFSFEBTBXBZQPJOUPO
your route. You can program up to ve waypoints per trip.
6

8
Finding an Address
7Select START ; route guidance begins along the displayed route.
t*GUIFTZTUFNDBOOPUýOEZPVSEFTJSFESPVUFTFMFDU CHG. ROUTE . This will allow you
to access the ROUTE OPTIONS screen from which you can prompt the system to
calculate a new route.
t*GUIFNBQEJTDEPFTOPUDPOUBJOUIFSFMFWBOUIPVTFOVNCFSEBUBBOFSSPSNFTTBHF
will be displayed and a street map will appear, allowing you to set the destination using
the map disc.
t*GUIFEFTUJOBUJPOJTOPUPOBSPBETFUBEFTUJOBUJPOQPJOUPOBNBJOSPBEOFBSFTUUPUIF
actual destination.
To cancel route guidance press the MENU button, then touch ROUTE OPTIONS ,
then touch ROUTE PREF. , and then touch CANCEL GUIDANCE .
NOTE

9
Safety & Navigation
Information
Emergency
Screen
Finding an
Address
Finding a Point
of Interest
Home
Registration
Additional
Quick Tips
t4FMFDUJOH CITY while inputting an address will display a screen that
searches the destination on a city basis.
ANY CITY : Search the destination from all cities.
5 NEAREST CITIES : Search the destination from the nearby ve cities
from your current position.
INPUT CITY NAME : Search the destination by inputting the city name.
LAST 5 CITIES : You can also search the destination from the ve cities
that you searched in the past.
9
Saf
Sf
ety
t
&
&
Nav
N
iga
i
tio
ti
n
Informati
on
Eme
E
rge
ncy
Screen
Fin
din
g an
A
ddres
s
Fin
Fi
din
di
g a
Po
P
int
it
of Interes
t
Hom
H
e
Registration
Add
Add
iti
iti
ona
l
l
Quick Tips
Finding an
Address

10
Finding a Point of Interest
You can also nd addresses by using the Point Of Interest (POI) function. You can use this in
the event you do not have a specic address but can refer to a specic shopping mall, airport,
museum, etc.
1To nd a Point Of Interest (POI) press the DEST button. Make sure you are in the
desired geographical search area, and then touch POINT OF INTEREST to access
the address input screen. Note: If you are not in the correct geographical area touch
CHANGE to select the correct geographical area.
Use the arrows on the screen to scroll up or down for the POI name. The screen
will display suggested routes.
3
2Enter the POI name by using the letter keys on the screen and then touch LIST .

11
Safety & Navigation
Information
Emergency
Screen
Finding an
Address
Finding a Point
of Interest
Home
Registration
Additional
Quick Tips
4
5
Select the route preference you want to take, and then touch
(destination) or (waypoint).
The system searches the route and displays it on the screen.
Once completed, touch START and begin driving.
11
Saf
Sf
ety
t
&
&
Nav
N
iga
i
tio
ti
n
Information
Eme
E
rgency
Screen
Fin
Fi
din
di
g an
A
ddres
s
Finding a Point
of Interes
t
Hom
H
e
Registration
Add
Add
iti
iti
ona
l
l
Quick Tips
Finding a Point
of Interest

12
Home Registration
If you have stored your home address in the system’s memory, you can use it for your destination or a
waypoint. Other locations stored in the memory can be used for quick setting of destinations and waypoints.
Press the MENU button and then touch STORED LOCATIONS .
1
2Next, touch MEMORY POINTS .

13
Safety & Navigation
Information
Emergency
Screen
Finding an
Address
Finding a Point
of Interest
Home
Registration
Additional
Quick Tips
Then touch ADD .
3
4Touch ADDRESS and then refer to steps 3-8 in the FINDING AN ADDRESS
section earlier in this Quick Reference Guide.
13
Saf
Sf
ety
t
&
&
Nav
N
iga
i
tio
ti
n
Information
Eme
E
rgency
Screen
Fin
Fi
din
di
g an
A
ddres
s
Fin
Fi
din
di
g a
Po
P
int
it
of Interes
t
Home
Registration
Add
Add
iti
iti
ona
l
l
Quick Tips
Home
Registration

14
Additional Quick Tips
Screen Preferences
From the map screen, touch . This expands the window to provide up to seven screen
selections, including:
Single Map Mode
Dual Map Mode
Turn List Mode
Turn Arrow Guidance Mode
Intersection Guidance Mode
Freeway Info Mode
Compass Mode

15
Safety & Navigation
Information
Emergency
Screen
Finding an
Address
Finding a Point
of Interest
Home
Registration
Additional
Quick Tips
Demonstration Mode (route preview)
To view the Demonstration mode after setting a destination, touch and hold START
for at least 5 seconds. A beep indicates that the Demonstration mode has begun.
1
2
1
2
To end the Demonstration mode, press the MAP button.
Search Area
To change your search area, press the DEST button, then touch
CHANGE on the screen.
Touch the desired search area and then touch .
15
Saf
Sf
ety
t
&
&
Nav
N
iga
i
tio
ti
n
Information
Eme
E
rgency
Screen
Fin
Fi
din
di
g an
A
ddres
s
Fin
Fi
din
di
g a
Po
P
int
it
of Interes
t
Hom
H
e
Registration
Additional
Quick Tips
S
TART
gun
.
Additional
Quick Tips

Notes
16

About the Map Discs.
This navigation system includes three map discs (contained in 2 disc holders)
covering different areas (West, Mid and East). Select the map disc containing the
destination area you wish and insert it in the Navigation System. Make sure to
reselect your destination when you change the map disc.
All information contained within this Legacy and Outback Navigation System Quick
Reference Guide was accurate at the time of publication. We reserve the right to change
features, operation and/or functionality of any vehicle specication at any time without
incurring any obligation to make the same or similar changes to products previously sold.
Your Subaru dealer is the best source for the most current information. For detailed
operating and safety information, please consult your Owner’s Manual.
West
East Mid
DISC HOLDER 1 CONTAINS: DISC HOLDER 2 CONTAINS:
MSA5B1207A
Issued May 2011
Printed in USA 10/11
2012A
This manual suits for next models
2
Table of contents
Other Subaru GPS manuals