Summer BABY PIXEL ZOOMHD 36044 User manual
THIS PRODUCT CANNOT REPLACE RESPONSIBLE ADULT SUPERVISION.
•STRANGULATION HAZARD - Children have STRANGLED in cords.
Keep this cord out of reach of children (more than 3 feet (0.9 m)
away from the crib). Use enclosed Security Clips to help secure cord
away from baby’s reach. Never use extension cords with AC
Adapters. Only use the AC Adapters provided.
•When an AC Adapter is plugged into an electrical outlet, do not touch the exposed end.
•Test monitor before first use, periodically, and when changing location of the Camera.
•Do not use monitor near water (such as bathtub, sink, etc.).
•Keep monitor away from heat sources (such as stoves, radiators, etc.).
• Make sure there is proper ventilation around all monitor components. Do not place on
sofas, cushions, beds, etc. which may block ventilation.
•This product is not a toy. Do not allow children to play with it.
•This product contains small parts. Adult assembly required. Exercise care when
unpacking and assembling the product.
WARNING
WARNING
extra video camera
For use with the 36044 Baby Pixel®ZOOM HD™ 5.0 inch Color Video Monitor
36054
NOTE: For best picture focus, place camera 6 to 8 ft.
from crib.
1. Plug in nursery camera.
2. Place camera on a flat surface, such as a dresser
or shelf.
3. Or, mount the camera on a wall using the screw
and wall anchor provided.
tabletop wall mount
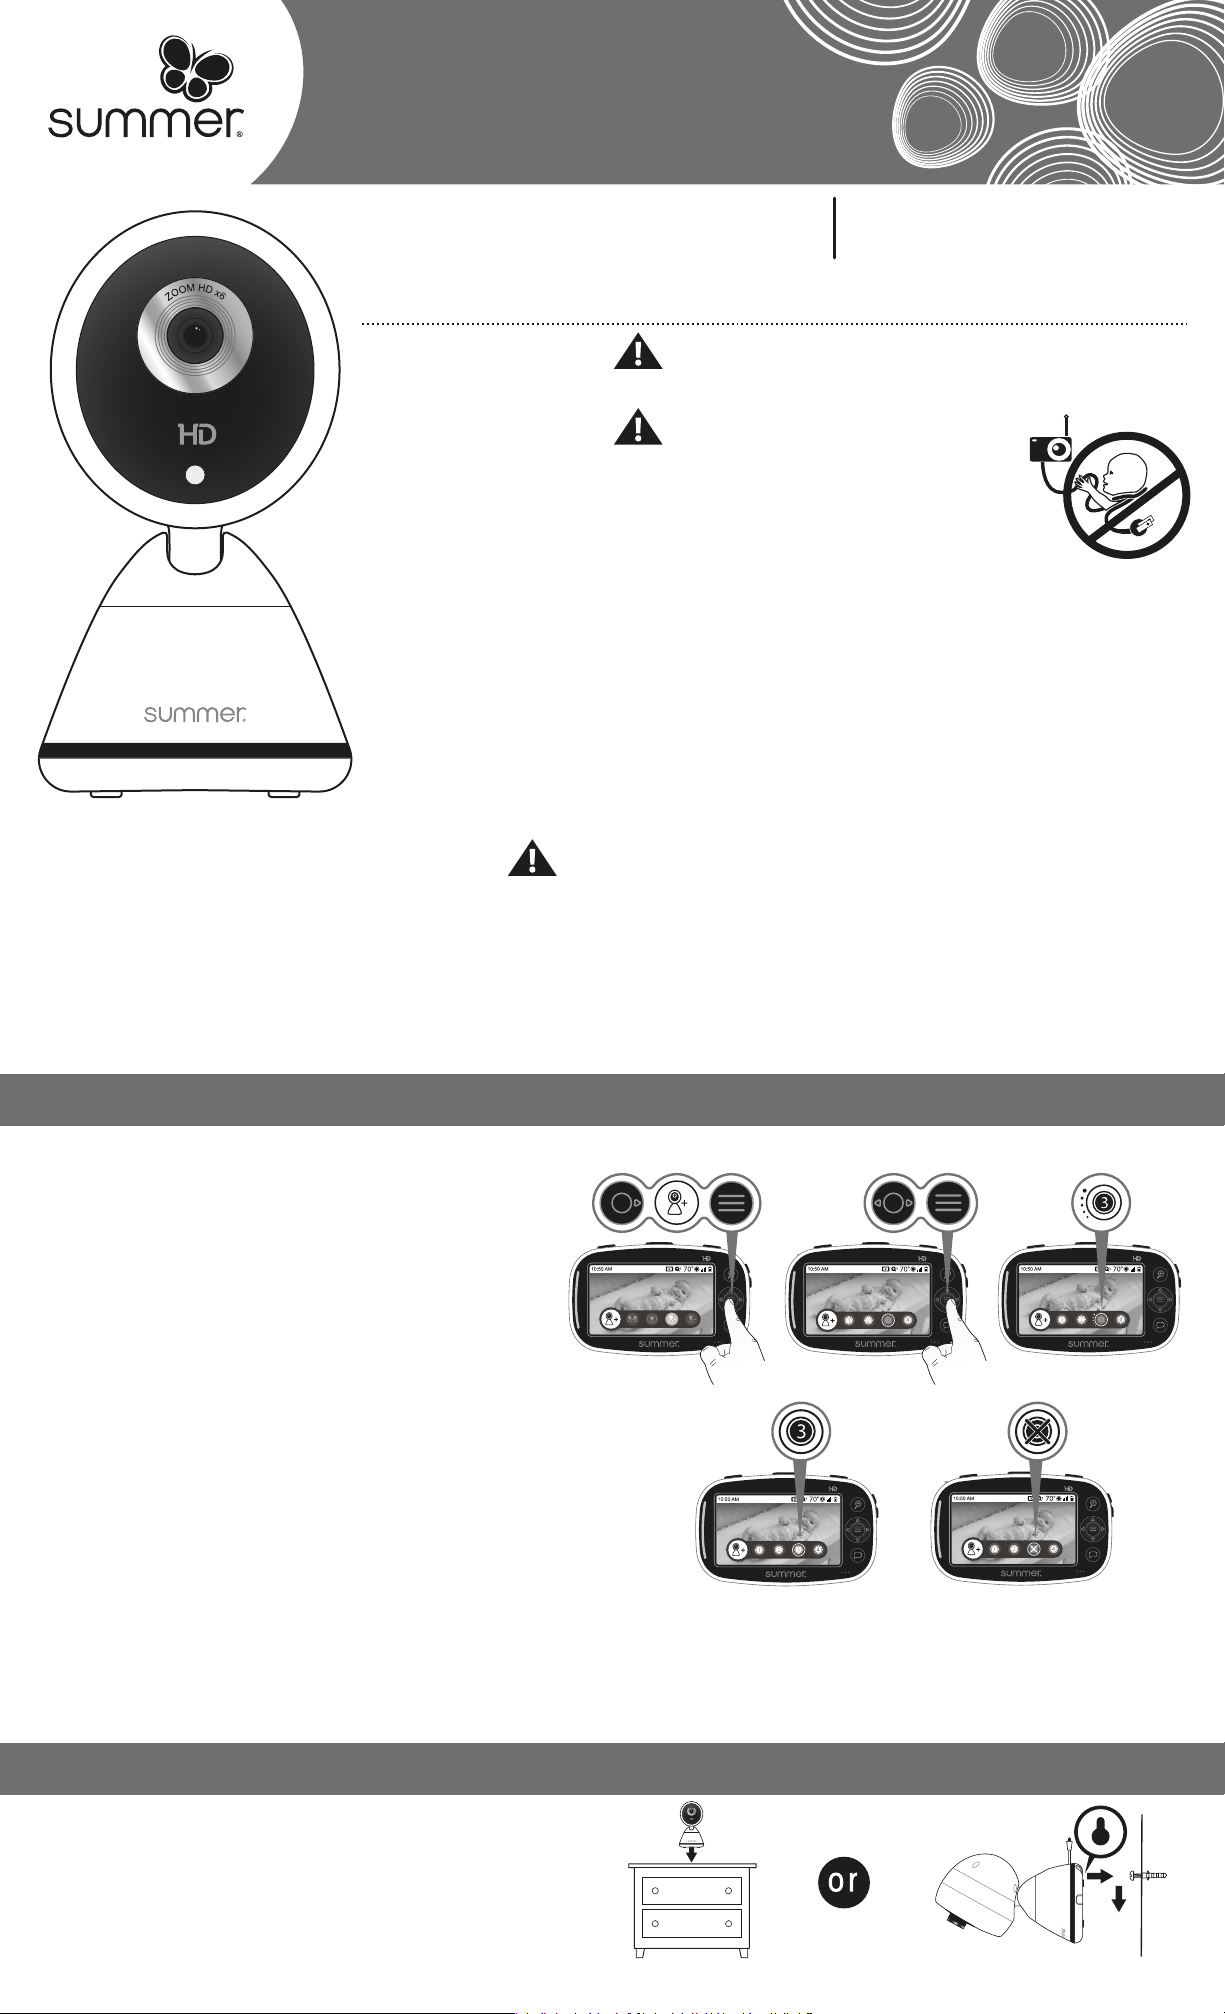
ADDING A CAMERA
INSTALLING THE CAMERA
BATTERY WARNING
•
Use only the original rechargeable battery provided. Please
contact Summer Infant
(USA), Inc. for replacement battery.
•Do not short-circuit supply terminals.
•Only the recommended battery or equivalent are to be used, volts and size.
•Remove battery when product is stored for long periods of time or when battery is exhausted.
•Dispose of exhausted battery properly.
•Keep all batteries away from children.
Your digital video monitor accepts up to 4 total cameras.
You can select the one you want to view OR use the
auto-scan mode to cycle through each camera on an
8-second rotation.
Successful Sync Unsuccessful Sync
Repeat steps.
Extra Cameras: To order an additional camera (item #36054)
or extra power cord for your camera (item #29580-05), please
contact our Consumer Relations Team at: 401-671-6551 or
www.summerinfant.com/contact for details.
Adult assembly required. Keep small parts away from children when assembling.
BABY
PIXEL
®
ZOOM HD™
1. Plug in camera. A small solid green light above the
lens will indicate power.
If not, press and hold the POWER button for 3 seconds
until the green light appears.
2. Enter pairing mode by pressing the camera power
button until it beeps and the small green light flashes
(about 8 seconds).
3. On the handheld, press MENU/SELECT twice to open
the Camera Options Menu.
4. Press the RIGHT ARROW button to highlight the Add
Camera icon.
5. Press MENU/SELECT.
6. Press the LEFT/RIGHT ARROW buttons to highlight
the desired camera.
Icons for Synced Cameras:
• Blue icons indicate synced cameras.
• Gray icons indicate cameras not yet synced.
• A blue ring indicates selected camera.
7. Press MENU/SELECT.
• A syncing icon will appear next to the corresponding
camera number.
• If sync is successful: video will appear from the newly
added camera with a blue ring around the camera icon.
• If sync is unsuccessful: an X will appear over the camera
number. Repeat steps from this section to sync, making
sure the camera and handheld are next to each other.
FCC Information
This device complies with part 15 of the FCC Rules. Operation is subject to the following two conditions: (1) This device may not cause harmful
interference, and (2) this device must accept any interference received, including interference that may cause undesired operation.
CAUTION: Changes or modifications not expressly approved by Summer Infant may void the users authority to operate this equipment.
NOTE: This equipment has been tested and found to comply with the limits for a Class B digital device, pursuant to part 15 of the FCC Rules. These
limits are designed to provide reasonable protection against harmful interference in a residential installation. This equipment generates, uses and
can radiate radio frequency energy and, if not installed and used in accordance with the instructions, may cause harmful interference to radio
communications. However, there is no guarantee that interference will not occur in a particular installation. If this equipment does cause harmful
interference to radio or television reception, which can be determined by turning the equipment off and on, the user is encouraged to try to correct
the interference by one or more of the following measures:
• Reorient or relocate the receiver.
• Increase the separation between the equipment and the receiver.
• Connect the equipment into an outlet on a circuit different from that to which the receiver is connected.
• Consult the dealer or an experienced radio/TV technician for help.
CAUTION: 1. To comply with FCC RF exposure compliance requirements, a separation distance of at least 7.9 in. (20 cm) must be maintained
between the antenna of this device and all persons. 2. This transmitter must not be co-located or operating in conjunction with any other antenna or
transmitter.
Summer Infant (USA), Inc. Monitor Warranty Policy
Summer Infant (USA), Inc. will repair or replace (at our option) your unit free of charge for 12 months from the date of purchase if the unit is defective
in workmanship or materials. To claim your repair/replacement, the product must be returned to Summer Infant along with a copy of the original
purchase receipt. In the absence of the purchase receipt, the warranty will be 12 months from the date of manufacture. This warranty does not apply
to normal wear or damage from misuse, abuse, improper storage and handling, installation, accident, unauthorized repair or alteration. Please
contact our Consumer Relations Team by phone at 401-671-6551 or via e-mail at summerinfant.com/contact for details. For sale and use in the USA
and Canada. The warranty is null and void if used outside its intended territory.
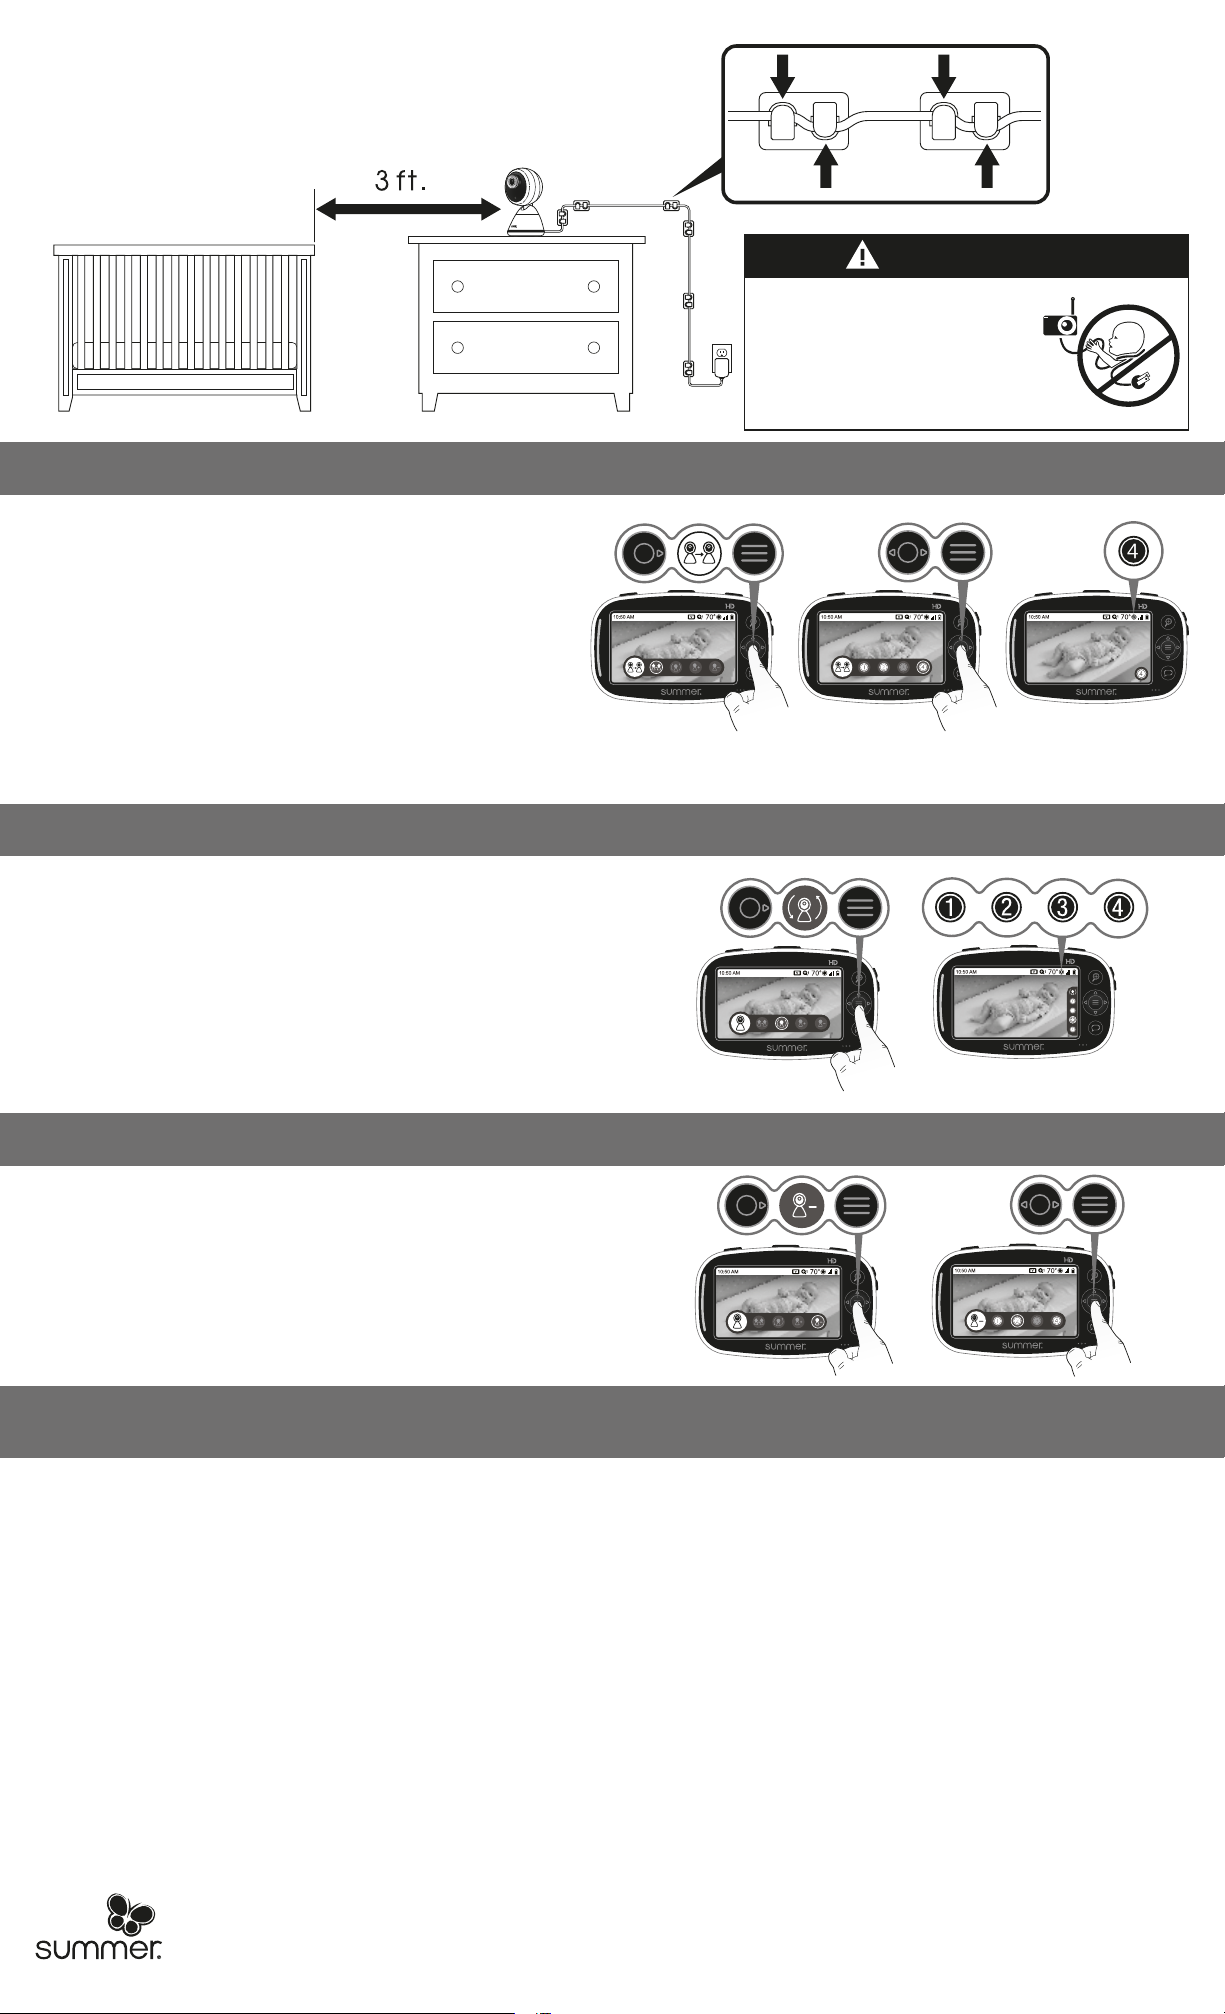
Secure the Camera Cord
NEVER place the camera or cords within 3-feet of the crib.
Secure the cord to your wall using the 6 security clips included to
keep the cord away from baby’s reach.
STRANGULATION HAZARD:
Children have strangled
in cords. Keep this cord
out of the reach of
children (more than 3 ft.
(0.9m) away).
WARNING
Read all warnings prior to using this product.
We're here to help!
If you have questions or need assistance, call our Consumer Relations Team at 401-671-6551 or visit www.summerinfant.com/contact
Do not return the product to the store. Please call us so we can help resolve any issues.
SELECTING A CAMERA TO VIEW
SCANNING CAMERAS
DELETING A CAMERA
If you have questions or need assistance,
contact our Consumer Relations Team at
401-671-6551 or visit
www.summerinfant.com/contact
© 2019 Summer Infant (USA), Inc.
Colors and styles may vary.
Please retain information
for future reference.
Made in China. 1/19
Summer Infant (USA), Inc.
1275 Park East Drive
Woonsocket, RI 02895
401-671-6551
Summer Canada, Ltd.
200 First Gulf Blvd., Unit C
Brampton, Ontario,
Canada L6W 4T5
905 456-8484
Scan Mode cycles through each active camera every 8 seconds.
NOTE: Scan Mode is only available if more than one camera is
synced with the handheld.
1. Press MENU/SELECT twice to open the Camera Options Menu.
2. Use the RIGHT ARROW button to highlight the Scan Cameras icon.
3. Press MENU/SELECT to confirm.
The scan status bar will appear on the lower right side of the screen.
• A red icon indicates cameras that have lost a signal.
•Camera Number icon in the indicator bar changes to show which
camera is currently being viewed.
•Press any button to stop scanning.
1. Press MENU/SELECT twice to open the Camera Options Menu.
2. Use the RIGHT ARROW button to highlight the Select
Camera icon.
3. Press MENU/SELECT.
4. Use the LEFT/RIGHT ARROW buttons to highlight the
camera you want to select.
Synced cameras appear in blue. A blue ring indicates
current viewing camera.
5. Press MENU/SELECT.
Video from the selected camera will appear on the
screen.
•The camera number (1-4) icon will briefly appear in
the screen's lower right corner.
•The camera number icon at the top of the screen will
change to the selected camera.
1. Press MENU/SELECT twice to open the Camera Options Menu.
2. Use the RIGHT ARROW button to highlight the Delete
Camera icon.
3. Press MENU/SELECT.
4. Use the LEFT/RIGHT ARROW buttons to highlight the
camera you want to delete.
5. Press MENU/SELECT button to delete camera.
The Camera icon will turn gray once disconnected.
Note: SleepZone®can only be used on one camera at a time. If using
SleepZone®, it will deactivate when you select a different camera or use
Scan Mode.
732-3605400-0701
Table of contents
Other Summer Camcorder manuals


 Operation motion")


