SUNTEC Home Essentials BBQ-9479 User manual

BBQ-9479 BBQ-9493
Bedienungsanleitung
DE

Vor dem Gebrauch
Bitte lesen Sie diese Anleitung sorgfältig durch. Sie enthält wichtige Hinweise bezüglich Gebrauch,
Sicherheit und Wartung des Gerätes. Bewahren Sie die Anleitung sorgfältig auf und geben diese bei Bedarf
an andere Nutzer weiter.
Das Gerät darf nur für den vorgesehenen Zweck gemäß dieser Anleitung verwendet werden.
Beachten Sie die Sicherheitshinweise.
Behalten Sie die Verpackung in gutem Zustand.
Sicherheitshinweise
Dieses Gerät darf von Personen (einschließlich Kindern) mit verminderten physischen, sensorischen
oder mentalen Fähigkeiten oder mit mangelnder Erfahrung und mangelnden Fachkenntnissen nur dann
benutzt werden, wenn sie von einer Person, die für ihre Sicherheit verantwortlich ist, beaufsichtigt werden
oder in der Anwendung des Gerätes angeleitet wurden.
Kinder sollten beaufsichtigt werden, um sicherzustellen, dass sie nicht mit dem Gerät spielen.
Schließen Sie das Gerät nur an Steckdosen mit Typenschild, sowie einer geerdeten 3-poligen Steckdose
an.
Die Installation einer Schutzeinrichtung durch einen Bemessungsausschaltstrom, bietet Ihnen
zusätzliche Sicherheit, dass 30mA in der Haushaltsinstallation nicht überschritten werden.
Lassen Sie sich von ihrem Installateur beraten. Gefahr besteht auch bei bereits ausgeschalteten Geräten,
daher sollte sofort nach Gebrauch der Stecker aus der Steckdose gezogen werden.
Verwenden Sie den Grill nicht in der Nähe von Geräten die Wasser enthalten wie z.B. Badewannen,
Waschbecken, usw. Setzen Sie das Gerät weder Regen noch andren Feuchtigkeiten aus.
Prüfen Sie regelmäßig, ob das Kabel defekt ist. In diesem Fall darf das Gerät nicht in Betrieb genommen
werden (sofort den Stecker ziehen).
Das Gerät darf nicht betrieben werden (ziehen Sie sofort den Netzstecker), wenn:
das Gerät, Gehäuse oder Kabel beschädigt ist
das Gerät sichtbare Anzeichen von Schäden aufweist
wenn Sie einen Fehler nach einem Sturz oder ähnlichem vermuten
Trennen Sie den Netzstecker:
bei Störungen während des Gebrauchs.
vor der Reinigung oder dem Transport des Gerätes
nach Gebrauch
Ziehen Sie den Stecker niemals im gebogenen Zustand oder mit nassen Händen.
Ziehen oder tragen Sie das Gerät niemals am Elektrokabel, da das Kabel sonst beschädigt werden
kann.
Ziehen Sie das Kabel nicht über scharfe Kanten oder klemmen es ein.
Tauchen Sie das Netzkabel oder den Thermostat niemals in Wasser oder andere Flüssigkeiten.
Verwenden Sie ein Verlängerungskabel nur, wenn es sich in einwandfreiem Zustand befindet. Benutzen
Sie ein geerdetes Kabel mit einer Mindest Kapazität von 10A.
Bringen Sie das Verlängerungskabel niemals in Kontakt mit der heißen Grillplatte.
Schalten Sie das Gerät immer zuerst aus, bevor Sie den Netzstecker ziehen.
Bevor Sie den Grill oder das Zubehör reinigen, lasse Sie das Gerät abkühlen.
Vorsicht! Die Grillplatte wird sehr heiß und kühlt nur sehr langsam ab, nachdem sie ausgeschaltet wurde.
Vorsicht Verbrennungsgefahr! Berühren Sie keine heißen Oberflächen und seien Sie vorsichtig beim
Umgang mit dem Gerät nach dem Gebrauch.
Stellen Sie den Grill nicht über die Kante oder Ecke des Tisches und vermeiden Sie den Kontakt mit den
heißen Oberflächen.
Stellen Sie das Gerät nicht in der Nähe eines Gasofens oder einem Ofen auf.
Verwenden Sie das Gerät nur, wenn es auf einer stabilen und trockenen Oberfläche platziert wird.

Lassen Sie das Gerät nicht unbeaufsichtigt.
Schalten Sie das Gerät immer aus, wenn es nicht in Gebrauch ist.
Dieses Gerät ist nicht für den kommerziellen Gebrauch, sondern ausschließlich für den privaten
Gebrauch bestimmt.
Verwenden Sie das Gerät nicht ohne Fettauffangschale oder den Geräteunterbau
Verdecken Sie die Grillplatte niemals mit Alufolie oder Tellern (dies könnte die Antihaftbeschichtung
beschädigen).
Stellen Sie sicher, dass das Gerät korrekt zusammengebaut wurde, bevor Sie es in Betrieb nehmen (vor
allem, wenn Sie es zum ersten Mal im Stand nutzen).
Bitte achten Sie darauf, dass die Grillplatte das Heizelement nicht berührt. Verletzungsgefahr!
Passen Sie auf Fettspritzer während des Grillens auf.
Stellen Sie das Gerät auf eine Oberfläche, die resistent gegen Hitze ist. Halten Sie den Elektro-Grill
mindestens 10 cm von Wänden entfernt, wenn Sie ihn in Betrieb nehmen.
Benutzen Sie dieses Gerät nur wie in dieser Anleitung beschrieben. Jede andere Verwendung die nicht
vom Hersteller empfohlen wurde, kann Brände, elektrische Schläge oder Verletzungen von Personen zu
Folge haben.
Bitte Verwenden Sie aus Sicherheitsgründen kein Zubehör, das nicht vom Hersteller geliefert oder
empfohlen wurde.
Nur geschultes Personal sollte Elektrogeräte reparieren. Durch nicht fachgerechte Reparaturen können
erhebliche Gefahren für den Benutzer entstehen.
Wenn die Anschlussleitung beschädigt ist, muss diese von einer qualifizierten Person ausgetauscht
werden
Es wird keine Haftung für eventuelle Schäden übernommen, wenn das Gerät für unsachgemäße Zwecke
verwendet, falsch bedient oder nicht fachgerecht repariert wurde. In einem solchen Fall haben Sie keinen
Garantieanspruch.
Achtung: Seien Sie vorsichtig. Stolpern Sie nicht über das Netzkabel, wenn das Gerät in Betrieb ist.
Denken Sie daran, den Stecker nach Gebrauch zu ziehen.
Beschreibung der Bauteile des BBQ-9493
1. Haubengriff 11. Haubenklammern
2.Haube 12. Gerätebuchse
3.Grillplatte 13. Fettauffangschale
4. Füße 14. Kontroll Knopf
5. Kunststoffgehäuse 15. Einstellbares Thermostat
6. Haubenschnalle in abnehmbaren Kabel
7. Seitentisch 16. Netzkabel
8. Gurthaken 17. Standrohr
9. Sicherheitssperreinrichtung 18. Rad
10. Stützrohre
19. Achse

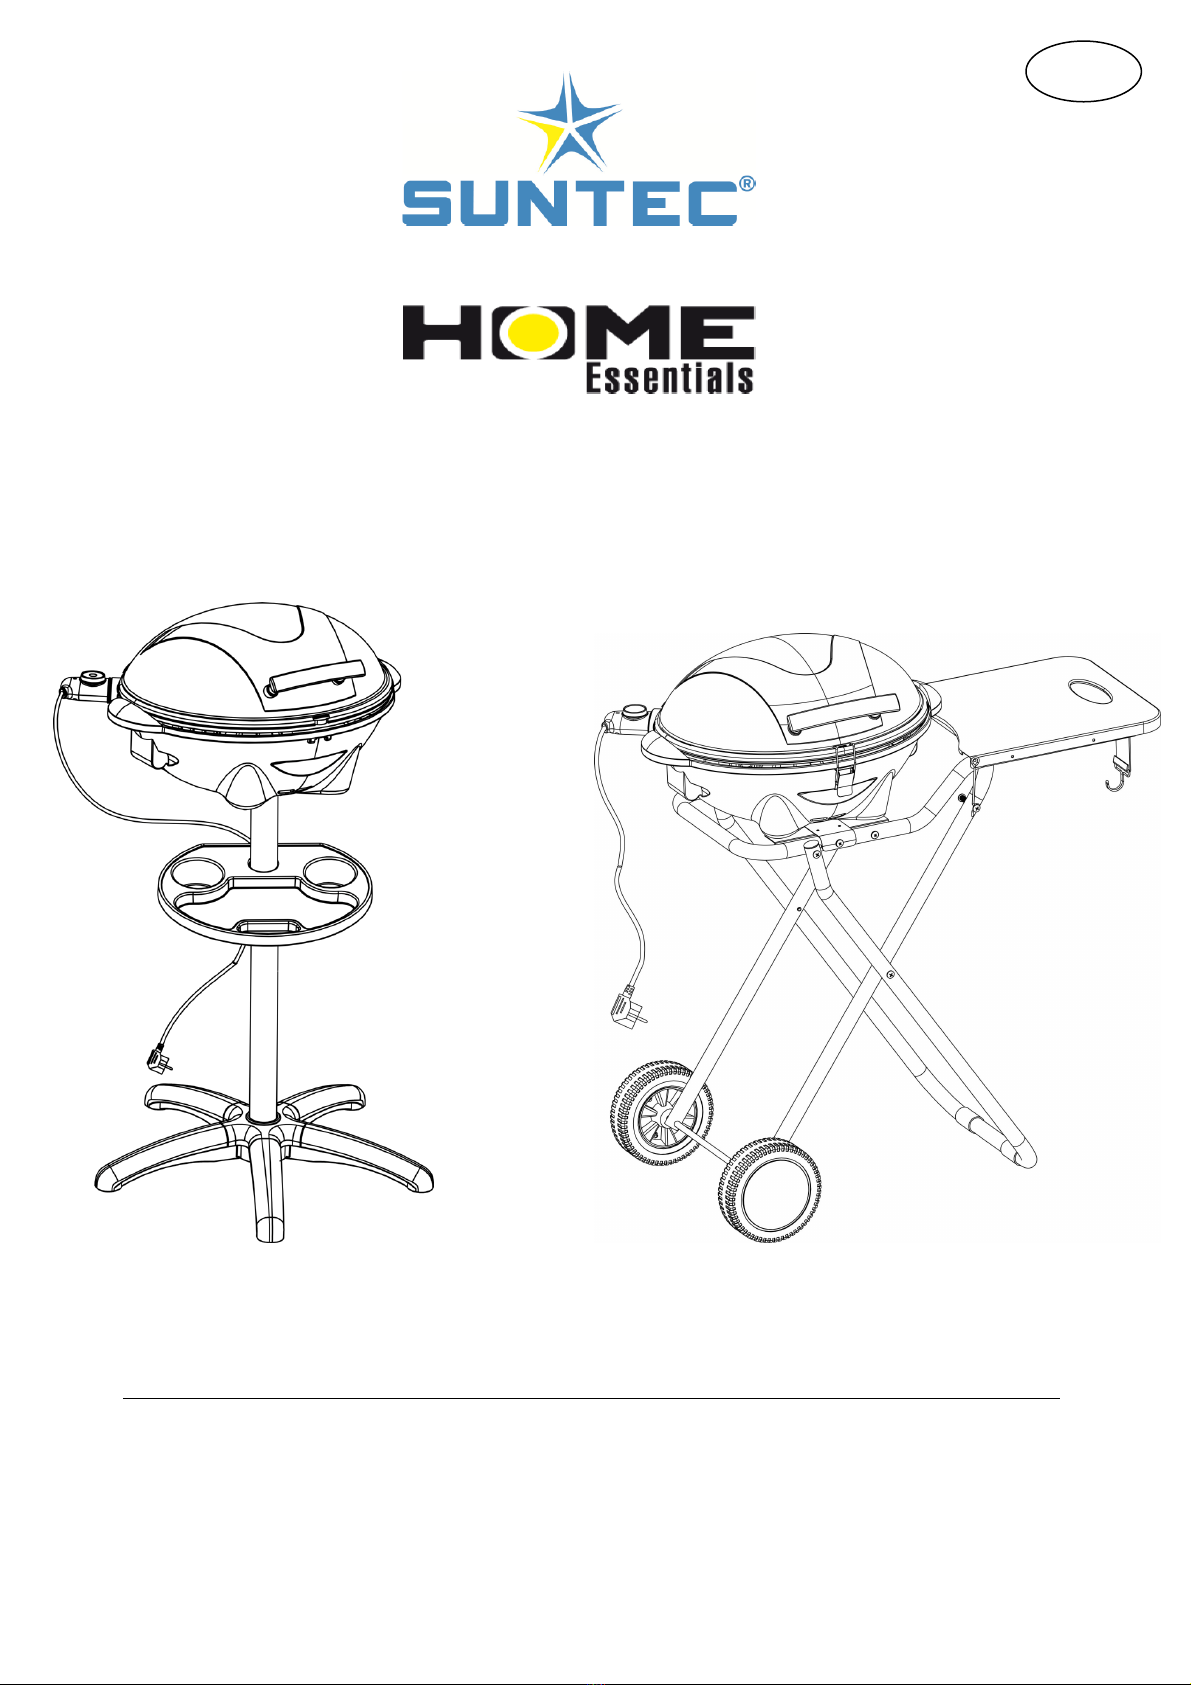
Montageanleitung BBQ-9493
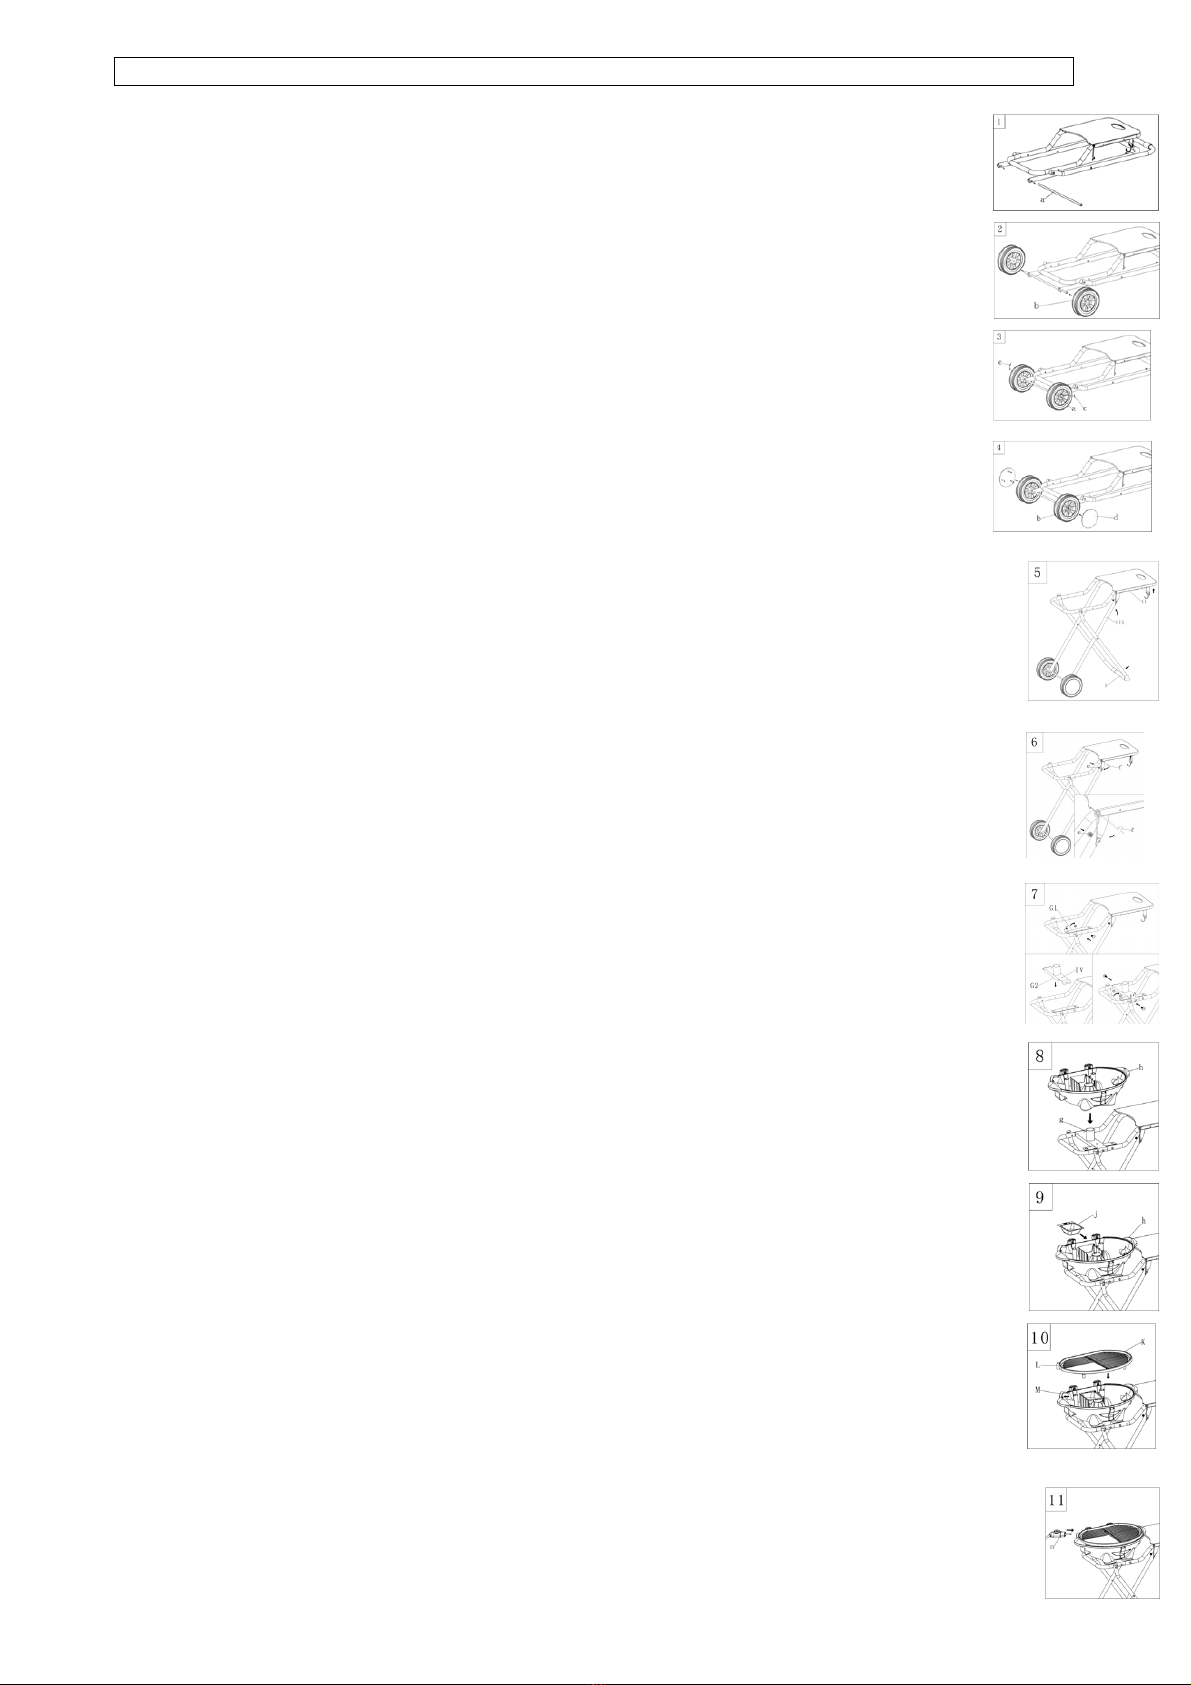
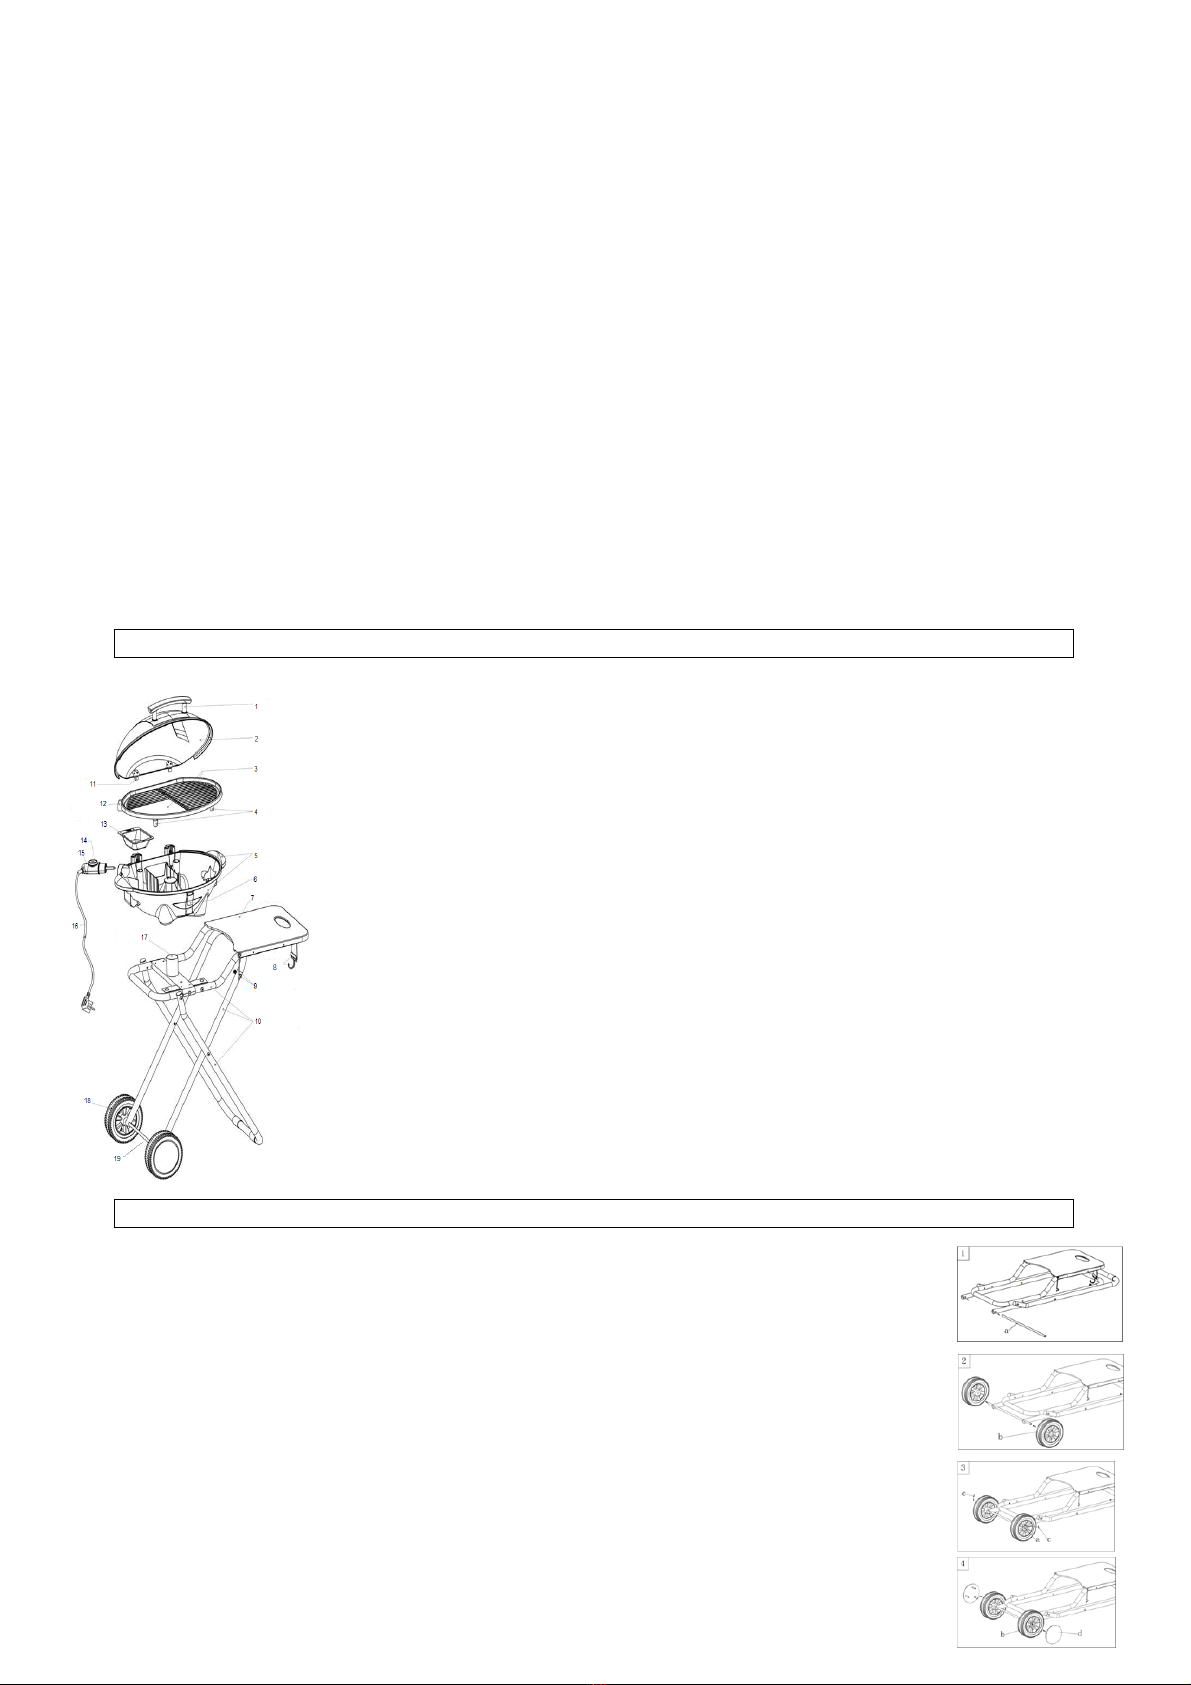
1. Nehmen Sie das Trolley-Gestell und das Zubehör aus dem Karton. Bitte stellen Sie sicher,
dass das Trolley-Gestell auf einer trockenen, ebenen und stabilen Oberfläche steht. Lassen Sie
die Radachse (a) durch zwei Löcher am Ende des Rohres gehen.
2. Montieren Sie die Räder (b) entsprechend an den zwei Seiten der Achse (a)
3. Es gibt zwei Bohrungen auf jeder Stirnseite der Achse (a). Führen Sie den Stift „R“ (c)
durch das Loch. Dies wird die Räder verriegeln.
4. Drücken Sie die Radabdeckungen (b) auf die Räder (b) entsprechend der Lagehinweise.
5. Stellen Sie den Trolley aufrecht hin: Treten Sie zuerst mit dem rechten Fuß auf die Mitte
des Tragerohrs (I), heben Sie den Seitentisch (II) mit der rechten Hand und das Rohr für das
Rad (III) mit der linken Hand an. Verbinden Sie dann das Rohr (III) mit dem Rohr, das sich unter
dem Seitentisch befindet. Der Trolley-Rahmen steht nun.
6. Nach dem Aufstellen des Trolley-Rahmens MÜSSEN Sie sofort die Sicherheitssperre (f)
einrasten lassen. Diese Sicherheitssperre ist selbstverriegelnd. Drücken Sie die Feder (e) und
haken Sie den gebogenen Haken (f) in das verlängerte Teil (e). Dann hören Sie auf zu drücken
und es wird zurückgehen, um den Sicherheitshaken automatisch einzurasten.
Achtung: Stellen Sie sicher, dass der Sicherheitshaken während des Grillens oder Bewegens
VERRIEGELT ist. Versuchen Sie NICHT, den Sicherheitshaken während der Verwendung
dieses Geräts zu drehen oder zu ziehen.
7. Entfernen Sie zunächst die Schraube aus dem Trolley-Rohr (III). Dann montieren Sie das
Standrohr (G1) auf das Trolley-Rohr (II) und montieren Sie das Standrohr (G2) auf das Trolley-Rohr
(II). Es gibt ein Positionierungsloch (IV) auf dem Standrohr (G2), das G1 und G2 miteinander durch
Schrauben befestigt. Verbinden Sie das Standrohr (G und G2) mittels Schrauben und Muttern fest
mit dem Trolley.
8. Setzen Sie den schlüsselförmigen Boden des Gerätes (h) in das Standrohr (g).
Befestigen Sie die Unterseite des Sockels im Positionierungsloch (IV). Beim Entfernen der Basis
aus dem Standrohr (g) treten Sie bitte leicht auf das Tragrohr (I), halten Sie die Griffe der Basis und
nehmen Sie sie ab.
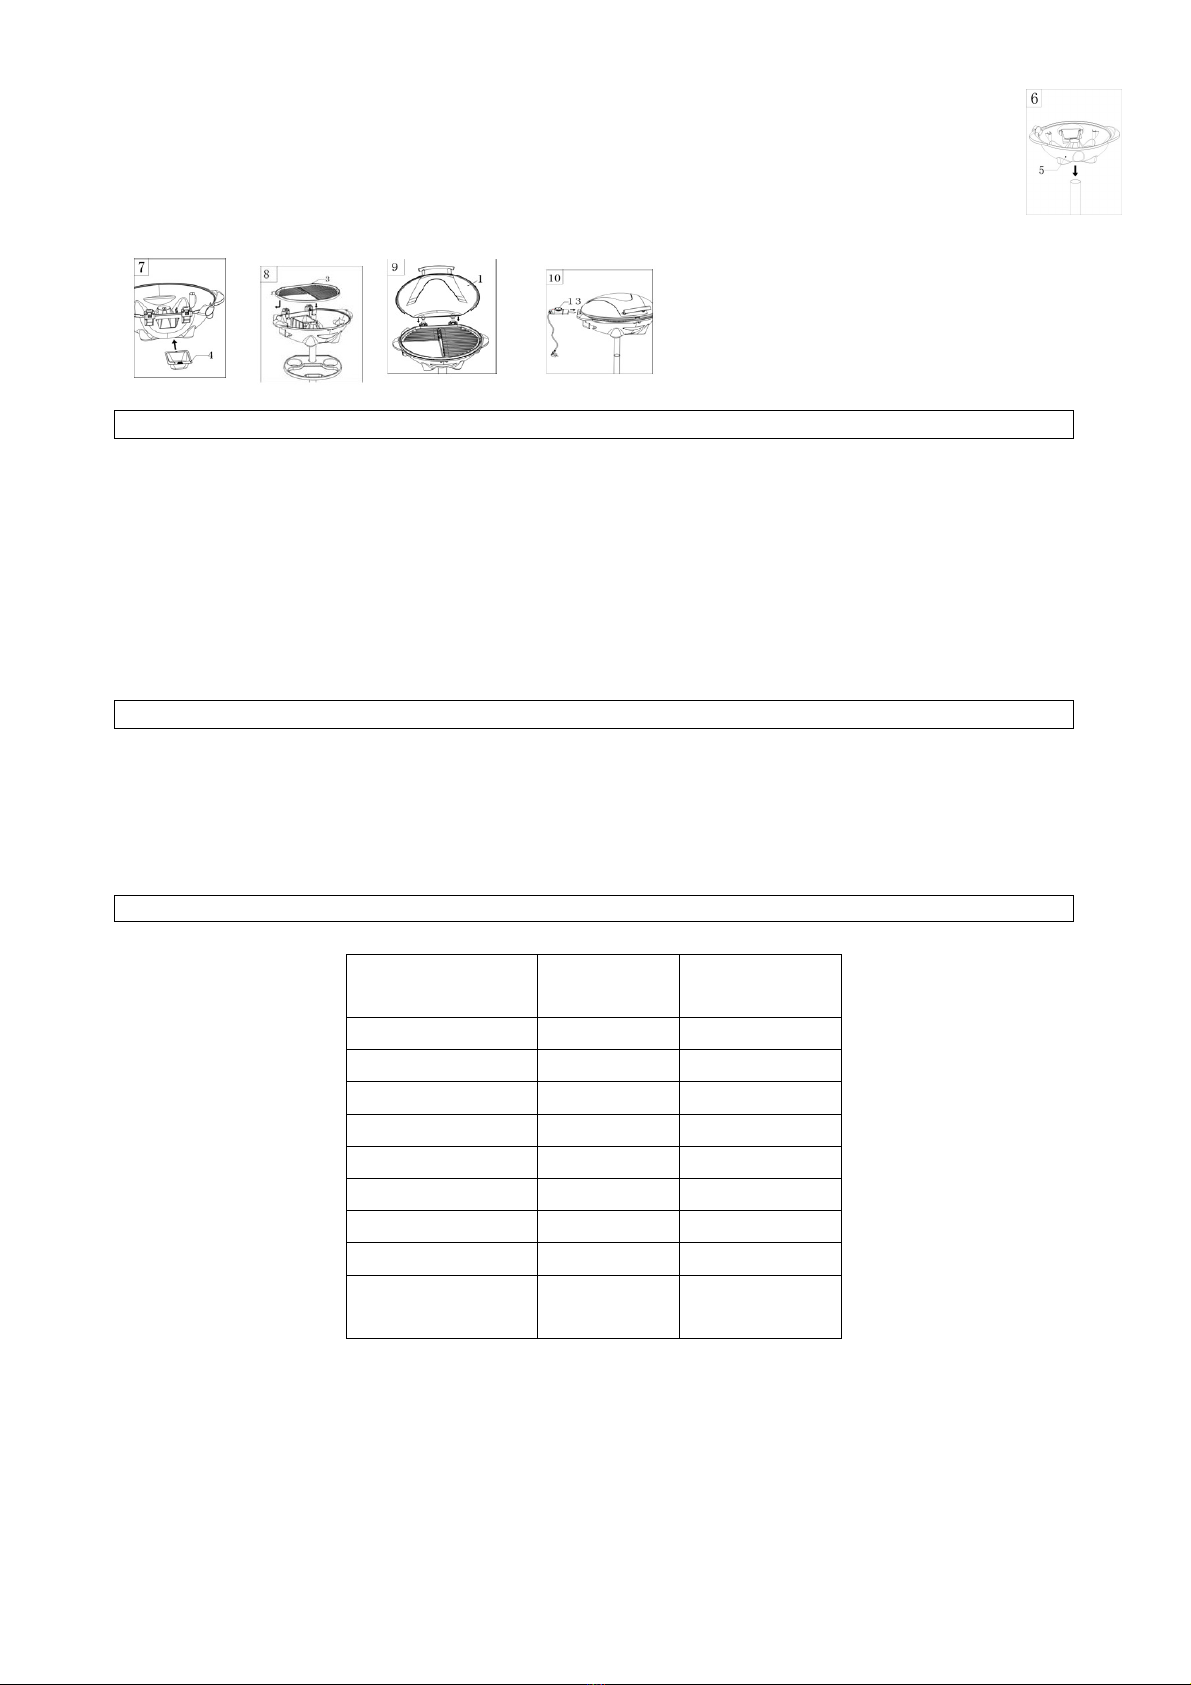
9. Legen Sie die Fettauffangschale (j) in den Schlitz der schüsselförmigen Basis (h). Um sie gut zu
befestigen, stellen Sie sicher, dass das Loch auf der Fettauffangschale mit der Erhebung in der
Mitte der schüsselförmigen Basis übereinstimmt (Tipp: Diese Fettauffangschale kann mit etwas
Wasser gefüllt werden, damit sie leichter zu reinigen ist.) Um die Fettauffangschale heraus zu
nehmen, drücken Sie leicht auf die Unterseite.
Achtung: Die Kapazität der Fettauffangschale ist 0,3 Liter. Bitte gießen Sie das Fett aus, wenn
sie voll ist. Die Oberfläche der Fettauffangschale ist heiß. Berühren Sie die Fettschublade
während des Kochens nicht.
10. Legen Sie die Grillplatte (K) auf den Boden des Geräts (H). Setzen Sie zuerst die Buchse (L) der
Grillplatte in das Loch (M) der Basis. Platzieren Sie dann die Grillplatte horizontal auf der
Gerätebasis. Um die Grillplatte heraus zu nehmen, halten Sie bitte die rechte Seite der Platte hoch
und nehmen Sie die Buchse (L) aus dem Loch (M). Bevor Sie die Grillplatte heraus nehmen, stellen
Sie sicher, dass sie vollständig abgekühlt hat und nicht in Gebrauch ist.
Achtung: Zum Schließen oder Öffnen der Haube benutzen Sie bitte den Deckelgriff.
Beachten Sie, dass die Haube währen des Grillens heiß ist.
11.Setzen Sie den einstellbaren Thermostat auf dem abnehmbaren Kabel (n) in die Gerätebuchse
(L). Beim entfernen des einstellbaren Thermostats halten Sie bitte den Griff der Basis, um
vermeiden, dass Sie das Gerät umwerfen.
Achtung: Seien Sie vorsichtig. Stolpern Sie nicht über das Netzkabel, wenn das Gerät in
Betrieb ist. Ziehen Sie nach dem Gebrauch immer den Stecker aus der Steckdose.

12. Montieren Sie die Haube. Halten Sie den Haubengriff (p) und legen Sie die Metall-Scharniere (O)
in die Montagelöcher (Q) der Basis. Beim Entfernen der Haube, öffnen Sie bitte die Haube und neigen
Sie sie bis 45° zwischen Haube und Grillplatte und lösen Sie die Metall-Scharniere (o) von dem
Montagelöschern (Q).
13. Da diese Haube abnehmbar ist, ist es bequemer für die Nutzung und Reinigung.
Achtung: Zum Schließen oder Öffnen der Haube benutzen Sie bitte den Deckelgriff. Beachten
Sie, dass die Haube während des Grillvorgangs heiß ist.
14. Beim Bewegen des gefalteten Trolleys oder wenn das Gerät nicht benutzt wird, sperren Sie bitte
die Haube mit der Schnalle und stellen Sie sicher, dass der Gürtelhaken (U) das Rohr verriegelt
Beschreibung der Bauteile des BBQ-9479
1. Haube 9. Unteres Standrohr
2. Haubengriff 10 A. Standfuß
3. Grillfläche 10 B. Standsockel
4. Fettauffangschale 11. Griff
5. Geräteunterbau 12. Gerätebuchse
6. Gewürzhalter 13. Temperaturregler
7. Oberes Standrohr 14. Kontrollleuchte
8. Dekoration 15. Gerätesteckdose
16. Scheibe
Schrauben
Montageanleitung des BBQ-9479
1. Installieren Sie den Standfuß (10A) in der Standbasis (10B). Sieh hören ein "Klick", wenn der
Standfuß fixiert ist.
2. Legen Sie die Scheibe (16) auf den Standfuß, und installieren Sie dann die Schrauben (17)
in der Scheibe, um die Standfüße zu fixieren.
3. Installieren Sie die halbe Gewindestange (a) in dem unteren Standrohr (9). Legen Sie die
Dekoration (8) auf das untere Standrohr (9) und montieren beide Rohre zusammen; stellen
Sie sicher, dass sie gut befestigt sind.
4.Verbinden Sie den Grill Standfuß (10) mit dem unteren Rohr (9), um den kompletten Grillständer zu
bilden (der Grill kann mit oder ohne Ständer verwendet werden).
5. Installieren Sie die Schraube (b) am oberen Rohr (7), platzieren Sie darauf das Gewürztablett.
(Stellen Sie sicher, dass das Fach auch fixiert ist)
6. Setzen Sie den Geräteunterbau(5) auf den Grill (stellen Sie sicher, dass der
Grill auf einer trockenen, flachen und stabilen Oberfläche platziert wird)
7. Legen Sie die Fett-Auffangschale (4) in die vorgesehene Halterung vom Geräteunterbau (5).
Fixieren Sie die Öffnung der Fettauffangschale mit einer Schraube (füllen Sie die Fettauffangschale
mit ein wenig Wasser, dadurch ist sie einfacher zu reinigen).
8. Platzieren Sie die Grillfläche (3) auf dem Geräteunterbau (5). Zunächst stecken Sie die
Gerätesteckdose (15) bitte in die dafür vorgesehene Öffnung (12). Dann platzieren Sie die Grillfläche

waagerecht auf dem Geräteunterbau.
9. Installieren Sie den Griff (2) mit der Schraube (d) und dem Haken am Metalldeckel (C).
Dann legen Sie die Metalldeckel bitte auf die Grillfläche.
10. Drücken Sie den abnehmbaren Temperaturregler (13) so weit wie möglich in die Grill-
Gerätesteckdose.
Vor dem Erstgebrauch des Gerätes
Entfernen Sie alle Verpackungsmaterialien und reinigen Sie die Grillplatte, die Tropfschale und Haube
gründlich. Die Grillplatte und die Tropfschale sind beide spülmaschinenfest.
Wichtig: Lassen Sie alle Teile gründlich trocknen, besonders die Gerätebuchse. Tauchen Sie das
einstellbare Thermostat auf dem abnehmbaren Kabel niemals in Wasser oder irgendeine andere
Flüssigkeit.
Heizen Sie den Grill bei geschlossenem Deckel auf maximaler Einstellung etwa 10 Minuten, ohne
Lebensmittel darauf zu legen. Rückstände des Fertigungsprozess könnten Geruch und Rauch erzeugen,
wenn das Gerät zum ersten Mal benutzt wird. Dies ist normal und wird nach kurzer Zeit verschwinden.
Betrieb des Geräts
Verbinden Sie das Gerät mit der Hauptstromversorgung
Setzen Sie das Thermostat auf die gewünschte Temperatur (es braucht gewöhnlich 10 Minuten zum
Aufheizen)
Das Einschalt-Anzeigelicht geht aus, sobald die eingestellte Temperatur erreicht wird.
Legen Sie die Lebensmittel zum Grillen auf die Grillplatte.
Grillzeiten
Die folgenden Grillzeiten sind nur Indikativ. Unterschiedliche Zeiten sind erforderlich für unterschiedliche
Gewichte und Größen der Lebensmittel, die gegrillt werden sollen und hängen davon ab, ob Sie mit oder
ohne Abdeckung grillen.
Lebensmittel Temperatur
einstellung
Grillzeit
Steak/Rind
5
22-30 min.
Lamm
5
18-27 min.
Hähnchenkeulen
5
37-45 min.
Kotletts
5
30-38 min.
Chicken wings
5
22-30 min.
Schweinefilet
4-5
13-15 min.
Ganzer Fisch
5
18-23 min.
Kebabs
3-4
15-18 min.
Verschiedene
Wurstsorten
3-4
18-23 min.

Tips für das Grillen
Ihr Fleisch wird zart, wenn Sie es über Nacht einlegen. Die Marinade wird immer mit Öl (für die
Feuchtigkeit), Essig (damit das Fleisch zart wird) und einer Mischung aus Gewürzen gemacht.
Benutzen Sie immer Grillzangen oder anderes Grill Besteck um das Grillfleisch umzudrehen (eine Gabel
würde das Fleisch austrocknen und die Antihaft-Beschichtung beschädigen).
Wenden Sie das Fleisch oder den Fisch nur einmal während dem Grillen um. Sie müssen es nicht öfter
wenden, da Sie das Essen sonst austrocknen.
Grillen Sie Fleisch niemals zu lange.
Sollten die Lebensmittel auf der Grillplatte kleben bleiben, reiben Sie die Platte mit einem in Öl
getränkten Küchenpapier ein
Reinigung und Pflege des Geräts
Trennen Sie das Gerät vom Stromnetz
Lassen Sie den Grill vollständig abkühlen
Nehmen Sie den Temperaturregler (13) aus dem Gerät
Reinigen Sie die Grillfläche(3) und die Fett Auffangschale (4) mit warmem Wasser und einem feuchten
Tuch. Verwenden Sie keine Stahlwolle, Bürste oder Scheuermittel, um Schäden an der Beschichtung des
Grills zu vermeiden.
Wischen Sie den Geräteunterboden (5) mit einem feuchten Tuch. Fettspritzer können mit einem milden
Reinigungsmittel entfernt werden.
Hinweis:
Die Grillplatte hat eine Antihaft-Beschichtung. Beschädigen Sie diese nicht während des Grillens oder der
Reinigung.
Tipp: Schützen Sie das Gerät vor Staub und Schmutz, wenn es für einen längeren Zeitraum nicht
verwendet wird, indem Sie es in eine Plastiktüte wickeln. Bewahren Sie es an einem trockenen Ort auf.
Umweltschutz
Dieses Produkt darf am Ende seiner Lebensdauer nicht über den normalen Haushaltsabfall entsorgt
werden, sondern muss an einem Sammelpunkt für das Recycling von elektrischen und
elektronischen Geräten abgegeben werden. Das Symbol auf dem Produkt,
der Gebrauchsanleitung oder der Verpackung weist darauf hin. Die Werkstoffe sind gemäß ihrer
Kennzeichnung wieder verwertbar. Mit der Wiederverwendung, der stofflichen Verwertung oder
anderen Formen der Verwertung von Altgeräten leisten Sie einen wichtigen Beitrag zum Schutze
unserer Umwelt. Bitte erfragen Sie bei der Gemeindeverwaltung die zuständige Entsorgungsstelle.
© 2013 Home Essentials
®
BBQ-9493 und BBQ-9479
SUNTEC WELLNESS GMBH / HOLZSTRASSE 2 / 40 221 DÜSSELDORF / DEUTSCHLAND

BBQ-9479 BBQ-9493
User Manual
GB

Before use
Please read these instructions carefully before proceeding. They will give you important advices for the
use, the security and the maintenance of the appliance. Keep the instructions carefully, it should be always
be stored with the product and should be passed on to each subsequent user.
The appliance must only be used for the intended purpose according to these instructions.
Observe the notes on stately regulations.
Keep the packaging properly.
Safety regulations
Plug the appliance only in on outlet as mentioned on the rating plate and only plus it into an earthed,
three-pin socket.
An electric appliance is not a children’s toy. Children are not aware of the hazards of electrical appliances.
Therefore close supervision is necessary when the appliance is used by children. Do not allow power
cable to hang down within easy reach. Keep children away from packing material, e.g. plastic bags.
The installation of a faulty current protective device with a rated breaking current offers you additional
safety by ensuring that 30 mA will not be exceeded in the house installation. Let your installation electrician
advice you. Danger also exists with appliance which have been switched off, this is why, after use, the plug
should be removed for the mains.
Do not use this appliance near the water contained in bath-tubs, washbasins or other receptacles neither
expose it to rain or other humidity.
Regularly check whether the wire is defective. In this case the appliance must not be put into operation
(immediately pull the plug). Send it to the manufacturer for repair.
The appliance must not be operated (disconnect the mains plug immediately) when:
the appliance, casing or cable is damaged
the appliance shows visible signs of damage.
a fault is suspected after a fall or the like.
Disconnect the main plug:
in case of faults during use.
before cleaning or moving the appliance from place to place.
after use
Never pull the plug out of the socket by the flex or with wet hands.
Never carry nor pull the appliance by the flex.
Don’t pull the flex over sharp edges. Don’t wedge it.
Never immerse the mains cord or the thermostat plug in water or any other liquid.
Only use extension leads after having made sure that their condition is faultless and use an earthed wise
with a minimum capacity of 10A.
Put the wire so that unintentional touching or drawing is impossible.
Never bring the extension wire in touch with the hot grill plate.
Always switch off the appliance before removing the mains plug.
Before removing attachments or cleaning the grill, allow to cool completely.
Take care! The grill plate will get very hot, and it stays hot for a long time after it has been
switched off. Beware of burns! Do not touch any hot surfaces and take care when handling the
appliance after use.
Do not stand the grill over the edge or corner of the table and avoid contact with the hot surfaces.
Do not place the appliance on or near a hot gas electrical burner, or in a heated oven.
Only use the appliance when it is placed on a stable and dry surface.
Do not leave the appliance unattended.
Always switch off the appliance when it is not in use.
This appliance is not meant for commercial use but exclusively for private use.

Do not use the appliance without the grease collecting cup or the base.
Never cover the grill plate with aluminum foil or trays (this might damage the non-stick coating)
Make sure without fail that the device is installed correctly before you put this into operation (first of all if
using the trolley).
Please, ensure that the grill plate must not touch the heating element-injury danger!
Beware of fat spitting while grilling fat or juicy meat.
Place the appliance on a surface that is resistant to heat. Keep the electric grill at least 10 cm from any
walls when in operation.
Use this appliance only as described in this manual. Any other use not recommended by the
manufacturer may cause fire, electric shock or injury to persons.
For safety reasons do not use attachments that were not recommended or supplied by the manufacturer.
Only trained personnel should repair electrical appliances. Unskilled repairs can cause considerable
danger to the user.
If the connection cord is damaged, it must be replaced by the manufacturer, his after-sales service
department or a similarly qualified person in order to avoid risks.
No warranty for any possible damage can be accepted if the appliance is used for improper
purpose, wrongly operated or unprofessionally repaired. In such a case, any warranty claim is
void.
Component BBQ-9493
1. Handle 11. Metal hinge
2. Upper cover 12. Jacket of socket
3.Grill plate 13. Collecting bowl
4. Feet 14. Control Knob
5. Thermoplastic 15. Thermostat Enclosure
Enclosere 16. Power cord
6. Buckle of c 6. Buckle of cover 17. Stand tube
7. Side table 18. Wheel
8. Belt hook 19. Axle
9. Pole of lockup
10.Tube of support
Installation Instructions BBQ-9493
1. Take the trolley frame and accessories out from the packing box. Please make sure that
the trolley frame is
placed on a dry, flat and stable surface. Then let the wheel axle(a) pass through two holes
which are at the end side of the tube.
2. Attach the wheels (b) with the two sides of the axle (a) respectively.
3. There are two mounting holes on each end side of the axle (a), insert the “R” pin(c) through the holes .
This will lock the wheels.
4. Press the wheel covers(d) to the wheels(b) according to those three location tips.
5. Stand up the trolley : First , step on the middle of supporting tube (I) with right foot , lift
up the side table(II)

with right hand whilst lift the tube for wheel (III) upward with left hand. Then locate the tube(III)
with the orientation tube which under the side table. The trolley frame is standing up now. Fold
up the trolley : First , step on the middle of support tube (I) with right foot , hold up the side
table (II) with right hand whilst your left hand holds the short edge of support tube(III) and place it
down slowly . Attention : When folding up the trolley , DON’T hold the two sides of tube (III)
to avoid any pinch to your hand.
6. After standing up the trolley frame, you MUST set the safety locking unit (f) immediately. This
safety locking unit is with self-locking feature. Press the spring (e) and hook the bent hook(f) on
the extension part (e). Then stop pressing the spring and it will retract to lock the safety hook unit
automatically.
Attention : Make sure the safety hook unit is LOCKED during cooking or moving. DO NOT
try to turn or pull the safety hook while using this appliance.
7. Firstly, remove the screw from the trolley tube (II). Then, install the stand tube (G1) onto the
trolley tube (II). and installthe stand tube (G2) onto the trolley tube (II). There is a positioning hole
(IV) on the stand tube (G2), which is going to fix the bottom positioning projection of base . Tighten
the stand tube (G1 and G2) and trolley with screws and nuts.
8. Set the bowl-shaped base (h) into the stand tube (g) to the bottom. Fix the bottom positioning
projection of base into the positioning hole (IV). When remove the base from stand tube (g),
please step slightly on the supporting tube (I),hold the handles of base and take it off.
9. Insert the grease collecting cup (j) into the bracket supplied for it in the back of bowl-shaped
base (h) of the appliance. In order to fix it well, please buckle the hole on grease collecting cup into
the positioning projection which is in the middle of the bowl-shaped base. (Tips: This grease cup
can be filled with little water to make it more easier to clean). To get the grease collecting cup out,
please give it a slight press, after depart the hole from the positioning projection,
you can take it out easily. Attention : The capacity of grease cup is 0.3L , please pour out the
grease once it’s full.The surface of grease cup is HOT . Please well protect yourself if
needed to touch it while cooking !
10. Place the grill plate (K) on the base of the appliance (H). Firstly, insert the heating tube socket
(L) of grill plate into the protective hole (M) intended for it slantways . Secondly, set the grill plate
horizontally on the appliance base.To take grill plate off, please hold up the right side of the plate
and take the pull socket (L) out of the protective hole(M) slantways. Before take the grill plate out,
make sure it is cool and not in use.
Attention: The grill plate must be used together with
bowl-shaped base!
11. Insert the detachable temperature regulator's pin(n)into the heating tube socket (L) , it can plug
in the appliance. When remove the detachable temperature regulator, please hold the handle of
the base to avoid pushing over the
appliance.Attention: Please take care DON’T be tripped over by the power cord when operating the
appliance. Remember to remove the plug after use.
12. Install the cover. Holds the cover handle (p) and insert the metal hinges (O) into the
installation holes (Q)
of base. When remove the cover, please open the cover and tilt to 45° between cover and grill
plate , and detach out the metal hinges(o) from installation holes (Q). Other angles can’t help to
detach the cover but only around 45°.
13. The design of clamshell function and detachable of this cover makes it more convenient for
using and cleaning. Attention: If user want to close or open the cover , please hold the cover
handle. Mind yourself not be burnt
as the metal cover is HOT while cooking.

14. When moving or pulling the trolley or the appliance is not in use, please lock the buckle (V/W) of upper
cover, and make sure the belt hook (U) lock the tube.
Installation Instruction BBQ-9479
1. Hood 9. Nether tube
2. Metall hood 10 A. Stand feet
3. Grill plate 10 B. Stand base
4. Collecting bowl 11. Handle of Base
5. Base of appliance 12. Appliance socket
6. Spice rack 13. Temperature Regulator
7. Upper tube 14. Indicator light
8. Decoartion 15. Appliance socket
16. Washer
17. Screws
Installation Instructions of BBQ-9479
1. Install the stand feet (10A) into the stand base (10B) properly. That will be a “click” sound when
the stand foot is fixed completely.
2. Place the washer (16) onto the stand base, and then install the screws (17) into the washer to fix
the stand feet and stand base firmly.
3. Install half of the threaded rod (a) in the nether tube (9) Put the decoration (8) on the nether tube
(9) and assemble both tubes together; ensure that they are fixed well
4. Connect the grill stand base (10) and the nether tube (9) together to form the complete grill stand.
(The grill can be used with or without this stand).
5. Install the screw (b) into upper tube (7), and then put the spice rack on the upper tube (Making
sure that the tray is fixed well)
6. Place the bowl-shaped base of the appliance (5) onto the grill stand. (Making sure that the grill
stand is placed on a dry flat, stable surface)
7. Put the fat collecting bowl (4) into the bracket supplied for it in the base of the appliance, buckle
the hole of fat
collecting bowl onto the screw to fix it well (The flat collecting bowl can be filled
with little water to make it easier to clean).
8. Place the grill plate (3) on the base of the appliance (5). First of all insert the appliance socket (15)
into the opening intended for it (12), then set the grill plate horizontally on the appliance base.
9. Install the handle (2) to the metal hood with the screw (d) and hook (c). Then place the hood on
the grill plate.
10. Push the detachable temperature regulator (13) as far as it will go into the grill’s appliance
socket.

Before using the appliance for the first time
Remove all the packaging materials and wash the grill plate , grease collecting cup and metal cover
thoroughly. The grill plate and the grease collecting cup are both dishwasher safe.
Important: Dry all the different parts thoroughly. This applies especially to the appliance socket .
Never immerse the detachable temperature regulator in water.
Heat the grill to its maximum setting for about 3-5 minutes, with the metal cover closed and without
putting any food on it. Residues left from the manufacturing process may cause some smell and
smoke when the appliance is used for the first time.
Operating the appliance
Connect the appliance to the mains electricity supply.
Set the temperature regulator to the required temperature level (it usually takes about 3 minutes to
heat up).
The temperature indicator lamp will go out as soon as the required temperature has been reached.
Place the food to be grilled on the grill plate.
Cooking times
The following are recommended cooking times. Different times will be required for different weights
and sizes of foods to be grilled, and depending on whether you are grilling with or without the metal
cover.
Tips for grilling
Your meat will be tendered if you marinade it overnight before cooking (the marinade is always made of
oil (to and moistness), vinegar (to tenderize) and a mixture of seasonings).
Always use tongs or some form of scoop to turn the grilled food (using a fork to turn the food will dry it out
and damage the non-stick coating).
Only turn meat and fish once during grilling. You do not need to turn it more than once and too much
turning dries food out.
Never cook meat for too long. Even pork is better if it is served when it is still somewhat pink and juicy.
If cooked food sticks to the grill plate, rub the plate with a piece of kitchen paper soaked in oil from time to
time.
Cleaning and looking after the appliance
Disconnect the appliance from the mains electricity supply.
Allow the grill to cool completely.
Take the detachable temperature regulator out of the appliance socket.
Food to be grilled
Temperature
grade setting
Cooking time
Steak/beef 5 22-30 mins
Lamb 5 18-27 mins
Chicken
drumsticks 537-45 mins
Chops 5 30-38 mins
Chicken wings 5 22-30 mins
Fillet of pork 4-5 13-15 mins
Whole fish 5 18-23 mins
Kebabs 3-4 15-18 mins
Various
sausages 3-4 18-23 mins

Wash the grill plate and fat collecting bowl with hot washing-up water (they are dishwasher safe).Do not
use steel wool pads or abrasives to avoid any damage to the coating of the grill.
Wipe the base of the appliance with a damp cloth. Fat splashes can be removed with a mild cleaning
agent.
Note:
The grill plate has a non-stick coating. Do not scratch this coating during either the grilling or the cleaning
stages.
Tip: Use a washing-up brush with plastic bristles to clean the grill plate.
Protect the appliance from dust and dirt if it is not to be used for a prolonged length of time (wrap it in a
plastic bag). Store it in a dry place.
Disposal
Disable unserviceable appliances immediately. Remove the mains plug and cut up the mains connection
cable. If possible, bring unserviceable appliances to an official waste collection point. Most local authorities
provide removal services for bulky refuse at least once a year.
Environmental protection
This product is not on its packaging disposed of in normal household waste
will, but at a collection point for the recycling of electrical and
are electronic equipment. The symbol on the product,
the instruction manual or the package indicates. The materials are recyclable according to their labeling. By
reusing, recycling or
other forms of recovery of used products you make an important contribution to protecting our environment.
Please ask the local authorities for the appropriate disposal site.
© 2013 Home Essentials
®
BBQ-9493 and BBQ-9479
SUNTEC WELLNESS GMBH / HOLZSTRASSE 2 / 40 221 DÜSSELDORF / GERMANY

BBQ-9479 BBQ-9493
Notice d’utilisation
FR

Avant l'utilisation
Veuillez soigneusement lire cette notice. Elle contient des informations importantes relatives à l'utilisation,
la sécurité et l'entretien de l'appareil. Conservez cette notice soigneusement et si besoin, transmettez-la à
d'autres utilisateurs.
L'appareil ne doit être utilisé qu'aux fins pour lesquelles il a été prévu, conformément à cette notice.
Respectez les consignes de sécurité.
Conservez l'emballage en bon état.
Consignes de sécurité
Cet appareil n’est pas conçu pour une utilisation par des personnes (y compris des enfants) ayant des
capacités physiques, sensorielles ou mentales réduites, ou ayant un manque d’expérience ou de
connaissance, à moins qu’elles ne soient surveillées ou qu’elles ne reçoivent des instructions concernant
l’utilisation de l’appareil de la part d'une personne responsable de leur sécurité.
Les enfants doivent faire l'objet d'une surveillance constante, afin de s'assurer qu'ils ne jouent pas avec
l'appareil.
Branchez l'appareil uniquement sur des prises avec plaque signalétique, comme les prises à 3 pôles
mises à la terre.
L'installation d'un dispositif de protection par un courant de coupure assigné vous apporte une sécurité
supplémentaire, celle que les 30 mA ne soient pas dépassés dans l'installation domestique.
Prenez conseil auprès de votre électricien. Il existe aussi un risque sur les appareils déjà arrêtés, c'est
pourquoi il faut retirer la fiche de la prise immédiatement après l'utilisation.
N'utilisez pas le grill à proximité d'un élément contenant de l'eau comme par ex. une baignoire, un évier,
etc. N'exposez l'appareil ni à la pluie, ni à l'humidité.
Assurez régulièrement que le câble n'est pas défectueux. Dans ce cas, l'appareil ne doit pas être mis en
marche (retirer immédiatement la fiche).
L'appareil ne doit pas être exploité (retirez immédiatement la fiche), lorsque :
l'appareil, le boîtier ou le câble est endommagé
l'appareil présente visiblement des signes de détérioration
vous soupçonnez un dysfonctionnement après une chute ou quelque chose de semblable
Débranchez la fiche :
en cas de défaillances au cours de l'utilisation.
avant le nettoyage ou le transport de l'appareil
après utilisation
Ne retirez jamais la fiche à l'état recourbé ou avec les mains mouillées.
Ne tirez ni ne portez l'appareil par le câble d'alimentation, le câble pouvant subir des dommages.
Ne faites pas cheminer le câble sur des arêtes vives et ne l'enfoncez pas.
Ne plongez jamais le câble d'alimentation ou le thermostat dans l'eau ou un autre liquide.
N'utilisez une rallonge que si elle est en parfait état. Utilisez un câble mis à la terre avec une capacité
minimum de 10 A.
Ne mettez jamais la rallonge en contact avec la grille chaude du barbecue.
Arrêtez toujours d'abord l'appareil, avant de le débrancher de la prise.
Avant de nettoyer le grill ou l'accessoire, laissez refroidir l'appareil.
Attention ! La grille devient très chaude et ne refroidit que très lentement après avoir été arrêtée.
Attention - risque de brûlures ! Ne touchez pas les surfaces chaudes et soyez vigilant lors de la
manipulation de l'appareil après l'utilisation.
Ne placez pas le grill sur un angle ou un coin de la table et évitez tout contact avec la surface chaude.
Ne mettez pas l'appareil en place à proximité d'une cuisinière à gaz ou d'un four.
Utilisez l'appareil uniquement lorsqu'il est placé sur une surface sèche et stable.
Ne laissez pas l'appareil sans surveillance.

Arrêtez toujours l'appareil lorsqu'il n'est pas utilisé.
Cet appareil n'est pas destiné à un usage commercial, mais exclusivement à un usage privé.
N'utilisez pas l'appareil sans coupelle-collectrice des graisses ou support de l'appareil.
Ne recouvrez jamais la grille avec de l'aluminium ou une assiette (cela pourrait endommager le
revêtement antiadhérent).
Assurez-vous que l'appareil est assemblé correctement avant de la mettre en service (surtout si vous
l'utilisez pour la toute première fois).
Veuillez veiller à ce que la grille ne touche la résistance de chauffe. Risque de blessures !
Faites attention aux projections de graisse pendant que vous faites vos grillades.
Placez l'appareil sur une surface résistante à la chaleur. Maintenez le grill électrique à une distance de
10 cm des murs, lorsque vous le mettez en marche.
Utilisez cet appareil uniquement comme décrit dans cette notice. Toute autre utilisation n'ayant pas fait
l'objet d'une recommandation de la part du fabricant, peut engendrer un incendie, une électrocution ou
blesser une personne.
Pour des raison de sécurité, n'utilisez que les accessoires livrés ou recommandés par le fabricant.
Seul un personnel formé ne devrait réparer les appareillages électriques. Des risques importants
peuvent survenir pour l'utilisateur, si les réparations ne sont pas faites dans les règles de l'art.
Lorsque le câble de raccordement est endommagé, celui-ci doit être replacé par le fabricant. Contactez
le
S.A.V. ou une personne de qualification semblable, pour éviter tout risque.
Le fabricant ne peut être tenu pour responsable des dommages éventuels, si l'appareil est utilisé à des
fins non conformes, n'est pas utilisé correctement ou n'est pas réparé dans les règles de l'art. Dans un tel
cas, aucun recours en garantie n'est possible.
Attention : soyez prudent. Ne trébuchez pas sur le câble lorsque l'appareil fonctionne. Pensez à retirer la
fiche après utilisation.
Description des composants du BBQ-9493
1. Poignée du capot 11. Crochets de capot
2.Capot 12. Douille
3.Grille 13. Coupelle-collectrice
4. Pieds 14. Bouton de contrôle
5. Boîtier plastique 15. Thermostat réglable
6. Attache du capot dans un câble amovible
7. Tablette latérale 16. Câble d'alimentation
8. Crochet de la sangle 17. Tube montant
9. Blocage de sécurité 18. Roue
10. Support tubulaire
19. Axe

Notice de montage BBQ-9493
1. Sortez le châssis du chariot et les accessoires du carton. Veuillez-vous assurer que le
châssis du chariot est bien placé sur une surface stable, plane et sèche. Faites passer l'axe de
la roue (a) par les deux trous au bout du tube.
2. Montez les roues (b) correspondantes des deux côtés de l'axe (a)
3. Il existe deux alésages sur chaque face apparente de l'axe (a). Faites cheminer la goupille « R » (c)
par le trou. Ceci verrouille les roues.
4. Poussez les caches (b) sur les roues (b) conformément à la position indiquée.
5. Mettez le chariot debout : donnez d'abord un coup de pied du pied droit au milieu du tube
porteur (I), soulevez la tablette latérale (II) de la main droite et le tube pour la roue (III), de la
main gauche. Assemblez ensuite le tube (III) au tube qui se trouve sous la tablette latérale. Le
cadre du chariot est en place.
6. Après mise en place du cadre du chariot, vous DEVEZ immédiatement enclencher le blocage
de sécurité (f). Le blocage de sécurité est auto-verrouillable. Appuyez le ressort (e) et accrochez
le crochet (f) courbé dans la partie allongée (e). Arrêtez ensuite d'appuyer et il reviendra pour
enclencher automatiquement le crochet de sécurité.
Attention : assurez-vous que le crochet de sécurité est bien VERROUILLÉ pendant les
grillades ou les mouvements. N'essayez PAS de tourner ou de tirer sur le crochet de sécurité
pendant l'utilisation de cet appareil.
7. Retirez d'abord la vis du tube du chariot (III). Ensuite, montez le
tube montant (G1) sur le tube du chariot (II) et montez le tube montant (G2) sur le tube du chariot (II).
Il existe un trou de positionnement (IV) sur le tube montant (G2), qui fixe G1 et G2 ensemble par vis.
Assemblez fermement le tube montant (G et G2) au chariot à l'aide de vis et d'écrous.
8. Placez le fond de l'appareil en forme de clé (h) dans le tube montant (g).
Fixez la partie inférieure du socle dans le trou de positionnement (IV). En extrayant la base
du tube montant (g), donnez une léger coup de pied sur le tube porteur (I), tenez les poignées de la
base et retirez-les.
9. Déposez la coupelle-collectrice des graisses (j) dans la fente de la base en forme de clé (h). Pour
bien la fixer, assurez-vous que le trou sur la coupelle-collectrice corresponde à l'élévation au
centre de la base en forme de clé. (Conseil : cette coupelle-collectrice peut être remplie avec un peu
d'eau, pour être nettoyée plus facilement.) Pour retirer la coupelle-collectrice des graisses, poussez
légèrement sur la partie inférieur.
Attention : la capacité de la coupelle-collectrice des graisses est de 0,3 litre. Veuillez jeter la
graisse, lorsqu'elle est pleine. La surface de la coupelle-collectrice est chaude. Ne touchez
pas le tiroir à graisse pendant la cuisson.
10. Placez la grille (K) sur le fond de l'appareil (H). Installez d'abord la douille (L) de la grille dans le
trou (M) de la base. Placez ensuite la grille horizontalement sur la base de l'appareil. Pour extraire la
grille, veuillez maintenir le côté droit de la grille en l'air et retirez la douille (L) du trou (M). Avant
d'extraire la grille, veuillez vous assurer qu'elle est complètement refroidie et pas en cours
d'utilisation.
Attention : pour ouvrir ou fermer le capot, veuillez utiliser la poignée.
Tenez compte du fait que le capot est chaud pendant les grillades.
11.Placez le thermostat réglable sur le câble amovible (n) dans la douille de la douille de l'appareil
(L). En enlevant le thermostat réglable, veuillez tenir la poignée de la base, pour éviter de renverser
l'appareil.

Attention : soyez prudent. Ne trébuchez pas sur le câble lorsque l'appareil fonctionne. Après
utilisation, retirez toujours la fiche de la prise,
12. Montez le capot. Tenez la poignée du capot (p) et placez les charnières métalliques (O) dans les
trous de fixation (Q) situées sur la base. Pour enlever le capot, veuillez ouvrir le capot et inclinez-le
sur 45°entre le capot et la grille et libérez les charnières métalliques (o) des trous de fixation (Q).
13. Étant donné que le capot est amovible, cela est plus convivial pour l'utilisation et le nettoyage.
Attention : pour ouvrir ou fermer le capot, veuillez utiliser la poignée. Tenez compte du fait
que le capot est chaud pendant les grillades.
14. En déplaçant le chariot plié et lorsque l'appareil n'est pas utilisé, veuillez bloquer le capot avec
l'attache et assurez-vous que le crochet de la sangle (U) verrouille bien le tube.
Description des composants du BBQ-9479
1. Capot 9. Tube montant inférieur
2. Capot 10 A. Pied
3. Grille 10 B. Socle
4. Coupelle-collectrice 11. Poignée
5. Boîtier plastique 12. Douille
6. Porte-épices 13.Thermostat réglable
7. Tube montant supérieur 14. Témoin lumineux
8. Décoration 15. Prise appareil
16.Rondelle
17. Vis
Notice de montage du BBQ-9479
1. Installez le pied (10A) dans la base (10B). Vous entendrez un « clic », lorsque le
pied est fixé
2. Placez la rondelle (16) sur le pied, puis installez les vis (17)
dans la rondelle, pour fixer les pieds.
3. Installez la demi-tige filetée (a) dans le tube coudé inférieur (9). Placez la
décoration (8) sur le tube coudé inférieur (9) et montez les deux tubes l'un à l'autre ; assurez-
vous qu'ils sont bien fixés.
4.Assemblez le pied du grill (10) et le tube inférieur (9), pour former une console complète
(le grill peut être utilisé avec ou sans console).
5. Installez la vis (b) sur le tube supérieur (7), placez-la sur la tablette porte-épices.
(Assurez-vous que le tiroir est également fixé)
6. Placez le support de l'appareil (5) sur le Grill (assurez-vous que le
grill est bien posé sur une surface stable, plane et sèche)
7. Placez la coupelle-collectrice des graisses (4) dans le support prévu du support de l'appareil (5).
Fixez l'ouverture de la coupelle-collectrice avec une vis. (Remplissez la coupelle-collectrice des
Graisses avec un peu d'eau, pour simplifier le nettoyage).
8. Placez la surface du grill (3) sur le support de l'appareil (5). Veuillez d'abord insérer la

prise (15) dans l'ouverture (12) destinée à cet effet. Ensuite, placez la surface du grill
à l'horizontal sur le support de l'appareil.
9. Installez la poignée (2) avec la vis (d) et le crochet sur le capot métallique (C).
Ensuite, veuillez placer le capot sur la surface du grill.
10. Poussez le régulateur de température amovible
(13) aussi loin que possible dans la prise
de l'appareil.
Avant la première utilisation de l'appareil
Retirez tous les matériaux d'emballage et nettoyez bien la grille, la coupelle-collectrice et le capot. La
grille et la coupelle-collectrice sont, toutes deux, résistantes au lave-vaisselle.
Important : laissez sécher toutes les pièces correctement, surtout la douille de l'appareil. Ne plongez
jamais le thermostat réglable situé sur le câble amovible, dans de l'eau ou tout autre liquide.
Faites chauffer le grill au réglage maximum, capot fermé, pendant 10 minutes environ, sans y déposer
d'aliments. Les résidus du processus de fabrication peuvent occasionner une odeur et de la fumée,
lorsque l'appareil est utilisé pour la première fois. Cela est normal et disparaît rapidement.
Fonctionnement de l'appareil
Branchez l'appareil sur l'alimentation du secteur
Positionnez le thermostat à la température souhaitée (il faut environ 10 minutes pour chauffer)
Le témoin de marche s'éteint dès que la température est atteinte.
Posez les aliments à griller sur la grille.
Temps de cuisson
Les temps de cuisson suivants ne sont qu'à titre indicatif. Il faut divers temps de cuisson selon le poids et
la taille des aliments qui doivent être grillés, et cela dépend si vous faites les grillades avec ou sans capot.
Conseils pour les grillades
Votre viande devient tendre si vous la laissez macérer pendant la nuit. La marinade est toujours faite à
base d'huile (pour l'humidité), de vinaigre (pour que la viande devienne tendre) et un mélange d'épices.
Utilisez toujours une pince ou autres couverts spécial grillade pour retourner la viande (une fourchette
dessècherait la viande et endommagerait le revêtement anti-adhésif).
Aliment Réglage
température
Temps de
cuisson
Steak / bœuf
5
22-30 min.
Agneau
5
18-27 min.
Pilons de poulet
5
37-45 min.
Côtelettes
5
30-38 min.
Ailes de poulet
5
22-30 min.
Filets de porc
4-5
13-15 min.
Poisson entier
5
18-23 min.
Kebabs
3-4
15-18 min.
Divers types de
saucisse
3-4
18-23 min.
This manual suits for next models
1
Table of contents
Languages: