Sunway SPM-308L User manual

SPM-308L User Manual

Table of Contents
01/ Important Safety Instructions
02/ Know About Your Sunway Multi-Function Cooking Machine
03/ Accessories of Sunway Multi-Function Cooking Machine:
a. Mixing mug b. Mug lid
c. Sealing ring d. Measuring cup
e. Round steamer f. Steamer set
h. Blade i. Blade sealing ring
j. Dough stirrer k. Dough stirring rod
04/ Touch Panel Operation:
a. Boot animation b. Boot guide
c. STT dial function d. Interface icons
e. Basic mode f. Preset mode
g. Electronic scale mode h. Recipe mode
i. Setting mode j. Internal mode
k. Life test l. Abnormal operation
05/ How to Use Your Sunway Multi-Function Cooking Machine
06/ Cleaning Guide
07/ Troubleshooting
08/ Technical Parameters

01. Important Safety Instructions
For the sake of your safety, please read the following instructions.
Even if you are familiar with this machine, please read these instructions carefully. Follow the instructions below to avoid fire, electric shock or injury.
/Before turning on the machine, please make sure that all the basic safety measures mentioned in the manual are taken for fear of fire, electric shock or injury. In order to
ensure that all operations are carried out properly, please know about some limitations and potential hazards of this machine. It is very important to read this manual
carefully for safe use of this machine.
/Do not place the machine, the power plug or the power cord in water or other liquids. Cleaning shall be done with a damp cloth.
/Please use the machine at 220~240V, 50/60Hz.
/Do not operate the machine beyond the scope of operation.
/Do not repair, disassemble or modify the machine yourself.
/Do not allow water or dust into the machine.
/Do not use the machine outdoors.
/There may be a potential risk of fire, electric shock or injury if parts or accessories not recommended or supplied by the manufacturer are used.
/Children are not allowed to use this machine. Keep the appliance and its cord out of reach of children. Children shall not play with the appliance. Appliances can be
used by persons with reduced physical, sensory or mental capabilities or lack of experience and knowledge if they have been given supervision or instruction
concerning use of the appliance in a safe way and if they understand the hazards involved.
/When the machine is running, do not add any utensils.

/Do not extend the power cord without authorization.
/Please place the machine in a dry place. Do not use the machine on or near flammable objects, such as curtains, towels or other flammable materials.
/After use or during cleaning, make sure the machine is turned off and the power has been disconnected. When disconnecting the power, hold the plug and pull it out of
the socket. Do not pull the power cord or pull the machine with the power cord.
/Do not hang the power cord on the edge of the table, and keep it away from heat.
/Be careful of some surfaces to avoid scald, as some surfaces become hot easily after heating. Let them cool down before cleaning.
/Prevent steam scald during use. If necessary, use a cloth to remove the steamer.
/If the machine contains hot liquid, have the power disconnected automatically or manually before moving the machine. Be careful not to get scalded by liquid when
moving the machine.
/Remember to hold the handle of the mug and never touch the mug body.
/Do not touch the movable parts on the machine.
/Observe the machine or accessories from time to time to avoid the risk of injury.
/Do not allow no-load running.
/Do not touch the food in the transparent measuring cup directly.
/Before running the machine, make sure the transparent measuring cup and lid are installed correctly.
/Do not open the lid until the blade completely stops rotating.
/Do not lock or block the brake system of the mug lid. Do not touch the sharp blade. When removing the blade from the mug, remember to hold the upper end of the
blade to avoid cutting.
/If the blade is stuck in the food, please remember to turn off the machine before moving the blade.
/Do not heat the transparent measuring cup or other parts in the microwave oven.
/The machine shall not be operated if there is something wrong with it.

/Do not put the mug or other parts in a sterilizer or a microwave oven.
/Make sure the food does not exceed the maximum capacity indicator.
/When using a steamer to steam food, make sure the food does not exceed the maximum capacity.
/Do not connect the machine to a timer or a remote control system.
/When cooking baby food, please check the food concentration frequently to make sure there is no chunky food.
/The machine is suitable for home use (and similar use in hotels or restaurants) and is in compliance with safety regulations.
/Make sure the steamer is placed correctly on the mug.
/Make sure the machine is out of reach of children.
/Please use the supplied stirring rod when stirring the food in the mug. Please do not use a metal spoon, a wooden spoon or other objects to stir, because these objects
may be stuck by the blade and then cause injury.
/Open the lid only when you need to stir the food in the mug. Remember to close the lid when you don’t need to stir.
/Avoid placing the machine on the edge of the table for fear of falling.
/If you do not need to use the steamer during operation, please ensure an enough distance from the cabinet or the shelf to avoid getting hurt by steam.
/Before use, please verify that the waterproof silicone ring on the blade combination is installed for fear that the food will easily flow into the machine during use and
cause damage.
/Please use AC power supply and a properly installed socket, and verify that the working voltage and frequency are consistent with the rated values (see the machine
base).
/Repair shall be done by a professional because only the repair done at the after-sales service office can prevent damages of some wire interfaces of the product.
Repairing by yourself is highly risky.

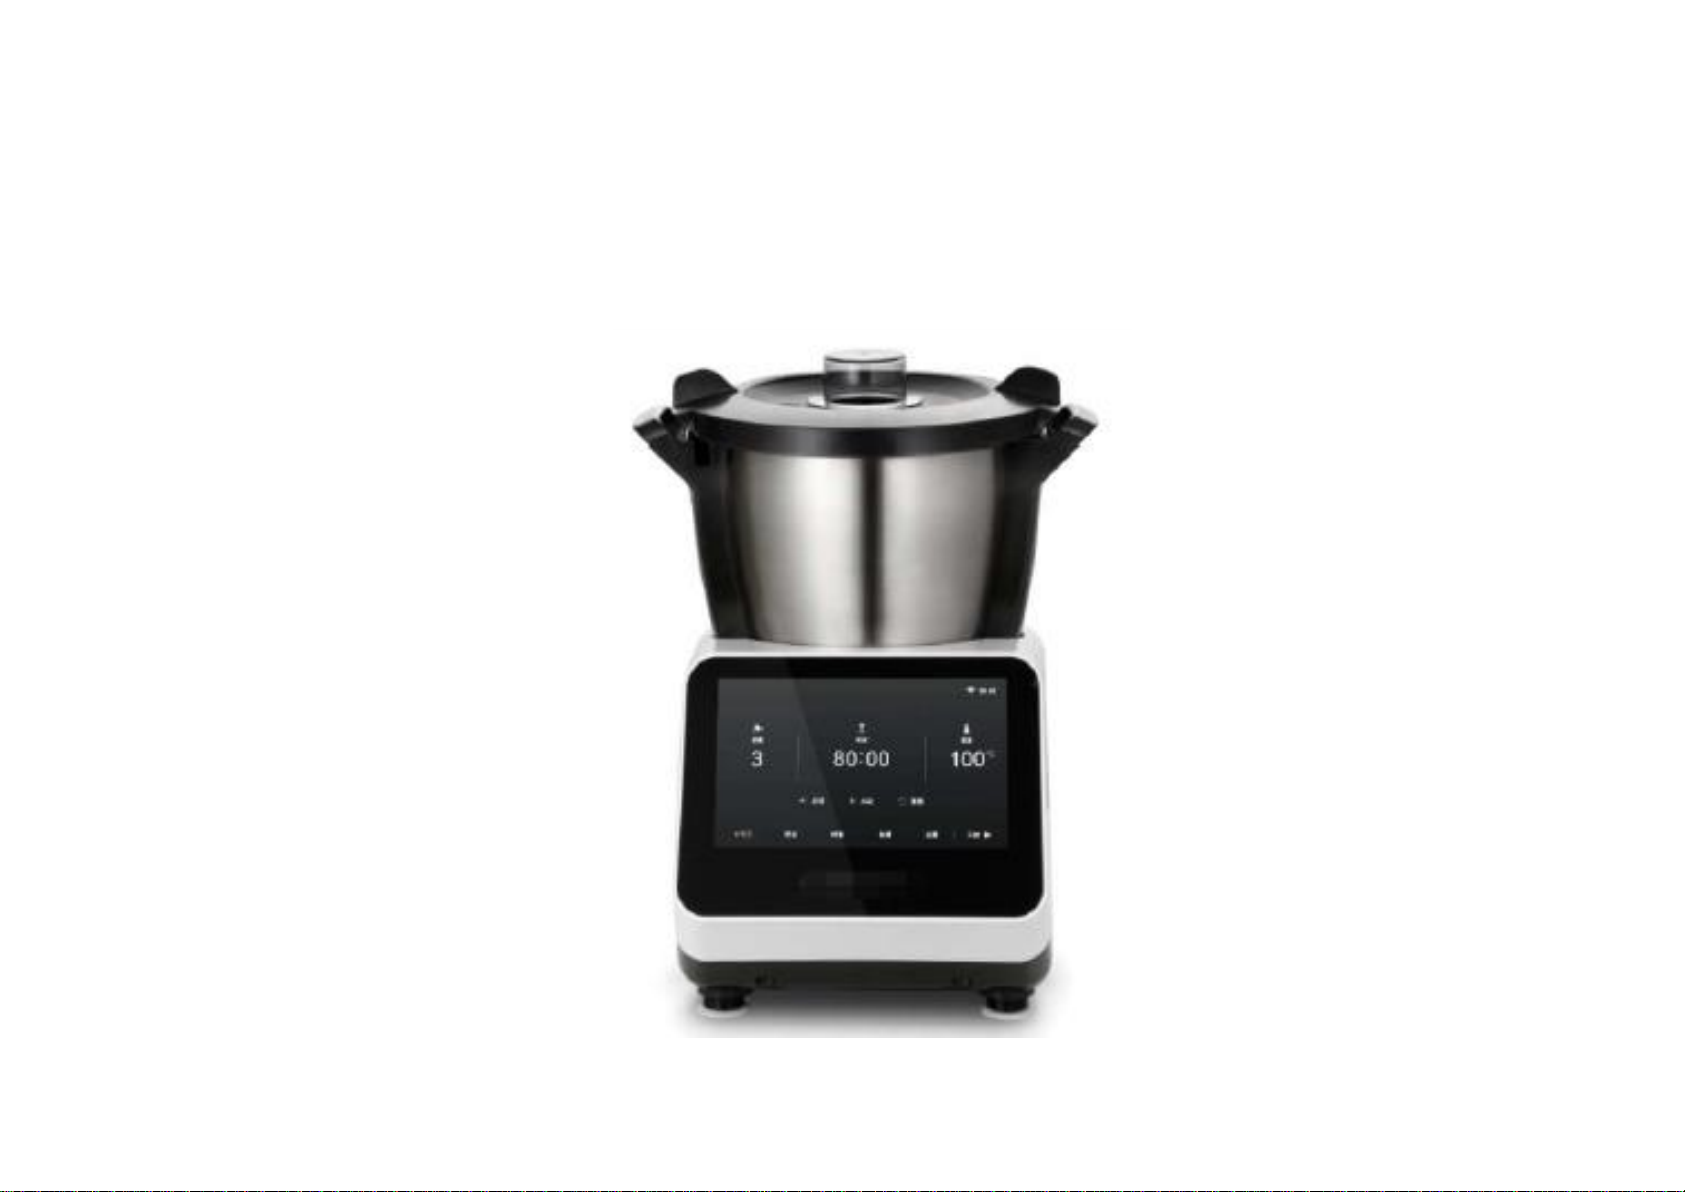
This machine can be used either at home or in any of the following places:
–Food areas in stores, offices or other work environments
–Farm houses
–Hotel rooms, motels or other residential environments
–Breakfast stores
Warning
Do not use the machine for some operations that are not mentioned in this user manual.
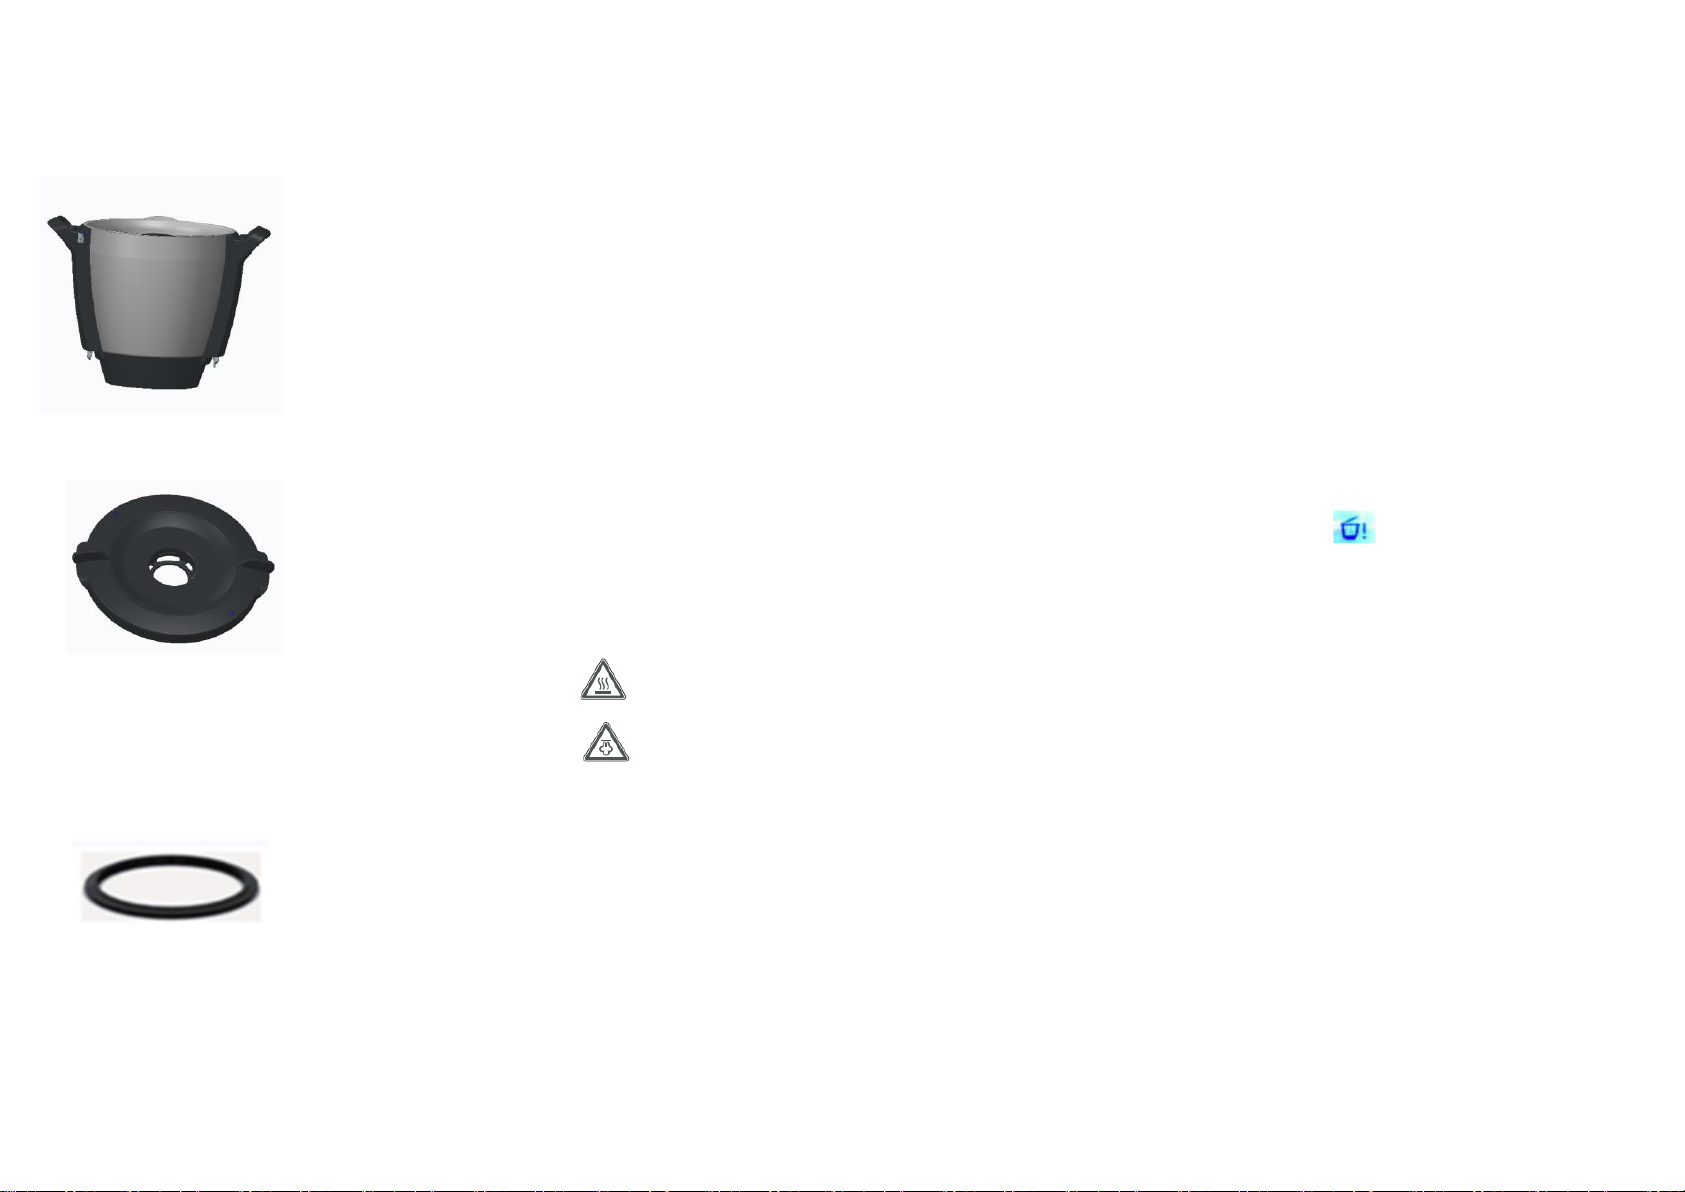
Place the machine on a clean, fixed, level and unheated surface.
The machine shall be unplugged before being left unused for a long time.
Verify that the air outlet on the back of the machine is unblocked and will not be covered by residual food or waste for fear of damage of the machine.
Before replacing an accessory or touching a movable part, be sure to disconnect the power and unplug the product. Be sure to disconnect the power when the machine is put
away or before installation/disassembly/cleaning.
Remember to turn off the machine before removing the accessories from the machine.
Please keep the above instructions in mind for future reference.
Care shall be taken when handling the sharp cutting blades, emptying the bowl and during cleaning
If the supply cord is damaged, it must be replaced by the manufacturer, its service agent or similarly qualified persons in order to avoid a hazard.
Changes or modifications to this unit not expressly approved by the party responsible for compliance could void the user’s authority to operate the equipment.
NOTE: This equipment has been tested and found to comply with the limits for a Class B digital device, pursuant to Part 15 of the FCC Rules. These limits are
designed to provide reasonable protection against harmful interference in a residential installation. This equipment generates uses and can radiate radio
frequency energy and, if not installed and used in accordance with the instructions, may cause harmful interference to radio communications.
However, there is no guarantee that interference will not occur in a particular installation. If this equipment does cause harmful interference to radio or television
reception, which can be determined by turning the equipment off and on, the user is encouraged to try to correct the interference by one or more of the following
measures:

Reorient or relocate the receiving antenna.
Increase the separation between the equipment and receiver.
Connect the equipment into an outlet on a circuit different from that to which the receiver is connected.
Consult the dealer or an experienced radio/TV technician for help.
This equipment complies with FCC radiation exposure limits set forth for an uncontrolled environment. This equipment should be installed and operated with a
minimum distance of 20cm between the radiator & your body. This transmitter must not be co-located or operating in conjunction with any other antenna or
transmitter.

02. Know About Your Sunway Multi-Function Cooking Machine
Measuring cup
Lid
Stainless steel mug
Touch panel
Wake-up button
Steamer set
Dough stirring rod
Round steaming basket
Blade set Dough stirrer

03. Components and Accessories
1. Mixing mug
The maximum capacity of the multi-function cooking machine is 3 liters, with markings both inside and outside, at 0.5 liter intervals. The capacity
scale includes 0.5L\1L\1.5L\2L.2.5L.3L
Warning: a. To ensure safe operation, the amount of ingredients shall not exceed the maximum scale of the mixing mug. When removing the mixing
mug from the machine, take special care to avoid any spillage to prevent scald.
b. When using the high-speed turbo function, the measuring mug shall be covered. Do not heat when there is no food in the mixing mug.
c. The soup exceeding 1L shall be cooked with the steamer set.
2. Lid of mixing mug
Only after the lid is properly placed and locked can the multi-function cooking machine begin to work. The “ ” mark on the display
indicates that the lid is not properly installed. Before placing the lid, always ensure that the lid is properly fitted with the sealing ring. For ease
of assembly, keep the bottom of the lid upwards when installing the sealing ring on the lid as indicated. The sealing ring can prevent spillage of
the liquid or food being cooked. During the cleaning of the lid, the sealing ring shall be removed and cleaned separately.
Warning: A. The symbol “ ” on the lid means hot surface.
B. The symbol “ ” on the lid means risk of spillage of hot liquid or food pieces to cause large areas of scald!!
3. Sealing ring
The sealing ring shall be installed in the lid.
Warning: The machine shall not be used unless it is equipped with a clean sealing ring. Please check the sealing ring for damage regularly. If
there is damage or leakage, please replace the sealing ring immediately.

4. Measuring cup
The measuring cup can be used either alone or together with the lid of the mixing mug to facilitate to add ingredients to the mixing mug without
stopping the machine.
a. When the lid is installed on the mixing mug, ingredients can be added from the mouth of the measuring cup.
b. Keep the cooking temperature.
c. The volume of the measuring cup is 100ml. /Removable.
d. After the measuring cup is inverted, rotate clockwise to lock it.
Warning: When using the high-speed turbo function, the measuring cup shall be installed on the lid of the mixing mug and locked. Do not place
a towel or similar items on the measuring cup.
5. Round steaming basket
a. The round steaming basket of the multi-function cooking machine can be placed in the mixing mug to maximize its function.
b. It can be used as a filter to drain vegetables and filter fruit juice. It can be placed in the mixing mug and fastened with the stirring rod to
isolate dregs.

6. Steamer set
The steamer is ideal for steaming meat, fish and vegetables. It consists of three parts: The bottom layer is used to collect the steam and liquid
generated in the preparation process. The middle layer can be used to contain ingredients. The top layer is the transparent steamer lid. Different
foodstuffs to be cooked are placed separately.
Warning: a. Accessories shall not be placed in a microwave oven, a baking oven or other kitchen appliances.
b. There may be steam or hot water in the steamer, so be careful when using it.
c. If the transparent steamer lid is placed improperly, the generated steam will overflow, which will make cooking unsuccessful or
affect the cooking result.
d. Make sure that the transparent steamer lid is properly placed before steaming food.
7. Blade
Note that the blade is sharp on one side and suitable for mixing, cutting and grinding.
Warning: a. Take special care when touching the sharp blade to avoid cutting.
b. After cleaning the blade, drain the water as soon as possible and do not soak the blade in the water.

8. Blade sealing ring
a. The blade sealing ring shall be installed, otherwise the food will leak out to damage the machine.
b. Make sure the sealing ring is clean and properly installed before using the multi-function cooking machine. Check it regularly, and replace it
if it is damaged.
Warning: For the sake of safety, please replace the sealing ring immediately if it is damaged.
9. Dough stirrer
Suitable for low-speed mixing recipes, such as cream and soup. The dough stirrer can be used only when the speed is at Level 1, 2, 3 or 4.
Install the dough stirrer on the top of the blade. When removing, grab both sides of the top of the dough stirrer and pull up.
Warning: a. The dough stirrer cannot be installed when using the turbo function.
b. After the dough stirrer is installed, the speed shall not exceed Level 5.
c. When kneading the dough, avoid using the dough stirrer for fear of blocking the blade.
d. When the machine is running with the dough stirrer installed, do not add food that may hinder the operation of the machine.
e. Speed can be selected only after the dough stirrer is locked.
f. Do not use the stirring rod when the dough stirrer is installed.

10. Stirring rod
a. It is used to stir or mix food, or remove the round steaming basket.
b. When the machine is running, the stirring rod can be placed from the lid hole.
c. The disc of the stirring rod can prevent it from contacting the blade, so that it can be used when cooking, draining or cutting food.
d. Fasten the end of the stirring rod onto the round steaming basket to lift the steaming basket or drain the water. The stirring rod can be
removed when not needed.
Warning: a. Do not place the stirring rod into the mixing mug when the blade is turning.
b. When scraping or pouring out the food in the mixing mug, operate the stirring rod clockwise because the stirring rod may be
damaged by the sharp blade if it is operated counterclockwise.

04. Touch Panel
BootAnimation
To start the gradient display of logo

Boot Guide Picture
To guide the user to trigger the dial to adjust the parameters

STT Dial Function
Speed Temperature
Home
Presets
Scale
Recipes
Settings
START
STT (speed/time/temperature) dial: It is an upgrade of the form of buttons. The touch
area in the form of a dial can meet the needs of users for convenient operation. The
dial, which is concealed by default, pops up after the user clicks it. You can slide the
dial up or down to adjust the parameters. Click the area outside the dial to conceal
the dial.
The packaged STT component is used on the homepage/presetting/recipe pages.

Interface Icons
Function icons
Speed: The speed of the machine can be set, and the blade can rotate
forward and backward
(“Forward rotation” - The blade rotates clockwise;
“Backward rotation” - The blade rotates counterclockwise;)
When the speed is > Level 4, the icon [Stirrer disabled] will appear.
When the speed is ≦Level 4, the icon [Stirrer disabled] will not appear.
When the temperature is 0, the speed can be adjusted within the range of
Levels 0 - 16
When temperature > 0, the speed can be adjusted within the range of
Levels 0 - 5
When the time is > 10 minutes, the speed can be adjusted within the range
of Levels 0 - 6 [forward rotation]
When the time is ≦10 minutes, the speed can be adjusted within the
range of Levels 0-16 [forward rotation]
When the time is 0-120 minutes, the speed can be adjusted within the
range of Levels 0-5 [backward rotation]
Time: The running time can be set, with timing and positive timing
functions (range: 0-120 minutes)
Parameter rules:
Number of minutes < 10: The value is increased or decreased by 1 second
each time.
Number of minutes ≧10: The value is increased or decreased by 5
minutes each time, and the value in the second zone is 0 (the color turns
gray).
Speed levels - Levels 10-16, running time ≦20minutes (the rotation range
of the dial is 0-20 minutes)
Temperature: Set the target temperature of the machine
When the speed is within the range of Levels 0-5, the temperature
adjustment range is 0-180℃.
When the speed is within the range of Levels 6-16, the temperature is 0.
If the real-time temperature does not reach the target temperature during
operation, the [red thermometer] dynamic heating icon will appear.
If the real-time temperature reaches the target temperature during
operation, the [green thermometer] static icon will appear.
Backward rotation: Click “Backward rotation”, and the blade will rotate
counterclockwise.
(Adjustment range: Levels 0-5)
Turbo: Food cutting and crushing at high speed (The default speed is
Level 16);
Press and hold “Turbo”, and the blade will rotate clockwise; After
releasing it, the blade will stop rotating.
In operation: This icon is disabled.
When the real-time temperature > 60℃, a prompt box pops up prompting
“The temperature in the main pot is too high, so operation is disabled”.
Reset [Home]: Not in operation: After clicking, the
speed/time/temperature all return to the default value of 0;
In operation: This icon is disabled.
Default [Preset/Recipe Details]: Not in operation: click to restore factory
defaults.
In operation: This icon is disabled.
Start: After setting the speed/time/temperature, click this button to start
the machine.
Click Start, and the operation indicator lights on both sides of the screen
will change from green to flashing red.
Stop: Click Stop, and the operation indicator lights on both sides of the
screen will change from flashing red to green.

Interface Icons
Prompt icons
Meal: Meal size
Running time: The actual running time of the machine (the total time of
the operation steps) rather than the total cooking time of the recipe
Star rating: The star rating for the recipe
Difficulty: Cooking difficulty of the recipe, divided into:
low/medium/high
Favorites: Click and add a recipe to Favorites, and view it in the list of
favorites; click again to remove it from Favorites.
Status icons
Time zone: The local time shall prevail;
Enter the internal mode to set the time zone.
Network:
Connected: The WiFi icon appears in the upper right corner of the
interface.
Not connected: The WiFi icon does not appear in the upper right corner of
the interface.
Different WiFi signal states for different WiFi signal strengths are
displayed.
Stirrer:
When the speed is > Level 4, the [Stirrer disabled] icon will appear.
When the speed is ≦Level 4, the [Stirrer disabled] icon will not appear.
Sleep/wake mode:
1. If the continuous standby time reaches 5 minutes, the system automatically
enters the sleep mode.
2. Touch the screen to wake up, then the interface before sleep appears, and a
prompt box pops up prompting
“Data recovery. Please wait...”.
Main pot lid indicator light:
When the machine is in operation: The indicator light is on (white).
When the machine is not in operation: The indicator light is off.

Interface Icons
Error prompts
Prompt of no main pot lid:
1. When the main pot lid is not closed or is forcibly opened during
operation, the [No main pot lid] icon will appear in the upper right
corner of the interface.
When the main pot lid is not closed and you click “Start” or the lid is
forcibly opened during operation, a prompt box will pop up prompting
[The main pot lid is not closed, so operation is disabled!].
2. After closing the main pot lid, the [No main pot lid] icon will not appear
in the upper right corner.
After closing the main pot lid, click “OK”, and the pop-up box will
disappear.
Prompt of no main pot:
1. When the main pot is not placed or is placed improperly, the [No main
pot] icon will appear in the upper right corner of the interface.
When the main pot lid is not placed or is placed improperly and you click
“Start”, a prompt box will pop up prompting
[The main pot lid is not closed, and the main pot is not placed, so operation
is disabled!].
2. After placing the main pot, the [No main pot] icon will not appear in the
upper right corner.
After placing the main pot and closing the main pot lid, click “OK” and the
pop-up box will disappear.
Emergency prompts
Dry heating protection: [Currently, this function is removed.]
Over-temperature at the bottom of the main pot will trigger the dry
heating protection, then a prompt box will pop up prompting [The
temperature in the main pot is too high, so operation is disabled!], and the
machine will stop operation to prevent hardware damage; when the
bottom of the main pot cools down, the machine can operate again.
Emergency stop:
1. In operation: Touch the screen 3 times, then the “Stop” button pops up,
and click the button to stop running.
2. There are two situations when operating [Emergency stop button]:
Click [Emergency stop button], and the machine will stop running.
When the machine is not operating, wait for the button to conceal
(automatically concealed after 3 seconds).

Basic Mode
Speed:
1. Click to display the dial: slide the dial up (to decrease speed) or down (to
increase speed) to adjust the parameter.
2. Click the area outside of the dial to conceal the dial.
Forward rotation
of the blade
No main pot lid/no
main pot
Network connection
status
Localtime
Speed Time Temperature
Backward
rotation of
the blade
Backward
rotation
Turbo
Reset
Reset
parameters
Home
Presets
Scale
Recipes
Settings
START
Press and hold to start, and release to stop
3. The status bar in the upper right corner of the interface will display the network
status; if it is not connected to the network, the icon will not appear;
4. If the main pot lid is not closed, a prompt box pops up prompting: [The main pot
lid is not closed, so operation is disabled!]
5. If the main pot is not properly placed, a prompt box pops up prompting: [The
main pot lid is not closed, and the main pot is not placed, so operation is
disabled!]
Click the speed area to display the dial; slide down to increase speed; slide
up to decrease speed.
Time Temperature
First level
navigation
Home
Presets
Scale
Recipes
Settings
START
Start
operation
(A total of 16 speed levels: Speed Levels 0-5 are the ideal cooking speed levels; Speed
Levels 6-16 are for high-speed cutting of ingredients.)
Table of contents
Other Sunway Kitchen Appliance manuals