Superlux FMX22D User manual

FMX22D
Portable Mixer
便攜二路麥克風前級
Instruction Manual 02
使用手冊

FMX22D
Portable Mixer
Description
The FMX22D is a 2 channel studio grade microphone mixer designed for
remote or eld mixing in video, lm, broadcast or professional recording
applications. The compact and lightweight mixer boasts an impressive feature
set starting with 2 transformer balanced XLR microphone inputs and stereo
(L/R) XLR outputs. Separate stereo tape output and tape return input are
provided, both feature 1/8” (3.5 mm) mini stereo jacks. The mixer supplies
+15V and +48V phantom power and a 1/4” TRS phone/headphone monitor
output allows monitoring of main and tape return inputs.
Both channels feature user switchable, two-stage limiting for control over
signal overload and distortion. The low-cut lter removes low frequency noise
caused by wind and proximity effect. Also provided is an internal test tone
oscillator and slate microphone for signal calibration. The FMX22D is powered
via 2 AA alkaline batteries or external DC power source.
2

Features
• 2 full function microphone preamps with stereo link
• 48V or 15V phantom power supply
• Independent gain/level control for each input and L/C/R panning controls
• Dual 7-segment peak level LED meter with 3 stage brightness control
• Built-in 1 kHz tone generator plus slate microphone for sound le
• Balanced and unbalanced line level outputs for connecting with professional
and prosumer recording devices
• Tape return monitor input with independent level alignments. A 3-position
monitor switch with center position for normal monitoring, and left side to
switch on tape return, while the right side is instant release for momentary
tape return
• Powerful headphone output for professional headphone monitoring
• Operates with 2 AA batteries as well as external DC power
• Sturdy aluminum alloy case
Applications
• Field Recording
• Studio
3

Controls and Settings
1. CH 1 to CH 2 Gain setting
This controls the sensitivity of the input signal. The gain should be
adjusted to a level that allows the maximum use of the audio, while still
maintaining the quality of the feed.
2. PEAK / LIM Indicators
When this illuminates, it means the audio level is over the threshold
setting and the limiter will prevent overload and distortion.
3. L / C / R PAN Setting
This switch will determine the assignment of each of the two input
channels to either the left, right or both audio channels. (When set at the
C position, the input signal will be sent to both output channels, placing
the audio in the center.)
4. Level Meter
Two rows of LED level meters indicate levels for both the left and right
audio channels. There is a setting to set the display to either high or low
intensity for use outdoors or to save battery power.
1 3 5 6 7 118 9
2 4 10
4

5. Tone Oscillator/Slate Microphone Switch
Toggle switch activates a 1 kHz tone oscillator when switched to the left
position and activates the slate microphone when in the right (momentary)
position. Microphone inputs are muted when tone or slate are activated.
6. LEVEL METER Intensity Switch
This switch determines the brightness of the level meter LED display
located on the front panel. Selectable for high visibility outdoors, mid and
low is for conserving battery power.
7. TAPE RTN Monitoring
Toggle switch allows external audio to be monitored in the headphones.
The center position is FMX22D program audio. The left and right positions
monitor tape return audio; the left position is locking, and the right position
is momentary.
8. HEADPHONE Jack
This 1/4” jack is for operator headphone monitoring. Always turn
the headphone level control down before connecting or putting on
headphones.
9. HEADPHONE Level Control
Please set to extreme left before you put on your headphones. Gradually
turn the knob to an appropriate level. Always use at the lowest practical
level to protect your hearing.
10. Headphone Level Peak Indicator
Illuminates 3 dB before clipping of either channel of the headphone circuit.
Also illuminates 3 dB before clipping of either channel of Tape Return
audio.
11. POWER INT/EXT
When set to INT position, power is from 2 AA batteries, or set to EXT
position the power is from external power adapter.
5

Left Panel
12. MIC XLR Inputs
These 2 input channels incorporate transformer balanced audio inputs.
There are mic gain setting and 15/48V phantom power on/off switches.
When the input source does not need to use phantom power, please set
to the off position.
These XLR connectors are wired as follows:
Pin 1: Ground (shield)
Pin 2: Hot (in phase)
Pin 3: Cold (out of phase)
Phantom power for these XLR connectors is wired in the following
manner:
Pin 1: Ground
Pins 2 & 3: Carry 15 or 48 volts DC
12
13 14
15 1816 17
6

13. TAPE OUT
3.5 mm TRS stereo output (unbalanced) can be used to feed consumer
level DAT, Mini-Disc, and CD recorders.
Tip = left, ring = right, sleeve = ground.
14. TAPE RTN LEVEL
These gain controls allow you to adjust the best level for matching a
variety of video cameras and other recording equipment for monitoring
tape condence heads.
15. Phantom Power
Three-position switch selects either 48-volt or 15-volt phantom power for
both inputs. Center position turns phantom power off.
16. High-Pass Filter Switch
Three-position switch selects 80 Hz or 160 Hz corner frequency lters,
6 dB per octave. Filters affect both inputs. Center position of switch
removes lters from the signal path.
17. Limiter Switch
Activates input peak limiter. ON position functions as a dual mono limiter,
with each input signal controlling its own limiter. LINK functions as a
stereo limiter, with both left and right inputs controlled simultaneously.
Center position of switch turns limiter off.
18. Limiter Threshold Level Control
Recessed potentiometers adjust peak level of limiter activation. Can be
independently controlled for each input.
7

Right Panel
201923 21 22
19. Tape Return Input Connector
3.5 mm TRS stereo (unbalanced) connector allows external audio sources
to be monitored in the FMX22D Headphone circuit.
Tip = left, ring =right, sleeve = ground
20. LINE OUTPUT
These two balanced XLR connectors will send out the master mix of
each input. When feeding unbalanced out from these connectors, avoid
grounding a signal pin.
21. Battery Compartment
Two AA batteries can be used in this battery compartment. Insert positive
(+) end of batteries rst.
22. External Power Socket
Accepts external DC power source (battery supply or AC to DC
transformer) from 5–18 VDC.
23. Strap Ear
This allows you to put on a shoulder strap and still protect the front panel
from damage.
8

Specications
• Inputs: 2-XLR 3-pin female
• Outputs: 2-XLR 3-pin male
• Monitor/ Headphone Out: 1/4” (6.3 mm) TRS Phone output jack
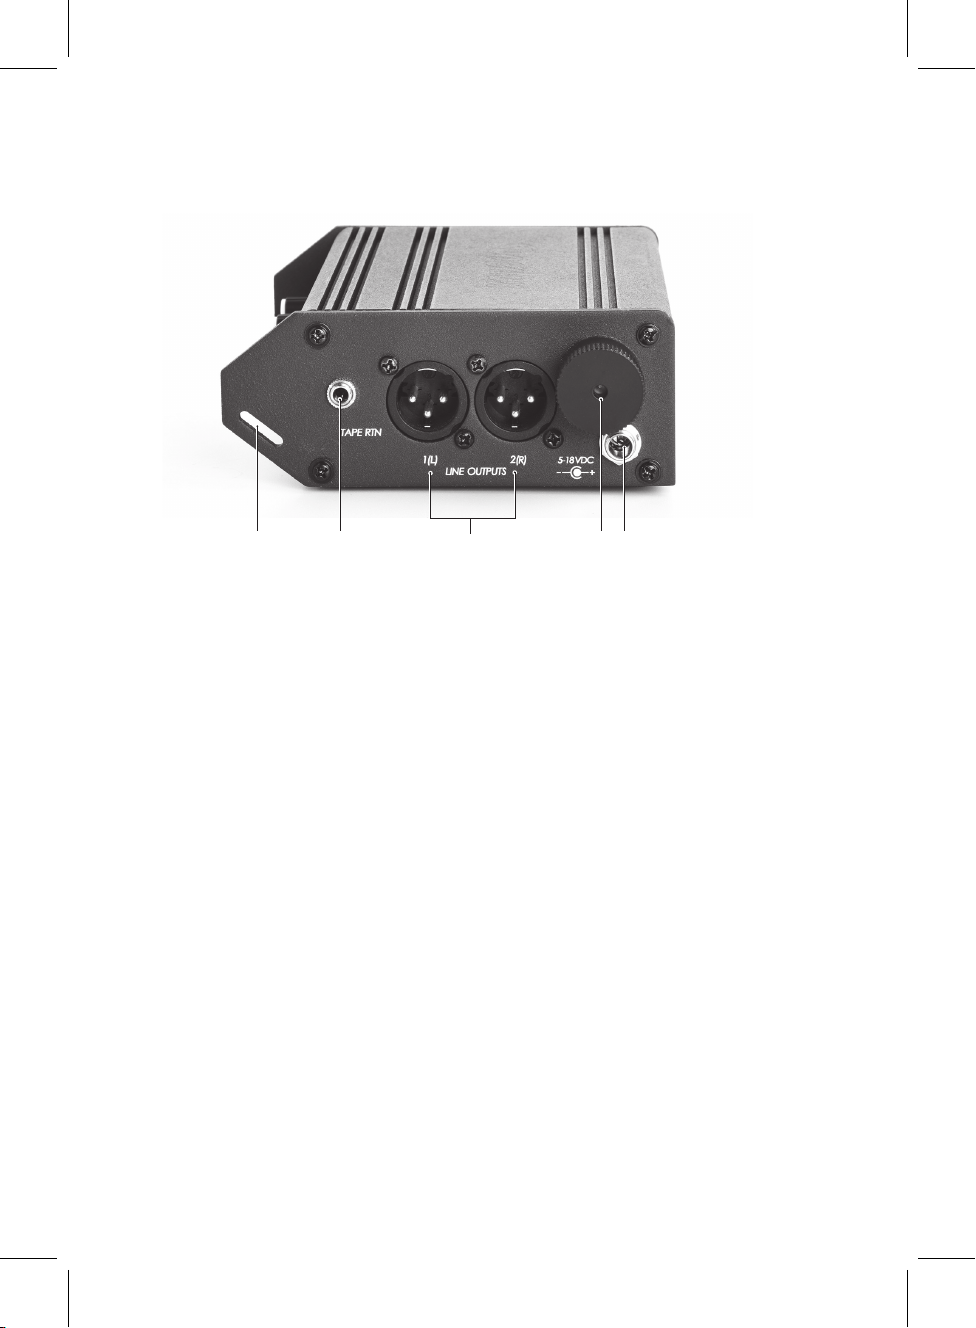
• ALT I/O Tape Out: 1/8” (3.5 mm) unbalanced output jack
• Tape RTN: 1/8” (3.5 mm) unbalanced input jack
• Input Impedance: Transformer balanced, 2 kΩ
• Output Impedance: 120 Ω; Tape: 2.4 kΩ
• Gain Mic In to Line Out: 66 dB
• Mic In to Line Out: 56 dB phantom power on
• Mic In to Tape Out: 56 dB
• Mic In to Tape Out: 46 dB phantom power on
• Hum &Noise: EIN -126 dBu min. (150Ω source, at weighted, 20-20 kHz
bandwidth, gain control at 50%, phantom power off)
• Frequency Response: 20 Hz-30 kHz , +0.2dB , -0.5dB
• THD: 0.08% max
• Phantom Power: +15V & +48V
• Power:
2 AA alkaline batteries - 6 hours life typically (phantom off)
External 5-17 VDC via coaxial connector,(5.5 mm outer diameter, 2.1 mm
inner diameter), pin positive, sleeve negative. Voltages above 17 VDC
cause no damage to unit, but will open an internal poly fuse. Poly fuse will
reset when voltage is removed.
• Operating Temperature Range: 00 C ~700 C(320F~1600F)
• Dimensions (H × W × D): 43 × 94 × 140 mm (1.69” × 3.7” × 5.51”)
• Net Weight: 0.95 kg (2.1 lbs)
• Optional Accessories: 12V DC / 500mA power adapter
9

Operational Notes
• Remove the batteries from the battery compartment when the FMX22D is
not in use. They will corrode and damage the battery box when unused for
a long period of time.
• The FMX22D is capable of driving headphones to harmful sound pressure
levels. Before you put on your headphones, please turn the volume control
of headphone to the extreme left in the beginning, and then adjust to an
appropriate level.
Important Safety Instructions
1. Read these instructions before operating this apparatus.
2. Keep these instructions for future reference.
3. Heed all warnings to ensure safe operation.
4. Follow all instructions provided in this document.
5. Do not use this apparatus near water or in locations where condensation
may occur.
6. Clean only with dry cloth. Do not use aerosol or liquid cleaners. Unplug
this apparatus before cleaning.
7. Do not install near any heat sources such as radiators, heat registers,
stoves, or other apparatus (including amplier) that produce heat
8. Protect the power cord from being walked on or pinched particularly at
plug, convenience receptacles, and the point where they exit from the
apparatus.
9. Only use attachments/accessories made by the manufacturer.
10. Unplug this apparatus during lighting storms or when unused for long
periods of time.
11. Refer all servicing to authorized service personnel.
10

LIMITED WARRANTY
Superlux Enterprise warrants all materials and workmanship under use as instructed by the user’s manual
of this product for a period of one year from the original date of purchase. Warranty period might be different
for each area. Please contact your local dealer for more information. If any defects are found in the materials
or workmanship or if the product fails to function properly during the applicable warranty period, Superlux
Enterprise, at its option, will repair or replace the product. This warranty applies only to equipment sold and
delivered by Superlux Enterprise’s authorized distributors or dealers. However, the following are not covered:
Damage caused by accident, misuse, abuse, product modication or neglect; damage occurring during
shipment; damage resulting from failure to follow instructions contained in your Instruction manual; damage
resulting from the performance of repairs by someone not authorized by Superlux; claims based upon any
misrepresentations by the seller; any Superlux product on which the serial number has been defaced, modied
or removed. Service and repairs of Superlux products are to be performed only at a factory-authorized facility
or authorized distributors or dealers. Unauthorized service, repairs, or modication will void this warranty. To
obtain repairs under warranty, you must have a copy of your sales receipt from the authorized Superlux dealer
where you purchased the product. It is necessary to establish purchase date and determine whether your
Superlux product is within the warranty period. To obtain factory authorized service, please contact authorized
distributors, dealers or mail to sales@superlux.com.tw.
11

FMX22D
便攜二路麥克風前級
敘述
FMX22D具有兩聲道、錄音室等級、麥克風混音,設計給遠端、現場錄音混音給錄影、廣播
或 是 專 業 的 錄 音 應 用。輕 巧 的 攜 帶 式
混音機含兩個變壓器平衡XLR麥克風輸入及立體XLR輸出。另有獨立的音訊返回(tape
return)及錄音輸出(tape out),它們都是3.5
mm的耳機插座。FMX22D提供+15V及+48V幻象電源及6.3 mm(1/4”)耳機監聽輸出,以
監聽麥克風音源及音訊返回(tape return)。每聲道包括可切換的限幅器功能以防過載及
失真。高通濾波器可消除風聲及近講效應。內建測試用訊號產生器及slate麥克風作為訊
號校正。FXM22D可由兩顆AA鹼性電池供電,或是外接電源供應器。
12

特點
• 2組全功能麥克風前級,並具立體連接功能
• 48V或15V幻象電源
• 兩組高通濾波器及可調限幅器
• 每一輸入具獨立增益/音量控制,L/C/R音像控制
• 雙七段峰值形音量指示並具三種亮度可調
• 內建1K Hz訊號產生器,加上聲檔辨識的slate麥克風,與錄音機及攝影機音量匹配
功能
• 平衡及非平衡輸出
• 音訊返回(tape return)輸入具音量控制。一個三段tape return監聽開關含有音訊
返回監聽、短暫監聽立即回復及正常監聽
• 高功率耳機輸出給專業耳機監聽用
• 雙電源供應:電池AA(UM3)或外接的電源供應器
• 堅固耐用的鋁合金結構
應用
戶外錄音及錄音棚
13

操作及設定
前面板
1. CH1~CH2增益設定
此旋鈕設定每個輸入聲軌的增益值。適當的增益值,可得到最大的訊噪比,但要避免
失 真。
2. PEAK/LIM峰值/限幅器指示燈
麥克風輸入或返送輸入訊號在過載前3dB,此燈點亮,內置限幅器將被啟動,以防此
訊 號 失 真。
3. L/C/RPAN設定
此開關可決定每個輸入端設定其輸出至L(Left)左聲道輸出、R(Right)右聲道輸出或
是左、右聲道都有輸出的C(Center)中間。
4. 音量表(左及右)
兩列LED音量表可顯示左、右輸出的音量大小。另有亮度設定的開關。在戶外亮度高
的環境可設為高亮度,以方便閱讀;在較暗的環境可設為低亮度,以節省電池電量。
1 3 5 6 7 118 9
2 4 10
14

5. 1KTONE/SLATE1K校對訊號及記錄標題錄音話筒
切至1K時,在輸出端會有1k Hz 正旋波的參考訊號產生。內置記錄用話筒SLATE MIC
瞬時開關可啟動內置記錄用話筒功能,此話筒位於前面板。撥至SLATE位置,可用口
語標示每段錄音的標題。一放開此開關,又可立即恢復原來的錄音工作。
6. 音量表亮度調整開關
此開關可決定音量表顯示的亮度。在戶外使用時,請設定至高量度,以提高可閱讀
性,若 不 然,請 設 定 至 低 量 度 以 節 省 電 池 電 量。
7. TAPERTN返送輸入監聽開關
此三段開關可用來控級返送輸入訊號的監聽,置中時,可監聽主輸出訊號,切至左邊
可監聽返送輸入訊號。切至右邊時為瞬時開關,需按壓住,可監聽返送訊號,一放開
後又回到主訊號輸出。
8. HEADPHONEJack耳機插孔
6.3 mm插孔是給調音台操作人員監聽使用。在插入耳機前,請將耳機音量旋鈕轉至
最小。
9. HEADPHONE耳機音量控制
此旋鈕決定前級操作人員耳機上的音量大小。請先將此鈕置於最小位置,再戴上耳
機,然後調整至適當音量大小,以免突然的高音量而傷及聽力。
10. 耳機訊號峰值指示燈
在達達峰值前3分貝,此燈點亮。訊號取自每話筒的耳機訊號及TAPE RTN返送訊號。
11. INT/EXT電源電關
切至INT時,電源取自2顆AA電池,當切至EXT時,電源取自外接電源供應器。
15

12
13 14
15 1816 17
操作及設定
左側面板
201923 21 22
操作及設定
右側面板
16

12. MIC話筒輸入
XLR卡儂插座具有變壓器平衡輸入,具
有15/48V幻象電源開關,當輸入音源不
需要幻象電源時,請將幻象電源關掉。
接線如下:
接腳 1: 接地(屏蔽)
接腳 2: 正相訊號端
接腳 3: 負相訊號端
幻象電源供電的接腳如下:
接腳 1: 接地
接腳 2 & 3: 當幻象電源打開時,送入
15V或48V電壓。
13. TAPEOUT錄音輸出
3.5 mm立體輸出接口,連接至民用音
響錄音設備,如DAT, Mini-Disk及CD錄
音 機 等。
Tip:左聲道; Ring:右聲道; Sleeve:地
端。
14. TAPERTNLevel卡帶返送音量設定
兩個音量旋鈕決定由攝像機或其他設
備返送音頻訊號大小,以決定監聽音
量。
15. PhantomPower+48V/+15V
三接點的開關,可選擇48V或15V的幻
象電源,供電容話筒使用。切至中間段
時,幻 象 電 源 是 在 關 的 狀 態。
16. 80/160Hz高通濾波器
三接點的開關,可選擇80Hz或160Hz的
高通濾波器,每音程降6dB。切至中間
段時,將避開高通濾波器。
17. Limiter限幅器
可啟 動 峰 值限 幅 器。切 至O N 位 置時,
個別聲道的限幅器啟動,當切至LINK
時,立體限幅器啟動,中間位置,限幅
器 不 動 作。
18. LimiterThreshold限幅器啟動電
平設定
調整此音量設定,可設定限幅器啟動
臨界值,每個聲道可獨立設定。
19. TapeReturn輸入接口
此 3.5 mm 非平衡輸入接口接受非平
衡訊號,並且直接送至內部的混音線
路中。
Tip:左聲道; Ring:右聲道; .Sleeve:
地端
20. LINEOUTPUT高電平訊號輸出
這兩個平衡卡儂輸出接口送出總混
音後的訊號。當接出非平衡訊號至其
他 設 備 時,請 避 免 將 接 腳 3 負 端 訊 號
接 地。
21. ExternalPowerSocket外接電源
供應器接口
可接入外部電源供應器。可透過電源
供 應 器 由 牆 上 交 流 電 源 插 座 來 供 電。
可 接 受 5 -17 V D C 的 電 壓。
22. 電池槽
雙AA電池可置入電池槽,將電池的正
端 先 塞 入電 池 槽 內。
23. 背帶安裝孔
可將肩背帶穿入此孔,此突出結構具
有保 護 前 面 板 功 能。 17

規格
• 輸入:2個XLR3F
• 輸出:2個XLR3M
• 監聽/耳機輸出: 6.3 mm (1/4”)耳機輸出插座
• 輸入/輸出:
音訊輸出:(tape out) 3.5 mm (1/8”)非平衡耳機型插座
音訊輸入: (tape RTN) 3.5 mm (1/8”)非平衡耳機型插座
• 輸入阻抗: 變壓器平衡式 2 k歐姆
• 輸出阻抗:XLR3M:120 歐姆
• 音訊輸出(tapeout):2.4 k歐姆
• 麥克風輸入至高電平輸出(lineout)增益:66 dB
• 麥克風輸入至音訊輸出(tapeout)電平:56 dB
• 麥克風輸入至音訊輸出(tapeout)電平:46 dB, 幻象電源開啟
• 哼聲及失真EIN: -126 dBu,最小 (150歐姆 音源,不加權、20-20 kHz,頻寬,增益控
制 設 於 5 0 %,幻 象電 源 關 閉 )
• 頻率響應:20 Hz-30 kHz , +0.2dB , -0.5dB
• 總諧波失真:THD 0.08 %
• 幻象電源:+15V及+48V
• 電源需求: 2顆1.5V AA鹼性電池(約可持續6小時)或是外接電源供應器(5-17V DC)
• 尺寸(高×寬×深):49 × 120 × 154 mm (1.7” x 3.7” x 5.5”)
• 重量:0.95 kg (2.1 lbs)
• 選購附件: 12VDC / 500 mA 外接電源供應器
18

操作注意事項
• 當不用此機時,請將電池取出,以避免電池盒被電也侵蝕而損壞。
• 請先將耳機音量鈕轉至最小,再戴上耳機,再逐漸轉至適合音量。耳機的輸出音量可
能 很 大 會 傷 及 聽 力。
重要安全須知
1. 請詳細閱讀使用手冊里的說明。
2. 請妥 善保 管使 用手 冊。
3. 請注意所有的警告說明。
4. 請 按 照 所 有 的 操 作 說 明 使 用。
5. 請勿在潮濕有水的附近使用本機器。
6. 請 用乾 布清 潔 此 機 器。
7. 請勿放置此機器於熱源附近。
8. 請正確鋪設電源線,以避免被踩踏或被尖角損害。
9. 請只使用製造廠認為合格的附加機器及配件。
10. 在打雷下雨或長期不使用下,請將電源線拔掉。
11. 維修保養本機器時,請交由原廠認可之工程人員進行。
19

保固服务
Superlux针对在符合使用手册上所载明之使用方法,给予自购买日期起一年的所有材料及制造质量的保证期
限。此保证期限将依据在不同国家或地区而有所调整。请联络当地的经销商以获得更多的信息。在有效期限内,
若发现任何材质或生产质量,或是任何功能无法正常使用,Superlux将进行维修或更换零件。此保证条款只针
对经由Superlux所授权的代理商或经销商所卖出的产品,然而以下的状况将不在保证条款内:
由 于意 外、错 误 的 使 用、不 正 当的 使 用、自行 修 改 或 维 修,运 送 过 程中 造 成 的 损害,不 遵守 说 明 书上 所 载 明 之使
用方法、未经由Superlux所授权的公司执行维修的动作,由非授权的经销商所提出的要求,或任何Superlux产
品其上的序号贴纸巳经无法辨识或巳经修改或被移除者。
Superlux产品的维修只能由原厂所授权的维修中心或是授权的代理商或经销商为之。未经授权的维修、保养或
修改将无法获取相关的保证,并且排除在保证条款之外。在保证条款下的维修保证,必须在提出当地授权代理
商或经销商的销货收据下,才能获得保障。而且必须在提出采买日期才能决定你的Superlux产品是否在保证期
限内。要获得原厂授权的维修保固,请联络授权的代理商、经销商或经由电邮sales@superlux.com.tw与我们
联络。
Contact
Marketing and sales
Superlux Taiwan
+886-2-26931323
Manufacturing & logistics
Superlux Enterprise
Development(Shanghai)Co., Ltd.
連絡我們
中国地区营销和业务-旭广企业发展(上海)有限公司
021-69223756
[email protected]om.tw
[email protected]om.tw
国际营销和业务- Superlux 舒伯乐 台湾
+886-2-26931323
[email protected]om.tw
www.superlux.com.tw P/N: LB00000000000000 2017 APR
20
Table of contents