Supra SVT32Z User manual

Precautions
Please keep the video machine's guarantee card and receipt safe for warranty purposes.
◆Read carefully through this manual to familiarize yourself with this
high-quality video recorder.
◆Make sure the rating of your household electricity supply matches
that shown on the back of the video recorder.
◆Refer to this chapter and the "Initial installation" chapter to help you
install and adjust your video recorder.
Do not ...
... expose the video recorder to high levels of humidity and heat, to
avoid the risk of fire and electric shock.
...
open the video recorder. Have a qualified technician carry out repairs.
... connect the video recorder to the power supply if you have just moved
it from a cold to warm environment. This can result in condensation
inside the recorder and cause serious damage to the machine and
cassettes. Wait around two hours to allow it to reach room
temperature.
Make sure ...
... the recorder is placed on a steady, flat surface.
... the recorder should be placed at least 10cm apart from the other
home appliances or the obstacles to get sufficient ventillation.
... you clean the recorder only with a soft, lint-free cloth; do not use
aggressive or alcohol-based cleaning agents.
... you disconnect the power supply if the recorder appears to be
working incorrectly, is making an unusual sound, has a strange smell,
has smoke emitting from it or liquids have got inside it. Have a
qualified technician check the recorder.
... you disconnect the power supply and aerial if you will not be using
the recorder for a long period or during a thunderstorm.
◆
This apparatus shall not be exposed to dripping or splashing and no objects
filled with liquids, such as vases, shall be placed on this apparatus.
For your own safety!
◆There are no components in this video recorder you can
service or repair yourself.
◆Do not open the case of the video recorder. Only allow
qualified personnel to repair or service your set.
◆This video recorder is designed for continuous operation.
Switching it off does not disconnect it from the mains
(stand-by). To disconnect it from the mains, you have to
unplug it.
◆Recording any copyright protected material may infringe a
copyright.
AUTOSET
CH.
OP EJECT
WORTH
knowing

Contents
1
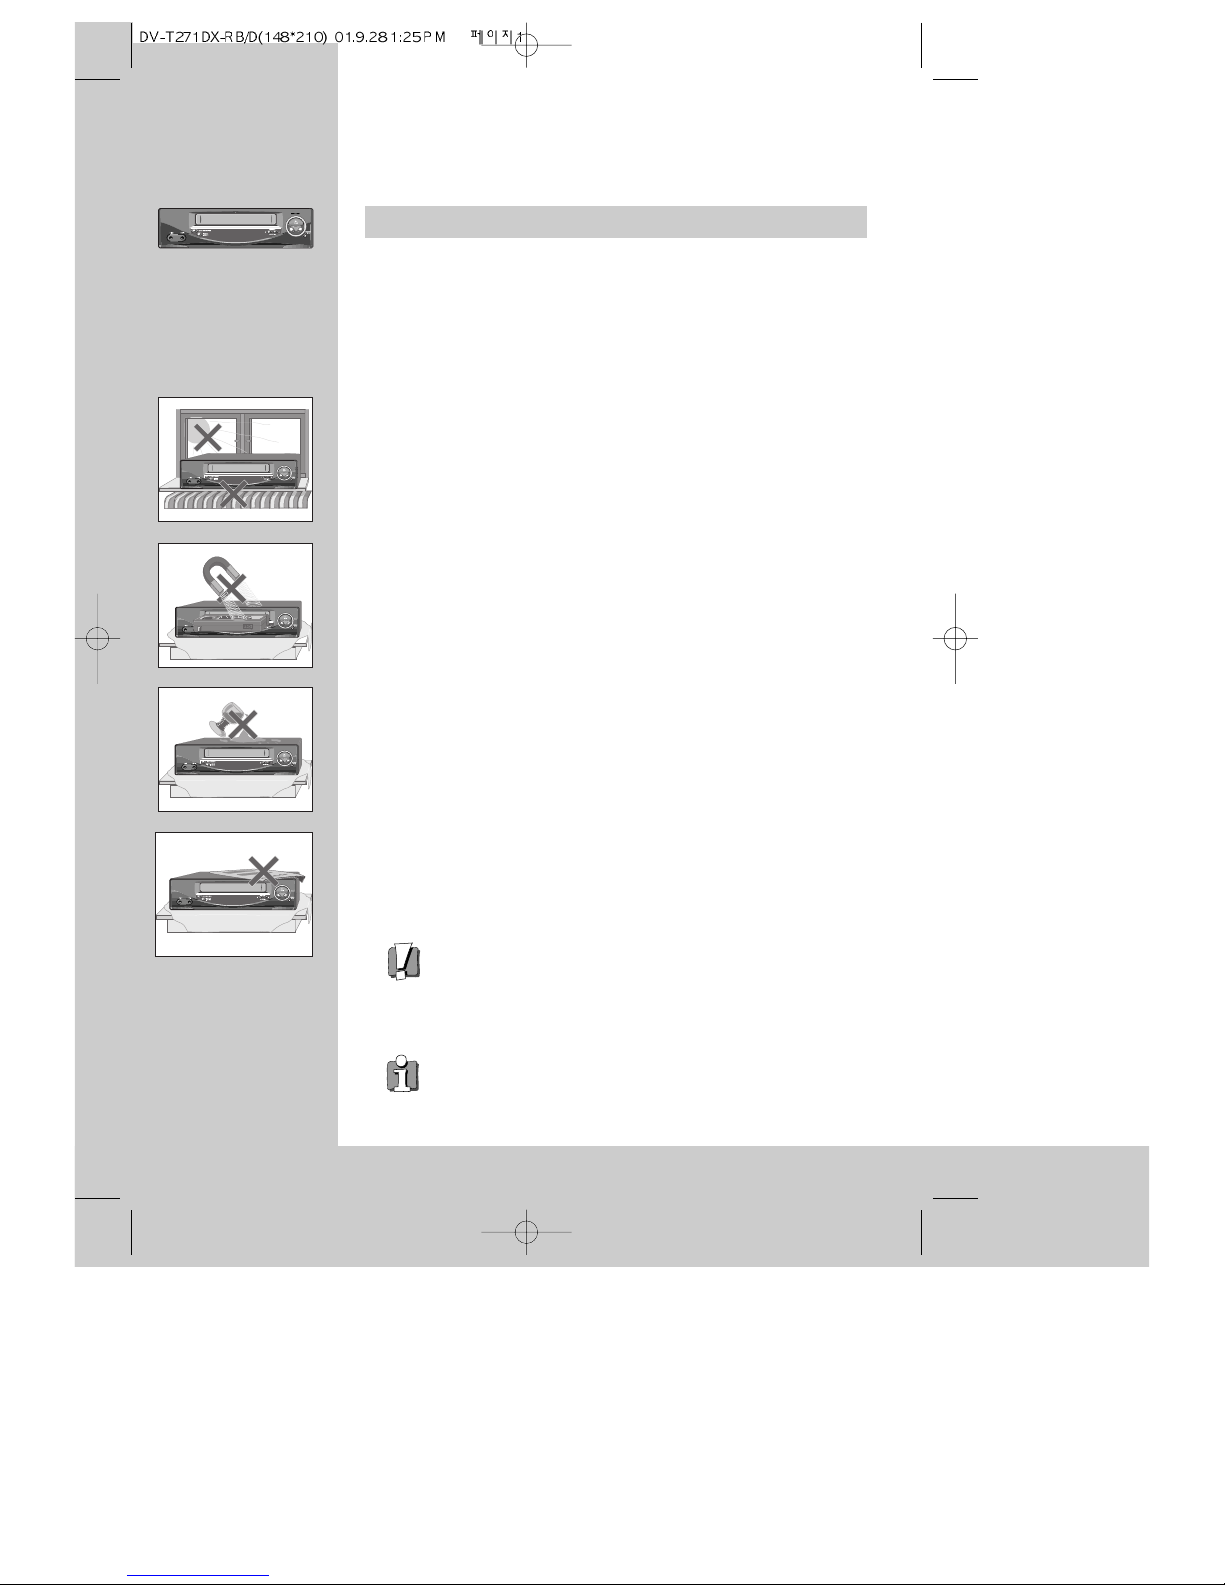
Before doing anything with the machine, please read the
chapter "Initial installation".
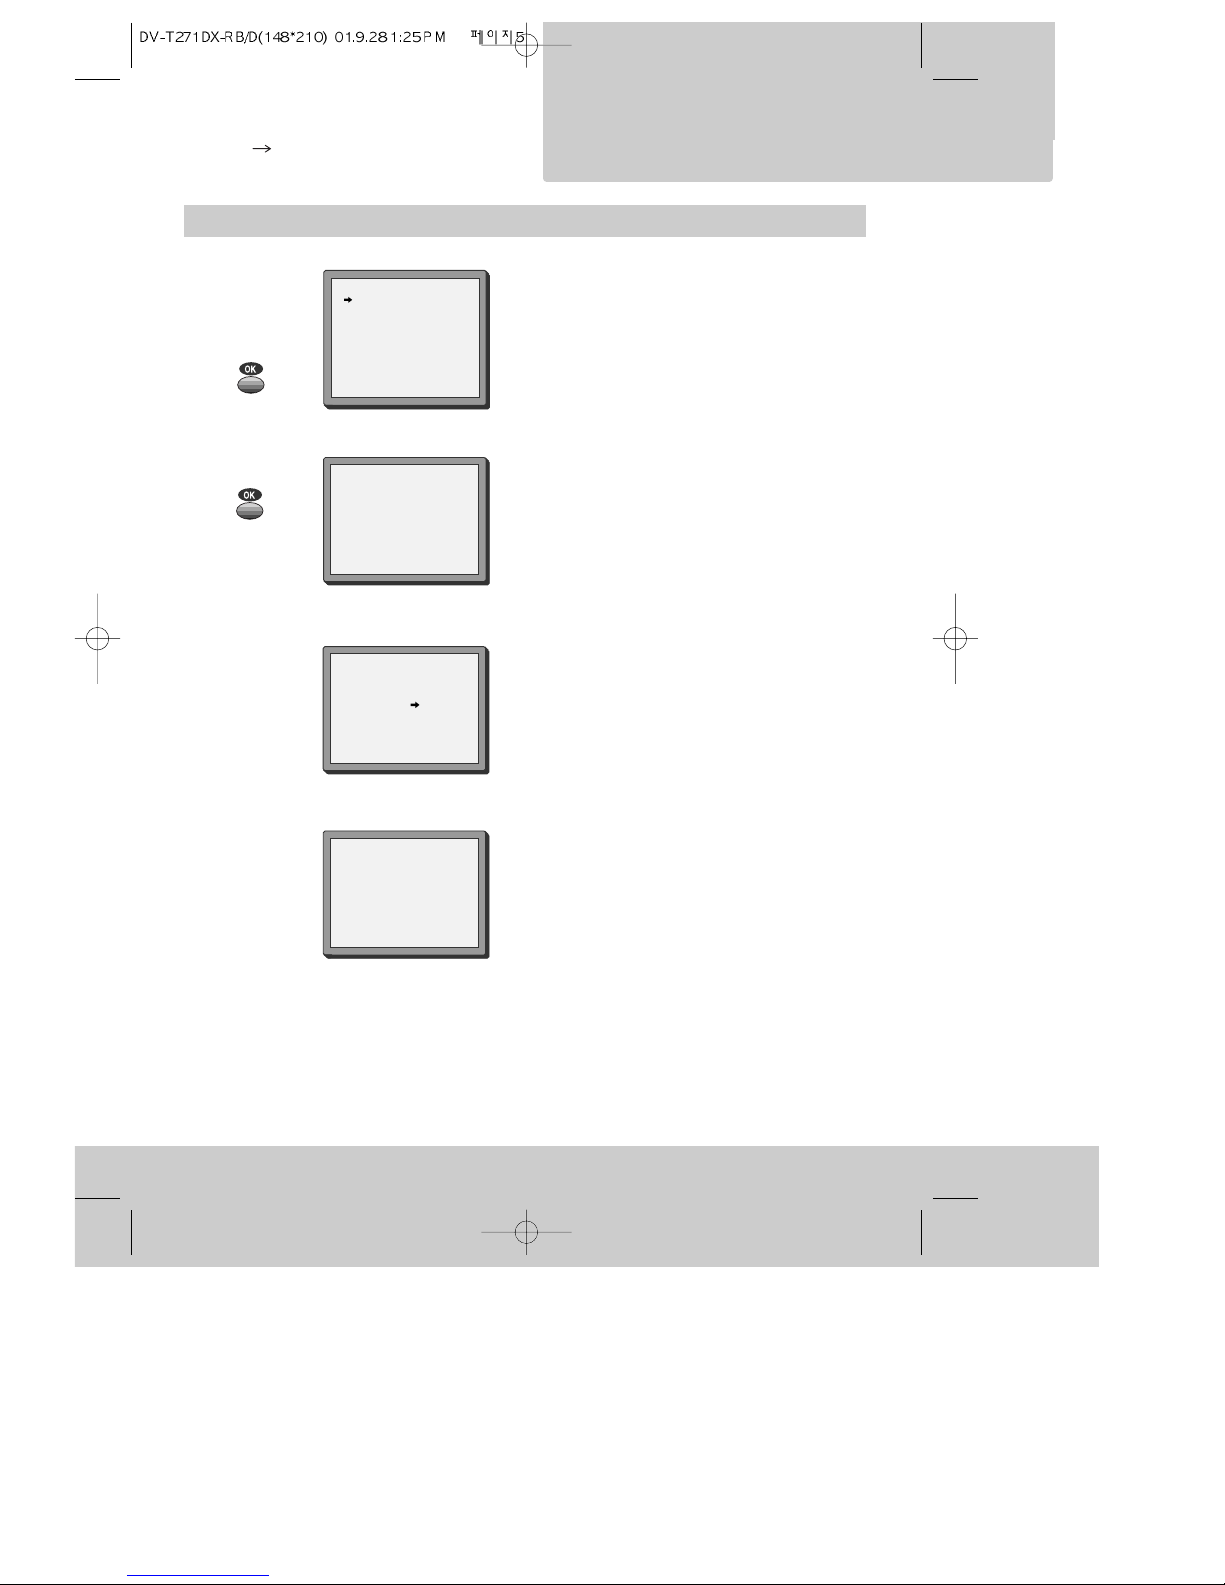
◆On the following pages, the pictures show the buttons you press on the remote control to perform the
function, and what you should see in the On Screen Display or machine display (if present).
Controls
The remote control unit ................................................................................................. 2
The machine, On screen display ................................................................................... 3
Initial installation
Connecting up the video recorder, Fitting the remote control’s batteries ................... 4
Setting up the video recorder ....................................................................................... 5
OSD (On Screen Display) ON & OFF .............................................................................. 7
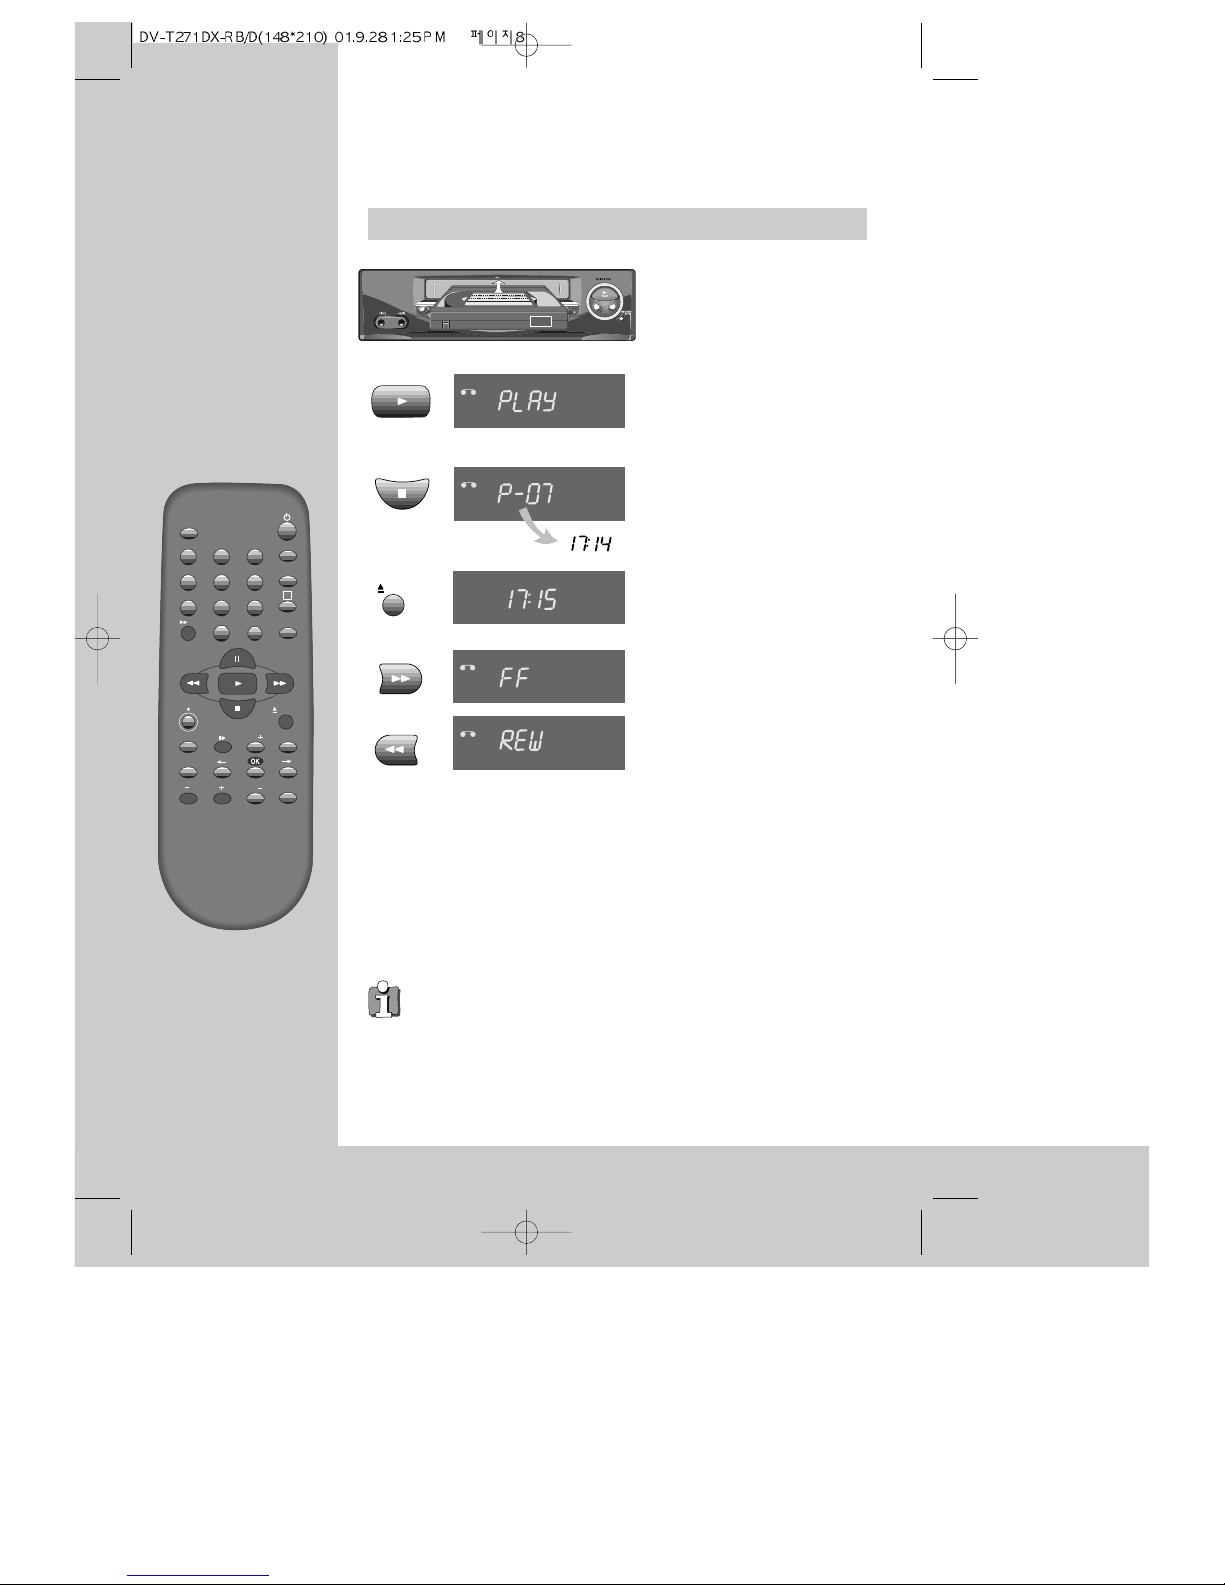
Playing cassettes
Playing back ...................................................................................................................8
Still, Variable picture search, Variable slow motion,
Accessing new recordings (index scan), CM Skip ........................................................ 9
Recording cassettes
Simple recording ......................................................................................................... 10
One touch recording (OTR) .......................................................................................... 11
More functions
Normal timer recording ............................................................................................... 12
Timer Review – changing and erasing, Setting time and date .................................. 13
Clock/Counter display, Remaining time and Cassette length,
Accessing counter zero position, Resetting the counter to zero ............................... 14
Menu languages, Child lock, Cassettes, and ... .......................................................... 15
Tuning in new stations
Tuning .......................................................................................................................... 16
Station names ............................................................................................................. 17
Sorting programme locations, Clearing programme locations ................................... 18
Connections and copying
To the TV via antenna cable (if you are not using a RCA cable) ................................ 19
Copying, Assembling ................................................................................................... 20
Appendix
Brief instruction for experienced users ................................................................. 21/22
Before you ask a specialist ......................................................................................... 23
Index, Technical data .................................................................................................. 24
WORTH
knowing

2
The remote control unit
The buttons to
use are marked
on the following
pages.
30°
max. 7 m.
30°
TV/VCR
PR
PR MENU
EJECT
PAL/SEC
A.SEL
AV
SP/LP
INDEX
123
456
789
0
30
A
◆
The remote control is the principle means of control, but the main playback and record
functions are also available on the front of the machine.
◆
Press any button to turn on the power.
power on/off
this button is not available for this set
a button for selecting input sources for recording:
TV stations – input sockets
You can select the external line by using “00”, “AV”, or
“PR+/-“ button. (refer to page 20)
clock/counter on-screen display
CM skip button to cue the tape for 30 seconds
to eject the cassette
the variable slow motion button
this button is not available for this set
to search the beginnings of records (index)
a button that doubles the maximum recording time for
very long recordings
the record or OTR button
(One Touch Recording means: each time you press the
button recording is extended by 30 minutes)
pause (record), still (playback)
playback start
playback stop
rewinding/fast forwarding a cassette from stop, or
picture search backwards/forwards from playback mode
number buttons to select programmes (stations) or to
type in numbers
the menu controls, programme (station) selection (PR +/–)
this button is not available for this set
TV/VCR
AV
30
EJECT
SP/LP
PR
PR MENU
A.SEL
PAL/SEC
INDEX
123
456
789
0
CONTROLS

The machine
3
◆
Press any button to turn on the power.
On screen display
MAIN MENU
example
The menus show you
which button to press for
the next step.
In addition, some other
functions appear on
screen temporarily.
REW SP PR04 EURO
The video’s menu system
gives you easy-to-understand
access to the less used
functions such as tuning to
stations, clock setting and
more.
“Tape Control” Menu
appears only when a tape is
in the VCR.
*
TIMER PROGRAM
PR PRESET
VCR SETUP
TAPE CONTROL
PR+/-:SELECT
OK:CONFIRM MENU:END
VCR SETUP
CLOCK SET
LANGUAGE SET
RF OUTPUT SET
16:9 SET
OSD ON/OFF
PR+/-:SELECT
OK:CONFIRM MENU:END
*Though the ”16:9 Set” is displayed on the screen, this function is not available for this set.
CONTROLS
STANDBY/ON
playback stop and ejecting the cassette
programme (station) selection
recording or OTR
(One Touch Recording means: each time you press the button recording is extended by
30 minutes)
rewinding / fast forwarding a cassette from Stop, or picture search
backwards / forwards from playback mode.
playback start
front input sockets for connecting a camcorder
MENU
2x
PR

Connecting up the video recorder
4
TV/VCR
PR
PR MENU
EJECT
PAL/SEC
A.SEL
AV
SP/LP
INDEX
123
456
789
0
30
A
Place your video
◆
horizontally on a flat, steady base so that air can circulate around it for ventilation.
◆
away from humidity and heat, magnetic fields, such as those from loudspeakers etc.,
and with no heavy objects placed on top.
Fitting the remote control's batteries
Switch off all components when connecting or disconnecting cables.
◆Unplug the aerial cable from your TV and plug it into the "ANT.
IN" socket of the video.
Plug the short coaxial cable provided into the "ANT.OUT" socket
of the video and the aerial socket of the TV.
◆Plug a RCA cable into the "RCA” socket of the video and the AV
socket on the TV if available.
This connection will provide best picture and sound quality.
Ask your dealer for an appropriate cable if you do not have one.
Without a RCA cable, you need to follow the steps described under "If you
are not using a RCA cable" (right page and page 19).
◆Make sure the rating of the household mains supply matches the rating shown
on the back of the video.
Now plug in the mains lead. The display of the video should now
light.
Fit the batteries as
shown by the
pictures in the bay.
+
–
+
–
1.5 V (AAA)
AC 230 V,
50 Hz
◆Protect your environment by returning used batteries to your dealer. Since batteries
contain toxic substances they require special disposal methods.
◆Make sure the batteries are always of the same type and age, and remove them
from the remote control if you are not using it for a long period.
The buttons to
use are marked
on the following
pages.
Initial
INSTALLATION

Setting up the video recorder
◆
Switch the TV on.
◆
You can also start "Auto Search" in the menu "PR
Preset" "Auto Search".
◆
To tune in new stations (manual tuning) and to enter
station names see page 16-18.
You should see this picture the first
time you switch on the TV and video.
Choose your language.
OK for "Auto Search!".
"AUTO SEARCH" tunes in all the stations you can
receive in your country and ...
... sorts them in an order common for your country.
LANGUAGE SET
ENGLISH
POLISH
CZECH
HUNGARIAN
PYCCK
NZ
DEUTSCH
SLOVAK
PR+/-:SELECT
OK:CONFIRM MENU:END
AUTO SEARCH!
OK:CONFIRM MENU:END
AUTO SEARCH
MENU:END
PR03
V-L - - - - - - - - - - - - - -
76%
PLEASE WAIT...
AUTO SEARCH
5
Initial
INSTALLATION

Setting up the video recorder (continued)
6
TV/VCR
PR
PR MENU
EJECT
PAL/SEC
A.SEL
AV
SP/LP
INDEX
123
456
789
0
30
A
If other stations are positioned
on near the current RF OUTPUT
PR, the guide message appears
automatically.
The VCR recommends the optimal RF
OUTPUT PR number automatically.
Should you wish the stations to
have the same numbers as those
used on the TV, follow the
instructions in "Sorting
programme locations" on page 20.
Else ...
exit the basic installation function and
enjoy your video recorder.
MANUAL SET
PR01 P-01 PR08 P-08
PR02 P-02 PR09 P-09
PR03 P-03 PR10 P-10
PR04 P-04 PR11 P-11
PR05 P-05 PR12 ----
PR06 P-06 PR13 ----
PR07 P-07 PR14 ----
PR+/-:SELECT
OK:CONFIRM MENU:END
ONE OR MORE STATIONS ARE
CLOSE TO THE VIDEO PICTURE.
PLEASE SELECT ANOTHER.
Press the OK button to confirm
the recommended PR.
PLEASE CHANGE THE TV
PR TO 54.
0-9:SELECT (21-69)
OK:CONFIRM MENU:END
CURRENT PR 52
RECOMMENDED PR 54
IMPORTANT!
Then type in the current time and
date.
CLOCK SET
0-9:SETUP (HOUR)
/ :CORRECT MENU:END
TIME - - : - -
DATE - - / - - /- - - -
◆If you don´t see this picture, because you don´t use a RCA cable, search this
picture now (CH 52) with the station tuning functions of your TV set (see its
user manual).
◆In case of interference problems on CH 52, type in an
other transmission channel between 21 and 69 using the
number buttons.
Initial
INSTALLATION
MENU
123
456
789
0

7
OSD ON/OFF
ON
OFF
PR+/-:SELECT
OK:CONFIRM MENU:END
OSD (On Screen Display) ON & OFF
This OSD (On Screen Display) indicates the channel program number and time information onto the
television screen. The factory default is ON for this feature. If you do not wish to have such
information shown during normal picture, follow the steps below and select the OSD OFF mode.
Call the video’s "MAIN MENU".
Choose “VCR SETUP”.
And press the OK button.
Select “OSD ON/OFF”.
If you want OSD OFF mode, select it and press OK
button to confirm.
Then OSD characters are not displayed in the
normal picture.
MAIN MENU
TIMER PROGRAM
PR PRESET
VCR SETUP
TAPE CONTROL
PR+/-:SELECT
OK:CONFIRM MENU:END
VCR SETUP
CLOCK SET
LANGUAGE SET
RF OUTPUT SET
16:9 SET
OSD ON/OFF
PR+/-:SELECT
OK:CONFIRM MENU:END
Initial
INSTALLATION
*
*Though the ”16:9 Set” is displayed on the screen, this function is not available for this set.
MENU
MENU

Playing back
8
TV/VCR
PR
PR MENU
EJECT
PAL/SEC
A.SEL
AV
SP/LP
INDEX
123
456
789
0
30
A
◆
Your TV and your video recorder are switched on.
◆
To see the picture from your video, press the station button on the TV reserved for
video input or the AV (Audio/Video) button.
Load the cassette by pushing
it smoothly and squarely into
the cassette bay, with its
windows pointing up.
Start playback.
Stop playback.
Eject the cassette.
Fast forward or rewind the
cassette from stop.
AUTOSET
20 : 10
VHS
VCR
VCR
VCR
VCR
VCR
◆When you load a protected cassette (e.g. pre-recorded film,
see page 15) playback starts automatically.
◆PLAY switches back to normal playback.
◆During still, slow or search, you don’t hear the sound.
◆
If the still picture is jittering, you can steady it by using the PR +/– buttons.
◆You can reduce horizontal interference stripes resulting from
inaccurate tracking (when playing tapes of poor quality or recorded on
other machines) by using the PR +/– buttons during playback.
◆
After approx. 5 minutes in still, the cassette plays back automatically.
◆NTSC PLAYBACK on PAL TV ; If you playback the tapes, which have
been recorded on NTSC color system, on this VCR, you can watch the
pictures on a PAL TV.
◆Clock / Counter / Remaining time – page 14.
◆Auto Head Cleaning
This VCR has Auto Head Cleaner. The video head will be cleaned
automatically whenever loading or unloading the tape.
PLAYING
cassettes
EJECT

Still
9
Variable picture search
Variable slow motion
Accessing new recordings (index scan)
Still picture from playback.
Each press of the button advances the picture
one frame.
PLAY switches back to normal playback.
Starting from playback you can control search
speed in 2 steps either forwards ( ) or
backwards ( ). Press repeatedly.
PLAY switches back to normal playback.
Starting from playback you can control slow
motion speed in 6 steps (1/15, 1/10, 1/5, 1/30,
1/25, 1/20, 1/15, ...). Press repeatedly.
PLAY switches back to normal playback.
Select INDEX + or INDEX – to search forwards or
backwards.
The video will now wind to the beginning of the first
recording, play it for about 6 seconds then wind on to the
next one.
When you see the recording you want, press
PLAY.
Access the beginning of recordings in the middle of the tape using the Index + / – function.
The video recorder automatically sets an electronic marker (index) at the beginning of each recording. It is these markers
which the Index + / – function detects.
FF SP
INDEX 01
0:11:09
VCR
VCR +
VCR -
VCR
CM Skip
If you press [CM Skip] button on the remote control, tape advances for 30
seconds segment.
PLAYING
cassettes
INDEX
30

Simple recording
10
TV/VCR
PR
PR MENU
EJECT
PAL/SEC
A.SEL
AV
SP/LP
INDEX
123
456
789
0
30
A
◆
The TV stations on the video have been tuned in (page 5).
◆
The video is switched on.
◆
You can either watch the picture from the video on the TV by pressing the station
button reserved for video input or the AV button, watch another TV station or switch
off the TV altogether.
Load a cassette with its safety
tab in place (see page 15).
Start your recording.
If you wish to interrupt recording
briefly - then continue.
Stop your recording.
Choose the station whose
programme you want to record.
If the programme you wish to
record is very long, double the
possible recording time with "LP"
(Long Play).
Up to eight hours with an E-240 cassette.
VCR
STOP SP PR09 EURO
◆The video stops automatically, if
pause exceeds five minutes.
VCR
VCR
RECORDING
cassettes
PR
SP/LP
PR

One touch recording – OTR
◆If you want to record from a source connected to your video see page 20.
◆To CANCEL OTR press the button (stop) for more than 5 seconds.
◆Clock / Counter / Remaining time – page 14.
Choose the station you want and press the button once
for every 30 minutes of programme you wish to record.
Up to ten hours are possible.
VCR
TMR
◆
For timer recordings, clock, date, and stations must be
set correctly.
◆
Load a cassette with its safety tab in place
(see page 15) and with sufficient free space for the
recording.
11
RECORDING
cassettes

Normal timer recording
12
TV/VCR
PR
PR MENU
EJECT
PAL/SEC
A.SEL
AV
SP/LP
INDEX
123
456
789
0
30
A
◆
For timer recordings, clock, date, and stations must be set correctly.
◆
Load a cassette with its safety tab in place
(see page 15) and with sufficient free space for the recording.
Call the video’s "MAIN MENU",
choose "Timer Program".
Decide if you want to record
"Once", "Weekly" or "Daily"...
... and confirm.
If you wish to make changes:
Move to the position you want to change
using the / buttons. Change the
setting using the PR+/- or number buttons.
If all setting are ok, press or , till
you see “OK : confirm” in the bottom line.
Confirm.
Switch your video off.
Type in one after the other:
◆The programme location
number;
◆the time the broadcast starts,
◆the time the broadcast ends,
◆the day of the broadcast, if it
is not today.
◆Select LP if you wish to make
a very long recording .
TMR
HOW OFTEN DO YOU WANT
TO RECORD THIS PROGRAM?
PR+/-:SELECT
OK:CONFIRM MENU:END
ONCE
WEEKLY(ONCE A WEEK)
DAILY(MON-FRI)
DAILY(MON-SAT)
DAILY(MON-SUN)
PR+/-:SET(AV)
0-9 :SETUP(PR)
/ :CORRECT MENU:END
PR --
START TIME --:--
END TIME --:--
START DATE --/--
TAPE SPEED SP
TIMER PROGRAM (ONCE)
PR 01
START TIME 18:10
END TIME 20:30
START DATE 12/04(THU)
TAPE SPEED LP
PR+/-:SET (AV)
0-9 : SETUP (PR)
/ :CORRECT
OK:CONFIRM MENU:END
◆Wait a few seconds after typing a one-digit-number.
◆If you have made a mistake, move to the position you want to change
using the / buttons and change the setting.
◆If programme timings overlap, the machine will give a warning
message. If you don’t adjust the times, the machine will record the first
programme completely then continue with the second one.
◆If there is no sufficient free space for the recording on the cassette the
video switches automatically to “LP” for double recording capacity.
◆The recorder will eject cassettes which have the safety tab removed
(page15).
MORE
functions
2x
MENU
123
456
789
0
PR

Timer Review – changing and erasing
Call the video’s "MAIN MENU",
choose "Timer Program".
Select the programming to change or erase.
If you want to erase this programming press
button 0, confirm with OK.
If you wish to make changes:
Move to the position you want to change using
the / buttons.
Change the settings using the PR +/– or number
buttons.
If all setting are ok, press or , till you see
"OK: confirm" in the bottom line.
Confirm changes with OK. Exit the menus.
TIMER PROGRAM
PR START END DATE
03 21:20 22:20 14/04
01 18:30 20:20 12/04
-- -- : -- -- : -- -- / --
-- -- : -- -- : -- -- / --
-- -- : -- -- : -- -- / --
-- -- : -- -- : -- -- / --
-- -- : -- -- : -- -- / --
-- -- : -- -- : -- -- / --
PR+/-:SELECT
OK:CONFIRM MENU:END
Setting time and date
Call the video’s "MAIN MENU",
choose "VCR Setup", then "Clock Set".
Move to the position you want to change and type
in the new values.
Wait a few seconds after typing a one-digit number.
Store with OK button and exit with MENU button.
TIMER PROGRAM (ONCE)
PR 03
START TIME 21:20
END TIME 22:20
START DATE 14/04(SAT)
TAPE SPEED SP
0 :ERASE
/ :CORRECT MENU:END
13
CLOCK SET
0-9:SETUP (HOUR)
/ :CORRECT MENU:END
TIME - - : - -
DATE - - / - - /- - - -
CLOCK SET
0-9:SETUP (HOUR)
/ :CORRECT
OK:CONFIRM MENU:END
TIME 06:05
DATE 10/04/2001(TUE)
MORE
functions
MENU
PR
PR MENU
123
456
789
0
MENU
2x
2x
MENU
MENU
123
456
789
0
PR

Clock / counter display
14
TV/VCR
PR
PR MENU
EJECT
PAL/SEC
A.SEL
AV
SP/LP
INDEX
123
456
789
0
30
A
◆
The counter counts in real time from the point you load the cassette. This does not
have to be its beginning! The counter does not count unrecorded parts of the tape.
◆
If you rewind beyond the zero position, the counter counts in negative values
(e.g. – 0:01:15).
Remaining time and cassette length
STOP SP PR01 ARD
14:00 10/04
1x: Time and date+current
status Time and date
2x: Counter+current status
counter
3x: disappear
If didn’t wind tape (PLAY, FF, REW,...), it
doesn’t appear the tape remain time.
When you want the video to show the time remaining from the current video
tape position (to find out if there is sufficient space for a recording, for example).
To ensure the remaining time shown is accurate, select the length of cassette
currently loaded by selecting this function until you reach the correct length.
Remaining time display is only possible when the cassette is loaded.
E-240 01:27
Call the video’s “MAIN MENU”, choose “Tape Control”.
TAPE REMAIN
E-180
E-240
E-300
PR+/-:SELECT
OK:CONFIRM MENU:END
TAPE CONTROL
TAPE REMAIN
GO TO ZERO
COUNTER RESET
PR+/-:SELECT
OK:CONFIRM MENU:END
Resetting the counter to zero
Accessing counter zero position
Reset the counter.
The video will wind to the
position 0:00:00 and stop.
COUNTER RESET
REW SP
GO TO ZERO
0:02:13
MORE
functions

Menu languages
15
Child lock
Call the video’s "MAIN MENU", choose
"VCR Setup", then "Language Set".
Select your language.
Confirm.
Press the button for about 5 seconds.
Your video can´t be operated now, only timer recordings
will be performed. Keep your remote control in a safe
place.
To release child lock, press the button again for 5 seconds.
and ...
Cassettes
Dimmer
Your video recorder dims its display when switched to stand-by mode.
Auto power off
Your video recorder switches to stand-by when no tape is played and no station is
received for more than 5 minutes.
Use only good quality tape cassettes with the VHS logo.
◆Keep cassettes away from excessive moisture or dust, magnetic and
electrical fields (loudspeakers and computer monitors, for example).
◆Always wind the tape to the beginning when you have finished. Store
with the full spool at the bottom and with the cassette in its cover.
You can protect your precious recordings from being wiped by breaking out
the safety tab on the side of the cassette (some cassettes have a slide).
Should you wish to re-use the tape after removing the tab, cover the hole
with adhesive tape.
PAL
MORE
functions
LANGUAGE SET
ENGLISH
POLISH
CZECH
HUNGARIAN
PYCCK
NZ
DEUTSCH
SLOVAK
PR+/-:SELECT
OK:CONFIRM MENU:END
MENU
PR
PR
2x

Tuning
16
TV/VCR
PR
PR MENU
EJECT
PAL/SEC
A.SEL
AV
SP/LP
INDEX
123
456
789
0
30
A
◆
The TV and video recorder are switched on.
◆
To see the picture from your video, press the station button on the TV reserved for
video input or the AV (Audio / Video) button.
◆
"AV" should not be selected with the AV button on the video.
Call the video’s "MAIN MENU",
choose "PR Preset".
Select "Manual Set".
Choose any unused location
number "----" or "P-xx" ...
It's simplest to use the same location
number on both the TV and video.
... and confirm.
Tune in the station you want.
Press button to see the
picture.
If it isn’t the station you want,
or the picture is disturbed,
carry on tuning.
Once you see the station you
want, store it.
Tune in further stations (from
step 3 onwards) or exit tuning
mode.
PR PRESET
AUTO SEARCH
MANUAL SET
PR ERASE
PR ALIGN
PR+/-:SELECT
OK:CONFIRM MENU:END
MANUAL SET
PR01 P-01 PR08 P-08
PR02 P-02 PR09 P-09
PR03 P-03 PR10 P-10
PR04 P-04 PR11 P-11
PR05 P-05 PR12 ----
PR06 P-06 PR13 ----
PR07 P-07 PR14 ----
PR+/-:SELECT
OK:CONFIRM MENU:END
MANUAL SET
PR29 P-29
PR+/-:SEARCH UP/DOWN
: NAME CORRECT
: PR VIEW
OK:CONFIRM MENU:END
MANUAL SET
PR+/-:SEARCH UP/DOWN
MENU :END
PR29
V-L ----------- -----
68%
MANUAL SET
PR29 P-29
PR+/-:SEARCH UP/DOWN
: NAME CORRECT
: PR VIEW
OK:CONFIRM MENU:END
T u n i n g i n
NEW STATIONS
2x
MENU
MENU
PR
PR
PR
PR
PR
PR

Station names
If your video is showing no station name or is showing a station name incorrectly, you can correct this. Select “ : name
correct” on the “MANUAL SET” menu.
Call this menu (just see the left page),
if it isn't displayed.
Select "name correct".
Either select the name from the stored list ...
... or you select " : name create" and enter
a 4-digit name.
Change the letters with the PR +/– buttons, move
to the next letter with the / buttons.
Store and exit.
MANUAL SET
PR29 P-29
PR+/-:SEARCH UP/DOWN
: NAME CORRECT
: PR VIEW
OK:CONFIRM MENU:END
MANUAL SET
PR+/-:NAME CHANGE
:NAME CREATE
OK:CONFIRM MENU:END
PR01 P-01
MANUAL SET
PR+/-:SELECT CHARACTER
/ :SELECT (POSITION)
OK:CONFIRM MENU:END
PR01 E-01
MANUAL SET
PR01 E-01 PR08 P-08
PR02 P-02 PR09 P-09
PR03 P-03 PR10 P-10
PR04 P-04 PR11 P-11
PR05 P-05 PR12 ----
PR06 P-06 PR13 ----
PR07 P-07 PR14 ----
PR+/-:SELECT
OK:CONFIRM MENU:END
◆The video's automatic tuning system usually produces the best results. In poor reception areas, fine tuning
may improve reception. Choose the station and tune using the / buttons.
Store, typing in the
location number again.
◆Should you wish to tune in all the channels available in your region, please refer to page 5.
◆Should you wish to sort or clear stations, please refer to page 19.
17
T u n i n g i n
NEW STATIONS
2x
PR
MENU
PR
PR MENU
MENU
PR
PR
PR

Sorting programme locations
18
TV/VCR
PR
PR MENU
EJECT
PAL/SEC
A.SEL
AV
SP/LP
INDEX
123
456
789
0
30
A
If the location numbers used for programmes stored in your TV and video are
different, you can change them on the video.
To do this, move the stations to the right numbers, until they are arranged the
way you want.
Call the video’s "MAIN MENU",
choose "PR Preset" then "PR
Align".
Select the programme to swap.
Confirm.
Move the station to the desired
location number.
Confirm.
PR ALIGN
PR+/-:ALIGN
:PR VIEW
OK:CONFIRM MENU:END
PR01 P-01 PR08 P-08
PR02 P-02 PR09 P-09
PR03 P-03 PR10 P-10
PR04 P-04 PR11 P-11
PR05 P-05 PR12 ----
PR06 P-06 PR13 ----
PR07 P-07 PR14 ----
Clearing programme locations
PR ERASE
PR+/-:SELECT
:PR VIEW
OK:ERASE MENU:END
Call the video’s "MAIN MENU",
choose "PR Preset" then "PR
Erase".
Select the station (location
number) you want to clear.
Review the picture.
Clear.
PR01 P-01 PR08 P-08
PR02 P-02 PR09 P-09
PR03 P-03 PR10 P-10
PR04 P-04 PR11 P-11
PR05 P-05 PR12 ----
PR06 P-06 PR13 ----
PR07 P-07 PR14 ----
PR03 P-03
IMPORTANT!
THE ‘OK’ BUTTON WILL
ERASE THIS PR.
:PR VIEW
OK:CONFIRM MENU:END
T u n i n g i n
NEW STATIONS
MENU
PR
PR
PR
MENU
PR
PR
PR
2x
MENU
PR
PR
MENU
PR
PR

To the TV via antenna cable (if you are not using a RCA cable)
◆
If you are using a RCA cable, select the AV input on
the TV to see the picture from the video.
◆
If you are not using a RCA cable, select the button
number on the TV reserved for video input to see the
picture from the video.
If you are not using a RCA cable, your video can transmit pictures and sound to the TV via the coax aerial
cable. Just tune the TV to the video's transmitting channel (factory set to UHF CH 52). Tune the TV carefully
to ensure the best pictures and sound.
Once you have carried out the steps in
"Connecting up the video recorder" (page 4),
switch on your TV.
Press the OK button of the video’s remote control
longer than 5 seconds to call the video´s test
picture.
Tune the TV to the test picture using the channel
pre-set functions of your TV as described in its
manual.
Once you have found the test picture, follow this
instructions within your television manual to store
this new channel into a programme location.
Press the OK button of the video’s remote control
again longer than 5 seconds to release the test
picture.
Call the video’s "MAIN MENU" choose
"VCR Setup" then "RF Output Set".
Type in the free channel.
Store and exit.
If the quality of the test picture transmitted to the TV is poor due to interference caused by a
station transmitting on channel 52, you can tune the video to a different transmitting channel. Find a
free channel between 21 and 69 on your TV.
RF OUTPUT SET
0-9:SELECT (21-69)
/:SELECT (BG/DK)
OK:CONFIRM MENU:END
PR 52
SYSTEM BG DK
◆If the quality of the test picture transmitted to the TV is poor, fine-tuning on the TV may help
(refer to the TV manual).
19
CONNECTIONS
a n d c o p y i n g
5 sec.
2x
2x
MENU
MENU
PR
PR
123
456
789
0
Table of contents
Other Supra VCR System manuals