SurfaceMaxx SGY-PWA65 User manual

AB15691
1
18 FT. Telescoping Pressure
Washer Extension Wand
INSTRUCTION SHEET
ITEM #0434982
MODEL #SGY-PWA65
ATTACH YOUR RECEIPT HERE
Purchase Date
service department at +1 (866) 870-9930, 9 a.m. - 5 p.m., EST, Monday - Friday.
www.surfacemaxx.com
Questions, problems, missing parts? Before returning to your retailer, call our customer
DANGER
DO NOT POINT IT
HUMAN BODY
SEVERE INJURY
MAYRESULT
TRIGGER
LOCK

2
www.surfacemaxx.com
TABLE OF CONTENTS
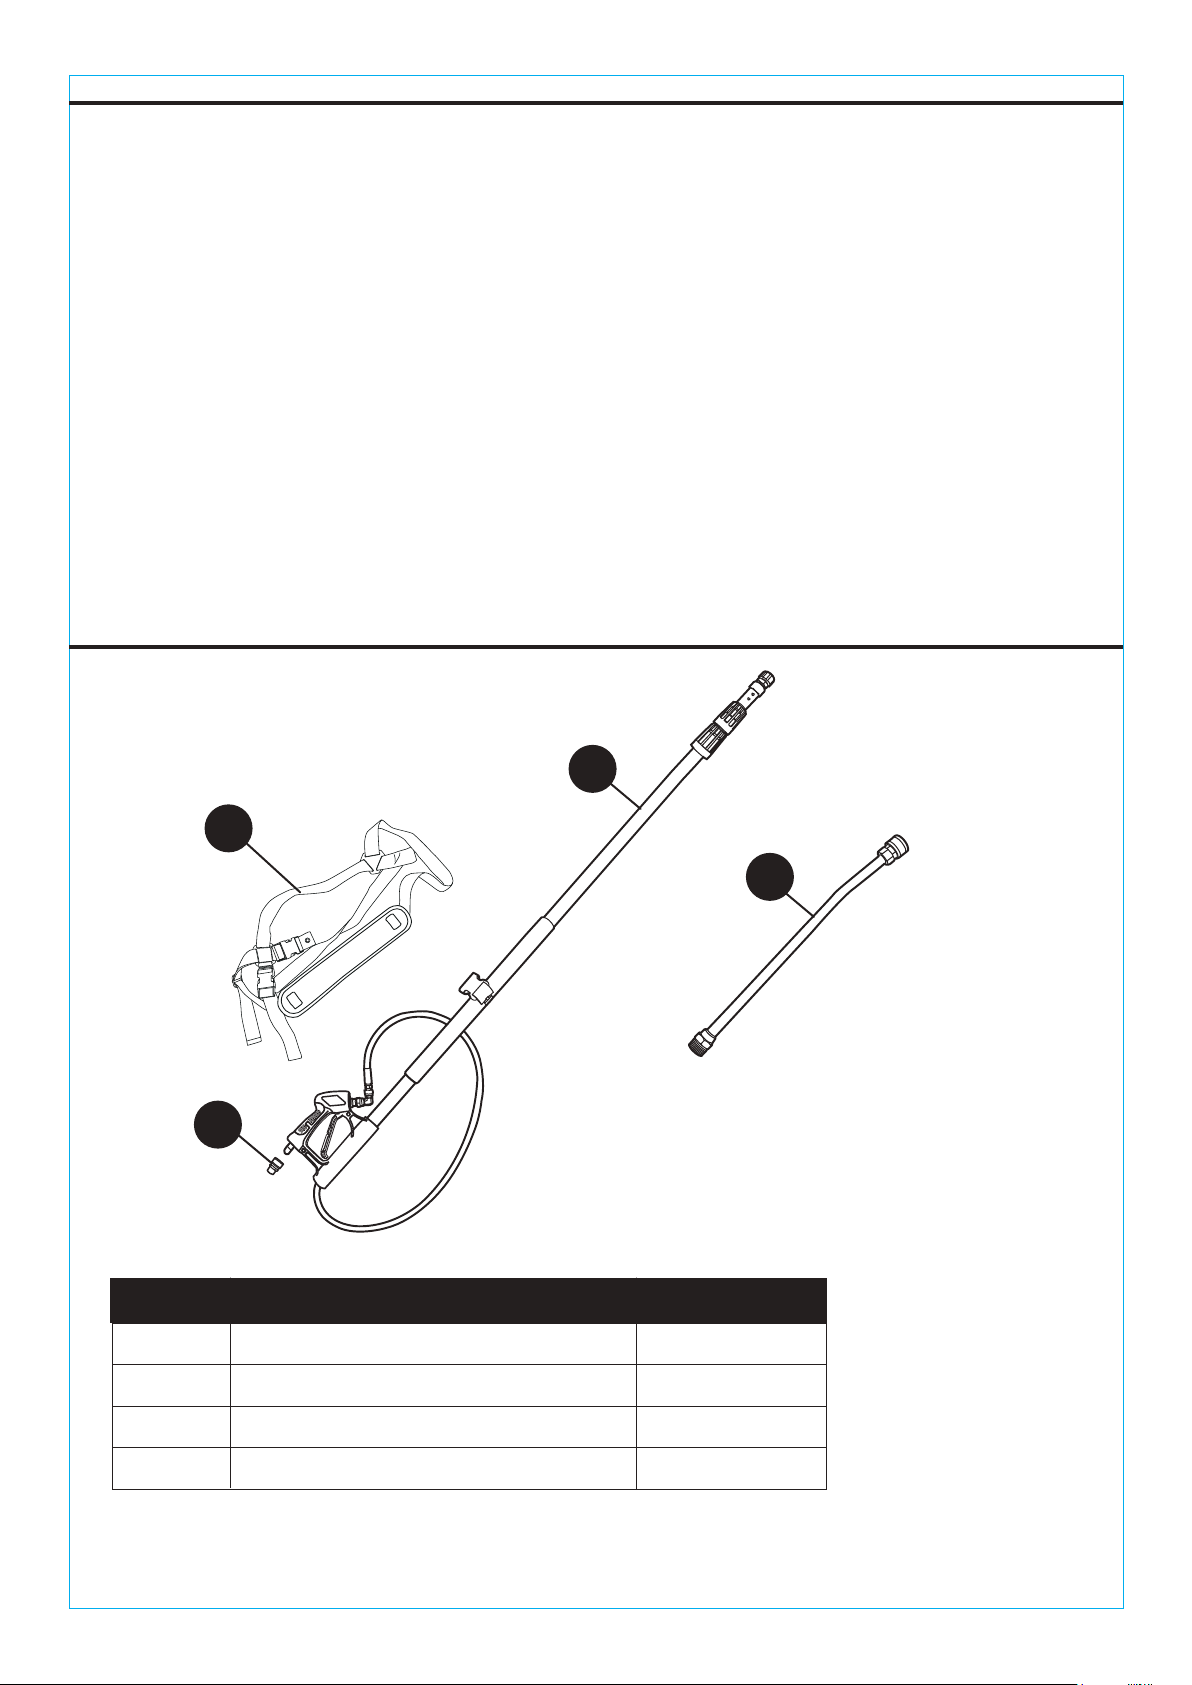
PACKAGE CONTENTS
Safety Information.....................................................................................................................
Preparation ..............................................................................................................................
Operating Instructions ..............................................................................................................
Care and Maintenance ............................................................................................................
Troubleshooting ..................................................................................................................................
Warranty .................................................................................................................................
3
4
Installation Instructions ............................................................................................................ 4
5
8
8
8
QUANTITYDESCRIPTIONPART
A 17 ft. Telescoping Wand 1
B 20 in. Extension Wand 1
C
D
Adapter
Harness
1
1
A
B
C
D
DANGER
DONOTPOINTIT
HUMAN BODY
SEVERE INJURY
MAYRESULT
TRIGGER
LOCK

3
www.surfacemaxx.com
WARNING
SAFETY INFORMATION
Beware of overhead power lines. Contacting these lines with the long wand may result in
electrocution, injury, or even death.
Always shut down pressure washer/water supply and depressurize before removing or
Wear safety glasses when operating unit.
Never point spray nozzles or guns at humans or animals. Never place any body part in the
Serious injury can result from the high pressure discharge produced by pressure washers.
To prevent accidental discharge from the gun, always use the trigger lock when you’ve
cleaning accessories.
water stream.
finished spraying.
Harness is not intended to provide any back support.
CAUTION
Fits gas and electric pressure washers rated up to 4,200 PSI.
Make sure all connections are secure. Hold the gun securely while starting pressure
When operating pressure washer, always stand on a permanent, stable surface. Do not
Before changing out tips, make sure the pressure washer has been turned off and
Do not fully extend the telescoping wand. A minimum of 6 inches must remain inside section of
washer unit.
stand on ladders, chairs, etc.
depressurized. The collar on the quick disconnect socket will snap back into its original forward
locking position when tip is inserted correctly.
the wand for stability.
IMPROPER OPERATION OR MAINTENANCE OF THIS PRODUCT COULD RESULT IN
SERIOUS INJURY AND PROPERTY DAMAGE OR DEATH. READ AND UNDERSTAND ALL
WARNINGS AND OPERATION INSTRUCTIONS BEFORE USING THIS PRODUCT.
WHENEVER USING TOOLS, BASIC SAFTEY PRECAUTIONS SHOULD ALWAYS BE
FOLLOWED TO REDUCE THE RISK OF PERSONAL INJURY.
4
www.surfacemaxx.com
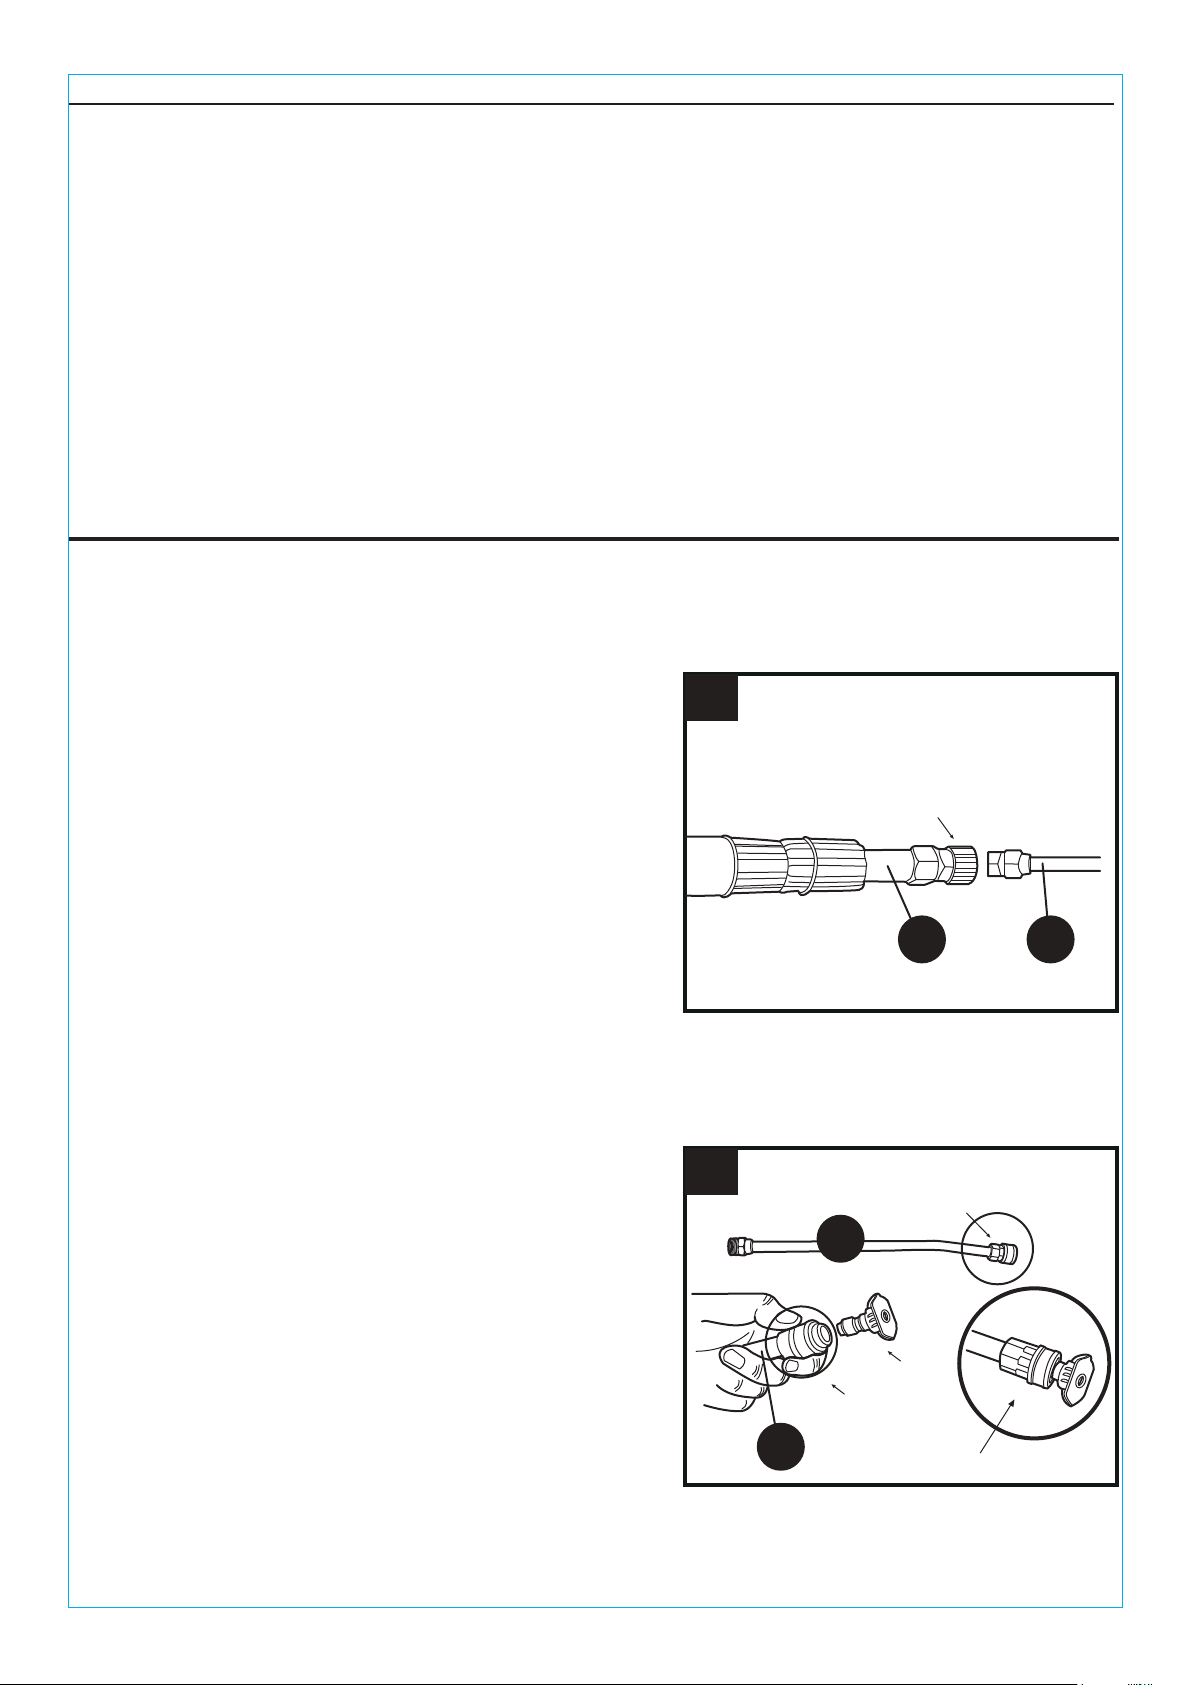
Screw female end of telescoping wand (A) onto
the male end of the extension wand (B) and hand
tighten.
Pull back on socket collar on extension wand (B) and
insert spray tip (not included), or pull out to remove,
then release collar.
INSTALLATION INSTRUCTIONS
1. WAND & EXTENSION WAND CONNECTION
2. QUICK DISCONNECT SPRAY TIP CONNECTION
Spray tip
Socket collar
Completed connection
2
Before beginning assembly, installation or operation of product, make sure all parts are present.
Compare parts with package contents list. If any part is missing or damaged, do not attempt to
assemble, install or operate the product.
PREPARATION
• Estimated Assembly Time: 10 minutes
• Tools Required for Assembly: Adjustable Wrench (not included)
B
B
Socket collar
Female end
1
A B
5
www.surfacemaxx.com
INSTALLATION INSTRUCTIONS
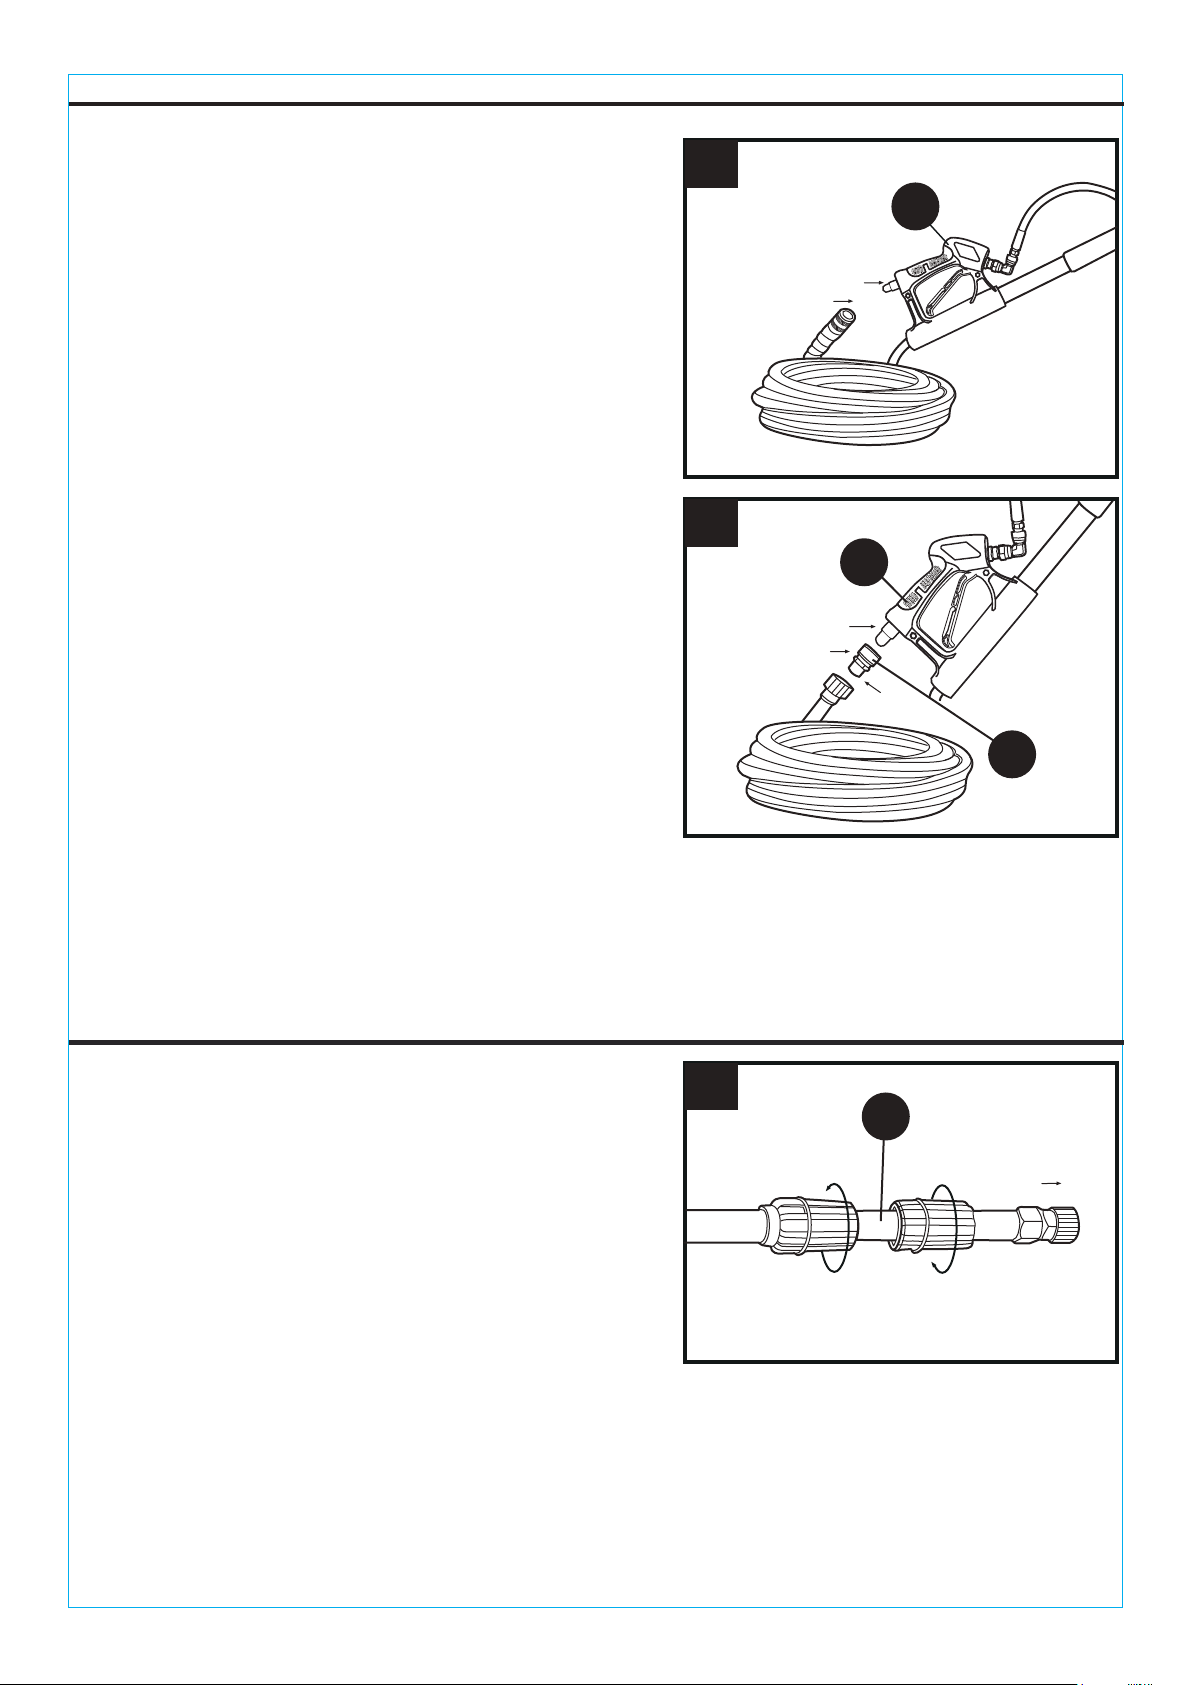
OPERATING INSTRUCTIONS
Attach hose (not included) to the telescoping
wand (A).
Twist knobs on telescoping wand (A) to unlock
and then pull to extend to desired length.
Turn knobs in opposite directions to retighten.
IMPORTANT: Overtightening the knobs can cause
damage.
3. GUN & QUICK DISCONNECT HOSE
CONNECTION
5. ADJUST WAND LENGTH
3
Quick disconnect plug
Socket collar
Attach the adapter (C) to the telescoping wand (A).
Attach hose (not included) to the adapter (C).
4. GUN & METRIC HOSE CONNECTION
Quick disconnect plug
Quick disconnect socket
Male metric
5
Pull
Lock
Unlock
Choose one: Step 3 or Step 4.
A
A
A
C
DANGER
DONOT POINT IT
HUMAN BODY
SEVEREINJURY
MAYRESULT
TRIGGER
LOCK
DANGER
DO NOT POINT IT
HUMAN BODY
SEVERE INJURY
MAYRESULT
TRIGGER
LOCK
4
6
www.surfacemaxx.com
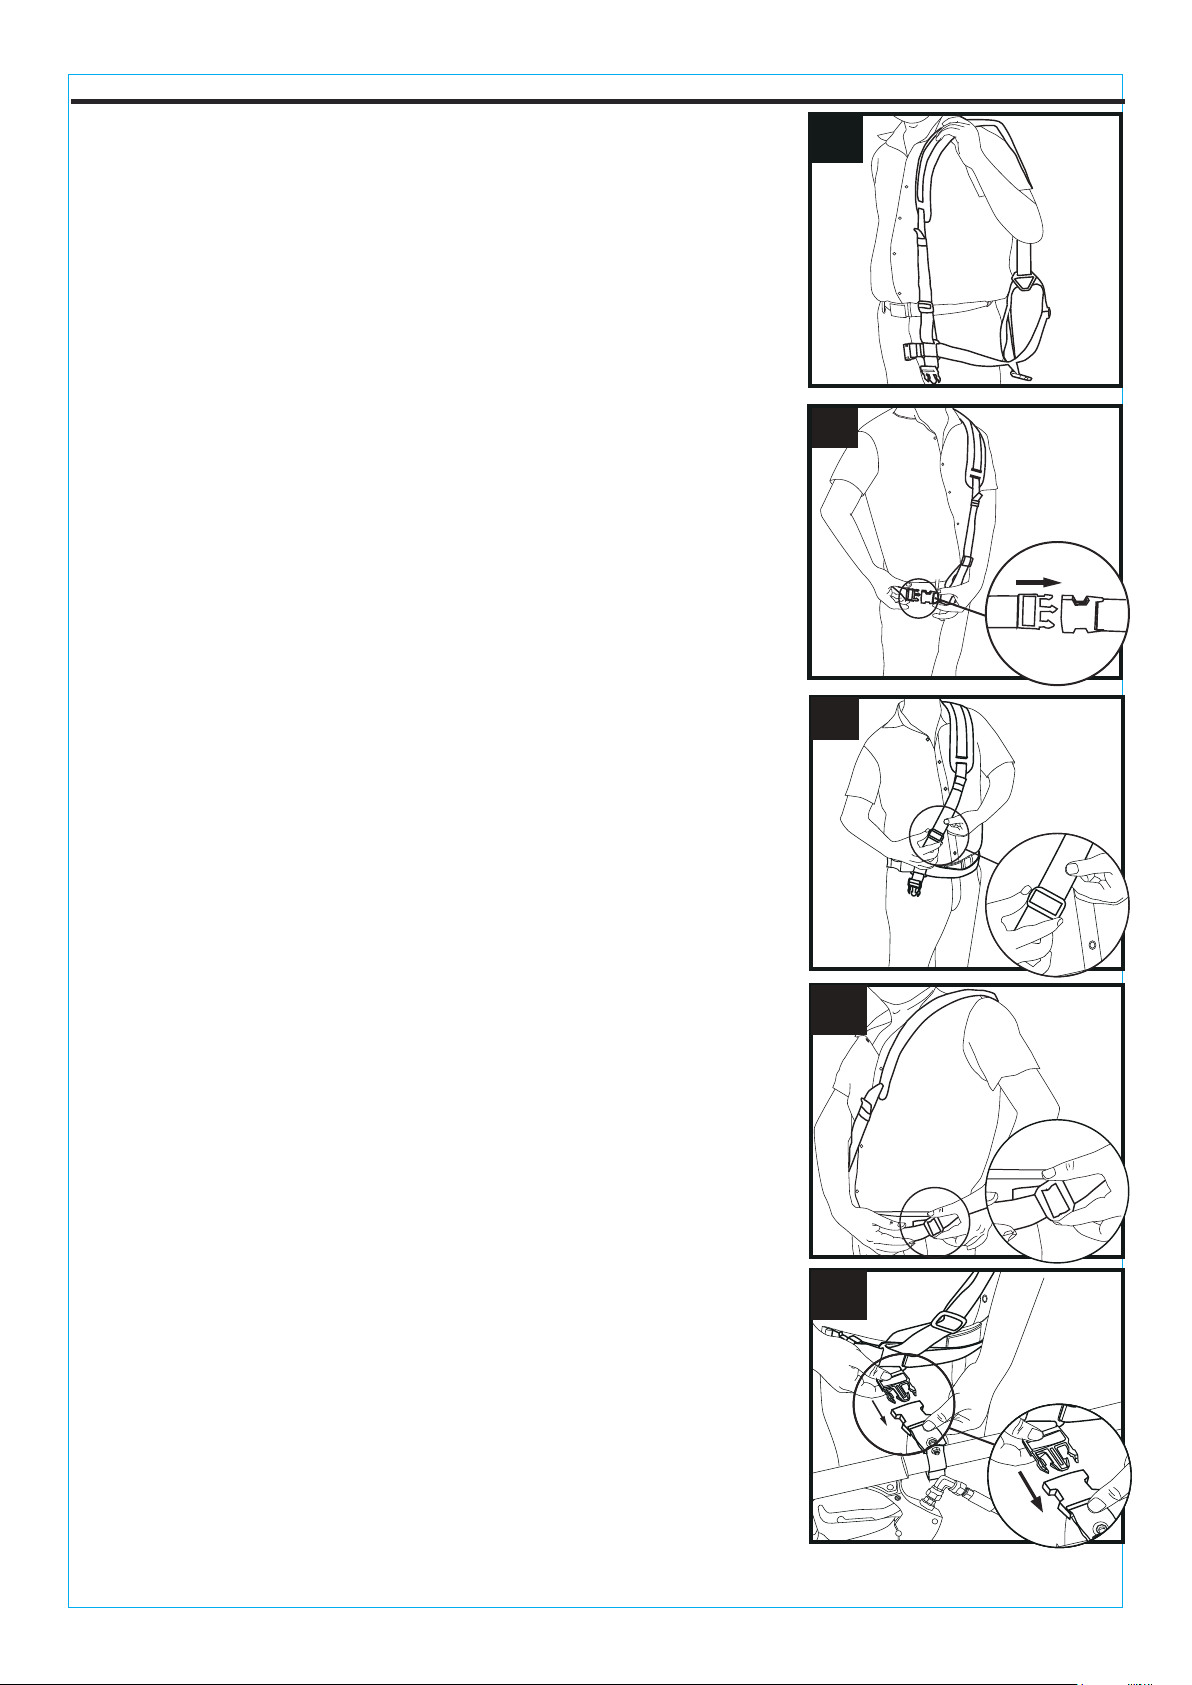
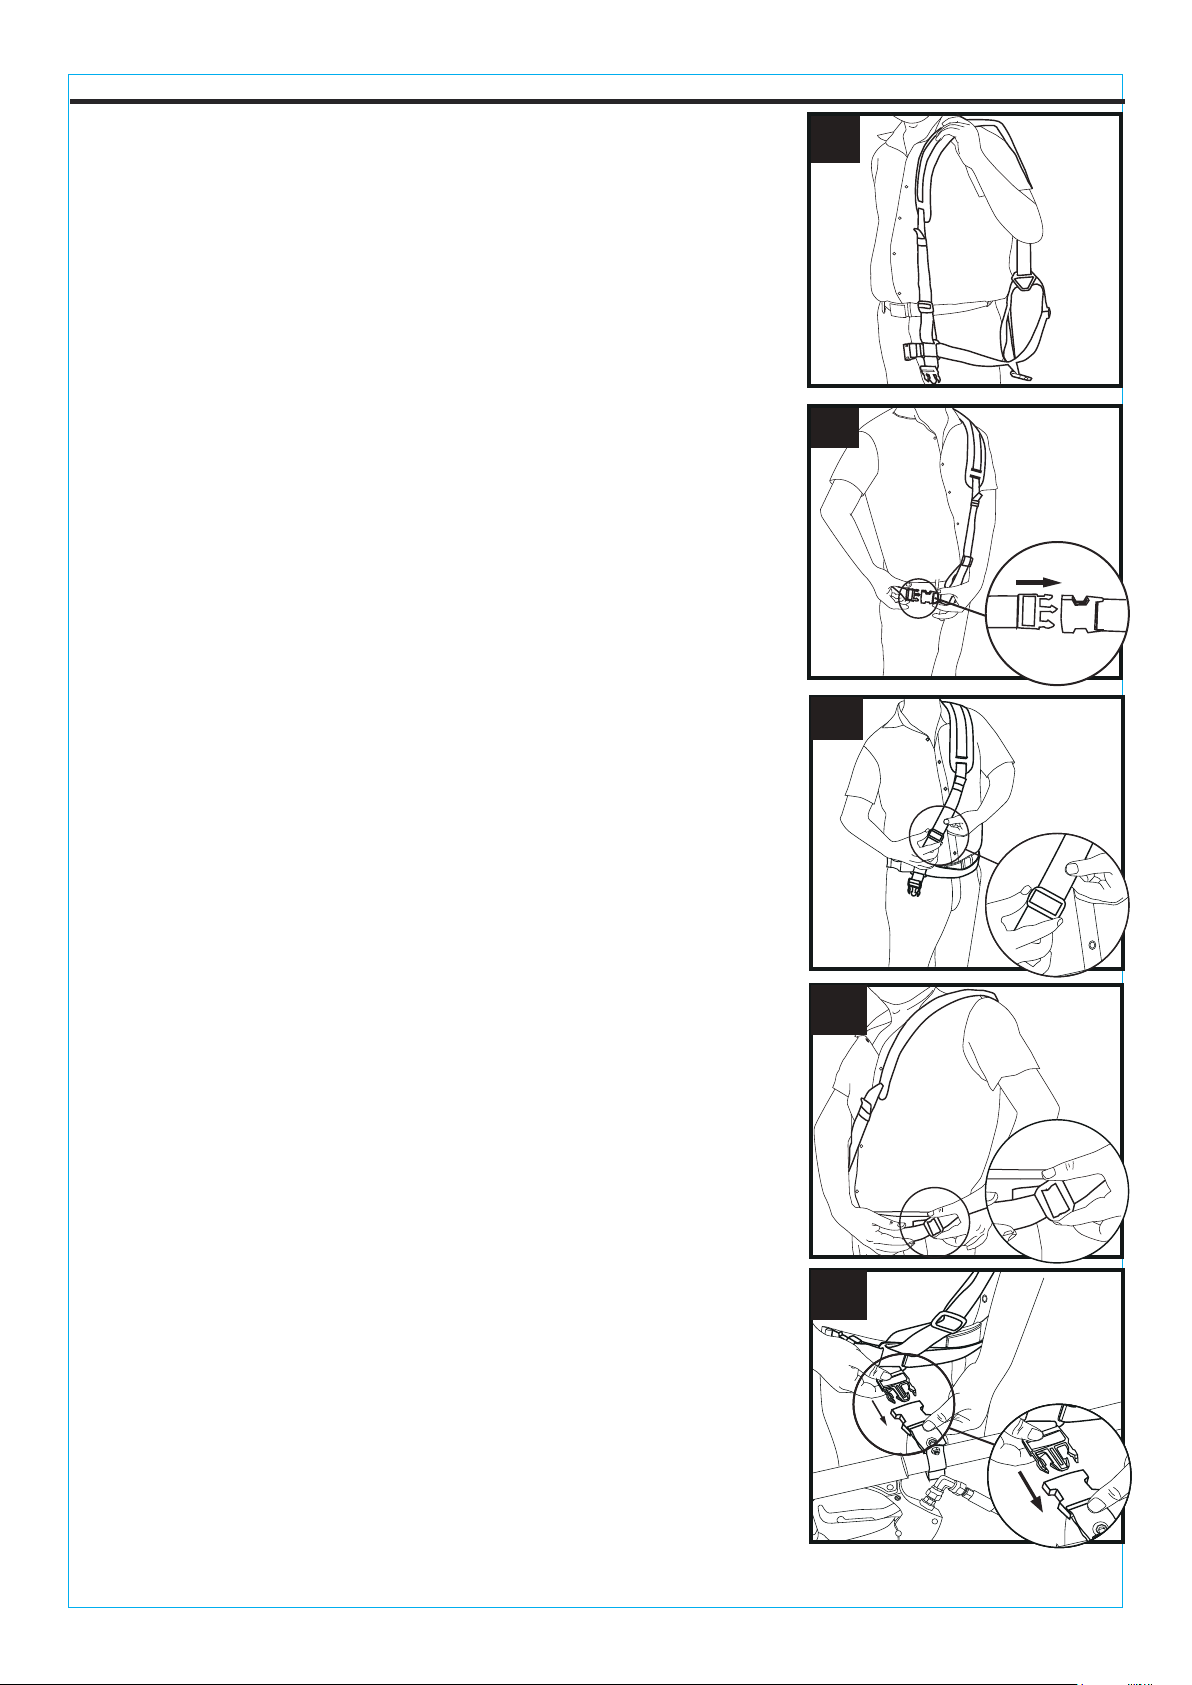
OPERATING INSTRUCTIONS
Choose step 7 for left handed operators.
Place padded shoulder strap on your left shoulder.
Wrap waist belt around waist and fasten buckle. Buckle
should rest against the right side of your torso as you look down.
Adjust shoulder strap to position waist belt at desired height.
Tighten the waist belt.
Fasten wand adapter to telescoping wand and connect buckle
to support belt.
6. HOW TO WEAR HARNESS FOR RIGHT HANDED
OPERATORS
Choose step 6 for right handed operators.
6a
6b
6c
6d
6e
NOTE: It is recommended that the harness be located
between your waist and chest. This will allow for better
support and control when using the wand.

7
www.surfacemaxx.com
OPERATING INSTRUCTIONS
7a
7b
7c
7d
7e
7. HOW TO WEAR HARNESS FOR LEFT HANDED
OPERATORS
Place padded shoulder strap on your right shoulder.
Wrap waist belt around waist and fasten buckle. Buckle should
rest against the right side of your torso as you look down.
Adjust shoulder strap to position waist belt at desired height.
Tighten the waist belt.
Fasten wand adapter to telescoping wand and connect buckle
to support belt.
Note: Shoulder pad can be rotated on strap for left handed
operators.
NOTE: It is recommended that the harness be located between
your waist and chest. This will allow for better support and
control when using the wand.

8
www.surfacemaxx.com
TROUBLESHOOTING
WARRANTY
PROBLEM POSSIBLE CAUSE CORRECTIVE ACTION
Connections leak. 1. Loose connections. 1. Retighten fittings.
2. Sealant worn. 2. Reapply pipe tape.
3. O-ring is worn. 3. Replace O-ring.
Unit won’t spray. 1. Unit power / water supply off. 1. Consult owner's manual.
Grey knobs won’t trun. 1. Overtightened. 1. Spray lubricant on threads on
inside of grey knobs.
2. Unit is clogged. 2. Reverse flush unit with water.
The manufacturer warrants this product against defects in materials and workmanship for
two (2) years from date of purchase. If within this period a product is found to be defective in
material or workmanship, the product must be returned with a copy of the bill of sale as proof of
purchase to the manufacturer. This warranty does not cover the product becoming defective
due to misuse, accidental damage, improper handing and/or installation and specifically
excludes liability for direct, incidental or consequential damages. As some states do not allow
exclusions or limitations on how long an implied warranty lasts, the above exclusions and
limitations may not apply to you. This warranty gives you specific rights and you may also have
other rights which vary from state to state. For warranty service, call +1 (866) 870-9930, 9 a.m. -
5 p.m., EST, Monday - Friday.
TWO YEARS LIMITED WARRANTY
CARE AND MAINTENANCE
Printed in China
• If a cleaning solution was run through the wand, run just water through the wand before
shutting off.
• De-pressurize by squeezing the gun trigger until all of the water has been drained out of the
unit.
9
Vara telescópica para equipo
de lavado con agua a
presión de 5,49 M
HOJA DE INSTRUCCIONES
MODELO #SGY-PWA65
www.surfacemaxx.com
ARTÍCULO #0434982
ADJUNTE SU RECIBO AQUÍ
Fecha de compra
¿Preguntas, problemas, piezas faltantes? Antes de volver a la tienda, llame a nuestro
Departamento de Servicio al Cliente al +1 (866) 870-9930, de lunes a viernes de 9 a.m. a 5
p.m., hora estándar del Este.
DANGER
DO NOT POINT IT
HUMAN BODY
SEVERE INJURY
MAYRESULT
TRIGGER
LOCK
10
www.surfacemaxx.com
ÍNDICE
CONTENIDO DEL PAQUETE
Información de seguridad.........................................................................................................
Preparación..............................................................................................................................
Instrucciones de funcionamiento .............................................................................................
Cuidado y mantenimiento .......................................................................................................
Solución de problemas
...............................................................................................................
Garantía ...................................................................................................................................
11
12
Instrucciones de instalación ..................................................................................................... 12
13
16
16
16
CANTIDADDESCRIPCIÓNPIEZA
A Vara telescópica de 5,18 m 1
B Vara de extensión de 51,70 cm 1
C
D
Adaptador
Arnés
1
1
A
B
C
D
DANGER
DONOTPOINTIT
HUMAN BODY
SEVERE INJURY
MAYRESULT
TRIGGER
LOCK

11
www.surfacemaxx.com
ADVERTENCIA
INFORMACIÓN DE SEGURIDAD
Tenga cuidado con las líneas eléctricas superiores. Si la vara larga entra en contacto con estas
líneas se podría provocar una electrocución, lesiones o incluso la muerte.
Siempre apague el equipo de lavado con agua a presión, corte el suministro de agua y
despresurice antes de retirar o limpiar los accesorios.
Use gafas de seguridad cuando opere la unidad.
Nunca apunte las boquillas de rociado ni las pistolas a personas o animales. No coloque
ninguna parte del cuerpo en el chorro de agua.
Se podrían producir lesiones graves debido a la descarga a alta presión del equipo de lavado
con agua a presión.
Para evitar la descarga accidental de la pistola, coloque siempre el gatillo en la posición de
bloqueo una vez que haya terminado de rociar.
El arnés no está diseñado para proporcionar ningún soporte para la espalda.
PRECAUCIÓN
Se ajusta a los equipos de lavado con agua a presión a gas o eléctricos con clasificación de
hasta 4.200 PSI.
Asegúrese de que todas las conexiones estén aseguradas. Sujete la pistola firmemente a
arrancar el equipo de lavado con agua a presión.
Párese sobre una superficie firme y estable siempre que opere el equipo de lavado con agua a
presión. No se pare sobre escaleras, sillas, etc.
Antes de cambiar las boquillas, asegúrese de que el equipo de lavado con agua a presión esté
apagado y sin presión. El anillo en el socket de desconexión rápida regresará a su posición
original de bloqueo adelante cuando la boquilla se coloque correctamente.
No extienda completamente la vara telescópica. De quedar un mínimo de 15,24 cm al interior
de la sección de la vara para brindar estabilidad.
LA INSTALACIÓN O EL MANTENIMIENTO INADECUADO DE ESTE PRODUCTO PUEDE
OCASIONAR LESIONES GRAVES Y DAÑOS A LA PROPIEDAD O LA MUERTE. LEA Y
COMPRENDA TODAS LAS ADVERTENCIAS E INSTRUCCIONES DE FUNCIONAMIENTO
ANTES DE USAR ESTE PRODUCTO. AL USAR HERRAMIENTAS, SIEMPRE TOME
MEDIDAS DE PRECAUCIÓN DE SEGURIDAD BÁSICAS PARA REDUCIR EL RIESGO DE
LESIONES PERSONALES.

12
www.surfacemaxx.com
Atornille el extremo hembra de la vara telescópica
(A) en el extremo macho de la vara de extensión
(B) y apriete a mano.
Jale hacia atrás el anillo del socket en la vara de
extensión (B) e inserte el punta de
rociado (no incluida), o jálela para retirarla y suelte
el anillo.
INSTRUCCIONES DE INSTALACIÓN
1. CONEXIÓN DE LA VARA Y LA VARA DE
EXTENSIÓN
2. CONEXIÓN DE BOQUILLA ROCIADORA DE
DESCONEXIÓN RÁPIDA
Extremo hembra
1
Boquilla rociadora
Anillo del socket
Conexión finalizada
2
Antes de comenzar a ensamblar, instalar o usar el producto, asegúrese de tener todas las piezas.
Compare las piezas con la lista del contenido del paquete. No intente ensamblar, instalar ni usar
el producto si falta alguna pieza o si estas están dañadas.
PREPARACIÓN
• Tiempo estimado de ensamblaje: 10 minutos
• Herramientas necesarias para el ensamblaje: Llave ajustable (no se incluye)
B
B
Anillo del socket
A B

13
www.surfacemaxx.com
INSTRUCCIONES DE INSTALACIÓN
INSTRUCCIONES DE FUNCIONAMIENTO
Fije la manguera (no se incluye) a la vara
telescópica (A).
Gire las perillas de la vara telescópica (A) para
desbloquear y luego jale al largo deseado. Gire
las perillas en direcciones opuestas para volver
a apretar.
IMPORTANTE: Si aprieta demasiado las perillas,
puede ocasionar daños.
3. CONEXIÓN DE LA PISTOLA Y LA MANGUERA
DE DESCONEXIÓN RÁPIDA
MÉTRICA
5. AJUSTE EL LARGO DE LA VARA
Fije el adaptador (C) a la vara telescópica (A).
Fije la manguera (no incluida) al adaptador (C).
4. CONEXIÓN DE LA PISTOLA Y LA MANGUERA
5
Jalar
Bloquear
Desbloquear
Escoja uno: Paso 3 o Paso 4.
A
3
A
A
C
DANGER
DONOTPOINTIT
HUMAN BODY
SEVEREINJURY
MAYRESULT
TRIGGER
LOCK
DANGER
DO NOT POINTIT
HUMAN BODY
SEVERE INJURY
MAYRESULT
TRIGGER
LOCK
4
Tapón de desconexión rápida
Anillo del socket
Tapón de desconexión rápida
Socket de
desconexión rápida
Casquillo
métrico macho
14
www.surfacemaxx.com
INSTRUCCIONES DE FUNCIONAMIENTO
Escoja el paso 7 para usuarios zurdos.
Coloque la correa acolchada sobre su hombro izquierdo.
Coloque el cinturón alrededor de la cintura y ajuste la hebilla.
La hebilla debe quedar contra el lado derecho del torso,
mirado desde arriba hacia abajo.
Ajuste la correa para dejar el cinturón a la altura deseada.
NOTA: Se recomienda que coloque el arnés entre la cintura
y el pecho. Esto otorgará mayor soporte y control cuando
utilice la vara.
Apriete el cinturón.
Ajuste el adaptador de la vara a la vara telescópica y conecte
la hebilla para sujetar el cinturón.
6. CÓMO USAR UN ARNÉS PARA USUARIOS DIESTROS.
Escoja el paso 6 para usuarios diestros.
6a
6b
6c
6d
6e

15
www.surfacemaxx.com
INSTRUCCIONES DE FUNCIONAMIENTO
7a
7b
7c
7d
7e
7. CÓMO USAR UN ARNÉS PARA USUARIOS ZURDOS.
Coloque la correa acolchada sobre su hombro derecho.
Coloque el cinturón alrededor de la cintura y ajuste la hebilla.
La hebilla debe quedar contra el lado derecho del torso,
mirado desde arriba hacia abajo.
Ajuste la correa para dejar el cinturón a la altura deseada.
NOTA: Se recomienda que coloque el arnés entre la cintura y
el pecho. Esto otorgará mayor soporte y control cuando utilice
la vara.
Apriete el cinturón.
Ajuste el adaptador de la vara a la vara telescópica y conecte
la hebilla para sujetar el cinturón.
Nota: Los operadores zurdos pueden dar vuelta el acolchado
para el hombro de la correa.

16
www.surfacemaxx.com
SOLUCIÓN DE PROBLEMAS
GARANTÍA
PROBLEMA CAUSA POSIBLE ACCIÓN CORRECTIVA
Fuga de las
conexiones.
1. Suelte las conexiones. 1. Vuelva a apretar los conectores.
2. El sellador está desgastado. 2. Vuelva a aplicar cinta para
tuberías.
3. La junta tórica está
desgastada. 3. Reemplace la junta tórica.
La unidad no rocía. 1. La alimentación de la unidad
o el suministro de agua está
cortado.
1. Consulte el manual del propietario.
Las perillas
grises no giran.
1. Está demasiado apretado. 1. Rocíe lubricante en las roscas en
el interior de las perillas grises.
2. La unidad está obstruida.
2. Enjuague la unidad con agua en
reversa.
El fabricante garantiza que este producto está libre de defectos en los materiales y la mano de
obra por dos (2) años a partir de la fecha de compra. Si dentro de este período un producto
presenta defectos en el material o la fabricación, se debe devolver el producto, junto con una
copia del recibo de venta como comprobante de compra, al fabricante. Esta garantía no cubre
productos dañados debido al mal uso, daño accidental, manipulación y/o instalación
inadecuada y excluye toda responsabilidad por daños directos, accidentales o resultantes.
Algunos estados no permiten exclusiones o limitaciones con respecto a cuánto dura una
garantía, de modo que las exclusiones y limitaciones anteriores pueden no aplicarse a usted.
Esta garantía le otorga derechos específicos, pero podría tener también otros derechos que
varían según el estado. Para obtener el servicio de garantía, llame al +1 (866) 870-9930, de
lunes a viernes, de 9 a.m. a 5 p.m., hora estándar del Este.
GARANTÍA LIMITADA DE DOS AÑOS
CUIDADO Y MANTENIMIENTO
Impreso en China
• Si se pasa una solución de limpieza por la vara, pase solo agua por esta antes de apagarla.
• Despresurice la unidad apretando el gatillo de la pistola hasta que se haya drenado toda el
agua.
This manual suits for next models
1
Table of contents
Languages:
Other SurfaceMaxx Pressure Washer manuals


Popular Pressure Washer manuals by other brands


blueclean
blueclean AR145S instruction manual

Powerplay
Powerplay SPYDER SPY1500V Assembly, care and use instructions

Excell
Excell VR2522 Operation manual

sunjoe
sunjoe 24V-X2-PW1200-CT-RM manual

LavorPro
LavorPro THERMIC 13 H Operator's manual

Powerplay
Powerplay PJR 2000PC Assembly, care and use instructions