sunjoe SPX4003-ELT-RM User manual

EN
A Division of Snow Joe®, LLC Model SPX4003-ELT-RM Form No. SJ-SPX4003-ELT-RM-880E-MR2-V1
R
OPERATOR’S MANUAL
© 2021 by Snow Joe®, LLC
All rights reserved. Original instructions. SAVE THESE INSTRUCTIONS
1
14.5A ELECTRIC PRESSURE WASHER
2250 PSI MAX PRESSURE AT INITIAL DISCHARGE PER CSA INTERNAL PRESSURE TESTING
1.65 GPM MAX FLOW WITH NOZZLE OPEN AT MINIMUM PRESSURE

EN
A Division of Snow Joe®, LLC Model SPX4003-ELT-RM Form No. SJ-SPX4003-ELT-RM-880E-MR2-V1
R
OPERATOR’S MANUAL
© 2021 by Snow Joe®, LLC
All rights reserved. Original instructions. SAVE THESE INSTRUCTIONS
2
14.5A ELECTRIC PRESSURE WASHER
2250 PSI MAX PRESSURE AT INITIAL DISCHARGE PER CSA INTERNAL PRESSURE TESTING
1.65 GPM MAX FLOW WITH NOZZLE OPEN AT MINIMUM PRESSURE
IMPORTANT!
Safety Instructions
All Operators Must Read These
Instructions Before Use
mWARNING! This indicates a hazardous situation, which,
if not avoided, could result in death or serious injury.
mCAUTION! This indicates a hazardous situation, which,
if not avoided, could result in minor or moderate injury.
mDANGER! This indicates a hazardous situation, which,
if not followed, will result in death or serious injury.
General Safety
mWARNING! This appliance is not intended for use
by children or by unassisted, unsupervised persons whose
physical, sensory or mental capabilities prevent them from
using it safely. Children should be supervised to ensure that
they do not play with the appliance.
Before starting up your machine, please check it carefully for
any defects. If you find any, do not start up your machine.
Contact your authorized Snow Joe®+ Sun Joe®dealer or
call the Snow Joe®+ Sun Joe®customer service center at
1-866-SNOWJOE (1-866-766-9563).
mWARNING! When using the pressure washer, basic
safety precautions should always be followed to reduce the
risk of fire, electric shock, and personal injury. These include:
• Know your product – Know how to stop the machine and
bleed pressure quickly. Thoroughly familiarize yourself with
the controls.
• Keep bystanders away – All visitors and pets should be
kept a safe distance away from the work area.
• Use the right product – Do not use this machine for any
job except that for which it is intended.
• Dress properly – Do not wear loose clothing or jewelry.
They can get caught in moving parts. Protective rubber
gloves and non-slip footwear are recommended when
working outdoors.
• mCAUTION! – Exercise caution to avoid slipping or falling.
Wear protective footwear that will protect your feet and
improve your footing on slippery surfaces.
• Stay alert – Watch what you are doing. Use common
sense. Do not operate the pressure washer when you are
tired, or under the influence of alcohol or drugs.
• Do not overreach – Keep proper footing and balance at
all times.
• Avoid unintentional starting – Do not carry a plugged-
in machine with your finger on the trigger. Make sure the
switch is off before plugging in the machine.
• Do not abuse the cord – Never carry the machine by the
cord or yank the cord to disconnect it from the receptacle.
Keep the cord away from heat, oil, and sharp edges.
• Use safety glasses – Also use safety footwear, snug-fitting
clothing, protective gloves, hearing and head protection.
• Check the water temperature – This pressure washer
is not meant to pump hot water. NEVER connect it to a
hot water supply as it will significantly reduce the life of
the pump.
• Store indoors – NEVER store the pressure washer
outdoors or where it could freeze. The pump could be
seriously damaged.
• Ground Fault Circuit Interrupter (GFCI) – This product
is provided with a ground fault circuit interrupter built into
the power cord plug. If replacement of the plug or cord is
needed, use only identical replacement parts.
• Inspect electrical cords – The insulation of the power cord
should be perfectly intact. If the power cord is damaged or
shows any signs of wear or tear, do not use the pressure
washer. Contact your authorized Snow Joe®+ Sun Joe®
dealer or call the Snow Joe®+ Sun Joe®customer service
center at 1-866-SNOWJOE (1-866-766-9563).
mWARNING! Do not use this appliance without reading
this instruction manual.
mWARNING! This appliance has been designed for
use with cleaning agents that are recommended by the
manufacturer. The use of other cleaning agents or chemicals
may adversely affect the safety of the appliance.
mWARNING! Do not use the appliance within range of
persons unless they are wearing protective clothing.
mWARNING! High-pressure jets can be dangerous if
subject to misuse. The jet must not be directed at persons,
pets, live electrical equipment, or the appliance itself.
• Do not direct the jet at yourself or others in order to clean
clothes or footwear.

3
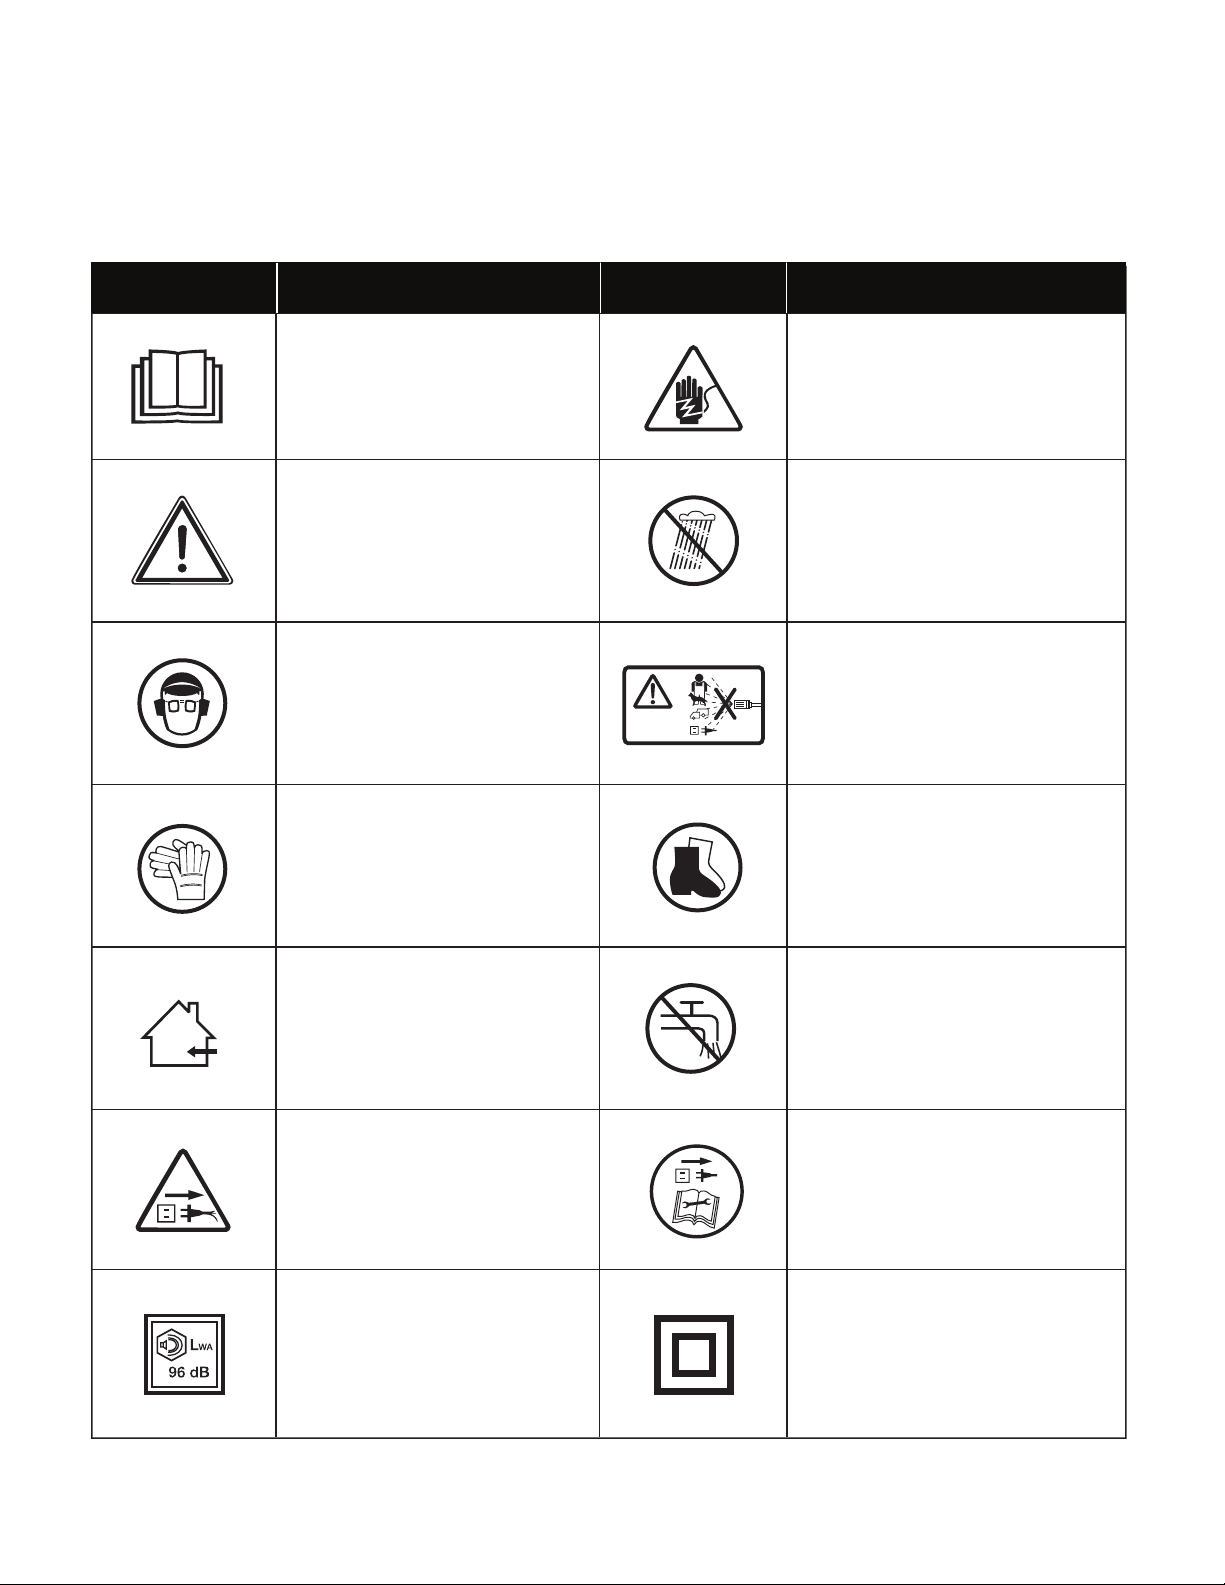
• Risk of explosion – Do not spray flammable liquids.
• Risk of injection or injury to persons – Never direct
discharge stream at people, pets, or electrical devices.
• Disconnect the tool – Disconnect from the electrical power
supply before performing any maintenance task.
• Keep children away – This high-pressure electric
power washer must not be used by children or untrained
personnel.
• To ensure appliance safety, use only original replacement
parts from the manufacturer or those approved by the
manufacturer.
mWARNING! Water that has flowed through backflow
preventers is considered to be non-potable.
mWARNING! During cleaning, maintenance or when
replacing parts, the machine must be disconnected from its
power source by removing the plug from the socket outlet.
mWARNING! High-pressure hoses, fittings, and
couplings are important for the safe operation of the appliance.
Use only hoses, fittings, and couplings recommended by the
manufacturer.
• Check for damaged parts – Do not use the appliance if
the supply cord or other important parts of the appliance
are damaged (e.g. safety devices, high-pressure hoses,
trigger gun).
mWARNING! If an extension cord is used, the plug and
socket must be of watertight construction.
mWARNING! Inadequate extension cords can be
dangerous.
• This high-pressure electric power washer must not be used
at temperatures below 32ºF (0°C).
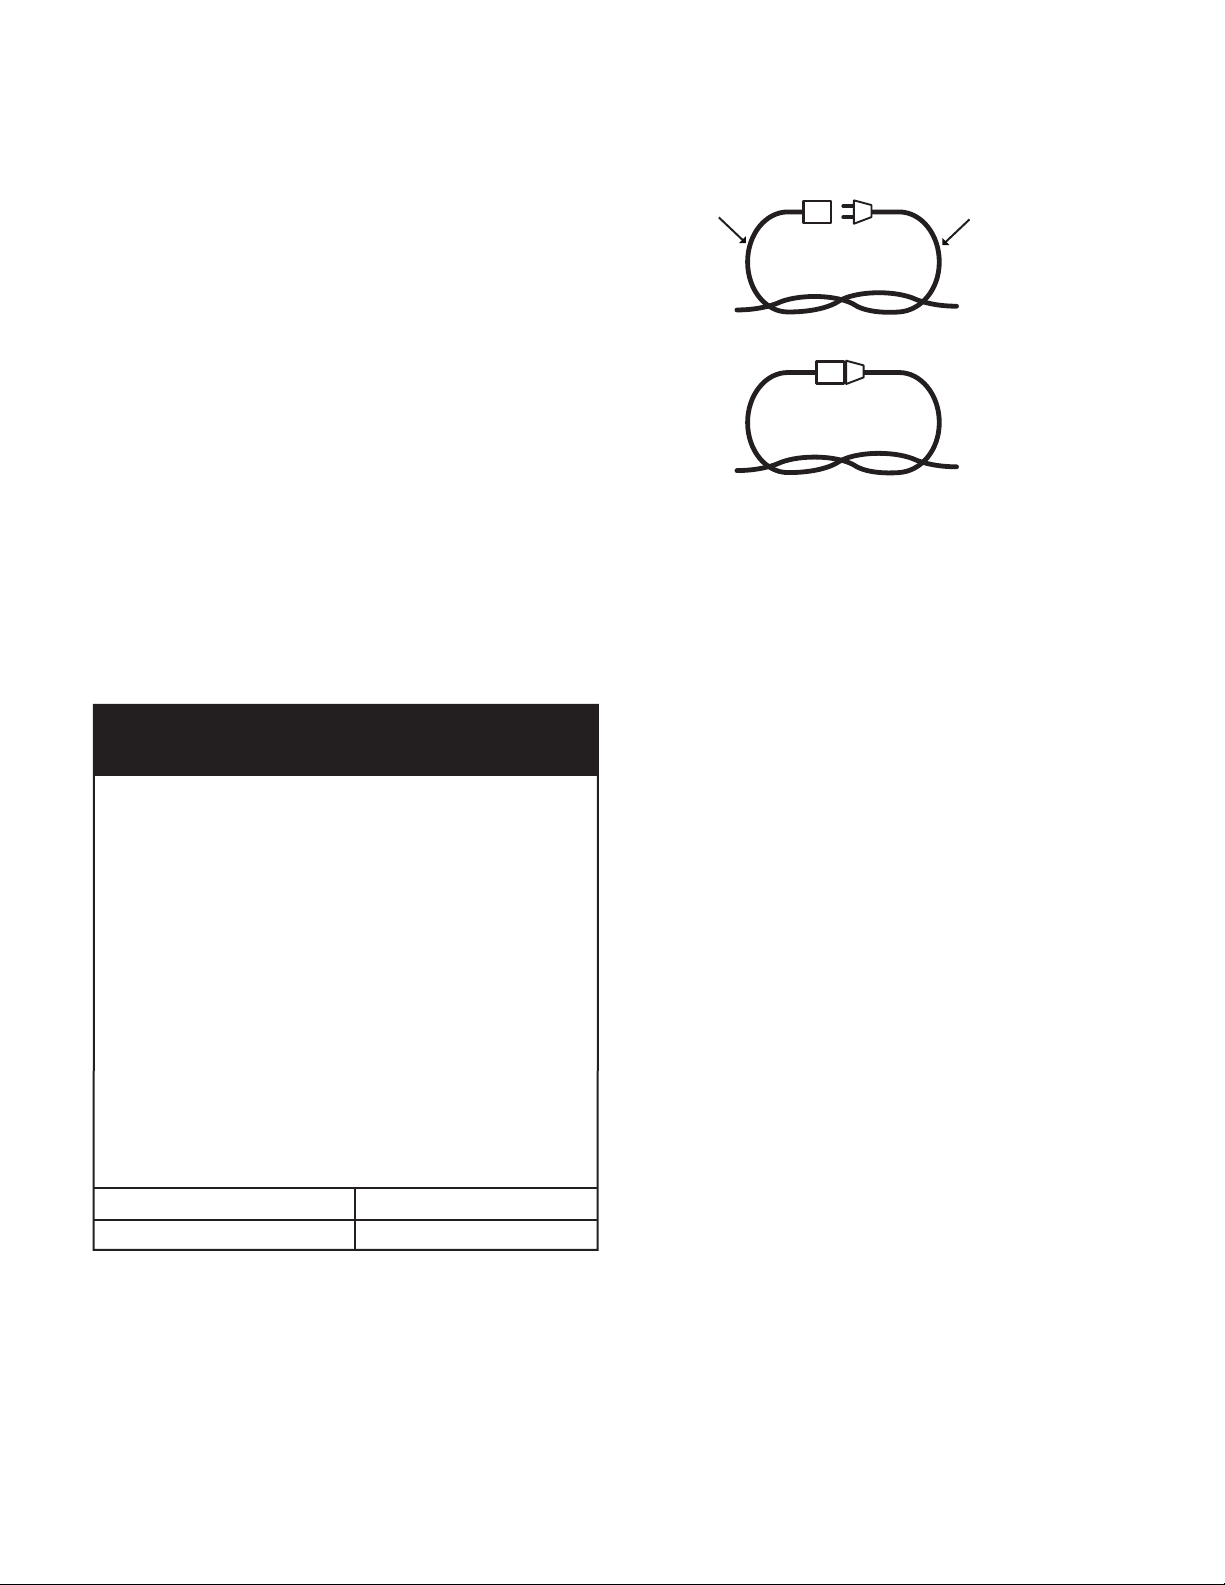
mWARNING! Power cords on drums should always be
completely unwound to prevent the cord from overheating.
• Power cord connections should be kept dry and off the ground.
• If the power cord is damaged, do not use the appliance.
Contact your authorized Snow Joe®+ Sun Joe®dealer or
call the Snow Joe®+ Sun Joe®customer service center at
1-866-SNOWJOE (1-866-766-9563).
• Keep the machine on a stable, flat surface during operation,
handling, transportation, and storage. Sudden overturn of
the machine can cause bodily injury.
• In the event of an accident or breakdown, switch off the
machine immediately. (If contact with detergent occurs,
rinse with an abundance of clean water.)
Electrical Safety
ATTENTION: If there are problems with the electrical
MAINS, short voltage drops may appear when starting the
equipment. This can, in turn, influence other equipment
(e.g. cause a lamp to blink). If the MAINS-IMPEDANCE Zmax
< 0.335 OHM, such disturbances are not expected. (If you
require assistance, contact your local supply authority for
further information.)
mWARNING! Electrical Shock Hazard – Before starting
up your machine, please check it carefully for any defects.
If you find any, do not start up your machine and contact your
distributor.
The following should be observed when connecting the
high-pressure electric power washer to the electric supply:
• The electric supply connection should be performed by a
qualified person.
• The electric supply to this appliance should include either
a residual current device that will interrupt the supply if the
leakage current to the earth exceeds 30 mA for 30 ms or a
device that will interrupt the earth circuit (GFCI).
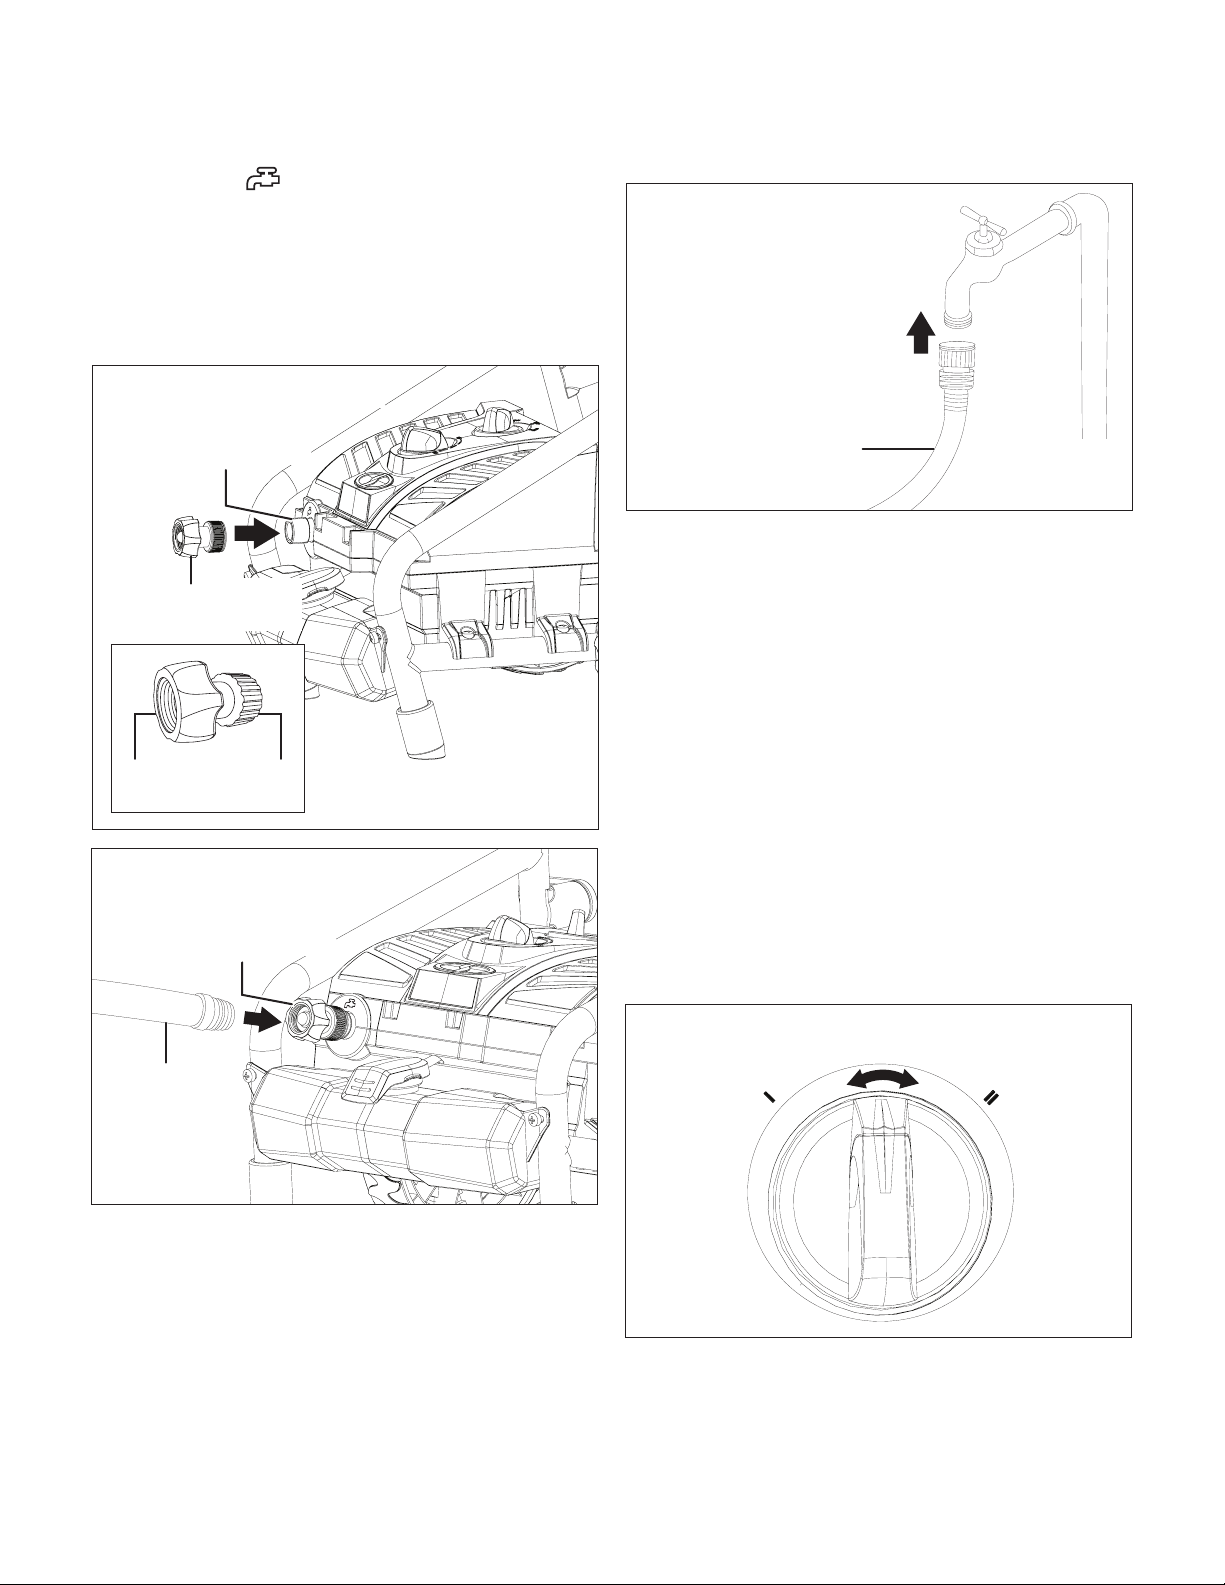
IMPORTANT: Only use water without any impurities. If there
is a risk of running sand into the inlet water (i.e. from your own
well), an additional filter should be installed.
Safety Devices
The unloader valve can reduce pressure if it exceeds preset
values. The spray gun features a locking device. When the lock
is activated, the spray gun cannot be operated.
1. Thermal sensor – A thermal sensor protects the motor
against overloading. The machine will restart after a few
minutes when the thermal sensor has cooled.
2. Double insulation – In a double-insulated appliance, two
systems of insulation are provided instead of grounding.
No grounding means is provided on a double-insulated
appliance, nor should a means for grounding be added
to the appliance. Servicing a double-insulated appliance
requires extreme care and knowledge of the system, and
should be performed only by qualified service personnel at
an authorized Snow Joe®+ Sun Joe®dealer. Replacement
parts for a double-insulated appliance must be identical
to the parts they replace. A double-insulated appliance
is marked with the words “Double Insulation” or “Double
Insulated.” The symbol (square within a square) may
also be marked on the appliance.
3. Ground fault circuit interrupter (GFCI) protection –
This pressure washer is provided with a ground-fault
circuit-interrupter (GFCI) built into the plug of the power-
supply cord. This device provides additional protection
from the risk of electric shock. Should replacement of
the plug or cord become necessary, use only identical
replacement parts that include GFCI protection.

4
4. Use only extension cords that are intended for outdoor
use. These extension cords are identified by marking
"Acceptable for use with outdoor appliance; store indoors
while not in use". Use only extension cord having an
electrical rating not less than the rating of the product.
Do not use damaged extension cords. Examine extension
cord before using and replace if damaged. Do not abuse
extension cord and do not yank on any cord to disconnect.
Keep cord away from heat and sharp edges. Always
disconnect extension cord from the receptacle before
disconnecting the product from the extension cord.
mWARNING! To reduce the risk of electrocution,
keep all connections dry and off the ground. Do not touch plug
with wet hands.
5. To reduce the risk of electric shock, this appliance has
a polarized plug (i.e. one blade is wider than the other).
The appliance plug will fit into a polarized outlet only one way.
If the appliance plug does not fit fully into the outlet,
reverse the plug. If the plug still does not fit, make sure
that you are using the correct polarized wall outlet. If the
plug still does not fit, contact a qualified electrician to install
the proper wall outlet. Do not modify the appliance plug,
power cord receptacle, or power cord plug in any way.
6. To prevent the appliance cord from disconnecting from the
extension cord during operation, make a knot with the two
cords as shown in Table 1.
7. Do not abuse the cord. Never pull the pressure washer
by the cord or yank the cord to disconnect it from the
receptacle. Keep the cord away from heat, oil, and
sharp edges.
Risk of Electrocution
• Inspect cord before using.
• Do not use if cord is damaged.
• Keep all connections dry and off the ground.
• Do not touch plug with wet hands.
• Keep cord away from heat and sharp edges.
• Do not spray electrical apparatus and wiring.
Risk of Explosion
• Do not spray flammable liquids.
• Do not use acids, bases, solvents, or any flammable
material in this product. These substances can cause
physical injuries to the operator and irreversible damage to
the machine.
Additional Safety Instructions
• High-pressure: keep clear of nozzle.
• Injection hazard: equipment can cause serious injury if the
spray penetrates the skin.
• Do not point the gun at anyone or at any part of the body.
• In case of skin penetration, seek medical aid immediately.
• Before servicing, cleaning, or removing any parts, shut off
the power and relieve pressure.
• This machine is not suitable for connection to the potable
water mains.
mWARNING m
Electric shock may cause SEVERE INJURY or
DEATH. Heed these warnings:
• Do not allow any part of the electric pressure washer
to make contact with water while it is in operation. If
the appliance becomes wet while turned off, wipe dry
before starting.
• Do not use an extension cord over 25 ft. The
pressure washer comes equipped with a 35 ft power
cord. Combined cord length must not exceed 60 ft.
Any extension cord must be 14-gauge (or heavier) to
safely power the pressure washer.
• Do not touch the appliance or its plug with wet hands
or while standing in water. Wearing rubber boots
offers some protection.
EXTENSION CORD CHART
Cord Length:
Min. Wire Gauge (A.W.G.):
25 ft (7.6 m)
14
(B) Connect plug and receptacle
Cord set Appliance cord
(A) Tie cord as shown
Table 1. Method of Securing Extension Cord

5
Product Description
Purpose
• This high-pressure electric power washer is intended for
residential use to clean vehicles, machines, buildings,
facades, etc.
Areas of Application
• Never use the machine in potentially explosive areas under
any circumstances!
• The operating temperature must be between 32ºF (0ºC) and
104ºF (40ºC).
• The machine consists of an assembly with a pump, which
is encased in a shock-absorbing housing. To provide the
operator with an optimal working position, the machine
is equipped with a spray wand and a non-slip handle
grip, whose shape and configuration comply with
applicable regulations.
• Do not cover or modify the spray wand or the spray nozzles
in any way.
• The high-pressure electric power washer is designed to be
used with cold or lukewarm water; higher temperatures can
damage the pump.
• Do not use water that is dirty, gritty, or contains any
chemical products, as these could impair operation and
shorten the life of the machine.

6
Safety Symbols
The following table depicts and describes safety symbols that may appear on this product. Read, understand, and follow all
instructions on the machine before attempting to assemble and operate.
To reduce the risk of injury, user
must keep all bystanders at least
49 ft (15 m) away.
Sound power level is 96 dB(A).
Always keep the power cord
away from heat sources, oils, or
sharp edges. Immediately remove
plug from the mains if the cord is
damaged, frayed, or entangled.
READ THE OPERATOR'S
MANUAL(S) – Read, understand,
and follow all instructions in the
user manual(s) before attempting
to assemble and operate.
SAFETY ALERT – Indicates a
precaution, a warning, or a danger.
WEAR EYE AND HEARING
PROTECTION – For protection
against injury, wear ear defenders
and safety goggles.
Double Insulation – When servicing,
use only identical replacement parts.
WARNING! Do not expose the unit
to rain or wet conditions. Keep dry.
Machine not suitable for connection
to the potable water mains.
WARNING! Electrical shock hazard –
Do not touch the plug with wet hands.
WARNING! Turn the machine OFF
and disconnect it from the power
supply before inspecting, cleaning,
changing accessories, or conducting
any other maintenance task.
Symbols SymbolsDescriptions Descriptions
Wear non-slip footwear that will
protect your feet and improve your
footing on slippery surfaces.
Wear safety gloves during
use to protect hands.
Store indoors. Never store the
pressure washer outdoors.
If the pump freezes, permanent
damage may result.

7
Know Your Electric Pressure Washer
Read the owner’s manual and safety instructions carefully before operating the electric pressure washer. Compare the illustration
below to the electric pressure washer in order to familiarize yourself with the location of the various controls and adjustments.
Save this manual for future reference.
1. Transport handle
2. Trigger gun
3. Safety lock
4. Trigger
5. High-pressure hose connection
6. Trigger gun holder
7. Spray wand
8. ON/OFF switch (Pressure select dial)
9. Detergent dial
10. Water inlet + Garden hose adapter (female coupler)
11. Detergent tank
12. High-pressure hose
13. High-pressure hose holder
14. Cord holder (2)
15. Power cord with GFCI
16. Wheel (2)
17. Needle clean-out tool
18. 0º Quick-Connect nozzle (orange)
19. 15º Quick-Connect nozzle (yellow)
20. 25º Quick-Connect nozzle (green)
21. 40º Quick-Connect nozzle (gray)
22. Soap Quick-Connect nozzle (black)
Technical Data
Motor ........................................................................ 14.5 amp
Rated Voltage .................................................... 120V ~ 60 Hz
Max Water Inlet Temperature ................................ 104ºF/40ºC
Max Water Inlet Pressure ........................................... 0.7 MPa
Max Flow with nozzle open at minimum pressure ... 1.65 GPM
Rated Flow under typical load............................ Low 0.8 GPM
High 1.1 GPM
Max Pressure at initial discharge............................... 2250 PSI
per CSA internal pressure testing
Rated Pressure under typical load ..................... Low 1130 PSI
........................................................................... High 1650 PSI
Detergent Tank Capacity ................................. 54.1 fl oz (1.6 l)
High-Pressure Hose Length .................................... 20 ft (6 m)
Power Cord Length ............................................ 35 ft (10.7 m)
Net Weight .................................................... 27.7 lbs (12.6 kg)
15º
15º
25º
25º
0º
0º
SOAP
SOAP
40º
40º
1
2
3
4
5
6
7
8
9
10
11
12
13
14
15
16
17 18 19 20 21 22

8
Unpacking
Carton Contents
• Upper handle frame
• Lower handle + pressure washer assembly
• Trigger gun
• Spray wand
• Five (5) Quick-Connect nozzles (0º, 15º, 25º, 40º and soap)
• Trigger gun holder
• Needle clean-out tool
• High-pressure hose
• High-pressure hose holder
• Screw (x3)
• Trigger gun holder
• Nut + bolt
• Garden hose adapter (female coupler)
• Manual with registration card
1. Carefully remove the pressure washer and check to see
that all of the above items are supplied.
2. Inspect the product carefully to make sure no breakage or
damage occurred during shipping. If you find damaged or
missing parts, DO NOT return the unit to the store. Please
call the Snow Joe®+ Sun Joe®customer service center at
1-866-SNOWJOE (1-866-766-9563).
NOTE: Do not discard the shipping carton and packaging
material until you are ready to use your new electric
pressure washer. The packaging is made of recyclable
materials. Properly dispose of these materials in
accordance with local regulations.
IMPORTANT! The equipment and packaging material are
not toys. Do not let children play with plastic bags, foils,
or small parts. These items can be swallowed and pose a
suffocation risk!
mWARNING! Do not connect to power supply until
assembly is complete. Failure to comply could result in
accidental starting and possible serious personal injury.
Assembly
1. Position the washer as CLOSE as possible to the
water supply.
2. The washer must be used on a secure and stable surface
in a standing, upright position (Fig. 1).
3. Connect high pressure hose holder to upper handle frame
using 3 screws provided, as shown (Fig. 2).
4. Connect trigger gun holder to upper handle frame using
supplied nut and bolt, as shown. Tighten securely (Fig. 3).
Fig. 1
Fig. 2
High pressure
hose holder
Upper
handle
frame
Screws
Fig. 3
Trigger gun holder
Upper handle frame
Nut
Bolt

9
5Slide the upper handle frame into lower handle then
depress the small button at the end of the upper handle
frame, push and insert into lower handle until it snaps
securely into place (Figs. 4 – 5).
6. Connect the high-pressure hose to the water outlet on the
washer (Fig. 6).
7. To connect the spray wand with the trigger gun, press
the wings of the spray wand into the slot of the trigger
gun, then twist counterclockwise until the 2 parts are
completely locked together (Fig. 7).
8. Connect the high-pressure hose to the trigger gun. Twist
to secure the connection (Fig. 8).
mWARNING! Keep hose away from sharp objects.
Bursting hoses may cause injury. Examine hoses regularly and
replace if damaged. Do not attempt to mend a damaged hose.
Fig. 4
Upper
handle
frame
Lower handle
Fig. 5
Upper
handle
frame
Lower
handle
Push
button
Fig. 6
High-pressure
water outlet
(REAR)
High-pressure hose
Trigger gun
Spray wand
Fig. 7
Spray wand wings
Fig. 8
High-pressure hose
Trigger gun

10
9. Connect the garden hose adapter (female coupler) to
the water inlet of the pressure washer, then thread
your garden hose (male end) into the garden hose
adapter (Figs. 9 – 10). The garden hose must have an
internal diameter of at least 13 mm (1/2 in.) and must be
reinforced. The water supply must be at least equal to the
washer delivery capacity.
NOTE: The machine is not suitable for connection to the
potable water main.
10. Attach garden hose to water supply (Fig. 11).
mWARNING! Do not connect to potable water system.
mWARNING! If connection is made to a potable water
system, the system shall be protected against backflow.
mWARNING! The intake water temperature must not
exceed 104ºF/40ºC. The water supply must not exceed
0.7 MPa.
mCAUTION! The washer must only be used with clean
water; use of unfiltered water containing corrosive chemicals
will damage the washer.
mCAUTION! To prevent damage to the appliance, do not
allow it to operate dry. Before starting the appliance, make
sure that it has proper and stable supply of water.
11. Make sure the ON/OFF switch (pressure select dial) is
pushed to the STOP (0) position before plugging the unit
into the power outlet (Fig. 12).
This end to the
water inlet on
the unit
Garden hose
(male end)
Fig. 9
Water inlet
(female coupler)
(FRONT)
Garden hose adapter
(female coupler)
Fig. 10
Garden hose adapter
(female coupler)
(FRONT)
Garden hose
Fig. 11
Connect to water supply
Garden hose
STOP
LOW
0
HIGH
Fig. 12

11
12. Check that the electrical supply voltage and frequency
(Volt/Hz) correspond to those specified on the pressure
washer rating plate. If the power supply is correct,
you may now plug the pressure washer into the power
outlet (Fig. 13).
NOTE: The GFCI may need to be reset when first plugged
into the electric outlet. Press the "Reset" button until the
power light indicator on the GFCI illuminates.
Operation
mIMPORTANT! This pressure washer is equipped with
a micro-switch sensitive to water flow. This Total Stop System
(TSS) senses water flow in the pump. When the trigger is
released, water stops flowing through the pump. The TSS then
automatically turns the motor off to protect the pump from
overheating, thus saving energy and prolonging pump life.
1. Turn the water supply tap on completely.
2. Release the safety lock, then press the trigger for a few
seconds until the water flow is steady. Operating the
pressure washer in this manner will allow air to escape and
discharge residual pressure in the hose (Figs. 14 – 15).
3. Turn the ON/OFF switch (pressure select dial) to the LOW (I)
or HIGH (II) position to start the pressure washer (Fig. 16).
Using the Nozzles
Before beginning any cleaning task, determine the best
nozzle for the job. Each of the nozzles has a different spray
pattern. The nozzle patterns are 40˚ (for gentle cleaning),
25˚ (for all-purpose cleaning), 15˚ (for tough jobs), 0˚ (for spot
cleaning or hard-to-reach areas) and the Soap nozzle
(for detergent application).
mCAUTION! NEVER change nozzles without locking the
safety lock on the trigger handle.
mWARNING! High-pressure jets can be dangerous if
subject to misuse. The jet must not be directed at persons,
pets, live electrical equipment, or the appliance itself.
This electric pressure washer is equipped with five (5)
Quick-Connect nozzles that easily snap onto the
Quick-Connect collar of the spray wand.
To connect a nozzle to the spray wand:
1. Turn off the pressure washer and shut off the water supply.
Pull the trigger to release water pressure.
RESET
TEST
Fig. 13
GFCI
Power light
indicator
Reset
Fig. 14
Safety lock
Fig. 15
Trigger
STOP
LOW
0
HIGH
Fig. 16

12
2. Engage the safety lock on the trigger handle.
3. Pull back the brass Quick-Connect collar and insert the
desired nozzle into the collar. Release the collar and the
nozzle will click into place (Fig. 17).
To disconnect a nozzle from the spray wand once the cleaning
job is complete:
1. Turn off the pressure washer and shut off the water supply.
Pull the trigger to release water pressure.
2. Engage the safety lock on the trigger handle.
3. Remove the nozzle by disconnecting it while pulling back
the brass Quick-Connect collar.
mWARNING! Do not make changes to the nozzle while
the trigger is engaged. Doing so could result in damage to the
pressure washer or injury to the user.
Working with Detergents
When cleaning with the pressure washer, some cleaning tasks
can be solved with water alone, but for most tasks cleaning
with detergent allows for more effective dirt removal.
mWARNING! Use only detergents specifically designed
for use with pressure washers. DO NOT USE household
detergents, acids, alkaline solutions, bleaches, solvents,
flammable material, or industrial grade solutions. These could
damage the pressure washer. Many detergents may require
mixing prior to use. Prepare the cleaning solution as instructed
on the solution bottle.
1. Remove the cap from the detergent tank and fill the tank
with detergent (Fig. 18).
2. Install the soap nozzle (black) on the spray wand (Fig. 17).
3. Turn on the pressure washer. Pull the trigger to operate
the unit. The liquid detergent will automatically mix with
water and be discharged through the nozzle.
mCAUTION! Always test the detergent in an
inconspicuous area before use.
4. Turn the detergent dial to adjust the suction volume of the
detergent solution (Fig. 19).
5. Apply detergent from the bottom to the top of the dry
surface to be cleaned.
NOTE: Wetting the surface first is not recommended as it
dilutes the detergent and reduces its cleaning ability.
6. Allow the detergent to remain on the surface for a short
time before rinsing. Do not allow the detergent to dry on
the surface.
mCAUTION! Damage may occur to painted surfaces if
the detergent is allowed to dry on the surface. Wash and rinse
a small section at a time. Avoid working on hot surfaces or in
direct sunlight.
7. When finished using the pressure washer, you must first
drain and rinse the detergent tank. Run the pressure
washer in low pressure until all of the soap is drained from
the detergent tank.
mCAUTION! Failure to follow these cleaning instructions
will cause the injection system to become clogged and
inoperable.
Rinsing with the Pressure Washer
1. Turn off the pressure washer and shut off the water supply.
2. Pull the trigger to release water pressure.
3. Engage the safety lock (Fig. 14).
4. Remove the nozzle by placing your hand over the nozzle
while pulling back on the quick-connect collar.
5. Select the right nozzle for the job (Fig. 20):
Fig. 17
Spray wand quick-
connect collar
Nozzle
Pull back
Fig. 18
Pressure washer
detergent
Detergent
tank
MIN
MAX
Fig. 19
Detergent dial

13
I) The 0º intense-jet nozzle (orange) is an extremely
powerful nozzle that delivers a high-pressure, pencil-
point jet stream. It is used to cut heavy dirt deposits
in a small, concentrated area. It is ideal for dissolving
stubborn substances, like tar and grease spots on
concrete, or for removing caked mud from equipment.
Use this nozzle to clean hard-to-reach areas including
the facades of 2-story buildings or the undersides of
lawn mowers and tractors.
NOTE: Care should be used when choosing the
right nozzle to avoid permanently gouging wood or
damaging fragile surfaces.
II)
Use the 15º fan-tip nozzle (yellow) for intense cleaning
jobs on hard surfaces. Applications include stripping paint,
removing oil stains, grease, heavy mildew stains, and rust
from steel. This nozzle should only be used in areas that
can withstand the high-pressure from this nozzle.
III) Use the 25º fan-tip nozzle (green) to clean home
siding, brick patios, wood decks, driveways, or
sidewalks. When using this nozzle, test a small area
first to avoid surface damage.
IV) Use the 40º wide-spray tip nozzle (gray) to clean
items such as cars, trucks, boats, patio furniture,
or lawn equipment.
V) Use the Soap nozzle (black) for low-pressure detergent
application to clean equipment, remove mildew and
oxidation stains from houses, clean bricks or degrease
grimy surfaces.
NOTE: When using detergent, make sure to install the
correct Soap nozzle (black). All of the other colored
nozzles will not work for detergent application.
6. Start at the top of the area to be rinsed and work your way
down, making sure to overlap your strokes.
mIMPORTANT! NEVER USE:
• Bleach, chlorine products, and other corrosive chemicals
• Liquids containing solvents (e.g. paint thinners, gasoline, oils)
• Tri-sodium phosphate products
• Ammonia products
• Acid-based products
These chemicals will harm the unit and will damage
the cleaning surface.
Shutting Down
1. Turn the switch to the STOP (0) position and unplug the
power cord from the outlet.
2. Turn off the water source.
3. Hold the trigger to release water pressure.
4. Disconnect the garden hose from the water inlet on
the unit.
5. Disconnect the high-pressure hose connection on the
trigger gun handle.
6. Release the trigger and engage the gun safety lock.
mWARNING! Turn off the water supply and squeeze the
trigger to depressurize the unit. Failure to do so could result in
personal injury due to discharge of high-pressure water.
Taking a Break
If you are taking a break of five minutes or more between
cleaning tasks:
1. Engage the gun safety lock (Fig. 14).
2. Turn the switch to the STOP (0) position.
3. Unplug the power cord from the outlet.
Storage
mCAUTION! Always store your pressure washer in a
location where the temperature will not fall below 32ºF (0ºC).
The pump in this machine is susceptible to permanent
damage if it freezes. FREEZE DAMAGE IS NOT COVERED
BY THE WARRANTY.
• Store the pressure washer indoors in a dry, covered area
where it is not subject to adverse weather conditions.
• It is important to store this product in a frost-free area.
• Always empty water from all hoses, the pump, and the
detergent bottle(s) before storing.
mCAUTION! The use of a pump protector is
recommended to prevent cold weather damage during storage
over the winter months.
Winterizing + Long-Term Storage
If you must store your pressure washer in a location where the
temperature falls below 32ºF (0ºC), you can minimize the chance
of damage to your machine by utilizing the following procedure:
• Disconnect all water connections.
• Turn on the machine for a few seconds until the remaining
water in the pump exits. Turn off immediately.
• Do not allow the high-pressure hose to become kinked.
• Store the machine and accessories in a room that does
not reach freezing temperatures.
15º
SOAP
25º 40º
0º
Fig. 20

14
• Do not store near a furnace or other sources of heat that
may dry out the pump seals.
• Operate the pressure washer with non-corrosive/non-toxic
anti-freeze, a pump saver, or a pump protector before
storing for the winter.
mWARNING! Before reusing, completely flush the unit
out with clear water. Anti-freeze products can damage
paintwork, so you must ensure there is no anti-freeze left in the
system before using it again.
Maintenance
mCAUTION! Before working on the pressure washer,
disconnect the plug from the power supply socket.
1. To ensure good performance, check and clean the water
inlet filter (Fig. 21). Remove the pre-filter and water inlet
filter and rinse with warm water to prevent any foreign
matter from clogging the pump (Figs. 22 – 23).
2. Clean the nozzle with the needle clean-out tool provided
(Fig. 24). Remove the spray wand from the gun; remove
any dirt from the nozzle hole and rinse.
3. Remove additional debris by back flushing water through
the nozzle and spray wand. To do this, place the end of
your garden hose (with water running) to the tip of the
nozzle, pushing water and debris out of the back opening
of the nozzle and spray wand.
Disposal
Recycling the Washer
• Do not dispose of electrical appliances as unsorted
municipal waste. Use separate collection facilities.
• Contact your local government agency for information
regarding the collection systems available.
• If electrical appliances are disposed of in landfills
or dumps, hazardous substances can leak into the
groundwater and get into the food chain, damaging your
health and well-being.
• When replacing old appliances with new ones, the retailer
is legally obligated to take back your old appliance for
disposal at least free of charge.
Service + Support
If your Sun Joe®SPX4003-ELT-RM electric pressure washer
requires service or maintenance, please call the Snow Joe®+
Sun Joe®customer service center at 1-866-SNOWJOE (1-866-
766-9563).
Model + Serial Numbers
When contacting the company, reordering parts, or arranging
service from an authorized dealer, you will need to provide the
model and serial numbers, which can be found on the decal
located on the housing of the unit. Copy these numbers into
the space provided below.
Fig. 21 (FRONT)
Water inlet filter
Garden hose adaptor
Pre-filter
Fig. 22
Pre-filter
Fig. 23
Inlet filter
15º
Fig. 24
Needle clean-out tool
Record the following numbers from the housing or handle of your
new product:
Model #:
Serial #:
S P X 4 0 0 3 - E L T - R M

15
Troubleshooting
• Disconnect the unit from the electrical power supply before carrying out maintenance on the machine or when checking that
its parts are in proper working order.
• To avoid unnecessary hassles, consult the following table before contacting customer service with any mechanical issues.
Problems Possible Cause Possible Solution
Machine refuses
to start
• Power failure/machine not
plugged into a working receptacle.
• Defective socket.
• Fuse has blown.
• Defective extension cord.
• Check to make sure machine is plugged into
a working outlet.
• Check the power cord and reset the GFCI.
Try a different outlet.
• Replace fuse. Switch off any other machines
that are using the same circuit.
• Try the unit without an extension cord.
• Check the hoses and connections are airtight.
• Clean or replace valves/seals.
• Please call the Snow Joe®+ Sun Joe®customer
service center at 1-866-SNOWJOE (1-866-766-9563)
for assistance.
• Replace fuse. Switch off other machines using
the same circuit.
• Check that the mains voltage corresponds to
specification on the model tag.
• Leave the washer for 5 minutes to cool down.
• Clean the nozzle.
• Install a fuse with a higher amp rating than the
amp consumption of the machine. Try the unit
without an extension cord.
• Allow machine to run by holding the trigger until
regular working pressure resumes.
• Check that the water supply corresponds to the
specifications required.
•WARNING! Avoid using long, thin hoses
(minimum 1/2 in. diameter).
• Clean the nozzle.
• Clean the water inlet filter.
• Straighten out the hose to remove any kinks/blockages.
• Please call Snow Joe®+ Sun Joe®customer service
center at 1-866-SNOWJOE (1-866-766-9563) for
assistance.
• Wait for pump/hoses or accessories to thaw.
• Connect inlet water.
• Clean the water inlet filter.
• Clean the nozzle.
• Pump sucking air.
• Valves dirty, worn out, or stuck.
• Pump seals worn out.
• Fuse has blown.
• Incorrect mains voltage.
• Thermal sensor activated.
• Nozzle partially blocked.
• Fuse too small.
• Air in inlet hose.
• Inadequate supply of mains water.
• Nozzle partially blocked.
• Water filter blocked.
• Hose kinked.
• Pump/spray gun is leaking.
• Trigger mechanism is broken.
• Pump/hoses or accessories frozen.
• No water supply.
• Water inlet filter blocked.
• Nozzle blocked.
Fluctuating pressure
Machine stops
Fuse blows
Machine pulsating
Machine often starts
and stops by itself
Machine starts, but
no water comes out

16
Accessories
mWARNING! ALWAYS use only authorized Snow Joe®+ Sun Joe®replacement parts and accessories. NEVER use
replacement parts or accessories that are not intended for use with this electric pressure washer. Contact Snow Joe®+ Sun Joe®
if you are unsure whether it is safe to use a particular replacement part or accessory with your pressure washer. The use of any
other attachment or accessory can be dangerous and could cause injury or mechanical damage.
NOTE: Accessories are subject to change without any obligation on the part of Snow Joe®+ Sun Joe®to provide notice of such
changes. Accessories can be ordered online at sunjoe.com or via phone by contacting the Snow Joe®+ Sun Joe®customer
service center at 1-866-SNOWJOE (1-866-766-9563).
Solid Brass Universal Quick Connector
(Garden Hose to Pressure Washer Adapter)
SPX3000-TPS
SPX-25H
SPX-UQC
ModelAccessories Item
1
2
3
NNRRŸŸ
plp l^^mm
OORRŸŸQQMMŸŸ
MMŸŸ
4Sun Joe®House + Deck All-Purpose Pressure
Washer Rated Concentrated Cleaner
Sun Joe®Premium Snow Foam Pressure
Washer Rated Car Wash Soap + Cleaner
Sun Joe®All-Purpose Heavy Duty Pressure
Washer Rated Cleaner + Degreaser
SPX-HDC1G
SPX-FCS1G
SPX-APC1G
Spray Tip Set
(Fits SPX3000, SPX4000 and
SPX9000-PRO Series Pressure Washers)
25 ft Medium-Duty
High Pressure Extension Hose
(For SPX Pressure Washer Series)
Sun Joe’s complete line of premium pressure washer accessories and attachments
make it easy to get your dirty work done, and also help you get the most out of your model!
SHOP ONLINE now at sunjoe.com

17
SNOW JOE®+ SUN JOE®REFURBISHED GOODS WARRANTY
GENERAL CONDITIONS:
Snow Joe®+ Sun Joe®operating under Snow Joe®, LLC warrants
this refurbished product to the original purchaser for 90 days
against defects in material or workmanship when used for normal
residential purposes. If a replacement part or product is needed,
it will be sent free of charge to the original purchaser except as
noted below.
The duration of this warranty applies only if the product is put to
personal use around the household. It is the owner’s responsibility
to correctly perform all maintenance and minor adjustments
explained in the owner’s manual.
HOW TO OBTAIN YOUR REPLACEMENT PART OR PRODUCT:
To obtain a replacement part or product, please visit
instructions. Please be sure to register your unit beforehand
to speed up this process. Certain products may require a serial
number, typically found on the decal afxed to the housing
or guard of your product. All products require a valid proof
of purchase.
EXCLUSIONS:
• Wearing parts like belts, augers, chains and tines are
not covered under this warranty. Wearing parts can be
purchased at snowjoe.com or by calling 1-866-SNOWJOE
(1-866-766-9563).
• Batteries are covered in full for 90-days from the date of
purchase.
Snow Joe®+ Sun Joe®may from time to time change the design of
its products. Nothing contained in this warranty shall be construed
as obligating Snow Joe®+ Sun Joe®to incorporate such design
changes into previously manufactured products, nor shall such
changes be construed as an admission that previous designs
were defective.
This warranty is intended to cover product defects only.
Snow Joe®, LLC is not liable for indirect, incidental or
consequential damages in connection with the use or misuse of
the Snow Joe®+ Sun Joe®products covered by this warranty.
This warranty does not cover any cost or expense incurred
by the purchaser in providing substitute equipment or service
during reasonable periods of malfunction or non-use of this product
while waiting for a replacement part or unit under this warranty.
Some states do not allow exclusions of incidental or consequential
damages so the above exclusions may not apply in all states. This
warranty may give you specic legal rights in your state.
HOW TO REACH US:
We’re here to help Monday through Friday from 9AM to 7PM EST
and Saturday and Sunday 9AM to 4PM. You can reach us at
1-866-SNOWJOE (1 866-766-9563), online at snowjoe/com, via
EXPORTS:
Customers who have purchased Snow Joe®+ Sun Joe®
products exported from the United States and Canada should
contact their Snow Joe®+ Sun Joe®distributor (dealer) to obtain
information applicable to your country, province or state. If for
any reason, you are not satised with the distributor’s service,
or if you have difculty obtaining warranty information, contact
your Snow Joe®+ Sun Joe®seller. If in the event your efforts are
unsatisfactory, please reach out to us directly.

18
NOTES

19
NOTES

sunjoe.com
Table of contents
Other sunjoe Pressure Washer manuals

sunjoe
sunjoe SPX2598 User manual

sunjoe
sunjoe SPX-FC34 User manual

sunjoe
sunjoe SPX4001 User manual

sunjoe
sunjoe SPX4001 User manual

sunjoe
sunjoe SPX3000 User manual

sunjoe
sunjoe WA24C-LT-RM User manual

sunjoe
sunjoe SPX-WB1 User manual

sunjoe
sunjoe SPX-ACS-MAX User manual

sunjoe
sunjoe SPX3000-XT1 User manual

sunjoe
sunjoe SPX3501 User manual

sunjoe
sunjoe SPX4003-ULT User manual

sunjoe
sunjoe PX205E-XT User manual

sunjoe
sunjoe SPX3000 User manual

sunjoe
sunjoe SPX2598-MAX Series User manual

sunjoe
sunjoe SPX3001 User manual

sunjoe
sunjoe SPX2100HH-SJG User manual

sunjoe
sunjoe SPX3001 User manual

sunjoe
sunjoe SPX201E-RM User manual

sunjoe
sunjoe SPX2700-MAX-RM User manual

sunjoe
sunjoe SPX1501 User manual