Swisscom Top FX 380 User manual

ECO
COK
0
987
456
321
#
@
Redial
QRY
UIOPWE T
ZVN
+
/
]
XC B
AFHJKL .
SDG
M@
Ctrl
'$-_ " %
&
()<>{}
[]
=?,:
!;
\
~
FaxTelLine TAD Toner!
Contrast
Std Fine SFinePhoto
Memory
100050
Resolution
On
messages
Fax
MENU
Control panel
13 14 16 18 20 22
15 17 19 21 23
24 25
26272829
30
33
32
34
35
36
373839
41 40
42
43
System overview
49
48
50
31
12
7b
910
2
3
44
5
7a
4
1
46
45
8
11
6
47

1
1. Fax unit
2. Scanning assembly
3. Control panel
4. Paper-in adjustable guide
5. Printer paper tray
6. Printer paper tray locking lever
7. (a) and (b) buttons used to unlock the
scanning assembly
8. Printer paper guard
9. Printer output tray
10.Scanning sheet feeder
11.Adjustable printer tray paper guide
12.Scanned paper tray
13.Alphabetic keypad
14.Fax-Answering indicator:
Lit: indicates that the unit is in fax-
answering mode
Flashing: message received in fax-
answering mode or faxes received
to memory
15.Line icon
Lit: call in progress
Flashing: connecting
16.Scan resolution for fax transmission
(Standard, Fine, Super Fine, Photo)
17.Memory used gauge (0 to 100%)
18.Tel icon: indicates that a telephone
handset is connected
19.Fax icon: automatic fax receive mode
20.TAD icon: indicates that a telephone
answering device is connected
21.Scanning contrast for document to
transmit
22.Paper jam icon
23.Toner gauge icon
Lit: toner empty
Flashing: toner low
24.On icon
Green: unit is powered up
Red: there is a problem
25.Numeric keypad
26.Internet key: send fax via Internet
27.FAX/COPY: fax transmission or local copy
28.Stop key: interrupt current operation
29.Scanning contrast selector
30.OK key: confirm the information displayed on
screen
31.Menu key: access the unit’s functions
32 to 35: Navigation keys
36.Correction key: back to previous menu
37.Fax transmission scanning resolution selector
38.Redial key: redial one of the last numbers called
39.Eco key: send off-peak
40.Dial tone key
41.Directory key: to access the directory and list of
quick-dial numbers
42.Broadcast key: send fax to several subscribers
43.Guide key: prints out a list of all the unit’s
functions
44.Paper tray cover
45.SmartCard slot (optional)
46.Memory expansion slot (optional)
47.Battery flap (on the unit’s underside, optional)
48.@ key: use in conjunction with the CTRL key to
obtain the @ character of an Internet address
49.Shift key ( ): use in conjunction with any letter
on the keypad to obtain a capital letter
50.CTRL key: use in conjunction with any letter on
the keypad to access the special symbols shown
above the alphabetic characters.
FOREWORD
This unit is a quick-scan laser output plain paper fax equipped with memory. Its large display and navigation
keys provide quick and easy access to the information you need.
SEND FAXES OVER THE INTERNET
Your unit’s Internet key enables you to send a fax anywhere in the world to a subscriber who is connected to
the Internet (see the chapter SENDING / RECEIVING FAXES OVER THE INTERNET).
Tosendafax,simplypress the INTERNETkey,enter the subscriber’se-mailaddress and presstheINTERNET
key a second time.

2
CONTENTS
INTRODUCTION 4
CHAPTER 1: INSTALLATION 5
CHAPTER 2: USING THE NAVIGATION KEYS 10
CHAPTER 3: SENDING YOUR FIRST FAX 12
CHAPTER 4: SENDING YOUR FIRST FAX OVER THE INTERNET 13
CHAPTER 5: THE DIRECTORY 15
CHAPTER 6: SETTINGS 18
CHAPTER 7: SENDING A FAX 22
CHAPTER 8: SENDING / RECEIVING FAXES OVER THE INTERNET 24
CHAPTER 9: ADVANCED COMMUNICATION FUNCTIONS 27
CHAPTER 10: ANCILLARY FUNCTIONS 33
CHAPTER 11: OPERATING MALFUNCTIONS 35
CHAPTER 12: CARING FOR YOUR UNIT 39
CHAPTER 13: TECHNICAL CHARACTERISTICS 41

SAFETY WARNINGS
Before powering on your unit, make sure the mains outlet it is connected to
meets the requirements printed on the warning label on your unit, or on the
separate power supply (depending on the model).
If your unit works with a separate Power Supply, use only the one delivered
with your unit; never use another power supply.
Ifyourunitworkswithabattery,replaceitonlywiththesametypeofbattery
or an equivalent type recommended by the manufacturer.
Warning: incorrect replacement of the battery may cause an explosion.
Usedbatteriesmustbedisposedoffollowingthemanufacturer’sinstructions.
Depending on the model, the unit’s mains plug may be the only way to
disconnect the unit from the power network. Therefore you must respect the
following:
• Your unit must be connected to a mains outlet located nearby.
• The mains outlet must remain easily accessible.
Your unit is delivered with a power cord including a plug which, depending
on the model, may be:
• without earth (the symbol on the warning label)
• with earth (no symbol on the warning label). It is imperative that a power
plug with an earth be connected to a wall outlet with an earth.
The European version of this unit includes the stamp, following the 73/
23/CEE, 89/336/CEE and 93/68/CEE directives.
APPAREIL A RAYONNEMENT LASER
DE CLASSE 1
CLASS 1 LASER PRODUCT
LASER KLASSE 1
APPARECCHIO LASER DI CLASSE 1
PRODUCTO LASER DE CLASE 1
APARELHO A LASER DE CLASSE 1
Ifthemachineis poweredwhenyouremovethe
upper cover, be careful with the two following
dangers:
.Laser beam interception by human eye can
produce irremediable injuries.
.Human contact with parts electrically
powered can produce a very dangerous
electric shock.
23225972
-
4B

4
INTRODUCTION
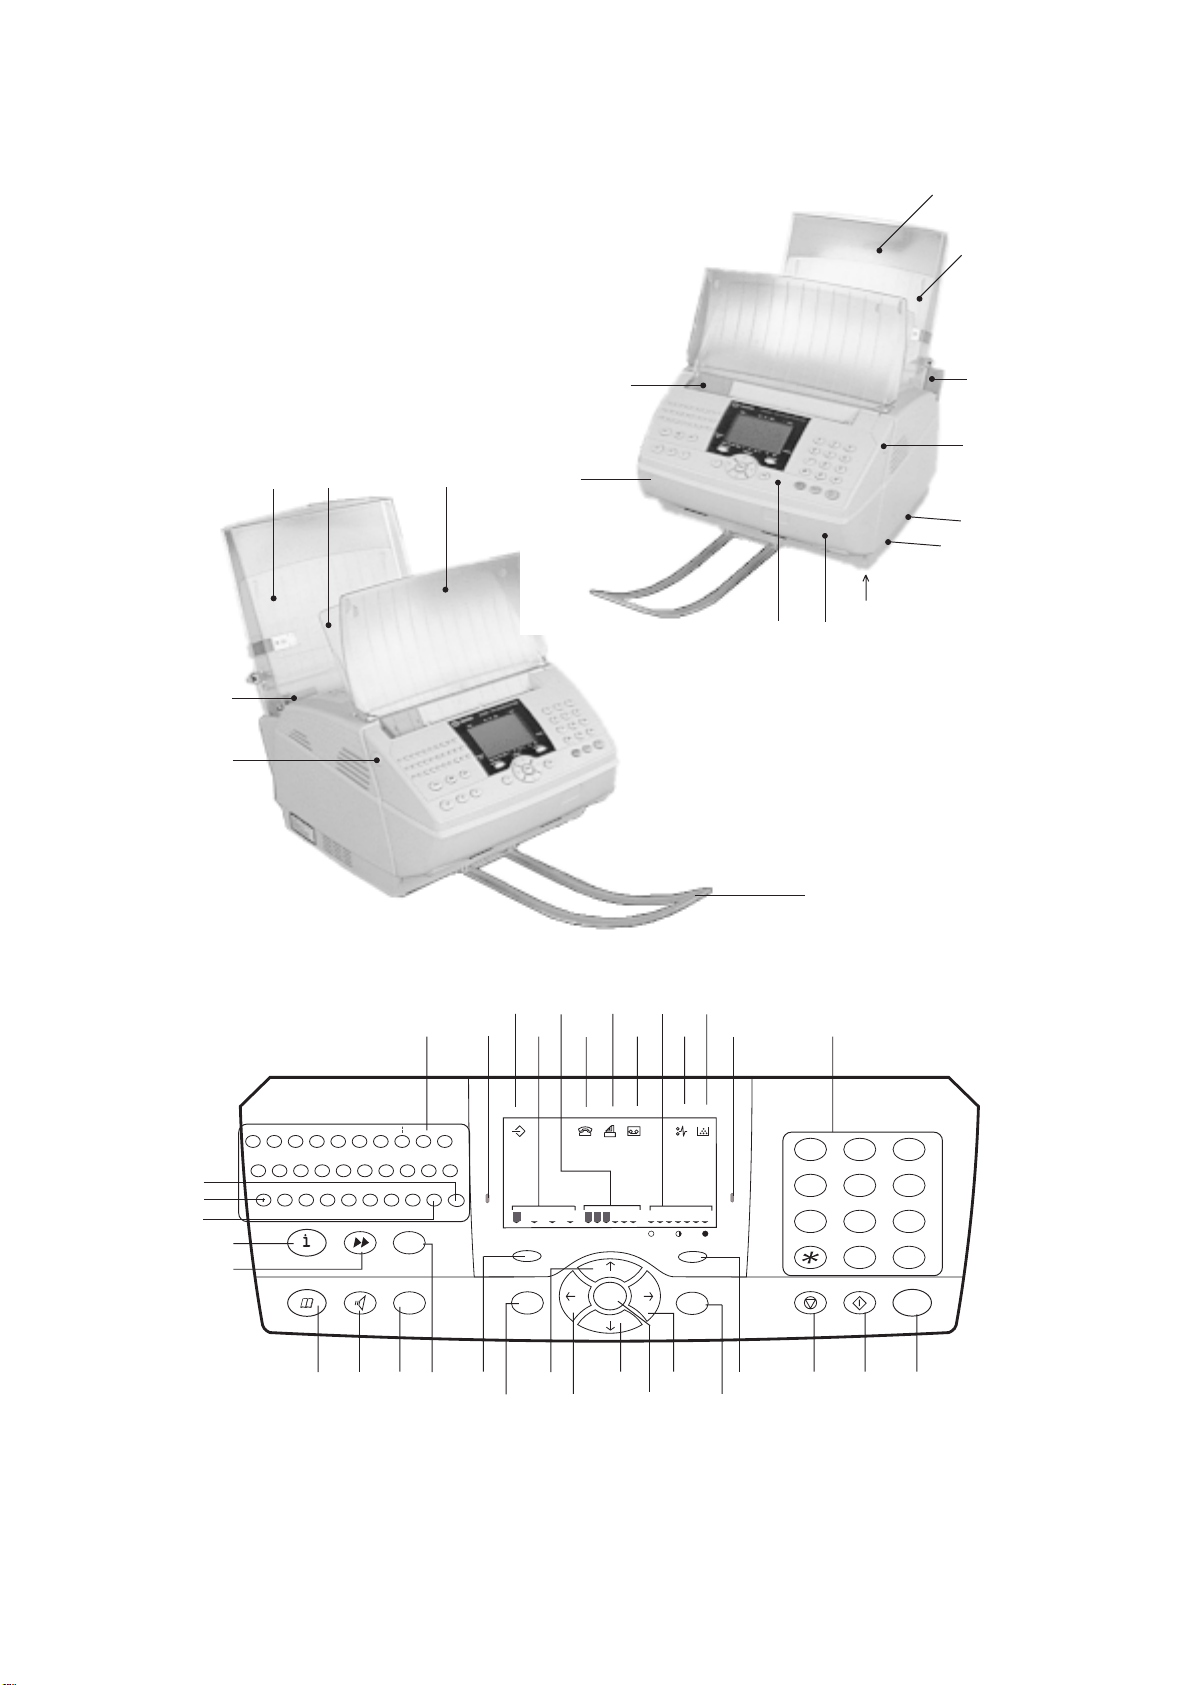
Your fax machine is a highly advanced unit equipped with automated features for increased ease of use.
It features laser output on plain paper, a fast scanning engine and a 4-line by 20 characters display.
You can use it to send and receive faxes over the Internet.
Your fax machine has a 200 sheet paper in-tray.
It has a non-volatile memory which can be used for both send and receive operations.
Your fax unit is multi-tasking: this means that you can perform other tasks while documents are being sent /
received.
Here is a summary of your unit’s features:
TRANSMISSION
- Send documents over the telephone network (normal fax transmission) or over the Internet
- Choose from four different resolutions: standard, fine, extra fine and photographic
- Send the same document to several subscribers at once
- Schedule transmissions (you can cancel or activate them at any time)
- Fax transmission queue (delete or send immediately any fax in the queue)
- Automatic re-dial
- Send faxes using pre-recorded names of subscribers
- Send faxes using mailing lists
- Broadcast faxes to a group of subscribers
- Load documents into the unit for polling by one or more remote fax machines
- Send faxes directly into a remote fax mailbox for confidentiality
- Monitors the number of pages sent
- Send documents directly or from memory
- Interrupt a fax transmission to switch to voice call mode
- Send documents over the Internet
- Use your fax to send e-mails
DIRECTORY
- Stores a large number of subscribers’ names and addresses
- Stores fax broadcast lists
- Lets you access subscribers / broadcast lists directly by name
- The directory can be locked (selected models only)
- Allows you to record a fax number and e-mail address for each subscriber
RECEPTION
- Connect an external telephone handset to the unit for manual receive (optional)
- Connect a telephone answering device to the unit to record voice messages automatically (optional)
- Poll documents from a remote fax
- Forward incoming documents (selected models only)
- Receive faxes automatically from the Internet
- Receive e-mails automatically
PRINTOUTS
Print out:
- A list of settings
- A list of phone numbers, broadcast lists, and e-mail addresses stored in the directory
- The send and receive logs
- A list of faxes in the send queue
- Fax transmission reports
- Documents in the queue (loaded into memory)
- A list of the unit’s functions
- The contents and list of mailboxes
MISCELLANEOUS FACILITIES
- Photocopy documents (up to 99 copies)
- Configure network settings (ringing tone, pulse / tone dial, etc.)
- The name of the subscriber and the page number are displayed during a call
- The unit can optionally be used as a PC multi-function peripheral
- Re-dial any of the last 10 numbers dialled
- Create mail-boxes and load incoming faxes or local documents into them
- Keypad lock (selected models only)
- Receive faxes to memory and schedule printing with PIN protection
- Automatically insert a dialling prefix to all numbers called
- Forward incoming to a remote fax machine
- Energy saving mode (selected models only)
- Memory expansion card (optional)
- Transfer the contents of the directory to a smartcard (optional)

5
1
CHAPTER 1: INSTALLATION
1. UNPACKING THE UNIT
Check for the following contents:
Fax machine (wrapped in plastic film)
Scanned paper tray
Scanner feeder
Printer tray
Printer paper guard
Telephone line cord
User guide
Paper tray cover
Photosensitive drum
FREE printer toner cartridge for up to 700 pages + toner gauge
card
2. INSTALLATION
POSITIONING YOUR UNIT
When choosing the location of your fax machine, you should take the following points into account:
- The telephone socket should be located less than 2 metres from your fax machine, otherwise you will
require an extension cord.
- To provide easy access to the fax machine, ensure there is clearance of around 10 cm on either side and to
the rear of the unit. The front of the unit should always be kept unobstructed.
- Do not expose the unit to direct sunlight, or position it close to sources of heat such as radiators, air
conditioning facilities and, as a general rule, to any excessively hot, dry, humid or dusty environment.
- Avoid exposing the unit to strong vibrations.
- Avoid environments where the unit is likely to come in contact with water or other foreign matter.
- Avoid touching the heat element and do not attempt to remove the internal panels (laser beam).
- Allow the heat element to cool for a few minutes prior to changing the toner cartridge.
FITTING THE PAPER TRAY
b
c
1- Remove the fax unit from its plastic packaging.
Fitthe paperguard(a) bypositioning the twopins
(b) into the slots (c) of the paper tray at the angle
shown.
Swivel the paper gard (a) round to its rear
position.
a
1- Flip the paper tray (g) forwards by pulling the
lever (h) in the direction shown. 2- Hold the top of the cover and open it by pulling
it towards you.
2
2
2- Fit the paper tray cover (d) by slotting the two
joints (e) into the pins (f) of the paper tray at the
angle shown.
e
f
d
LOADING THE PAPER
1g
h

6
4- Close the tray cover.
FITTING THE SCANNING FEEDER AND THE PRINTER OUTPUT TRAY
k
j
m
1- Assemblethescanningfeeder(j)andtheprinter
output tray (k) by bending the latter slightly. 2- Fit the resulting assembly into the two slots (m)
of the unit’s top cover.
l
The ribbing on the trays (l) must be facing towards the unit’s keypad.
G
FITTING THE PHOTOSENSITIVE DRUM
1- Open the cover housing the scanning assembly
by pressing simultaneously on the two buttons
located to either side.
2- Unpack the photosensitive drum.
Using the two handles, slot the right-hand-side
roller gear with its black protective sheath into
the runners (G)
4
12
21
3- Placeasheathofpaperagainstthepaperguard(a)
behindanyremainingsheetsofpaperinthecover
(aredlineinthepapertrayindicatesthemaximum
capacity of the latter).
3
a

7
FITTING THE GAUGE AND THE TONER CARTRIDGE
h
i
1- Removethecardbearingthegauge(h)fromitsaluminium
packaging.
- Detach the gauge mini-smartcard (i) from the card.
2. Open the cover housing the scanning assembly by
simultaneously pressing on the buttons located on
either side.
Locate the panel housing the gauge.
i
j
3. Slide the panel (j) open and position the gauge mini-
smartcard (i) in its housing ensuring that the contacts
are facing outwards.
4. Slide the panel back.
Ensure that the gauge mini-smartcard stays in
place while you slide the panel back.
5. Remove the toner cartridge from its aluminium
packaging.
Remove the strips of adhesive tape.
Gently shake the cartridge sideways 5-6 times to
distribute the toner evenly.
1
2
4
3
5
L
Unfurlthe strip(L) of theblack protective
sheath prior to fitting the photosensitive
drum.
4- Gently pull on the strip (L) of the black protective
sheath until the sheath has been completely
removed.
Should the black protective sheath tear, carefully
remove any remaining pieces.
34
L

8
1-2- Clip the scanning out-tray (a) into the two slots (b) of the unit’s base (c).
Ensure you always remove the scanning out-tray prior to opening the cover housing the scanning
assembly.
a
c
b
b
a
SELECTING THE PRINTER OUTPUT CONFIGURATION
Your unit directs printed output by default to the tray
located above the unit (a) (incoming documents are
printed out in the correct order).
Thecapacityoftheprinteroutputtray(a)variesbetween
40 and 60 pages depending on the weight of the paper
used.
A sensor warns the user when the paper tray is full.
1- Todirect paperoutput to the front of the unit (b), for special applications, e.g. printing off a PC using headed
paper:
FITTING THE SCANNING OUT-TRAY
1
2
1
8. Closethescanningassemblycover.Pressdownonboth
sides of the cover to make sure that it locks into place.
8
6. Unclip the protective plastic guard of the toner
cartridge using the two tabs.
Carefully remove the plastic guard and the foam
gasket.
The foam gasket is attached to the plastic guard
at one end.
7. Hold the toner cartridge by the handle with the text
facing upwards.
Check that the photosensitive drum is in position,
otherwise refer to the previous section: fitting the
photosensitive drum.
Slot the toner cartridge into the unit along the lateral
guides (M).
Push the cartridge in firmly using the handle until it
slots into place.
M
M
67

9
3. CONNECTIONS
A RJ11 connector 44 Telephone cable socket
B Telephone wall socket connector 45 Socket used for linking a telephone set or telephone answering
43 Mains lead device
46 Socket used for linking the unit up to a PC (optional)
CONNECTING THE TELEPHONE LINE
Plug connector A of the telephone line cable into socket 44, located to the rear of the unit underneath the printer
paper tray, and plug connector B (standard stackable telephone plug) into the telephone wall socket.
CONNECTING TO THE MAINS
Refer to the safety guidelines set out at the beginning of this booklet.
Plug the end of the mains lead (43) into a mains socket.
CONNECTING A TELEPHONE HANDSET OR TELEPHONE ANSWERING DEVICE
Connect the phone line cable of the telephone handset or answering device into the stackable connector (45) of the
unit’s phone line cable.
4. POWERING UP YOUR FAX MACHINE
Plug in the mains lead.
Afterafewseconds,duringwhichthe printerwarms up,the dateand timeare displayed.Settheyourfaxmachine’s
dateandtime- for instructions, see the section entitled setting the dateand time inthe chapter headed SENDING
YOUR FIRST FAX.
44 43 B
A
46
c
Open the cover housing the scanning assembly by pressing on
the two buttons located to either side.
2- Flip the lever (c) to the upwards position
- lever down: paper output to top of unit
- lever up: paper output to front of unit
Finally, close the cover.
With printer output directed towards the front of the
unit, pages received are printed out in reverse order.
Scanned documents may be mixed up with received
documents.
2
45

10
CHAPTER 2: USING THE NAVIGATION KEYS
1. PRESENTATION
THE NAVIGATOR PAD:
This consists of 7 keys which you can use to navigate through the menus displayed by
your fax machine.
TO ACCESS THE MAIN MENU:
Press the MENU key (whatever your position within the unit’s menus)
TO NAVIGATE THROUGH THE MENUS:
Press the down arrow key to select the next line of a menu.
Press the up arrow key o select the previous line of a menu.
Press OK to access the next menu level.
Press C to return to the previous menu level.
Press START to confirm your selection and exit the current menu.
TO NAVIGATE ALONG A DATA ENTRY FIELD:
Press the arrow key to move left.
Press the arrow key to move right.
Press OK to confirm your entry.
Press C to delete one character.
Press START to confirm your selection and return to the initial display.
THE DISPLAY:
This consists of 4 lines of 20 characters. The cursor shows the currently selected line.
LINE 1
LINE 2
LINE 3
LINE 4
To view further lines in a menu, scan through it using the and keys of the navigator pad.
2. ACCESSING THE UNIT’S FUNCTIONS USING THE NAVIGATOR
You may access the various functions of your unit by either of two means:
Step by step by navigating through the menu structure using the and keys of the navigator pad.
Directly by pressing the MENU key and entering the number of the function you require on the numeric
keypad.
When your fax machine is idle, press GUIDE (i) to print out a comprehensive list of the functions of your
fax machine.
C
OK
MENU
Menu
OK
C
OK
C

11
STEP BY STEP FUNCTION ACCESS
In this mode, you use the and keys of the navigator pad to scan through the options of a menu, and the OK
and C keys to access the following or previous menu level.
Example 1:
To access the PRINT OUT DIRECTORY menu step by step:
Example 2:
To access your unit’s date and time settings:
To access this function step by step:
Press the MENU key.
Move the cursor to 2 SETUP by pressing the key on the navigator pad once.
Press OK. The display shows:
F2--- SETUP
1 DATE TIME
2 YOUR NUMBER
3 YOUR NAME
Press OK. You are in data entry mode, and the cursor is flashing over the first digit to be entered.
Note:
Throughout this document, the position of the data entry cursor will be represented by a “_”.
To input a new date and time, e.g. 16:45 on 07 March 1998, enter the following sequence using the
numeric keypad: 0, 7, 0, 3, 9, 8, 1, 6, 4, 5.
Should you need to amend the data you have entered, use the and keys to position the cursor on
the character to be altered.
Once you have input the right date and time, press OK to confirm your entry and enter a number to dial,
or press FAX/COPY to confirm your entry and exit the menu.
DIRECT FUNCTION ACCESS
In this access mode, you press the MENU (FUNCTION) key followed by a numerical code to directly access the
function required.
Example:
Setting your unit’s date and time
To access this function directly:
Press MENU followed by 2 and 1. You are now in data entry mode and can enter the new date and time
using the numeric keypad (see previous section).
OK
MENU
F---- FUNCTION
1 DIRECTORY
2 SETUP
3 SEND
F1--- DIRECTORY
3 SEE OR MODIFY
4 CANCEL
5 PRINT
F1--- DIRECTORY
1ADD NAME
2 ADD LIST
3 SEE OR MODIFY
OK
C
4 times

12
CHAPTER 3: SENDING YOUR FIRST FAX
When you first power up your unit, we recommend you configure the following settings prior to sending your
first fax:
- DATE TIME : enter the current date and time.
- YOUR NUMBER : enter the telephone number of your fax machine.
- YOUR NAME : enter the name your wish to appear at the top of each fax page sent out (if the
SENDING option is on).
Note: see Chapter - SETTINGS for a list of all your unit’s other settings.
1. SETTING THE DATE AND TIME
You may alter the unit’s date and time settings at any moment. To do so using the direct access mode:
Press MENU followed by 2 and 1.
Enter the date and time using the numerical keypad then press FAX/COPY to confirm your entry. For
example, to enter 7 May 1999, 9:15am, enter the following sequence: 0 7 0 5 9 9 0 9 1 5, then press FAX/
COPY.
2. ENTERING YOUR NUMBER
Your number will be printed on all fax pages you send out if the SENDING option is on. To input your number
using the direct access mode:
Press MENU followed by 2 and 2.
Input the telephone number of your fax machine using the numeric keypad.
Press FAX/COPY to confirm your entry.
3. ENTERING YOUR NAME
This is the name which identifies your fax machine.
It will be printed on all fax pages sent out when the SENDING option is on. To input your name using the direct
access mode:
Press MENU followed by 2 and 3.
Input your name using the alphabetic keypad then press FAX/COPY to confirm your entry.
4. TEST TRANSMISSION
In order to check that your fax machine is operating properly over the telephone network, carry out a test send
then a test receive operation after powering it up for the first time.
SENDING A FAX
Send a fax to someone (clearly indicating that this is a test transmission).
Place the document to be sent face down in the fax machine’s feeder, with the first page at the bottom of
the stack.
Notes:
You can dial the subscriber’s number before placing the document in the sheet feeder - this is handy as it
enables you to read the fax number off the document to be sent.
Thesheetfeederhastwosmall guides which will help you to position your document optimally for scanning.
Dial the subscriber’s number using the numeric keypad and press FAX/COPY.
Notes:
If you want to insert a pause in the number dialled (e.g. after dialling 00): press the / key on the alphabetic
keypad.
A “/” will be inserted in the number on the display.
The LINE icon flashes as your unit connects to the remote fax, and stays lit continuously once the two fax
machines FAX/COPY to communicate.
When the transmission is over, the initial screen is displayed.
RECEIVING A FAX
Ask the subscriber to send you a fax by return in order to test your unit’s receive capability.
As the first page is being received by your fax machine, the following screen is displayed:
Incoming call
reception Pg:1 (example)
+33 140807207

13
(1) Should your identifier be more than 20 characters long, the text will pan automatically to the left.
(2) When modifying your password, all the characters you entered previously appear as asterisks (in order to keep your password
safe from prying eyes).
CHAPTER 4: SENDING YOUR FIRST FAX OVER THE
INTERNET
1. INTRODUCTION
You can send faxes to subscribers world-wide over the Internet.
First of all ensure:
- that the subscriber has an Internet address,
- that you subscribe to the Internet through an access provider,
- that your unit is configured in accordance with your access provider’s guidelines.
2. SETTING UP: SUBSCRIBING TO AN INTERNET SERVICE
In order to access the Internet, you must first take out a subscription with an Internet access provider.
You then enter into your Internet fax all the parameters required to connect to the Internet (these parameters are
provided to you by your access provider), namely:
- your login identifier and password: these enable the fax machine to access the Internet and send your
faxes and e-mails over the Web.
- your e-mail identifier and password: these enable the fax machine to access its Internet mailbox and thus
receive and print out the faxes and e-mails you receive.
- The telephone number of your access provider’s Internet Point of Presence.
Note:
Do not forget to insert a PABX dialling prefix if your fax machine is connected to a PABX (Private
Automated Exchange)
- your E-MAIL address: this address is required to send and receive messages via the Internet. You should
disclose this address to your contacts for the purpose of exchanging mail.
- The remaining parameters are:
• the address of the SMTP server
• the address of the POP 3 server
• the address of the Primary DNS
• the address of the Secondary DNS
Ensure that the technical characteristics of your Internet access provider are compatible with those set
out in the chapter headed TECHNICAL CHARACTERISTICS
INTERNET ACCESS PROVIDER SETTINGS
Press MENU followed by 9 and 1,
this menu enables you to choose from a list of Internet providers.
Select NO ACCESS to disable access to the unit’s Internet-related functions. Any parameters entered beforehand
will be stored but not used (this helps avoid operating errors).
Choosing a provider from the list enables the unit to adapt to the terminology used by each provider.
Note:
Your access provider will notify you of the parameters you require together with your confirmation of
subscription.
Choose PROVIDER 3 to enter all the access provider’s parameters manually:
Press MENU followed by 9 and 2; your fax machine will list the various parameters available.
Select the relevant ones using the and of the navigator pad.
CONNECTION SETTINGS (9, 2, 1 MENU)
These parameters enable you to access the Internet. You use them to identify yourself to your access provider
when transmitting documents and/or e-mail over the Internet.
DIAL-UP NUMBER
You enter the access number of the Internet access provider like any other normal fax number.
Note:
If your unit is connected to a private automatic exchange (PABX), you may have to insert a dialling prefix.
IDENTIFIER
Use this menu to input your identifier (1).
PASSWORD
Use this menu to input your password (2).

14
MESSAGING SETTINGS (9, 2, 2 MENU)
These settings enable you to access your personal Internet mailbox in order to receive incoming fax documents
or e-mails.
IDENTIFIER
Use this menu to input your identifier (1) .
PASSWORD
Use this menu to input your password (2).
E-MAIL ADDRESS
This menu enables you to input your E-MAIL address (1).
SERVER SETTINGS (9, 2, 3 MENU)
SMTP SERVER
This parameter enables your fax machine to automatically display the server address for any transmission over
the Internet.
This menu enables you to input the address of the SMTP server (1).
POP3 SERVER
This parameter enables your fax machine to automatically display the server address for reception of any
document to be retrieved from your Internet mailbox.
This menu enables you to input the address of the POP3 server (1).
PRIMARY DNS
This parameter enables messages to be routed over the Internet. The menu enables you to input the address of the
PRIMARY DNS servers.
The address of a given server consists of up to 4 sets of 3-figure numbers.
SECONDARY DNS
This menu enables you to input the address of the SECONDARY DNS servers.
The address of a given server consists of up to 4 sets of 3-figure numbers.
3. SENDING A FAX OVER THE INTERNET
Place the document to be sent face down in the fax’s sheet feeder, with the first page at the bottom of the
stack.
Press the INTERNET key.
Note:
- to obtain the @ character, use the corresponding key on the alphabetic keypad.
- to enter the full stop, press the . / key on the alphabetic keypad.
- to enter capital letters, use the Shift key ( ).
Press the INTERNET key. The document is scanned into memory.
It is then automatically transmitted to its intended subscriber over the Internet.
The exact time when the transmission takes place depends on the particular settings on your fax:–
- either at a set time
- or every 3 hours
- or immediately
(see the Settings section in the chapter entitled SENDING / RECEIVING OVER THE INTERNET).
(1) Should your identifier be more than 20 characters long, the text will pan automatically to the left.
(2) When modifying your password, all the characters you entered previously appear as asterisks (in order to keep your password
safe from prying eyes).

15
CHAPTER 5: THE DIRECTORY
Your fax machine enables you to input records of data for individual subscribers as well as fax broadcast lists.
SUBSCRIBER RECORDS:
You may enter up to 250 subscriber records, consisting of the names of individual subscribers and their contact
details.
BROADCAST LISTS:
You may group several subscribers together in order to form up to 32 broadcast lists.
You may at any stage:
- alter the content of the subscriber records or broadcast lists,
- print them out,
- call them.
1. SUBSCRIBER RECORDS
ADDING A SUBSCRIBER RECORD
To access this menu, press MENU, followed by 1 and 1.
Your fax machine automatically creates a new, blank record. You may now enter the details of the new
subscriber.
- You may at any stage cancel the new record by pressing STOP.
- Furthermore, you need not fill in all the fields of the record (only the name of your contact, and the fax
number or e-mail number are mandatory). You may at any stage save the record in its present state by
pressing FAX/COPY.
ENTERING THE SUBSCRIBER’S NAME
Move the cursor if required to NAME using the and keys of the navigator pad. Using the alphabetic
cursor, enter the name used to identify the subscriber. You may correct your entry by pressing the C key.
Press OK to confirm the entry of the subscriber’s name.
ENTERING THE SUBSCRIBER’S FAX NUMBER
Move the cursor if required to TEL using the and keys of the navigator pad.
Using the numeric cursor, enter the subscriber’s fax number.
Press OK to confirm the entry of the subscriber’s fax number.
Note:
If your fax machine is connected to a private automatic exchange (PABX), you may have to insert a pause
in the number; to do so, insert an “/” into the subscriber’s number.
ENTERING THE SUBSCRIBER’S E-MAIL ADDRESS
If the subscriber has an Internet address, enter it into the directory.
Move the cursor to E-MAIL if required.
confirm.
ENTERING AN ASSIGNED NUMBER FOR THE SUBSCRIBER
Your fax machine automatically assigns a number to each of the subscribers whose details you enter into the
directory.
If you do not like the number assigned, you may modify it as follows:
Move the cursor if required to NUMBER ASSIGNED using the and keys of the navigator pad.
Press the or GUIDE keys and enter the number of your choice using the numeric keypad.
Press OK to confirm the assigned number you have chosen to assign to the subscriber.
ASSIGNING AN ASSOCIATED KEY TO A SUBSCRIBER
You may store a subscriber’s details to be associated with each of the keypad’s 26 alphabetic keys, (A to Z).
To log a subscriber under a one-touch dialling key, proceed as follows:
Move the cursor if required to ASSOCIATED KEY using the and keys of the navigator pad.
Press the or GUIDE keys or press the relevant associated key directly. Only those keys that are free
and available are shown on the display.
- either using the alphabetic keypad,
- or using the and keys of the navigator pad to position the cursor on the associated key which
you would like to assign to the subscriber.
Press OK to confirm your choice of the key to be assigned to the subscriber.

16
SETTING THE TRANSMISSION SPEED FOR OUTGOING FAXES
Your fax machine provides you with the option of choosing between several transmission speeds.
If the line conditions are good (the line is suited to data transmissions, there is no echo), transmission can usually
take place at 14,400 baud (bits per second).
However, it is sometimes necessary to restrict transmission speeds for certain sessions. To set an upper limit on
the speed:
Move the cursor if required to SPEED using the and du navigateur.
Use the or keys to scroll through the various options available.
Alternatively, press the GUIDE key then move the cursor onto the required transmission speed using
the and keys of the navigator pad.
Press OK to confirm your selection. You may save the record as a whole:
- either by pressing on FAX/COPY,
- or by confirming the last option (SPEED).
2. BROADCAST LIST OF SUBSCRIBERS
A list consists of subscribers entered in the directory:
- subscribers with a fax number,
- subscribers with an e-mail address,
- subscriber entries with both an e-mail address and a fax number.
A given list may include both fax and Internet subscribers.
To send a fax to a broadcast list of subscribers, press either the FAX/COPY or INTERNET keys.
Should a subscriber entry include 2 addresses (fax no. and e-mail address):
- he or she will receive your fax on their fax machine if you pressed the FAX/COPY key,
- he or she will receive your fax in their e-mail mailbox if you pressed the INTERNET key.
ADDING A BROADCAST LIST
To access this menu, press MENU, followed by 1, 2.
Your fax machine automatically creates a new record. You may now enter the characteristics of this list of
subscribers.
- You may at any stage cancel the new list by pressing STOP.
- Furthermore, you need not fill in all the characteristics of the list. You may at any stage save the list in its
present state by pressing on FAX/COPY.
ENTERING THE NAME AND QUICK-DIAL NUMBER OF A BROADCAST LIST
The procedure used to enter the name and quick-dial number of a new broadcast list is identical to that used to
enter the name and quick-dial number of a subscriber into the directory.
For further information on these procedures, refer to the sections entering a subscriber’s name, entering a
quick-dial number for a subscriber in this chapter.
CREATING THE LIST
A broadcast list consists of subscribers whose details have already been entered into the directory. When creating
a new list, you must indicate which subscribers are to be included.
Move the cursor if required to LIST COMPOSITION using the and keys of the navigator pad.
Press the or GUIDE keys to enter the elements of the list.
There are several ways of entering these elements:
1- You can type the first few letters of the subscribers’ names using the alphabetic keypad; the fax
machine will search for the relevant subscriber as you type. Press OK to add the chosen subscriber to
the list.
2- Directly key in the subscribers’ quick-dial numbers.
3- Click on the DIRECTORY key and select a subscriber by moving the cursor using the and .
Click on OK to confirm your choice.
Press OK to confirm the list contents.
Press FAX/COPY to save the entire record.
ENTERING A LIST NUMBER
Your fax machine supports up to 32 fax broadcast lists, numbered L-0 to L-31. The list number is used for relay
broadcasting (see the section RELAY BROADCASTING A DOCUMENT VIA A REMOTE FAX).
Note:
Your fax machine automatically assigns a quick-dial number to each list. If you do not like the assigned
number, you may modify it as follows:
Move the cursor if required to LIST NUMBER using the and keys of the navigator pad.
Press the or GUIDE keys or enter the number of your choice (between 0 and 31).
Press OK to confirm the list number.

17
DELETING A SUBSCRIBER FROM A BROADCAST LIST
Press MENU followed by 1 and 3.
Select the list (L) from which you want to remove a subscriber using the and .
Click OK to display the list selected.
Use the to move the flashing cursor to LIST COMPOSITION and press the key followed by .
The display will show the numbers forming part of the list under consideration.
Position the cursor on the number of the subscriber who is to be removed, using the and keys,
then press the C key.
To remove further subscribers from the list, simply repeat the last two steps.
Press OK followed by FAX/COPY.
ADDING A SUBSCRIBER TO A BROADCAST LIST
To add one or more subscribers to a previously created list:
Press MENU followed by 1 and 3.
Select the list (L) to which you want to add a subscriber using the and .
Press OK.
Use the to move the cursor to LIST COMPOSITION and press the key to see the numbers
currently in the list.
Enter the quick-dial number of the subscriber you wish to add to the list
To add further subscribers to the list, move the cursor to the end of the list (the numbers displayed will pan
automatically to the left) using the key and enter the additional quick-dial numbers.
Press FAX/COPY.
Notes:
- Some of your subscribers may feature on several lists.
- You cannot enter the quick-dial number of a list as part of the numbers in another list.
3.
VIEWING, MODIFYING OR DELETING A SUBSCRIBER RECORD
Press MENU followed by 1.
If you wish to view or modify a record or a list in the directory, press 3.
If you wish to delete a record or list from the directory, press 4.
Select the record or list you wish to view, modify or delete.
Press OK.
F13-- MODIFY -
112 SMITH
002 (L)STOCKPORT (example)
003 WATSON
112 SMITH : The subscriber known as “SMITH” is registered under quick-dial number 112
002 (L) STOCKPORT : The “STOCKPORT” list is registered under quick-dial number 2
and so on…
Note:
Subscriber records and broadcast lists in the directory are sorted in alphabetical order
STEP BY STEP SELECTION USING THE AND
Example: searching for WATSON in the directory:
Move the cursor using the and until you reach the subscriber known as “WATSON”.
Press OK to carry out the chosen operation on the selected list or record.
SELECTION BY NAME
Example: searching for WATSON in the directory:
Enter the letters W then Y.
If several respondents’ names start with these same letters, narrow the search by keying in the next letters in the
subscriber’s name.
Your fax will search for the subscriber as you type.
Press OK to carry out the chosen operation on the selected list or record.
SELECTION BY QUICK-DIAL NUMBER
Example: searching for WATSON, registered under quick-dial number 3 in the directory:
Press the DIRECTORY key and enter the number 3.
Press OK to carry out the chosen operation on the selected list or record.
4. PRINTING OUT THE DIRECTORY
To print the directory (both subscribers and broadcast lists):
Press MENU, followed by 1 and 5. The directory is printed out in alphabetical order.

18
CHAPTER 6: SETTINGS
You can print a list of parameters at any time, in order to check the status of your units default settings and
modified settings.
To print a list of settings, press MENU, followed by and 4. Your fax will print out a list of parameters.
You may modify the parameters of your fax machine at any moment in time.
1. GENERAL SETTINGS
To access the general settings of your fax machine, press MENU followed by 2.
Move the cursor using the and , then enter or modify the date and time, your number and your
name.
Press OK to confirm your entries.
2. TRANSMISSION
REPORT
Your fax machine can be programmed to print out a transmission report (for standard transmission over the
telephone network) or a send notice (for documents sent over the Internet) following each fax you transmit. You
can set the parameters of this report as follows:
To access the various types of report available, press MENU followed by 2, 4 and 1.
To select WITH directly, press MENU followed by 2, 4, 1 and 1.
A transmission report will be printed out upon each successful or finally abandoned transmission. Only
one report will therefore be printed out for each send request.
To select WITHOUT directly, press MENU followed by 2, 4, 1 and 2.
No transmission reports will be printed (see the send log for a record of fax transmission sessions).
To select ALWAYS directly, press MENU followed by 2, 4, 1 and 3.
A report will be printed out upon each transmission attempt.
To select ON ERROR directly, press MENU followed by 2, 4, 1 and 4.
Transmission reports will only be printed out when all attempts to send the fax have failed and the
transmission request is finally abandoned.
Note:
A reduced-size representation of the first page of the document is automatically added to the transmission
report when the document is sent from memory (see the section entitled Transmission from memory or
from the feeder).
FAX TRANSMISSION
This function enables you to request that documents be loaded into memory prior to transmission. You can
retrieve your documents faster in this way, and your telephone costs will be lower.
To select MEMORY directly, press MENU followed by 2, 4, 2 and 1.
To select FEEDER directly, press MENU followed by 2, 4, 2 and 2.
3. RECEPTION
RECEIVE MODE
You can choose between 4 receive modes: a standard mode (fax mode), and three other modes which can be used
when a telephone handset and/or answering device are connected to your fax machine.
To set your fax machines receive mode, press MENU followed by 2, and 1.
Your fax machine supports 4 different receive modes:
- MANUAL MODE
- FAX MODE
- FAX / PHONE MODE
- FAX / TAD MODE
The chosen receive mode is represented by three icons located at the top of the display.
MANUAL MODE
To select this mode directly (The Tel icon will light up), press MENU followed by 2, , 1 and 1.
An external telephone handset must be connected to your fax machine. You will have to lift the receiver to receive
a document (by pressing on FAX/COPY).
FAX MODE
To select this mode directly (The Fax icon will light up), press MENU followed by 2, , 1 and 2.
Your machine will receive faxes automatically. This is the most commonly used mode.

19
FAX - TEL MODE
To select this mode directly (the Tel and Fax icons will light up), press MENU followed by 2, , 1 and 3.
An external telephone handset must be connected to your fax machine (see the section entitled Connections in
the chapter headed INSTALLATION). Your fax machine automatically discriminates between different types
of calls. In this receive mode, you are advised to set the number of rings before the unit picks up incoming calls
to 2 if you expect a heavy fax traffic or if you expect only few. When there is an incoming call, the unit
automatically answers the call after the set number of rings, and plays an intermittent beeping tone inviting the
caller to wait. Then:
- if the call is a fax, your unit switches to fax receive mode,
- if it is a voice call, your unit rings to warn you. If you do not take the call within 30 seconds, the unit
switches to fax receive mode. To take the call, pick up the telephone handsets receiver and take the line
by pressing on the LINE key on your fax machine.
- if you lift the receiver while the telephone handset is ringing and the call turns out to be an incoming fax,
press FAX/COPY and hang up.
FAX - TAD MODE
To select this mode directly (The Fax and TAD icons will light up), press MENU followed by 2, , 1 and
4.
Your fax machine supports an external telephone answering device (see the Connections section in the
INSTALLATION chapter). In this mode, your answering device will answer incoming voice calls and your fax
machine will automatically receive any incoming faxes.
Please ensure that your answering device is on constantly and configured to automatic answering mode.
When there is an incoming call, the unit automatically answers the call and listens silently to the call signature.
- if the call is a fax, your unit switches to fax receive mode,
- if it is a voice call, it lets your answering device record any messages.
PAPER SAVING MODE
Your fax machine has a feature which enables you to save the paper used to print out incoming faxes. In this mode,
pages of an incoming fax are printed out two to a page.
To select paper saving mode, press MENU followed by 2, , 2 and 1.
To cancel paper saving mode, press MENU followed by 2, , 2 and 2.
PAPERLESS RECEPTION
If you select REC. WITHOUT PAPER, your fax machine will receive incoming faxes directly to memory when
its printer is unavailable.
If you select WITH PAPER, your fax machine will refuse incoming faxes when its printer is unavailable.
To set your fax machine to REC. WITHOUT PAPER mode, press MENU followed by 2, , 3 and 1.
To set your fax machine to WITH PAPER mode, press MENU followed by 2, , 3 and 2.
NUMBER OF COPIES
Your fax machine can print out several copies (1 to 99) of incoming faxes.
To set the number of copies, press MENU followed by 2, and 4.
Enter the number of copies required, then press OK to confirm.
4. NETWORK
NETWORK TYPE
The telephone line to which your fax machine is connected can be linked to a public network, or to a private
network (running off a corporate automatic telephone exchange, or PABX).
To configure your fax machine for operating on a private network (PABX), press MENU followed by 2,
6, 1 and 1.
To configure your fax machine for operating on a public network (PSNT), press MENU followed by 2,
6, 1 and 2.
DIAL MODE
This is the dial mode used by the automatic telephone exchange to which your fax machine is connected: pulse
or tone. To determine which dial mode is in use, select TONE DIALLING and test your setup by calling someone.
If you are unable to connect, switch to PULSE DIALLING.
To configure your fax machine for tone dialling, press MENU followed by 2, 6, 2 and 1.
To configure your fax machine for pulse dialling, press MENU followed by 2, 6, 2 and 2.
Table of contents