Sharp FO-135 User manual


NOTICE FOR UNITS INSTALLED IN NEW ZEALAND
WARNING:
WARNING:
WARNING:
WARNING:
Should any physical damage occurto the equipment which may result ininternal
parts becoming exposed, the equipment should immediately.be.disconnected
and the user should arrange for its repair before it is reconnected, or its disposal
if necessary.
(NEW ZEALAND PTC 101)
Should it be necessaryto move the equipment, it is necessaryto disconnect the
telecom networkconnectionbeforedisconnectingthe powerleadoranyseparate
earth lead. Similarly when reconnectingthe equipment it is necessaryto connect
the power lead or earth lead before connecting to the telecom network.
(NEW ZEALAND PTC 101)
This equipment rrlaynot necessarily provide for the effective hand-over of acall
to or from atelephone connected to the same line.
(NEW ZEALAND PTC211 )
The operation of this equipment on the same lines as telephones or other
equipment with audible warning devices or automatic ringdetectors will give rise
to bell tinkle or noise and may cause false tripping of the ring detector. Should
such aproblem occur, the user is not to contact Telecom faults service.
(NEW ZEALAND PTC211 )
Use of this device for monitoring telephone conversations is not permissible
under New Zealand law, unless:-
(a) At least one party of the conversation has given consent for its use, or,
(b) Use is authorised for Policeor Security Service applications.
Not all standard telephones and standard telephone answering machines will
respond to incoming ringing when connected to the extension socket of the
equipment.
(NEW ZEALAND PTC211 )

.
Cyour purchaseottheFO-135, andthank youfor choosing
Sharp!
The FO-I 35facsimile transceiver isG3compatible, the mostcommonly used
type offacsimile machinetoday. Inadditiontothe basicoperations ofsending
and receiving documents, it provides avariety of special features designed
to increase the range and power of your communication. These make it an
ideal tool for the office, no matter how big or small the scale of operation.
.
i

INTRODUCTION i
TABLE OF CONTENTS ii
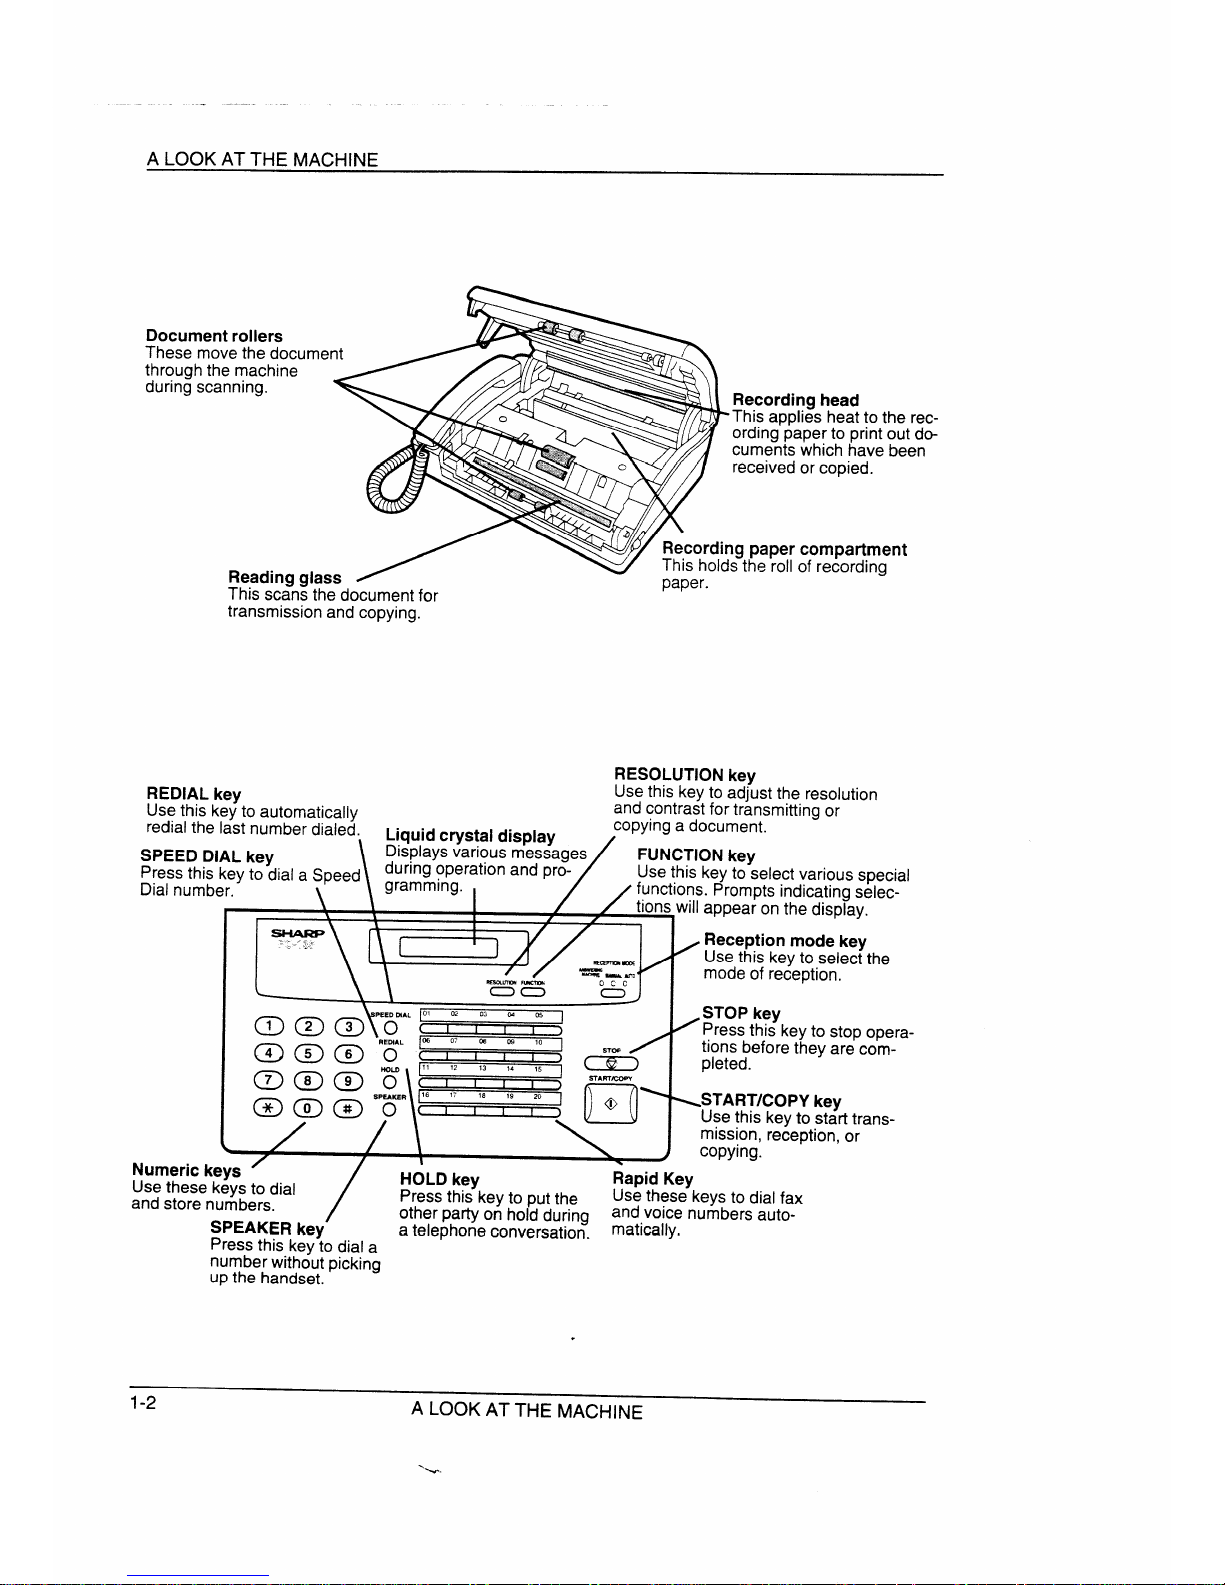
1. ALOOK AT THE MACHINE 1-1
2. INSTALLATION 2“1
SITE SELECTION . . . . . . . . . . . . . . . . . . . . . . . . . . . . . . . . . . . 2-1
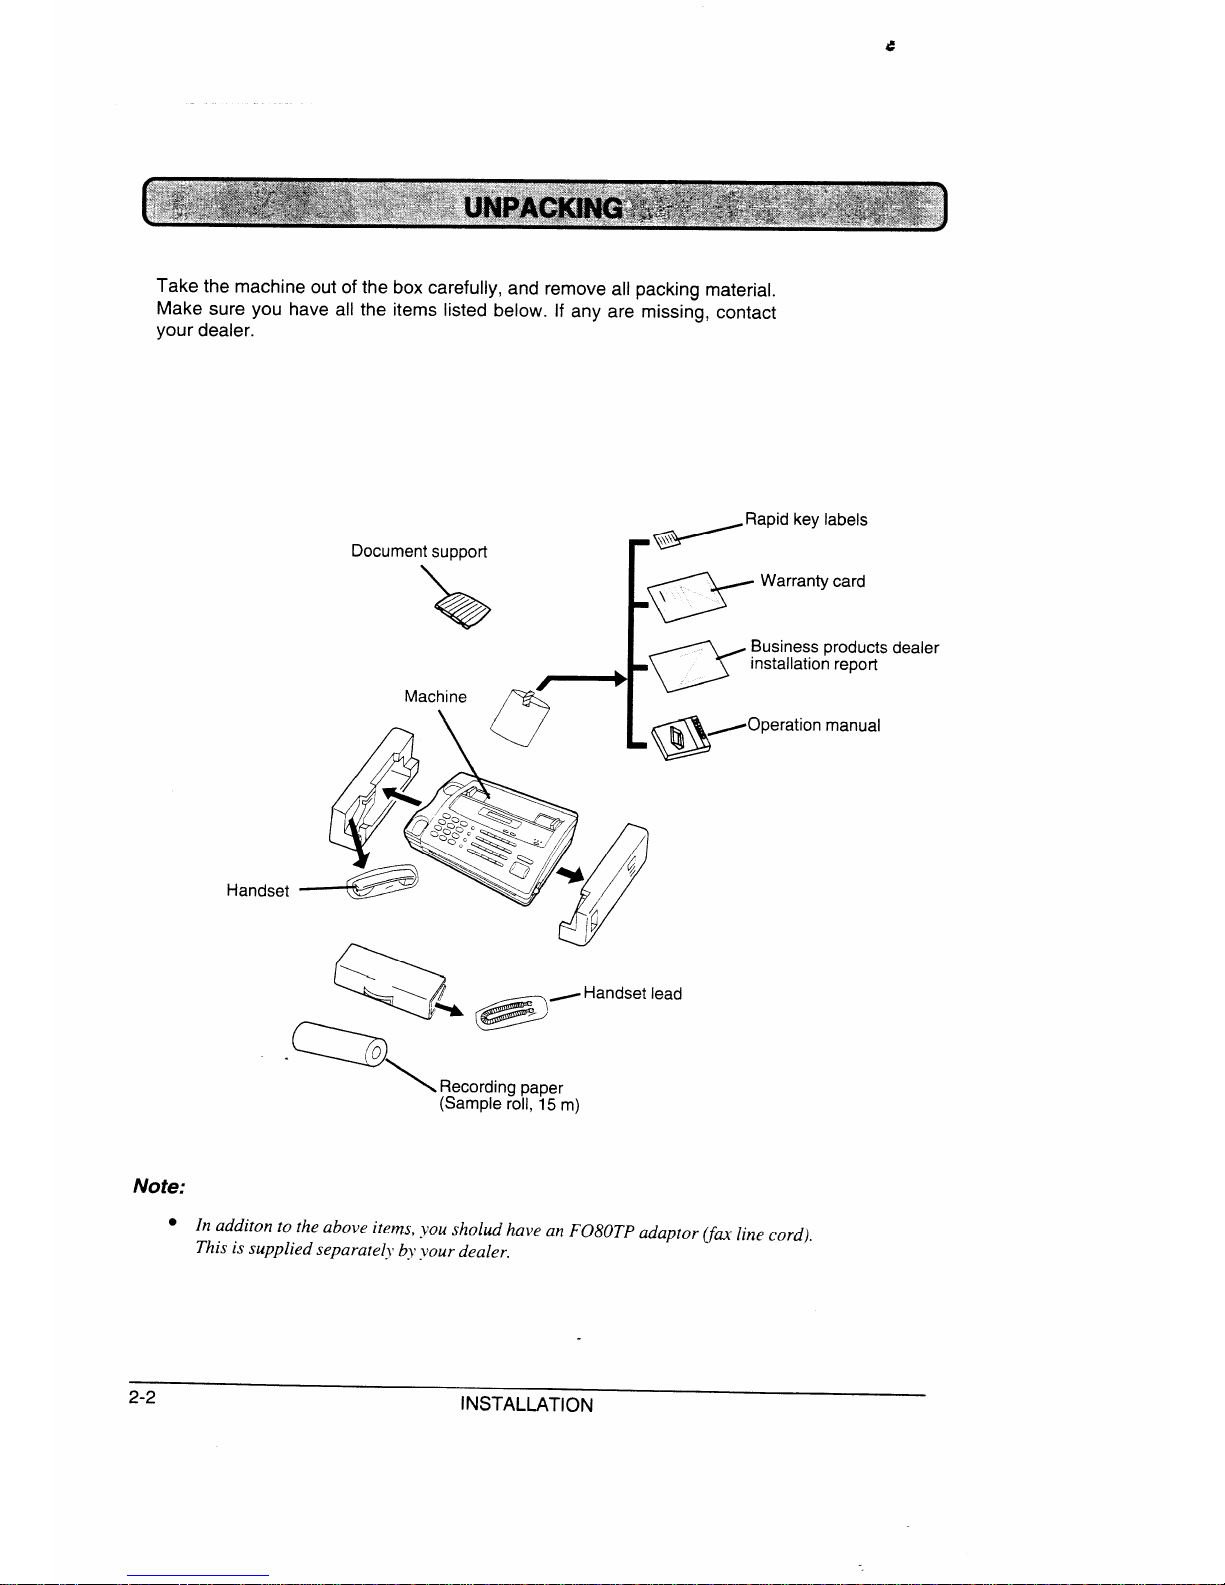
UNPACKING . . . . . . . . . . . . . . . . . . . . . . . . . . . . . . . . . . . . . . 2-2
ASSEMBLYANDCONNECTIONS . . . . . . . . . . . . . . . . . . . . . . . . . . 2-3
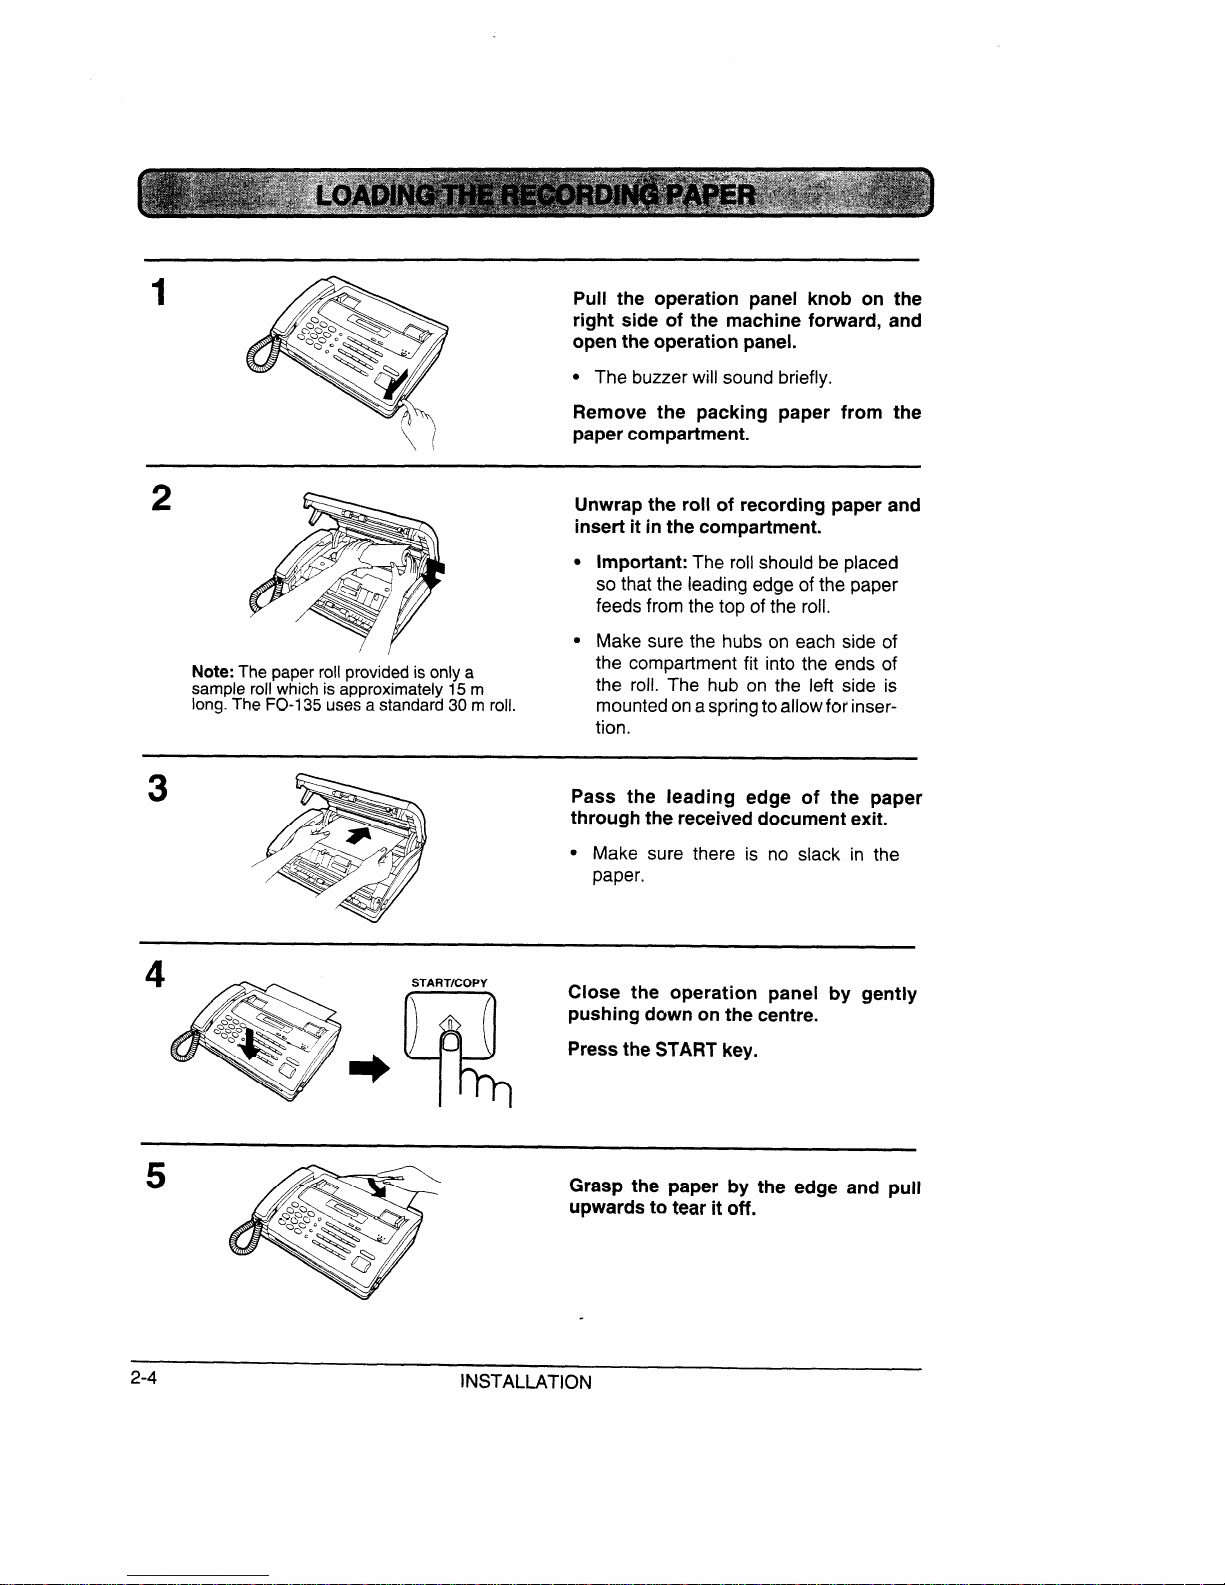
LOADINGTHE RECORDING PAPER . . . . . . . . . . . . . . . . . . . . . . . . . 2-4
3. INITIAL PROGRAMMING 3-1
ENTERING YOUR NAME AND FAX NUMBER . . . . . . . . . . . . . . . . . . . . 3-1
ENTERING LETTERS FOR NAMES . . . . . . . . . . . , . . . . . . . . . . . . . 3-2
SETTING THE DATE AND TIME . . . . . . . . . . . . . . . . . . . . . . . . . . . 3-3
STORING NUMBERS FOR AUTOMATIC DIALLING ........,........ 3-4
4. BASIC OPERATIONS 4-1
TRANSMISSION .................................... 4-1
RECEPTION .,......,............................. 4-8
COPYING . . . . . . . . . . . . . . . . . . . . . . . . . . . . . . . . . . . . . . . 4-Il
VOICE COMMUNICATIONS ,,,.,,,,,............,,.,.....4-12
5. USING YOUR FAX WITH OTHER DEVICES 5-1
ANSWERING MACHINE . , . . . . . . . . . . . . . . . , . . . . . . . . . . . . . . 5-1
EXTENSION TELEPHONE ...........,.................. 5-7
6. OPTIONAL SETTINGS 4-1
7. PRINTING OUT REPORTS AND LISTS 7-1
8. USER MAINTENANCE 8-1
RECORDING PAPER . . . . . . . . . . . . . . . . . . . . , . . . . . . . . . . . . 8-1
CLEANING THE MACHINE ...............m. . , . . . , . , . . . . . 8-2
9. TROUBLESHOOTING 9-1
PROBLEMS AND SOLUTIONS ....,.................,..... 9-1
MESSAGES AND SIGNALS . . . . . . . . . . . . . . . , . . . . , . . . . . . . . . 9-3
CLEARING PAPER JAMS . . . . . . . . . . . . . . . . . . . . . . . . . . . . . . . 9-4
10. SPECIFICATIONS 10-1
QUICK REFERENCE GUIDE Quick-i
INDEX Index-i
.
ii

.
A
Whentransmittingorcopyinga
document,settheseguidesto
Use handset
t
O
\
t
d
/
n
d
EtT
etT
ait
ALOOK AT THE MACHINE 1-1

ALOOK AT THE MACHINE
tc
R
at
a
ao
gf
\\fI
[\ [ IJ
.0
L>
~
m m m 5
@m m
/ I t
‘
/
natcm
a
Up h
.
ALOOK AT THE MACHINE

Take the following points into consideration when selecting asite for your
FO-I 35:
Enviro
●
●
●
●
●
The machine must be installed on a level surface.
Keep the machine away from air conditioners, heaters, direct sunlight, and dust.
Provide easy access to the front, back, and sides of the machine. In particular,
keep the area in front of the machine clear, or the original document may jam as
it comes out after scanning.
The temperature should be between 5°and 35°C.
The humidity should be between 300/0and 85% (without condensation).
Electr
A230-240 V, 50 Hz, earthed (3-prong)AC outlet is required.
●Ieaio
ap
pts
Telepja
Astandard telephone jack must be located nearthe machine.
Ithmacimofracotawpl
If the machine is moved from acold to awarm place, it is possible that the
reading glass may mist up due to condensation, preventing proper scanning
of documents for transmission. To remove the mist, turn on the power and
wait approximately 2hours before usingthe machine.
INSTALLATION 2-1

Take the machine out of the box carefully, and remove all packing material.
Make sure you have all the items listed below. If any are missing, contact
your dealer.
oi
a@Zmanual
Q
\\
R
Not
●s s . .
INSTALLATION

1A,->
-<, ‘
:the power cord into a230-240 V,
w’ ‘~
‘<:.
. . grounded (3-prong) AC outlet.
Press the power switch to turn on the
1~, >- power.
2
3/Connectthe handset cordto the handset
.\.u....7~9;
v,“
3
and the machine as shown.
-/ sTheendsofthe handsetcordareiden-
.e
‘& tical, so they will go into either jack.
(; :<~.
.,
.—.. Place the handset on the handset rest.
3
/. .
- - “
adaptor into the teie-
phone jack on the wall. Insert the small
modular plug which terminates the
adaptor line cord into the jack on the
backofthe machine marketedTEL.LINE.
m
Adjust the volume switches on the left
side of the machine:
cRINGINGVOLUME: Set the switch at
high (H), medium (M), or low (L) as
desired.
●SPEAKER VOLUME:
setting from high (H) to low (L) as
desired.
Set the mode of dialing with the DIAL
switch. Select “T”if you are on atouch-
tone line, or “P”ifyou are on apulsedial
(rotary) line.
“Be sureto makethe correctsetting, or
you will not be able to make acall.
~WARNING NOTICE: Forall units installed in NewZealand, only
;the Tsetting for tone dialling ispermitted, The Psetting for pulse
~dialling does not operate properly and must not be used.
5sSlide the hook-shaped ends of the
support onto the two studs on the rear
cf the machine as shown.
INSTALLATION 2-3

A
1Pull the operation panel knob on the
right side of the machine forward, and
open the operation panel.
“The buzzerwill sound briefly.
Remove the packing paper from the
Y
\
~
/paper compartment.
2
p a
am
am
Unwrap the roll of recording paper and
insert it in the compartment.
●Important: The roll should be placed
so that the leading edge of the paper
feeds from the top of the roll.
●Make sure the hubs on each side of
the cfit into the ends of
the roll. The hub on the left side is
mountedonaspringto allowfor inser-
tion.
3
/
Pass the leading edge of the paper
through the received document exit.
cMake sure there is no slack in the
paper.
4S
R
Close the operation panel by gently
&pushing down on the centre.
Press the START key.
*
Grasp the paper by the edge pull
upwards to tear it off.
2-4 INSTALLATION

Your name and fax number (called the “Sender’s name” and “Sender’s
number”) are used in several functions which the machine performs. In
particular, they are printed at the top of each page you transmit.
To give the machine your name and fax number, press the panel keys as
shown in the procedure below.
●fo
f
!
~Step ~Press these keys: IComments
1~;=O;a!
iOWNPASSCODESET.
I~
!
~I@~ ~ ~ ~ Ia
~a
(Example)~
I
~ ~ ~ @ @ @ ~o
I(~d
I
!
ST
n
7I@(
SI
~
INITIAL PROGRAMMING 3-1

To symbols during aname storing procedure, press the
panel keys as shown
a
below.
a
ar
n
I
1
.------
1
II
I
I01
I
I
.0
iI
I
I4
-------- .,.
o~
o~Cursor left
o
r
●s
e
●
Symbli
To abelow, the ‘*” key
rsymbol appears.
1
I
#+I
3-2 INITIAL PROGRAMMING

The date and time appear inthe display and in reports, and are printed at the
top of every page you transmit.
Set the date and time by pressing the keys on the operation panel as shown
below.
●a
a-.
III
1Day ~SUN !MON TUE WED ~THU IFRI ‘SAT ,,
IIII
~~Step IPress these keys: 1
~Comments ,
~1’:3- ~~Select
I
III
~I
I
]1 !
~~ 4!~ ~ I
(Example)~2
I5~@ @ (Examp”)~ I
2~
,
~E•Œ°6À•‘~ ~ ~ ~ ,(~2
III
I
~7,(Example)~aI
I
I
I
~8;am ~
(~-
I
I“
~@ @ (E.amPl’)~ -
I-SI
1
II
1
I‘D
i10 ~ + [~‘hec’ockwi”‘
SI
IExit.
I
INITIAL PROGRAMMING 3-3

(This section is not necessary for basic operation of the FO-135—if desired,
you can go directly to Chapter4, “Basicoperations”.)
Automatic Dialing is aquick and convenient way of dialing which is done by
either pressing aRapid Key (Rapid Key Dialing), or pressing the SPEED
DIAL key and entering a2-digit number (Speed Dialing). It can be used for
both fax transmissions and voice calls.
To useAutomatic Dialing (described in “Transmission” and “Voice commun-
ications” in Chapter 4), you must first store the full number in the FO-I 35 At
this time, youassign a2-digit Speed Dial numberto it, and you can also enter
aname (this appears in the display when the number is dialed). Up to 50
numbers can be stored.
●n
D
●i
a
ChaDialfolonum
The maximum number of digits which may be entered when storing a
telephone or fax number is20. If you needto store anumber which is longer
than 20 digits, use Chain Dialing.
Chain Dialingallows youto combinetwo or moreAutomatic Dialingnumbers,
or use an Automatic Dialing number followed by additional digits entered
manually with the numeric keys,to dial asingle number. In addition to being
convenient for storing long numbers, it allows you to store an area code or
access code as an Automatic Dialing number.
Forexample,tostorea26-digit numberforAutomatic Dialing,youwould need
to break it into two parts:
1.
2.
Storethe first 20digits intooneSpeed Dialnumber(“01”, forexample) usingthe storing
procedure which follows, and press”1” in Step 9on the following page to specify it as
aChain Dialing number (when dialing, this tells the machine to wait for the remainder
of the telephone number when you usethe Speed Dial number “01“).
Store the remaining 6digits into aseparate Speed Dial number (“02”, for example),
and this time press “2” in Step 9 on the following page to specify that it is not aChain
Dial number (this tells the machine that the final part of the number has been dialed).
In this way, you specify all parts of the number but the last as Chain Dial
numbers.
●
3-4 INITIAL PROGRAMMING

STORING NUMBERS FOR AUTOMATIC DIALING
●a
caa
t
a
●a
r
II ~tep ;Press these keys:
I
I
1’
,
il D
03
Comments 1
1
I
I
#1
!
I
1
a
I
II
ca~
I
I
,
I
a!
OS
4~
i
a/
INITIAL PROGRAMMING 3-5

STORING NUMBERS FOR AUTOMATIC DIALING
Step
1
2
3
4
5
6
Press these keys:
Fo
03
0
#
o2
S
“
Comments I
f,
I
Select
FAX~EL.#MODE.
Select I
I
the whichyouwantto ~,
clearusingthenumerickeys. 1’
I
I
I
4
press toexit.
make changes in anumber previously stored, repeat the storing proce-
dure. Select the code number for which you want to make changes in Step
andthen change the numberand/or namewhenthey appear inthe display
(Steps 5 and 7, respectively).
Numbersand lettersarechangedasdescribedin“Entering lettersfor names”
inthis chapter.
+A
a
p
c5
y.
3-6 INITIAL PROGRAMMING

d
lines are as follows:
Siawei
Thesize andweight ofdocumentswhichyoucanload
a
One sheet at atime: q1
!
I,
~]
i+b
I
xI
1
x
Several sheets at once:
I
I
-------
xx
—,
. .
I
f
1
●t i
dt
4
Othrestri
●Documents blue inkcannot betransmit-
ted, as the scanner does not recognisethese colours.
●Ink, glue, and correcting fluid on documents must bedry before they are transmit-
ted.
●All clips, staples, and pins mustbe removedfrom documentsbeforetransmission.
If these are not removed, they may damage the machine.
cDocuments whicharepatched,taped,torn,smallerthan the minimumsize,carbon
backed, or easily smudged should be photocopied, and the copy used for
transmission,
BASIC OPERATIONS 4-1

TRANSMISSION
Upto 10sheets can be placed in the feeder at one time (see “Transmittable
documents” at the beginning of this sectionfor allowed sizes). These will be
automatically fed into the machine starting from the sheet on the bottom.
●a
cd
●dca
t
d
1Adjustthedocument guides tothe width
of your document.
2~/,. .... Placethedocument face down and push
it gently into the document feeder. The
top edge of the document should enter
the machine first.
●The feeder will draw the leading edge
of the document into the machine.
SEND READY will appear in the
display.
3You can now either make resolution
and/or contrast settings as described in
the following section, or
party as described in the section, “Dial-
Iing and transmission”.
.
4-2 BASIC OPERATIONS

TRANSMISSION
If you want, you can adjust the resolution and contrast before sending a
document.
Resol
The FO-135 has 3resolution settings:
STANDARD: Use STANDARD for ordinary documents. This setting gives
you the fastest and most economical transmission.-
FINE: Use FINE for improved reproduction, especially with docu-
ments containing small letters or fine drawings.
HALF TONE: Use HALF TONE for photographs and illustrations. The
original will be reproduced in 16shades of grey.
If you do not make asetting, the machine will automatically send the
document in STANDARD. (The default setting can be changed to FINE by
adjusting User Switch l—see Chapter 6, “Optional settings”.)
●r r
ra
Cont
The contrast is normally set to AUTO, which means that the machine
automatically controls the contrast, but for very light documents you can
change the setting to DARK.
Maktsett
Pressthe RESOLUTION key one or more
times until the desired resolution and
Rcontrast settings appear in the display.
Thefirsttime you movethrough the list
of resolution settings, the contrast
setting AUTO will appear next to each
resolution setting. The second time
yoI,Imovethrough the list, the contrast
setting DARK will appear.
BASIC OPERATIONS 4-3

TRANSMISSION
Once you have loaded the document and made any desired transmission
settings, you are ready to dial the number of the receivingfax machine and
transmitthe document. There areseveralwaysof dialling,and youcan select
the one which best suits your needs.
NormDial
With Normal Dialing, you pick upthe handset (or press the SPEAKER key)
and dial as you would to make atelephone call. If the receiving machine is
set to receive faxes manually (this means that the receiving party first
answers your call vocally, and then presses their Start key to begin fax
reception), you can talk with them before sending the fax.
‘Wo‘p~ Pick up the handset or press the
SPEAKER key. Listen for the dial tone.
2Dial the number of the receiving
@@@ machine by pressing the numeric keys.
h
ma
ma
3
4
Wait for the connection. Depending on
thesettingofthe receiving machine, you
/’( \will either hear afacsimile reception
tone or the other person will answer.
/’ i% ●If the other party answers, ask them
to presstheir Start key (ifyou pressed
the SPEAKER key, pick up the
handset to speak with them). This
causes the receiving machine to
issue areception tone.
4S
R
Whenyou hearthe reception tone, press
the START/COPY key. Replace the
/‘( handset if you used it.
●Atthe end oftransmission, the buzzer
will sound briefly and the machinewill
-return to standby mode.
4-4 BASIC OPERATIONS
Table of contents
Other Sharp Fax Machine manuals