SXSTAR MG3-4U-X User manual

MG3-4U-X
使用说明书
USER MANUAL
安装前,请详细阅读安装说明书。
PLEASE READ INSTRUCTIONS & ASSOCIATED DRAWINGS BEFORE
INSTALLATION.

第1页
目录 INDEX
安装说明 INSTALLATION GUIDE
接线图 WIRING DIAGRAM
语言设置 LANGUAGE SETTING
归零校正 0KG CALIBRATION
调整 ADJUSTMENT
控制面板说明 CONTROL PANEL GUIDE
操控说明 OPERATION GUIDE
故障排除 TROUBLESHOOTING
组件名称
ACCESSORIES LIST
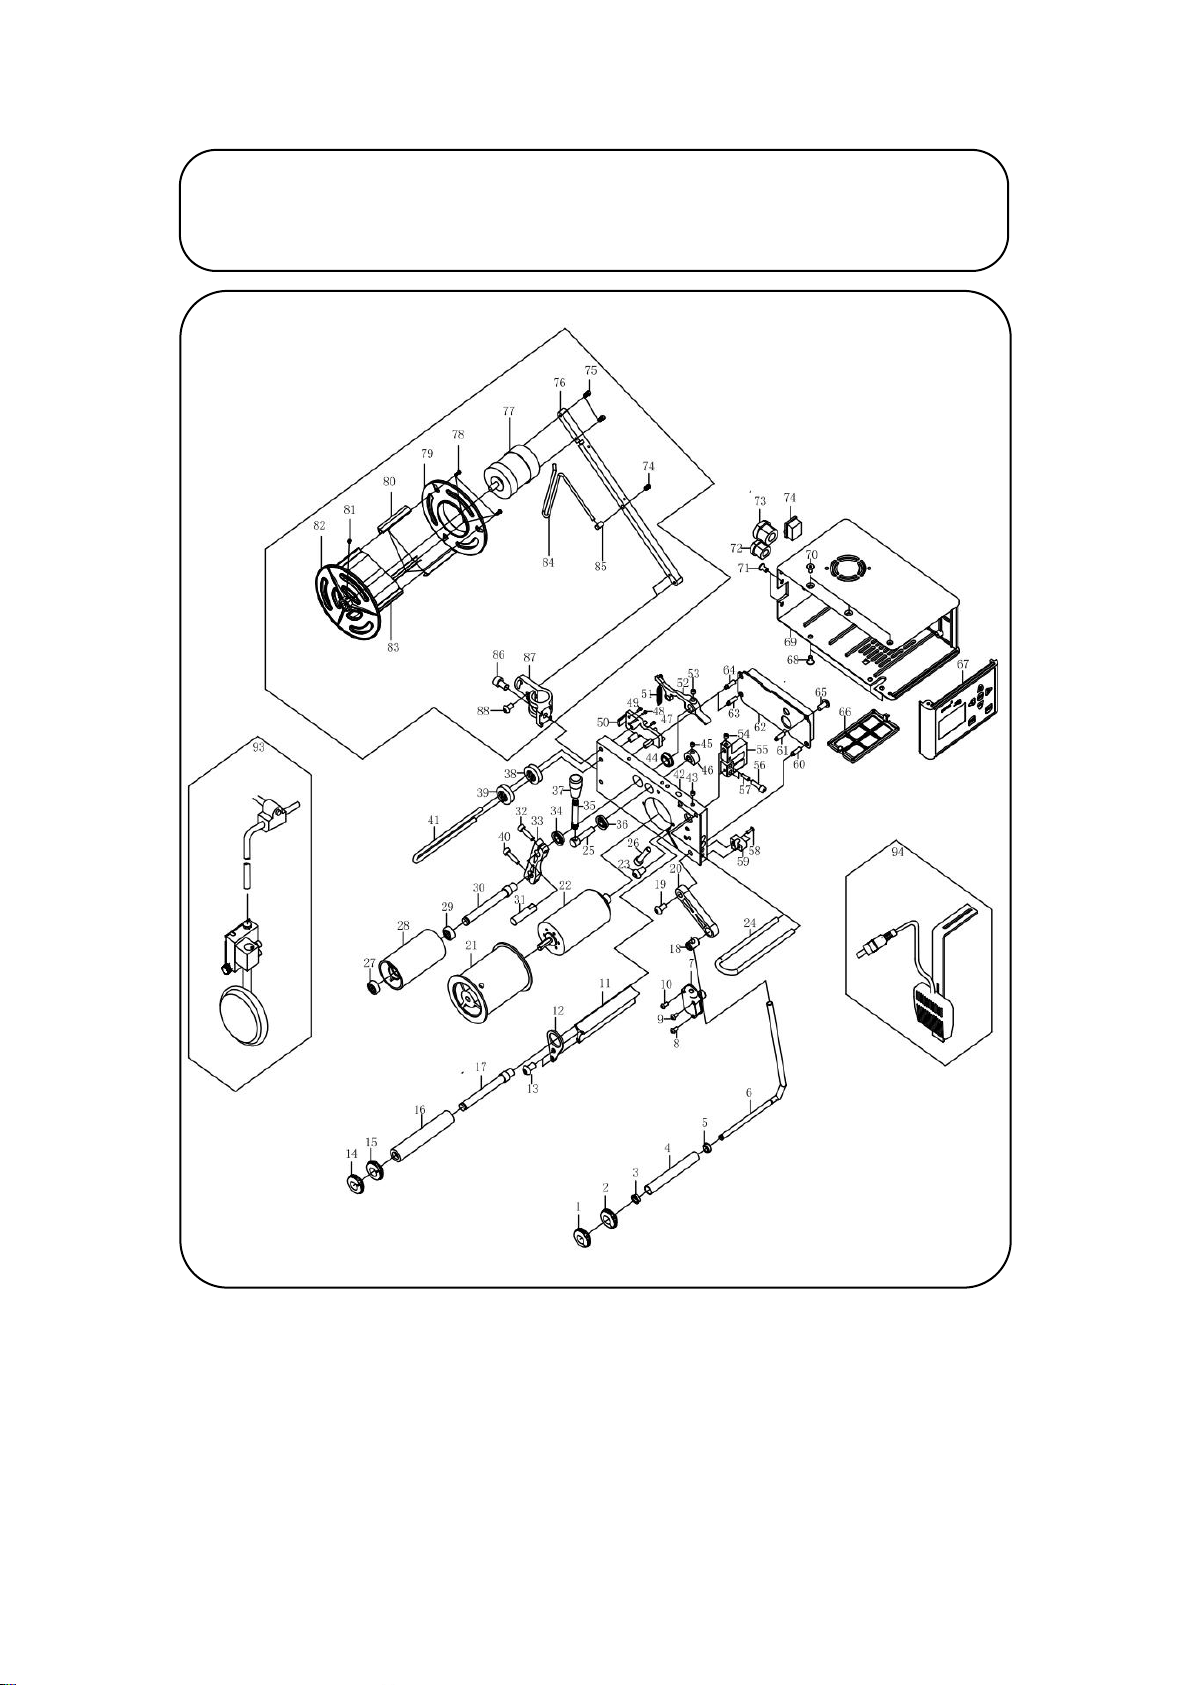
1.驱动组连结架 1.Joint 9.辅助轮 9.Auxiliary Roller
2.把手 2.Handle Bar 10.换段开关 10.Section Switching
3.导带杆 3.Holder 11.横杆 11.Arm
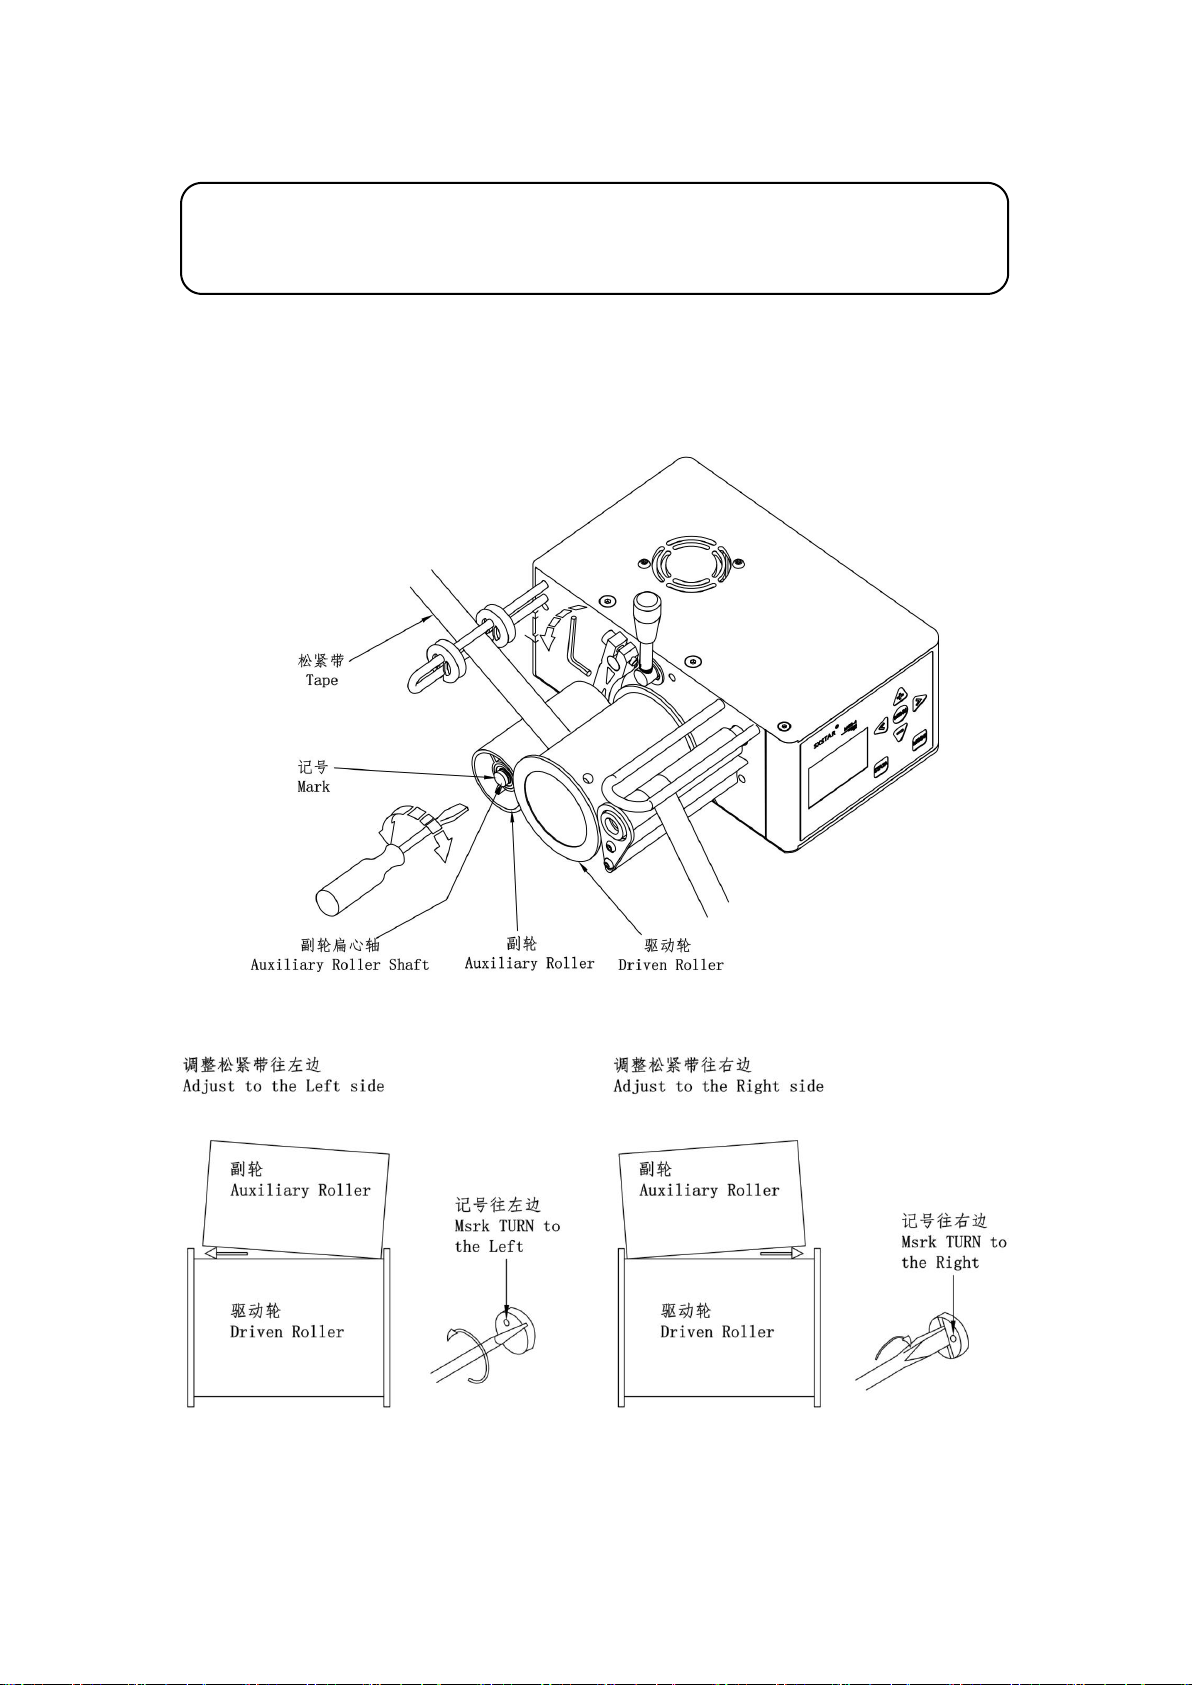
4.副轮 4.Auxiliary Roller 12.连结架 12.Joint Stand
5.副轮偏心轴 5.Auxiliary Roller Shaft 13.支柱 13.Holder
6.驱动轮 6.Driven Roller 14.夹座 14.Clamping Base
7.保护架 7.Secure Holder 15.控制面板 15.Control Panel
8.感应轮 8.Secure Roller

第2页
组合图
THE ASSEMBLE DIAGRAM

第3页
高度调整 HEIGHT
辅助杆调整 Auxiliary Guide

第4页
组合图
THE ASSEMBLE DIAGRAM
E9 无张力开关(选配)
Zero-tension switch (Option)
E9
E6-1 悬吊无张力开关(选配)
Suspensory zero-tension switch(option)
E6-2 连杆无张力开关(选配)
Linkage zero-tension switch(option)
UT 电动防打结装置
UT Electric Anti-knotting device
SY 数针编码器
SY Needle Counter
E8 膝部换段开关
Knee switch
E8
电源线
Power line

第5页
语言设置 LANGUAGE SETTING
操作指引:
Operation guide:
语言设置说明
LANGUAGE SETTING GUIDE
面板语言设置:面板有中文和英文两种语言供用户选择
Panel language setting:provide Chinese and English for select
注意:功能设置选项中→符号指示所选内容,通过单击菜单键可以进入相应设置页面
Noted: the →symbol indicated that which option is selected,user can enter the corresponding
settings mode by pressing the menu key
简 体 中 文
English
5. Status Data
6. Contrast Set
→7. Language Set
8. DataInit Set
5. 实时状态界面
6. 对比度界面
→7. 语言设定界面
8. 初始化界面
(长按 3秒)
(Keep press for 3 second)

第6页
以下情况需要做归零校正:
Always correct the calibration after the following instances:
1.本装置安装完成后
After installation.
尺寸出现异常不稳定时
If the device is feeding irregularly.
感应轮在无负载的状态(移开感应轮上的松紧带),在任何一段工程中,送料值在 980~990 之间,
(灵敏度必须设定在 99),而驱动轮未停止转动时
If the driven roller can not stop. In any section.The driven roller must stop when the tension
value to be adjusted between 980-990 and the sensitivity is set at 99 after remove the elastic
tape from the sensor bar (Make sure nothing Contact with Sensor Bar).
归零校正 0KG CALIBRATION
操作指引:
Operation guide:
压力系数 050
Pressure
0KG SET →050
1KG SET 600
压力系数 050
Pressure
0KG SET →054
1KG SET 600
→1. Beep Set
2. Zero Set
3. Current Set
4. Setector Set
→1. 报警设定界面
2. 归零设定界面
3. 电流设定界面
4. 带料设定界面
(长按 3秒)
(Keep press for 3 second)
注意:如果归零后,其数值不介于 10~90 之间,则表示装置有问题,需要检修
Notice:if the value is not between 10 ~ 90 after regular calibration.the device need to be repaired.
归零校正时应移开感应轮之松紧带(如下图 )
Please remove the elastic tape before calibration (Refer to the following figure).

第7页
松紧带左右偏差调整
Adjustment for tape sliding over the roller
调整 ADJUSTMENTS
副轮偏心轴可调整松紧带左右的偏差
Adjust Eccentric Shaft of the Auxiliary Roller can let the tape to go the Right or Left side.

第8页
注意:如果灵敏度值调得过小,虽不会有震荡现象,但会影响尺寸的准确度。因此在不震荡的情况下
值越大越好
Notice:If the value is too less. It will effect the accuracy. Therefore, the value is better
with larger without vibration
灵敏度调整说明:车缝时驱动轮及松紧带发生前后颤动不停时(如图 2),需适当调整灵敏度值,每
段工程均可调整,
边调灵敏度、边用手拉松紧带,直到无震荡为止(如图 3)(灵敏度值从 00-99,出厂设定值为↓90)
Sensitivity adjustment: If the driven roller and elastic occur lasting vibration forward
and backward while sewing.(Adjustable from 0-99. The default setting is 90) the tape must
be pulled manually while the value is being adjusted.This allows you to feel if there is
any vibration occurring(please refer to Figure 2 & Figure 3).
调整 ADJUSTMENTS
图3调整后
Figure 3 After adjust
图2调整前
Figure 2 Before adjust
段值:4(→1)780
灵敏度:90
松带值:980
针数:000 工程:A
段值:Set-no
灵敏度:Sensitivity
松带值:Free tape
针数:Pin 工程:mode
段值:4(→1)780
灵敏度:80
松带值:980
针数:000 工程:A
操作指引:
Operation guide:

第9页
零件图
PARTS LIST FOR MG3-4U SERIES

第10 页
零件图
PARTS LIST FOR MG3-4U SERIES
95
安装支架(标配)
Installation holder ( standard )
94
E8 膝部换段开关(标配)
Knee switch ( standard )
93
E9 无张力开关(标配)
Zero-tension switch ( standard )
选配性配件
OPTIONAL PARTS
97
E6-1 悬吊
无张力开
关(选配)
Suspensory
zero-tension
switch(optional)
E6-2 连杆
无张力开
关(选配)
Linkage
zero-tension
switch(optional)
96
计数器(选配)
SY Needle Counter ( Optional )
99
E10 缝纫机导带支架(选配)
Zigzag machine tape
guiding holder(Optional)
98
E11 缝纫机导带支架(选配)
Interlock machine tape guiding holder(optional)

第11 页
视窗及按键说明 (参照图 1):
Control panel instructions (refer to figure 1) :
①工程段数量:指示当前工程组所包含的有效工程段数量
Total number of section: Indicate that how many section is available in a program
②当前工程段号:指示当前正常使用的工程段号
Current section number: Indicate that which section is using
③松紧度设定:显示当前工程段的松紧度设定值,有效范围 1~999
Tension value: The current section tension value,it’s free for set from 1 to 999
④灵敏度:显示灵敏度设定值,有效范围 1~99
Sensitivity value: Indicates the sensitivity which you have set from 1 to 99
⑤松带值:显示松带设定值,有效范围 1~980
Free tape: Indicates the free tape value from 1 ~ 980
⑥针数:显示当前工程段的针数设定值,用于自动换段,最多针数 999 针
Pin / Stitch counting value: Show the stitch counting value of current section
⑦工程组:显示当前工程组编号
Mode / Program number: Indicate that which program number is using
⑧启动键:进入车缝模式用
Start key: Push start key to normal sewing operation
⑨模式键:用于选择工程组,共 12 组工程记忆可供用户选择
Mode key : Use this key to memorize up to 12 different program from A to Z
⑩菜单键:用于进入工程参数设置或系统功能参数设置
Menu key: Used for enter project parameter setting or system parameter setting
⑪左移键:用于选择参数
Left shift key: Used for parameter select
⑫右移键:用于选择参数
Right shift key: Used for parameter select
⑬加键:用于参数数值调节
Addition key: Used for parameter value modify
⑭减键:用于参数数值调节
Subtract key: Used for parameter value modify
控制面板说明 CONTROL PANEL GUIDE
图1
Figure 1
4

第12 页
针数设定说明:
STITCH SETTING GUIDE:
针数计数功能用于自动换段,该功能需要搭配数针器使用,如不需要自动换段功能,在针数设定被
选中时,通过菜单键对针数功能进行开关操作(↓符号用于指示针数计数功能开关状态)
Stitch counting function is used for auto-section change(optional stitch counter required),it can be turn on
or turn off by menu key when stitch counting value is selected.( ↓flag indicates the stitch counting
function switch status)
操控说明 OPERATION GUIDE
段值:4(→1)780
灵敏度:80
松带值:980
针数:000 工程:A
段值:3(→1)780
灵敏度:80
松带值:980
针数:000 工程:A
段值:Set-no
灵敏度:sensitivity
松带值:Free tape
针数:Pin 工程:mode
操作指引:
Operation guide:
用户可按需求设置工程段数量
To set the total number of section according to actual usage
段值:4(→1)780
灵敏度:80
松带值:980
针数:020↓ 工程:A
段值:Set-no
灵敏度:sensitivity
松带值:Free tape
针数:Pin 工程:mode
段值:4(→1)780
灵敏度:80
松带值:980
针数:000 工程:A
操作指引:
Operation guide:

第13 页
操控说明 OPERATION GUIDE
松带值操作说明
FREE TAPE OPERATION
松带值的设定:配合不同的松紧带,需要设定不同的值,否则值太多会造成松紧带太松而掉落,反
之值太少使得松紧带太紧而移出布料(出厂设置:980)
Free tape operation guide : the different tape should use the different setting .otherwise,the free tape
Function may cause too tight or too loose(the default is 980)
注意:此功能需要配合无张力开关操作使用
NOTICE:This function is used with Zero-tension switch
例1:设定松带功能
Example 1:Setting free tape function
段值:4(→1)780
灵敏度:80
松带值:980
针数:000 工程:A
段值:Set-no
灵敏度:sensitivity
松带值:Free tape
针数:Pin 工程:mode
段值:4(→1)780
灵敏度:80
松带值:985
针数:000 工程:A
操作指引:
Operation guide:

第14 页
操控说明 OPERATION GUIDE
工程记忆操作说明:
MODE OPERATION:
设备提供 12 组不同的工程组可选,用户可快速选择事先存储的工程组,无需重复设定
Provide 12 different program memory for select,user can rapidly switch the program which
Is already set,not necessary to re-set the program again.
段值:Set-no
灵敏度:sensitivity
松带值:Free tape
针数:Pin 工程:mode
段值:4(→1)800
灵敏度:80
松带值:980
针数:000 工程:B
段值:4(→1)780
灵敏度:80
松带值:980
针数:000 工程:A
操作指引:
Operation guide:
例2:更换工程组,由工程组 A切换到工程组 B
Example 2: switch the program A to program B
工程 B
Program B
工程 A
Program A

第15 页
操控说明 OPERATION GUIDE
料值送料值调整说明:
FEED VALUE ADJUSTMENT GUIDE:
送料值小
Feed value lower
送料值大
Feed value higher
段值:1(→1)750
灵敏度:80
松带值:980
针数:000 工程:A
段值:1(→1)780
灵敏度:80
松带值:980
针数:000 工程:A
段值:Set-no
灵敏度:sensitivity
松带值:Free tape
针数:Pin 工程:mode
例3:单段工程
Example 3:Single section
操作指引:
Operation guide:

第16 页
操控说明 OPERATION GUIDE
例4:4段工程设定(手动换段)
Example 4:Four section setting (section change by manual)
操作指引:
Operation guide:
段值:4(→1)750
灵敏度:80
松带值:980
针数:000 工程:A
段值:4(→3)735
灵敏度:80
松带值:980
针数:000 工程:A
段值:4(→2)680
灵敏度:80
松带值:980
针数:000 工程:A
段值:4(→4)750
灵敏度:80
松带值:980
针数:000 工程:A
段值:4(→4)726
灵敏度:80
松带值:980
针数:000 工程:A
段值:4(→3)750
灵敏度:80
松带值:980
针数:000 工程:A
段值:4(→2)750
灵敏度:80
松带值:980
针数:000 工程:A
段值:Set-no
灵敏度:sensitivity
松带值:Free tape
针数:
Pin 工程:
mode
段值:4(→1)750
灵敏度:80
松带值:980
针数:000 工程:A

第17 页
操控说明 OPERATION GUIDE
例5:1段和 2段为自动换段(需要搭配数针器)
Example 5:Section 1 and 2 are auto-section change(optional stitch counter required)
操作指引:
Operation guide:
段值:3(→3)700
灵敏度:80
松带值:980
针数:000↓ 工程:A
段值:3(→1)750
灵敏度:80
松带值:980
针数:100↓ 工程:A
段值:3(→3)735
灵敏度:80
松带值:980
针数:000↓ 工程:A
段值:3(→2)680
灵敏度:80
松带值:980
针数:000↓ 工程:A
段值:3(→2)700
灵敏度:80
松带值:980
针数:000↓ 工程:A
段值:3(→2)680
灵敏度:80
松带值:980
针数:120↓ 工程:A
段值:Set-no
灵敏度:sensitivity
松带值:Free tape
针数:Pin 工程:mode
段值:3(→1)750
灵敏度:80
松带值:980
针数:000 工程:A

第18 页
故障排除 TROUBLESHOOTING
问题现象
Symptom
原因
Cause
对策
Solution
送带机异常振动
Abnormal vibration
1.支架各固定螺丝松弛
2.灵敏度值过高
1.Fixed screw loosen
2.The value of Sensitivity is too high
1.上紧松弛的螺丝
2.降低灵敏度值
1.Check and Tighten the screws
2.Lower the value of sensitivity
送带数值 999 仍然过紧
999 still too tight
1.感应杆有异物接触碰撞
2.感应值不在正常范围
1.Something contact with the sensor bar
2.The sensor is not at the working range
1.请将异物移除
2.参照归零校正,如果不在 10-90 范围内,
通知维修人员进行维修
1.Remove the irrelevant object
2.Redo the 0kg calibration.Call the technician to
maintain if the value is not between 10-90
送带数值 001 仍然过松
001 still too loose
送带机无动作
No signal
1.电源未接妥
2.线路系统断路
3.控制系统故障
1.power is not connected properly
2.Connected line is break
3.Electronic control system error
1.参考接线图接好电源
2.检查各线路插座与插头接角是否松脱
3.通知维修人员进行维修
1.Refer to wiring diagram connecting the power
2.Check the pin of connecting plug or socket are
not close
3.Call the technician to maintain
荧幕不显示
Blank panel
面板故障
Panel out of order
通知维修人员进行维修
Call the technician to maintain
模式数值无法记忆
Cannot memorized the mode
记忆体故障
Memory out of order
通知维修人员进行维修
Call the technician to maintain
启动后,松紧带无法
回拉至所设计的松紧带
After turn on the power,
The elastic tape can not
Back to reach the setting
tension
无张力开关
动作不正常
Switcher of Free Tape is not working
Properly Un-plug the Switches of Free Tape
请拆下无张力开关的电源插头后,若可正常回拉
则表示:
1.无张力开关位置不良,应调整
2.无张力开关故障,通知维修人员维修
If the elastic tape can pull back normally,
it means:
1.The position of Switches if Free Tape is not in
good position,Please re-adjust
2.The Switches of Free Tape is out of order,
call the technician to maintain
车缝不准确
Unstable Elastic
Size Control
1.进带过程不流畅:
1-1.限宽环太宅造成送带过程产生阻力
1-2.车缝时松紧带与车头或其他物体接触产生摩擦
1.Un-smooth feeding path way for the Tape:
1-1.The width of Elastic Guide Rings for the Tape is too narrow to
feed the tape
1-2.The Elastic Tape contacts to the Machine Head or other
obstacle which causes friction
1-1 无压脚导引靠边器及压脚上之限位装置均需要调整
略宽松于松紧带(注:如因此造成车缝时松紧带左右移
位时,请调整限宽环的正确位置)
1-2 调整辅助杆,将所有松紧带隔离所有接触的车头或
物体
1-1.Adjust the proper width of All Guide include
on the Pressure Foot(P.S. Pls.Re-location of Elastic
Guide Rings,if the Tape is sliding to the right or
left irregularly)
1-2.Use Auxiliary Roller to prevent the from
contacting the machine or other obstacle
2.灵敏度调整不当
3.缝制员手势熟练度及布料裁剪尺寸不均
2.Improper Sensitivity Setting
3.Unskilled operator and Irregularly cutting
2.依松紧带材质的伸缩性调整灵敏度,伸缩度越大灵敏
度调整需越高,但如果调太高灵敏度时会产生主机颤动
不止,而太多则会反应延缓产品尺寸的准确度
3.缝制员在车缝过程中,应保持手势给予布料一致的压
力,不可忽松忽紧,且布料的裁剪尺寸要一致。
2.Pls.Re-setting the Sensitivity.More flexible tape
is with higher value.It will cause vibration,if the
value is too high.However,Lower value setting
may cause slow reaction and causes incorrect
tension
3.Operator must remain the same pressure to
handle the sewing material and the cutting must
be the same size
松紧带已经很松,但车缝
布料的效果仍然有缩皱无法平坦
Can not reach Flat sewing
(Some situation need Flat
sewing result)
因缝纫机的前差动齿,差动太多,送过多的布料
There is with too much differential Feed Ratio in order to feed too
much material
调整缝纫机差动齿轮与主动齿的差动比为同步(1:1)
Pls. Re-adjust the Differential Feed Ratio to
1: 1 range
Table of contents
Other SXSTAR Sewing Machine manuals