ADVERTENCIA:
PARA REDUClR EL R1ESGO DE ]INCENDIO O DE SHOCK ELECTR/ICO, NO EXPONGA
ESTE ARTEFACTO A LA LLUV]IA O LA HUMEDAD.
PRECAUCION
PRECAUCION: PARA RED1J(IR EL R[ESGO DE
SHOCK ELECTRK?O. NO QUITE LA CUBIERTA (O
LA 12M)A POSTERIOR). EL APARATO NO TtENE
ADENTRO PtEZAS Q1JE PUEDAN REPARARSE.
DEJE LA REPARACION AL PERSONAL DE
SERVIC ]O ( AL[FtCAI)O.
La llOta importante estfi co]ocada en ]a parle/rasera del gabinete.
ESTE SIMBOLO INDICA QUE EN ESTA
UNIDAD HAY VOLTAJE PEL[GROSO LO
CUAL CONST[TUYE UN R[ESGO DE
SHOCK ELECTRICO.
ESTE SIMBOLO INDICA QUE HAY
[NSTRUCC[ONES [MPORTAN ES DE
MANTENIM[ENTO Y OPERACION EN
LA LITERATURA QUE ACOMPAiqA A
ESTE ARTEFACTO.
IMPORTANTE PARA SU SEGURIDAD
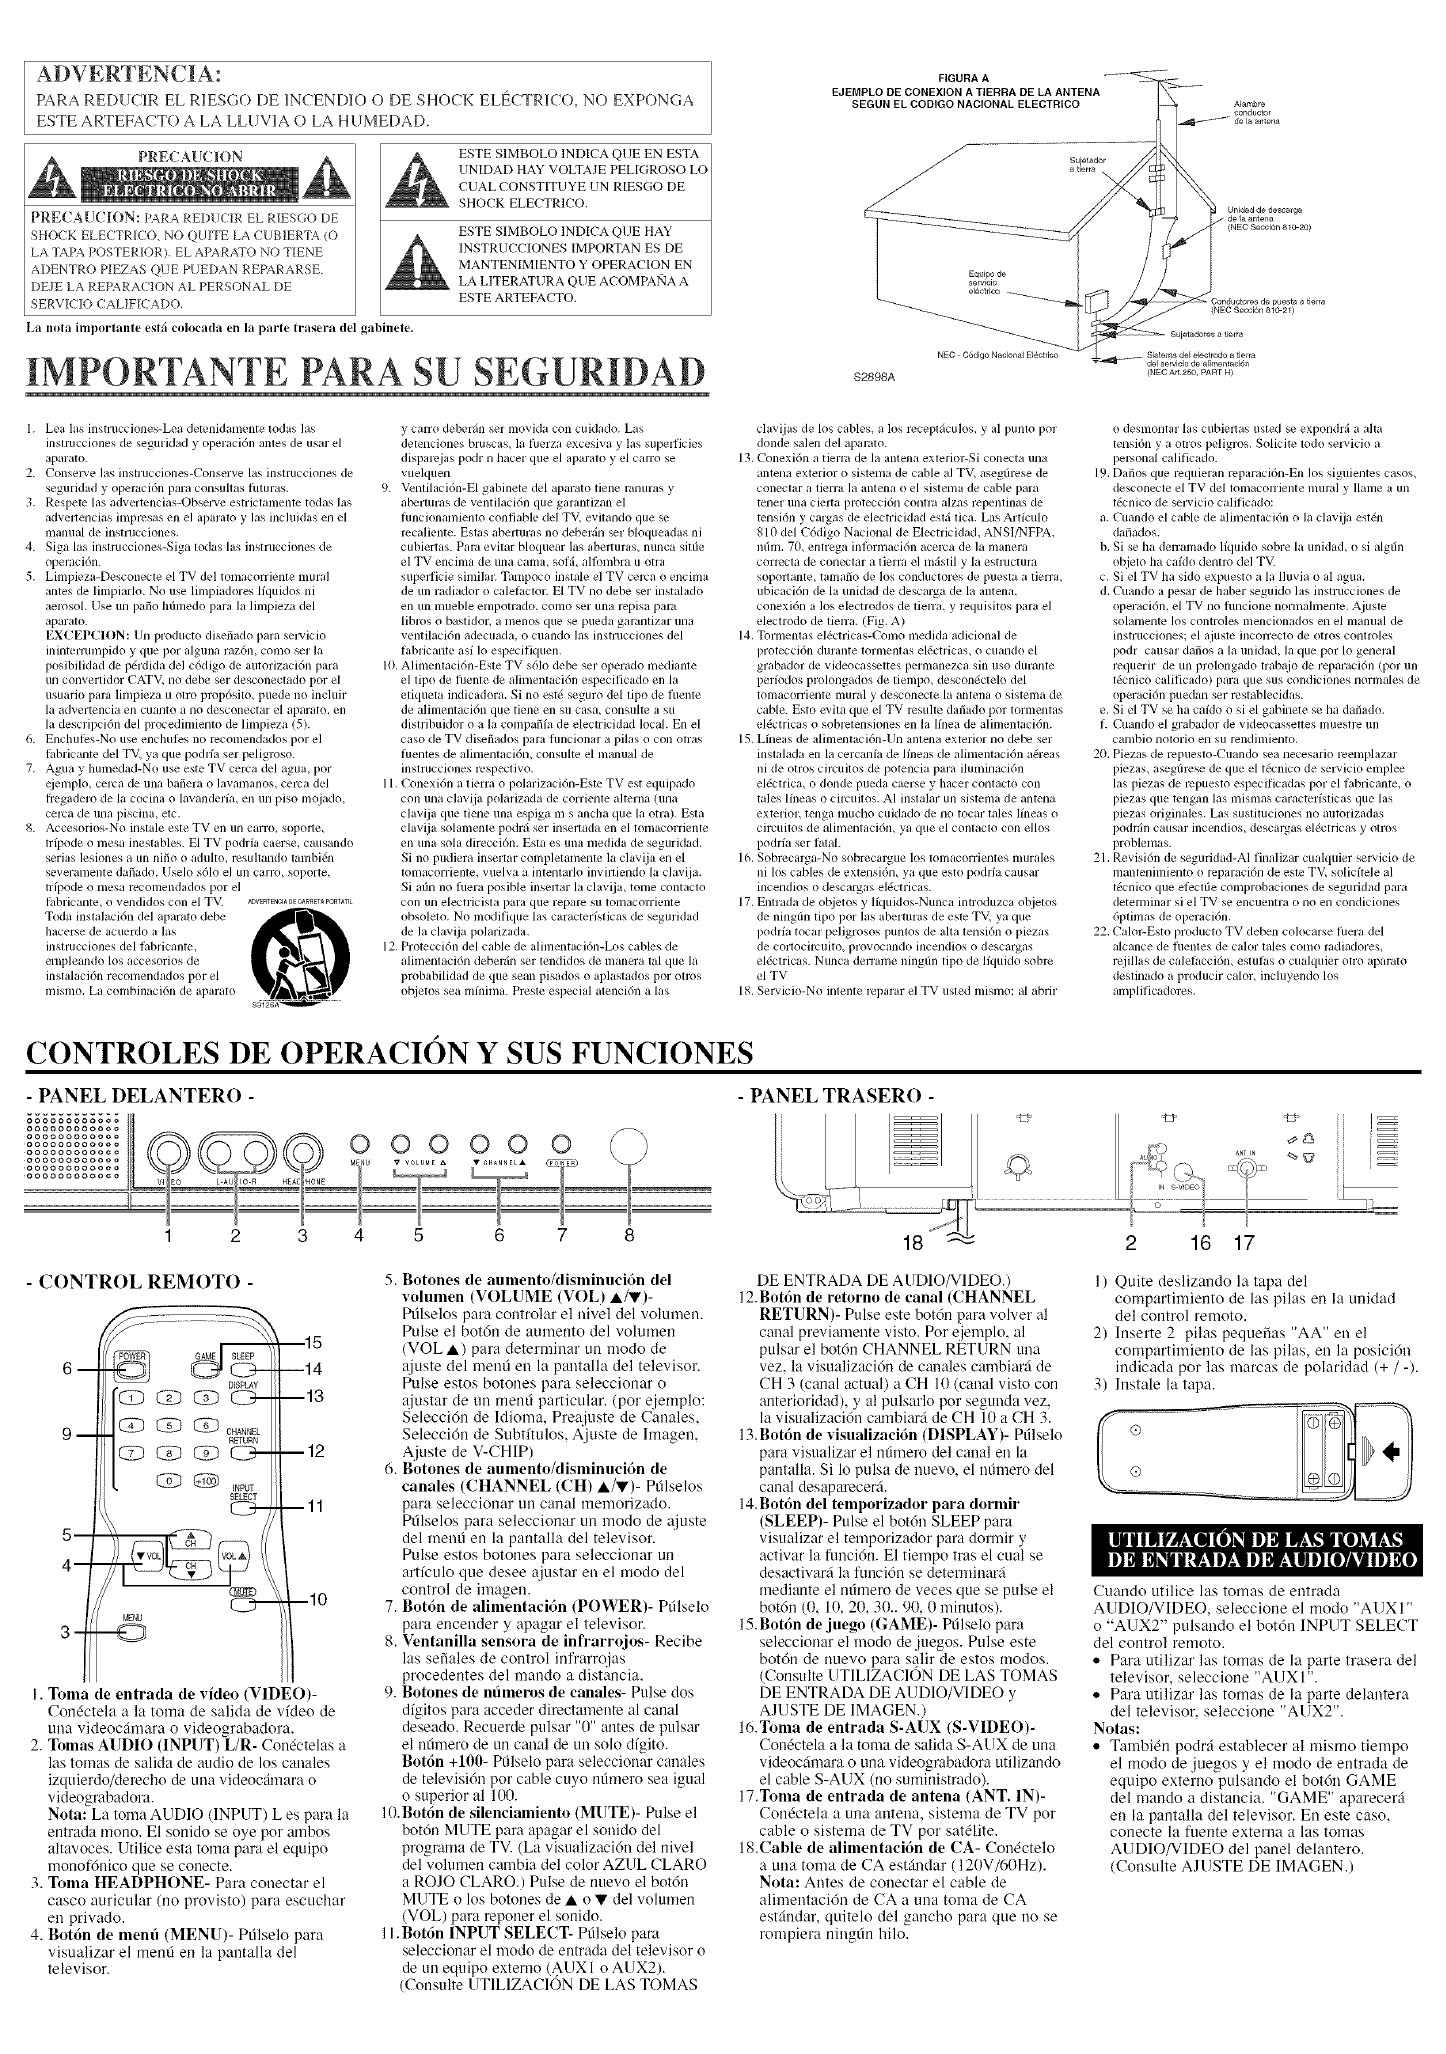
FIGURA A
EJEMPLO DE CONEXION ATIERRA DE LA ANTENA
SEGUN EL CODIGO NACIONAL ELECTRICO
Equipode
se_wclo
el_¢tfico
NEC C6digo N acion al EI6ct rico
$2898A
Alambre
condactor
de la amena
Unidad de descarga
(NEC Se_i6n 810 20)
1. Lea las instrucciones-Lea detelfidamenle todas las
insliucciones de seguiklad y operaci6n ames de usal el
apaiato.
2. Consei'_e las instrllcciones-Collseive las insllucciolleS de
seguiidad y opelaci6n paia consullas tutuias.
3. Respete las adveitencias-Obseiwe estriclamente todas las
advenencias m_pi'esas en el apalalo y las incluidas en el
mallual de instrucciones.
4. Siga las instmcciones-Siga lodas las inshucciones de
opelaci6n.
5. Limpieza-Desconecle el TV del tomaconiente muIal
antes de limpiarlo. No use limpiadores lfquidos ni
aeiosol. Use un patio hfimedo pala la limpieza del
aparato.
EXCEPCION: Un producto disefiado pare smwicio
inintemunpido y que por alguna mz6m como sel la
posibilidad de p&dida del c6digo de autorizacidn pare
un convertklor CATV. no debe sei desconectado poi el
usualio pala lmlpieza u o1io prop6silo_ puede no inclui_
la advertencia ell cuanto a no descollectai el aparalo, el/
la desclipcidn del procedimiento de limpieza (5).
6. Enchufes-No use enchul)s no iecomendados por el
b@icante del TV_ ya que podlfa seI peligroso.
7. Agua y humedad-No use este TV cmva del agua_ por
e.ielnplo_ celca de una bafieia olavamanos, ceic-a del
flegadelo de la cocina o lavaMelfa, en un piso mojado_
ceiva de una piscina_ elc.
8. Accesoiios-No instale este TV el/ un carro, sopolte_
tripode o nlesa inestables. El TV podiia caeise, causando
sei'ias lesiones a un nifio o adulto, lesullando lambi&_
severalllente dafiado. Uselo s61o el un CallO_ sopoite.
n fpode o mesa iecomendados pm el
Ihblicante_ ovendidos con el TV. _VEFaENOaDEOmRETAPORTATIL
Toda inslalacidn del aparalo debe
hacerse de acuerdo a las
insliucciones del b@icante,
elnpleando los accesorios de
instalaci6n reconleMados poi el
mismo. La colnbinaci6n de apamlo
y calTo debei';_ll seI nlovMa con cuidado. Las
detenciones biuscas_ la fuerza excesiva y las supedicies
dispaieias podr n hacm que el apalato y el cano se
vuelquen
9. Venlilaci6n-El gabinete del aparato tiene Ianmas y
abermms de ventilacidn que gaiantizan el
funcionamienlo confiable del TV_evilando que se
lecaliente. Eslas abeituras no debeifin ser bloqueadas ni
cubiertas. PaIa evitai bloqueai las abeltulas_ nunca sitfie
el TV encima de una cama_ sof£ alRnnbra u otla
supedicie similar. _Lmpoco instale el TV celva oencima
de un radiador o calefacloL El TV no debe sel instalado
ell tin ll/Ueble empotrado, como sei una iepisa pala
libms o bastidor, a nlenos que se pueda galantizaI una
ventilaci6n adecuada, o cuando las instrucciones del
fablicante asf Io especifiquen.
10. Alimentacidn-Este TV s61o debe sel operado mediante
el tipo de fllente de alimentaci6n especificado el/ la
etiqueta indicadora. Si no est_ seguro del tipo de fllente
de alimenlacidn que tielle ell SUcasa, COIISUl[e asu
disllibuklor o a la conlpafiia de electricidad local. En el
caso de TV disefiados paia flmcional a pilas o con otras
fuentes de almlentaci6n, consulte el manual de
illSII ucciones respeclivo.
1I. Conexi6n a lieIIa o polafizaci6n-Este TV est equipado
con una clav0a polalizada de C(nTienle alterna (una
cla%a que tiene una espiga m s ancha que la otra). Esla
cla%a solamenle podr4 ser inseltada en el tonlaconiente
en una sola direcci6n. Esta es una nledida de segmidad.
Si no pudiera inserlai complelamente la clav0a en el
lomacorriente, vuelva a intenlarlo inviniendo la clav0a.
Si afin no fllera posible inseltar la clav0a, tonle contaclo
con un electlicisla pala que repale su tomacoriienle
obsolelo. No modifique las camcterislicas de segulidad
de la cla_0a polarizada.
12. Protecci6n del cable de alimentaci6n-Los cables de
alimenlaci6n debelfin sm tendidos de manera lal que la
pmbabilklad de que sean pisados o aplastados por otlos
objetos sea mfnmla. Piesle especial alencidn a las
cla_iias de los cables, a los i'eceptficulos, y al punlo pm
donde salen del apalato.
13. Conexi6n a tiena de la antena exlelior-Si conecta una
antena exterior o sistenla de cable al TV_ asegfirese de
conectai a lieiTa la antena o el sistenla de cable paia
tenei ulla cielta ploteccidn toni121 alzas repenlinas de
tensi6n y caigas de electricidad eslfi lica. Las Aitfculo
810 del C6digo Nacional de Electiicidad. ANSI/NFPA.
ndm. 7(L entrega inRtrmaci6n acmva de la manera
corlecla de coneclai a liella el nlfistil y la estluctula
sopollanle_ tanlafio de los conductores de puesla a lieiTa_
ubicaci6n de la unklad de descarga de la antena.
conexi6n a los elecnodos de liena, y lequisitos pala el
electIodo de liena. (Fig. A)
14. Tormenlas el&tricas-Como medida adicional de
])iotecci611 dulante lornlenlas ek_ctlicas_ o cualldo el
grabador de videocasseltes pennanezca sin uso dulallte
pelfodos prolongados de liempo, descondctelo del
tomacorriente mural y desconecte la antena o sistema de
cable. Esto evita que el TV Iesulte dafiado por tormentas
eR!ctlicas o sobIetensiones en la lfi_ea de alimentacidn.
15. Lineas de alimentaci6n-Un antena extefioi no debe sei
instalada en la ceicanfa de lfneas de Mimentaci6n a_ieas
ni de otios cflcuitos de potencia pala iluininaci6n
eb3ctfica, o donde pueda caeise y hacei contacto con
tales lfneas o cficuitos. AI instalar un sistema de antena
extelioI, tenga illucho cuMado de no tocar tales lhleas o
cficuitos de alimentaci6n_ ya que el contacto con ellos
podlfa sei lalab
16. Sobrecalga-No sobiecalgue los tonlacorrielltes muiales
ni los cables de extensi6n_ ya que esto podlfa causar
incendios o descargas el&tiicas.
17. Entiada de o[zjetos y lhluklos-Nunca introduzca objetos
de ningdn tipo poi las abeituias de este TV_ ya que
podlfa tocai peligrosos puntos de alia tensi6n o piezas
de c()i'Iocilcuito_ provocalldo incelldios o descaigas
eldcliicas. Nunca dename nmgdn tipo de lfquido soble
el TV
I 8. Servicio-No inlente lepalar el TV usled mismo: al abi'ii"
o desmontar las cubiellas usted se expondifi a alia
tensi6n ya otios peligros. Solicite lodo servicio a
pei*onal calificado.
19. Dafios que IequieIan reparaci6n-En los siguientes casos_
desconecle el TV del loinaconiente mulal y Ilame a un
t&nico de seivici(t calificado:
a. CuaMo el cable de alimentaci6n o la clavija est&_
dafiados.
b. Si se ha denamado lhluido sobie la unidad, o si algfin
objelo ha caklo denim del TV.
c. Si el TV ha sido expuesto a la lluvia o al agua.
d. CuaMo a pesal de haber seguklo las insliucciones de
operacidn, el TV no fllncione nornmhnente. Ajusle
solanlente los controles nlellciollados en el manual de
instiucciones; el aiusle incorreclo de OtlOSconlloles
podI causal dafios a la unklad_ la que por 1ogenelal
lequeiiI de un prolongado tiab@l de reparaci6n (por un
t_cnico calificado) paia que sus condiciones nonnales de
operacidn puedan sei restablecidas.
e. Si el TV se ha caklo o si el gabinete se ha dafiado.
f. Cuando el grabador de videocassettes muestle un
cambio llOlOi'io ell SUlendinlielltO,
20. Piezas de repuesto-CuaMo sea necesalio i'eemplazal
piezas_ asegdrese de que el t&nico de seiwicio einplee
las piezas de repuesto especificadas poi el fabricante, o
piezas que tengan las inismas caiactelfsticas que las
piezas originales. Las sustimciones no autolizadas
podl2in causal incendios_ descalgas eldctlicas y olros
problenlas.
21. Revisidn de seguridad-Al finalizai cualquier selwicio de
mantenimiento o Iepaiaci6n de este TV_solicftele al
t_cnico que efectde comprobaciones de seguridad paia
detemlinal si el WV se encuenha ono en condiciones
6plimas de operaci6n.
22. Calor-Esto producto TV deben colocaise fuera del
alcance de fllenles de caloi tales COlllOIadiadores,
lejillas de calelhcci6n_ eslufas o cualquier otro apalato
deslinado a producir caloi_ incluyendo los
amplificadores.
CONTROLES DE OPERACION Y SUS FUNCIONES
0 0000 0
1 2 3 4 5
- PANEL TRASERO -
18 16 17
- CONTROL REMOTO -
6 m
9 m
4--
CD _ o.A..EL
RETURN
SgLET
C>-
(g_D
C3--
MENU
--15
--14
--13
m12
mll
ml0
1. Toma de entrada de video (VIDEO)-
Con4ctela a la toma de salida de vfdeo de
una videocfimara o videograbadora.
2. Tomas AUDIO (INPUT) L/R- Con&telas a
las tomas de salida de audio de los canales
izquierdo/derecho de una videocfimara o
videogmbadora.
Nota: La toma AUDIO (INPUT) L es para la
entrada mono. El sonido se oye por ambos
altavoces. Utilice esta toma para el equipo
InOllO[6IliCOque se conecte.
3. Toma HEADPHONE- Para couectar el
casco auricular (no provisto) para escuchar
en privado.
4. Bol6n de menfi (MENU)- Pdlselo para
visualizar el mend en la pantalla del
televisor.
5. Botones de aumento/disminuci6n del
volumen (VOLUME (VOL) •/V)-
Pfilselos para coutrolar el nivel del vokuneu.
Pulse el bot6n de aumento del volumen
(VOL _) para determinar un modo de
ajuste del meud eu la pantalla del televisor:
Pulse estos botones para seleccionar o
ajustar de un mend particular. (por ejemplo:
Selecci6n de Idioma, Preajuste de Canales,
Selecci6u de Subtftulos, Ajuste de hnageu,
Ajuste de V-CHIP)
6. Botones de aumento/disminucidn de
canales (CHANNEL (CH) •/•)- Pdlselos
para seleccionar un cHnal lnenlorizado.
Pdlselos para seleccionar un modo de ajuste
del meud en la pantalla del televisor.
Pulse estos botones para seleccionar un
artfeulo que desee ajustar en el modo del
coutrol de imageu.
7. Botdn de alimentacidn (POWER)- Pfilselo
para enceuder y apagar el televisor.
8. Ventanilla sensora de infrarrojos- Recibe
las sefiales de coutrol infrarrojas
procedentes del mando a distancia.
9. Botones de nfimel_s de eanales- Pulse dos
dfgitos para acceder directamente al canal
deseado. Recuerde pulsar "0" antes de pulsar
el nfimero de un canal de un solo dfgito.
Botdn +101!- Pfilselo para seleccionar canales
de televisi6n por cable cuyo nfimero sea igual
o superior al 100.
10.Bot6n de silenciamiento (MUTE)- Pulse el
bot6n MUTE pare apagar el souido del
progmma de TV. (La visualizacidn del nivel
del volumen cambia del color AZUL CLARO
a ROJO CLARO.) Pulse de nuevo el bot6n
MUTE o los botones de • o • del volumen
(VOL) para reponer el sonido.
1I. Botdn INPUT SELECT- Ptilselo para
seleccionar el modo de entrada del televisor o
de tin equipo externo (AUXI o AUX2).
(Consulte UTILIZACION DE LAS TOMAS
DE ENTRADA DE AUDIO/VIDEO.)
12.Bot6n de retorno de canal (CHANNEL
RETURN)- Pulse este botdn para volver al
caual previmnente visto. Por e.jemplo, al
pulsar' el botdn CHANNEL RETURN una
vez, la visualizacidn de carnies cambiarfi de
CH 3 (canal actual) a CH 10 (canal visto con
anterioridad), y al pulsarlo por segunda vez,
la visualizaci6n cambiarfi de CH 10 a CH 3.
13.Botdn de visualizacidn (DISPLAY)- Ptilselo
para visualizar el ntimero del canal en la
pantalla. Si 1opulsa de uuevo, el nfimero del
canal desaparecer£
14.Botdn del temporizador para dormir
(SLEEP)- Pulse el botdn SLEEP para
visualizar el temporizador para donnir y
activar la fimci6n. El tiempo tras el cual se
desactivarfi la funcidn se detenninarfi
mediante el nfimero de veces que se pulse el
bot6n (0, 10, 20, 3(t.. 90, 0 minutos).
15.Bot6n de juego (GAME)- Pdlselo para
seleccionar el modo de juegos. Pulse este
bot6n de nuevo para st!lir de estos modos.
(Consulte UTILIZACION DE LAS TOMAS
DE ENTRADA DE AUDIO/VIDEO y
AJUSTE DE IMAGEN.)
16.Toma de entrada N-AUX (S-VIDEO)-
Con4ctela a la toma de salkta S-AUX de una
videocfimara o una videograbadora utilizando
el cable S-AUX (no suministrado).
17.Toma de entrada de antena (ANT. IN)-
Con4ctela a una antena, sistema de TV pot
cable o sistema de TV por sat41ite.
18.Cable de alimentaci6n de CA- Con6ctelo
a una toma de CA est_ndar (120V/60Hz).
Nora: Antes de couectar el cable de
alimentaci6n de CA a una toma de CA
estfindar, quitelo del gancho para que no se
rompiera ningdn hiM.
1) Quite deslizando la tapa del
compartimiento de las pilas en la unidad
del control remoto.
2) lnserte 2 pilas pequefias "AA" en el
compartflniento de las pilas, en la posici6u
indicada por las marcas de polaridad (+ /-).
3) lnstale la tapa.
Cuando utilice las tomas de entmda
AUDIO/VIDEO, seleccione el modo "AUX 1"
o "AUX2" pulsando el bot6n INPUT SELECT
del control remoto.
• Para utilizar las tomas de la parte trasera del
televisor, seleccione "AUX l".
• Para utilizar las tomas de la parte delautera
del televisor, seleccione "AUX2".
Notas:
• Tambi@ podrfi establecer al mismo tiempo
el modo de juegos y el modo de entrada de
equipo externo pulsando el bot6n GAME
del mando a distaucia. "GAME" aparecerfi
en la pantalla del televisor. En este caso,
conecte la fuente externa a las tomas
AUDIO/VIDEO del panel delantero.
(Cousulte AJUSTE DE IMAGEN.)