TachoControl DATA TCD-Download BoxGPS/Data User manual

Einbauanleitung/Manual DE/EN
TCD Download Web +++ Ortung + Daten / position + data 990 004 000

Seite 1 von 13 Stand 01.2021
Einbauanleitung/Instruction manual
TCD Download Web +++ Art. Nr. 990 004 000
Geeignet ab Fahrtenschreiber Type:
Continental DTCO 1381 V1.4
Stoneridge SE 5000 7.4

Seite 2 von 13 Stand 01.2021
Lieferumfang/Delivery:
1. TCD-Download
BoxGPS/Data
2. Kabel für
Anschluss Stecker
rot C f. Box
3. EU SIM
4. Antenne
5. Single Company
Card Manager
Software
Optional:
CAN Krokodil Anschluss Art.Nr. 005000504
Chipkartenleser Art. Nr. 014001118

Seite 3 von 13 Stand 01.2021
Installation:
Stromanschluss - Interne Batterie anschließen:
Power connection - Connect internal battery
In der Box ist eine Batterie verbaut. Diese Batterie muss vor der
Installation im Fahrzeug in der GPS-Box angeschlossen werden. Die Box
lässt sich durch Lösen der Schraube öffnen.
A battery is installed in the GPS box. The battery must be connected in
the GPS box before installing it in the vehicle. The box can be opened
by loosening the screw.

Seite 4 von 13 Stand 01.2021
Schrauben Sie das Antennenkabel an die GPS-Box
Screw the antenna cable to the GPS-Box
LED Kontrolle grün/ blau
Control LED blue/ green

Seite 5 von 13 Stand 01.2021
Stromanschluss –Verbindungskabel/Power connection -
connection cable
Die Verbindungskabel für die GPS-Box und den Fahrtenschreiber haben
beidseitig Stecker. Die schwarzen Stecker sind bereits mit der GPS-Box
verbunden. Auf der Seite des roten Steckers für den Fahrtenschreiber
befinden sich drei Kabel (siehe Bild). Bitte diese über eine Sicherung an
die Stromversorgung des Fahrzeuges anschließen.
The connecting cables for the GPS box and the tachograph have
connectors on both sides. The black plugs are already connected to the
GPS box. There are three cables on the side of the red tachograph
connector (see picture). Please connect them to the vehicle's power
supply via a fuse.

Seite 6 von 13 Stand 01.2021
Stromanschluss Fahrtenscheiber/ Electricity connection
of the tachograph:
Das schwarze Kabel verbinden Sie mit der Buchse A6 (Minus, Klemme 31),
das rote Kabel mit der Buchse A1 (Plus, Klemme 30) und das weiße Kabel
mit der Buchse A3 (Zündung, Klemme 15) im Stecker in der Schnittstelle A,
siehe auch Abbildung oben.
Stecken Sie den roten C-Stecker auf der Rückseite des Tachographen in die
Schnittstellen C. Sollte die Buchse C bereits mit einem Stecker belegt sein,
haben Sie folgende Möglichkeiten:
1. Kabel können mit bestehendem C-Stecker verbunden werden
2. Y-Kabel C verwenden und beide Stecker belassen

Seite 7 von 13 Stand 01.2021
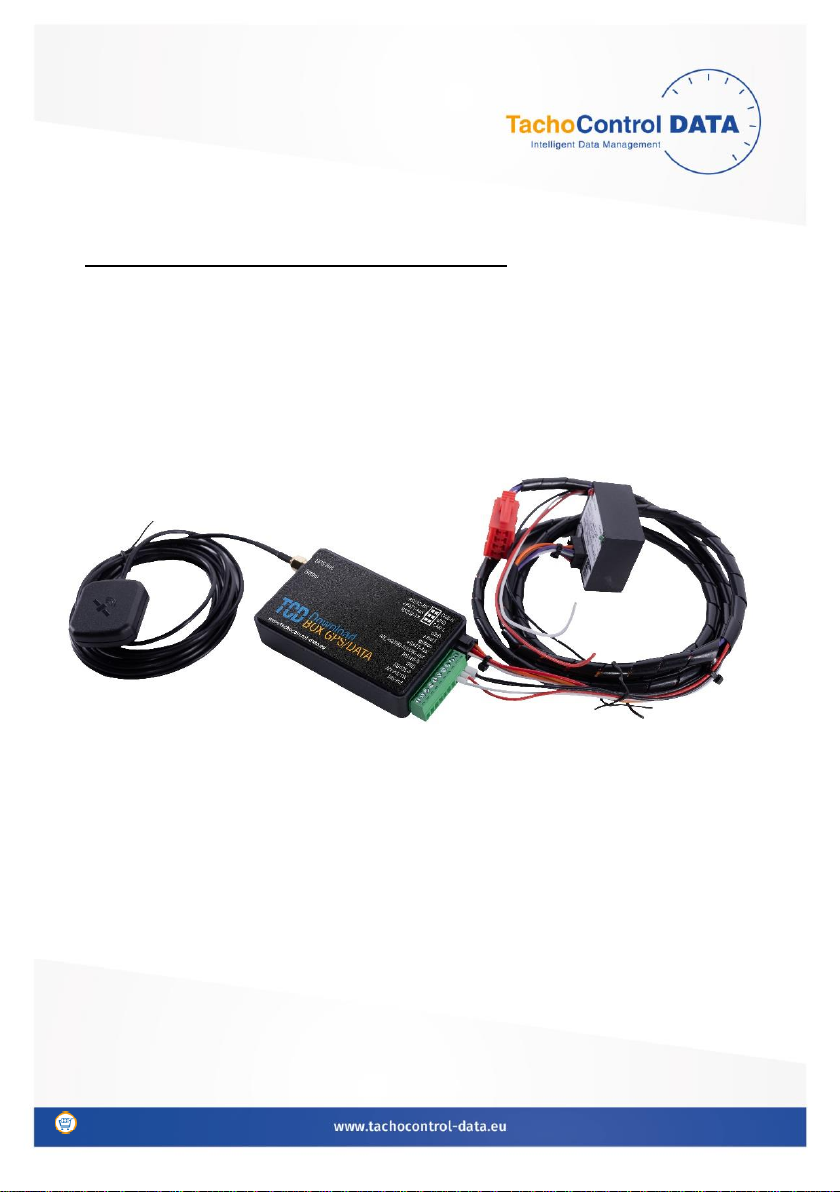
Nachdem die Box auf diese Weise angeschlossen wurde, schalten Sie die
Zündung ein. An der GPS-Box leuchtet die LED nach ca. 15 Sekunden im
Wechsel grün/blau und zeigt damit an, dass die Box betriebsbereit ist. Es
muss der CAN im Fahrtenschreiber freigeschaltet sein.
Die Daten von Fahrtenschreiber und der gesteckten Fahrerkarte können
nun heruntergeladen werden. Die Verbindung zum Download von Daten
ist jetzt so lange hergestellt, bis die Zündung wieder ausgeschaltet wird.
Bitte beachten Sie, dass hierfür Ihre Unternehmerkarte in Ihrem
Chipkartenleser gesteckt sein muss und die Single Company Card Manager
Software gestartet sein muss.
Bitte beachten, dass Ihr Windows Betriebssystem nicht in den Sleep
Modus kommt.
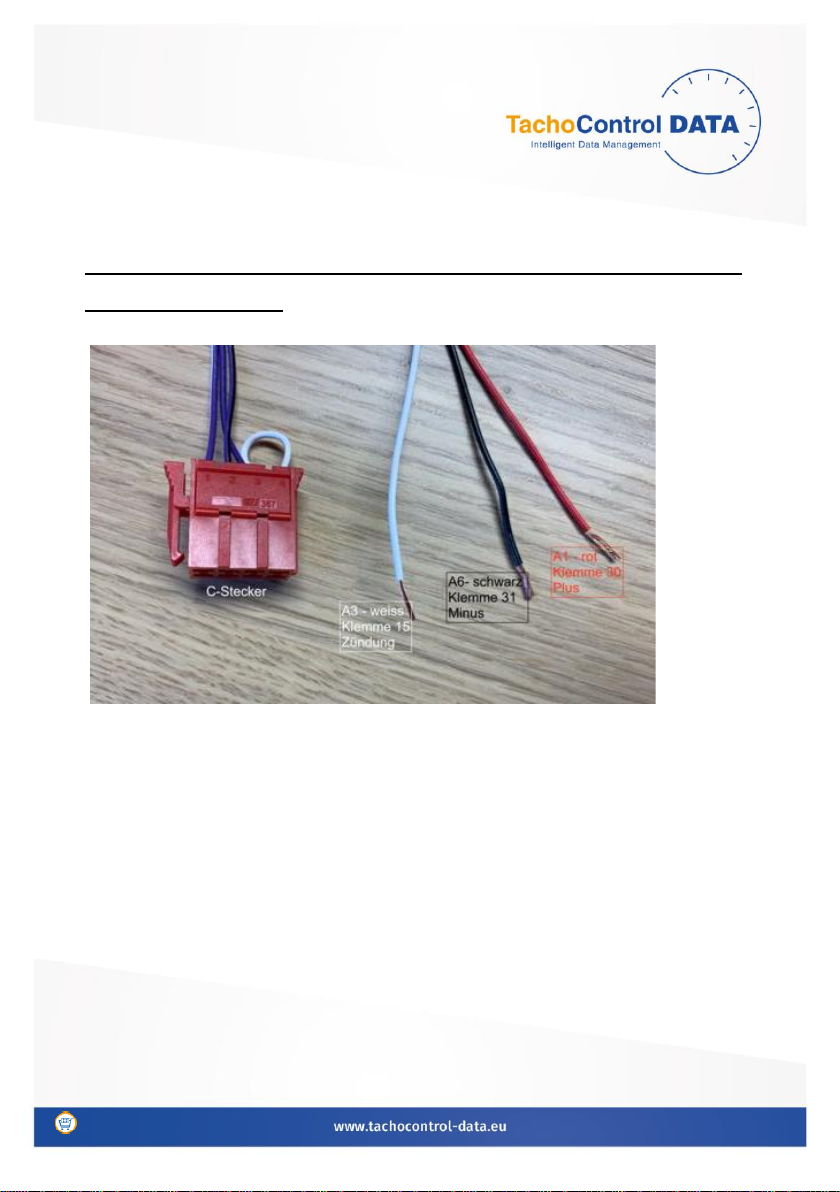
The black cable connects to the socket A6 (minus, terminal 31), the red
cable to the socket A1 (plus, terminal 30) and the white cable with the
socket A3 (ignition, terminal 15) in the connector in the interface A, see
also figure above.
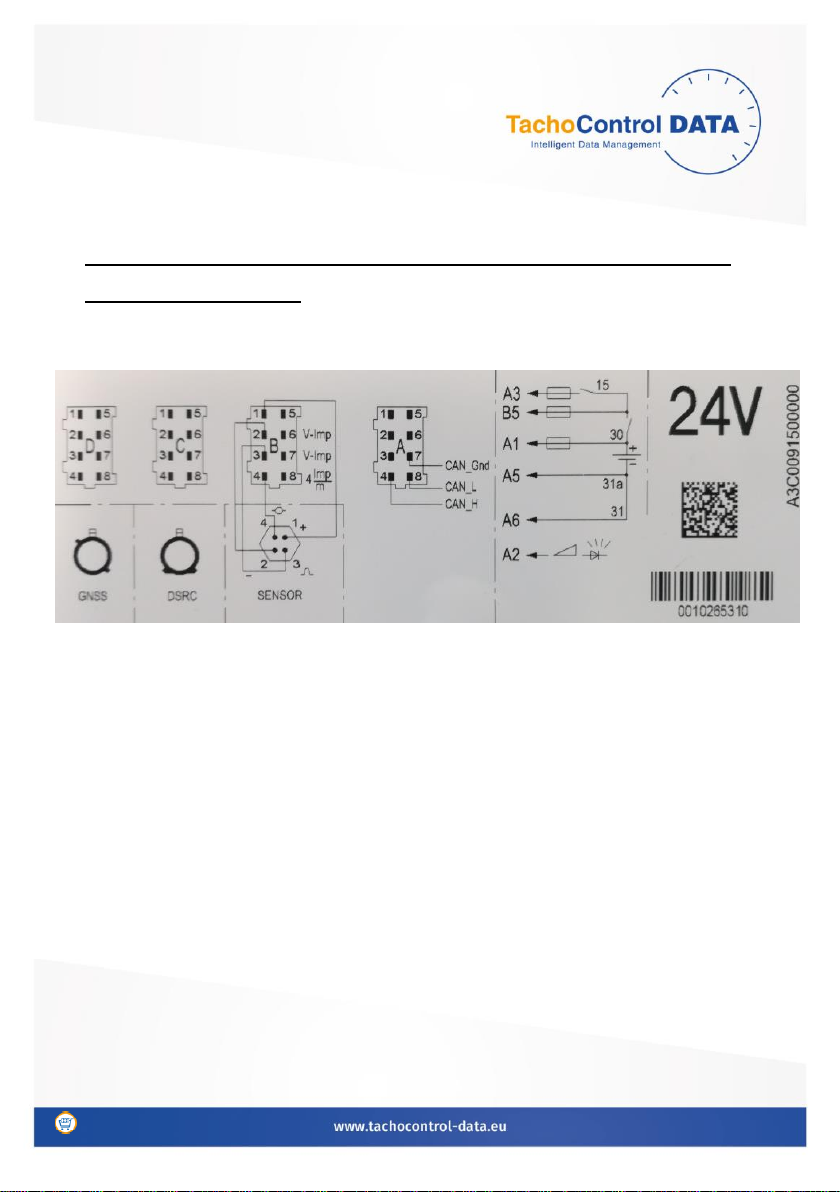
Insert the red C connector on the back of the tachograph into the
interfaces C. If the socket C is already plugged, you have the following
options:
1. Cables can be connected to an existing C connector
2. Use Y-cable C and leave both connectors

Seite 8 von 13 Stand 01.2021
After the box has been connected in this way, turn on the ignition. On the
GPS box, the LED lights up green/blue after about 15 seconds, indicating
that the box is ready for operation. The CAN inside the Tachograph must
be activated.
The data of the tachograph and the inserted driver card can now be
downloaded. The connection to download data is now established until
the ignition is switched off again. Please note that this requires your
business card to be inserted into your smart card reader and the Single
Company Card Manager software must be started.
FMS/CAN Bus Anschluss Krokodil/ FMS/CAN Bus Connection Crocodile:
1. Positionieren Sie den Krokodil-Anschluss zwischen die zwei CAN Kabel
(High CAN A4 und Low CAN A8). Beachten Sie hier auch die richtige Seite
auf Krokodil: CAN High (CANH B Seite) Seite und CAN Low (CANL A Seite).
2. Achten Sie darauf, dass der Krokodil zwischen den beiden gedrehten
CAN Kabel richtig positioniert wurde (siehe Bild unten).
3. Krokodil mit zwei Kabelbindern befestigen (siehe Bild unten).

Seite 9 von 13 Stand 01.2021
1. Position the crocodile connector between the two CAN cables (High
CAN A4 and Low CAN A8). Also note the right page on Crocodile: CAN High
(CANH B page) page and CAN Low (CANL A page).
2. Make sure that the crocodile is positioned correctly between the two
rotated CAN cables (see picture below).
3. Attach the crocodile with two cable ties (see picture below).
Art. Nr.005000504

Seite 10 von 13 Stand 01.2021
Installation Single Company Card Manager Software 006 002 000
Ihre Unternehmerkarte muss zwingend immer in Ihrem Chipkartenleser
sowie der verbunden Card Manager Software gestartet sein. Ihre
Unternehmerkarte autorisiert den remote Download für alle Ihnen
zugewiesenen Fahrzeugen. Somit ist eine sichere Kommunikation
sichergestellt.
In dieser Software können Sie auch die einzelnen Fahrerkarte und
Fahrzeuge einsehen. Sie können dort die Download Zyklen einstellen und
sonstige Funktionen Konfigurieren.
Installation of Single Company Card Manager Software 006 002 000
Your company card must always be started in your chip card reader and
the connected Card Manager software. Your company card authorizes the
remote download for all vehicles assigned to you. This ensures secure
communication.
You can also view the individual driver cards and vehicles in this software.
There you can set the download cycles and configure other functions.

Seite 11 von 13 Stand 01.2021
Hardware, Gebühren, sowie Registrierung erfolgt unter:
Hardware, fees, and registration are available at:
www.tachodownload.com/registrierung
ALLE PRODUKTE SIND AUSSCHLIESSLICH ÜBER UNSEREN WEB SHOP www.tachodatenscout24.de
ERHÄLTLICH
ALL PRODUCTS ARE ECLUSIVE ABOUT OUR WEB SHOP www.tachodatenscout24.de
Es gelten unsere aktuellen AGB unter www.tachocontrol-data.eu/agb
Our current terms and conditions apply under www.tachocontrol-data.eu/agb

Seite 12 von 13 Stand 01.2021

Seite 13 von 13 Stand 01.2021
Table of contents