Tangent iMan User manual

iMan mp3 player
Instruction manual


Service information
Congratulations with Your purchase !
To get the most out of your new product we recommend that you follow our guidance
below. We recommend that you read the manual thoroughly to get the most out of your
purchase.
We have done our outmost to make sure that the product live up to your expectations.
Should you still need help with installation etc. we suggest that you visit our home
page.
www.tangent-audio.com
On our home page under support you’ll find >FAQ< Frequently Asked Question, where
you’ll find answers to most questions.
On our home page you can also download the manual in other languages.
Remember to keep the original receipt of your purchase, in case of need for service
during the warranty period.
If you, contrary to expectations, should need service for your new product, you shall
hand in the product to the dealer from whom you have purchased it.
Remember to keep the original packaging if the product shall be handed in for service.
The product is to be returned in original and otherwise secure packaging, to avoid
damaging the product during transportation.
Note: Thank you for choosing the MP3 player! Please read the following user
manual carefully to ensure easy operation of the player

CONTENTS
Attention
System request
1. Installation Instruction
2. Connect to PC and download
3. Basic Operation
4. Music function
5. Voice Recording function
6. Tools function
7. A-B repeat function
8. Lock function
9. USB mode
10. Reset
11. Recharge the battery
12. Lyrics display with mp3
13. Trouble Shooting
14. Technical Specifications

Attention:
1.Please do not use the player with earphones while driving a vehicle or riding a
bicycle. It’s not only dangerous, but also against the law. And please keep the
volume down when crossing a street.
2.Please insert earphone into earphone jack before turning the player on, in order
to avoid spoiling the earphones. This way, the player can be taken good care of.
3.Turn-off the player when it is not being used.
4.Please do not expose the player to direct sunlight, heat sources or dusty areas
and please keep the player away from water. Please use soft wet-cloth to clean
the dirty surface
5.Please do not clean the player with chemicals such as alcohol or thinner.
6.To prevent static, avoid the extreme dry surroundings.
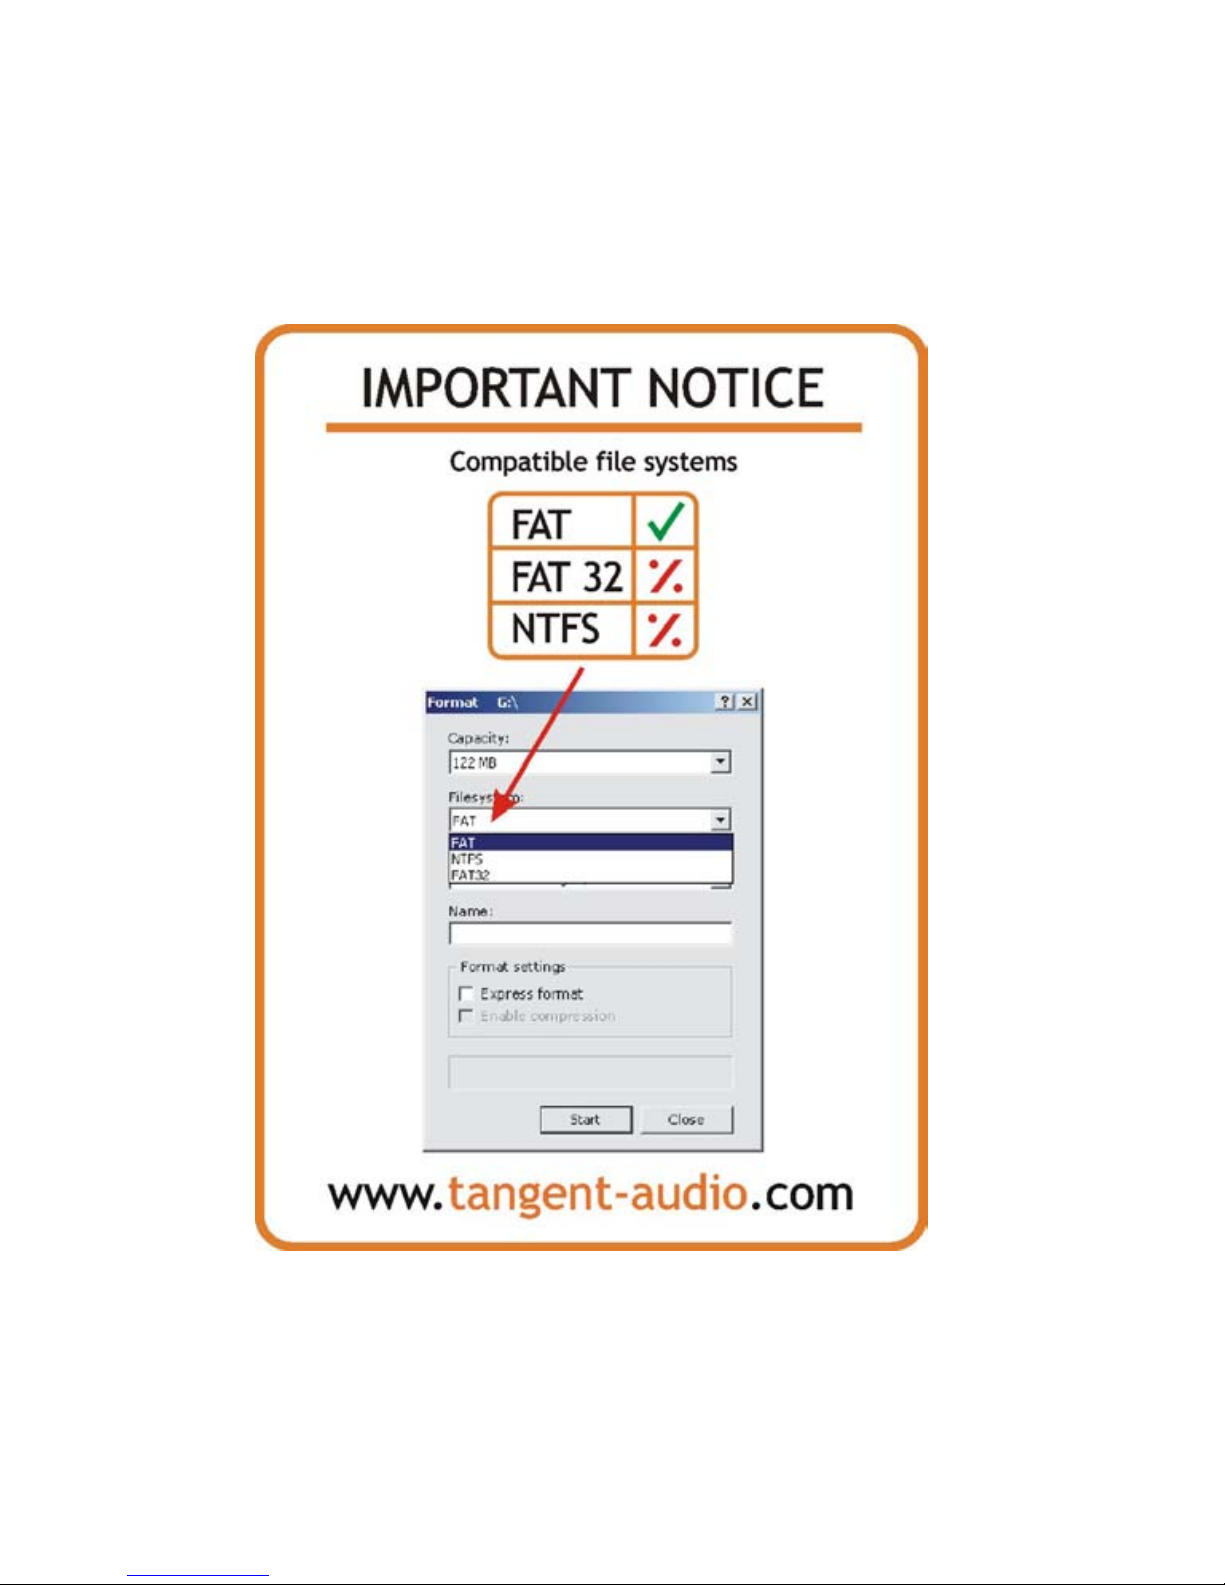
7.Do not disconnect the player from PC during format or downloading.
8.When you use this player as a USB stick, please always follow the correct
operation method. Any misuse may cause file loss.
System Requirements
System Requirements of the MP3 Player
- Microsoft Windows98SE/2000/Me/XP
- Pentium 200MHZ or greater
- USB Port Supported
- Available hard disk space
- CD-Rom Drive
- Mouse installed

1 Installation Instruction
1.1 Install the driver for Windows Operating Systems 98 SE. For windows
Operating System ME/2000/XP or greater, you don’t need to install the
driver.
When connect the MP3 player to the PC USB port, a window will pop-up with title
“found a new equipment”, click “search for latest
driver”, then insert the installation CD into PC’s CD-ROM drive, then click “next”.
Select and click on the “install from a list or specific location”, then click on the
“Drivers” folder in CD-ROM and click
“CONFIRM”. Pc will complete W98 installation automatically.
2 Connecting to a PC and downloading
2.1 Connecting to a PC
Before operating, please make sure the player is powered off. Connect the
USB cable to the PC’s USB port and connect the other side to the player’s port.
2.2 Download mp3 /WMA songs
Connect the player to the PC.
The computer will tell you that a device has been connected and is ready to use.

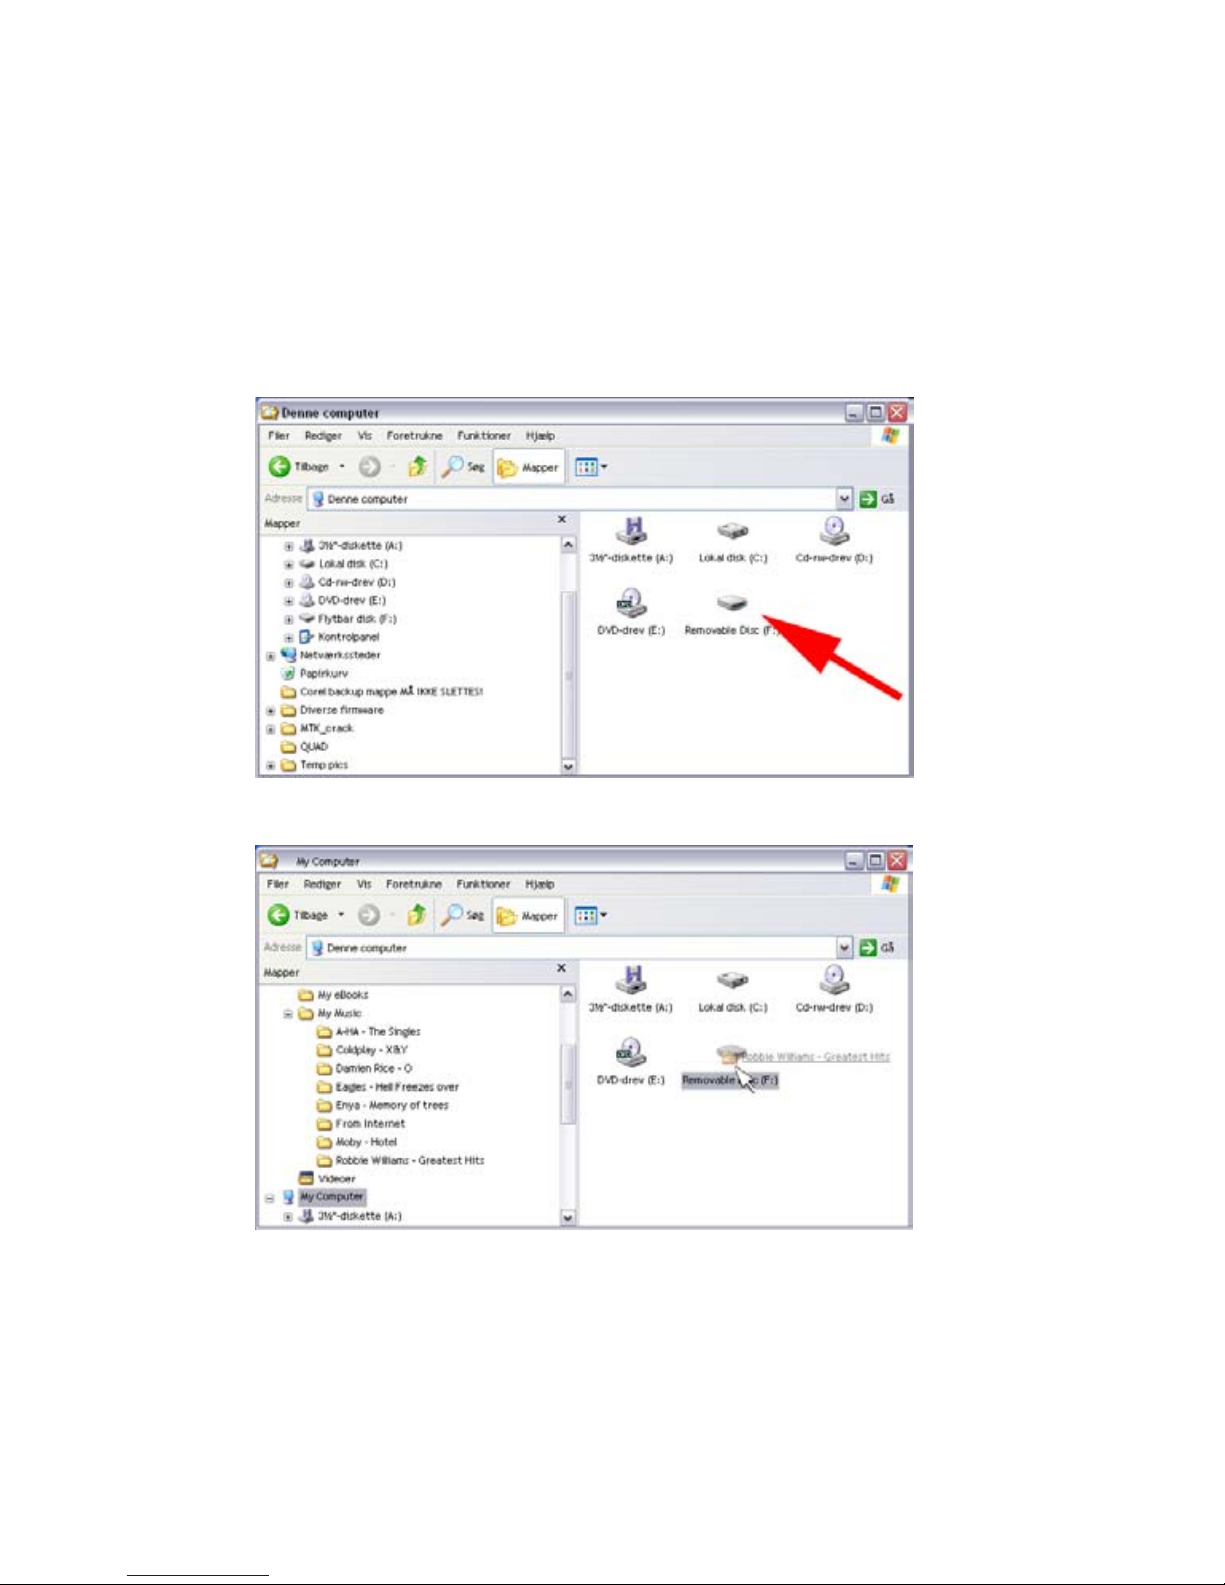
Open the Windows Explorer. Here you can see that the MP3 player is found as a
new drive.
Click and drag files from the PC’s music library to the MP3 player

For further information about downloading files, please read your Windows manual.
The message below will be shown in the display of the MP3 player
Transferring Data
When the message “WRITING” disappears from the display, the MP3 player is
ready to disconnect and use. (See point 2.3 below)
Note: 1) The player only can hold Max. 500 tracks of music file including MP3
and WMA file format
2) The player only can hold Max. 999 voice recording files
3) The player only can hold Max. 256 files in the root directory of the flash
memory. The quantity beyond 256 files can be stored in the subdirectory of root
directory
2.3 Disconnect USB port setting
Double click with the mouse on the icon of Taskbar safe removal of the device.
Select “USB Mass Storage Device” item, then click “Stop” button. “Stop to
Hardware Device” window will pop up as below:

Click “OK” button. When “Safe to Remove Hardware” window appeared, the
Player can be removed from PC safely.
Warning: An error might occur if the player is removed when transferring data. After
data transferred and “Safe To Remove Hardware” window appeared, the player can
be removed from PC safely! While the USB cable is operating, other keys on the
player are unavailable.

3. Basic operation
3.1 Button and function
1)MIC
2)Earphone Jack
3)Line In Jack
4)MENU
5)EQ
6)A-B/REC
7)Play/Pause/Stop
8)VOLAdjustment
9)HOLD
10)Resethole10
3.2 Power ON/OFF
During off mode press to turn the player ON.
In power on mode, keep pressing for 3 seconds, the player will save files first and
then power off.
Music Stand-by Mode
10

3.3 Function switch
In standby mode, press the MENU key in and hold it in for 3 seconds to enter the
function menu. Pull MENU key orto select the relative icon: Music / Voice /
Tools / MP3 Encode Press the MENU key to select the desired function
4 Music function
4.1 Play MP3 / WMA file
a) In MP3 stand-bymode, press((toplayMP3 music. Re-press (( to enter
Pause mode, press (( again to resume playback.
Playback
Pause
b) In play mode or pause mode, keep pressing ((for 2 seconds
to enter Music stand-by mode. Re-press (( to repeat step “a”).
c)In Music stand-by or play mode, pull MENU key orto select the next or
last song.
d)In play mode, keep pulling MENU key orto fast forward or fast backward.

4.2 Volume adjustment:
In music playback mode, press the “Vol +”- or the “Vol –“-key to adjust the volume.
4.3 Music playback setting
During Music mode, press the MENU key and release it again immediately to enter
music playback settings: EQ/Preview/Repeat/ Sleep. Pull MENU key orto select
and press MENU to select relative settings
EQ:
Press the MENU key and release it again immediately, then pull MENU key orto
choose EQ:
Normal/Rock/Classic/Treble/Pop/Jazz/Bass
Press MENU key again to select the desired EQ mode
Press the EQ button during Music playback to quick select EQ mode.
Preview:
In preview mode, the player will automatically review all music files in the memory.
Each song will play for 10 seconds then skip to next song.
In music playback mode, press the MENU key and release it again immediately, then
pull MENU key orto choose preview.
Press the MENU key again to activate the preview mode.
In preview mode, press MENU key in and release it again immediately to enter music
playback settings. Pull MENU key orto choose EXIT to quit preview function
Repeat:
In music playback mode, press the MENU key and release it again immediately, then
pull MENU key orto choose repeat.

Press the MENU key again to enter the repeat settings.
In repeat settings, pull MENU key orto choose the suitable repeat function:
Normal / Repeat one/ Repeat All/ Shuffle (Random play)/ Rep Shuffle (Random and
repeat all)
Press and hold the EQ/REP key to quick select the suitable repeat function during
playback.
Normal Repeat 1
Repeat All Shuffle
Repeat Shuffle

Sleep :
In this setting, you can choose the suitable time to automatically power off the player.
In music playback or stop mode, press the MENU key and release it again
immediately, then pull MENU key orto choose sleep.
Press the MENU key again to enter the sleep settings.
In sleep settings, pull MENU key orto choose the suitable sleep function:
Always on / 30 Mins / 60 Mins / 90 Mins /120 Mins
5 Voice Recording function
In standby mode, press and hold the MENU key for 2 seconds to enter the function
menu. Pull MENU key orto select relative icon: Voice
Press MENU key to enter the voice recording standby mode
5. 1 Start voice recording
In Music playback or voice recording standby mode, hold A-B/REC key 2 seconds to
enter the voice recording function.
Recording
Press the A-B/REC key again to stop voice recording.
Press to play the saved voice recoding

5.2 Playback of saved voice recording file
In voice recording standby mode, press to play the recorded files. Pull MENU key
orto choose the files.
5.3 Recording Bitrate:
In voice recording function, press the MENU key and release it again immediately to
enter the sample rate menu. Here the bitrate can be adjusted. Choose between: 8KHz,
16KHz, 32Khz, 48KHz
A voice recording will become more clear and bigger in size the higher the bitrate is
set to.
Note: The player only can hold Max. 999 voice recording files
6.Tools function
In standby mode, press and hold the MENU key for 2 seconds to enter the function
menu. Pull MENU key orto select relative icon: Tools
Press MENU key to enter the tools settings
In the tools menu, there are the following options:
Delete / Delete All / Contrast / Language / Screen / Memory / Shutdown
6.1 Delete
Pull MENU key orto choose the music file, and press key to erase the file or
press MENU to exit.

Note: You can’t erase the music file which is “read-only”
6.2 Delete All
Press key to confirm erasing (only for music file), or press MENU to exit.
Note: You can’t erase the music file which is “read-only”
6.3 Contrast Set up
Pull MENU key orto adjust LCD contrast, Press MENU to save the selected
setting.
6.4 Multi-languages for ID3 display
Pull MENU key orto select language.
Choose between: simple Chinese, traditional Chinese, English+ German, English+
Japanese, English+ Korean, English+ Latin and English. Press MENU to save the
selected setting.

For example: English+ Latin means Unit OSD is English, and ID3 tag and Lyrics can
support Latin. Same situation to English + Korean/Japanese / German
6.5 Screen
Pull MENU key orto select when the screen saver is activated.
Choose between: 5secs, 10-secs, Always on, Disable and exit.
Press MENU to save the selected setting.
6.6 Memory
Check the total memory of the unit and available memory capacity. For example: “INT:
125-100MB” means that the total memory of the unit is 125MB, and the current
available memory capacity is 100MB.
6.7 Shut down
Pull MENU key orto select auto-off.
Choose between: Disable, 1 minute, 2 minutes, 5 minutes, 10 minutes and exit. Press
MENU to save the selected setting.
7. A-B repeat function
In Music playback or voice recording mode:
a)Press A-B/REC key to set a start point for the A-B repeat function (Point A)
b)Press A-B/REC key again to set a end point for the A-B repeat function (Point B).

The player will now repeat the music between point A and point B.
c)During A-B repeating mode, press A-B/REC key to cancel the A-B repeat function.
The player will return normal to MP3 playback or Voice recording.
8. Hold Function
In any playback mode, push HOLD key in the arrow direction to lock the player. In
hold mode, none of the functions except power ON/OFF can be used.
You can see the lock icon in the LCD display, when the Hold function is activated.
To cancel the Hold function, push HOLD key to the opposite direction as the arrow.
9. USB Mode
Plug the player into the USB connector of the PC, and the LCD will show the
related icon.
The LCD screen only displays the corresponding icon, when there is file
transfer between the mp3 player and the computer.
10. Reset
If the player can’t used normally for any reason (This seldom occurs during normal
operation) . Please use the small plastic stick or dielectric to reset the player
through the small hole on the players back side.

11. Rechargeable Mode
The internal environmental polymer battery, is recharged when the player is
connected to the PC via USB.
It shows the corresponding rechargeable icon in the LCD screen.
12. Lyrics:
This player supports mp3 files with lyrics.
Note:1) The lyrics file format must be *.LRC
2) The file name of the LRC file must be the same the mp3 files name.
3) The lyrics file must be placed in the same folder as the mp3 file.

13. Trouble shooting:
Description Reason analysis Solutions
Press , but nothing happens Battery is out of power Please recharge the battery
No sound during playback
1) Low volume or no music inside the
memory
2) Battery is out of power
3) MP3/WMA/WAV music file is destroyed
1) Adjust volume.
2) Please recharge the battery
3) Download other music files
Can not download from PC
1) The HOLD key is in lock position, so
the mp3 player is write be protected
2) USB can’t contact with PC normally
3) The existing position was wrong
1) Deactivate the HOLD function
2) Re-connect USB, PC can
recognize to mobile disc.
3) It can save 256 files at most in
root directory. (if the file name
exceeds 8 characters, the quantity
of files will be reduced). If exceed,
please set up the subdirectory, and
copy.
Can not play the MP3 file that is
made by user
This player can only support the standard
compressed format. Please don’t download
non-standard MP3 music especially
Layer-2
Re-download a standard MP3/WMA file
MP3 Player cannot be recognized
by computer Operation in bad way
Drive letter conflict
1) Format the external disc (FAT 16
ONLY)
2)Restoration
3) Give the mp3 player a new drive
letter via Microsoft Windows
Administration.
No function on buttons HOLD key is in lock position Push the HOLD key in the opposite
direction of the arrow
Table of contents