TATA Motors Voltas Beko DT8S User manual

22
·ÖÇø
¹²
·ðɽÊÐ˳µÂÇøÃÀµÄ
Ï´µÓµçÆ÷ÖÆÔìÓÐÏÞ¹«Ë¾
DD
[]
00
80G
67
1. PANTONE BLACK C
3.
2060
规格为 ,按 规格输出菲林和印刷
如供应商的排版需再加空白页,请加在封底前。
4.
2. A5 A5
,
DT8S(WQP8-3806)
BEKO

DT8S
EN HI
|
User ’s
Manual
Dishwasher
2 / EN
C
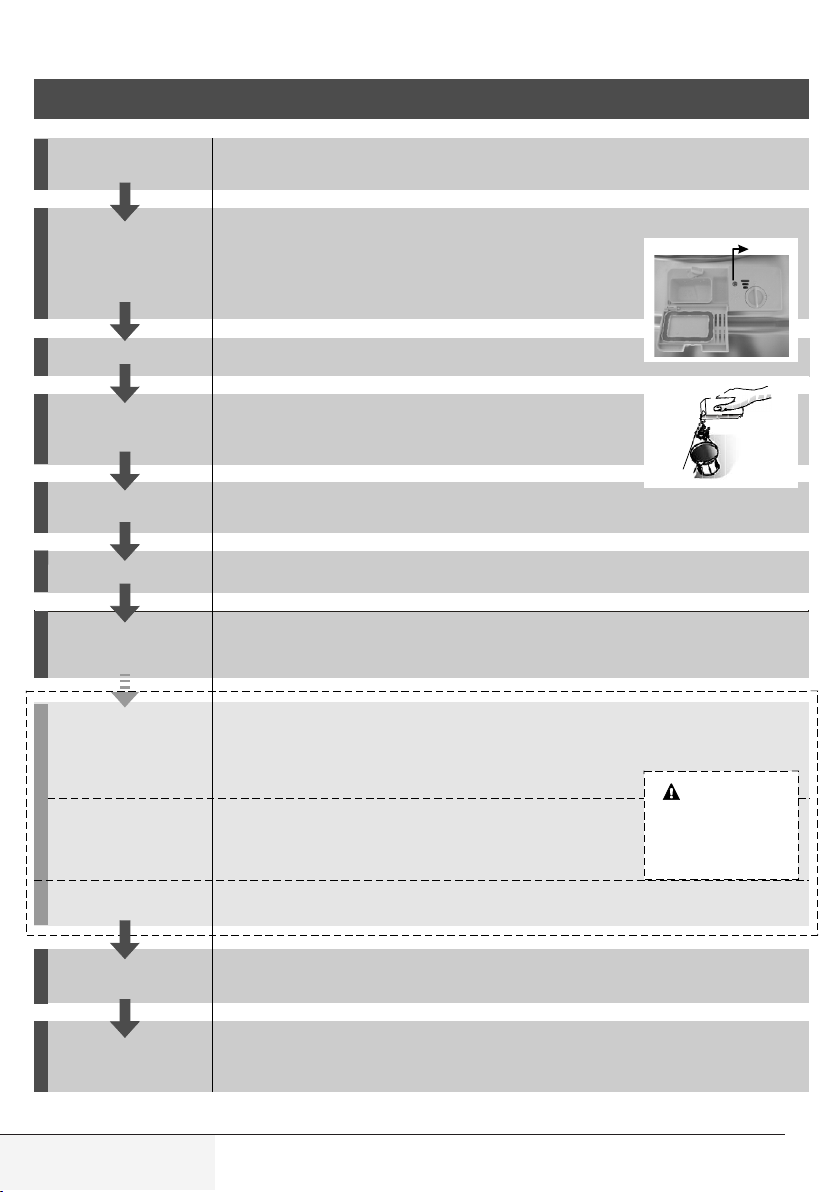
Quick operation guide
For detailed operating method read the corresponding content on the instruction manual.
Switch on the appliance Touch the Power switch button to switch on the appliance, Open the door.
Mechanical indicator C.
Electric indicator on control panel (if provided).
Scrape off any large amount of leftover food. Soften remnants of burnt food in pans, then
load the baskets. Refer to the dishwasher loading instructions.
Close the door, Touch the programme button until the selected programme lights up. (See
the section entitled “Operation instruction” )
Turn on the water tap and touch the Start/Pause button. The machine will start working
after about 10 seconds.
When the working cycle has finished, the buzzer of the dishwasher will sound 8 times, then stop.
Turn off the appliance using the Power button.
Since the appliance is standing by, it will power off automatically after 30 minutes without any operation.
Warning: wait a few minutes (about 15 minutes) before unloading the dishwasher to avoid handling the dishes
and utensils while they are still hot and more susceptible to break.
They will also dry better.Unload the appliance, starting from the lower basket.
2.Open the door.
3.Add the forgotten dishes.
4.Close the door, then touch the start/pause button, the dishwasher will start running again
after 10 seconds.
2. Press the Start/Pause button ,than press the program button more than 3 seconds to cancel the running pro
gramme.
3. Select a new programme.
(On models with water softener system only.)
Electric indicator on control panel (if provided).
(for some models), you can estimate when to fill the salt into the softener by the number of cycles
the dishwasher has run.
Compartment A:
With each wash cycle.
Compartment B:
(Follow the user instructions!)
Fill the detergent dispenser
Check the rinse aid level
Check the regeneration
salt level
Load the baskets
Select a programme
Running the dishwasher
gramme
Open the door carefully.
Hot steam may escape
when the door is opened!
WARNING!
the dishwasher.
off during a wash cycle.
Switch off the appliance
Turn off the water tap,
unload the baskets

3 / EN
For detailed operating method read the corresponding content on the instruction manual.
Read this Manual
Dear Customer,
■Please carefully read this manual before using the dishwasher, it will help you to
use and maintain the dishwasher properly.
■Keep it to refer to it at a later date.
■Pass it on to any subsequent owner of the appliance.
Before Calling for Service
■To review the section on troubleshooting Tips will help you to solve some com
mon problems by yourself.
■
sional technicians.
NOTE:
■■The manufacturer, following a policy of constant development and updating of
the product, may make modifications without giving prior notice.
■This user manual shall also be got from the manufacturer or responsible vendor.

4 / EN
CONTENTS
ENGLISH 5-32
33-64

5 / EN
1. IMPORTANT SAFETY INFORMATION
AWARNING!:
When using
your dishwasher, follow the
precautions listed below:
•This appliance is intended to be used in household
•and similar applications such as:
•This appliance can be used by children aged from 8 years and above and
persons with reduced physical, sensory or mental capabilities or lack of
experience and knowledge if they have been given supervision or in
struction concerning use of the appliance in a safe way and understand
the hazards involved. Children shall not play with the appliance. Cleaning
and user maintenance shall not be made by children without supervision.
•This appliance is not intended for use by persons (including children )
with reduced physical, sensory or mental capabilities, or lack of experi
ence and knowledge ,unless they have been given supervision or instruc
tion concerning use of the appliance by a person responsible for their
•This appliance is for indoor use only, for household use only.
•To protect against the risk of electrical shock, do not immerse the unit,
cord or plug in water or other liquid.
•Please unplug before cleaning and maintenance the appliance .
•Use a soft cloth moisten with mild soap, and then use a dry cloth to wipe
it again.

6 / EN
EARTHING INSTRUCTIONS
•
down, grounding will reduce the risk of an electric shock by providing a
path of least resistance of electric current. This appliance is equipped
•The plug must be plugged into an appropriate outlet that is installed and
earthed in accordance with all local codes and ordinances.
•
the risk of an electric shock.
•Check with a qualified electrician or service representative if you are in
doubt whether the appliance is properly grounded.
•
outlet.
•Have a proper outlet installed by a qualified electrician.
•Do not abuse, sit on, or stand on the door or dish rack of the dishwasher.
•Do not operate your dishwasher unless all enclosure panels are properly
in place.
•Open the door very carefully if the dishwasher is operating, there is a risk
of water squirting out.
•Do not place any heavy objects on or stand on the door when it is open.
The appliance could tip forward.
•When loading items to be washed:
•
•2) Warning: Knives and other utensils with sharp points must be loaded
in the basket with their points down or placed in a horizontal position.
•Check that the detergent comparment is empty after completion of the
wash cycle.
•Do not wash plastic items unless they are marked dishwasher safe or the
equivalent.
•For plastic items not so marked, check the manufacturer’s recommenda
tions.

7 / EN
•Use only detergent and rinse additives designed for an automatic dish
washer.
•Never use soap, laundry detergent, or hand washing detergent in your
dishwasher.
•Children should be supervised to ensure that they do not play with the
appliance.
•The door should not be left open, since this could increase the risk of
tripping.
•
its service agent or a similarly qualified person in order to avoid a hazard.
•During installation, the power supply must not be excessively or danger
ously bent or flattened.
•Do not tamper with controls.
•The appliance is to be connected to the water mains using new hose sets
•The maximum number of place settings to be washed is 8.
•The maximum permissible inlet water pressure is 1MPa.
•The minimum permissible inlet water pressure is 0.04MPa.
8 / EN
Safety and Envronment Instructons
tion symbol for waste electrical and electronic equipment (WEEE). This product has been
manufactured with high quality parts and materials which can be reused and are suitable for
recycling. Do not dispose of the waste product with normal domestic and other wastes at the
end of its service life. Take it to the collection center for the recycling of electrical and elec
tronic equipment. Please consult your local authorities to learn about these collection centers.
Packaging materials of the product are manufactured from recyclable materials in accordance with our
tic or other wastes. Take them to the packaging material collection points designated by the local au
thorities.
Compliance to standards and test data / EC declaration of conformity
stages of this product comply with the safely rules included in all pertaining European
Community regulations.
Power input
Total power consumption
Heater power consumption 1400W
Total current (depends on the model)
Drain pump power consumption 30 W (see rating label)
Water pressure
C
Technical specifications may be changed without prior notice to improve the
quality of the product
C
Figures in this manual are schematic and may not match the product exactly.
C
accompanying the product are obtained in the laboratory on basis of the rel
evant standards. Depending on operational and environmental conditions of
the product these values may vary.
/ EN
3. Operaton Instructon
A
fore using it for the first time.
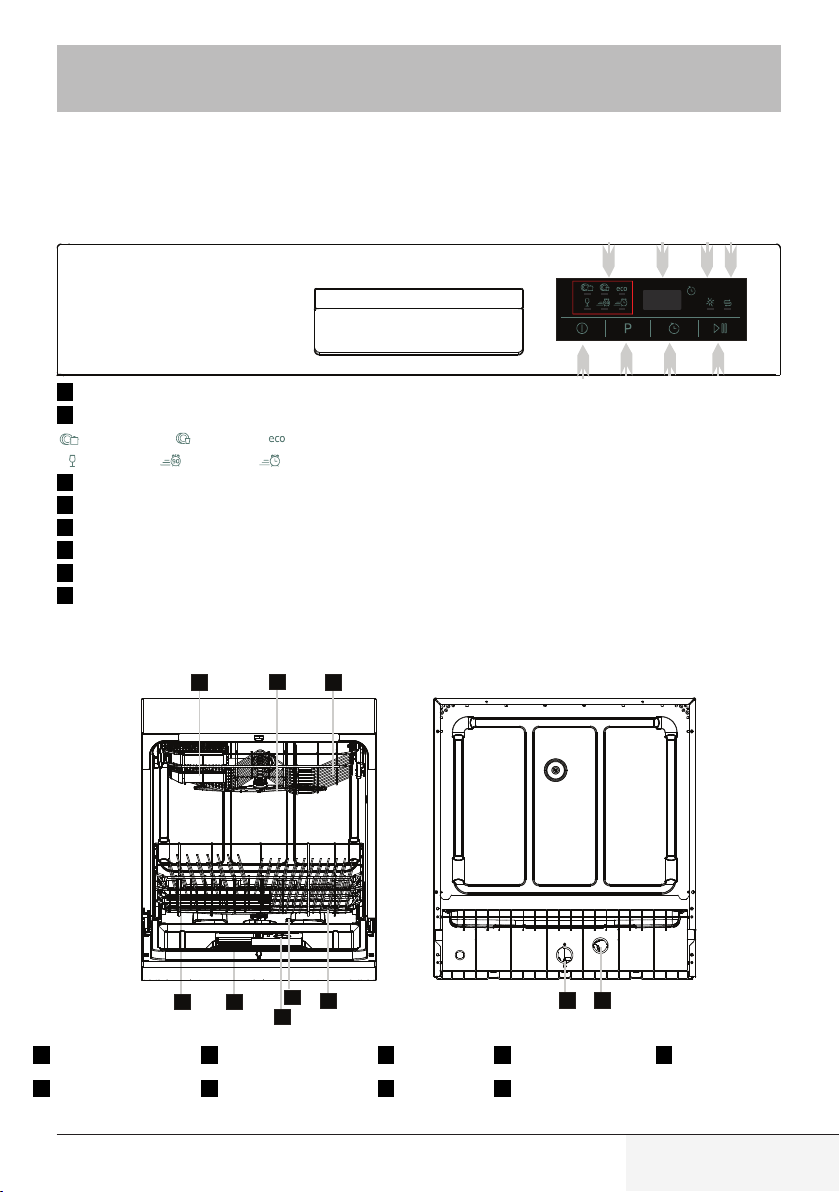
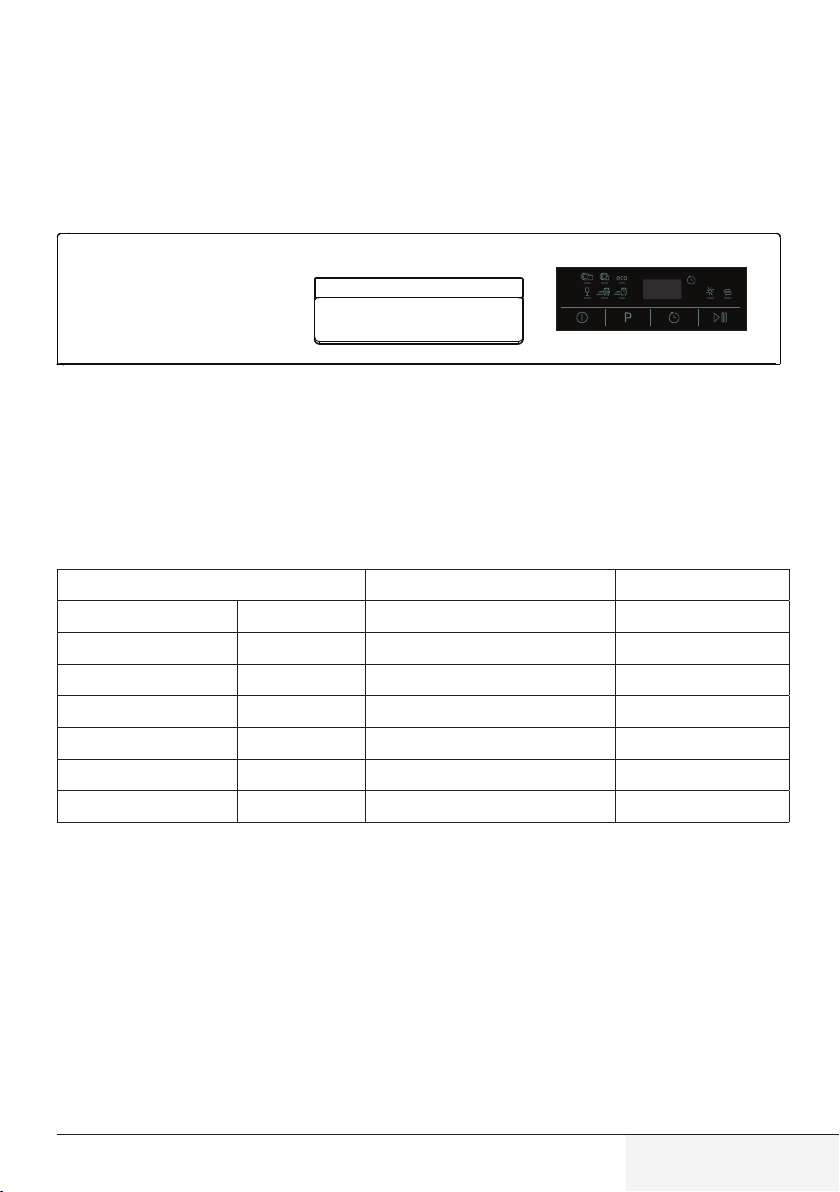
Control Panel
13
4
2
45
4
8 47 46
1Power Button: To turn on/off the power supply.
2Program indicator light:
—ECO
—Rapid
3Program Selector: Press the button to select wash cycles
4Delay Button : To press the button to delay.
5Start/Pause Button: Press this button to start or pause the dishwasher.
6Salt Warning Light: To be on when the softener needs to be refilled.
7Rinse Aid Warning Light: To be on when the rinse aid dispenser needs to be refilled.
8Display screen: to show the reminding time and the state(running state, delay time etc ).
Dishwasher Features
8 9
1
2
4
6
35
5
7
1Salt Container 3Filter assembly 5Spray Arms 7Basket 9
Drain pipe connector
2
Detergent Dispenser
4Rinse Aid Dispenser 6Cup Shelf 8
10 / EN
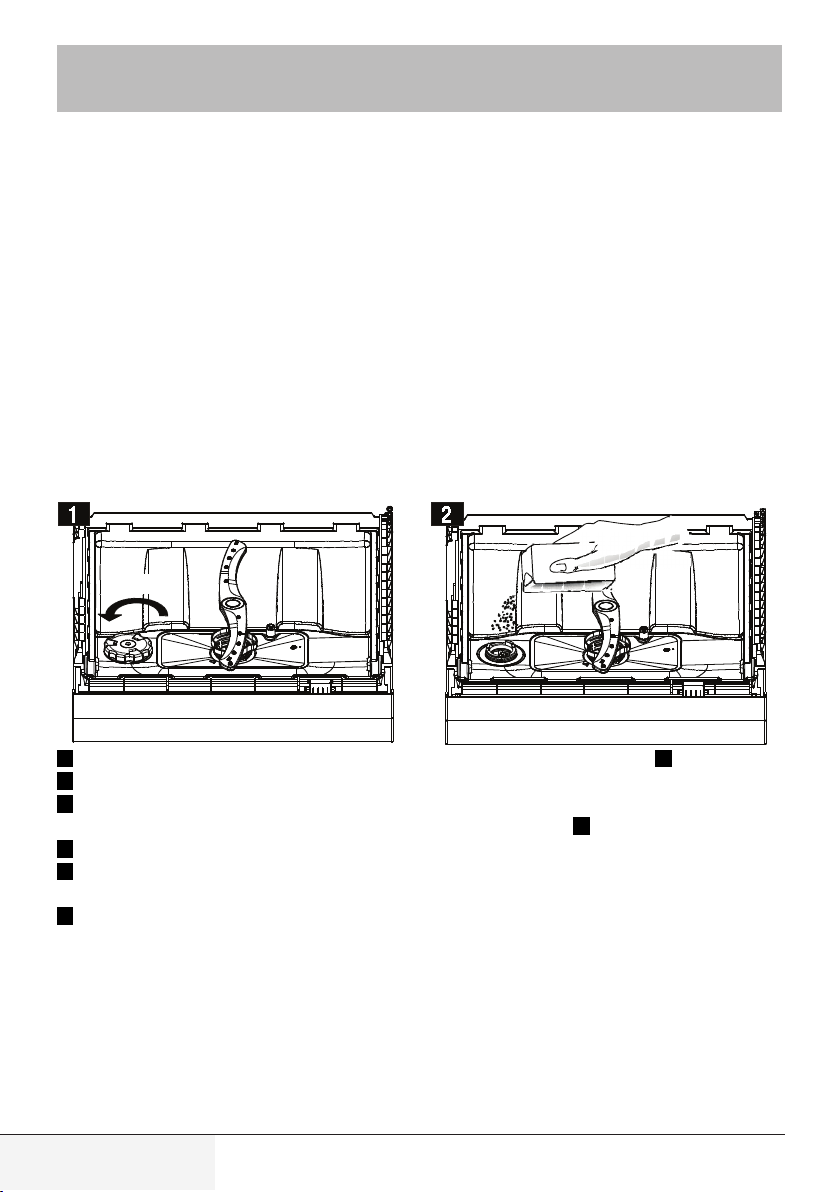
4. Pror usng for the frst tme
ANOTE:
Always use salt intended for use with dishwasher.
The salt container is located beneath the basket and should be filled as follows:
Attention!
■Only use salt specifically designed for use in dishwashers! All other types of salt
not specifically designed for use in a dishwasher, especially table salt, will damage
the water softener, in case of damages caused by the use of unsuitable salt the
manufacturer does not give any warranty noris liable for any caused damages.
■Only fill with salt just before starting one of the complete washing programmes.
This will prevent any grains of salt or salty water, which may have been split,
remaining of the bottom of the machine for any period of time, which may cause
corrosion.
Open
ARemove the basket and then unscrew and remove the cap from the salt container. 1
BBefore first wash, add lit. of water inthe salt container of your machine.
CPlace the end of the funnel (supplied) into the hole and introduce about 1kg of salt.
2
DAfter filling the container, screw the cap tightly back clockwise.
E
has been filled with salt.
F
(Suggest choose rapid programme). Otherwise filter system, pump or other important parts of the
ANOTE:
1The salt container must only be refilled when the salt warning light in the control panel comes on.
Depending on how fully the salt dissolves, the salt warning light may still be on even though the salt
container is filled.
11 / EN
salt into the softener by the cycles that the dishwasher had run.
Step 1: Enter the status of salt adjustment
Close the door, within 60 seconds after power on, Touch Start/Pause button and hold for 5 seconds, the
machine will enter setting mode.
Step 2: select a certain level of salt consumption
Touch the Start/pause button to select the proper set according to your local environment, the sets will
Step 3: Exit the status of salt adjustment
Without any operation in five seconds, the machine will exit from set mode, the machine is into standby
status.
There are 6 levels of salt consumption in all lt is recommended to select the level according to below
table:
Water Hardness level Setting on the water softener Digital display stalls
°dH1) mmol/l 2)
1 H1
2 H2
3 H3
4* H4
5 H5
6 H6
Note:
2) millimol, internationel unit for water hardness
*) factory setting
Contact your local water board for information on the hardness of your water supply.
12 / EN
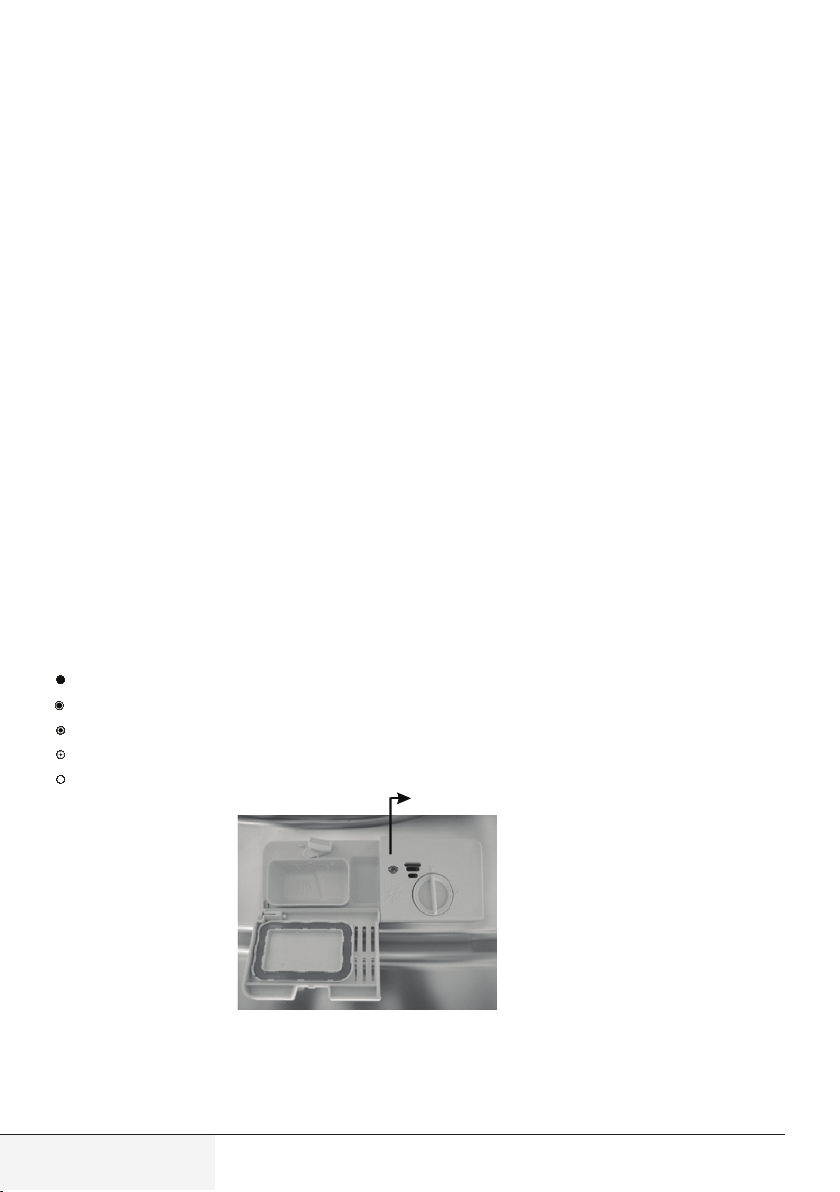
Rinse Aid Dispenser
The rinse aid is released during the final rinse to prevent water from forming droplets on your dishes.
dishwasher is designed to use liquid rinse aids. The rinse aid dispenser is located inside the door next
to the detergent dispenser. To fill the dispenser, open the cap and pour the rinse aid into the dispenser
until the level indicator turns completely black. The volume of the rinse a id container is a bout 110ml.
Function of Rinse Aid
Rinse aid is automatically added during the last rinse, ensuring thorough rinsing, and spot and streak
free drying.
Function of Rinse Aid
Rinse aid is automatically added during the last rinse, ensuring thorough rinsing, and spot and streak
free drying.
Attention!
Only use branded rinse aid for dishwasher. Never fill the rinse aid dispenser with any other substances
(e.g. Dishwasher cleaning agent, liquid detergent). This would damage the appliance.
When to Refill the Rinse Aid Dispenser
never let the rinse aid get below 1/4 full.
As the rinse aid diminishes, the size of the black dot on the rinse aid level indicator changes, as illustrated
below.
Full
3/4 full
1 / 2 full
Empty
C (Rinse-Aid indicator)
13 / EN
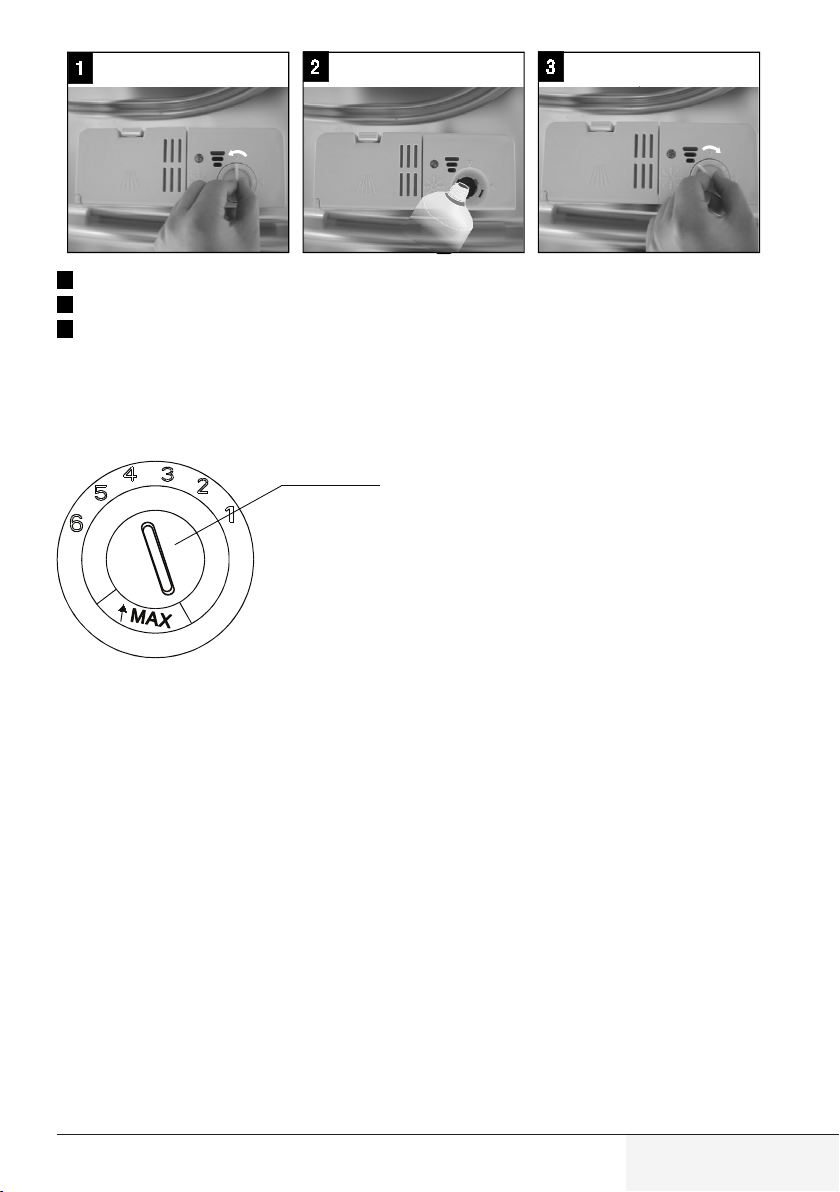
1To open the dispenser, turn the cap to the “open” (left) arrow and lift it out.
2Pour the rinse aid into the dispenser, being careful not to overfill.
3Replace the cap by inserting it aligned with “open” arrow and turning it to the closed (right) arrow.
ANOTE: Clean up any rinse aid split during filling with an absorbent cloth to avoid excessive foaming
during the next wash. Don’t forget to replace the cap before you close dishwasher door.
Adjust lever (Rinse) The rinse aid dispenser has six or four settings.
and poor drying are problems, increase the amount of
rinse aid dispensed by removing the dispenser lid and
properly or are spotted, adjust the dial to the next
recommended setting is “4”. (Factory value is”4”.)
ANOTE:
Reduce it if there are sticky whitish stains on your dishes or a bluish film on glassware or knife blades.
Detergents with its chemical ingredients are necessary to remove dirt, crush dirt and transport it out of
the dishwasher. Most of commercial quality detergents are suitable for this purpose.
Normally new pulverised detergent is without phosphate. The water softener function of phosphate is
please choose a programme with higher Temperature.
Concentrated Detergent
Based on their chemical composition, dishwasher can be split in two basic types:
■conventional, alkaline detergents with caustic components
■low alkaline concentrated detergents with natural enzymes

14 / EN
Detergent Tablets
Detergent tablets of different brands dissolve at different speeds. For this reason so me detergent tab
lets cannot dissolve and develop their full cleaning power during short programmes. Therefore please
use long programmes when using detergent tablets, to ensure the complete removal of detergent re
siduals.
ANOTE: Detergent tablets are only for the models with 3 in 1 function or 3 in 1 program.
Detergent Dispenser
The dispenser must be refilled before the start of each wash cycle following the instructions provided in
items need more detergent. Always add the detergent just before starting the dishwasher, otherwise it
could get damp and will not dissolve properly.
Amount of Detergent to Use
Push latch to open
ANOTE:
■
■Always add the detergent just before starting each wash cycle.
■Only use branded detergent aid for dishwasher.
AWARNING:
Dishwasher detergent is corrosive!
Take care to keep it out of reach of children.
Proper Use of Detergent
Use only detergent specifically made for use in dishwashers. Keep your detergent
fresh and dry.
Don’t put powder detergent into the dispenser until you’re ready to wash dishes.

15 / EN
Fill the detergent dispenser with detergent. The marking indicates the dosing lev
els , as illustrated on right:
A
The place of main wash cycle detergent placed.
B
Please observe the manufacturers dosing and storage Recommendations as stat
ed on the detergent packaging.
Close the lid and press until it locks in place.
AB
ANOTE:
■
on the last page.
■Please aware, that according to the level soiling and the specific hardness of
water differences a re possible.
■Please observe the manufacturer’s recommendations on the detergent packag
ing.
5. Loadng the Dshwasher Baskets
■
■
ther information from detergent manufacturers.
■For particular items, select a programme with as low a temperature.
■To prevent da mage, do not take glass and cutlery out of the dishwasher imme
diately afterthe programme has ended.

16 / EN
Are not suitable
■
■Plastic items that are not heat resistant
■Older cutlery with glued parts that is not temperature resistant
■Bonded cutlery items or dishes
■Pewter or copper items
■Crystal glass
■Steel items subject to rusting
■Wooden platters
■
Are of limited suitability
■Some types of glasses can become dull after a large number of washes
■Silver and aluminium parts have a tendency to discolour during washing
■
For best performance of the dishwasher, follow these loading guidelines.
Features and appearance of baskets and cutlery baskets may vary from your model.)
Scrape off any large amounts of leftover food. Soften remnants of burnt food in
pans
Place objects in the dishwasher in following way:
2. Curved items, or those with recesses, should be loaded at a slant so that water
can run off.
3.All utensils are stacked securely and can nottip over.
4.All utensils are placed in the way that the spray arms can rotated freely during
washing.
ANOTE:
■Load hollow items such as cups, glasses, pans etc. With the opening downwards
so that water cannot collect in the container or a deep base.
■Dishes and items of cutlery must not lie inside one another, or cover each other.
■To avoid damage to glasses, they must not touch.
■Load large items which are most difficult to clean into the basket.
■Long bladed knives stored in an upright position are a potential hazard!
■Long and/or sharp items of cutlery such as carving knives must be positioned
horizontally in the basket.
■Please do not overload your dishwasher. This is important for good results and
for reasonable energy consume.
17 / EN
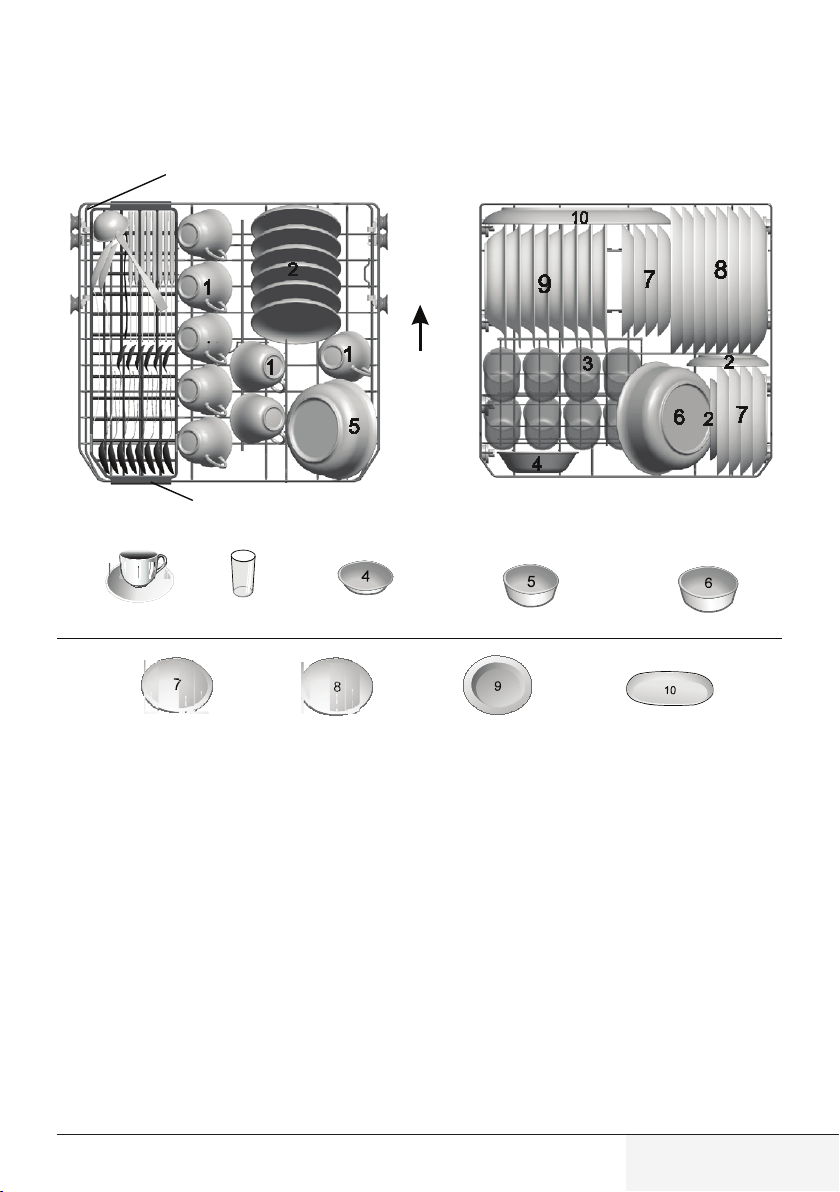
Down Shelf
Up Shelf
IN
2
13
Cups
Saucers Small serving bowl Medium serving bowl Large serving bowl
Oval platter
Soup plates
Dinner plates
Dessert dishes

18 / EN
Note: Please place the light flat wares on the up shelf. The total weight is less than
2kg.
2
1
4
54
68
7
3
Up Shelf
1 Soupspoons
2 Forks
3 Knives
4 Teaspoons
5 Dessert spoons
6 Serving spoons
7 Serving forks
Down Shelf
IN
IN
Capacity: 8 place settings
Programme: ECO
Rinse aid setting: 6
Softener setting: H4
AWARNING!
■Do not let any item extend through bottom.
■Always load sharp utensils with the sharp point down!
■They do not nest together.
■
■
/ EN
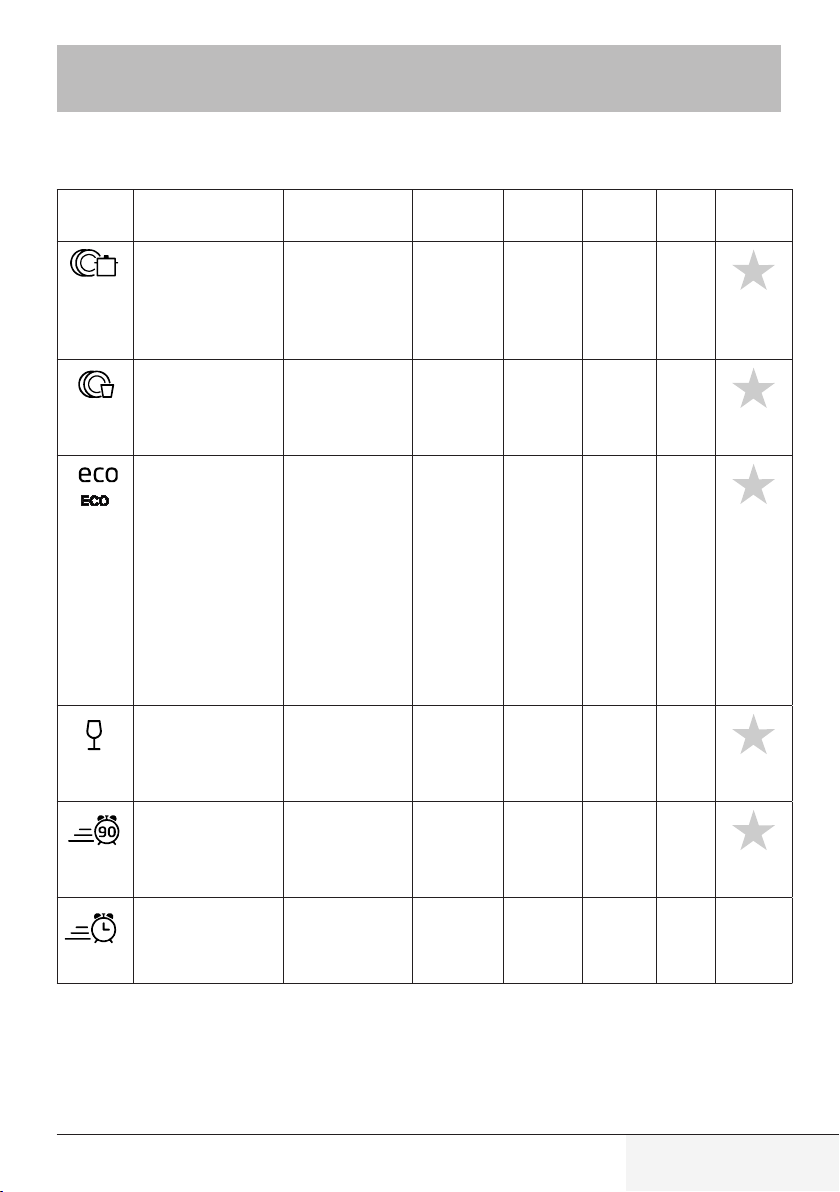
6. Startng a washng programme
Program Cycle Selection
Description of
Cycle
Detergent
pre/main
Running
time(min)
Energy
(Kwh)
Water
Rinse Aid
For heaviest soiled
crockery, and nor
mally soiled pots»
pans, dishes etc with
dried on soiling.
Wash (65 °C)
Rinse Rinse Rinse
(70 °C) Drying
4/20g (Or 1
piece,
160 1.25 12.5
Normal
For normally soiled
loads, such as pots,
plates, glasses and
lightly soiled pans.
°C) Wash (60 °C)
Rinse Rinse (68
°C) Drying
4/20g 150 1.05 12.5
(*EN
50242)
This is standard pro
gramme, it is suitable
to clean normally
soiled tableware
and it is the most
efficient programme
in terms of its com
bined energy and
water consumption
for that type of ta
bleware.
(45 °C) Rinse (65
°C) Drying
4/20g 185 0.72 8
For lightly soiled
loads, such as glass
es, crystal and fine
china.
(45 °C) Rinse
Rinse (60 °C)
Drying
4/20g 0.7 10.5
For lightly soiled
crockery and glass.
Wash(55°C)
Wash(65°C)
Rinse(68 °C)
Drying
24g 1.15 11
Rapid
Ashorter wash for
lightly soiled loads
and quick wash.
Wash (45 °C)
Rinse Rinse (55
°C)
15g 35 0.52 7
ANOTE:
*EN 50242 : This programme is the test cycle. The information for comparability test in accordance with
EN 50242, as follows:
■Capacity: 8 settings
■Rinse aid setting: 6
Table of contents
Other TATA Motors Dishwasher manuals


