Bartscher 109.750 User manual

INSTRUCTION MANUAL FOR DISHWASHERS
BEDIENUNGSANLEITUNG FÜR GESCHIRRSPÜLMASCHINE
MANUEL D’INSTRUCTIONS POUR LAVE-VAISSELLE
MANUALE DÌ ISTRUZIONE PER LAVASTOVIGLIE
MANUAL DE INSTRUCCIONES PARA LAVAVAJILLAS
MANUAL DE INSTRUÇÕES PARA MÁQUINA DE LAVAR LOUÇA
HANDLEIDING VOOR AFWASMACHINES
BRUGSVEJLEDNING TIL OPVASKEMASKINE
INSTRUKTIONSMANUAL FÖR DISKMASKINER
ASTIANPESUKONEIDEN KÄYTTÖOPAS
ΕΧΕΙΡΙ∆ΙΟ ΧΡΗΣΗΣ ΓΙΑ ΠΛΥΝΤΗΡΙΟ ΠΙΑΤΩΝ
109.750
109.751
109.760
109.761
GB
F
I
E
P
NL
DK
SV
FI
GR
D

INSTRUCTION MANUAL FOR DISHWASHERS
Page 1 of 12
GB
CONTENTS
CHAP 1 PREFACE ..................................................................................................................... 2
CHAP 2 INSTALLATION ............................................................................................................ 2
2.1 UNPACKING ........................................................................................................................ 2
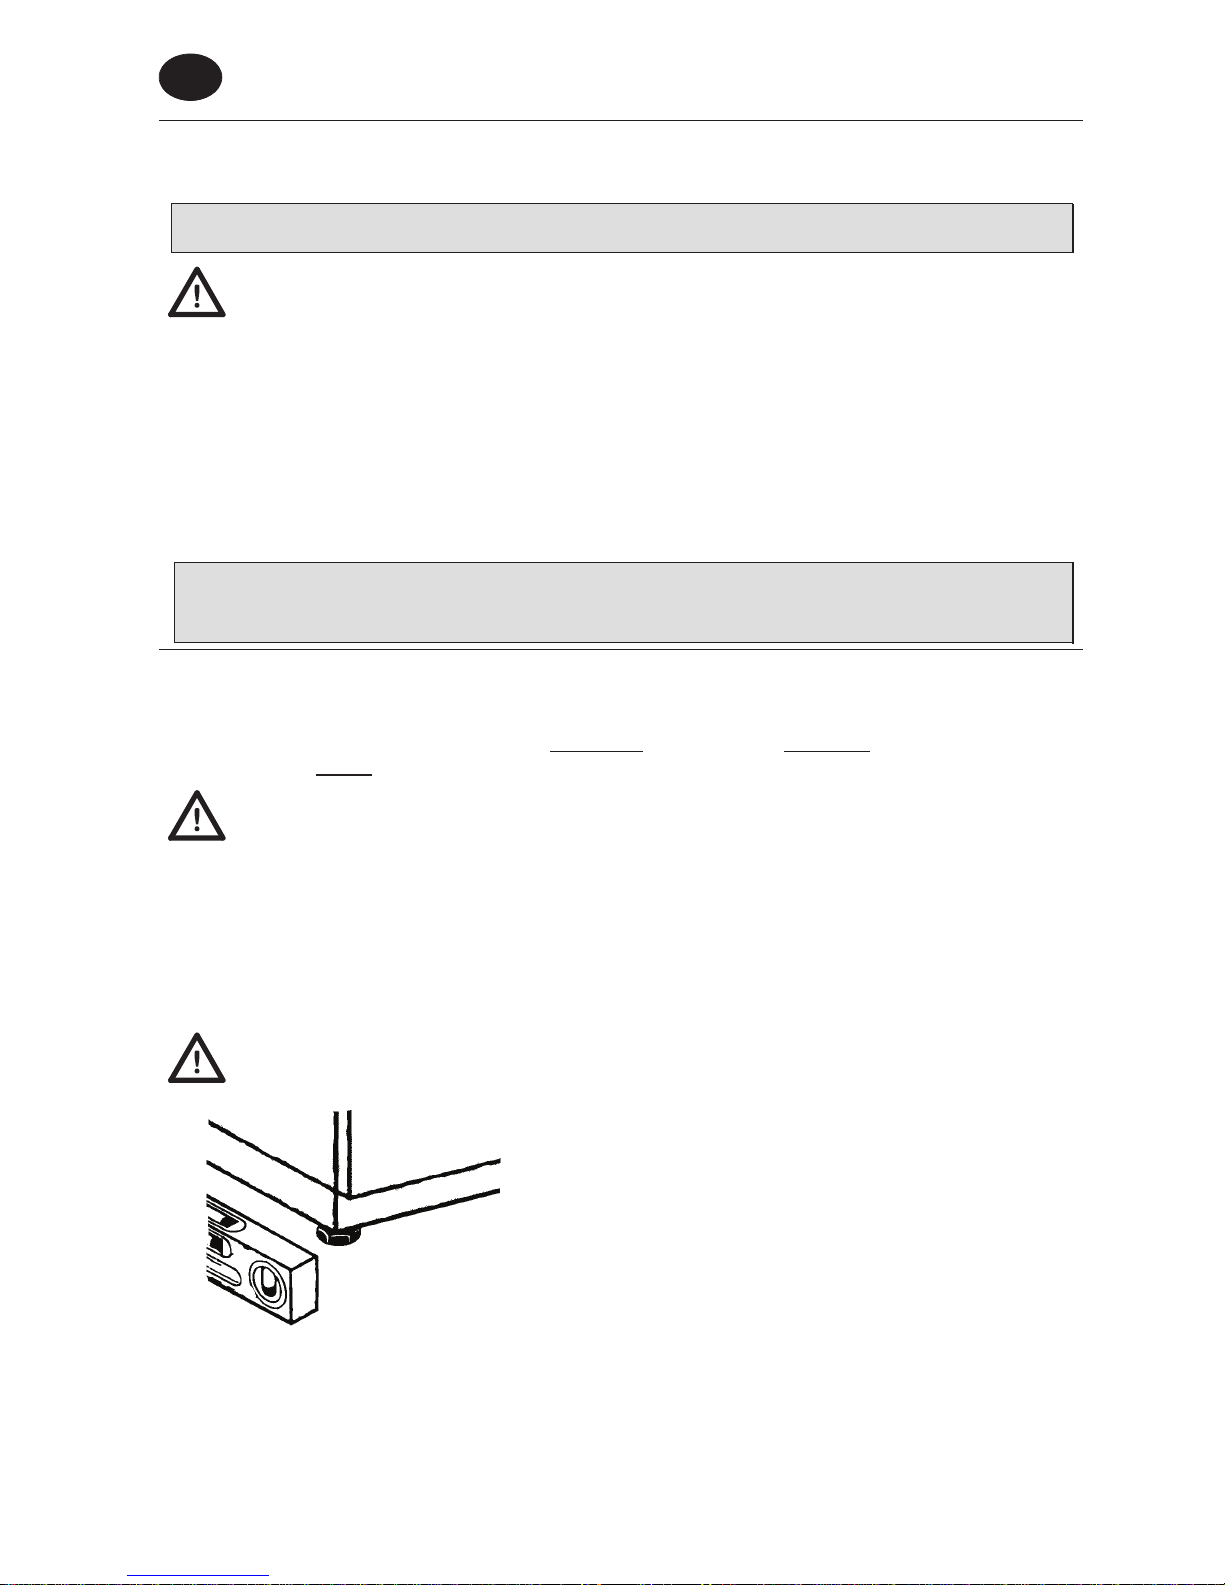
2.2 POSITIONING....................................................................................................................... 2
2.3 ELECTRICAL CONNECTION ................................................................................................... 3
2.4 PLUMBING CONNECTION ...................................................................................................... 3
2.5 CONNECTION TO THE DRAIN LINE ......................................................................................... 4
CHAP 3 RISKS AND IMPORTANT WARNINGS ....................................................................... 4
CHAP 4 USING YOUR APPLIANCE.......................................................................................... 5
4.1 SYMBOLS USED................................................................................................................... 5
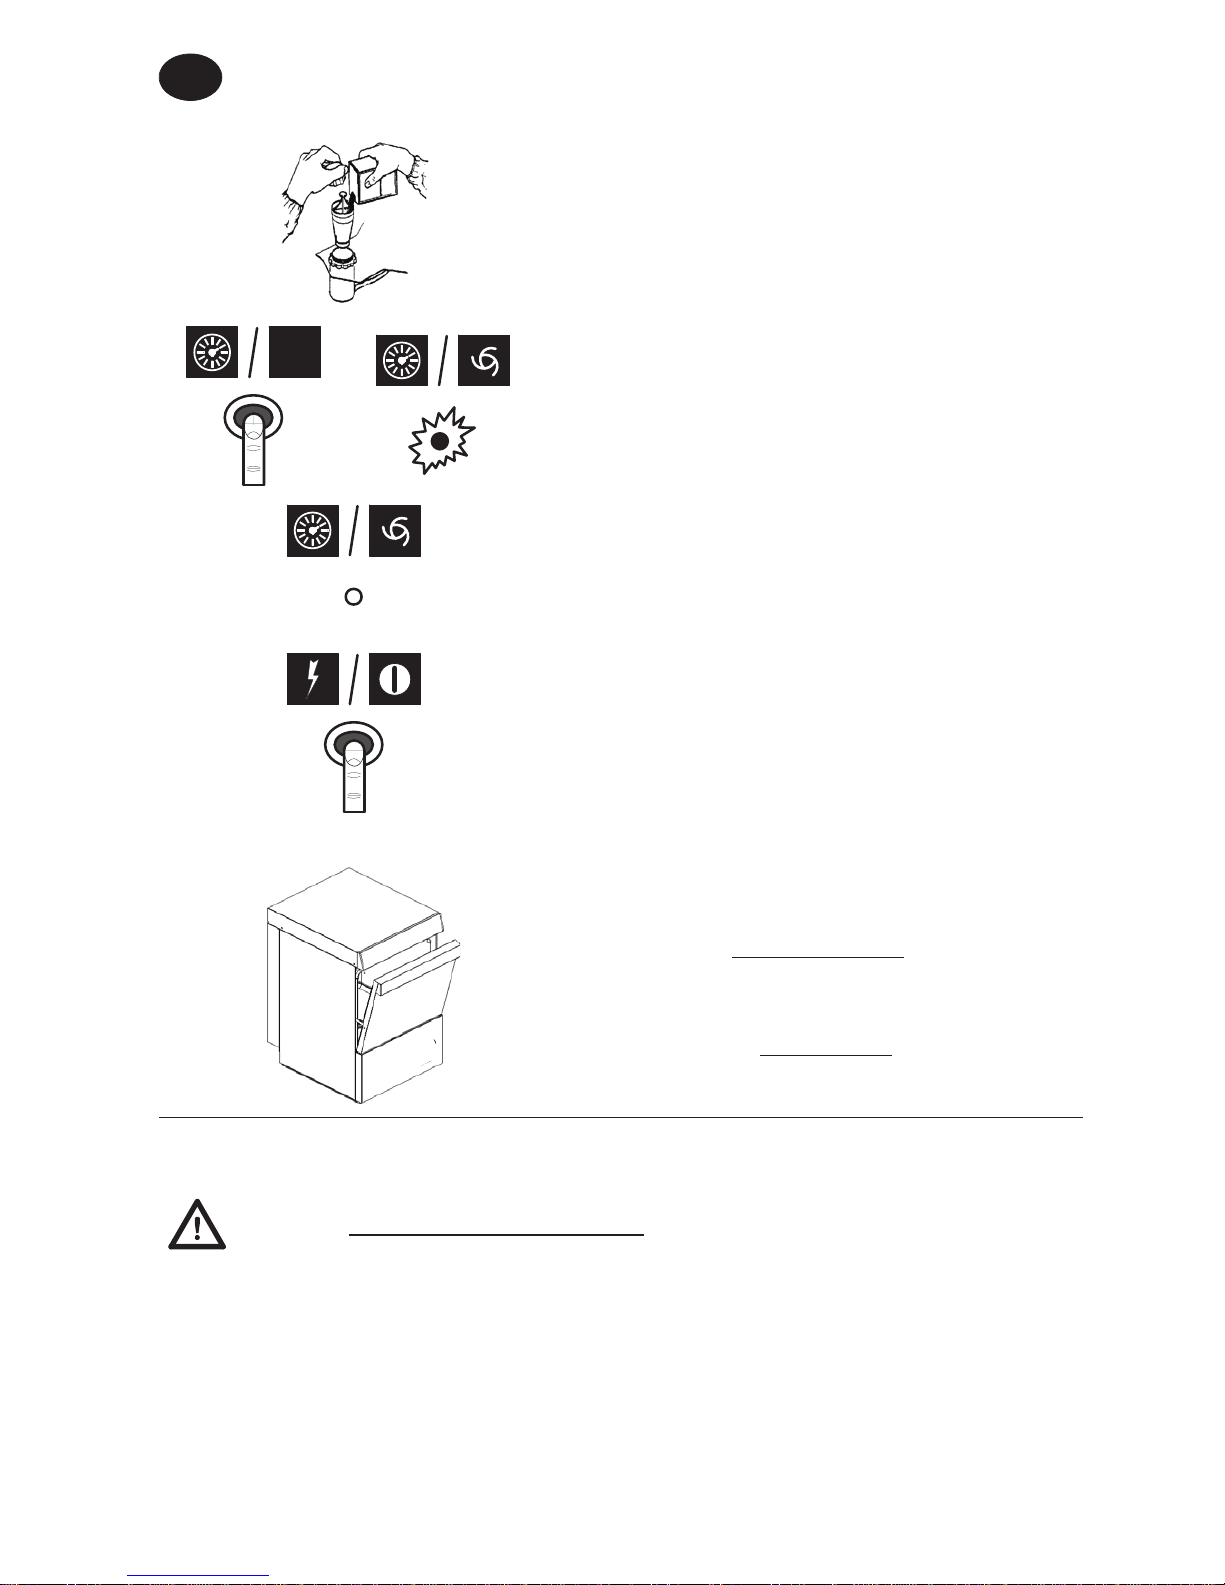
4.2 STARTING UP...................................................................................................................... 5
4.3 LOADING AND WARMING UP................................................................................................ 5
4.4 WASHING CYCLE................................................................................................................. 5
4.5 TURNING OFF THE APPLIANCE............................................................................................. 6
4.6 DISCHARGING THE APPLIANCE............................................................................................. 7
4.6.1Models without discharging pump ............................................................................. 7
4.6.2Models with discharging pump .................................................................................. 7
4.7 REGENERATING THE ION EXCHANGE RESINS ....................................................................... 7
4.8 END OF SERVICE................................................................................................................. 8
CHAP 5 MAINTANANCE............................................................................................................ 8
5.1 HYGIENE AND CLEANING...................................................................................................... 8
5.2 ROUTINE MAINTENANCE (DAILY)........................................................................................... 8
5.3 WEEKLY MAINTENANCE....................................................................................................... 9
5.4 ANNUAL MAINTENANCE ..................................................................................................... 10
CHAP 6 ADJUSTMENTS AND SETTINGS.............................................................................. 10
6.1 DISPENSER....................................................................................................................... 10
6.1.1Rinse agent dispenser............................................................................................. 10
6.1.2Models with no detergent metering unit .................................................................. 11
6.1.3Models with detergent dispenser (available on request) ......................................... 11
CHAP 7 DEINSTALLATION ..................................................................................................... 12
CHAP 8 DISPOSAL .................................................................................................................. 12
8.1 CORRECT DISPOSAL OF THIS PRODUCT ............................................................................. 12
In legal terms, the manufacturer reserves the property of this document. It is forbidden to reproduce it or divulge it with any means
without prior written authorisation.
The manufacturer reserves the right to introduce changes in order to achieve the improvements it deems necessary without prior notice.
442392 REV00 07
-
08
-
09 GB

INSTRUCTION MANUAL FOR DISHWASHERS
Page 2 of 12
GB
Chap 1 PREFACE
Failure to follow the instructions provided in the attached documentation may jeopardize
safety of the appliance and immediately cancel the warranty.
The warnings contained in this manual provide important information regarding
safety during the various installation, operation and maintenance stages.
Carefully store all documentation near the appliance; give it to the technicians and operators who
will be using it. It is the operator’s duty to read, understand and learn this manual before
starting any operation on the machine. The appliance is intended for the professional washing of
dishes for communities, so installation, use and maintenance must in all cases to be performed by
trained personnel who follow the manufacturer’s instructions. Do not leave within the reach of
children. The choice of materials, construction in conformity with CE safety directives and complete
testing ensure the quality of this machine. In addition to this manual, you will find in the machine:
xwiring diagram
xtopographic table
The manufacturer declines all responsibility for damage to things or injuries to persons
deriving from failure to comply with the instructions given or from improper use of the
machine.
Chap 2 INSTALLATION
Proper installation is essential in order for the machine to operate well. Some of the data needed for
machine installation can be found on the data plate placed on the right side of the machine and in
duplicate on the cover of this manual.
Only qualified, authorised technicians must install the machine.
2.1 Unpacking
Check that the packing is in perfect condition and write down any damage found on the delivery
note. After you have removed the packing, make sure the appliance is intact. If the machine is
damaged, immediately notify the dealer by fax or by registered letter with advice of receipt and the
haulage contractor that transported it. If the damage is such as to jeopardize machine safety, do not
install and/or use until a qualified technician services it.
The packing components (plastic bags, foam polystyrene, nails, etc. ...) must not be
left within the reach of children and pets as they may be dangerous.
2.2 Positioning
xCheck that there are no objects and materials in the
installation area that can be damaged by steam that
may exit the machine during operation, or at least
that they are sufficiently protected.
xIn order to ensure stability, install and balance the
machine on its four feet.
xDifferent installation solutions must be agreed upon
and approved by the manufacturer.

INSTRUCTION MANUAL FOR DISHWASHERS
Page 3 of 12
GB
Mod.
V~ Hz kW A
S/N
H2OkPa °
C
2.3 Electrical connection
xThere must be an omnipolar type of main switch
that disconnects all contacts, including the
neutral, with a distance of at least 3 mm between
the open contacts and with safety circuit breaker
tripping or connected with fuses, to be sized or
calibrated in conformity with the power indicated on
the machine’s data plate.
xThe main switch must be located on the electric line
close to the installation, and it must serve only one
appliance at a time.
xElectric network voltage and frequency must coincide
with those given on the data plate.
xThere must be an effective earthing system in
conformity with the prevention standards in force for
operator and equipment safety.
xThe power supply cable (type H07RN-F only) must
not be pulled or crushed during normal operation or
routine maintenance.
xThe unipotential terminal fastened to the body must
be connected to a unipotential cable having a section
suited to the application.
xRespect the polarities indicated in the wiring
diagram.
xConsult that attached wiring diagram for additional
information.
Do not use adaptors, multiple socket-outlets or cables of inadequate type and section
or with extension connections not compliant with plant engineering standards in
force.
2.4 Plumbing connection
The appliance is to be connected to the water network
with a hose. There must be a slide on-off, ball or gate
valve able to quickly and completely turn off the water
if necessary between the water network and the
appliance’s solenoid valve. The on-off valve must be on
the line near and right before the appliance.
xIf the system is new or barely used, have the water run a long time before making the
connection.
xThe water supply, temperature and pressure must be compatible with what is indicated on the
machine’s technical data plate.
xIf the water’s hardness is greater than 14 F (8 dH), we recommend you use the machine with
internal water softener (available on request). If the water’s hardness is greater than 35 F (19.5
dH), we recommend you install an external water softener upline of the solenoid valve.

INSTRUCTION MANUAL FOR DISHWASHERS
Page 4 of 12
GB
Free drain
2.5 Connection to the drain line
xThe drain line must be made up of a free water
trap of a size proportionate to the delivery of the
drain pipe supplied with the machine. The pipe must
be able to reach the water trap without being
pulled, squeezed, bent, crushed, pressed or
forced by anything.
xThe tank empties by gravity, so the drain must be at
alower level than the base machine.
Max.
1 m
With discharge pump (available on
request)
xIf the drain is not at a lower level than the base of the
machine, you can use the version equipped with a
discharge pump (available on request).
xIn this case the maximum drain height is 1 m.
x
A
lways check that the drain works properly and that it
is not clogged.
x
A
ll other solutions must be previously agreed upon
and approved by the manufacturer.
Chap 3 RISKS AND IMPORTANT WARNINGS
xThis appliance is to be used only for the use for which it was expressly designed. All other uses
are to be considered unfit and therefore dangerous.
xThe specialised personnel who will install the machine is obliged to appropriately instruct
the user on the appliance’s operation and any safety measures that are to be complied
with, also by providing practical demonstrations.
xAny type of service done on the machine, also in the case of failure, must be performed only by
the manufacturer or by an authorised service centre and by qualified personnel, using only
original spare parts.
x
A
lways disconnect or separate the machine from the electric and water networks before
performing maintenance, repairs or cleaning.
xUntrained personnel must NOT use the machine.
xThe machine must NOT remain live when it is not used.
xNEVER open the machine door quickly if it has not finished the cycle.
xNEVER use the machine without the factory-installed safety attachments.
xNEVER use the machine for washing object of a type, shape, size or material not guaranteed for
machine washing or not perfectly intact.
xNEVER use the appliance or its parts as a ladder or support for people, things or animals.
xNEVER overload the open door of front-loading machines, which are sized to support only the
rack loaded with kitchenware.
xNEVER immerse bare hands in the washing solutions.
xNEVER turn the machine over after installation.

INSTRUCTION MANUAL FOR DISHWASHERS
Page 5 of 12
GB
Chap 4 USING YOUR APPLIANCE
4.1 Symbols used
? ?? Push the button
corresponding to one of the
symbols shown.
? ?? Push the button corresponding
to one of the symbols shown.
The related warning light
illuminates.
? ?? The warning light
corresponding to one of the
symbols shown lights up.
? ?? The warning light
corresponding to one of the
symbols shown turns off.
4.2 Starting Up
1. Open the main water tap and engage the main
electrical switch.
2. Ensure the overflow cap is present.
3. Push the “on/off” button shown here. If present, the
related warning light will light up.
4.3 Loading and Warming Up
xIf the tank is empty, the appliance starts filling up once
switched on.
xOnce the tank is filled up, the warm up process is
started. If present, the related warning light goes off.
x
A
s tank and boiler reach the set temperature, the
warning light turns off.
xTo reduce the waiting time, it is possible to carry out
an empty cycle, 5-10 minutes after starting the
appliance.
4.4 Washing Cycle
xCheck for the presence of dishwashing detergent and
rinse agent. Information on the type of products and
quantities to be used (automatic or manual) is given in
chapter “Adjustments and settings”.
xUse an adequate rack; do not overload the rack o
r
place dishes on top of each other. Always remove
large food particles from dishes; do not load dishes
with dry food residues.
xPlace empty bowls upside down in rack. Load dishes
and similar items slanted on dedicated rack with
internal surface facing upwards. Accommodate all
silverware in the supplied basket with handles-down.
xWash only items approved for dishwashing.
xIt is advisable to wash the dishes immediately afte
r
use, in order to prevent any residuals from hardening
and sticking on them.

INSTRUCTION MANUAL FOR DISHWASHERS
Page 6 of 12
GB
For versions with rotating basket:
xIf possible, run the cycle only with the basket full,
evenly distributing the dishes.
xPlace the lightest dishes near the middle of the rack,
and the heaviest ones near the outside.
xPlace the smallest dishes near the middle of the rack,
and the largest ones near the outside.
xLoad rack into dishwasher and shut the door.
xFor versions with rotating basket, make sure the basket turns freely, lightly spinning i
t
clockwise, then close the door and start the cycle.
xIn order to avoid damages, only load items approved for dishwashing.
xDo not place silver and stainless steel cutlery in the same basket. This may corrode the steel
and cause the silver to burnish.
On appliances featuring different washing times, select
the appropriate time for the loaded items by using the
“time selection” knob shown here.
START
xTo start the cycle, press the “start” button shown.
xIf available, the “cycle warning light” lights up to
indicate that the cycle has started.
x
A
fter the washing portion of the cycle is terminated,
the appliance automatically initiates the rinse and
discharge operations. At the end of the cycle, the
warning light turns off.
xIf during the cycle the door is accidentally opened, the appliance will automatically stop. To
resume the cycle, simply shut the door.
xFor a quick drying, immediately remove the rack from the dishwasher, once the cycle is
terminated.
xIf the washing solution is found to be excessively dirty or dirt residues are spotted on the
tank filter, carry out the standard maintenance operations as described in the
“Maintenance” chapter.
xTo perform other cycles, repeat the operations listed in the “Washing cycle” paragraph.
4.5 Turning Off the Appliance
Press the “On/off” button as shown. If present, the
corresponding warning light will turn off.

INSTRUCTION MANUAL FOR DISHWASHERS
Page 7 of 12
GB
4.6 Discharging the Appliance
4.6.1 Models without discharging pump
1. Turn off the appliance as described in the “Turning of
f
the Appliance” paragraph, above.
2. Remove the overflow cap: wait until the tank is
completely empty.
4.6.2 Models with discharging pump
1. Turn off the appliance as described in the “Turning of
f
the Appliance” paragraph, above.
2. Remove the overflow cap and shut the door.
3. Push the “discharging pump” button shown to drain.
START 4. On models without the “discharging pump button”, turn
off the appliance as described in the “Turning off the
Appliance” paragraph, above.
5. Remove the overflow cap and shut the door.
6. Push the “start” button, shown to drain.
xWith the tank completely empty, clean the appliance as described in the “Maintenance”
paragraph.
xTurn off the appliance whenever the overflow cap is removed.
4.7 Regenerating the Ion Exchange Resins
If the machine is equipped with an internal softener (available on request), in order to ensure its
correct performance, it is necessary to periodically regenerate the ion exchange resins. The numbe
r
of cycles between each regeneration is set by the hardness of the water, according to the following
table.
dH F No. of
Cycles dH F No. of
Cycles dH F No. of
Cycles dH F No. of
Cycles
6,0 10 153 9,5 17 107 13,5 24 73 17,5 31 52
6,5 11 147 10,0 18 100 14,0 25 70 18,0 32 50
7,0 12 140 10,5 19 93 14,5 26 67 18,5 33 48
7,5 13 133 11,0 20 87 15,0 27 63 19,0 34 47
8,0 14 127 12,0 21 83 15,5 28 60 19,5 35 43
8,5 15 120 12,5 22 80 16,0 29 57
9,0 16 113 13,0 23 77 17,0 30 53
xIt is suggested to carry out the regeneration during breaks.
xTurn off the appliance as indicated in paragraph “Turning off the appliance”.
xDrain the appliance as indicated in paragraph “Discharging the appliance”.
xClean the dishwasher as directed in chapter “Maintenance”. At the end of the cleaning
procedure, open the main water tap and engage the main electrical switch.

INSTRUCTION MANUAL FOR DISHWASHERS
Page 8 of 12
GB
xMake sure the overflow cap has been removed.
xOpen the salt dispenser inside the tank.
xPour approx. 250g of regenerating salt (cooking salt
with no additives and grains of 1-2 mm in diameter).
xClose the dispenser flap.
xShut the door
START
xWithout turning the appliance on, press the “start”
button until the “cycle warning light” goes off.
xThe regeneration cycle is then started and will last fo
r
approximately 20 minutes.
xThe regeneration is completed when the cycle
warning light turns off.
At the end of the regeneration cycle, with the tank empty
and the overflow cap removed, it is suggested to:
xTurn the appliance on by pressing the “On/off” button
shown.
xLet water run through for approx. 1 minute so to
remove salt residues from the tank.
xTurn the appliance off by pressing the “On/off” button;
hence refit the overflow cap.
The appliance is now ready to resume its service.
4.8 End of Service
x
A
t the end of the day always drain the machine as
described in the “Machine draining” section.
xDisconnect the power supply by means of the
main switch and close the external water cock.
xPerform routine maintenance and clean the machine
as described in the “Maintenance” section.
xIf possible, leave the door ajar to prevent the formation
of bad smells inside.
Chap 5 MAINTANANCE
Before carrying out any maintenance operation, drain all the water as described in
paragraph “Discharging the Appliance”, cut the power by disengaging the main
electric switch, and shut the external water valve.
5.1 Hygiene and cleaning
To guarantee machine hygiene the routine (daily), weekly and yearly maintenance operations
indicated below must be regularly performed. Also carry out a periodical sanitising treatment with
suitable non-corrosive products available on the market.
5.2 Routine maintenance (daily)
xIf dirt residues are found at the bottom of the tank:
xRemove and clean racks, overflow, and filter.

INSTRUCTION MANUAL FOR DISHWASHERS
Page 9 of 12
GB
xTo clean the steel tank, do not use abrasive detergents or objects; instead, use a lightly soaped
damp cloth.
xDo not use pressurised water jets as these may damage the electrical system.
5.3
W
eekly Maintenance
xPerform routine maintenance.
xRemove and clean the wash and rinse arms and nozzles.
Illustrated below are the possible configurations of upper and lower wash/rinse arms.
(*) Spray closed. Nozzle not present.
xClean the arm rotation pins and the wash and rinse water
outlet zone.
xCarefully clean the tank and machine, using non-abrasive
disinfectant products.
xCorrectly refit the nozzles, arms and filters, paying attention to
the inclination and coupling of the arms in their respective
seats.

INSTRUCTION MANUAL FOR DISHWASHERS
Page 10 of 12
GB
5.4 Annual Maintenance
Have your appliance carefully inspected by an authorised technician, and in particular:
xRemove residues from the bottom of the tank.
xRemove and deep clean wash arms and diffusers.
xThoroughly clean the weir inserted in the lower wash arm shaft and the water exit area.
xCorrectly refit weir, pivoting pins and wash arms.
xInspect the conditions of the sealing gaskets and the wear of other components such as pumps,
dispensers, etc.
xInspect the settings of washing detergent and rinse agent dispensers.
xInspect and eventually clean the resistors.
If the appliance is not used for long periods of time, it is necessary to have it adequately setup. I
f
you have any suspects about the presence of ice, do not run the appliance until an authorised
technician has inspected boiler and pipes.
Chap 6 ADJUSTMENTS AND SETTINGS
The following adjustment and setting operations may be carried exclusively by qualified
and authorised personnel, paying the utmost care and attention, and taking all
precautions in the event that safety features are bypassed.
6.1 Dispense
r
Before the zeroing operation may be carried out,
dispenser(s) and supply pipes must be filled up. The
zeroing is performed via the adjusting screws which may
be reached by removing the front panel underneath the
tank door.
xThe warranty does not cover damages resulting from improper use of the
dispenser(s) or incorrect manual feed.
xType and dosage of detergent and rinse agent are crucial in affecting the
appliance’s performance and service life. Use only liquid products for industrial
washing with antifoaming agents.
xAdjustments must be made with the appliance hot and correct amount o
f
washing product.
6.1.1 Rinse agent dispense
r
The level of rinse agent inside the container must be adequate; it must never be
completely emptied, or topped-up with corrosive or impure products. To fill up the supply
pipe and the dispenser, turn on the appliance and start the washing cycle, wait fo
r
approx. 20 seconds and press the “On/off” button for 8-10 times with intervals o
f
approximately 10 seconds. Leave it pressed to let the cycle terminate.
x
Turning the adjusting screw anticlockwise, reduces
the quantity of rinse agent released, while turning it
clockwise, increases the dosage.
xFor a rough estimate concerning the amount of rinse
agent required for the first zeroing operation, refer to
the dosage suggested by the manufacturer of the
product.
xThe screw adjustment must be refined on the basis o
f
the results obtained after at least three rinsing cycles,
so to let the system settle.
xStriations on washed items and the formation of foam within the washing solution indicate an
excessive quantity of rinse agent. Items covered with water drops and long drying time, indicate

INSTRUCTION MANUAL FOR DISHWASHERS
Page 11 of 12
GB
insufficient amount of rinse agent.
xTo obtain optimum results, use only rinse agents with a manufacturer’s suggested dosage o
f
less than 1.5 gr. /litre.
x7.9 cm of pipe = 1 ml. of product (= 1 gr. of product with a density of 1 kg/dm3). The amount o
f
water used for the rinsing process is approx. 3 litres/cycle.
xDo not modify the height difference between tank and appliance after setting the dosage.
xIf the height difference between tank and base of appliance is more than 80 cm, the dispense
r
may not work correctly.
xIf rinse aid is not used, completely close the dispenser adjustment screw.
6.1.2 Models with no detergent metering unit
Manual feed is discouraged as it does not guarantee
the optimal results offered by an automatic system. If,
however, an automatic dispenser is not used, introduce
the detergent in the pump intake filter area every five
cycles, in the dosage suggested by the manufacturer o
f
the detergent. Refer to the technical specifications to find
out the amount of water used in the tank; the quantity
used for rinsing is approx. 3 litres. At every top-up, add a
quantity of detergent corresponding to the quantity o
f
water in the tank and the five following rinsing cycles. Fo
r
following dosages only add the amount of detergent
required for rinsing operations.
The installation of a detergent dispenser is always recommended.
6.1.3 Models with detergent dispenser (available on request)
The level of detergent inside the container must be adequate; it must never be
completely emptied, or topped-up with corrosive or impure products. To fill up the supply
pipe it is sufficient to turn on the appliance and perform the first loading with the unit connected.
x
Turning the adjusting screw anticlockwise decreases
the amount of detergent released, while turning it
clockwise, increases the dosage (from 1 to 1.5 ml pe
r
rinse per mark, corresponding to approx. 1.2 – 1.8 gr.
of product with density 1.2 kg/dm3). Check the
appliance’s technical specifications to find out about
the amount of water in the tank.
xFor a rough estimate concerning the amount of rinse
agent required for the first zeroing operation, refer to
the dosage suggested by the manufacturer of the
product.
xThe screw adjustment must be refined on the basis o
f
the results obtained after at least three rinsing cycles,
so to let the system settle.
xAt the end each cycle, no foam must be present in the tank.
xIf foam is present, first check the type of detergent used and eventually replace with a more
adequate one. If foam is still present, check the water temperature in the tank is correct and
eventually reduce the dosage of detergent until all foam is successfully eliminated.
xWith the dispensers supplied, it is necessary to use only detergent with a manufacturer’s
suggested dosage less than 5 gr. /litre.

INSTRUCTION MANUAL FOR DISHWASHERS
Page 12 of 12
GB
Chap 7 DEINSTALLATION
Only qualified and authorised technical personnel can perform deinstallation.
xTurn off the power to the machine with the external main switch.
xShut off the external water supply tap.
xCompletely disconnect the machine from the electric and water supply networks.
xEmpty, clean and completely prepare all the internal water circuits, measuring devices, pumps
and boiler.
xCompletely empty the detergent and rinse aid dispensers and tubes connected to them, making
sure to correctly dispose of the detergent and rinse aid (contact the supplier of the products
used)
Chap 8 DISPOSAL
There are no materials on our machines that require special disposal procedures.
8.1 Correct Disposal of this product
(Waste Electrical & Elctronic Equipment)
(Applicable in European Union and other European countries with
separate collection systems)
This marking shown on the product or its literature, indicatess that
it should not be disposed with other household wastes at the end
of its working life. To prevent possible harm to the environment or
human from ncotrolled waste disposal. Please separate this from
other types of wastes and recycle it responsibly to promote the
sustainable reuse of material resources.
Household usures should contact either the retailer where thet
purchased this product or their local government office, for detils of
where and how they can take this item for evironmentallly safe
recycling.
This manual suits for next models
3
Table of contents
Other Bartscher Dishwasher manuals

Bartscher
Bartscher 110540 User manual

Bartscher
Bartscher GS HH 500 LR User manual

Bartscher
Bartscher GS M400 LPR K User manual

Bartscher
Bartscher E500D LPR User manual

Bartscher
Bartscher DS 901 User manual

Bartscher
Bartscher 110530 Parts list manual

Bartscher
Bartscher RK401 LPWR Quick start guide

Bartscher
Bartscher 109.245 User manual

Bartscher
Bartscher 110644 Quick start guide

Bartscher
Bartscher US E500 LPR User manual