Taurus T300 User manual

Instruction Manual
T300, T330, T350, T400, T500, T600
taurustelescopes.com

1
WARNING!
Telescope Taurus brings together a large amount of
sunlight. You should avoid aiming the telescope at the sun
without the mirror cover. Sunlight reflected by a mirror and
focused on the focal can severely burn people staying
nearby, damage their eyes, damage the telescope and start
a fire. Do not use the telescope to observe the sun. This may
cause an immediate loss of vision! Children should always
have adult supervision while observing.

2
Contents
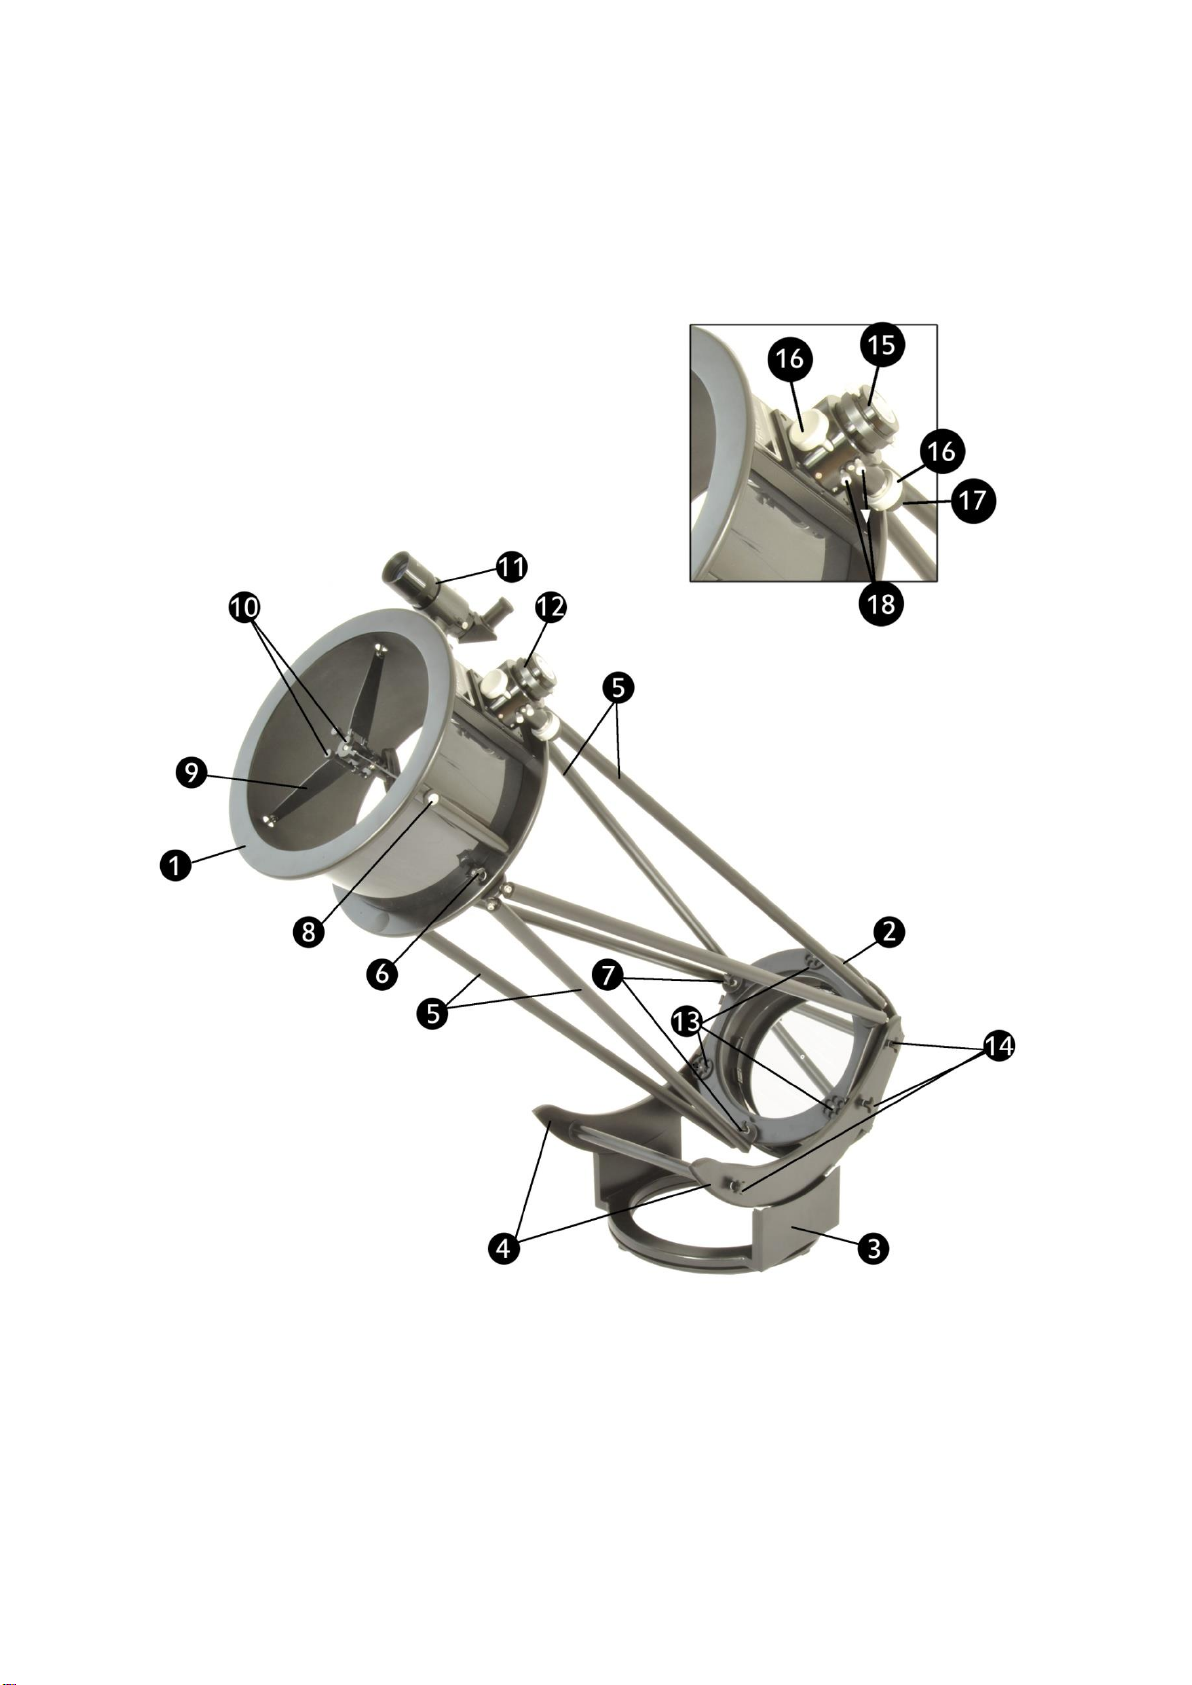
1. Elements of the set.............................................................................................................................. 3
2. Usage................................................................................................................................................... 5
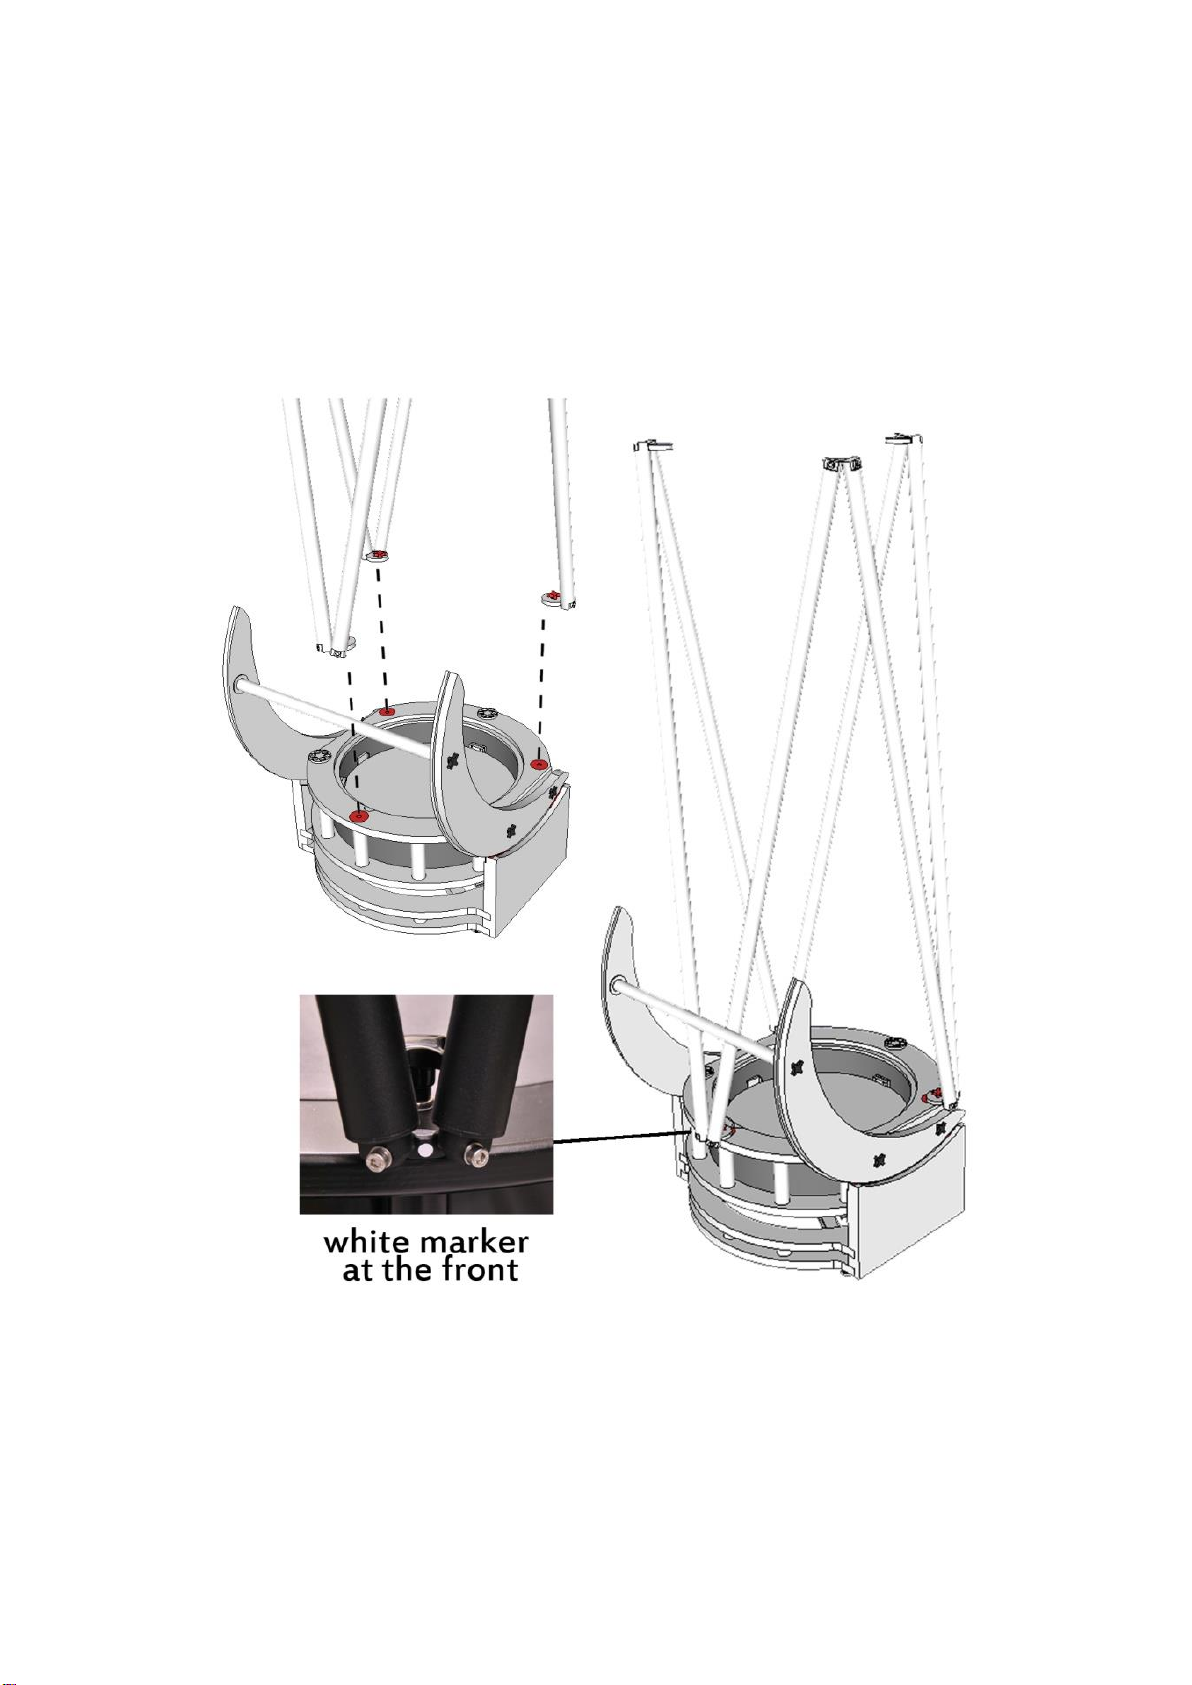
2.1. Assembling .......................................................................................................................... 5
2.2. Disassembling...................................................................................................................... 9
2.3. Preparation of the telescope to observe........................................................................... 10
2.4. Finder adjustment. ............................................................................................................ 10
2.5. The use of 2” eyepiece ...................................................................................................... 10
2.6. Using 2” filters with 1,25” eyepiece.................................................................................. 10
2.7. Shifting the focus............................................................................................................... 11
3. Collimation. ....................................................................................................................................... 12
3.1. Collimation of the secondary mirror................................................................................. 12
3.2. Primary mirror collimation................................................................................................ 13
4. Maintenance...................................................................................................................................... 14
4.1. Cleaning the main mirror. ................................................................................................. 14
4.2. Cleaning the secondary mirror.......................................................................................... 15
4.3. Removing the primary mirror............................................................................................ 15
4.4. Cleaning the covers. .......................................................................................................... 17
4.5. Care of wood. .................................................................................................................... 17
5. Specifications..................................................................................................................................... 17

3
1. Elements of the set.
1. Top cell
2. Bottom cell with the primary mirror
3. Base
4. Runners
5. Trusses
6. Top cel lock knobs
7. Bottom truss lock knobs
8. Spider adjustment
9. Spider 3- vanes
10. Collimation adjustment(secondary
mirror)
11. Finder (optional)
12. Crayford style focuser 2" dual rate
13. Collimation adjustment knobs
14. Runner's lock knobs
15. Adapter from 2" to 1,25"
16. Focus knob
17. Fine fous knob 1:10
18. Focus lock and tension adjustment
knobs
19. Truss shroud

4

5
2. Usage.
2.1. Assembling
When assembling the telescope should be remembered that all the elements should be put
together in two stages. First, the pre-turn with each individual elements so that they pass
well and then tighten the screws.
Step 1. If the top cell and bottom cell are connected together for transport, they should be
disconnected by unscrewing 3 knobs marked in red.
Note:
Do not raise cells fastened together by grabbing the top cell.
This can lead to damage and breakage of the element. Cells
should be pulled from the box alone or by grabbing lower cells.

6
Step 2. Bottom cell put on the ground and screw one runner into it. Then assemble one tube
spacers into runners screwed before and then screw in the second runner. Making sure it is
facing front of the telescope.
Step 3. Put the prepared cell on the base, so that the runners entered between teflon slides.

7
Step 4. Spread the truss, so that the elements of the screws are on the bottom, then set it to
the bottom of the cell. The screws should partially fall into the bottom cell holes, pre-tighten
them so that was still have 0,5-1 turns to be done. The white marker should be at the front
of the telescope.

8
Step 5. We put the top cell on the truss, the screws should partially fall into the hole for easy
installation. The screw that is nearest to the focuser should be at the back of the telescope.
Screw in and tighten the screws at the top cell, and then tighten the screws at the bottom of
the truss.
Step 6. If necessary, attach the tube shroud. Start from the top of the telescope was on the
front of the telescope. Take off the primary and secondary mirror cover. The drawcord
should be put on two hooks located in front of the bottom cell

9
Step 7.Check if the telescope is properly collimated. If so, mount the eyepiece and the
telescope is ready for use. If the telescope needs to improve the collimation, see instruction,
point 3.
Step 8. Place the finder(not included in the set) in the base and lock it with the screw.
2.2. Disassembling.
Disassembling the telescope is done in the reverse order as above. Pay special attention to
the primary mirror the installation of the protective cover.

10
2.3. Preparation of the telescope to observe.
When assembled, the telescope should wait until the mirror has cooled, it will improve the
image quality significantly especially at higher magnifications. The openwork design of
telescopes Taurus allows air to circulate freely around the mirrors, which greatly speeds up
the process.
Once you completed observations, you must first attach the cover of the main mirror. To do
this, you have to unhook some snaps. Only after the closure of the main mirror it is safe to
proceed with the disassembling of the telescope.
2.4. Finder adjustment.
➢Put the eyepiece with longest focal into the focal.
➢Point the telescope at the sky and find any bright start in the finder.
➢Look into the telescope and see if the star is visible. If not, turn a telescope in circles
looking for a star. After finding it, set it in the middle of the vision area.
➢Without moving the telescope, look through the seeker and set adjusting screws so
that the star is at the intersection of the finder cross.
2.5. The use of 2” eyepiece
In order to use the eyepieces with a diameter of 2" you need to partially unscrew the
two screws from the eyepiece lift and remove the reducer.
2.6. Using 2” filters with 1,25” eyepiece
The reducer in the lower part has a filter screw in a 2" format. You can screw any 2"
filter into this screw and placed in a focuser. This makes it possible to use 1.25" eyepieces
with 2" filters.

11
2.7. Shifting the focus.
Taurus telescopes (depending on the model and equipment) are capable to reduce the truss,
which moves the focal length beyond the 45mm from the eyepiece. To do so, remove the
spacers. This allows shooting in the so-called main focus of the telescope. When mounting
the camera instead of the eyepiece you will receive a summary grid focal outcome same as a
telescope.
Reducing the truss starts with the top cell removal. Then manually unscrew the spacer in the
opposite direction to clockwise, if it does not want to "let go", use the Allen key to loosen
the screw holding spacer. Now you can re-install the top cell.
WARNING!
Prior to removing the spacers, secure assuming
primary mirror cover. There is a risk of
dropping screws on the primary mirror.

12
3. Collimation.
Taurus telescopes, like any optical device, especially refractor, needs to be collimated. In our
products we have made every effort to ensure that this process was fast, easy and does not
require tools, possible to perform in all conditions and at any time of the day. Collimation is
done in two stages. Secondary mirror first, then the main mirror.
Note: Each telescope before it leaves the factory is collimated. A verification and possible
minor corrections may be necessary. For this purpose, we recommend the use of an optical
or laser collimator. If you do not have a collimator, then on the mirrors there are markers
that facilitate collimation. The ring on the primary mirror and (depending on the version) dot
on the secondary mirror.
3.1. Collimation of the secondary mirror.
There are three knobs for the secondary mirror collimation.
Looking through the extended focuser (without eyepiece) check to see if a black dot in the
center of the secondary mirror matches with white ring on the primary mirror. The eye
should be set as closely as possible to the center of focuser
Collimation should be done before putting the cover.

13
If the dot is in the middle of the secondary mirror, gently manipulate the knobs in order to
achieve the desired effect.
incorrect correct
3.2. Primary mirror collimation.
The new Taurus® telescopes series is equipped with three large knobs for collimation. They
are located on the upper ring of the main cell, which made the collimation process more
comfortable and faster.
The center of the main mirror is marked with white ring. While looking through the focuser,
you need to turn the main mirror collimation screws, until you see your eye reflection to be
placed in the middle of white circle.

14
For the properly collimated telescope, the focuser reflection in the secondary mirror is not
centered, you can see it in the picture. This is due to the offset of the secondary mirror and
do not try to fix it..
Incorrect Correct
4. Maintenance.
4.1. Cleaning the main mirror.
To clean the dust from the mirror is best to use a gentle stream of air, such as medical pears
that we can blow off the dust from the mirror.
Stubborn dirt should be removed by washing the mirror. In a domestic environment will be
needed: 1-2 liters of distilled water, hair dryer, shower.
Note!
The main mirror, as well as the
secondary mirror must not touch or be
cleaned with any materials or tools.

15
1. Remove the primary mirror from the bottom cell and binding (see 3.3 Removing the
primary mirror).
2. Place the mirror in the bath or shower tray and rinse for strong stream of hot water
(eg. showering).
3. In case of stubborn stains, remove them gently using soapy fingers.
4. When the dirt is removed - wash the mirror with distilled water. This is extremely
important because the normal water will bleed.
5. Dry the mirror with a strong cold air flow from the dryer.
6. Attach the mirror to the binding and the bottom cell.
4.2. Cleaning the secondary mirror.
Cleaning the secondary mirror is made the same way as the main mirror.
4.3. Removing the primary mirror.
1. Place the bottom cell on a flat surface;
2. Turn the collimation knobs counter-clockwise, until you can easily lift the bottom cell.
Mirror with the binding should remain on the ground.

16
3. Remove the protection from the clutches holding the mirror. To do this, hold the pad
with one hand, with the other unscrew the two screws with an Allen key and gently
raise the block, taking care not to unnecessarily dirt a mirror. Repeate
4. this step for each foot.
5. Raise the glass with both hands from the bottom.

17
When installing the mirror repeat all the steps in reverse order.
4.4. Cleaning the covers.
Transportation covers(they are not in the set) and tube cover can be cleaned dry or
manually. Machine washing only at your own risk..
4.5. Care of wood.
Wooden parts can be cleaned and waxed by a majority of the maintenance of
furniture.
5. Specifications
Taurus reserves to the product or discontinue products without notice.
This manual suits for next models
5
Table of contents
Popular Telescope manuals by other brands

Takahashi
Takahashi FC-100DZ instruction manual

Celestron
Celestron FirstScope 76EQ Quick setup

Carson
Carson Skelescope SK-100 instruction manual

Vixen
Vixen VC200L brochure

Orion
Orion STARBLAST instruction manual

ORION TELESCOPES & BINOCULARS
ORION TELESCOPES & BINOCULARS FunScope Astro Dazzle 4.5 instruction manual