Tchibo 605 193 User manual

LAMP
MON
MENU
MON
MENU
Walkie-Talkies
Tchibo GmbH D-22290 Hamburg · 111938FV05X00XI · 2020-10
en Instructions for use

Dear Customer
Your new walkie-talkies are perfect for communicating
easily without any costs. The set has an extensive range
of up to 3000 metres in optimum conditions, making it
particularly suited to outdoor use.
You can use it during family outings or at sports events
with friends, for example.
Whether you are taking part in survival training, trekking,
or power walking in broken terrain, your new walkie-talkies
will serve you well.
Yet the walkie-talkies are not just suitable for outdoor use.
The VOX function also means they can be used as a baby
monitor.
We hope you enjoy using these walkie-talkies.
Your Tchibo Team
www.tchibo.de/instructions
(Please enter the product number in the box labelled
“Bedienungsanleitungssuche” and click on “Suchen”)

3
4 About these
instructions
5 Safety warnings
7 Technical specifications
8 At a glance (features)
10 Prior to first use
10 Unpacking
10 Removing and inserting
the belt clip
11 Inserting batteries
11 Changing the batteries /
capacity status
12 Standby mode
12 Connecting headphones
or earphones
13 What you need to know
14 Basic settings
14 Switching on and off
14 Activating / releasing
button lock
15 Setting the channel
15 Setting a sub-channel
16 Adjusting speaker volume
16 Setting the ringtone
17 Setting the button tone
17 Setting the confirmation
signal
17 Setting the voice control
(VOX function)
19 Use
19 Sending the call alert
tone
19 Sending a message
19 Receiving a message
20 Searching for weak
signals (monitor function)
20 Scanning all channels
(scan function)
21 Switching on the display
lighting
22 Switching the light on
and off
22 Cleaning
22 Declaration of
Conformity
23 Problems / solutions
24 Disposal
Contents

4
About these instructions
This product is equipped with safety features. Nevertheless,
read the safety warnings carefully and only use the product
as described in these instructions to avoid accidental injury
or damage.
Keep these instructions for future reference. If you give this
product to another person, remember to also include these
instructions.
Symbols used in these instructions:
This symbol warns you of the danger of injury.
The term DANGER warns against possible severe injuries
and danger to life.
The term WARNING warns against injuries and severe
material damage.
The term CAUTION warns against slight injuries or damage.
Further information is marked using this symbol.

5
Safety warnings
Intended use
The walkie-talkies enable
low-interference voice
contact between users over
short to medium distances.
They are designed for private
use and are not suitable for
commercial purposes.
Respect the privacy of other
people. Do not listen in on
discussions on other radio
devices or from baby
monitors, for example.
DANGER to children
•Swallowing batteries can
be fatal. If a battery has
been swallowed, it can cause
severe internal chemical
burns and even death within
2 hours. Therefore, keep
both new and old batteries
and the product out of the
reach of infants. If you think
that a battery has been
swallowed or has got into
the body in any other way,
seek medical advice
immediately.
•Keep the packaging material
out of the reach of children.
There is a risk of suffoca-
tion! You should also store
small parts (e.g. the belt
clips) out of the reach of
small children.
CAUTION - risk of injury
•Do not use the walkie-
talkies in environments
where there is a risk of
fire or explosion.
•Single-use batteries must
not be charged, taken apart,
thrown into fire or short-
circuited.
•If a battery has leaked,
avoid all contact with skin,
eyes and mucous mem-
branes. If necessary, rinse
the affected areas with
water and consult a doctor
immediately.

6
CAUTION - material
damage
•Protect the devices from
impacts, falls, dust, mois-
ture, direct sunlight and
extreme temperatures.
Never immerse the devices
in water or other liquids.
•Do not take the devices
apart. Repairs must only be
carried out by a specialist
workshop.
•Protect the batteries from
excessive heat. Remove the
batteries from the product
if they are flat or if you
do not intend to use the
product for a long period
of time. This helps prevent
damage caused by leakage.
•Always replace all batteries
at the same time. Do not
mix old and new batteries
and do not use different
types or brands of batteries,
or batteries with different
capacities.
•Ensure correct polarity
(+/–) when inserting the
batteries.
•Clean the contacts on the
batteries and device as
required before insertion.
Danger of overheating!
•Do not use any caustic
chemicals, or aggressive
or abrasive detergents for
cleaning.
•The built-in LEDs cannot
and must not be replaced.
You must not use the
walkie-talkies in the
following situations:
•To prevent electromagnetic
conflicts, you must switch
the walkie-talkies off when
signs prompt you to do so.
•You must always switch off
the walkie-talkies in areas
where the use of mobile
phones is prohibited (petrol
stations, aeroplanes,
hospitals, etc.).
•Do not use the walkie-talkies
while operating a vehicle.

7
Technical specifications
Model: 605 193
Batteries: 2x 4 LR03 (AAA)/1.5 V
Channels: 8
System: Private Mobile Radio (PMR),
UHF band
Frequency: 446.00625 MHz (channel 1) to
446.09375 MHz (channel 8)
Transmission power: 0.5 watts
Range: up to 3000 m in open spaces
Headphone port: 2.5 mm jack plug (not included)
Ambient temperature: +10 to +40 °C
Made exclusively for: Tchibo GmbH, Überseering 18,
22297 Hamburg, Germany
We reserve the right to make technical and optical
modifications to the appliance in the course of
product improvements.

8
MON
MENU
At a glance (features)
Antenna
Included:
– 2 walkie-talkies
Not illustrated:
– 8 x single-use batteries
On/Off switch
Menu button
Selection button
Front
On/Off switch
for light
Scan button
Selection button
Call alert tone
button
Headphone port
Light
Display
Send button TALK
Signal search
button MON
Microphone/
speaker

9
Back
Battery compartment
Belt clip

10
Prior to first use
Unpacking
DANGER to children – danger to life due
to suffocation/choking
•Keep all packaging material out of the reach of children.
Dispose of it immediately. Store small parts (e.g. the belt
clips) out of the reach of small children.
Removing and inserting the belt clip
Each walkie-talkie comes with a belt clip, which you can attach
or detach as required.
M
MON
MENU
1
2Removing the belt clip:
Pull the tab of the belt clip
in the direction of the arrow
as illustrated and then pull
the belt clip upwards and
out of the guide.
MInserting the belt clip: Slide the belt clip into the guide
provided for this. You must hear the clip lock into place.
11
Inserting batteries
Each walkie-talkie is operated using 4 batteries.
1. Remove the belt clip above the battery compartment.
2. Open the battery compartment by placing your thumb
on the recessed grip, pressing down gently on the battery
compartment lid, and then sliding the battery compart-
ment lid down to remove it.
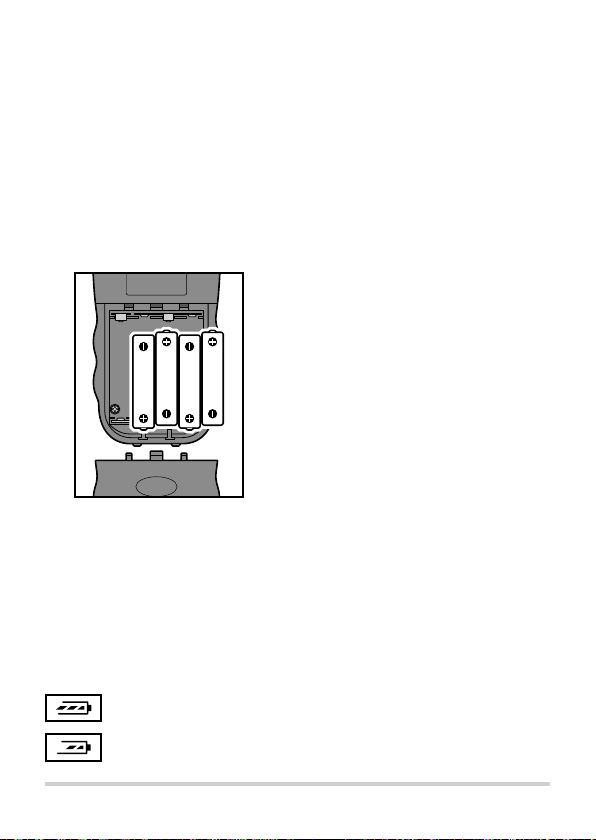
3. Insert the batteries as shown on the
base of the battery compartment.
Ensure correct polarity (+/—) when
doing so.
4. Put the battery compartment lid back on correctly and
slide it upwards. You should hear and feel it lock into
place. Reinsert the belt clip if required.
5. Repeat this procedure with the other device.
Changing the batteries / capacity status
The batteries’ capacity status is shown in the display
and is also indicated acoustically.
Batteries are full.
Batteries are 2/3 full.

12
Batteries are almost completely flat.
Batteries are flat and must be replaced.
If the batteries are almost completely flat, the battery
symbol will flash continuously and the walkie-talkie will
beep. The device will then switch off automatically.
If a device is switched on when the batteries are almost
flat, the empty battery symbol will appear at first as an
indication that the batteries need to be replaced.
Standby mode
If no buttons are pressed for 6 seconds, the walkie-talkies
will automatically switch to battery-saving standby mode.
However, they will remain ready to receive a signal and will
switch back to standard mode once a signal is received.
Connecting headphones or earphones
Electrically adapted headphones or earphones can be
connected to the headphone port with a 2.5 mm jack plug
(not included).
Once headphones or earphones are connected, the speaker
is switched off.
Follow the safety warnings in the user manual for the head-
phones or earphones.

13
What you need to know
• Your walkie-talkie set comprises two identical radio
communication devices. Both devices can be used for
transmitting and receiving and are equipped with the
same functions.
• In order to be able to communicate with each other, the
devices must be set to the same channel. The display
shows which channel a device is set to.
• The walkie-talkies operate on transmission frequencies
that are also used by other systems (e.g. baby monitors
and other walkie-talkies on the same frequency band).
This may cause background noise or even interference.
If this happens, try to avoid the interfering transmitter
by switching the devices to a different channel.
• Building materials (e.g. steel-reinforced concrete) or
other equipment causing interference (e.g. television sets,
computers, mobile phones, cordless telephones), as well
as telephone and power lines, may interfere with or restrict
communication between the devices. Change location if
necessary.
• The quality and range of communication also depends on
the amount of power left in the batteries. The higher the
power level, the better communication will be. Check the
capacity status shown on the display at regular intervals.

14
Basic settings
Switching on and off
MTo switch on, press and hold the On/Off switch until
you hear a beep and the entire display lights up briefly.
MON
MENU
The following information is shown
on the display:
– Selected channel and sub-channel
or OF
– Transmission power
– Battery capacity
– Speaker volume setting
MTo switch off, press and hold the On/Off switch
until you hear a beep and the display switches off.
Activating / releasing button lock
The button lock prevents device settings being changed
without you noticing if a button is pressed accidentally.
When the button lock is activated, the , TALK, MON and
buttons will still work, meaning you can still send (and receive)
messages even when the button lock is activated.
MPress and hold the button until the lock symbol is
shown on the display. You will hear a brief beeping sound.
MTo release the button lock, press and hold the button
until the lock symbol disappears from the display.
You will hear a brief beeping sound.

15
Setting the channel
In order for participants to communicate, the walkie-
talkies must be set to the same channel.
1. Switch the first device on.
2. Press the button.
The number (= set channel) flashes on the display.
3. Set the required channel using the and buttons.
There are 8 channels to choose from.
4. Press TALK to save the setting. Or wait until the number
stops flashing on the display. The channel is saved.
5. Set the other device to the same channel as described.
Setting a sub-channel
In order for participants to communicate, the walkie-
talkies must be set to the same sub-channel.
If there are several radio transmission devices in your area
which are also using the 400 - 470 MHz frequency band
and have several channels, then there is the possibility that
multiple devices may be using the same channel. To prevent
your messages being received by other devices, or vice versa,
the walkie-talkies have 99 sub-channels. Your walkie-talkies
use the Continuous Tone Coded Squelch System (CTCSS).
This involves a low-frequency sound being transmitted at the
same time, which usually cannot be heard and thus does not
disrupt your communication.

16
1. Switch the first device on.
2. Press the button twice.
The number (= current sub-channel) flashes on the display.
3. Set the required channel using the and buttons.
There are 99 sub-channels to choose from.
If you do not require a sub-channel, select OF.
Press and hold the or button to scan through
the numbers more quickly.
4. Press TALK to save the setting. Or wait until the number
stops flashing on the display. The sub-channel has been
saved.
5. Set the other device to the same sub-channel as described.
Adjusting speaker volume
1. Switch the device on.
2. Set the required volume using the and buttons:
The selected volume is displayed in the form of a bar
symbol .
Setting the ringtone
You can choose between 10 different ringtones.
1. Switch the device on.
2. Press the button four times.
CA will appear on the display along with the corresponding
number of the ringtone.
3. Use the and buttons to select your preferred
ringtone.
4. Press TALK to save the setting.

17
Setting the button tone
1. Switch the device on.
2. Press the button five times. tO will appear on
the display.
3. Press to switch the button tone on (ON), and
to switch it off (OF).
4. Press TALK to save the setting.
Setting the confirmation signal
The confirmation signal will sound automatically as soon as
you release the TALK button. The receiving device is informed
that the transmission has stopped.
1. Switch the device on.
2. Press the button six times. rO will appear on the display.
3. Press to switch the confirmation signal on (ON),
and to switch it off (OF).
4. Press TALK to save the setting.
Setting the voice control (VOX function)
Voice control (VOX function = Voice Operated Exchange) saves
you having to change the mode by hand using the TALK button.
The walkie-talkie switches to transmission mode automatically
when you speak into the microphone.
You can also use the walkie-talkies as a baby monitor
by switching on the VOX function on one of the walkie-
talkies and placing it next to your child. The second
walkie-talkie, which is used as a receiving device, must
have the VOX function switched off.

18
The walkie-talkie will also switch to transmission
mode when it picks up other noises. For this reason,
we recommend not using the VOX function in a loud
or windy place.
1. Switch the device on.
2. Press the button three times. The last selected setting
and the VOX symbol will appear on the display.
3. Use the and buttons to select your preferred sensitivity
level between 1and 3. 3is the highest sensitivity level. If you
would like to switch the VOX function off, press the and
buttons until OF appears on the display.
4. Press TALK to save the setting.

19
Use
Check that both devices are set to the same channel
and sub-channel before use.
Sending the call alert tone
You can, for example, send the call alert tone as an agreed
signal (e.g. for “Everything OK here”) or as an announcement
that you will shortly be sending a message.
MPress the call alert tone button once.
A signal sounds on both the transmitting and receiving device.
The transmission symbol will appear on the display
of the transmitting device...
... and the receiving symbol will appear on the display
of the receiving device.
Sending a message
While speaking, hold the microphone about 5 cm away from
your mouth and speak at a normal volume.
1. Press and hold the TALK button and speak into the
microphone.
2. Then release the TALK button.
Receiving a message
The walkie-talkies are ready to receive a message as soon
as they are switched on. You do not need to press any
buttons to hear a message.

20
Please note:
As soon as your walkie-talkie is “called” by another
walkie-talkie, the receiving symbol will appear on
the display.
This symbol will appear when the other person ends their
message. An acoustic signal also sounds. You may now
send your own message.
You cannot send and receive a call alert tone and
a message at the same time. Therefore, wait until
the other person has ended their message before
answering them.
Searching for weak signals (monitor function)
The monitor function enables your walkie-talkie to search
for weak signals on the channel selected. This may be useful
if reception conditions are poor (e.g. atmospheric disturbances
due to thunderstorms, power lines close by, etc.).
MPress and hold the MON button to use the monitor function.
MRelease the MON to end the monitor function.
The CTCS System is not active while the monitor
function is in use.
Scanning all channels (scan function)
When the scan function is activated, the walkie-talkie
continuously scans all 8 channels. As soon as it receives
a message, the search stops and you will hear the message
or radio signals.
Table of contents


