bca BC Link 2.0 Parts list manual
Charging the battery
Connect the base unit to a power outlet using the
included cable and USB power adapter. A full recharging
can take up to four hours.
Connecting Smart Mic
Connect the Smart Mic by placing the cord connection hook
in the slot and rotating the cord lock screw until tight.
Check Battery Power
Hold down the pand qbuttons simultaneously, and the
remaining battery power percentage will be displayed.
Using the BC Link
a. Place the radio in your pack, feed the cord through or
over the shoulder strap, and clip the Smart Mic onto
shoulder or sternum strap.
b. Rotate the power knob clockwise/counter clockwise
to power on, raise volume, or power off.
c. To transmit, press and hold the push-to-talk button,
wait one second before speaking. Release when
finished speaking.
d. Lights on the Smart Mic: Solid red = transmitting,
solid green = receiving, flashing green = standby.
Selecting a channel
a. 8 PM446 channels + 38 sub-channels for privacy.
b. Push MENU and use pand qbuttons to scroll and
select a channel. Stop on the desired channel code
and wait 5 seconds until it stops flashing, or press OK.
Pre-setting channels on Smart Mic
The radio comes with factory pre-set channels,
but you can customize them. Have your commonly
used channels set ahead of time to avoid going into your
pack to change channels on base unit.
a. Select a letter on the pre-set channel knob.
b. Push MENU and use pand qbuttons to scroll and
select a channel.
c. Stop on the desired channel code and wait 3 seconds
until it stops flashing, or press OK.
d. To set privacy code, push MENU button while
channel code is flashing, scroll to desired
channel and wait 5 seconds, or push OK button.
e. Select the next letter on the pre-set channel knob
and repeat.
BC Link 2.0 comes with preset channels from the factory:
AChannel 1 privacy code 0 (off) DChannel 5 privacy code 8
EChannel 7 privacy code 11BChannel 2 privacy code 22
CChannel 4 privacy code 20 FChannel 3 privacy code 21
Getting Started
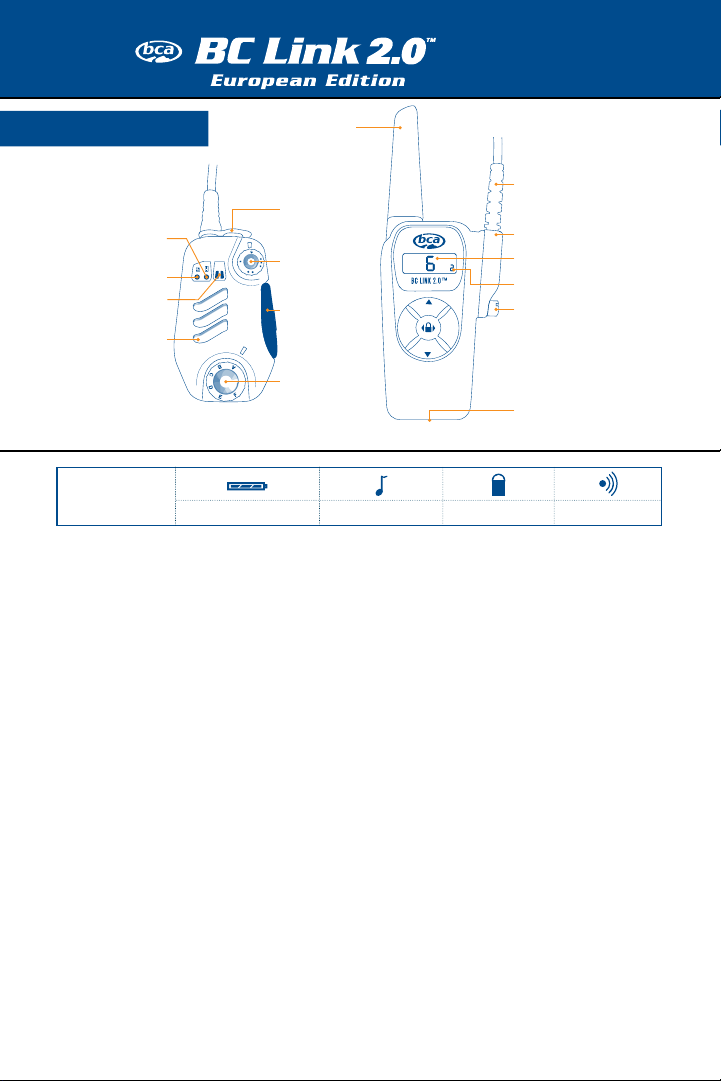
Smart Mic
MIC
M
E
N
U
O
K
Power/
Volume
Push-to-talk
button
Pre-set
channels
Earphone
jack
Red transmit light
Green power light
Microphone
Speaker
Radio Base Unit
MIC
M
E
N
U
O
K
Antenna
Smart Mic
connection cord
Cord lock screw
Cord connection
Channel
Privacy code/Battery %
Micro-USB charging port
Keys locked
Additional
screen icons Roger beepButton soundBattery meter
Reference Card

Two-way radios serve three important
functions in the backcountry:
a. Allow team members to share information on
the best conditions;
b. Allow team members to warn of hazards and
dangers;
c. Facilitate more efficient rescue operations.
Verifying function and range
Recommended checklist for trailheads and during
the day, to ensure your communication is there
when you need it:
Trailhead
a. Ensure your radio is functioning by turning it on and
transmitting “Radio Check” on your selected channel.
Get a confirmation from each team member. “Kim,
Radio check?……Copy Scott…..Copy Dave…..
Copy Dan.”
b. If someone is not transmitting or receiving, find out
why and remedy the situation, or alter your plans to
assist a team member not having communications.
Typical problems can be as simple as dead batteries
or wrong channels.
On slope
BCA radios are designed for effective communication
in mountain environments but all radios are affected
by environmental and geographical factors. Test your
radio’s function and range at various points of your
tour. This will build your confidence in the radio’s
function and uncover any communications gaps.
Recommended places to test are:
a. Whenever the team is separated by relatively
large distances.
b. Whenever the first person descending stops or
reaches the bottom (remember to stop only at
islands of safety).
c. Whenever a team member is separated by a ridge
or thick tree stand.
Communication tips
a. Keep the mic 5 cm from mouth and talk
“across” rather than into it.
b. Think before speaking, be clear and brief.
c. Remember that everything over the radio
is public.
If you’re in an area you regularly travel, make note
of any communication holes to better plan future
tours. Remember, radios are mainly for local team
communications. A cell phone can be your link to the
civilized world AND search-and-rescue in case of an
emergency. As you move through the terrain, check for
cell phone reception as well as radio function. Use the
radios as a relay link where part of the team is out of
cell phone reception. Plan your emergency plans based
on your radios’ AND your cell phones’ functionality.
Using two-way radios in an emergency
a. Use to warn a user of an ongoing event.
“AVALANCHE, GO RIGHT”
b. Use to coordinate rescue efforts including:
- Organize and direct self-rescue efforts within
your touring party.
- Relay to another party member who has a cell
phone connection to a search-and-rescue group.
- Communicate to other users on the same or
other channels.
- Keep 50 cm between radio and avalanche
transceiver when performing a transceiver search.
Download the full BC Link 2.0™ manual:
https://backcountryaccess.com/downloads
International Phonetic Alphabet
A — Alpha
B — Bravo
C — Charlie
D — Delta
E — Echo
F — Foxtrot
G — Golf
H — Hotel
J — Juliet
K — Kilo
L — Lima
M — Mike
N — November
O — Oscar
P — Papa
Q — Quebec
S — Sierra
T — Tango
U — Uniform
V — Victor
W — Whiskey
X — Xray
Y — Yankee
Z — Zulu
Using a Radio
Lock the keys
Hold down the MENU and OK buttons simultaneously for
three seconds. Holding down those two buttons will also
unlock the keys.
Factory Reset
Hold down the MENU and pbuttons simultaneously for 5
seconds. The pre-set channels will be reset to factory settings.

MIC
M
E
N
U
O
K
MIC
M
E
N
U
O
K

™
https://backcountryaccess.com/downloads

MIC
M
E
N
U
O
K
MIC
M
E
N
U
O
K

Utilisation de la radio
a
a
a
™
https://backcountryaccess.com/downloads
Other manuals for BC Link 2.0
1
This manual suits for next models
1
Table of contents
Languages:
Other bca Two-way Radio manuals


