Team Kalorik TKG SIS 9 User manual

Copies of the I/B. Please reproduce them without any
changes except under special instruction from Team
International BELGIUM. The pages must be reproduced and
folded in order to obtain a booklet A5 (+/- 148.5 mm width x
210 mm height). When folding, make sure you keep the good
numbering when you turn the pages of the I/B. Don’t change
the page numbering. Keep the language integrity.
Fax +32 2 359 95 50
Dampfbügelstation
Steam Ironing Station
Centrale Vapeur
Stoomgenerator
Central de planchado
Ferro a vapor com caldeira
Sistema stirante
Żelazko z generatorem pary
TKG SIS 9
230V~ 50Hz 2300W
I/B Version
100226
Ï
Front cover page (first page)
Assembly page 1/44

Copies of the I/B. Please reproduce them without any
changes except under special instruction from Team
International BELGIUM. The pages must be reproduced and
folded in order to obtain a booklet A5 (+/- 148.5 mm width x
210 mm height). When folding, make sure you keep the good
numbering when you turn the pages of the I/B. Don’t change
the page numbering. Keep the language integrity.
Fax +32 2 359 95 50
2 TKG SIS 9 - 100226
Assembly page 2/44

Copies of the I/B. Please reproduce them without any
changes except under special instruction from Team
International BELGIUM. The pages must be reproduced and
folded in order to obtain a booklet A5 (+/- 148.5 mm width x
210 mm height). When folding, make sure you keep the good
numbering when you turn the pages of the I/B. Don’t change
the page numbering. Keep the language integrity.
Fax +32 2 359 95 50
D
1. Kontrollleuchte des Bügeleisens
2. Bügelsohle
3. Sockel
4. Entnehmbarer Wassertank
5. Antikalk-Kassette
6. Kappe des Wassertankes
7. Entriegelungsknopf des Wassertankes
8. Dampfdruckknopf
9. Thermostat
10. Verbindungskabel mit Drehgelenk
11. Dampfregler
12. Ein-/Ausschalter
13. Anschlussleitung
14. Aufheizkontrollleuchte (HEAT)
15. Betriebsleuchte (POWER)
16. Dampfkontrollleuchte (STEAM)
GB
1. Pilot light of the iron
2. Soleplate of the iron
3. Base
4. Detachable water tank
5. Anti-scale cartridge
6. Water tank cap
7. Release button of the water tank
8. Burst of steam button
9. Temperature dial
10. Swivel connection cord
11. Steam control knob
12. Power switch
13. Power cord
14. Heating pilot light
15. Power light
16. Steam pilot light
F
1. Témoin lumineux de contrôle du fer
2. Semelle du fer
3. Base
4. Réservoir amovible
5. Cartouche anti-calcaire
6. Bouchon du réservoir
7. Bouton de déverrouillage du réservoir
8. Bouton jet de vapeur
9. Thermostat réglable
10. Cordon de raccord articulé
11. Bouton de réglage de la vapeur
12. Interrupteur marche/arrêt
13. Cordon d'alimentation
14. Témoin lumineux de chauffe (HEAT)
15. Témoin lumineux de fonctionnement
(POWER)
16. Témoin lumineux de vapeur (STEAM)
NL
1. Controlelampje van het strijkijzer
2. Strijkzool
3. Sokkel
4. Afneembaar waterreservoir
5. Antikalk-cassette
6. Stopsel van het reservoir
7. Ontgrendelingsknop van het reservoir
8. Stoomstootknop
9. Regelbare thermostaat
10. Scharnierend verbindingssnoer
11. Stoomregelaar
12. Aan-/uitschakelaar
13. Snoer
14. Verwarmingscontrolelampje (HEAT)
15. Aan-/uitcontrolelampje (POWER)
16. Stoomcontrolelampje (STEAM)
SP
1. Testigo luminoso de funcionamiento
de la plancha
2. Suela de la plancha
3. Base
4. Depósito de agua amovible
5. Recarga antical
6. Tapa del depósito
7. Botón de desbloqueado del depósito
8. Botón vaporizador
9. Termostato regulable
10. Cable de conexión con articulación
11. Botón de ajuste del vapor
12. Interruptor encendido/apagado
13. Cable de alimentación
14. Testigo luminoso del calentamiento
(HEAT)
15. Testigo luminoso de funcionamiento
(POWER)
16. Testigo luminoso del vapor (STEAM)
3 TKG SIS 9 - 100226
Assembly page 3/44

Copies of the I/B. Please reproduce them without any
changes except under special instruction from Team
International BELGIUM. The pages must be reproduced and
folded in order to obtain a booklet A5 (+/- 148.5 mm width x
210 mm height). When folding, make sure you keep the good
numbering when you turn the pages of the I/B. Don’t change
the page numbering. Keep the language integrity.
Fax +32 2 359 95 50
PL
P
1. Lamka kontrolna żelazka
1. Sinalizador luminoso do funcionamento do
ferro 2. Stopa żelazka
3. Baza
2. Base do ferro
4. Odłączany zbiornik na wodę
3. Base superior da caldeira
5. Wkładka zapobiegająca odkładaniu
kamienia
4. Depósito amovível da água
5. Cassete anti-calcário
6. Nakrętka zbiornika wody
6. Tampa do depósito
7. Przycisk zwalniający zbiornik
7. Botão de abertura do depósito
8. Przycisk uderzenia parą
8. Botão da saída do vapor
9. Pokrętło temperatury
9. Termóstato regulável
10. Przewód obrotowy
10. Cabo de conexão com articulação
11. Pokrętło regulacji pary
11. Botão da regulação do vapor
12. Włącznik zasilania
12. Interruptor ligado/desligado
13. Przewód zasilający
13. Cabo de união flexível
14. Lampka kontrolna nagrzewania
14. Sinalizador luminoso do aquecimento
(HEAT) 15. Lampka kontrolna zasilania
16. Lampka kontrolna pary
15. Sinalizador luminoso do funcionamento
(POWER)
16. Sinalizador luminoso do vapor (STEAM)
I
1. Spia luminosa di funzionamento del ferro
2. Piastra del ferro
3. Base
4. Serbatoio staccabile
5. Cartuccia anticalcare
6. Tappo del serbatoio
7. Pulsante di rilascio del serbatoio
8. Pulsante di getto di vapore
9. Termostato regolabile
10. Cavo di connessione snodabile
11. Pulsante di regolazione del vapore
12. Interruttore acceso/spento
13. Cavo d’alimentazione
14. Spia luminosa del riscaldamento (HEAT)
15. Spia luminosa di funzionamento (POWER)
16. Spia luminosa del vapore (STEAM)
4 TKG SIS 9 - 100226
Assembly page 4/44

Copies of the I/B. Please reproduce them without any
changes except under special instruction from Team
International BELGIUM. The pages must be reproduced and
folded in order to obtain a booklet A5 (+/- 148.5 mm width x
210 mm height). When folding, make sure you keep the good
numbering when you turn the pages of the I/B. Don’t change
the page numbering. Keep the language integrity.
Fax +32 2 359 95 50
WICHTIGE SICHERHEITSVORSCHRIFTEN
Lesen Sie aufmerksam die Gebrauchsanleitung, bevor Sie Ihr Gerät benutzen.
Wichtig: Personen (einschließlich Kinder), die aufgrund ihrer physischen, sensorischen oder
geistigen Fähigkeiten oder ihrer Unerfahrenheit oder Unkenntnis nicht in der Lage sind, das
Gerät sicher zu benutzen, sollten dieses Gerät nicht ohne Aufsicht oder Anweisung durch eine
verantwortliche Person benutzen. Kinder sollten beaufsichtigt werden, um sicherzustellen, dass
sie nicht mit dem Gerät spielen.
Kontrollieren Sie, ob die Netzspannung mit der auf dem Gerät vermerkten Spannung
übereinstimmt, bevor Sie das Gerät benutzen.
Stellen Sie den Sockel des Gerätes immer auf ein stabiles Bügelbrett, einen Tisch oder auf
den Boden.
Schließen Sie das Gerät nur an Schukosteckdosen an.
Um eine Überlastung zu vermeiden, sollten Sie kein weiteres Gerät mit hoher Wattleistung
an dem selben Stromkreis benutzen.
Falls ein Verlängerungskabel notwendig ist, sollte es mindestens für eine Stromstärke von
10 Ampere ausgelegt sein. Benutzen Sie nie ein Verlängerungskabel mit einer niedrigen
Stromstärkenzulassung. Achten Sie immer darauf, dass das Kabel so verlegt ist, dass es
weder verknotet noch verheddert ist, so dass Sie nicht darüber stolpern können.
Das Bügeleisen muss auf einer stabilen, flachen Ebene benutzt und hingestellt werden.
Wenn Sie das Bügeleisen auf dessen Halter stellen, achten Sie darauf, dass Sie es auf eine
stabile Fläche hinstellen.
Benutzen Sie das Bügeleisen nicht, wenn es gefallen ist oder irgendwelche sichtbaren
Schäden aufweist oder leckt.
Lassen Sie Ihr Gerät nie unbeaufsichtigt, wenn es in Betrieb ist und vor allem wenn das
Bügeleisen heizt.
Überprüfen Sie regelmäßig, ob die Anschlussleitung nicht beschädigt ist. Bei Beschädigung
der Anschlussleitung oder des Gerätes dieses nicht benutzen, sondern von einem
Fachmann (*) überprüfen und reparieren lassen. Eine beschädigte Anschlussleitung sollte
von einem Fachmann(*) ausgewechselt werden.
Benutzen Sie das Gerät nur zu Haushaltszwecken, wie in der Bedienungsanleitung
angegeben.
Tauchen Sie das Bügeleisen und den Dampfgenerator niemals in Wasser oder andere
Flüssigkeiten, weder zum Reinigen, noch zum anderen Zweck.
Benutzen Sie das Gerät nicht in der Nähe einer Wärmequelle.
Lassen Sie die Anschlussleitung und das Verbindungskabel zwischen dem Sockel und dem
Bügeleisen nicht in Berührung mit heißen Oberflächen kommen.
Benutzen Sie das Gerät nicht im Freien und bewahren Sie es an einem trockenen Platz auf.
Benutzen Sie nur Zubehör, welches vom Lieferanten empfohlen wurde. Anderes Zubehör
stellt eine Gefahr für den Benutzer dar und das Gerät könnte dadurch beschädigt
werden.
Ziehen Sie niemals an der Anschlussleitung, um das Gerät zu bewegen. Achten Sie darauf,
dass die Anschlussleitung nicht irgendwo hängen bleibt und dies zum Fall des Gerätes
führen könnte. Wickeln Sie die Anschlussleitung nicht um das Gerät oder knicken Sie diese
nicht.
Ziehen Sie immer den Stecker, wenn das Gerät nicht in Gebrauch ist.
Verbrennungen können durch Berühren der Metallfläche, heißen Wassers oder
Wasserdampfes entstehen.
Stellen Sie das Bügeleisen immer auf den Sockel des Gerätes, auf den dafür vorgesehenen
Platz. Stellen Sie das Bügeleisen nicht auf die Hinterseite und achten Sie darauf, dass es
nicht in Berührung mit leicht entflammbaren Materialien und der Anschlussleitung kommt.
5 TKG SIS 9 - 100226
Assembly page 5/44

Copies of the I/B. Please reproduce them without any
changes except under special instruction from Team
International BELGIUM. The pages must be reproduced and
folded in order to obtain a booklet A5 (+/- 148.5 mm width x
210 mm height). When folding, make sure you keep the good
numbering when you turn the pages of the I/B. Don’t change
the page numbering. Keep the language integrity.
Fax +32 2 359 95 50
Füllen Sie den Wassertank niemals mit Essig, Entkalkungsmitteln oder anderen Chemikalien.
Benutzen Sie das Gerät niemals ohne Wassertank oder ohne Antikalk-Kassette.
Vor der ersten Benutzung entfernen Sie alle Aufkleber oder Schutzfolien von der
Bügeleisensohle. Säubern Sie die Sohle mit einem weichen Tuch.
Einige Teile des Bügeleisens wurden leicht eingefettet, daher kann das Bügeleisen beim
ersten Gebrauch leicht riechen. Das wird sich jedoch nach kurzer Zeit geben.
Das Bügeleisen muss auf einer stabilen, flachen Ebene benutzt und hingestellt werden.
Benutzen Sie das Bügeleisen nicht, wenn es gefallen ist oder irgendwelche sichtbaren
Schäden aufweist oder leckt.
Wenn Sie das Bügeleisen auf dessen Halter stellen (wenn vorhanden bei diesem Modell),
achten Sie darauf, dass Sie es auf eine stabile Fläche hinstellen.
Dies gilt auch dem Wassertank. Um das Risiko von Elektroschocks zu vermeiden, sollten Sie
das Gerät nicht selber auseinander bauen, sondern zu einem Fachmann(*) bringen, um es
prüfen und reparieren zu lassen. Falsches Zusammenbauen kann bei Benutzung zu
Elektroschocks führen.
Entrollen Sie die Anschlussleitung und das Verbindungskabel, bevor Sie das Gerät
anschalten.
Der Schalter des Wassertanks sollte immer auf die AUS-Stellung (0) gestellt werden, bevor
Sie den Stecker einstecken oder herausziehen.
Ziehen Sie den Stecker aus der Steckdose und lassen Sie das Bügeleisen und den
Wassertank abkühlen, bevor Sie diese reinigen und wegräumen. Ziehen Sie ebenfalls den
Stecker aus bei Dampfbügelstationen mit Dampfkettel (abhängig vom Modell), bevor Sie
sie öffnen, füllen oder bevor Sie den Wassertank entleeren.
SCHRAUBEN SIE BEI DAMPFBÜGELSTATIONEN MIT DAMPFKETTELN (ABHÄNGIG VOM MODELL)
NIEMALS DEN SCHRAUBDECKEL DES WASSERTANKS AB, WÄHREND DAS GERÄT UNTER
SPANNUNG IST UND VOR ALLEM WENN DAMPF ERZEUGT WIRD.
(*) Fachmann: Anerkannter Kundendienst des Lieferanten oder des Importeurs, der für derartige
Reparaturen zuständig ist. Für eventuelle Reparaturen wenden Sie sich bitte an diesen
Kundendienst.
BÜGELEISEN: VORSICHTSMAßNAHMEN UND TEMPERATUREN
Überprüfen Sie immer als erstes, ob an dem zu bügelnden Artikel Bügelanweisungen
angegeben sind.
•
•Wenn die Bügelanweisungen fehlen sollten, Sie aber das Material kennen, richten Sie sich
nach den empfohlenen Bügeltemperaturen in der Tabelle.
Textilart Temperaturskala Dampfbügeln
Synthetik (z.B. Azetat,
Acrylic, Viskose,
Polyamide, Polyester,...)
Seide
MIN
⏐
z
⏐
OFF
Wolle
⏐
zz
⏐
z/ zz
Baumwolle
Leinen
⏐
zzz
⏐
MAX
z/ zz / zzz
6 TKG SIS 9 - 100226
Assembly page 6/44

Copies of the I/B. Please reproduce them without any
changes except under special instruction from Team
International BELGIUM. The pages must be reproduced and
folded in order to obtain a booklet A5 (+/- 148.5 mm width x
210 mm height). When folding, make sure you keep the good
numbering when you turn the pages of the I/B. Don’t change
the page numbering. Keep the language integrity.
Fax +32 2 359 95 50
Stecken Sie den Stecker in die Steckdose und drücken Sie auf den Ein-/Ausschalter (12).
Die rote Betriebsleuchte (15) leuchtet auf, um anzudeuten, dass das Gerät in Betrieb ist.
Die gelbe Kontrollleuchte (14) leuchtet ebenfalls auf, um anzudeuten, dass das System
aufheizt.
•
•
•
•
•
•
•
•
•
Stellen Sie den Thermostat (9) auf die gewünschte Temperatur. Die Kontrollleuchte des
Bügeleisens (1) leuchtet auf. Sobald die gewünschte Temperatur erreicht ist, erlischt die
Kontrollleuchte. Sie können nun zu bügeln anfangen.
Während des Bügelns wird diese Kontrollleuchte von Zeit zu Zeit angehen. Wenn dies
geschieht, erhitzt sich die Sohle erneut auf die gewünschte Temperatur. Sie können weiter
bügeln.
Die Tabelle ist nur für Faserstoffe geeignet. Sortieren Sie gemäß Bügeltemperatur die
Kleiderstoffe aus: Wolle mit Wolle, Baumwolle mit Baumwolle usw..
Das Bügeleisen erwärmt sich schneller, als es sich abkühlt. Fangen Sie daher mit Stoffen an,
die niedrige Temperaturen benötigen wie z.B. synthetische Stoffe und steigern Sie dann zu
höheren Temperaturen.
Wenn ein Artikel aus mehreren Fasern besteht, müssen Sie immer die Bügelstufe wählen,
die der empfindlichsten Faser entspricht ( z.B. ein Stoff besteht aus 60% Polyester und 40%
Baumwolle und sollte mit der Temperatur gebügelt werden, die für Polyester angegeben
ist, ohne Wasserdampf). Wenn Sie nicht wissen, aus welchen Fasern der Artikel ist, suchen
Sie eine Stelle, die man nicht sieht, wenn das Kleidungsstück angezogen ist und probieren
Sie an dieser Stelle eine Temperatur aus. Fangen Sie immer mit der niedrigsten Stufe an
und steigern Sie dann um eine weitere, bis das gewünschte Resultat erzielt ist.
Pure Wollstoffe (100% Wolle) können mit Dampf gebügelt werden. Es wird empfohlen, den
Dampfstoß und ein Trockenbügeltuch zu benutzen.
Beim Dampfbügeln (siehe Abschnitt "Dampfbügeln") können glänzende Stellen entstehen,
diese können vermieden werden, indem man das Bügelstück nach links dreht und von der
Innenseite bügelt oder man ein leicht feuchtes Tuch dazwischen legt.
Velvet und andere Gewebe, die leicht glänzende Flecken aufweisen, sollten nur in eine
Richtung gebügelt werden (mit einem Tuch). Nur leicht drücken.
Halten Sie das Bügeleisen immer in Bewegung.
Bügeln Sie die umgekehrte Seite von synthetischen Artikeln. Es ist ratsam, nicht
dampfzubügeln, da dies Flecken erzeugen kann.
WASSERTANK FÜLLEN
1. Stellen Sie das Gerät auf eine stabile Fläche.
2. Drücken Sie auf die Entriegelungstaste des Wassertanks (7) und schieben Sie den
Wassertank aus dem Gerät heraus. Öffnen Sie den Wassertank indem Sie an der Kappe
ziehen (6) und gießen Sie Wasser in den Wassertank, ohne die MAX-Markierung zu
überschreiten. Sie können Leitungswasser benutzen, aber wir empfehlen Ihnen
demineralisiertes Wasser zu benutzen.
3. Schließen Sie den Wassertank, indem Sie die Kappe (6) schließen und schieben Sie nun
den Wassertank wieder ins Gerät bis er einrastet.
4. Benutzen Sie niemals Essig, Entkalkungsmittel oder andere Chemikalien.
Achtung: Vergewissern Sie sich, dass die Antikalk-Kassette richtig im Wassertank installiert ist.
Benutzen Sie das Gerät nie ohne Antikalk-Kassette.
WASSER EINFÜLLEN WÄHREND DES BÜGELNS
Da der Wassertank dieses Gerätes nicht unter Druck steht, ist er während des Betriebes
nachfüllbar. Gehen Sie dazu vor wie im Abschnitt "Wassertank füllen" beschrieben.
7 TKG SIS 9 - 100226
Assembly page 7/44

Copies of the I/B. Please reproduce them without any
changes except under special instruction from Team
International BELGIUM. The pages must be reproduced and
folded in order to obtain a booklet A5 (+/- 148.5 mm width x
210 mm height). When folding, make sure you keep the good
numbering when you turn the pages of the I/B. Don’t change
the page numbering. Keep the language integrity.
Fax +32 2 359 95 50
DAMPFBÜGELN
Füllen Sie den Wassertank mit Wasser und stecken Sie den Stecker in die Steckdose.•
•
•
•
•
•
•
•
Wie auf dem Regler (9) und in der Tabelle angegeben, ist Dampfbügeln nur mit hohen
Temperaturen möglich. Stellen Sie den Temperaturregler also auf zz oder auf zzz.
Stecken Sie den Stecker in die Steckdose und drücken Sie auf den Ein-/Ausschalter (12).
Die rote Betreibsleuchte (15) leuchtet auf, um anzudeuten, dass das Gerät in Betrieb ist.
Die gelbe Kontrollleuchte (14) leuchtet ebenfalls auf, um anzudeuten, dass das System
aufheizt.
Stellen Sie den Dampfregler (11) auf die gewünschte Stellung je nach dem zu bügelnden
Stoff (Siehe Tabelle). Stellen Sie den Thermostat des Bügeleisens auf die gewünschte
Temperatur. Sobald die gewünschte Temperatur erreicht ist, erlischt diese Kontrollleuchte.
Sobald die gelbe Aufheizkontrollleuchte (14) erlischt, drücken Sie auf den
Dampfdruckknopf (8) damit Dampf aus der Sohle des Bügeleisens heraustritt. Achtung:
Wenn Sie die Dampffunktion zum ersten Mal benutzen, halten Sie den Dampfdruckknopf
etwa 1 Minute eingedruckt um das Dampfausstoßsystem zu reinigen. Dabei kann das
Gerät ein abgehacktes Geräusch erzeugen, dies ist perfekt normal. Danach wird Dampf
auf normale Weise aus der Sohle heraustreten. Wenn Sie auf den Dampfdruckknopf (8)
drücken, leuchtet die grüne Dampfkontrollleuchte (16) auf, um anzudeuten, dass Dampf
im Verbindungskabel ankommt. Wenn Sie den Knopf loslassen, erlischt die Kontrollleuchte
(16) und tritt langsam kein Dampf mehr aus der Sohle. Für Dauerdampf, drücken Sie
einfach länger auf den Druckknopf. Auch wenn Sie dann den Knopf loslassen, dauert der
Dampf an.
Während des Bügelns wird die Kontrollleuchte des Bügeleisens (1) von Zeit zu Zeit
angehen. Wenn dies geschieht, erhitzt sich die Sohle erneut auf die gewünschte
Temperatur. Sie können weiter bügeln.
Wenn Sie viel Dampf in einer sehr kurzen Zeit benutzt haben, reduziert sich die
Dampfmenge, bis Ihr Gerät wieder genügend Dampf erzeugt, um den Dampfverlust
auszugleichen. Diese Erscheinung tritt auch auf, wenn nicht genug Wasser im Tank ist.
Wenn der Wassertank (fast) leer ist, werden Sie ein lauteres Geräusch hören, wenn Sie auf
den Dampfdruckknopf drücken. Wenn Sie die Dampffunktion weiter benutzen möchten,
müssen Sie den Wassertank nachfüllen.
IN EINER VERTIKALEN POSITION BÜGELN
Hängen Sie das zu bügelnde Kleidungsstück auf einen Bügel. Damit vermeidet man Falten.
Halten Sie das Bügeleisen vertikal einige Zentimeter von dem Kleidungsstück entfernt und
bewegen Sie es, bei gleichzeitiger Benutzung des Dampfstoßes.
TROCKENBÜGELN
Um ohne Dampf zu bügeln, stellen Sie den Dampfregler (11) auf "OFF" und drücken Sie nicht
auf den Dampfdruckknopf (8).
NACH DEM BÜGELN
•Ziehen Sie den Stecker aus der Steckdose und lassen Sie das Gerät vollständig abkühlen.
•Es ist nicht notwendig, das restliche Wasser aus dem Wassertank auszugießen.
•Zum Aufräumen wird empfohlen, das Bügeleisen auf die Station zu stellen. Die dafür
vorgesehene Stelle ist rutschfest und wird die Sohle des Bügeleisens nicht beschädigen.
8 TKG SIS 9 - 100226
Assembly page 8/44

Copies of the I/B. Please reproduce them without any
changes except under special instruction from Team
International BELGIUM. The pages must be reproduced and
folded in order to obtain a booklet A5 (+/- 148.5 mm width x
210 mm height). When folding, make sure you keep the good
numbering when you turn the pages of the I/B. Don’t change
the page numbering. Keep the language integrity.
Fax +32 2 359 95 50
ANTIKALK-KASSETTE
•Ihr Gerät ist mit einer Antikalk-Kassette (5) ausgestattet,
die sich im Wassertank befindet. Sie können also
Leitungswasser benutzen, es wird durch die Kassette
filtriert werden.
•Es ist notwendig diese Kassette etwa jede 6 Monate
auszuwechseln. Diese Zeit kann jedoch auch kürzer oder
länger sein, je nach der Häufigkeit des Gebrauches und
nach der Kalkhaltigkeit des Wassers. Je kalkhaltiger das
Wasser, desto häufiger muss die Kassette ausgewechselt
werden.
•Um die Kassette zu entfernen, schieben Sie zuerst den
Wassertank aus dem Gerät wie im Abschnitt "Wassertank
füllen" erklärt.
•Ziehen Sie dann die Antikalk-Kassette (5) aus dem
Wassertank (4) heraus.
•Stecken Sie eine neue Antikalk-Kassette in den
Wassertank und schieben Sie letzteren wieder ins Gerät.
•Wenden Sie sich bitte an den nächsten Kundendienst um
eine neue Antikalk-Kassette zu erhalten.
•Benutzen Sie das Gerät nie ohne Antikalk-Kassette.
REINIGUNG
•Die Plastikteile des Gerätes können mit einem feuchten Tuch gereinigt werden.
•Um die Sohle des Bügeleisens zu reinigen, gibt es auch handelsübliche Produkte. Befolgen
Sie deren Bedienungsanleitung. Benutzen Sie nie Schleifmittel.
•Tauchen Sie das Gerät niemals in Wasser oder irgendwelche andere Flüssigkeit.
UMWELTSCHUTZ – RICHTLINIE 2002/96/EG
Zum Schutz unserer Umwelt und unserer Gesundheit sind Elektro- und Elektronik-Altgeräte nach
bestimmten Regeln zu entsorgen. Dies fordert den Einsatz sowohl des Herstellers bzw.
Lieferanten als auch des Verbrauchers.
Aus diesem Grund darf dieses Gerät, wie das Symbol auf dem Typenschild bzw. auf der
Verpackung zeigt, nicht in den unsortierten Restmüll gegeben werden. Der Verbraucher hat
das Recht, dieses Gerät über kommunale Sammelstellen zu entsorgen; von dort aus wird die
spezifische Behandlung, Verwertung bzw. das Recycling gem. den Erfordernissen der Richtlinie
sichergestellt.
9 TKG SIS 9 - 100226
Assembly page 9/44
Copies of the I/B. Please reproduce them without any
changes except under special instruction from Team
International BELGIUM. The pages must be reproduced and
folded in order to obtain a booklet A5 (+/- 148.5 mm width x
210 mm height). When folding, make sure you keep the good
numbering when you turn the pages of the I/B. Don’t change
the page numbering. Keep the language integrity.
Fax +32 2 359 95 50
IMPORTANT SAFEGUARDS
Please read these instructions carefully before using the appliance.
Important: People (including children) who are not able to use the appliance in a safe way,
due to their physical, sensorial or mental capacity or their lack of experience or knowledge,
must never use the appliance except if they are supervised by a person responsible for their
safety or if they previously received instructions concerning the safe use of the appliance.
Close supervision is necessary to prevent children from using the appliance as a toy.
Always place the base of the appliance on a stable ironing board, table or on the
ground.
Check that your mains voltage corresponds to that stated on the rating plate of the
appliance.
Only connect the appliance to a mains earthed wall socket.
To avoid a circuit overload, do not operate another high wattage appliance on the same
circuit.
If an extension cord is absolutely necessary, a 10-ampere or higher cord should be used.
Never use cords rated for less than 10-ampere. Care should be taken to arrange the cord
so that it cannot be pulled or tripped over.
The iron shall be used and placed on a stable level surface.
When you place the iron on its support, make sure that the surface on which you put it is
stable.
Do not use the iron if it has fallen, if it shows any visible signs of damage or if it leaks.
Never leave the appliance unsupervised when switched on and especially the steam iron
when it is heating.
From time to time check the appliance for damages. Never use the appliance if cord or
appliance shows any signs of damage but have it checked and repaired by a competent
qualified service(*). Should the cord be damaged, it must be replaced by a competent
qualified service(*).
Only use the appliance for domestic purposes and in the way indicated in these
instructions.
Never immerse the iron or the base in water or any other liquid for any reason whatsoever.
Never use the appliance near hot surfaces.
Do not allow power cord and cord binding the base to the steam iron to touch hot
surfaces.
Never use the appliance outside and always place it in a dry environment.
Never use accessories that are not recommended by the producer. They could constitute
a danger to the user and risk to damage the appliance.
Never move the appliance by pulling the cord. Make sure the cord cannot get caught in
any way. Do not wind the cord around the appliance and do not bend it.
Always unplug the appliance when it is not in use.
Burns can occur from touching hot metal parts, hot water, or steam.
Always place the iron on the base of the appliance, on the foreseen place. Do not place
the iron on its rear cover. Be sure that it does not come in contact with flammable
materials or with the mains cord.
Never fill the water tank with vinegar, descaling agents or other chemicals.
Never use the appliance without the water tank and its anti-scale cartridge.
Before using for the first time, remove any sticker or protective foil from the soleplate.
Clean the soleplate with a soft cloth.
Some parts of the iron have been slightly greased and as a result the iron might slightly
smoke when switched on for the first time. After a short while, however, this will cease.
The iron shall be used and placed on a stable level surface.
10 TKG SIS 9 - 100226
Assembly page 10/44

Copies of the I/B. Please reproduce them without any
changes except under special instruction from Team
International BELGIUM. The pages must be reproduced and
folded in order to obtain a booklet A5 (+/- 148.5 mm width x
210 mm height). When folding, make sure you keep the good
numbering when you turn the pages of the I/B. Don’t change
the page numbering. Keep the language integrity.
Fax +32 2 359 95 50
Do not use the iron if it has fallen, if it shows any visible signs of damage or if it leaks.
When you place the iron on its support (if available with the model), make sure that the
surface on which you put it is stable.
Proceed the same way if the water tank stops working or is damaged. To avoid the risk of
electric shock, do not disassemble the iron or steam tank, take it to a qualified technician
for examination and repair. Incorrect re-assembly can cause a risk of electric shock when
the iron or steam tank is used.
Fully unwind the mains cord and supply hose before starting to iron.
The steam tank switch should always be turned to “0” before plugging or unplugging the
power cord from outlet.
Unplug the appliance and allow the iron and the water tank to cool down before
cleaning or storing them and for pressurized steam iron station (depending on the model)
before opening, filling or emptying the water tank.
FOR PRESSURIZED STEAM IRONING STATION (DEPENDING ON THE MODEL), NEVER UNSCREW
THE CAP OF THE STEAM TANK WHILE THE APPLIANCE IS CONNECTED TO THE MAINS WALL
SOCKET AND ESPECIALLY WHEN STEAM IS BEING PRODUCED.
(*) Competent qualified service: after-sales department of the producer or importer or any
person who is qualified, approved and competent to perform this kind of repairs in order to
avoid all danger. In case of need you should return the appliance to this service.
STEAM IRON: USE PRECAUTION AND TEMPERATURES
Always check first if a label with ironing instructions is attached to the article to be ironed.
Follow these ironing instructions in all cases.
•
•
•
•
If ironing instructions are missing but you know the kind of fabric, then see the table for
recommended ironing temperatures.
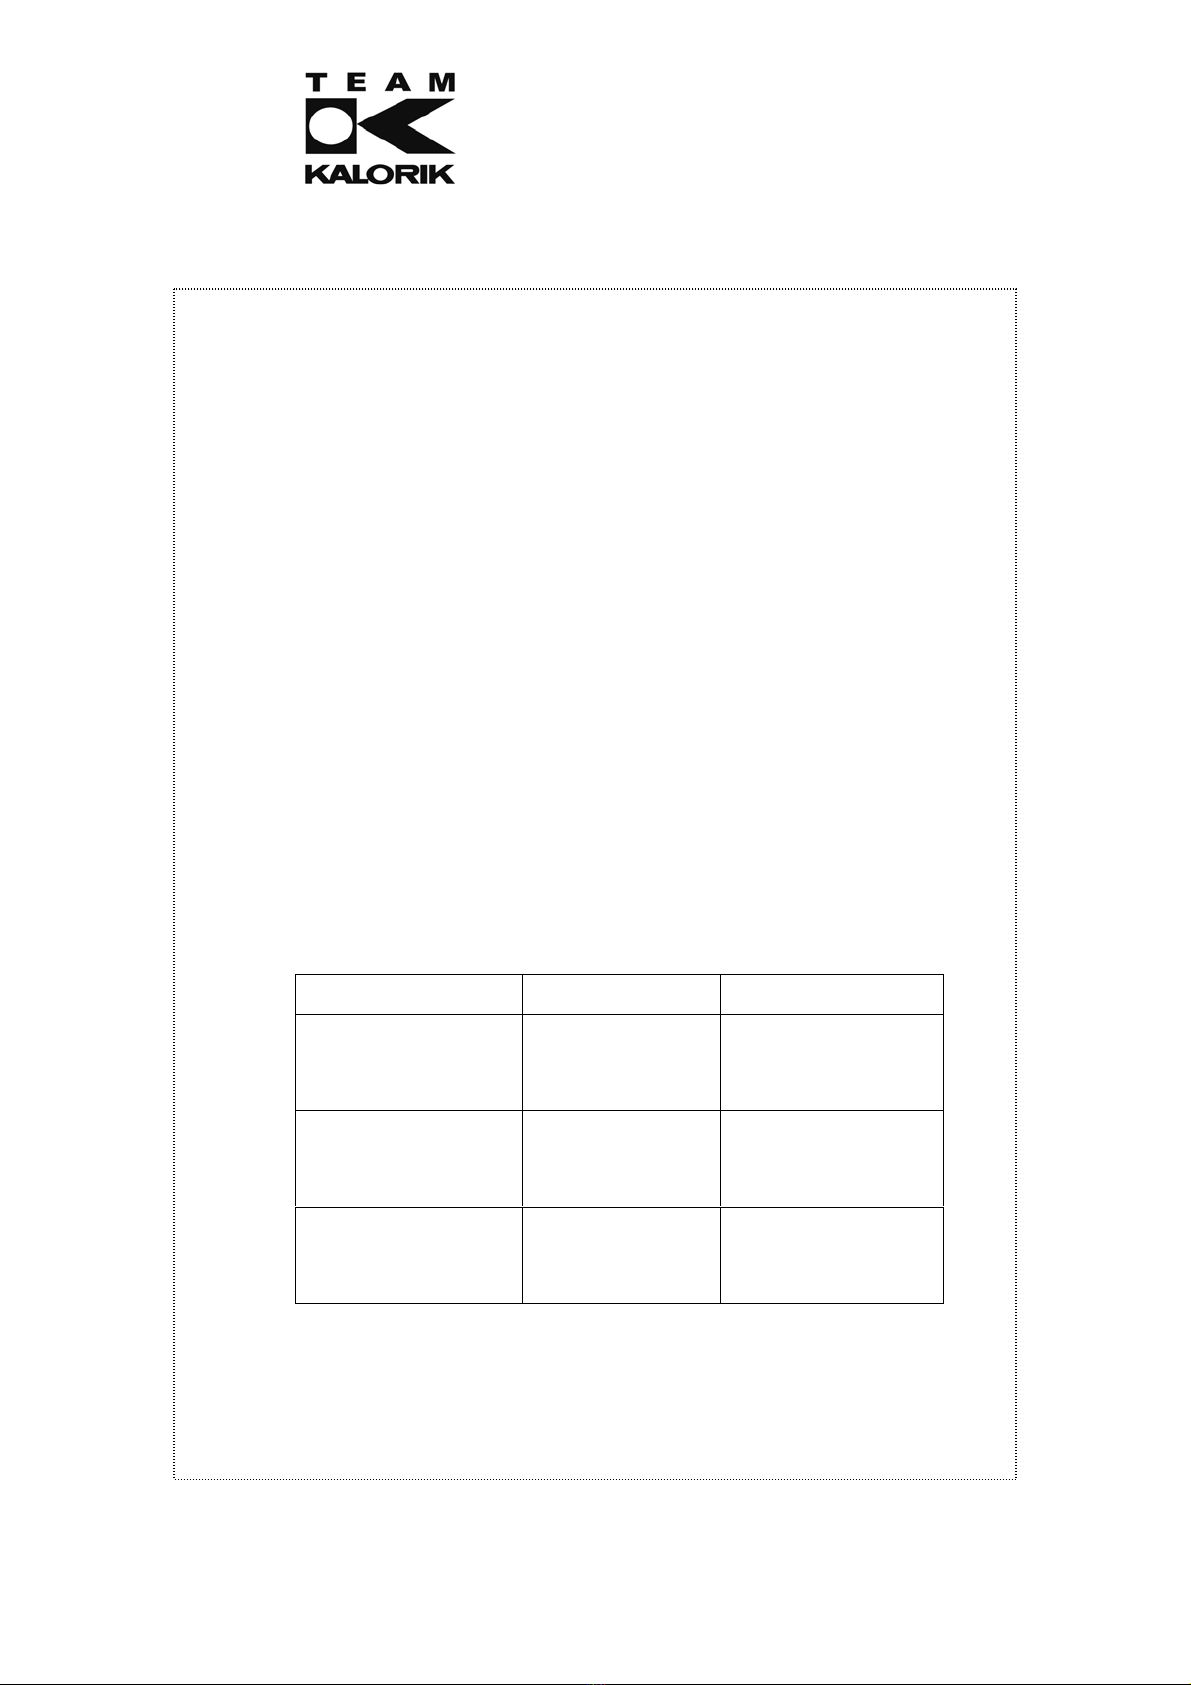
Kind of textile Temperature dial Steam ironing
Synthetic (e.g. acetate,
acrylic, viscose,
polyamide, polyester…)
Silk
MIN
⏐
z
⏐
OFF
Wool
⏐
zz
⏐
z/ zz
Cotton
Linen
⏐
zzz
⏐
MAX
z/ zz / zzz
Plug in the appliance and press the power switch (12). The red pilot light (15) comes on
indicating that the appliance is operating. The yellow pilot light (14) also comes on
indicating that the water tank is heating.
Set the temperature dial of the iron (9) to the desired position. The pilot light of the iron (1)
will come on, indicating that the iron is heating. As soon as the desired temperature is
reached, the pilot light will go out, and you can start ironing.
11 TKG SIS 9 - 100226
Assembly page 11/44

Copies of the I/B. Please reproduce them without any
changes except under special instruction from Team
International BELGIUM. The pages must be reproduced and
folded in order to obtain a booklet A5 (+/- 148.5 mm width x
210 mm height). When folding, make sure you keep the good
numbering when you turn the pages of the I/B. Don’t change
the page numbering. Keep the language integrity.
Fax +32 2 359 95 50
During ironing this pilot light (1) will come on from time to time. When this happens, the
soleplate is being heated up to the required temperature again. You can continue
ironing.
•
•
•
•
•
•
•
•
•
•
•
The table is valid for the fibre materials only. If some kind of finish has been applied (gloss,
wrinkle, relief etc.), the textile can best be ironed at a lower temperature.
First sort out the fabrics according to ironing temperature: wool with wool, cotton with
cotton, etc.
The iron heats up quicker than it cools down. Therefore, start ironing the articles requiring
the lowest temperature such as those made of synthetic fibres. Then progressively increase
the temperature.
If the article is made of a mixture of different fibres, you must always select the ironing
temperature corresponding to that of the fibre requiring the lowest temperature.
(E.g. an article consisting of “60% polyester and 40% cotton” should be ironed at the
temperature indicated for polyester and without steam.)
If you do not know the kind of fabric(s) the article has been made of, find a spot which will
be invisible when wearing or using the article to try out the ironing temperature. (Always
start at a low temperature and increase to one which gives the required results.)
Pure woollen fabrics (100% wool) may be pressed with the iron set to a steam position. It is
recommended to apply a burst of steam and use a dry pressing cloth between the
woollen article and the iron.
When ironing with steam (see paragraph “Steam ironing”), the fabric might shine. You can
prevent it by ironing the reverse side of the article or interposing a slightly humid cloth
between the article and the soleplate.
Velvet and other fabrics that rapidly acquire shiny spots should be ironed in one direction
only (the one of the nap), applying only light pressure. Always keep the iron moving.
Iron the reverse side of synthetic materials and silk; it is not advisable to use steam as this
may cause stains.
FILLING THE WATER TANK (FOR STEAM IRONING)
1. Put the base on a stable surface.
2. Press the release button (7) of the water tank and slide it forward. Open the water tank by
removing the cap (6) and fill the water tank with clear water up to its "Max" level. You can
use tap water, but we advise you to use demineralised water.
3. Close the cap (6) of the water tank and put the water tank back in the base correctly.
Slide it backward until it is locked.
4. Never use vinegar, detergents or other chemical products.
Caution: always make sure that the anti-scale cartridge situated inside the water tank is well
put into place. Never use the appliance without anti-scale cartridge.
FILLING THE WATER TANK DURING USE
As the water tank of this appliance is not under pressure, you can refill it during use. To do so,
just proceed as described above in the "Filling the water tank" section.
STEAM IRONING
Fill the water tank with water.
As indicated on the temperature dial (9) and in the table, steam ironing is only possible at
higher ironing temperatures, so set the dial to zz or zzz.
Plug in the appliance and press the power switch (12) to turn on the appliance. The power
light (15) of the base will come on. The yellow pilot light (14) also switches on indicating
that the water tank is heating.
12 TKG SIS 9 - 100226
Assembly page 12/44
Copies of the I/B. Please reproduce them without any
changes except under special instruction from Team
International BELGIUM. The pages must be reproduced and
folded in order to obtain a booklet A5 (+/- 148.5 mm width x
210 mm height). When folding, make sure you keep the good
numbering when you turn the pages of the I/B. Don’t change
the page numbering. Keep the language integrity.
Fax +32 2 359 95 50
Put the steam knob (11) in the desired position according to the fabric to iron (see table
above). Set the temperature dial of the iron (9) to the desired position. When the iron has
reached the desired temperature, its pilot light (1) will go out. You can now use the steam
function.
•
•
•
•
•
•
•
•
As soon as the yellow heating light (14) goes out, press the burst of steam button (8) to
have the steam coming out of the soleplate of the iron. Caution: When you use steam for
the first time, hold the steam button down for about one minute to clean out the steam
producing system. During this operation, you will hear a jerky sound; this is absolutely
normal. Afterwards the steam will come out normally from the soleplate. Every time you
press the steam button, the green pilot light (16) will switch on indicating that steam is
going through the connection cord. When you release the button, the steam will
progressively stop coming out of the soleplate and the green pilot light (16) will go out. If
you want a continuous jet of steam, hold the steam button pressed down.
When ironing, the pilot light of the iron (1) will go on and off from time to time. This means
that the temperature of the iron is regulated by its thermostat. You can continue ironing.
When you use a lot of steam in a very short time, the steam output is lightly reduced until
your appliance produces enough steam to make up for the difference. This phenomenon
also happens when there is not enough water in the water tank.
When the water tank is running empty, you will hear more noise when pressing the steam
button. If you want to go on using the steam function, you will have to refill the water tank.
STEAMING IN A VERTICAL POSITION
You have to hang the garment you want to smooth out avoiding the creases and place the
iron in a vertical position at a few centimetres from the item of clothing. Then move the iron
and press the burst of steam button at the same time.
DRY IRONING
For ironing without steam, put the steam control knob (11) in “OFF” position and do not press
the steam button (8).
WHEN FINISHED IRONING
Unplug the appliance and let it cool down.
It is not necessary to empty the water tank.
We recommend placing the iron on its base when you store it. The foreseen place is non-
slip and will not damage the soleplate of the iron.
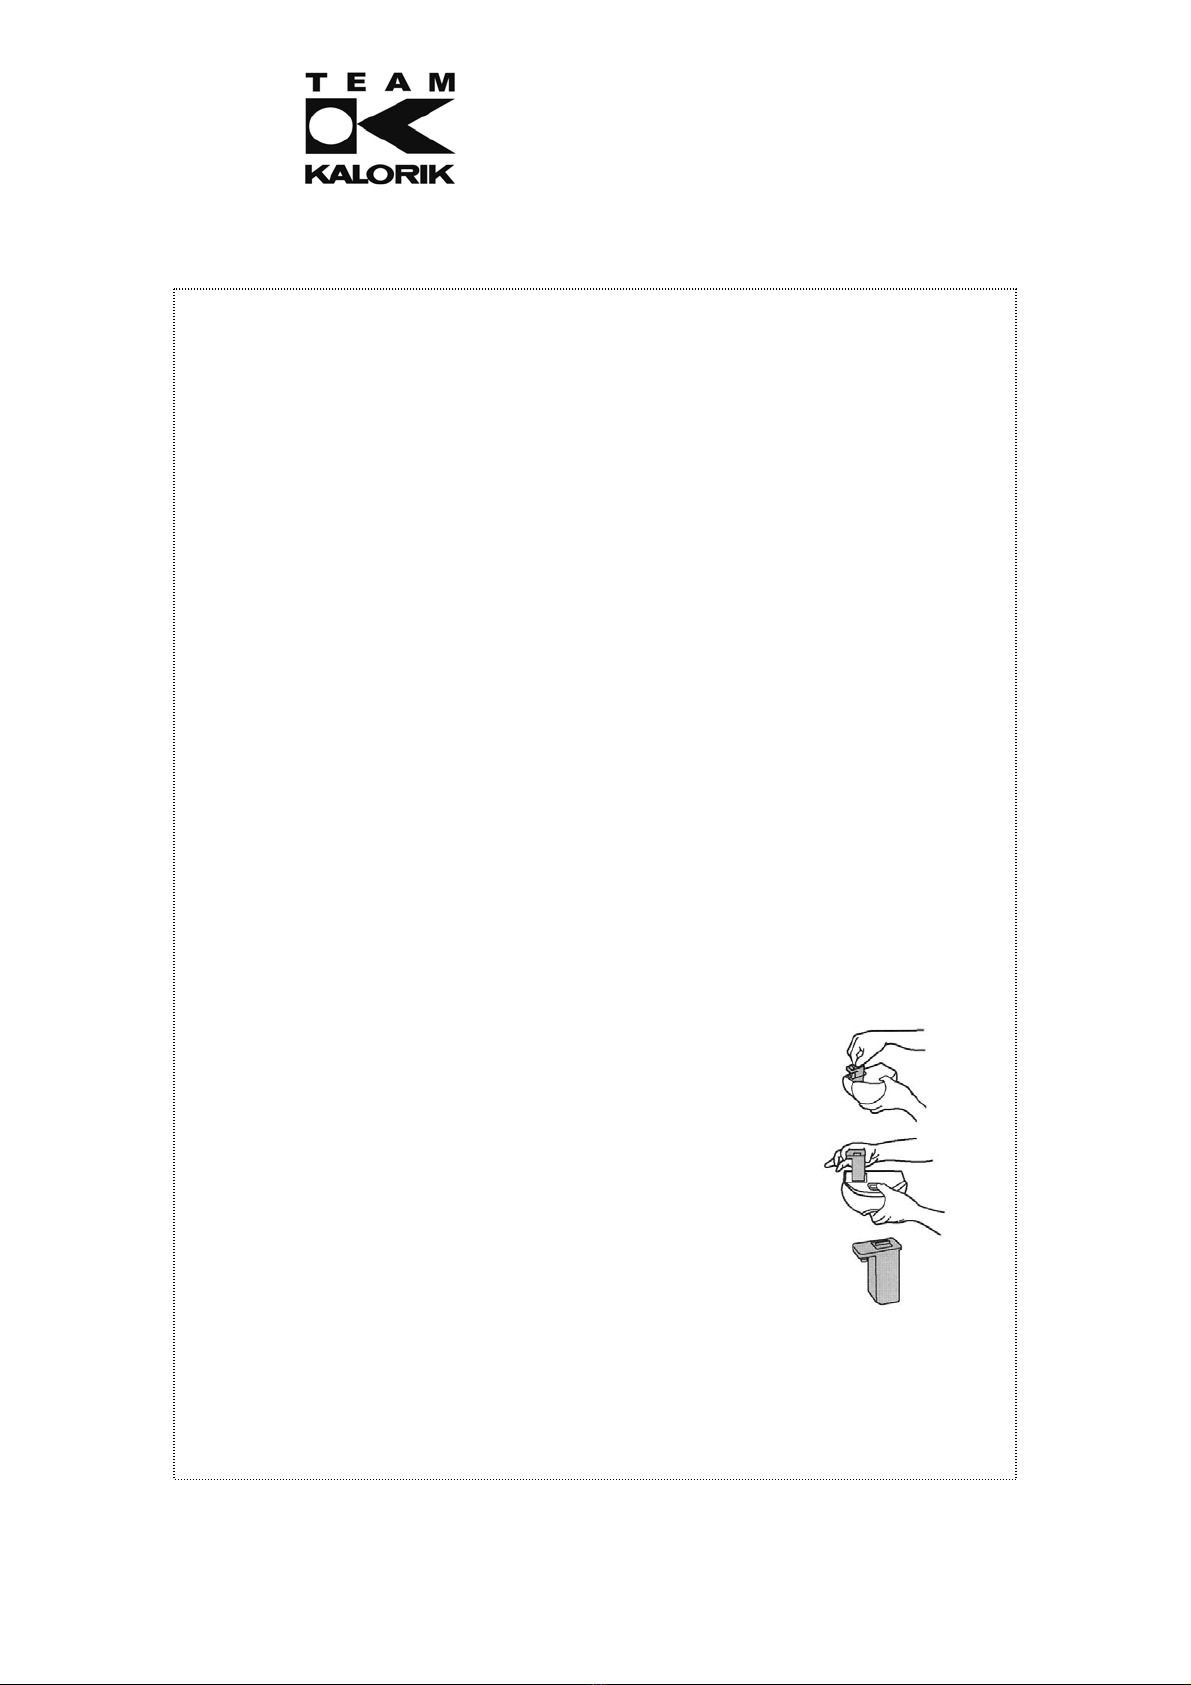
ANTI-SCALE CARTRIDGE
•Your appliance is equipped with an anti-scale cartridge (5) located
inside the water tank (4). As a result, you can use tap water as it will
be filtered by the cartridge.
•It is necessary to replace the cartridge approximately every 6 months.
However, this period may vary depending on the frequency of use
and on the scale content of the water in your area. If the water
contains much scale, you will have to replace the cartridge more
frequently.
•To take the cartridge out, remove the water tank as indicated in the
paragraph “Filling the water tank”.
•Then remove the cartridge (5) from the water tank (4) simply by
pulling it out.
•To buy a new cartridge, please contact the nearest customer
service.
•Never use the appliances without anti-scale cartridge!
13 TKG SIS 9 - 100226
Assembly page 13/44
Copies of the I/B. Please reproduce them without any
changes except under special instruction from Team
International BELGIUM. The pages must be reproduced and
folded in order to obtain a booklet A5 (+/- 148.5 mm width x
210 mm height). When folding, make sure you keep the good
numbering when you turn the pages of the I/B. Don’t change
the page numbering. Keep the language integrity.
Fax +32 2 359 95 50
CLEANING
•The plastic parts of the appliance can be cleaned with a damp cloth.
•To clean the soleplate of the iron, you will find specific products in the shops. Please also
read the instructions of use. Never use abrasive products to clean it.
•Never immerse the appliance in water or any other liquid.
PROTECTION OF THE ENVIRONMENT – DIRECTIVE 2002/96/EC
In order to preserve our environment and protect human health, the waste electrical and
electronic equipment should be disposed of in accordance with specific rules with the
implication of both suppliers and users. For this reason, as indicated by the symbol on the
rating label or on the packaging, your appliance should not be disposed of as unsorted
municipal waste. The user has the right to bring it to a municipal collection point performing
waste recovery by means of reuse, recycling or use for other applications in accordance with
the directive.
14 TKG SIS 9 - 100226
Assembly page 14/44

Copies of the I/B. Please reproduce them without any
changes except under special instruction from Team
International BELGIUM. The pages must be reproduced and
folded in order to obtain a booklet A5 (+/- 148.5 mm width x
210 mm height). When folding, make sure you keep the good
numbering when you turn the pages of the I/B. Don’t change
the page numbering. Keep the language integrity.
Fax +32 2 359 95 50
POUR VOTRE SECURITE
Lisez attentivement cette notice avant toute utilisation.
Important: Votre appareil n’est pas prévu pour être utilisé par des personnes (y compris les
enfants) dont les capacités physiques, sensorielles ou mentales sont réduites, ou des personnes
dénuées d’expérience ou de connaissance, sauf si elles ont pu bénéficier, par l’intermédiaire
d’une personne responsable de leur sécurité, d’une surveillance ou d’instructions préalables
concernant son utilisation en toute sécurité.
Il convient de surveiller les enfants pour s’assurer qu’ils ne jouent pas avec l’appareil.
Toujours déposer la base de l’appareil sur une surface stable (planche à repasser, table
ou sur le sol).
Avant d'utiliser l'appareil, vérifiez que la tension du réseau correspond bien à celle notée
sur la plaque signalétique de l'appareil.
Connectez uniquement l’appareil à une prise murale reliée à la terre.
Afin d’éviter une surcharge électrique, n’utilisez pas un autre appareil de puissance
élevée sur le même circuit électrique.
Si une rallonge électrique est nécessaire, elle doit être équipée d’une prise de terre et
capable de supporter un minimum de 10 ampères. Prenez les dispositions nécessaires afin
que l’on ne puisse rester accroché ou trébucher sur le cordon électrique.
Le fer à repasser doit être utilisé et reposé sur une surface stable.
Lorsque le fer est remis sur son repose-fer, s’assurer que la surface qui supporte le repose-
fer est stable.
Le fer à repasser ne doit pas être utilisé s’il a subi une chute, s’il y a des signes visibles de
dommages ou s’il fuit.
Ne laissez jamais votre appareil sans surveillance lorsque celui-ci est sous tension et plus
particulièrement le fer à repasser lorsqu’il est en chauffe.
Vérifiez régulièrement l’état de votre appareil et s’il est endommagé de quelque façon
que ce soit, faites-le vérifier et réparer par un service qualifié compétent(*). Si le câble est
endommagé, il doit être obligatoirement remplacé par un service qualifié compétent(*).
Utilisez l'appareil uniquement pour des usages domestiques et de la manière indiquée
dans la notice.
Ne plongez jamais le fer à repasser ainsi que le la base de l'appareil dans l'eau ou dans
tout autre liquide ni pour son nettoyage ni pour toute autre raison.
N'utilisez pas l'appareil près de sources de chaleur.
Veillez à ce que le cordon électrique et le cordon de liaison entre la base et le fer
n’entrent pas en contact avec des surfaces chaudes.
Veillez à ne pas utiliser l'appareil à l'extérieur et entreposez-le dans un endroit sec.
Ne pas utiliser d’accessoires non recommandés par le fabricant, cela peut présenter un
danger pour l’utilisateur et risque d’endommager l’appareil.
Ne déplacez jamais l’appareil en tirant sur le câble. Veillez à ce que le cordon
d’alimentation ne puisse être accidentellement accroché et ce, afin d’éviter toute chute
de l’appareil. Évitez d’enrouler le cordon autour de l’appareil et ne le tordez pas.
Débranchez toujours le cordon électrique lorsque vous n’utilisez pas l’appareil.
Faites attention car vous pourriez vous brûler en touchant l’eau chaude, la vapeur ou les
parties en métal.
Déposez toujours le fer à repasser sur la base de l’appareil, à l’emplacement prévu à cet
effet. Ne le déposez pas sur son talon et prenez garde qu’il n’entre pas en contact avec
des matériaux inflammables ni avec le cordon d’alimentation.
Ne remplissez jamais le réservoir d’eau avec du vinaigre, détartrant ou autre produit
chimique.
N'utilisez jamais l'appareil sans son réservoir d'eau et sa cartouche anti-calcaire.
15 TKG SIS 9 - 100226
Assembly page 15/44
Copies of the I/B. Please reproduce them without any
changes except under special instruction from Team
International BELGIUM. The pages must be reproduced and
folded in order to obtain a booklet A5 (+/- 148.5 mm width x
210 mm height). When folding, make sure you keep the good
numbering when you turn the pages of the I/B. Don’t change
the page numbering. Keep the language integrity.
Fax +32 2 359 95 50
Avant la première utilisation, veillez à enlever toute protection de l’appareil ainsi que de
la semelle. Nettoyez la semelle avec un chiffon doux.
Certaines parties du fer à repasser ont été légèrement graissées. De ce fait, le fer à
repasser pourrait dégager un peu de fumée lorsque vous le mettez en marche pour la
première fois, mais cela ne durera qu’un court moment.
De même si le réservoir d’eau s’est arrêté de fonctionner ou s’il est endommagé. Pour
éviter toute décharge électrique, ne démontez pas le fer à repasser ou le réservoir d’eau:
présentez votre appareil chez un technicien qualifié afin qu’il examine votre appareil. Un
montage incorrect peut causer un risque de décharges électriques lorsque le fer à
repasser ou le réservoir d’eau est utilisé.
Déroulez entièrement le cordon électrique ainsi que le tuyau d’alimentation avant de
mettre l’appareil en marche.
L'interrupteur du réservoir doit toujours être en position arrêt avant de brancher et
débrancher l’appareil.
Débranchez l’appareil et laissez refroidir complètement le fer à repasser ainsi que le
réservoir d’eau avant de les nettoyer et de les ranger, et pour les centrales vapeur avec
chaudière (selon modèle), avant d’ouvrir, de remplir ou de vider le réservoir d’eau.
POUR LES CENTRALES VAPEUR AVEC CHAUDIERE (SELON MODELE), NE JAMAIS OUVRIR LE
BOUCHON DU RESERVOIR D’EAU TANT QUE L’APPAREIL EST SOUS TENSION ET
PARTICULIEREMENT LORSQUE LA PRODUCTION DE VAPEUR EST EN COURS.
(*) Service qualifié compétent: service après-vente du fabricant ou de l'importateur ou une
personne qualifiée, reconnue et habilitée à faire ce genre de réparation afin d'éviter tout
danger. Dans tous les cas, veuillez retourner l'appareil auprès de ce service.
FER A REPASSER: PRECAUTION D’USAGE ET TEMPERATURES
•Choisissez la température en fonction de la nature du tissu. Vérifiez l’étiquette du
vêtement avant de positionner le bouton.
•Si les instructions de repassage ne sont pas mentionnées sur l’étiquette mais que vous
connaissez la composition de la matière à repasser, suivez les instructions mentionnées
dans le tableau ci-dessous.
Type de textile Réglage de
température
Réglage de la vapeur
Synthétique (e.g. acétate,
acrylique, viscose,
polyamide, polyester, …)
Soie
MIN
⏐
z
⏐
OFF
Laine
⏐
zz
⏐
z/ zz
Coton
Lin
⏐
zzz
⏐
MAX
z/ zz /zzz
•Branchez l'appareil et appuyez sur l'interrupteur (12). Le témoin lumineux rouge (15)
s'allume pour indiquer que l'appareil est en fonctionnement. Le témoin lumineux jaune
(14) s'allume également pour indiquer que le cycle de chauffe du réservoir est en cours.
16 TKG SIS 9 - 100226
Assembly page 16/44

Copies of the I/B. Please reproduce them without any
changes except under special instruction from Team
International BELGIUM. The pages must be reproduced and
folded in order to obtain a booklet A5 (+/- 148.5 mm width x
210 mm height). When folding, make sure you keep the good
numbering when you turn the pages of the I/B. Don’t change
the page numbering. Keep the language integrity.
Fax +32 2 359 95 50
•Placez le thermostat du fer (9) sur la position désirée. Le témoin lumineux du fer (1)
s'allume, vous indiquant que le fer chauffe. Dès que ce témoin lumineux s'éteint, cela
signifie que la semelle du fer a atteint la température désirée, vous pouvez commencer à
repasser.
•Pendant le repassage, ce témoin lumineux s’allume et s’éteint régulièrement. Lorsqu’il
s’allume, cela veut dire que la semelle chauffe pour atteindre la température demandée.
Vous pouvez continuer à repasser.
•Le tableau ci-dessus est valable pour les fibres uniquement. Si le tissu se plisse ou brille ou
encore bombe sous le fer à repasser, il est préférable de baisser la température à l’aide
du thermostat réglable (9) pour éviter d’abîmer le textile. Trier les articles à repasser en
fonction des fibres textiles: laine avec laine, coton avec coton, etc. L’appareil chauffe
plus vite qu’il ne refroidit. De ce fait, commencez à repasser les articles qui demandent
une température basse, comme ceux qui sont composés de fibres synthétiques ou laine.
Ensuite, les articles qui demandent une température moyenne, pour finir avec ceux qui
demandent une température élevée.
•Si l’article à repasser est fabriqué en différentes fibres textiles, choisissez la température en
fonction de la fibre qui demande la plus basse température (par exemple si vous devez
repasser un tissu comprenant 40% de polyester et 60% de coton, il faudrait choisir la
température correspondant au polyester et sans vapeur).
Si vous ne connaissez pas la composition textile du tissu à repasser, prenez une partie qui
n’est pas visible lorsque vous portez le vêtement et commencez à repasser à basse
température pour augmenter petit à petit.
Les articles 100% laine peuvent être repassés avec le fer à repasser sur position vapeur. Il
est recommandé d’appliquer un jet de vapeur et d’appliquer un morceau de tissu sec
entre le fer et la matière en laine.
•
•
•
•
Lorsque vous repassez avec vapeur (voir paragraphe "Repassage à la vapeur"), veillez à
ce que le tissu ne brille pas. Ceci peut être évité en repassant l’article à l’envers ou en
interposant un linge légèrement humide.
Le velours et autres textiles qui brillent rapidement devraient être repassés dans une seule
direction (de préférence dans le sens des fibres). Veillez à ne pas appliquer une pression
trop forte et évitez de laisser le fer à repasser pendant un laps de temps (même court) sur
la même place.
Repassez l’envers des tissus synthétiques ou en soie. Il est recommandé de ne pas utiliser la
vapeur car cela provoque des taches inconvenantes (auréoles, ...).
REMPLISSAGE DU RESERVOIR (POUR REPASSAGE AVEC VAPEUR)
1. Posez la base de l’appareil sur une surface stable.
2. Appuyez sur le bouton de déverrouillage (7) du réservoir et faites coulisser le réservoir vers
l'extérieur. Ouvrez le réservoir en retirant le capuchon (6) et versez de l’eau claire dans le
réservoir sans dépasser le niveau "MAX". Vous pouvez utiliser l’eau du robinet, mais il est
préférable d’utiliser de l’eau distillée.
3. Fermez le réservoir à l'aide du capuchon (6) et replacez ensuite le réservoir correctement
dans l'appareil jusqu'à ce qu’il arrive en butée.
4. Ne jamais utiliser de vinaigre, agent détartrant ou autre produit chimique.
Attention: assurez-vous toujours que la cartouche anti-calcaire située dans le réservoir est bien
en place. N'utilisez jamais l'appareil sans cartouche.
REMPLISSAGE DU RESERVOIR PENDANT LE REPASSAGE
Etant donné que le réservoir de cet appareil n'est pas sous pression, il vous est possible de
remplir le réservoir en cours de fonctionnement. Pour cela, procédez comme décrit ci-dessus
dans le paragraphe "Remplissage du réservoir".
17 TKG SIS 9 - 100226
Assembly page 17/44

Copies of the I/B. Please reproduce them without any
changes except under special instruction from Team
International BELGIUM. The pages must be reproduced and
folded in order to obtain a booklet A5 (+/- 148.5 mm width x
210 mm height). When folding, make sure you keep the good
numbering when you turn the pages of the I/B. Don’t change
the page numbering. Keep the language integrity.
Fax +32 2 359 95 50
REPASSAGE A LA VAPEUR
•Remplissez le réservoir d’eau et mettez l’appareil sous tension.
•Suivez les indications reprises dans le tableau concernant le réglage du thermostat du fer
(9), le repassage à vapeur est uniquement possible pour le repassage à haute
température. Il faut donc placer le thermostat sur ●● ou ●●●.
•Branchez l'appareil et mettez l'appareil en marche à l'aide de l'interrupteur (12). Le témoin
lumineux de fonctionnement (15) de la base s'allume. Le témoin lumineux jaune (14)
s'allume également pour indiquer que le cycle de chauffe du réservoir est en cours.
•Placez le bouton de réglage de la vapeur (11) sur la position désirée en fonction de la
matière à repasser (voir tableau ci-dessus). Réglez la température du fer à l’aide du
thermostat (9). Dès que le fer a atteint la température nécessaire, le témoin lumineux de
contrôle du fer (1) s'éteint.
•Dès que le témoin de chauffe jaune (14) (HEAT) est éteint, poussez sur le bouton jet de
vapeur (8) pour faire sortir la vapeur de la semelle du fer. Attention: Lors de la première
utilisation de vapeur, maintenez le bouton de vapeur enfoncé pendant environ une
minute pour nettoyer le système d'émission de vapeur. L'appareil fera alors un bruit
saccadé; cela est parfaitement normal. Par la suite, la vapeur sortira normalement de la
semelle. Lorsque vous appuyez sur le bouton jet de vapeur (8), le témoin lumineux vert
(16) s'allume indiquant que la vapeur circule dans le cordon de raccord. Lorsque vous
relâchez le bouton, la vapeur cessera progressivement de sortir de la semelle et le témoin
lumineux vert (16) s'éteindra. Pour un jet de vapeur continu, maintenez le bouton enfoncé.
•Pendant le repassage, le témoin lumineux du fer (1) s’allumera alternativement signifiant
que la température du fer à repasser se régule en fonction du réglage du thermostat.
Vous pouvez continuer à repasser.
•Lorsque vous avez utilisé beaucoup de vapeur dans un laps de temps très court, le débit
de vapeur sera légèrement réduit le temps que votre appareil produise à nouveau
suffisamment de vapeur pour compenser cette différence. Ce phénomène se produira
aussi lorsqu’il n’y aura plus suffisamment d’eau dans le réservoir.
•Lorsqu'il n'y a plus d'eau dans le réservoir, vous entendrez un bruit plus important lorsque
vous actionnez le bouton vapeur. Si vous désirez continuer d'utiliser la fonction vapeur, il
sera alors nécessaire de remplir le réservoir.
DEFROISSAGE VERTICAL
Il faut suspendre le vêtement à défroisser en évitant les mauvais plis et positionner le fer à
repasser verticalement à quelques centimètres du vêtement. Déplacez ensuite le fer à
repasser en envoyant simultanément de la vapeur.
REPASSAGE A SEC
Pour repasser sans vapeur, placez le bouton de réglage de la vapeur (11) sur "OFF" et ne
pressez pas le bouton jet de vapeur (8).
LORSQUE VOUS AVEZ TERMINE DE REPASSER
•Débranchez l’appareil et laissez-le refroidir suffisamment.
•Il n’est pas nécessaire de vider l’eau du réservoir d’eau.
•Il est conseillé de poser le fer sur sa base lors du rangement. L’emplacement prévu à cet
effet est antidérapant et ne dégradera pas la semelle du fer.
18 TKG SIS 9 - 100226
Assembly page 18/44

Copies of the I/B. Please reproduce them without any
changes except under special instruction from Team
International BELGIUM. The pages must be reproduced and
folded in order to obtain a booklet A5 (+/- 148.5 mm width x
210 mm height). When folding, make sure you keep the good
numbering when you turn the pages of the I/B. Don’t change
the page numbering. Keep the language integrity.
Fax +32 2 359 95 50
CARTOUCHE ANTI-CALCAIRE
•Votre appareil est muni d'une cartouche anti-calcaire (5) située
dans le réservoir (4). Vous pouvez donc utiliser de l'eau du robinet,
elle sera filtrée par la cartouche.
•Il est nécessaire de remplacer la cartouche environ tous les 6 mois.
Cependant, cette période peut varier en fonction de la fréquence
d'utilisation et du taux de calcaire dans l'eau de votre région. Si le
taux de calcaire est élevé, il faudra changer la cartouche plus
fréquemment.
•Pour retirer la cartouche, sortez d'abord le réservoir de l'appareil
comme indiqué dans le paragraphe "Remplissage du réservoir".
•Ensuite, sortez la cartouche (5) du réservoir (4) en tirant simplement
dessus.
•Introduisez la nouvelle cartouche dans le réservoir et remettez ce
dernier dans l'appareil.
•Pour vous procurer une nouvelle cartouche, faites appel au
service après-vente le plus proche.
•N'utilisez jamais l'appareil sans cartouche anti-calcaire!
NETTOYAGE
•Les parties plastiques de l’appareil peuvent être nettoyées avec un tissu humide.
•Pour nettoyer la semelle du fer, vous trouverez des produits spécifiques dans le commerce
et suivez les consignes indiquées. N’utilisez jamais d’éponge abrasive ou équivalent.
•Ne plongez jamais l'appareil dans l'eau ou tout autre liquide.
PROTECTION DE L’ENVIRONNEMENT – DIRECTIVE 2002/96/CE
Afin de préserver notre environnement et notre santé, l’élimination en fin de vie des appareils
électriques et électroniques doit se faire selon des règles bien précises et nécessite
l’implication de chacun, qu’il soit fournisseur ou utilisateur. C’est pour cette raison que votre
appareil, tel que le signale le symbole apposé sur sa plaque signalétique ou sur
l'emballage, ne doit en aucun cas être jeté dans une poubelle publique ou privée destinée
aux ordures ménagères. L'utilisateur a le droit de déposer l'appareil dans des lieux publics de
collecte procédant à un tri sélectif des déchets pour être soit recyclé, soit réutilisé pour
d’autres applications conformément à la directive.
19 TKG SIS 9 - 100226
Assembly page 19/44

Copies of the I/B. Please reproduce them without any
changes except under special instruction from Team
International BELGIUM. The pages must be reproduced and
folded in order to obtain a booklet A5 (+/- 148.5 mm width x
210 mm height). When folding, make sure you keep the good
numbering when you turn the pages of the I/B. Don’t change
the page numbering. Keep the language integrity.
Fax +32 2 359 95 50
BELANGRIJKE VEILIGHEIDSVOORSCHRIFTEN
Lees de gebruiksaanwijzing aandachtig alvorens u uw toestel gebruikt.
Belangrijk: Personen (kinderen inbegrepen) die wegens hun fysieke, sensoriële of mentale
capaciteiten, of wegens hun gebrek aan ervaring of kennis, het toestel niet veilig kunnen
gebruiken, mogen dit toestel niet zonder toezicht of instructies van een verantwoordelijke
persoon gebruiken. Hou kinderen goed in het oog om te vermijden dat ze met het toestel
spelen.
Plaats de sokkel van het toestel steeds op een stabiele ondergrond (strijkplank, tafel of op
de grond).
Controleer of de netspanning overeenkomt met deze van het toestel.
Steek de stekker van het toestel enkel in een stopcontact met aardleiding.
Gebruik geen ander toestel met hoog vermogen op hetzelfde stroomcircuit teneinde elke
elektrische overbelasting te vermijden.
Indien een elektrische verlengdraad nodig blijkt, gebruik dan een snoer met een minimum
van 10 Amp. Gebruik geen snoer van minder dan 10 Amp. Neem de nodige maatregelen
opdat men niet over het snoer kan struikelen of erachter kan blijven haken.
Het strijkijzer moet gebruikt en geplaatst worden op een stabiel oppervlak.
Wanneer u het strijkijzer op zijn houder plaatst, zorg er dan voor dat die op een stabiel
oppervlak staat.
Gebruik het strijkijzer niet wanneer het gevallen is of wanneer het zichtbare schade
vertoont of lekt.
Laat uw toestel tijdens het gebruik nooit zonder toezicht wanneer het onder spanning is,
evenmin het strijkijzer wanneer het warm wordt.
Controleer regelmatig of het snoer niet beschadigd is. Gebruik uw apparaat niet indien
het snoer of het apparaat zelf beschadigd is maar laat het nakijken en herstellen door
een bekwame gekwalificeerde dienst(*). Indien het snoer beschadigd is, dient het te
worden vervangen door een bekwame gekwalificeerde dienst(*).
Gebruik het toestel enkel voor huishoudelijke doeleinden en op de wijze aangeduid in de
gebruiksaanwijzing.
Dompel het strijkijzer of de basis nooit onder in water of in een andere vloeistof voor
reiniging of enig ander doel.
Gebruik het toestel niet in de nabijheid van warmtebronnen.
Controleer of de snoeren niet in contact zijn met een warm oppervlak.
Gebruik het toestel niet buiten en berg het steeds op in een droge plaats.
Gebruik geen accessoires die niet door de fabrikant zijn aanbevolen. Dit kan gevaarlijk zijn
voor de gebruiker en het apparaat beschadigen.
Trek nooit aan het snoer om het toestel te verplaatsen. Controleer of het snoer nergens
kan achterhaken, hetgeen het toestel kan doen vallen. Draai het snoer niet rond het
toestel en plooi het niet.
Trek steeds het elektrische snoer uit het stopcontact wanneer u het toestel niet gebruikt.
Let erop dat u zich niet verbrandt aan het warme water, de stoom of de metalen
onderdelen.
Plaats het strijkijzer steeds op de basis van het toestel en op de hiervoor voorziene plaats.
Plaats het nooit op zijn hiel en wees voorzichtig dat het niet in contact komt met
brandbare materialen of met het elektrische snoer.
Vul het waterreservoir nooit met azijn, een ontkalkingsmiddel of een ander chemisch
product.
Gebruik het toestel nooit zonder waterreservoir of antikalk-cassette.
Alvorens het toestel te gebruiken, let erop dat elke bescherming van het apparaat en van
de strijkzool verwijderd is. Reinig de strijkzool met een zachte doek.
20 TKG SIS 9 - 100226
Assembly page 20/44
Table of contents
Languages:


