Teba therm TPW-23 User manual
Page 1/ 33
Model TPW-23 Oven and Cooker User
TR

Page 2/ 33
Contents
1. OVEN ELECTRONIC CARD ................................................................................. 3
1.1 INTRODUCTION........................................................................................... 3
1.1.1 Touch Buttons ....................................................................................... 3
1.1.2 Cooking Function Selection button........................................................ 3
1.1.3 Temperature Adjustment button .......................................................... 3
1.1.5 Screen Symbols...................................................................................... 4
1.2 USE.............................................................................................................. 6
1.2.1 Switching ON ......................................................................................... 6
1.2.2 The Main Menu Screen and its items .................................................... 7
1.2.3 Cooking.................................................................................................. 7
1.2.4 Alarm....................................................................................................14
1.2.5 Smart functions ....................................................................................15
1.2.6 Error Codes...........................................................................................20
1.2.7. Drawing of Connections ......................................................................21
1.2.8. Electrical Connection Diagram.............................................................22
2. 30 CM BUILT-IN STOVE OVALDUAL - DOUBLE ELECTRONIC BOARD................23
2.1 Turning the Stove ON/OFF .........................................................................23
2.2 Child Lock Function (Optional) ...................................................................27
2.3 Error Codes and Recommendations for Solutions......................................30
2.4 Hotplate usage ...........................................................................................31
2.5 Electric heating power ...............................................................................32
2.6 Maintenance and cleaning .........................................................................33

Page 3/ 33
1. OVEN ELECTRONIC CARD
1.1 INTRODUCTION
1.1.1 Touch Buttons
1.1.2 Cooking Function Selection button
Resides on the left hand side of the oven and the screen ( in some oven models,
its position may be exchanged with the Tempererature Adjustment button )
and serves to select the desired cooking function. As the big oven symbol with
symbolized cooking function is flashing on the screen ( means you are allowed
to change the currently assigned cooking function ), touching it up/down will
bring the next/previous cooking function onto the screen. The cooking function
appearing on the screen will be accompanied by its default assigned
Temperature , flashing on the screen.
1.1.3 Temperature Adjustment Button
Resides on the right hand side of the oven and the screen ( in some models , its
position is exchanged with the Cooking Function Selection Button ) and serves
to adjust the cooking Temperature. As the Temperature assigned to the
cooking function is flashing, touching up/down buttons will increase/decrease
the adjusted Tempereature in 5C ( 5F).
Cooking Function and Temperature Selection Touch Buttons
TCH-2B touch boards can be used instead of selection buttons. Every touching
to appropriate button changes cooking function to the next one or changes
temperature 5C (5F) steps.1.1.4 Touch Buttons
Page 4/ 33
Switches the oven ON or OFF upon long press ( 1 sec ) , independent of
the child lock. Any running program will be cancelled when turned OFF.
When scrolling through screen menus, pressing this button has the
function of returning to the previous menu, at the end resulting in the
idle screen. Pressing this button during a running cooking program will pause, a
long ( 2 sec ) press will cancel the program.
Serves to toggle between idle and main menu screens. In some cases /
screens, it serves as a shortcut key to access directly the related edit
menu.
Used to scroll upwards within menu items or for increasing any
numerical parameter on the screen during editing. Long press during a
cooking activates the RAPID HEAT UP function.
Used to scroll downwards within menu items or for decreasing any
numerical parameter on the screen during editing. Long presses except
being in any adjustment mode, will turn on and off the lamp.
Used for selecting a highlighted menu item or confirm any ( adjusted )
parameter visible on the screen or to start cooking or a cooking program
with prev. adjusted parameters.
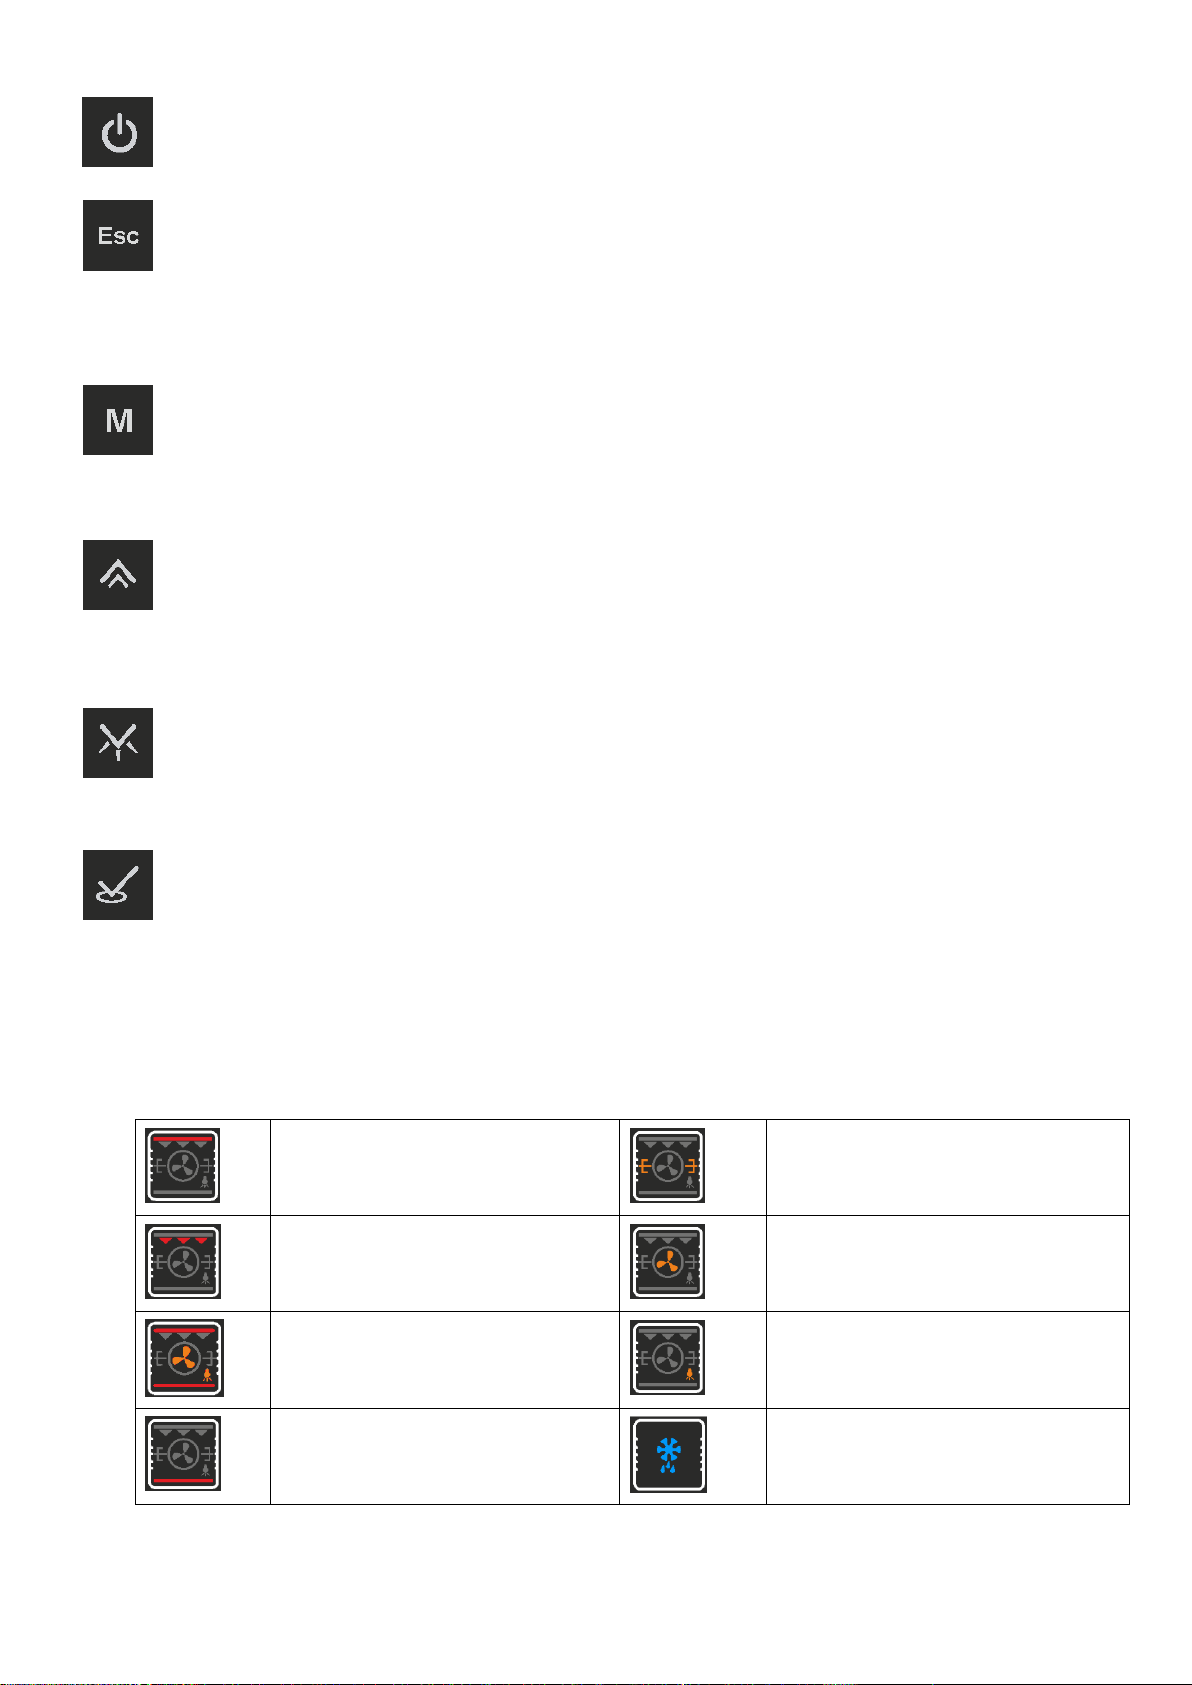
1.1.5 Screen Symbols
The symbols which may appear on your screen and their meanings are below
TOP heating element
Turnspit
Grill heating element
Circular(Turbo) Fan (Opsiyonel)
Selected cooking function
(left example is for a combination of top
+ bottom + fan elements)
Lamp
Bottom heating element
Defrost
Page 5/ 33
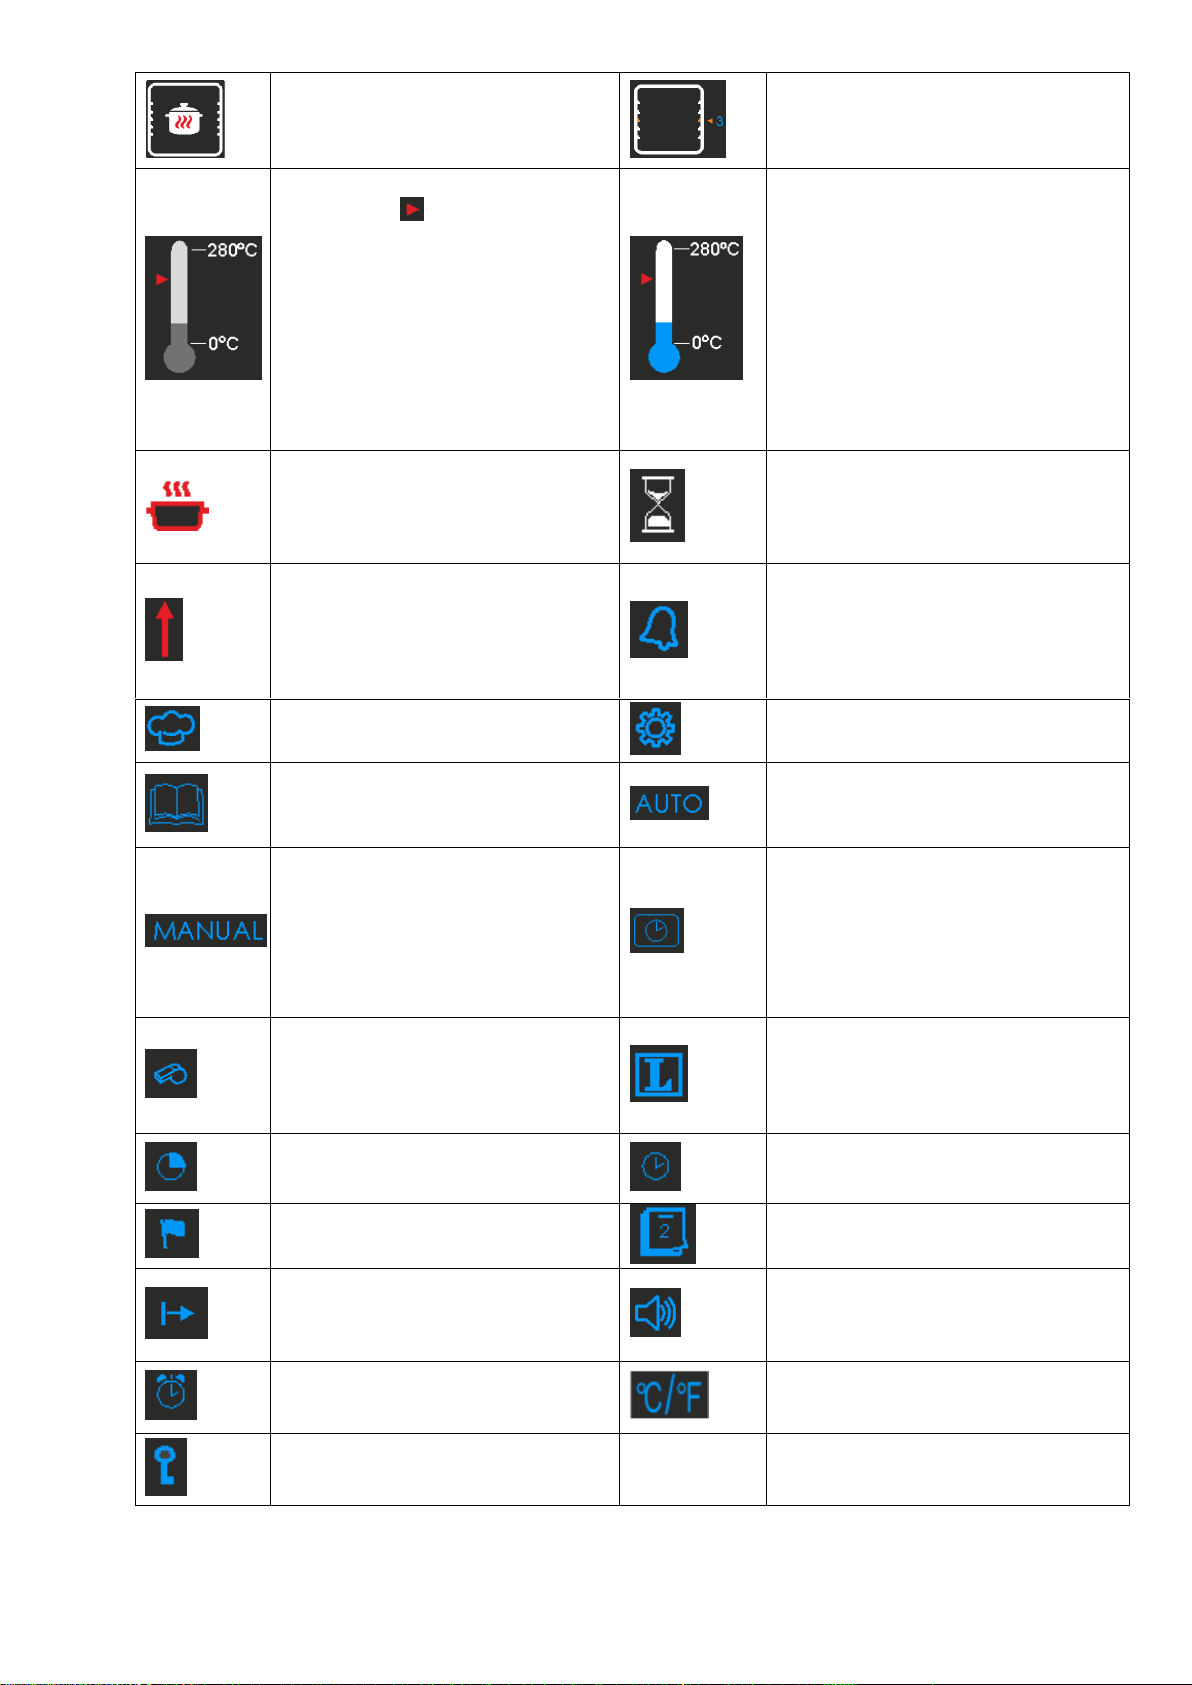
KeepWarm
Tray position recommendation
( left example is for the mid position )
Set Temperature and heating cycle
indicator ( )
This symbol indicates the set
Temperature level according to the
scaling from 0-280C. During a heating
cycle (heater relays on ), it will apear in
red, otherwise in blue.
Thermometer
Symbolises the oven cavity Temperature.
The level of the interior fluid
symbolization dynamically changes
according to the measured cavity
Temperature. It is scaled as 0C at the
lowest, 280C at the top level. The color
will be red when heating elements are
active or the cavity Temperature is above
60C, otherwise it is blue.
Cooking
Appears when a cooking is in progress
Waiting for the cooking start time
Appears when a delayed cooking is
programmed and waiting for the time to
start cooking.
Rapid Heat Up
Alarm
Appears steady when an alarm is or being
set, flashes when the set alarm time has
expired.
Cooking Menu
Settings Menu
Cooking Guide Menu
Auto Cooking. Appears steady during an
automatic cooking,flashes upon its
completion.
Manual Cooking
Screen Clock Apperance Menu
Start of Cooking
Language Selection Menu
Cooking Duration
Time of day
Time of day / clock adjustment
End of Cooking
Date adjustment Menu
Elapsed cooking time
Sound Menu ( symbol on the left means
all sound effects are on )
Alarm Clock
Temperature Unit Selection Menu
Child Lock

Page 6/ 33
1.2 USE
1.2.1 Switching ON
The screen will be black and empty when the device is OFF. By long ( 1 sec)
pressing of the button, the device is switched on, the screen lights up ( a
temporary logo screen may appear depending on the software version ) and the
idle screen will be visible. The oven controls are enabled now. To switch the
device OFF, a long press of the same button is required. In that case, any
running cooking program will be cancelled.
INFO: When no cooking or cooking program is in progress, the brightness of
the screen will be reduced automatically after 1 minute following the last
button press.
Mains Power Losses:
Your oven control will not be affected from mains power interrupts shorter than
2 minutes. Longer power losses will cause the oven to get OFF, any adjusted
cooking or alarm will be cancelled. Upon power restore after a long loss of
power, the device will be in idle mode when it was ON , in OFF mode when it
was OFF before the mains power interrupt .
INFO! Upon first installation or after a power loss lasting longer than 48
hours, the date and time of day settings will not be correct. Please set/correct
them using the SETTINGS menu.
The idle Screen
The idle screen is defined as the screen appearance as no cooking program is in
progress and the time of day and date are shown. Any of the symbols , ,
or , not related to cooking may also take place on the idle screen .
Page 7/ 33
Digital Screeen Clock Analog Screen Clock When oven cavity
Temperature > 60C
When the Temperature of the oven cavity is above 60C, the screen will appear
as red on black.
INFO : The symbol appearing on the bottom right of the screen indicates
that the, button has a shortcut function to enter the cooking menu directly.
The function and Temperature settings indicated on the screen will be the ones
used in the last cooking performed before..
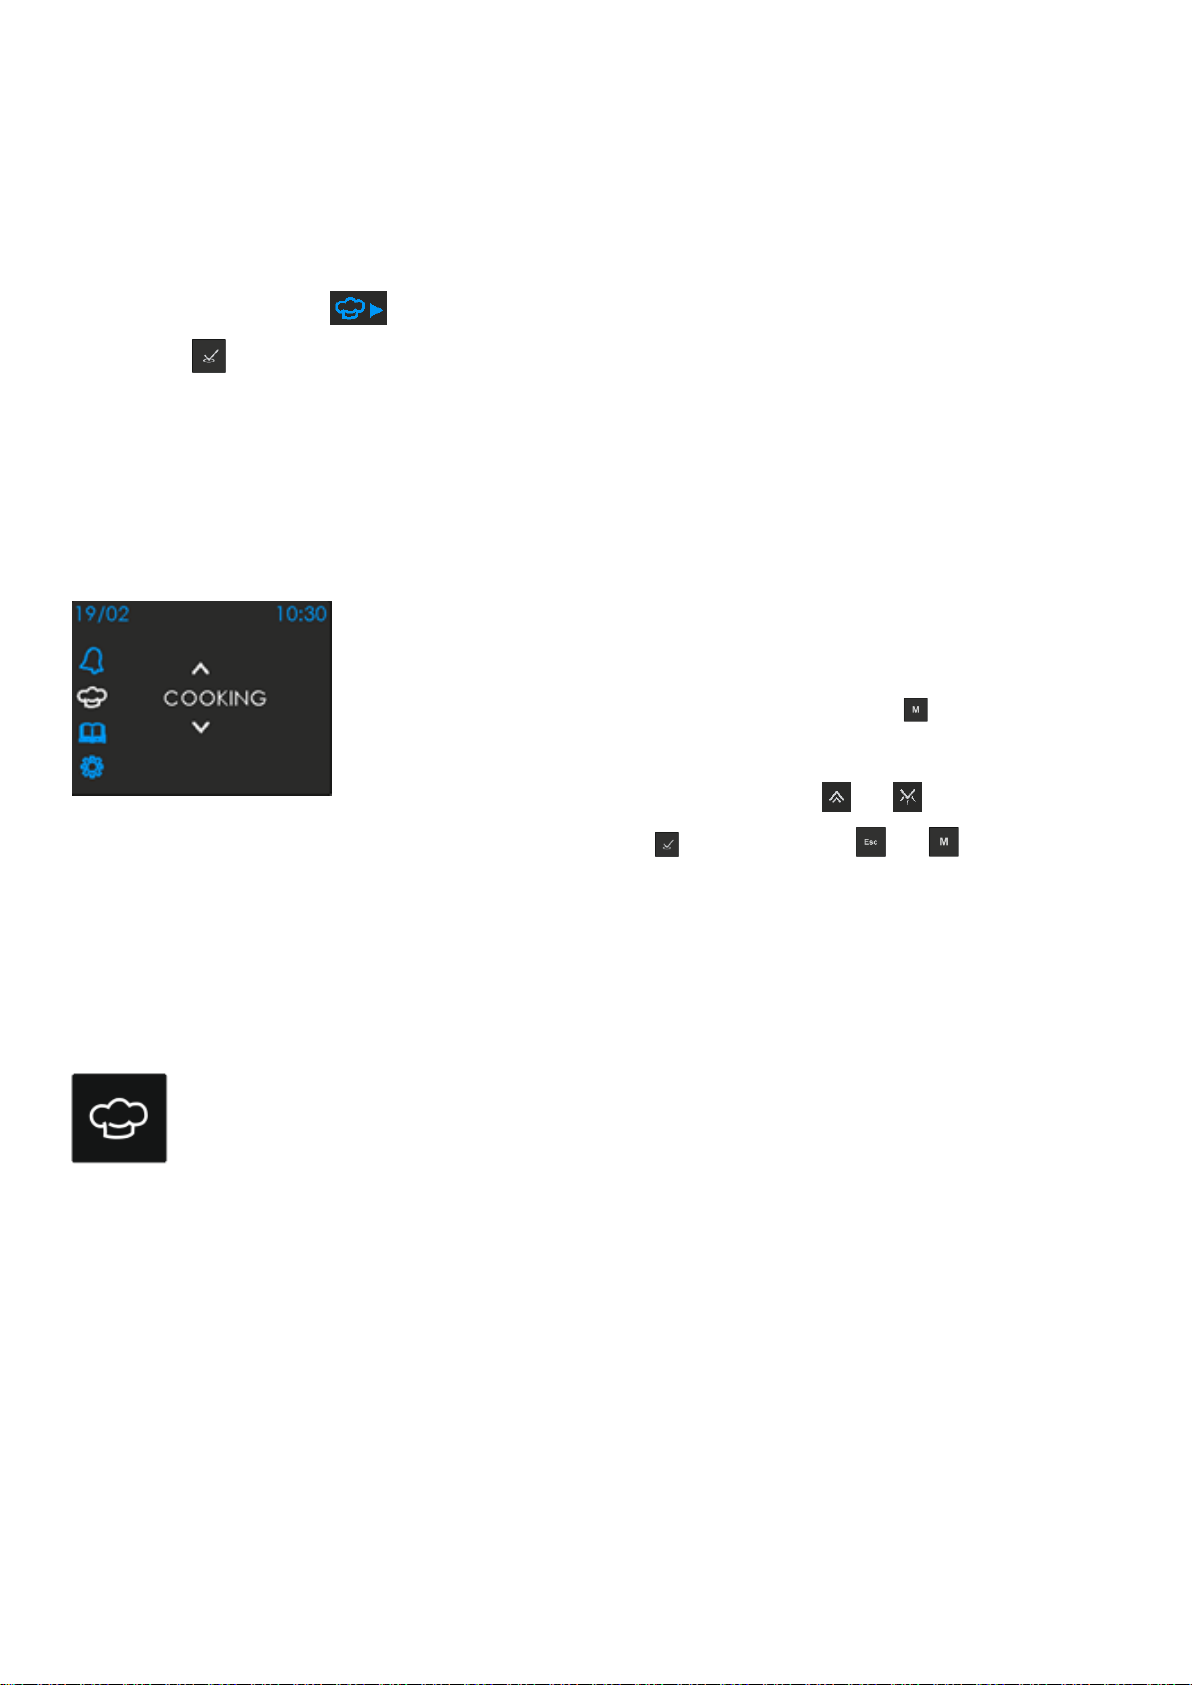
1.2.2 The Main Menu Screen and its items
There are 4 main menu items: ‘ALARM‘,‘COOKING’ ,
‘COOKING GUIDE’ and ‘SETTINGS’. The MAIN MENU
screen can be accessed upon pressing the button when
no cooking program is in progress . You can scroll through
the 4 main menu items by pressing or buttons and
select one by pressing . By pressing or , you can
return to the idle screen.
1.2.3 Cooking
Using the cooking menu, you can start a manual cooking or program
an automatic cooking and run it.
Cooking Functions
Your oven has 11 or more cooking functions. There might be additional
available functions depending on the oven model.

Page 8/ 33
Display
Function Name
Recommended
Temperature
Setting Range
Display
Function Name
Recommended
Temperature
Setting Range
Display
Function Name
Recommended
Temperature
Setting Range
Static
Cooking
200C
50C-250C
Bottom
Cooking
180C
50C-250C
Top
Cooking
180C
50C-250C
Small Grill
250C
50C-250C
Grill
250C
50C-250C
Small Grill +
Fan
200C
50C-250C
Static + Fan
200C
50C-250C
Pizza
200C
50C-250C
Grill + Turnspit
250C
50C- 250C
Defrost
20C
20C-60C
Keep Warm
80C
60C-90C
Small Grill +
Turnspit
250C
50C-250C
Manual Cooking
It is a cooking type in which you select the cooking function and Temperature
manually and terminate cooking manually after being sure the food is well
cooked.
Press as no cooking present and enter the main menu. Select “COOKING”
by pressing . The screen will show the first cooking function and its assigned
Temperature in a flashing manner. (pressing directy as the idle screen is
visible is also available as a shortcut, in that case the last cooking parameters -
function and Temperature –will be flashing)
Rotating the cooking function Selector button, select the desired function. The
assigned Temperature of this function will also appear on the screen..
Rotating the Temperature button, you may change the Temperature within
allowed limits.

Page 9/ 33
Press to start cooking. Cooking will last until manually stopped or the
maximum allowed duration ( 10 hours ) have been elapsed. In the latter case,
an error code ( see Error Codes ) will be displayed on the screen.
Note: The elapsed cooking duration will be shown on the bottom near the
symbol in hours: minutes format.
Pause, Edit or Cancel a Manual Cooking
During a manual cooking, pressing will pause it , PAUSE will appear on the
screen in a flashing manner. An edit screen with flashing cooking function and
Temperature is accessed. Rotating the related buttons on both sides , the
cooking function and Temperature can be changed. Pressing will resume
manual cooking with the changes made if any. Instead, you can also press to
access automatic cooking parameters.
At any time during manual cooking, by pressing ( results in the idle screen )
or ( screen will turn off ) for 2 seconds , you may cancel the manual
cooking.
Auto Cooking
In case of using automatic cooking, by programming the cooking period and/or
the cooking end time, cooking will be terminated automatically and
accordingly.
Auto Cooking / Instant start
Cooking will start immediately and will be automatically terminated when the
defined cooking duration has elapsed.

Page 10 / 33
1- Follow the first 3 steps of manual cooking ( explained above ) to set the
desired cooking function and Temperature.
2- Press to enter the cooking duration menu.
3- Set the desired cooking duration using buttons or (maximum allowed
cooking duration is 10 hours ). Press to confirm your adjustment. The
screen will show the cooking end time.
4- Press to start auto cooking. Cooking will be automatically ended when
the cooking duration has elapsed.
Note: In the bottom info line of the screen , you will see the cooking start time,
the remaining cooking duration and the cooking end time.
Delayed Auto Cooking
You may also use your oven by defining a cooking end (food ready ) time. In this
case, cooking will not start immediately but after some delay. This delay is
automatically calculated according to the end time setting you give in and the
cooking duration. The end time ( food ready time ) cannot exceed the current
time of day plus 23 hours 59 minutes.
1- Follow the first 3 steps of auto cooking ( explained above ) to set the desired
cooking function, Temperature and cooking duration.
2- Press . The screen will show the end time.
3- Set the desired cooking end time using or buttons ( maximum allowed
cooking end time is current time + 23hours 59 minutes )
4- Press to start the delayed cooking program . Now , the control will wait
until the calculated cooking start time, which is symbolized by appearing
on the screen.

Page 11 / 33
In the example below, it is explained how a previously entered 1h:15 min
duration cooking is delayed so that cooking will be terminated automatically at
12:50. Since the current time of day is 10:30, the oven will wait until 11:35, at
that time start cooking for 1 hour 15 minutes and automatically stop cooking at
12:50.
Note: In the bottom line of the screen , you will see the cooking start time ,
cooking duration and the cooking end time.
Pause, Edit or Cancel an Automatic Cooking :
During an Auto Cooking, pressing will pause it, PAUSE, cooking function and
Temperature will start flashing. Rotating the related buttons on both sides, the
cooking function and Temperature can be changed. . You may also press to
enter the menus for editing the cooking duration and end time. Pressing will
resume auto- cooking with the changes made if any.
At any time during auto-cooking, by pressing ( results in the idle screen ) or
( screen will turn off ) for 2 seconds , you may cancel the cooking . The
cooking program will be erased.
Note: On the bottom line of the Follow the first 3 steps of manual cooking (
explained above ) to set the desired cooking function and Temperature.
Page 12 / 33
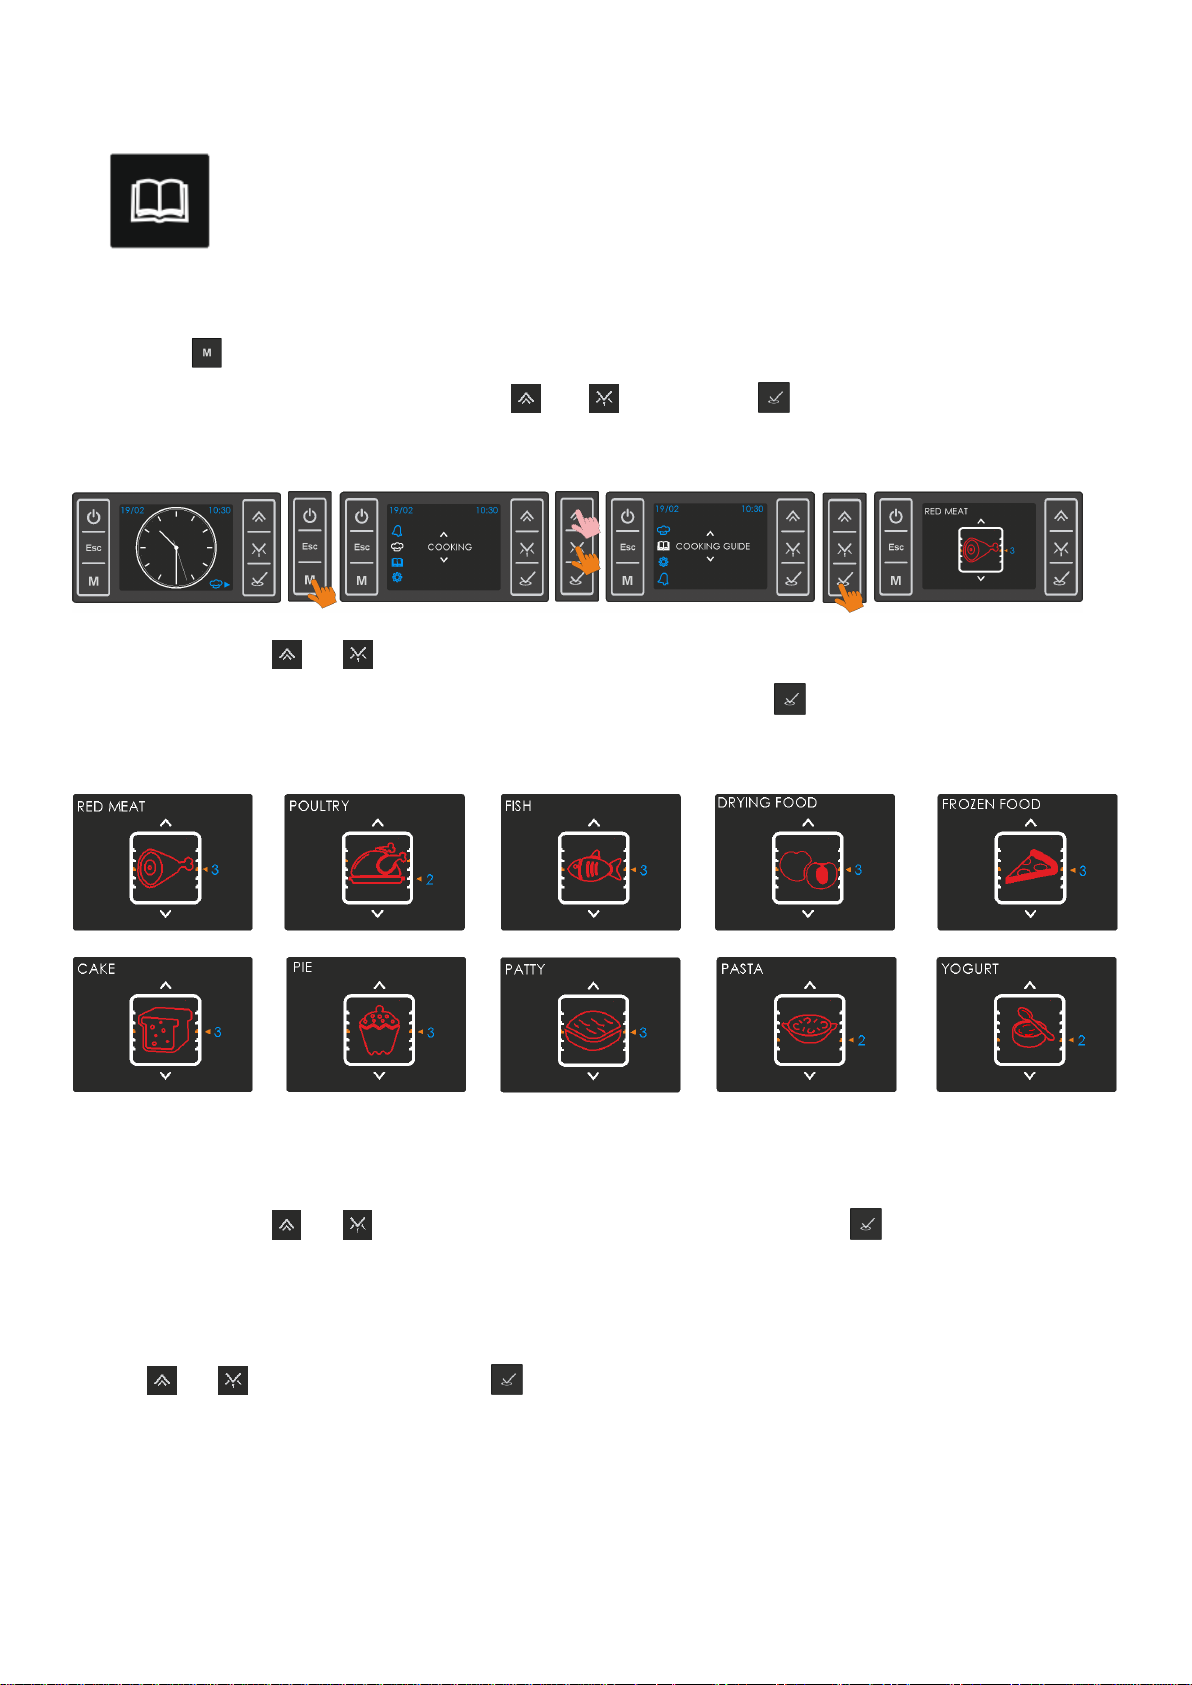
Cooking guide
Using the Cooking Guide menu, you can select one food type
among a variety. The most suitable cooking function, Temperature,
Cooking Duration will be automatically set . You will also be advised
a suitable tray position.
1. Press as no running cooking program, and access the main menu. Select
‘Cooking Guide’ using buttons or and press . The first type of food in
memory and the suggested tray position will be shown on the screen.
2. Using the or buttons (or by rotating the Function Selector Button ) ,
you may scroll through all available food types. Press when the desired food
type is on the screen.
3. For some type of foods, the control will ask you if your food to be
cookedis a single piece or multi pieces ( e.g a big piece of meat or sliced meat
/steak ). Using or , select the correct match and press to confirm.
4. The weight of the food to be cooked might be asked for some food types.
Give in the right weight ( correct the default weight appearing if necessary )
using or and confirm with .

Page 13 / 33
5. The screen will show all parameters of the cooking you are about to start.
The set oven Temperature will be flashing and can be changed within allowed
limits rotating the Temperature button.
6. Pressing will start cooking with the parameters seen on the screen
including the automatically set cooking duration and end time. Before pressing
, you may edit those two parameters by pressing and entering the edit
menu . Editing is done as explained before in the AUTO COOKING paragraph
before (Please note that the cooking duration is only allowed to be changed
within some limits) .
Pause, Edit or Cancel a Cooking :
During Cooking, pressing will pause it, PAUSE and Temperature will start
flashing. Rotating the related button, Temperature can be changed. You may
also press to enter the menus for editing the cooking duration and end time.
Pressing will resume auto- cooking with the changes made if any.
At any time during auto -cooking, by pressing ( results in the idle screen ) or
( screen will turn off ) for 2 seconds , you may cancel the cooking . The
cooking program will be erased. .
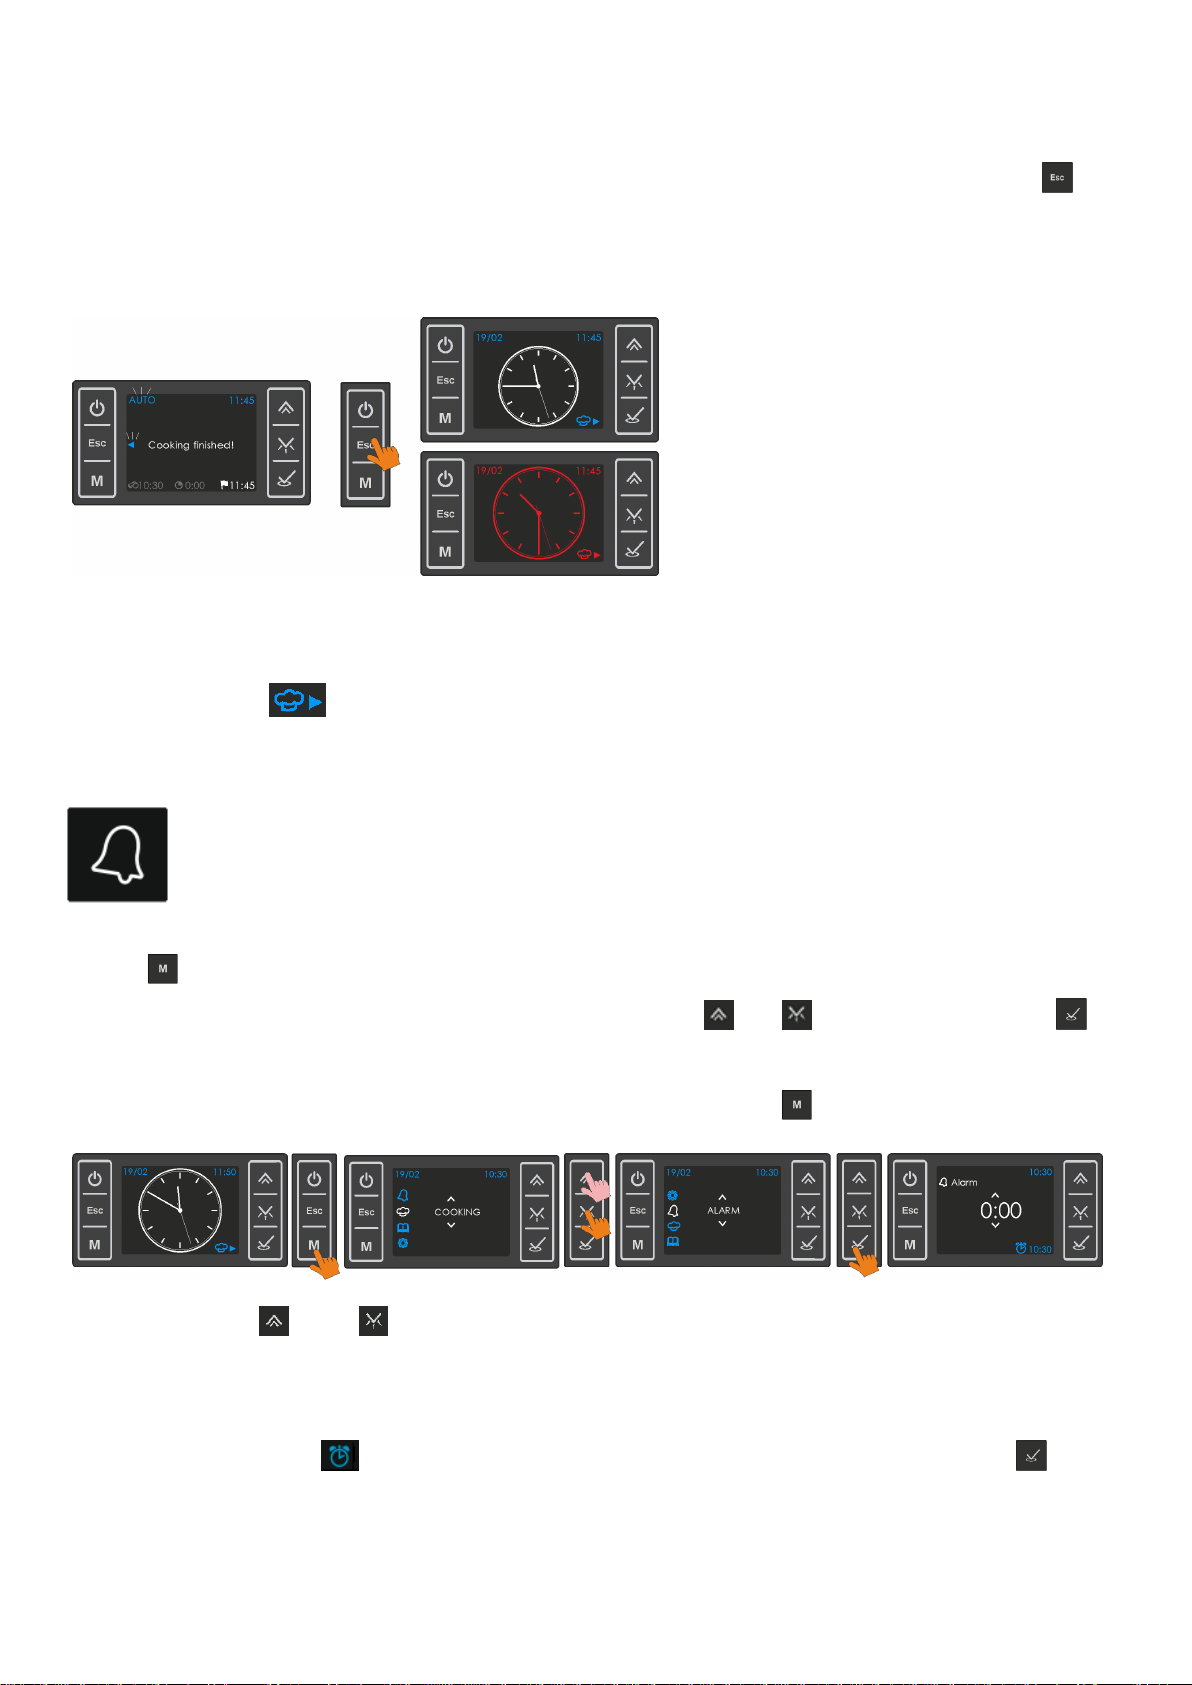
Automatic End of a Cooking
Page 14 / 33
Any cooking except manual, will end automatically when the programmed
cooking duration has elapsed. The screen will show the ‘cooking finished’
indication, AUTO symbol will be flashing and a buzzer tone is heard. Press to
confirm you received the message and stop it, the idle screen will be visible
now.
INFO: The Cooking Function and Temperature setting of the last cooking will
be memorized. Direct Access to the cooking menu with those parameters is
possible when appears nearby.
1.2.4 Alarm
You may use the Alarm function independent of the cooking functions.
The alarm will sound after the adjusted duration has elapsed or the
adjusted time of day has been reached.
Press . This will result in the main menu screen if no cooking or cooking
program is running, select ALARM using buttons or and confirm with .
The alarm duration menu will appear. If a cooking or cooking program was
running, this screen will appear directly upon pressing .
Using buttons and , adjust the alarm duration in terms of hours: seconds.
Note that, the time of day the alarm will be activated ( calculated according to
the duration being programmed ), is also indicated on the bottom right of the
screen, nearby the symbol. After completing your adjustment, press to
confirm.
When the oven cavity
Temperature is below
60C
When the oven cavity
Temperature is above
60C .

Page 15 / 33
The remaining time for the alarm will be indicated on the top of the screen if
less than 10 minutes, in minutes : seconds format, nearby the symbol. If
more than 10 minutes, the time of day the alarm will be active is indicated
instead, nearby the symbol.
Auto end or Cancelation of an Alarm:
To cancel any running alarm countdown, the duration has to be set to zero
following the steps above.
When the programmed alarm time has been reached / programmed duration
has expired, the buzzer will sound and 0:00 will be flashing on the screen.
Any button press will stop the buzzer, whereas only pressing will clear up the
screen resulting in the idle screen.
1.2.5 Smart functions
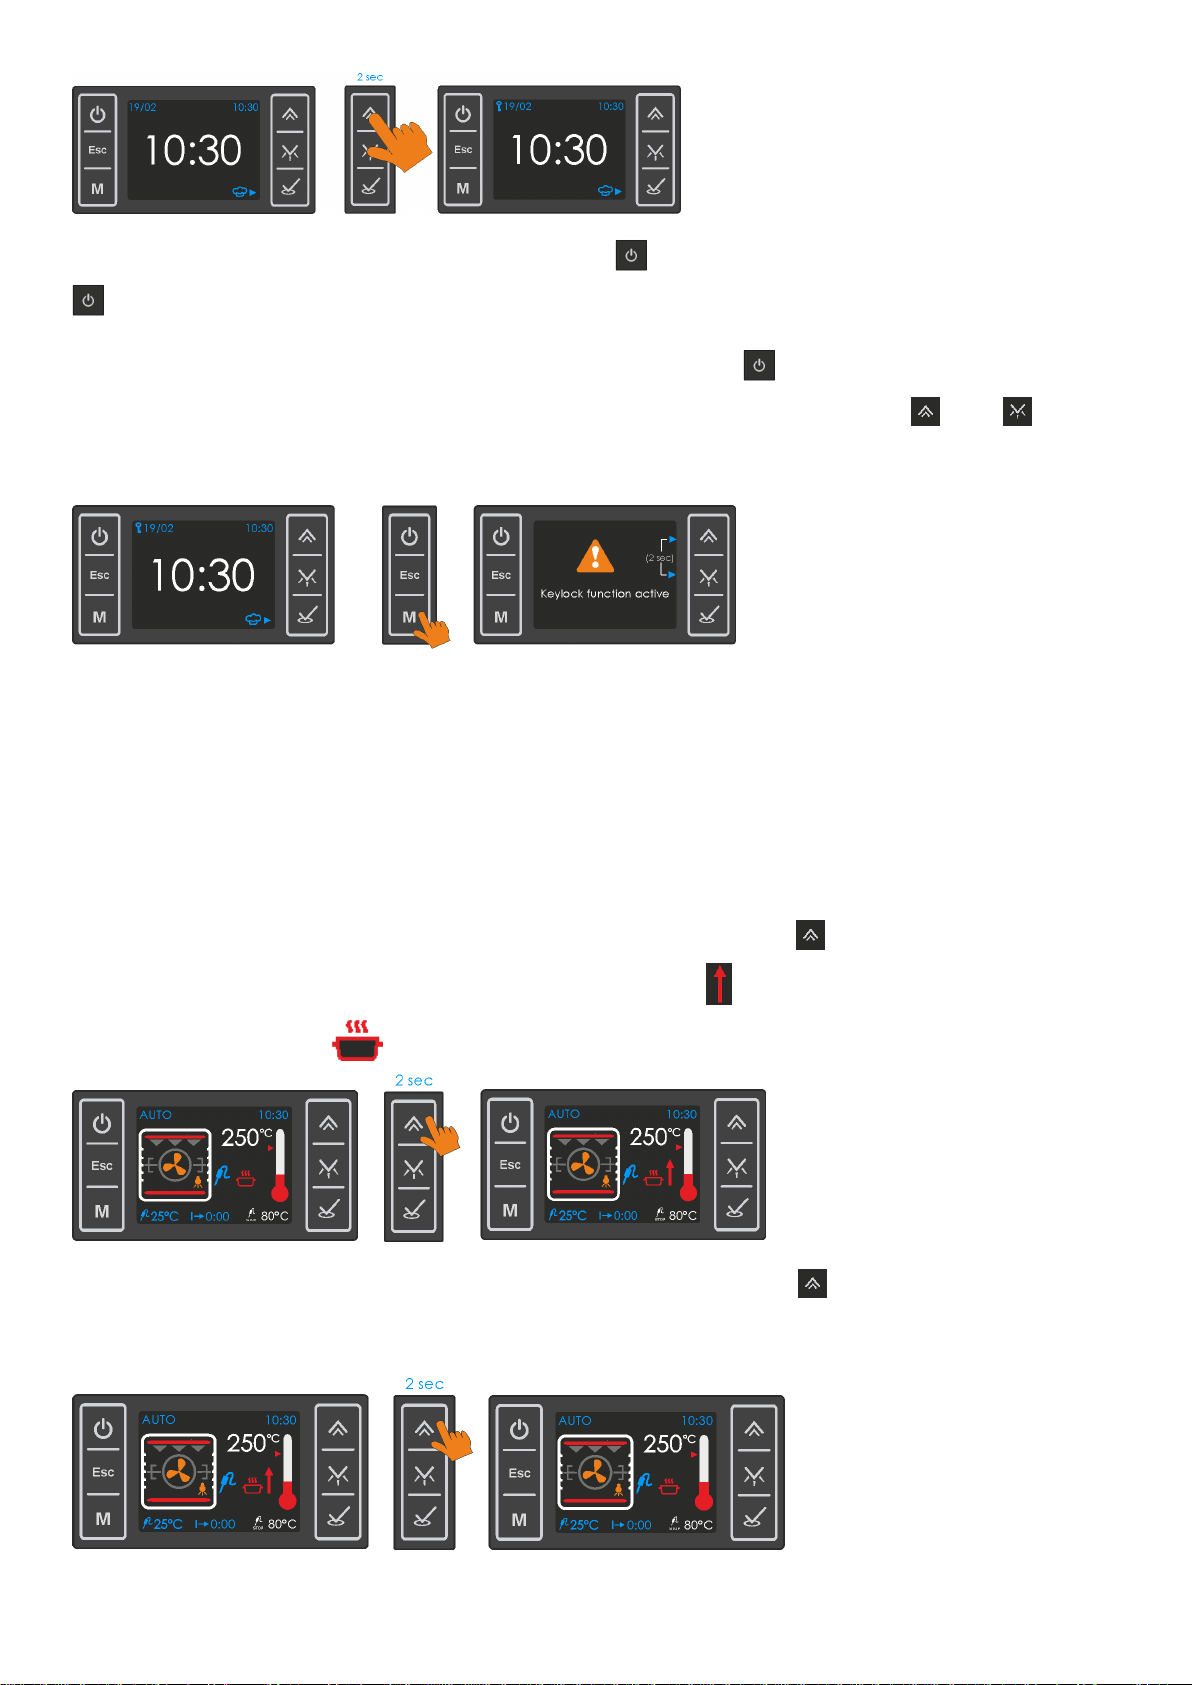
The Child Lock
In order to prevent unintended button presses , you may use the child lock
function. To activate, press both and simultenously for 2 seconds, when
not beeing in any adjustment mode. The symbol will appear on the left top
of the screen.
Page 16 / 33
When the child lock is active, only button will be functional . By long pressing
you can turn the control ON or OFF. All other touch keys will be inactive.
As the child lock is active, any button press except will result in a warning
message shown below. To disengage the child lock, press both and
buttons for 2 seconds.
Rapid Heat Up
This tool is usefull for heating up the oven rapidly to the set Temperature by
temporarily activating convectional heating ( circular heating elements and
turbo fan ) . Those additional heating elements will automatically be deactivated
when the desired cavity Temperature has been reached.
As cooking is running ( after having started ) , pressing for 2 seconds will
activate this function. The rapid heat up symbol will appear on the right of
the cooking symbol .
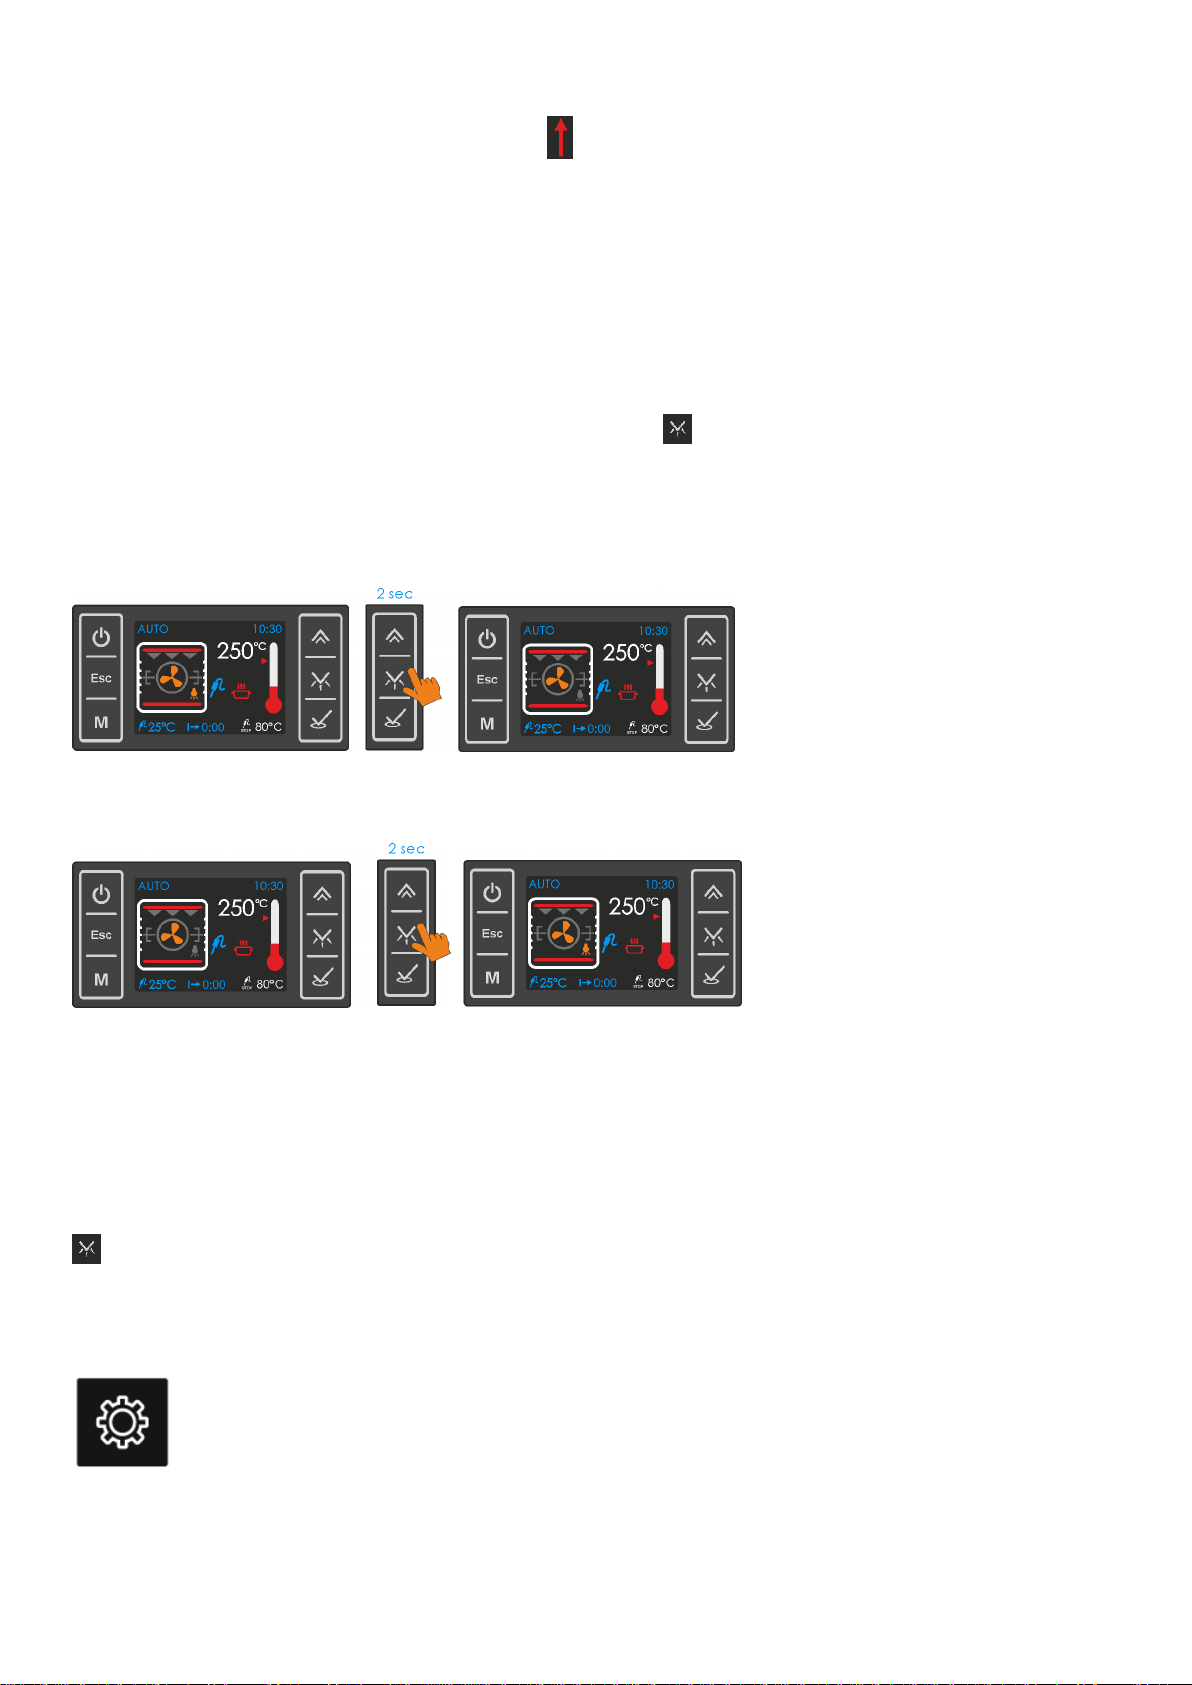
To cancel any running rapid heat up function, pressing for 2 seconds is
required.
The warning
message will
disappear after
10 seconds if key
lock is not
disengaged.
Page 17 / 33
The rapid heat up function is automatically cancelled when the oven cavity
Temperature reaches the set value, symbol will disappear.
Note: Rapid Heat Up cannot be activated during any grill function or if the
difference between set and actual Temperature is less than 50C or the set
Temperature is below 100C in other functions
Lamp ON/OFF
When not in any adjustment menu, pressing for 2 seconds will toggle the
lamp off and on.
Switching the Lamp OFF:
Switching the Lamp ON:
When the Lamp is ON, the lamp symbol on the screen will appear colored, when
OFF grey.
Note: when entering the cooking menu lamp light up automatically. if user starts
cooking lamp remains lit. If desired, the lamp can be turned off by pressing the
button for 2 seconds.
Settings
Using this menu, you may adjust the time of day, date, language,

Page 18 / 33
screen clock ( digital or analog ) , sound preferences and the Temperature unit
to be used.
Press as no running cooking program, and access the main menu, select
SETTINGS using buttons or and press . The first menu on the
screen will be the time of day. To make adjustments on the current menu on
the screen, press , to access other menus, scroll with or . Press ,
when the menu to be adjusted appears on the screen.
INFO: In case of a running cooking or cooking program , the Settings
menu cannot be accesed.
Time of Day
Following the steps below, the time of day can be adjusted.
As seen above , you can select any of 24 or 12 hour formats.
INFO: In case of an alarm countdown, time of day menu cannot be accessed.
Date
Following the steps below, the date can be adjusted.
Sounds
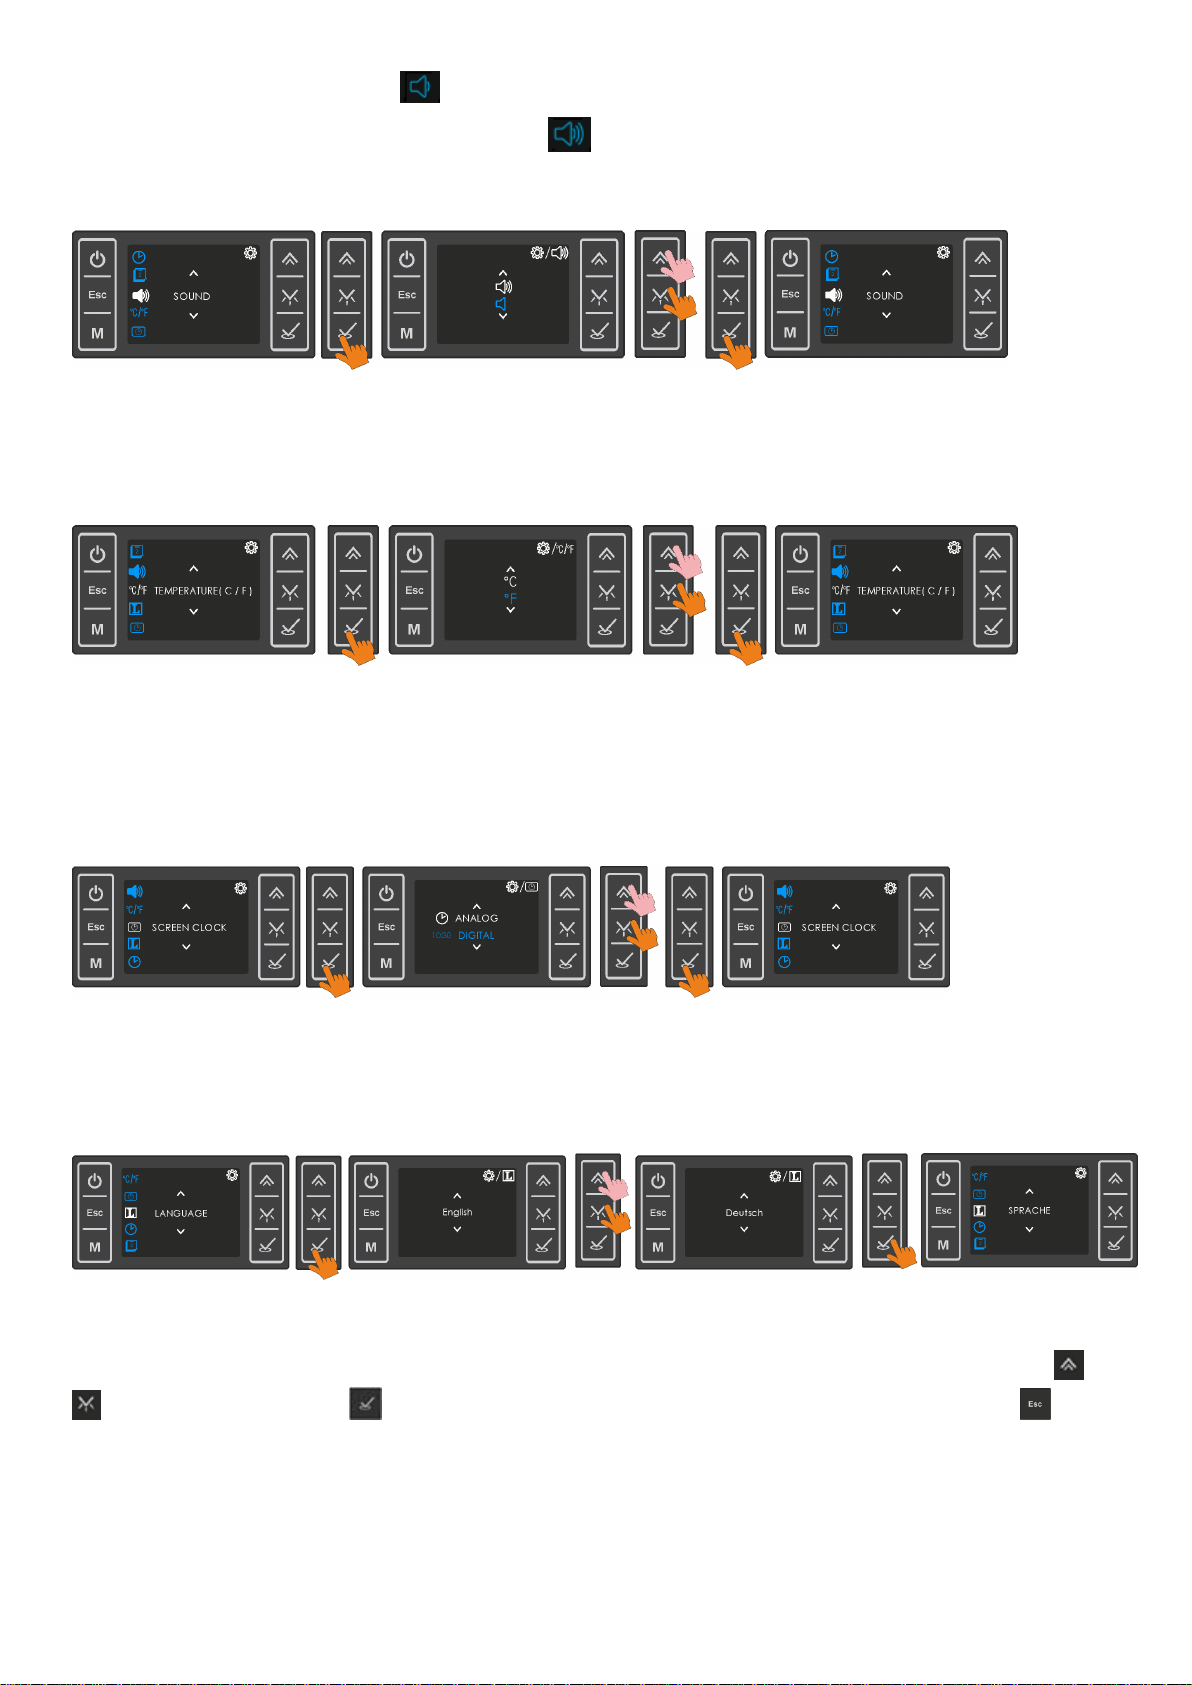
Page 19 / 33
Selecting and confirming , the buzzer sound will only be active upon any
alarm and/or cooking end. Selecting will activate all other warning tones
available additionally.
Temperature Unit
Any of the units Celcius or Fahrenheit can be selected as explained below.
Screen Clock
The clock indication on the idle screen may be selected as digital or analog as
explained below.
Language
Any of the available kanguages may be selected as explained below.
INFO : After completing an adjustment , the adjusted menu item will appear
on the screen . You may select another item to be adjusted using buttons or
and confirm with or return to the main menu screen by pressing .
Page 20 / 33
1.2.6 Error Codes
Any error preventing normal operation will be displayed on the screen . In that
case, any running cooking or cooking program will be cancelled. The message
will remain on the screen until is pressed , even if the error has been
recovered.
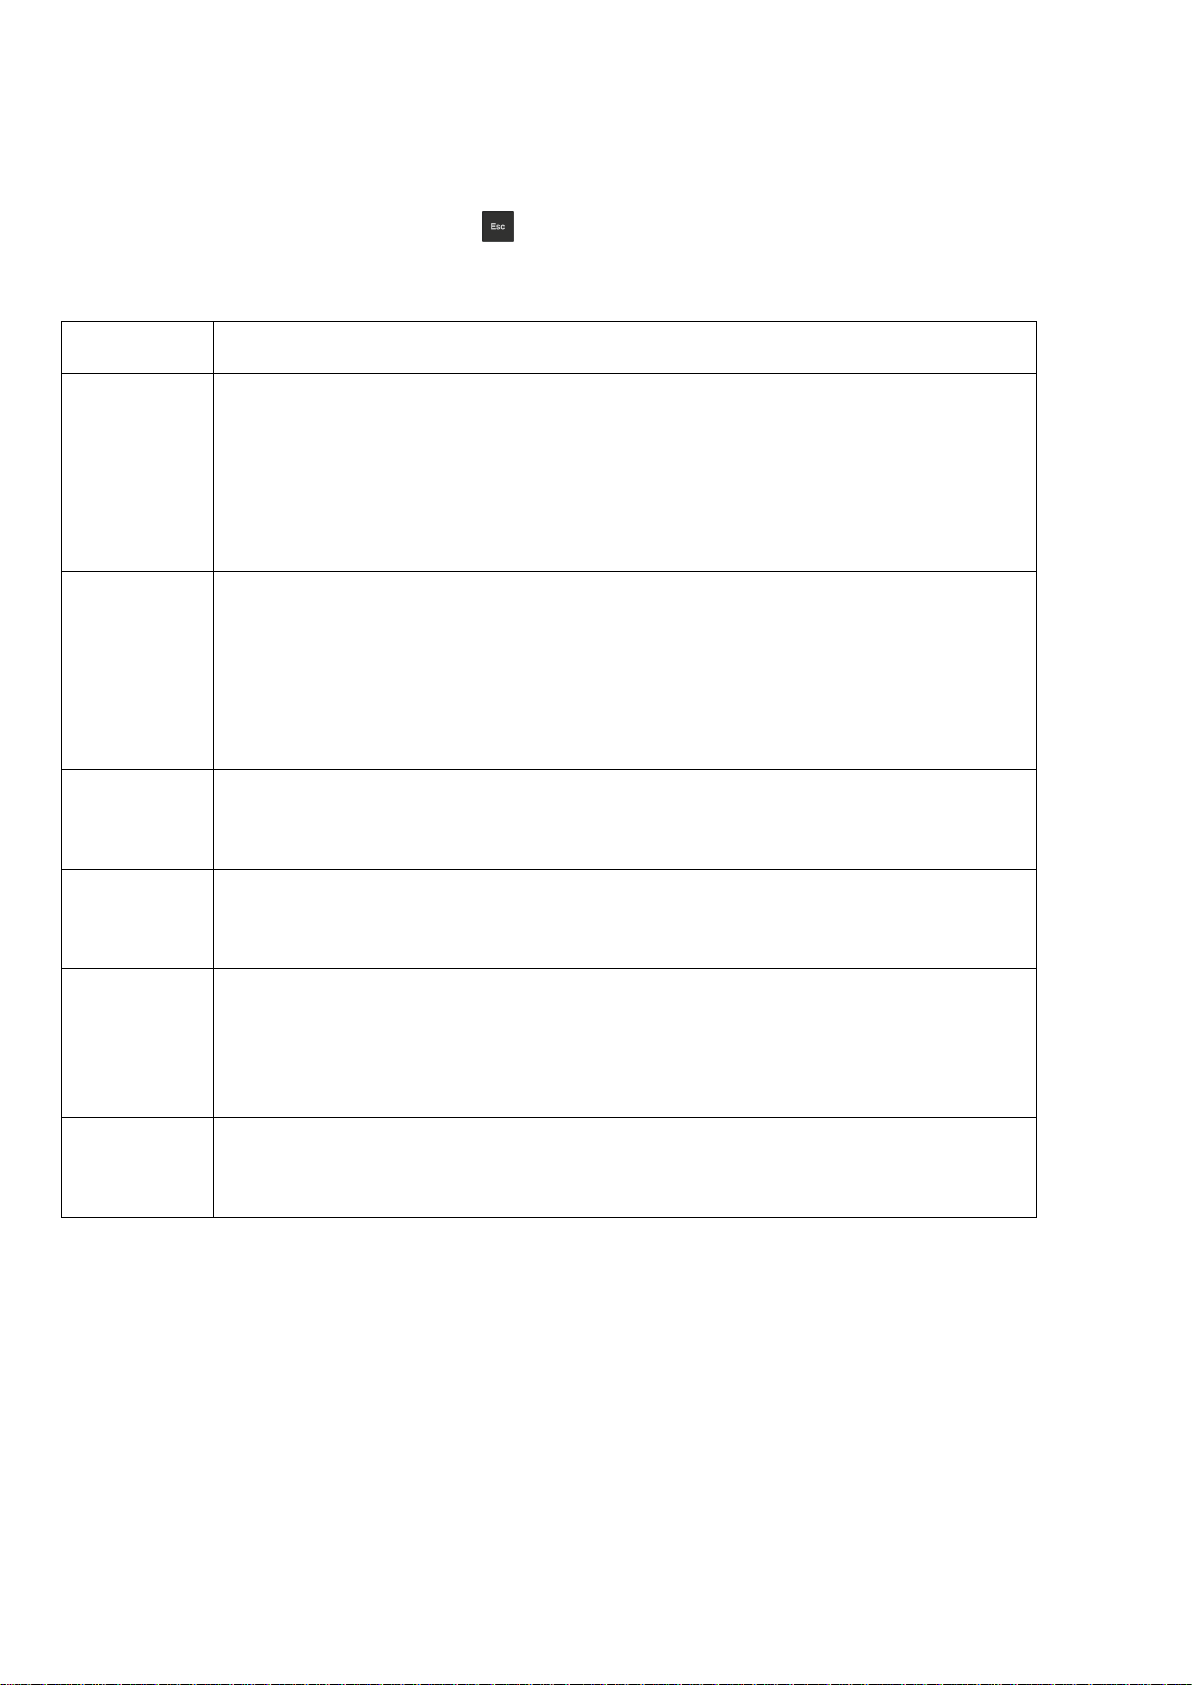
Error Code
Explanation
Error 1
Temperature Sensor Error
The connector of the sensor may be loose or disconnected.
Temperature sensor malfunction .
Power Module malfunction
Error 2
User Module Temperature limit exceeded
The ambient Temperature of the user module is > 85C.
Cooling Fan malfunction .
User module malfunction
Error 3
User Module Temperature Limit Sensor Error
User module malfunction
Error 6
Real Time Clock Error
The real time clock IC on the user module is defect.
Error 8
Power Section Error ( oven gets not heated or does not cool down )
Loose heating element connection
Power Module malfunction
Error 9
Frequency Error
The crystal oscilator of the real time clock is defect.
Table of contents
Popular Oven manuals by other brands


Hotpoint
Hotpoint DKD3 841 Instructions for installation and use

Zanussi
Zanussi easySteamPlus 237502 Specifications

Landmann
Landmann 825 Assembly instruction

Bosch
Bosch HB 78B Y Series User manual and installation instructions

Electrolux
Electrolux EOB3430DAX user manual

SEVERIN
SEVERIN Rotisserie toast oven Instructions for use