Technika 32G23B-HD/DVD User manual


33
Manufacturers Guarantee
IMPORTANT GUARANTEE INFORMATIONIMPORTANT GUARANTEE INFORMATION
Congratulations on purchasing this television. We hope you have many years of trouble free
enjoyment from your purchase.
Your product is covered under the manufacturers guarantee for 12 months from the date
of purchase.
If you experience any difficulties with your TV, please refer to the ‘Frequently asked questions’ section
in this user guide.
If you are still unable to remedy the issue, try resetting the TV to factory settings. (Details in the
‘Settings menu’ section of this user guide). Alternatively you can contact the helpline on the
number below.
In the event that a fault is diagnosed, the helpline will arrange to collect the TV from your home
or work address, return it to our service centre, repair the item and then return it to you.
Should options to fix your set be exhausted, we reserve the right to either replace your set or refer back
to your retailer for a solution
Technical Support Information
Telephone UK 0330 024 0804 ROI 01443 3940
Web support: www.umc-uk.co.uk
The telephone opening hours are Monday to Friday 8.30am – 6pm, Saturday 9am – 5pm.
UK: Calls are charged at a local rate.
ROI: Calls are charged at a local rate.
You must retain all packaging materials, in addition to your proof of purchase/receipt,
as you will need these in the event of warranty/service support.
This guarantee is in addition to and does not affect your statutory rights.
If you need to call the helpline, you will need the following information.
1) Model No ______________________________________ (You can find this on the rear of the TV)
2) Date of purchase ______________________________________ (You can find this on your sales receipt)
3) Serial Number ______________________________________ (You can find this on the rear of the TV)
EXAMPLE OF LABEL ON REAR OF TV
This TV set is for domestic use only.
Model No
Serial No.

4
- Alternating current
- This equipment is a Class II or double insulated
electrical appliance. It has been designed in such
a way that it does not require a safety connection
to electrical earth.
To prevent spread of fire,
keep candles or other open
flames away from this product
at all times
Please read these instructions. All of the
safety and operating instructions should
be read before the appliance
is operated.
Warnings
• Television sets with 40” screens or larger must be
lifted and carried by at least 2 people.
• This television does not contain any parts that are
serviceable by the user. In the event of a fault, contact
the manufacturer or authorised service department.
• Exposing the internal parts of the TV may endanger
your life. The manufacturers guarantee does not extend
to faults caused by repairs carried out by unauthorised
third parties.
• Do not use the TV set immediately after unpacking.
Wait until the TV warms up to room temperature before
using it.
• To reduce the risk of fire, electric shock or damage to
the TV, do not expose it to dust, rain or moisture. Never
expose the TV to dripping or splashing and do not place
objects filled with liquids on or near the TV.
• Do not connect any external devices (DVD player,
games console etc) when the TV is switched on.
Disconnect both the TV and device from the mains
before connecting. Only switch appliances on when the
connection process is complete.
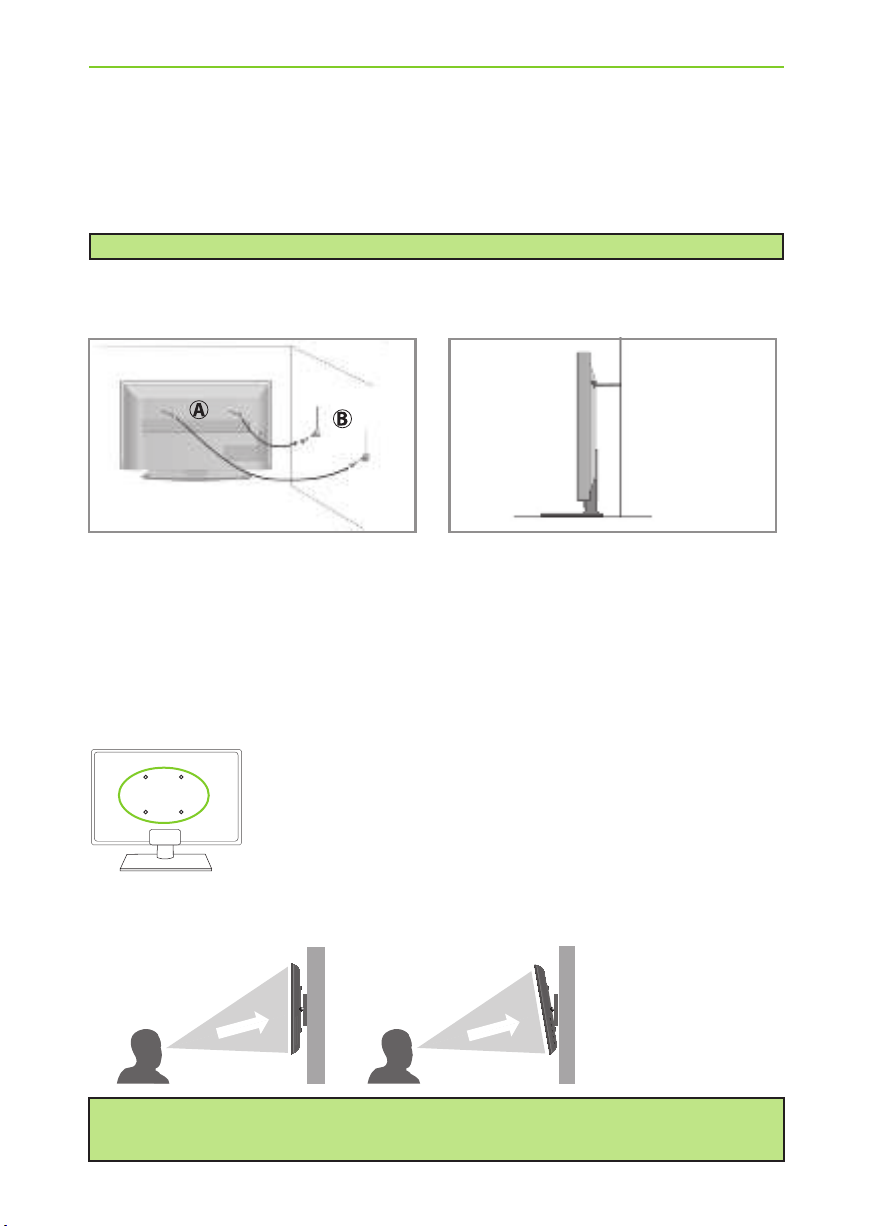
• Do not place the television in a confined space. Allow
at least 5cm around the TV and do not obstruct the
ventilation openings at the rear of the television.
• When installing on a wall, ensure the TV is at
least 5cm from the wall for ventilation.
• Always ensure that the TV’s ventilation openings
are not covered with items such as newspapers, table-
cloths, curtains, etc.
• Dispose of this television and any components
including batteries in an environmentally friendly
manner. If in doubt, please contact your local authority
for details of recycling.
• Ensure this TV is used in moderate climates only.
• In cases of electrostatic discharge (ESD) the TV may
operate incorrectly. If this happens, turn the set off at
the mains and then turn back on again after 30 seconds.
The set should now work normally.
Important Safety Instructions • TV operating conditions:
-Temperature from +10 to +35°C
- Humidity no more than 80% (at a temperature of 25°C)
CLASS 1 LASER PRODUCT (Applies to models
with built in DVD player)
• This unit is a class 1 laser product. This unit uses a visible
laser beam which could cause hazardous radiation explosure if
directed. Be sure to operate the player correctly as instructed.
WARNING: Never place a television set on an unstable
surface. The TV set may fall causing serious personal injury
or death. Many injuries, particularly to children, can be
avoided by taking simple precautions such as:
• Use cabinets or stands recommended by the manufacturer of
the television set.
• Only use furniture that can safely support the television set.
• Ensure the television set is not overhanging the edge of the
supporting furniture.
• Do not place the television set on tall furniture
(for example, cupboards or bookcases) without anchoring both
the furniture and the television
set to a suitable support.
• Do not place the television set on cloth or other materials
that may be located between the television set and supporting
furniture.
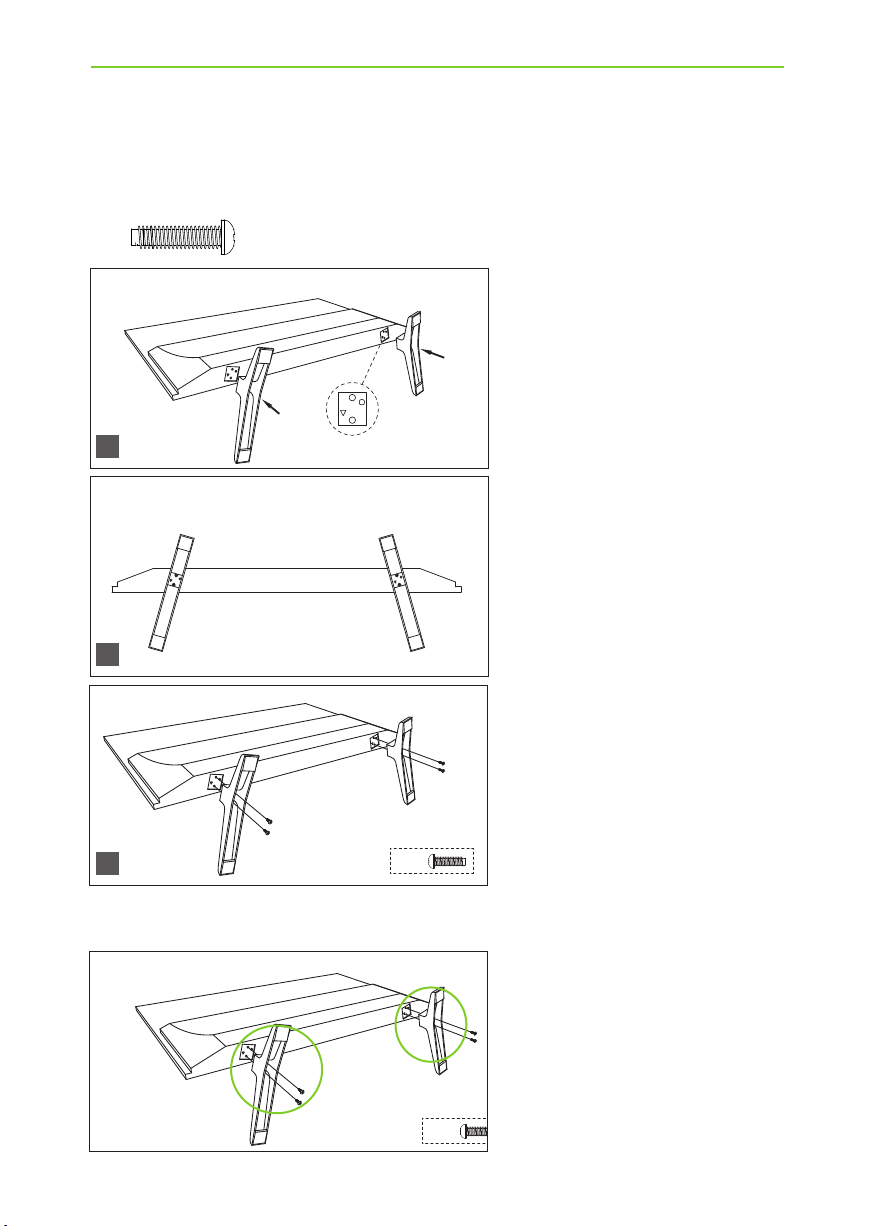
• For maximum safety while using your set, it is recommended to
fit anti-tip straps. These are designed to be attached between the
wall/secure surface and the VESA mounts on the television. These
are available from major retailers and websites and are an easy
and inexpensive way of ensuring that your set stays safely upright.
• Please educate children about the dangers of climbing on
furniture to reach the television set or its controls.
• If your existing television set is being retained and relocated,
the same considerations as above should be applied.
Safety
• For your safety, this appliance is fitted with a fused 3 pin
mains plug. Should the fuse need to be replaced, ensure that any
replacement is of the same amperage and approved with the BSI
mark.
• Never try and replace the mains plug unless you have
adequate qualifications and are legally authorised to do so. In
the event that a replacement mains cable is required, contact the
manufacturer for a suitable replacement.
• Never use the television if it is damaged in any way.
• Always place the television on a flat level surface avoiding
anywhere which may be subject to
strong vibration.
• The ideal distance to watch the television is approximately
2.5-3 times the length of the diagonal measurements of the TV
screen.
• Ensure the television is not placed on top of the power cable
as the weight of the television may damage the cable and cause a
safety hazard.
• Never place mobile phones, speakers or any other device which
may cause magnetic or radio interference, near the television. If
interference is apparent, move the device causing the interference
away from the television.
• To disconnect the set from the mains, remove the mains plug
from the socket.
• Ensure that the mains plug is always easily accessible.
• When handling the set do not grip the LCD screen/glass.
• Do not pull the set when mounted on a bracket. If using a
moveable bracket, adjust via the bracket and not the TV set.
• Do not place this set above a heat source.
WARNING: Excessive volume when using earphones and
headphones can cause damage to hearing.
Important Safety Instructions

55
Important Safety Instructions
Maintenance
• To clean your TV, wipe with a soft, dry cloth. If the
surfaces are extremely dirty, use a soft cloth dampened
with a weak detergent solution.
• Never use alcohol, paint thinner or benzene to
clean this unit.
• Before using a chemically treated cloth, read the
instructions that came with the cloth carefully.
CAUTION: If water or other liquid enters the
television through the display panel surface,
a malfunction may occur.
Packaging
• The safest way to transport your item is in the
original box/packaging - please save your packaging
for this.
• You will need the original box/packaging in the
event of warranty/service repair or support. We are
unable to carry out warranty/service if you are unable
to package the item correctly.
Important information regarding use of video
games, computers, captions or other fixed
image displays
The extended use of fixed image program material can
cause a permanent “shadow image” on the LCD/LED panel,
also known as “screen burn”.
This “shadow image” can appear in the background during
normal viewing. This type of irreversible LCD/LED panel
deterioration can be limited by observing the following
steps:
1. Reduce the brightness/contrast setting to a minimum
suitable viewing level.
2. Do not display the fixed image for extended periods
of time.
3. Turn the power off when not in use.
Examples of images that are more likely to cause “screen
burn” are as follows (this is not an exhaustive list):
• TV channel logos: e.g. shopping channel logos and
pricing displays - especially if they are bright and stationary.
Moving or low-contrast graphics are less likely to cause
ageing of the screen.
• Time displays.
• Teletext: Do not view a static page for a long period of
time
• TV/DVD menus: e.g. listings of DVD disc content.
• Pause mode: Do not leave the TV in pause mode
for long periods of time, e.g. when watching DVDs
or videos.
Important: Once‘shadow image/screen burn’
occurs, it will never disappear and is not
repairable under warranty.
How do I dispose of this product?
UK: Waste electrical products should not
be disposed of with household waste.
Please dispose of the product at a
designated collection point for recycling
of WEEE. For your nearest facilities, please
see www.recycle-more.co.uk or in store
for details.
ROI: Waste electrical products should not
be disposed of with household waste.
Separate disposal facilities exist. Check with
your local authority or retailer for recycling advice.
Batteries
• CAUTION: Risk of explosion if the battery is replaced by
an incorrect type.
• Do not expose batteries to high temperatures, excessive
heat, prolonged sunshine or fire as this may cause leakage,
explosion or ignition.
Observe the correct polarity when inserting batteries.
• Do not use different types of batteries together or mix
old and new batteries.
• Dispose of batteries in an environmentally
friendly way.
• Certain regions may regulate the disposal of batteries.
Please consult your local authority.
Cd
CE Statement:
Hereby, UMC Poland Sp. z o.o. declares that this LED
TV is in compliance with the essential requirements
and other relevant provisions of
RED Directive 2014/53/EU.
The full text of the EU declaration of conformity is
available by following the link:
www.umc-poland.com/declaration-of-conformity/
Important Safety Instructions

6
CAUTION:
THIS UNIT IS A CLASS 1 LASER PRODUCT. THIS UNIT USES A VISIBLE LASER BEAM WHICH COULD CAUSE HAZARDOUS
RADIATION EXPOSURE IF DIRECTED. BE SURE TO OPERATE THE PLAYER CORRECTLY AS INSTRUCTED.
WHEN THIS UNIT IS PLUGGED INTO THE WALL OUTLET, DO NOT PLACE YOUR EYES CLOSE TO THE OPENINGS TO LOOK
INTO THE INSIDE OF THIS UNIT.
USE OF CONTROLS OR ADJUSTMENTS OR PERFORMANCE OF PROCEDURES OTHER THAN THOSE SPECIFIED HEREIN MAY
RESULT IN HAZARDOUS RADIATION EXPOSURE.
DO NOT OPEN COVERS AND DO NOT REPAIR YOURSELF. REFER SERVICING TO QUALIFIED PERSONNEL.
CLASS 1
LASER PRODUCT
This caution label is located on the rear panel of the unit
TV Models with built in DVD players
Trademarks
The terms HDMI, HDMI High-Denition Multimedia Interface,
and the HDMI Logo are trademarks or registered trademarks
of HDMI Licensing Administrator, Inc.
The DVB logo is the registered trademark of the Digital Video
Broadcasting (DVB) project.
The FREEVIEW HD words and logos are trade marks of DTV
Services LTD. © DTV Services Ltd.
SAORVIEW is a registered trademark owned by RTÉ.
Manufactured under license from Dolby Laboratories. Dolby,
Dolby Audio, and the double-D symbol are trademarks of
Dolby Laboratories Licensing Corporation.
For DTS patents, see http://patents.dts.com. Manufactured
under license from DTS Licensing Limited. DTS, the Symbol, &
DTS and the Symbol together are registered trademarks.
DTS TruSurround is a trademark of DTS, Inc. © DTS, Inc.
All Rights Reserved.
For DTS patents, see http://patents.dts.com. Manufactured
under license from DTS Licensing Limited. DTS, the Symbol, &
DTS and the Symbol together are registered trademarks, and
DTS 2.0+Digital Out is a trademark of DTS, Inc. © DTS, Inc. All
Rights Reserved.
CE Statement:
Hereby, UMC Poland sp. z o.o. declares
that this LED TV is in compliance with the essential
requirements and other relevant provisions of
RED Directive 2014/53/EU.
The full text of the EU declaration of conformity is
available by following the link:
www.umc-poland.com/declaration-of-conformity/
Trademarks

77
CONTENTS
Manufacturers Guarantee Information. . . . . . . . . . . . . . . . . . . . . . . . . . . . . . . . . . . . . . 3
Important Safety Instructions. . . . . . . . . . . . . . . . . . . . . . . . . . . . . . . . . . . . . . . . . . . . . . 4-5
Trademarks . . . . . . . . . . . . . . . . . . . . . . . . . . . . . . . . . . . . . . . . . . . . . . . . . . . . . . . . . . . . 6
What is included in the box . . . . . . . . . . . . . . . . . . . . . . . . . . . . . . . . . . . . . . . . . . . . . . . 8
Attaching/Detaching the Stand . . . . . . . . . . . . . . . . . . . . . . . . . . . . . . . . . . . . . . . . . . . . 9
Securing the TV to a Wall/ Wall mounting . . . . . . . . . . . . . . . . . . . . . . . . . . . . . . . . . . . 10
Remote Control. . . . . . . . . . . . . . . . . . . . . . . . . . . . . . . . . . . . . . . . . . . . . . . . . . . . . . . . . 11
TV Control Stick and Input Source Menu . . . . . . . . . . . . . . . . . . . . . . . . . . . . . . . . . . . . 12
Connections. . . . . . . . . . . . . . . . . . . . . . . . . . . . . . . . . . . . . . . . . . . . . . . . . . . . . . . . . . . . 13-15
First Time Installation and Information Banner . . . . . . . . . . . . . . . . . . . . . . . . . . . . . . . 16
7 Day TV Guide . . . . . . . . . . . . . . . . . . . . . . . . . . . . . . . . . . . . . . . . . . . . . . . . . . . . . . . . .17
TV Menu Operation . . . . . . . . . . . . . . . . . . . . . . . . . . . . . . . . . . . . . . . . . . . . . . . . . . . . . 18-26
Channel Menu . . . . . . . . . . . . . . . . . . . . . . . . . . . . . . . . . . . . . . . . . . . . . . . . 18
Picture Menu . . . . . . . . . . . . . . . . . . . . . . . . . . . . . . . . . . . . . . . . . . . . . . . . . 19-20
Sound Menu . . . . . . . . . . . . . . . . . . . . . . . . . . . . . . . . . . . . . . . . . . . . . . . . . . 21-22
Time Menu . . . . . . . . . . . . . . . . . . . . . . . . . . . . . . . . . . . . . . . . . . . . . . . . . . . 23
Lock Menu . . . . . . . . . . . . . . . . . . . . . . . . . . . . . . . . . . . . . . . . . . . . . . . . . . . 24
Settings Menu . . . . . . . . . . . . . . . . . . . . . . . . . . . . . . . . . . . . . . . . . . . . . . . . 25
Network Menu . . . . . . . . . . . . . . . . . . . . . . . . . . . . . . . . . . . . . . . . . . . . . . . . 26
USB Mode / Media Player . . . . . . . . . . . . . . . . . . . . . . . . . . . . . . . . . . . . . . . . . . . . . . . . . 27
USB Record - Freeview / Saorview Mode . . . . . . . . . . . . . . . . . . . . . . . . . . . . . . . . . . . . . 28
DVD Setup Menu. . . . . . . . . . . . . . . . . . . . . . . . . . . . . . . . . . . . . . . . . . . . . . . . . . . . . . . . 29
General Information . . . . . . . . . . . . . . . . . . . . . . . . . . . . . . . . . . . . . . . . . . . . . . . . . . . . . 30-37
Using your TV with a Sky Digital set top box. . . . . . . . . . . . . . . . . . . . . . . . 30
Frequently Asked Questions . . . . . . . . . . . . . . . . . . . . . . . . . . . . . . . . . . . . . 31-32
Technical Specifications . . . . . . . . . . . . . . . . . . . . . . . . . . . . . . . . . . . . . . . . . 33-34

8
What is Included in the Box
Please save your box/packaging as you will need this in the event of warranty/service repair or support.
We are unable to carry out warranty/service if you are unable to package it correctly. The safest way to
package your item in the event of warranty/service repair is in it’s original box/packaging.
WHAT IS INCLUDED IN THE BOX
1 x Safety Leaflet
1 x Quick Start Guide
1 x TV
1 x Remote Control and 2 x AAA Batteries
Safety Leaflet
Quick Start
Guide
1 x RF Cable
Accessories
Included with this TV are the following accessories
2 x Stand Feet (Left & Right)
plus screws
1 x Mini Component/YPbPr
1 x Mini Composite / Video

99
Attaching/Detaching the stand
ATTACHING THE STAND
Screws that are included.
Attaching the stand
To complete the stand installation you will require a cross head screw driver
4 x
4 x
4 x
1
2
3
(fig.1) Place the TV set on a flat and
clean surface with the panel facing
downwards to avoid damage, then fix
the stand feet shown.
(fig.2) When the stand feet are
installed correctly the stand feet will
be longest at the front of the TV
and shortest at the back with the
feet pointing away from each other.
(fig.3) When the stand feet are
in the correct position, secure the
stand feet to the underside of the
TV set using the 4 screws provided.
Detaching the stand
Remove the screws highlighted then remove the stand feet from the underside of the TV set.

10
Wall Mounting
IMPORTANT - Before drilling any holes in the wall ensure you are not drilling where
there could be any electrical wires, water or gas pipes.
TV wall mounting brackets are available to purchase separately from Tesco - please visit www.tesco.com/direct.
1) Remove the four screws highlighted that are supplied in the wall mounting
holes.
2) The wall mount can now be easily attached to the mounting holes on the rear
of the TV.
For VESA wall mounting information please refer to the Technical
Specification page.
Securing the TV to a Wall/Wall Mounting
SECURING THE TV TO A WALL
Note - Please ensure that children do not climb on the TV set.
Securing the TV to a wall with anti-tip straps
For maximum security in the home when using a TV with its stand anti-tip straps should be fitted. These
are available from supermarket websites and other websites and are an easy, inexpensive and effective
way of ensuring your TV stays safely upright. Straps are designed to be attached to the rear of the TV and
then tethered to the wall or the furniture the TV is stood on.
The Royal Society for the Prevention of Accidents is urging people to take care with flat-screen televisions.
RoSPA stated in 2010 that “Toddlers are particularly at risk of pulling flat-screen televisions on to
themselves. They are unsteady on their feet and are attracted by colourful television images.”
The risk is increased as televisions become lighter.
A) Using one or both of the top wall-mounting
holes and screws (the screws are already supplied
in the wall mounting holes) fasten one end of the
fastening cord/s to the TV.
B) Secure the other end of the fastening cord/s to
your wall. (you will need screws/fixings suitable
for your wall type - available separately from most
DIY stores).
For optimum viewing, if wall mounting the TV higher than eye level, the TV should be tilted downwards
so that the TV’s screen is ‘face on’. See fig 1 and 2.
Important – If wall mounting this TV, only use the screws already provided in the wall mounting holes.
Using other screws which are longer could cause irreparable damage to internal parts. When using a
wall bracket, please ensure the screws in the back of the TV set are not over tightened.
fig 1 fig 2
TV
TV
Viewing angle
Viewing angle
INCORRECT CORRECT

1111
Remote Control
REMOTE CONTROL
STANDBY - Switch on TV when in standby or vice versa
MUTE - Mute the sound or vice versa
DTV - Switch to Freeview source
RADIO - Switch to radio whilst in Freeview source
USB - Switch to USB source
DVD - Switch to DVD source
NUMBER BUTTONS - 0 – 9 to select a TV channel directly.
TV GUIDE - Opens the 7 Day TV Guide (Freeview mode)
- To return to the previous channel viewed
VOL (+/-) - To increase / decrease the sound level
P.MODE - Scrolls through picture mode options
S.MODE - Scrolls through sound mode options
FAV - To display favourites menu
CH (+/-) - To increase or decrease the channel being watched
MENU - To display OSD menu
EXIT - To exit all menus
- Allows you to navigate the on-screen menus
and adjust the system settings to your preference
SOURCE - To display the input/source menu
INFO - Press once for now/next channel information
Press twice for programme information about current
programme
ASPECT - To switch the screen between the different picture
formats
SLEEP - Press repeatedly to cycle through the sleep options
AUDIO - To change the audio language (if available)
SUBTITLE - To switch the dialogue at the bottom of the screen
(on/off)
TEXT - To enter/exit Teletext
TEXT HOLD - Teletext mode - Hold current page which is
displayed (Analogue TV)
DISPLAY - To switch off the screen when listening to radio
DVD MENU/RECORD - Access the DVD root menu and USB
record function
DVD SETUP/REC LIST - Opens up DVD Menu or Opens the list
of what has been previously recorded
TEXT/DVD ZOOM - Zoom function for Teletext and DVD
GOTO - To go to a specific chapter
A-B - Press once to set point, press a second time to return
to point
ANGLE - Select different angle of DVD
REPEAT - To repeat playback
For Models with Integrated DVD players
For Models with PVR Function
For Models with USB Playback
1
1
2
3
4
4
2
3
- To restart the current chapter
- To advance forward to the next chapter
- To stop the playback/Eject Disc
(To EJECT the disc press/hold the button for 4 seconds)
- To play in fast rewind mode
- To play in fast forward mode
- To play/pause

12
TV Control Stick and Input Source Menu
TV Control Stick
The TV control stick is located on the back of the TV. The control stick can be used to control many of the
TV functions. The shape of the TV’s control stick may vary by model.
While TV is in standby mode:
• Press the centre of the control stick once - Power on the TV set
While watching TV:
• RIGHT/LEFT – volume up/volume down
• UP/DOWN – changes channel up/down
• Press the centre of the control stick once – displays the menu
• Press and hold the centre of the control stick – Standby/Power Off
While in menu:
• RIGHT/LEFT/UP/DOWN – navigation of cursor in on-screen menus
• Press the centre of the control stick once – OK/Confirm selected item
• Press and hold the centre of the control stick – back to previous menu
Choosing Mode Input/Source
Use the source menu to switch between input/connections.
A) Using the buttons on the remote control:
1. Press [SOURCE] - The ‘source’ menu will appear.
2. Press [ ] or [ ] to select the input you require.
3. Press [OK].
B) Using the TV control stick:
1. Press the centre of the control stick once to enter the TV menu.
2. Press the control stick UP/DOWN and navigate through to ‘SOURCE’ menu.
3. Press the centre of the control stick to enter the ‘SOURCE’ menu.
4. Press the control stick UP/DOWN to scroll through and select the input/source you require.
5. Press the centre of the control stick to select the chosen input/source option highlighted.
For further information on input/connections please view the ‘Connections’ pages.
Control Stick
TV CONTROL STICK
AND INPUT SOURCE MENU
For models with the joystick type controller.
<
<

1313
Connections
CONNECTIONS
ACD E
J
L
Earphones Earphone input
LAN* Network connection
Digital audio Digital optical audio output
SCART SCART input
HDMI 1 (ARC) HDMI input
HDMI 2 HDMI input
RF in RF / TV aerial input
HDMI 3 HDMI input
USB x 2 USB port
AV in Audio/video input
YPbPr HD input (Ypbpr)
CI card in Common interface module
* The LAN/Ethernet port is used for Freeview HD services.
B
K
I
H
G
F
K
H
J
L
I
G
F
E
D
C
B
A

14
Connections
CONNECTIONS
Connecting to a device with SCART output
SCART connection (using SCART to AV cable) for the 32G23B-HD, 32G23B-HD/DVD models only. TV Source
should be set to Composite/AV
SCART connection for the 32G23B-HD, 32G23B-HD/DVD models only. TV Source should be set to SCART.
Note: Connecting cables are shown for example only and may not be included. Please check ‘What Is
Included In The Box’ page.
Scart
AV in
Scart
Scart
Connecting to a device with Component/YPbPr output
If you are supplied with a cable from the device which has RED, GREEN, BLUE, RED & WHITE connectors
you must connect via Component (for picture) and by phono cable (for sound).
Component/YPbPr connection for the 32G23B-HD, 32G23B-HD/DVD.TV Source should be set to
Component/YPbPr
AV in
YPbPr
Y (green)
PB (blue)
PR (red)
Video (yellow)
is not connected
R (red)
L (white)

1515
Connecting to a device with Composite AV/Video output
TV Source should be set to Composite/AV
L (white)
R (red)
Video
(yellow)
AV in
Connecting to a device with HDMI output
A HDMI cable can output both video and audio and enables you to enjoy digital-quality video and audio
with minimal loss of quality.
TV Source should be set to the corresponding HDMI port (HDMI 1, HDMI 2 etc)
Connections
CONNECTIONS
Connecting to an external audio device (Amplifiers, Surround Sound,
Sound Bars etc)
When connecting via the TV’s 3.5mm Earphone output, this will disable the TV speakers.
There are two options when connecting a device via the 3.5mm Earphone Output and the
Digital Optical Audio Output
3.5mm
EARPHONE
OPTION 1 for 3.5mm EARPHONE Output
OPTION 2 for Digital Optical Audio Output
DIGITAL
AUDIO
OUT
(OPTICAL)
3.5mm
AUDIO
IN
DIGITAL
AUDIO
IN
(OPTICAL)
Ethernet
Port
Ethernet
Port
Connecting an Ethernet/Network cable
The Ethernet port is used only for Pay TV services and Freeview HD (Freeview services are only available in
the UK). It is not intended to be used for internet/network use.

16
When the TV is first set up and switched on you will be welcomed with the First Time Installation screen.
In the event the First Time Installation screen does not appear, press the MENU button on the remote
control, when the menu appears press 8-8-8-8 and then the First Time Installation menu will appear.
Information Banner
The Information Banner is available in the Freeview/Saorview input source. When watching a Freeview/
Saorview channel press the INFO button on the remote control (fig.1) and the Information Banner will
appear at the bottom of the screen (fig.2). The Information Banner will also provide information on the
current TV channel and TV programme as well as the time and date. Please see below.
(Example of the Information Banner and a TV programme description).
Language - Confirm the language of the TV’s On Screen
Display menu.
Country - Confirm the Country where the TV is
being tuned.
Default Viewing Source - Please select the default Input
source, the TV will switch to this Input Source once the
First Time Installation process is completed.
Environment - Please select the following presets:
• Home Mode - The default TV picture settings
will be set to Economy, this is the recommended
power saving mode which reduces the energy used
by up to 25% (by reducing the power to the LED/LCD
panel). The auto standby setting is set to 4 hours.
• Store Mode - The default TV picture settings will be
set to dynamic, which is a brighter picture setting.
The auto standby setting is set to OFF.
Continue with TV Installation - Press the OK button on the
remote control to confirm your selections and complete
the First Time Installation process.
Press the INFO button once to view the Information Banner.
You can now:
Use the buttons to scroll through the Freeview/Saorview TV channels
Press the RED button to record
Press the GREEN button to set a reminder
Press the OK to watch the programme highlighted
Press the INFO button to view the TV programme description
First Time Installation and Information Banner
FIRST TIME INSTALLATION
Note: we recommend the use of an outdoor aerial. If
you are missing channels, please ensure the RF cable
is connected securely. If there is a low signal strength,
you should consider connecting a signal booster and
re-tuning the TV.
fig.2
fig.1

1717
TV Guide is available in Freeview TV mode. It provides information about forthcoming programmes
(where supported by the Freeview channel). You can view the start and end time of all programmes and
on all channels for the next 7 days and set reminders.
1) Press [TV GUIDE]. The following 7 Day TV Guide will appear:
2) Navigate through the menu using .
You can now:
Record a programme by pressing RED (USB device must be connected)
Set a reminder by pressing GREEN
View a previous day by pressing YELLOW
View the next day by pressing BLUE
View further information about the programme by pressing INFO
3) Press [EXIT] to exit the 7 day TV Guide
Channel List
To view the channel list, please ensure that the TV is set to either the analogue or digital source and
no menus or TV notifications are displayed.
1) Press [OK] on the remote control and the
channel list menu will appear.
2) Scroll through the channel list by using buttons then
press [OK] to view the channel that is currently highlighted.
3) Scroll through different types of channels such as Freeview/ALL/
Digital TV/Radio/data and HD channels by using buttons.
4) Press [EXIT] to exit the channel list.
7 Day TV Guide and Channel List
7 DAY TV GUIDE

18
TV Menu Operation
CHANNEL MENU
To access this menu, press [MENU] button on the remote control.
To select a sub menu press [OK].
If you wish to make changes to any of the default settings, use the scroll buttons.
To confirm any settings press [OK] button. To exit this menu at anytime, press [EXIT] button.
Tip: If you do not press any buttons for 15-30 seconds, the menu will automatically exit. You can change
the length of time before the menu exits automatically - see ‘OSD Timer’ in the Time Menu
Important: To receive Freeview channels, in particular
Freeview HD channels, you will need a Digital TV aerial
and be in a good Freeview coverage area. You can check
coverage for your postcode at www.freeview.co.uk
Please note that any Freeview HD channels found during
tuning will be placed in channel positions above 100.
For example, 101 (BBC1 HD) 102 (BBC2 HD) etc.
Auto Tuning - Allows you to retune the television for all digital channels, digital radio stations and
analogue devices.
Analogue Manual Tuning - Allows you to manually tune your analogue signal.
Freeview Manual Tuning - Allows you to manually tune your digital signal.
Channel Edit - Allows you to delete, move, skip and favourite channels.
Signal Information - Allows you to view signal frequency, signal quality and signal strength.
Recorded List - Shows a list of recorded TV programmes.
CI Information - Pay per view services require a “smartcard” to be inserted into the TV. If you subscribe to
a pay per view service the provider will issue you with a ‘CAM’ and a “smartcard”. The CAM can then be
inserted into the COMMON INTERFACE PORT (CI Card In).
Schedule List - Lists your programme reminders.
Software Update (OAD) - Switch on/off OAD (over air download) updates.

1919
TV Menu Operation
PICTURE MENU
Picture Mode - Choose from the following presets:
Dynamic Recommended settings for fast moving pictures
Standard Standard settings
Movie Set to be lighter in colour and less bright
Personal Lets you manually alter all the settings
Economy Power saving mode which reduces the energy used by up to
25% (by reducing the power to the LED/LCD panel).
In Economy mode, the TV will switch itself to Standby mode
after 3-5 hours in the event that the TV buttons or remote
control buttons are not pressed (change the picture mode
to another setting to de-activate this function)
You can make the following adjustments in Personal mode:
Contrast - Switch the balance between black and white.
Brightness - Increase or decrease the brightness of the picture.
Colour - Increases the colour from black and white.
Tint - Lets you increase or decrease the level of tint within the picture
(only available for NTSC source signal).
Sharpness - Increase or decrease the sharpness of the picture.
Colour Temperature Choose from the following presets:
Normal Default settings
Warm Increases red within the picture
Cold Increases blue within the picture
To access this menu, press [MENU] button on the remote control and scroll up/down.
To select a sub menu press [OK].
If you wish to make changes to any of the default settings, use the scroll buttons.
To confirm any settings press [OK] button. To exit this menu at anytime, press [EXIT] button.

20
TV Menu Operation
PICTURE MENU
Auto
Automatically displays the best picture format so
the picture is in the correct position. Black lines may
appear at the top/bottom and/or sides.
Zoom1 and Zoom2
Dot by dot
16:9
The picture
is the correct
proportion
but zoomed
in to fill the
screen
Will display the picture from the broadcaster without
any change, only available in HDMI input source.
4:3
Full Screen
Displays the 4:3
picture in its
original size.
Side bars are
shown to fill the
16:9 screen
Displays a picture in
the full screen mode
with out overscan.
16:9 signal will be
displayed in original
proportion. Other
picture format will
be stretched to fill
the screen.
Fills the screen with
a regular 16:9 signal
and 4:3 picture
format will be
stretched to fill
the screen
Aspect Ratio - Within the UK the picture format varies depending on the channel/broadcast. There are a
number of different options to best meet your needs
Expert Settings: Please choose from the following options.
Noise Reduction - Allows you to turn Noise Reduction ON or OFF.
Active Contrast - Automatically optimises the ‘backlight’ and ‘contrast’ of the picture according to the
brightness of the screen. Choose one of the following options, ON or OFF.
This manual suits for next models
1
Table of contents