TechniSat HDTV 46 User manual

ENFRESITGRNLNODASVFIPLCZHURU
Quick start guide
HDTV 46
HDTV 40 / HDTV 40 Plus
HDTV 32 / HDTV 32 Plus

2
1 Figures
Device connections
lllustration of the device connections
1Common Interface Slot 1
2Common Interface Slot 2
3Card reader (Adjust the
golden chip of the CONAX
smart card forwards and
in the slot direction)
4USB connection
5Network connection (LAN)
6Antenna input
(DVB-C, DVB-T, analogue)
7Video, S-Video and
audio input
8LNB input 2 (DVB-S)
9LNB input 1 (DVB-S)
10 HDMI connection 3
11 HDMI connection 2
12 HDMI connection 1
13 Microphone input
(Jack 3.5mm)
14 Headphone output
(Jack 3.5mm)
15 Audio output (R,L)
16 Centre output
17 Sub-woofer output
18 Component inputs
(Y, Pb/Cb, Pr/Cr and audio)
19 Digital audio input
(SPDIF electric)
20 Digital audio output
(SPDIF electrical)
21 Digital audio output
(SPDIF optical)
22 DC 12V output switching
voltage ext. Ampliers
23 VGA connection
24 Audio input (VGA/DVI)
(Jack 3.5mm)
25 Loudspeaker connection
26 Scart connection (AV1)
27 Scart connection (AV2)
28 Mains connector
1
2
3
4
5
6
7
8
9
10
11
12
21
22
13
14
20
19
18
17
16
15
23 24 25 27
28
26
Please open.

5
ENFRESITGRNLNODASVFIPLCZHURU
Notes / Connecting
2 Important note
Dear customer,
This quick start guide only describes the most important connection options and the basic operating
steps, in order to enable you to become quickly familiar with the HDTV 32, HDTV 32 Plus, HDTV 40,
HDTV 40 Plus respectively HDTV 46.
3 Remote control / Inserting the batteries
> Open the lid of the battery compartment on the back of the remote control
by lightly pressing the marked spot and pushing the lid in the direction of the Arrow.
> Insert the supplied batteries while observing the correct polarity
(marking visible in the battery compartment) and close again.
4 Connecting
You must rst remove the cover, in order to be able to get to the device connections.
> For this purpose, lightly press both snap-ts upwards and remove the cover towards the back.
> In order to cover the connection cable, lead this along
the back of the pedestal behind the detachable plastic holders.
Snap-t

3
Remote control
1) This function is only available, if the appropriate data are broadcast on the set programme position.
2) Remote control option:
This remote control can control two TechniSat receivers and a TechniSat television set with same encoding by switching
the remote control option. The appropriate LED ashes indicating the currently set remote control code when a key is pressed.
> To change the remote control option press the remote control code key and then press the OK key as many times as necessary
until the LED of the required remote-control option (SAT1, SAT2 and/or TV) ashes briey.
Illustration of the remote control
Sound on/o On/Standby
Sleep Timer
Option1)
during TV operation:
Sound / Sub-title selection,
special functions
during radio operation:
Station selection by changing
the sound subcarriers
Record
Info
Programme list on/o
OK
Volume +
Programme +
Freeze image
jogshuttle on/o
PiP/PaP
Numeric keyboard
Remote control code2)
TV/Radio operation Category list
Zoom/Format
0/AV (External inputs)
SFI+
Back
Fast backward Fast forward
Stop Pause / Playback
Programme -
Volume -
Video text on/o1)
Language selection1)
Menu on/o
Arrow keys
blue: function selectionMulti-control keys

4
ENFRESITGRNLNODASVFIPLCZHURU
Illustration of the manual control
HDTV 46
HDTV 32 Plus / HDTV 40 Plus
HDTV 32 / HDTV 40
1Mains switch
2AV
3Menu
4OK
5Programme +/-
6Volume +/-
7On/Standby
8LED
9IR receiver
1
1
8 2 3 7 94 5 6
2
3
4
7
8
9
5
6
1
9
8

6
Connecting
4.1 Connection example
a Connection of the cable connection (digital and/or analogue)
or DVB-T antenna to the antenna input of the television.
b Connection/s of the satellite antenna to the LNB input 1/LNB input 2.
(Please note: LNB must be connected to LNB input 1 when working with an antenna signal)
c Connection of the television to a DVD player by an HDMI cable,
a Cinch component cable or a SCART cable.
d Connection of the analogue or digital audio output to a Hi stereo or surround equipment.
DVD
TV Radio
cc
b
a
d

7
ENFRESITGRNLNODASVFIPLCZHURU
Connecting
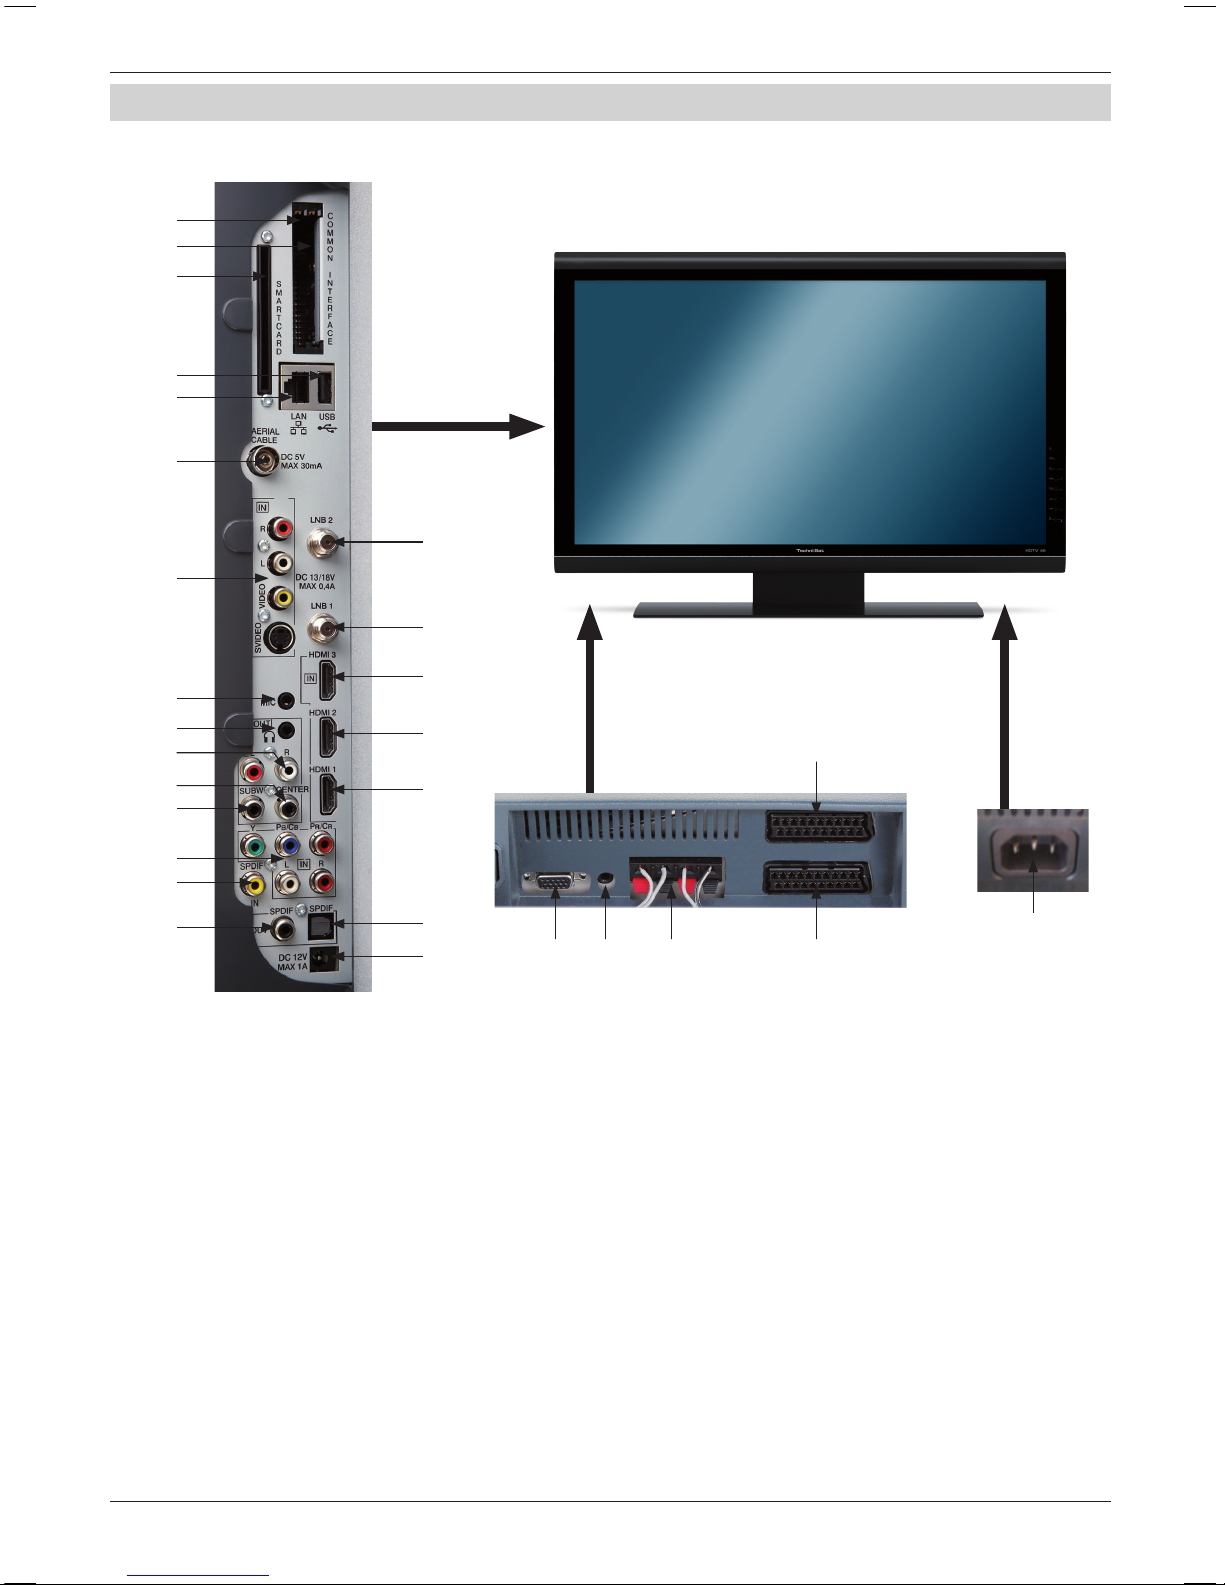
The following references (a b c) refer to the connection example on page 6.
4.2 Antenna/cable connector (analogue and digital)
a Connect the antenna input of the LCD TV set either to a terrestrial antenna
or to the outlet of the cable or antenna connection.
Please note that the simultaneous reception of DVB-T and DVB-C signals
can lead to problems when receiving some cable and DVB-T programmes.
4.3 Satellite antenna
b Connect the LNB inputs 1/2 to two separated antenna feeders, which are used identically,
in order to be able to use the full functional range.
or
Only if one antenna signal is available, then connect it to the LNB input 1 of the device.
4.4 DVD player
c Connect your DVD player either with
- an HDMI connector cable to a HDMI connection
or by
-a DVI/HDMI connector cable to a HDMI connection and additionally with an audio connector
cable to the Audio (VGA/DVI) input respectively Audio digital input (SPDIF electric).
or by
- a SCART cable to a SCART socket
or by
- a Cinch cable to the component inputs of the LCD TV set.
4.5 HiFi/Surround amplifier
You can connect the LCD TV set to a HiFi /Surround amplier,
in order to achieve the best possible sound quality.
dTo achieve this connect the cinch sockets of the analogue audio output
of the television set with a suitable cable with to the input of your HiFi amplier
(e.g. CD or AUX; Note! The phono-input is not suitable!).
or
If your amplier should be equipped with an appropriate electrical or optical input (SPDIF),
then connect the audio digital output socket (electric or optical) to the input of your amplier.
4.6 Mains connection
The LCD TV equipment should only be connected to the mains (230 V/50 Hz) after all cables
from the device to the associated components have been connected. This prevents destruction
of the TV set or of other components.

8
Initial installation
5 Initial installation
The installation assistant AutoInstall is started automatically when starting the device
for the rst time; this assistant helps you adjust the most important television settings.
The procedure illustrated here is only exemplary. The exact procedure depends on your settings.
Therefore, follow the instructions on the screen.
5.1 Operating language
The installation assistant starts with the selection of the operating language.
> Use the Arrow keys to highlight the operating language that you want to select.
The preferential audio language is also set according to this selection.
> Conrm by pressing the green Accept control key.
5.2 Setting the country
> Use the Arrow keys to select the county in which the unit will be used.
According to your selection, the time as well as summer/winter time is set automatically.
In addition, this setting automatically sorts the programmes in the installation assistant
as well as after a station search run.
> Press the green Accept control key, in order to take over the selection
and continue to the next installation step.

9
ENFRESITGRNLNODASVFIPLCZHURU
Initial installation
5.3 Selection of the reception signals
> Select the available reception signals with the up/down Arrow keys.
DVB-S for digital satellite programmes;
DVB-C for digital cable programmes;
DVB-T for digital terrestrial programmes;
Analogue CT for analogue terrestrial and cable programmes;
FM radio for VHF radio stations.
> Use the right/left Arrow keys to determine, whether the marked
reception signal is available at your location (Yes) or (No).
> In order to save the settings, press the green Accept control key.
5.4 Antenna signals (DVB-S)
Select the number of connected DVB-S antenna feeders. (If the source DVB-S has been deactivated,
as described in the step “Selection of the reception signals”, the “Antenna settings (DVB-T)”
window is displayed in place of this window of the installation assistant)
> Using the Arrow keys right/left, select whether you have connected one or two antenna signals.
> Conrm the selection with the green Accept control key,
in order to continue to the “Antenna conguration (DVB-S)”.

10
Initial installation
5.5 Antenna configuration (DVB-S)
In this installation step, you can adapt the settings of your TV set to the conguration
of your satellite antenna. (If the source DVB-S has been deactivated, as described in the step
“Selection of the reception signals”, the “Antenna settings (DVB-T)” window is displayed
in place of this window of the installation assistant)
> If you would like to accept the standard antenna setting, press the green Accept control key.
In this case continue with the “Antenna settings (DVB-T)”.
> If the conguration of your reception equipment does not comply
to the standard setting press in the yellow Change control key.
> After adapting the conguration press the green Accept control key.
The set satellite is now displayed again, in order to check it.
> To accept the setting, press the green Accept control key,
to change again press the yellow Change control key.

11
ENFRESITGRNLNODASVFIPLCZHURU
Initial installation
5.6 Antenna settings (DVB-T)
In this step, a channel spectrum with the signal levels of the dierent channels is displayed,
in order to be able to align the DVB-T antenna to achieve the best possible reception.
(The “Station search run/ISIPRO” is immediately displayed, if the DVB-T source has been deactivated)
> Switch the power supply on with the Arrow keys right/left, if you want to feed an active DVB-T
antenna via the coaxial cable and/or o, if you would like to use a passive DVB-T antenna or to
feed the active DVB-T antenna via a separate mains adapter.
> Accept the setting by pressing the green Accept control key.
5.7 Station search run / ISIPRO (only for DVB-S via ASTRA 19.2° East)
> In order to download an existing current programme list, use the Arrow keys up/down
to highlight the line ISIPRO - Programme List Update.
The programme list is now downloaded from the satellite; this is followed by a station
search run via “All stations”, which scans all further selected reception sources.
> In order to execute a station search run for all activated sources, mark the eld
“All Stations” or “All Unencrypted Stations” with the Arrow keys up/down.
> Pressing the green Start control key starts the programme list update and/or station search run.

12
Initial installation
5.8 Regional programmes
Some broadcasting stations transmitter their programme with dierent regional contents.
You can now specify which of these regional programmes you prefer.
> Select the station, whose regional programmes you would like to specify by marking it
with the Arrow keys up/down, and open the window with the available regional programmes
of this station by pressing the OK key.
> Highlight the regional programme you prefer with the Arrow keys up/down
and select it by pressing the OK key. Specify all preferential regional programmes in this manner.
> Press in the green Accept control key, in order to accept these settings over
and to continue to the next installation step.
5.9 Software update (only DVB-S (ASTRA 19.2° East) and DVB-C/DVB-T (when data channel is available)
Your device now checks, whether new system software is available.
You can run an automatic software update if new software is available.
> Select the Update eld with the Arrow keys right/left and acknowledge with OK.
Please note that the “Software update, please be patient” display now appears as well as three
progress bars, which indicate progress of the software download procedure, the entire update progress
as well as the progress of the individual update steps. AutoInstall is then carried out in the following.

13
ENFRESITGRNLNODASVFIPLCZHURU
Initial installation
5.10 Downloading “SFI+” data
Your television set is equipped with an electronic programme guide “SFI+” (“SiehFern INFO Plus”).
In order to display this electronic programme guide it must be downloaded.
Your HDTV starts to download the “SFI+” data automatically after a possibly necessary
software update. This process will take up to 30 minutes.
> You can skip this procedure, if you do not want to wait until the “SFI+” data has been downloaded.
Press the yellow Skip control key to do this.
The “SFI+” data are only available from ASTRA 19.2° East. The station data are downloaded,
if neither ASTRA 19.2° East nor the data channel via DVB-C/DVB-T are available.
5.11 Terminating the installation assistant
> Conrm the nal message of the installation assistant by pressing the green Finish function key,
in order to return to normal operation.

14
Switching the equipment on/o
6 Operation
6.1 Turning the TV set on and off
6.1.1 Turning on with the mains switch on the TV set
> Switch the TV set on by pressing the mains switch.
The TV set now runs through an initialisation procedure and cannot be operated
during this period. This procedure can take the few seconds.
6.1.2 Turning on from the standby mode
> Switched the TV set on by pressing the On/Standby key or the Programme +/- keys
on the remote control /on the TV1) or by pressing one of the numeric keys from 0to 9
on the remote control. The green LED display signals the operating condition.
6.1.3 Switching to the standby mode
> Turn the TV set o by pressing the On/Standby key on the remote control/on the set1).
Please note that when the set is switched o it also checks whether a new operating software2)
or programme list3) is available. This procedure can take some time. The LED shines orange
and the LCD panel is already switched o during the test.
The television set is turned on again immediately, if the On/Standby key is pressed during the test.
The television set switches to standby after the test has been carried out, the LED now shines red.
The TV set is now in the standby mode and can be completely switched o with the mains switch.
If new operating software2) or a new programme list3) was found during the test,
this is displayed when the TV set is switched on the next time.
The new software or programme list can then be downloaded immediately.
6.1.4 Turning off with the mains switch on the TV set
> The TV set is completely turned o by pressing the mains switch.
Please note that in this case neither software nor “SFI+” data
can be downloaded and the timer can also not be used.
Please note that the TV set may only be turned o with the mains switch when it is in the
standby mode. This prevents the loss of data and possible damage to the les or hard disk.
The device remembers, whether it was set to “On” or “O”,
as entered with the remote control or keys of the set1).
In the case of an electrical power outage, the TV set should therefore be switched o
during ongoing operation with the mains switch to prevent it turning itself on
inadvertently as soon as power is available again.
1) Only possible with the remote control for HDTV 32 Plus and HDTV 40 Plus.
2) Only from DVB-S (ASTRA 19.2° East) and DVB-C/DVB-T (when data channel is available).
3) Only from DVB-S (ASTRA 19.2° East).

15
ENFRESITGRNLNODASVFIPLCZHURU
Programme selection
6.2 Selecting the programme
6.2.1 By means of the programme up/down keys
> You can move up and down through the programmes by one programme position
respectively with the Programme +/- key on the remote control/on the set1).
6.2.2 By means of the numeric keyboard
> Enter the required programme number by means of the numeric keyboard.
For example:
1for programme position 1
1, then 4for programme position 14
2, then 3, then 4for programme position 234
1, then 2, then 4, then 5for programme position 1245
When entering multi-digital programme numbers, you have approximately three seconds time after
pressing a key to complete the input. If you only want to enter one-, two-, or three-digit gures, you
can accelerate the procedure by pressing the last number longer or by pressing the OK key.
6.2.3 By means of the programme list
> Press the OK key.
The programme list is displayed. Only TV programmes are displayed in the TV mode and
only radio programmes in the radio mode. The currently set channel has been marked.
6.2.3.1 Selecting the programme
> By means of the Arrow keys or numeric keyboard, you can now select the required programme.
Use the up/down arrow keys to move the marker by one line and use the left/right arrow keys
to page forwards and backwards in the list.
> You can obtain additional information on the current broadcasts by pressing the INFO key.
> To leave the Navigator, press the OK key; the selected programme is now displayed on the screen.
1) Only possible with the remote control for HDTV 32 Plus and HDTV 40 Plus.

16
Selecting the programme
6.2.3.2 Select list
In order to facilitate nding programmes, your device is equipped with various programmes lists.
You can select your favourites lists or have the programmes displayed in an alphabetically
sorted overview list, in a station list, or according to category.
> Press the OK key to open the active programme list.
> You can now open the window with the programme list types (Favourites lists,
overview list, station lists and category lists) by pressing the Option key.
> Use the up/down Arrow keys to select the programme list types
or overview list and then press OK to conrm.
> Now select the required programme as described above.
6.2.4 Selection of a regional programme
You selected the preferential regional programmes during the initial installation. If you select one
of these regional programmes, you will be informed that further regional programmes are available.
> Press the Option key, in order to open the selection screen.
> Use the Arrow keys up/down to select the required regional programme
and then press OK to conrm. The selected regional programme is set and
is now stored as preferential regional programme.
6.2.7 Switching between TV/radio
> Switch to the radio mode with the TV/Radio key.
The device switches to the last heard radio programme.
> You return to TV mode by renewed pressing of the TV/Radio key
and therewith to the last adjusted television programme.

17
ENFRESITGRNLNODASVFIPLCZHURU
Source selection / Programme/Source information
6.3 AV source
> In order to select a device connected to the Scart sockets, component input, to the HDMI inputs,
to the VGA connection or to the AV connection of the TV set, press the AV key.
> Select the required source (TV, Radio, EuroAV 1/2, HDMI 1/2/3, VGA,
Video / S-Video oder YUV) with the Arrow keys up/down.
> Acknowledge with OK to switch to the selected input.
6.4 Programme/Source information
6.4.1 Infobox
An info box always appears on the screen after changing the programme.
This info box displays the programme position and the programme name of the set programme,
the title of the current broadcast, the currently active programme list, and the current time
as well as further programme features (e.g. for video text, for 16:9 programmes
and for Dolby Digital broadcasts).
A progress bar (yellow) is additionally displayed, which indicates the past broadcasting time of
the current programme. The running programme has lasted longer than indicated, if the end is red.
6.4.2 Displaying time and programme information/further programme information
Use this function to view information on the program you are watching.
> Press the Info key, to display information on the set programme.
> As far as the programme is being broadcast, you can call further programme information
concerning the viewed programme by pressing the Info key again.
> The following programme is displayed, if broadcast, by pressing the Info key again.
> Press the Info again to remove the display.

18
Encrypted programmes / Volume / Language selection
6.5 Reception of encrypted programmes
> Insert a CONAX smart card into the slot of the integrated card reader.
(The golden chip should point forwards and in the insertion direction)
or
> Insert a CI module into the slot with the top pointing to the rear.
> Insert the smart card into the card slot of the CI module.
Make sure that the golden chip of the smart card is pointed to the rear in insertion direction.
If an encrypted programme is set, your TV set will check the CI slot and the card reader automatically
and will display the programme unencrypted, if a smart card or an appropriate CI module with a valid
smart card has been used.
6.5.1 Smart card PIN code
A child lock can also be implemented to block programmes that are unsuitable for children and are
broadcast by encrypted programmes. It is necessary to enter the smart card pin code stored on the
smart card, in order to access the respective programme.
> Use the numerical keypad to enter the 4-digit smart card PIN-code
in order to activate the broadcast.
6.6 Volume control
> Adjust the volume of your TV set with the Volume + rocker key louder
and with the Volume - rocker key quieter.
6.6.1 Mute function
> Pressing the Sound o/on key turns the sound o,
renewed pressing of this key turns the sound on again.
6.7 Selection of a different language /sound option
The message Sound Selection is displayed above the info box respectively a Dolby symbol
in the info box, if a programme is broadcast in several languages or on several sound channels.
> A list of the broadcast languages/sound options is displayed on the screen
by pressing the Language Selection key.
> Use the up/down Arrow keys to mark the language that you want and then press OK to conrm.
Please note that the chosen sound selection is stored as preferential audio language
for the respective station and is also retained after switching the TV o or changing the programme.

19
ENFRESITGRNLNODASVFIPLCZHURU
Sub-titles / Video text
6.8 Sub-titles
The symbol is displayed in the info box when a programme with sub-titles is turned on.
> If necessary, press the Option key several times to select sub-titles.
> Use the Arrow keys up/down to mark the required sub-title and then press OK to conrm.
6.9 Video text
The symbol in the info box shows you, if you have
switched to a station oering video text information.
6.9.1 Turning the video text on/off
> Select the programme, whose video text you would like to look at.
> Pressing the Video text key turns the video text on.
This is displayed on the start page 100 (overview).
> Renewed pressing of the Video text key switches to mixed operation; the video text is thereby
displayed without the video text background and instead with the TV picture in the background.
> Press the Video text key a further time, in order to return to the TV mode.
6.9.2 Page selection
> Enter the 3-digit page number on the numeric keyboard 0 to 9.
Your input is displayed in the upper left corner of the screen.
or
> Use the red or green key to scroll forward or backward by one page.
> Press the yellow control key to call up the video text group displayed in the yellow window.
> Press the blue control key to call up the video text block displayed in the blue window.

20
Format change / Zoom / PiP / PaP / Freeze image
6.10 Format change/Zoom
> Pressing the Zoom/Format key runs through the various pre-dened formats
(original, optimal, always 16:9, full zoom and stretch) and calls the user-dened setting,
in which you can adapt the screen according to your requirements.
The following options are available to adapt the picture to your requirements
using the user-dened setting:
red/green control key Increase/reduce picture height
yellow/blue control key Increase/reduce picture width
Arrow key up/down Move picture up/down
OK key Run through zoom levels
Arrow key left Resetting picture settings
> Press the Return key, in order to fade out the format change-over.
6.11 PiP-/PaP Function
Your TV set is equipped with both the PiP function (PiP = Picture in Picture)
as well as the PaP function (PaP = Picture and Picture).
6.11.1 Calling the PiP-/PaP Function
> You can turn the PiP and/or PaP function on by pressing the PIP key.
6.11.2 Exchanging PiP-/PaP pictures
> Press the Return key to swap the two pictures.
The PiP-/PaP picture becomes the main picture and vice versa.
6.11.3 Turning the PiP-/PaP Function off
There are two possibilities to turn the PiP and/or PaP function o. These dier in whether after
leaving the PiP /PaP mode the main picture or the PiP /PaP picture is to be represented on the screen.
> Pressing the PIP key fades out the main picture and the PiP /PaP picture
is now represented as the new main picture.
> Press the TV/Radio key, in order to fade out the PiP /PaP picture
and to display the main picture on the entire screen.
6.12 Freeze image
> Press the Freeze image key to display the TV picture as a frozen image.
The sound continues to be transmitted unchanged.
> Pressing this key again terminates the freeze image and the TV picture is shown as normal.
This manual suits for next models
4
Table of contents
Languages: