TechnoPiano TP300C User manual


EN
Contents
SAFETY CAUTION
FUNCTION LIST
ASSEMBLING INSTRUCTIONS
CONTROL PANEL
OPERATING GUIDE
POWER BUTTON
VOLUME NOB
REC/PLAY
METRONOME/TEMPO
SYNC START/STOP BUTTON
CHORD BUTTON
FILL BUTTON
INTRO/END BUTTON
DEMO BUTTON
TONE/RHYTHM BUTTON
FUNCTION BUTTON
MENU BUTTON
FUNCTION EYS
1 . REVERB EFFECT
2. CHORUS EFFECT
3. DUAL VOICE
4. SPLIT FUNCTION
5. PERCUSSION FUNCTION
TONE/RHYTHM MEMORY STORAGE SETTING
MP3/BLUETOOTH
MIDI IN/OUT
USB PORT
AUDIO INPUT/OUTPUT
TONE LIST
DEMO LIST
RHYTHM LIST
TROUBLESHOOTING
1
3
4
6
7
8
9
9
9
11
11
1 2
1 2
1 2
1 2
1 3
1 3
1 4
1 4
1 4
1 5
1 7
1 8
20
7
7
7
7
7
8
8
8
SAFETY CAUTION
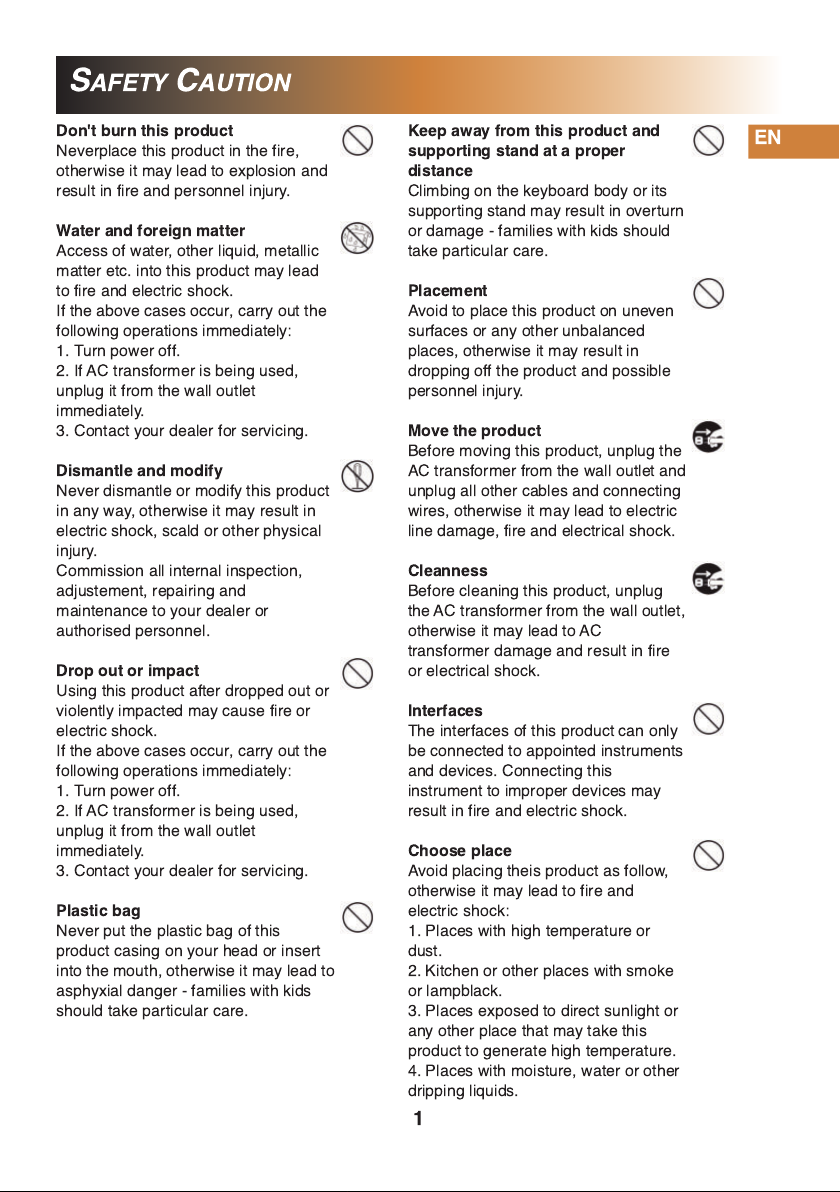
Don't burn this product
Neverplace this product in the fire,
otherwise it may lead to explosion and
result in fire and personnel injury.
Water and foreign matter
Access of water, other liquid, metallic
matter etc. into this product may lead
to fire and electric shock.
If the above cases occur, carry out the
following operations immediately:
1 . Turn power off.
2. If AC transformer is being used,
unplug it from the wall outlet
immediately.
3. Contact your dealer for servicing.
Dismantle and modify
Never dismantle or modify this product
in any way, otherwise it may result in
electric shock, scald or other physical
injury.
Commission all internal inspection,
adjustement, repairing and
maintenance to your dealer or
authorised personnel.
Drop out or impact
Using this product after dropped out or
violently impacted may cause fire or
electric shock.
If the above cases occur, carry out the
following operations immediately:
1 . Turn power off.
2. If AC transformer is being used,
unplug it from the wall outlet
immediately.
3. Contact your dealer for servicing.
Plastic bag
Never put the plastic bag of this
product casing on your head or insert
into the mouth, otherwise it may lead to
asphyxial danger - families with kids
should take particular care.
Keep away from this product and
supporting stand at a proper
distance
Climbing on the keyboard body or its
supporting stand may result in overturn
or damage - families with kids should
take particular care.
Placement
Avoid to place this product on uneven
surfaces or any other unbalanced
places, otherwise it may result in
dropping off the product and possible
personnel injury.
Move the product
Before moving this product, unplug the
AC transformer from the wall outlet and
unplug all other cables and connecting
wires, otherwise it may lead to electric
line damage, fire and electrical shock.
Cleanness
Before cleaning this product, unplug
the AC transformer from the wall outlet,
otherwise it may lead to AC
transformer damage and result in fire
or electrical shock.
Interfaces
The interfaces of this product can only
be connected to appointed instruments
and devices. Connecting this
instrument to improper devices may
result in fire and electric shock.
Choose place
Avoid placing theis product as follow,
otherwise it may lead to fire and
electric shock:
1 . Places with high temperature or
dust.
2. itchen or other places with smoke
or lampblack.
3. Places exposed to direct sunlight or
any other place that may take this
product to generate high temperature.
4. Places with moisture, water or other
dripping liquids.
1
EN
SAFETY CAUTION
A careful and good installation and maintenance of this product play a very important role in
lengthen the service life of the product and decrease faults.
AVOID HEATING,DAMPING O DI ECT SUNLIGHT
AVOID USING NEA TV SET,ADIO AND MAGNETIC FIELDS
AVOID SHAKING,BUMPS AND SHOCKS
AVOID USING PAINT,DILUENTS O SIMILA CHEMICALS FO CLEANING
AVOID THE MAL SHOCKS,TOO HIGH AND TOO LOW TEMPE ATU ES
Don't expose the musical instrument to direct sunlight, don't place the instrument near air
conditioners or hot baking devices.
This musical instrument may lead to video or audio disturbance on TV sets and radio and
electromagnetic fields may cause disturbance to the instrument. Move the instrument away
from electromagnetic devices.
Clean the product with a dry and soft cloth, when possible. It is possible to use a very weak
solution with water and some neutral detergent: dip the cloth in the solution, then wring the
cloth until it's almost dry before cleaning.
The product must be handled with care, avoid bumps and shocks and avoid to shake the
instrument in order to not damage the shell or the inner electronic components.
Too high or low temperatures may cause mulfunctionings or make pictures and digits on the
LCD screen turn gray and hard to read. When keeping the product under a normal
temperature range, the display problems will be corrected automatically.
2
EN
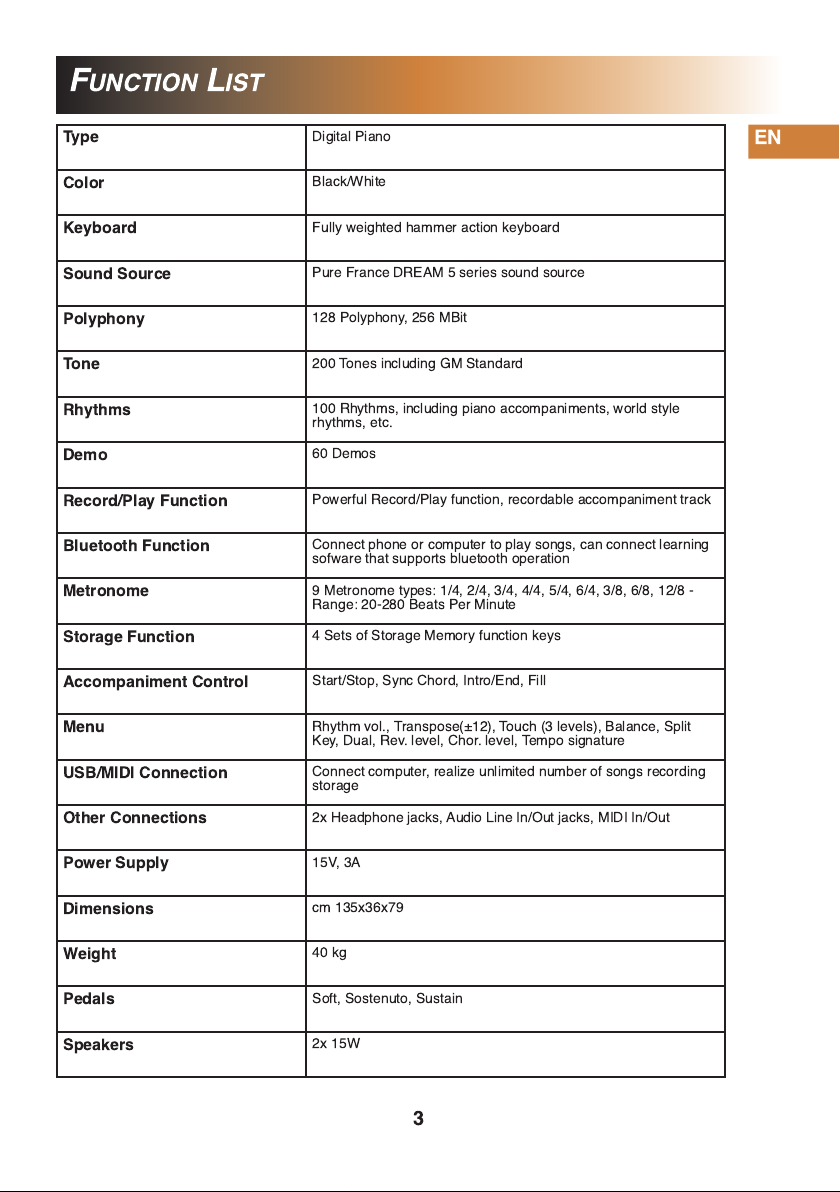
FUNCTION LIST
Type
Digital Piano
Color
Black/White
Keyboard
Fully weighted hammer action keyboard
Sound Source
Pure France DREAM 5 series sound source
Polyphony
1 28 Polyphony, 256 MBit
Tone
200 Tones including GM Standard
hythms
1 00 Rhythms, including piano accompaniments, world style
rhythms, etc.
Demo
60 Demos
ecord/Play Function
Powerful Record/Play function, recordable accompaniment track
Bluetooth Function
Connect phone or computer to play songs, can connect learning
sofware that supports bluetooth operation
Metronome
9 Metronome types: 1 /4, 2/4, 3/4, 4/4, 5/4, 6/4, 3/8, 6/8, 1 2/8 -
Range: 20-280 Beats Per Minute
Storage Function
4 Sets of Storage Memory function keys
Accompaniment Control
Start/Stop, Sync Chord, Intro/End, Fill
Menu
Rhythm vol., Transpose(±1 2), Touch (3 levels), Balance, Split
ey, Dual, Rev. level, Chor. level, Tempo signature
USB/MIDI Connection
Connect computer, realize unlimited number of songs recording
storage
Other Connections
2x Headphone jacks, Audio Line In/Out jacks, MIDI In/Out
Power Supply
1 5V, 3A
Dimensions
cm 1 35x36x79
Weight
40 kg
Pedals
Soft, Sostenuto, Sustain
Speakers
2x 1 5W
EN
3

ASSEMBLING INSTRUCTIONS
4
Make sure that all parts are included before starting to
assemble your unit.
Parts Name:
A_ Side Board 2 pcs.
B_ Back Board 1 pc.
C_ Pedalboard 1 pc.
D_ Screw 4 pcs.
E_ Screw 4 pcs.
F_ Screw nobs 2 pcs.
G_ Plastic Caps 8 pcs.
D E FG
A
B
C
E
DA
C
F
G
1 . Fasten Side Panel (A) and
Pedalboard (C) with 4 Screws (E)
2. Fasten Side Panel (A) and Back
Board (B) with 4 Screws (D)
3. Place the piano on Side Board
(A), fasten the piano and stand
with 2 Screw nobs (F)
4. Place the 8 Plastic Caps (G) in
the corresponding screw holes on
both the Side Boards
EN

HEADPHONE JACKS
There are two headphone jacks located on
the left underside of the piano, allowing up
to two pairs of headphones to be
connected simultaneously.
EA PANEL
1 . DC Power Input
2. Audio Input/Output
3. Pedal Jack
4. MIDI Interface
5. USB Port
5
ASSEMBLING INSTRUCTIONS
EN
The piano has three pedals - just like a grand piano
Soft Sostenuto Sustain
Soft pedal:
Depressing this pedal soften the sound and also reduces its volume.
Sostenuto pedal:
Depressing this pedal after pressing the keyboard and before releasing
the keys, sustains the sound of only the keys just played.
Sustain pedal:
Depressing this pedal sustains the sound even after removing your hands
from the keyboard.
NOTE:
The pedalboard connector is located on the right underside of the piano.
PEDALBOA D CONNECTO
Connect the pedalboard
plug to the jack located
under the piano on the
right side.
EN
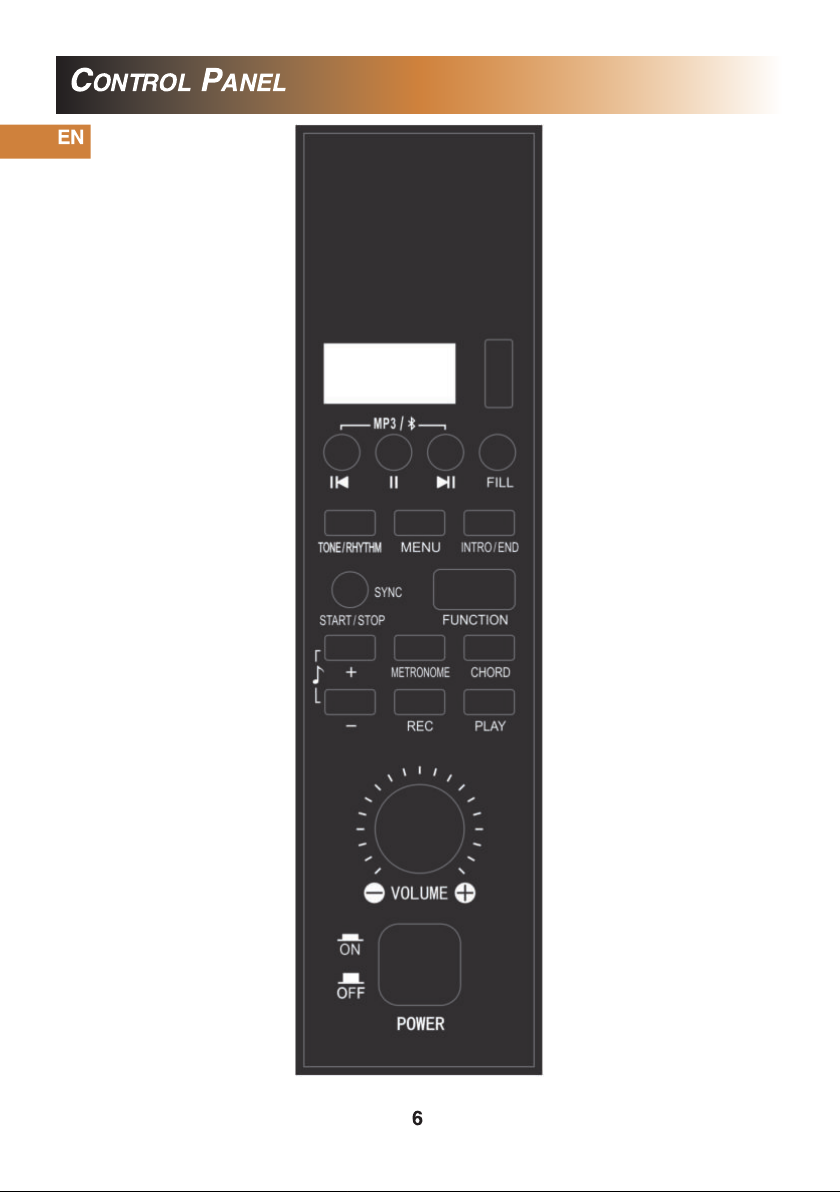
CONTROL PANEL
6
OPERATING GUIDE
EN
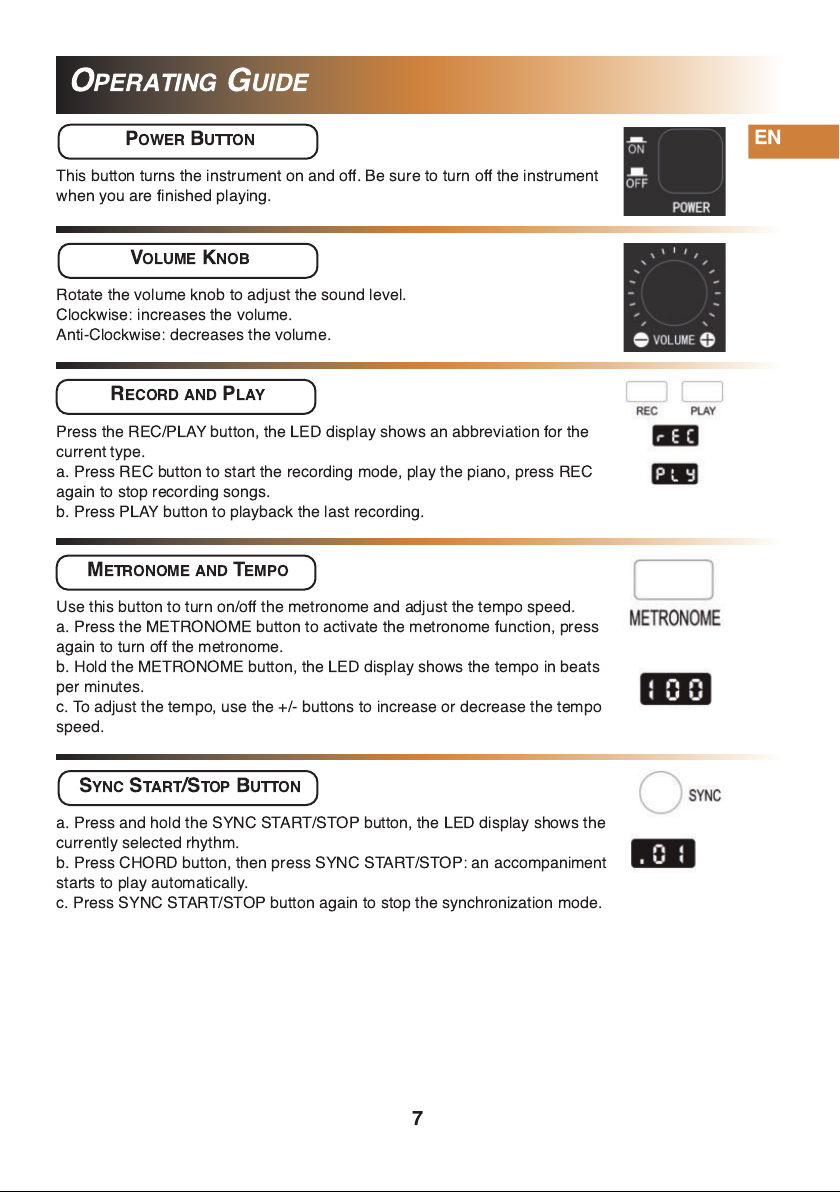
POWE BUTTON
This button turns the instrument on and off. Be sure to turn off the instrument
when you are finished playing.
VOLUME KNOB
Rotate the volume knob to adjust the sound level.
Clockwise: increases the volume.
Anti-Clockwise: decreases the volume.
ECO D AND PLAY
MET ONOME AND TEMPO
SYNC STA T/STOP BUTTON
Press the REC/PLAY button, the LED display shows an abbreviation for the
current type.
a. Press REC button to start the recording mode, play the piano, press REC
again to stop recording songs.
b. Press PLAY button to playback the last recording.
Use this button to turn on/off the metronome and adjust the tempo speed.
a. Press the METRONOME button to activate the metronome function, press
again to turn off the metronome.
b. Hold the METRONOME button, the LED display shows the tempo in beats
per minutes.
c. To adjust the tempo, use the +/- buttons to increase or decrease the tempo
speed.
a. Press and hold the SYNC START/STOP button, the LED display shows the
currently selected rhythm.
b. Press CHORD button, then press SYNC START/STOP: an accompaniment
starts to play automatically.
c. Press SYNC START/STOP button again to stop the synchronization mode.
7

OPERATING GUIDE
EN CHO D BUTTON
Use this button to turn on/off the chord accompaniment function.
a. Press START/STOP to start performing the selected rhythm - press
START/STOP again to stop chord mode.
b. Play different performances according to different fingering on the
accompaniment section of the keyboard (keys 1 to 22 keys, from the left).
FILL BUTTON
a. Press RHYTHM to select one of rhythms
b. Press START/STOP button to start the rhythm performance
c. Press FILL button to insert a fill-in to the accompaniment, press and hold
FILL button to continue to insert the fill-in arrangement.
INT O/END BUTTON
a. Press RHYTHM button at first to select a desired rhythm.
b. Press INTRO/END button to enter INTRO mode, then press START/STOP
button to insert an intro pattern to rhythm.
c. When the rhythm is in progress, press INTRO/END button again to add an
end pattern to rhythm.
DEMO BUTTON
a. To listen to all the demo songs, press and hold + and - buttons
at the same time to start the demos.
b. To stop the demo, press and hold + and - buttons again.
c. Use + or - button to select a different demo song.
8

OPERATING GUIDE
EN
TONE/ HYTHM BUTTON
TONE - 200 Tones selectable
a. Press TONE/RHYTHM button to start TONE mode, LED screen will show an
abbreviation for TONE.
b. Use + or - buttons or hold FUNCTION button and input a NUMBER (0-9) with
the keyboard to recall a desired tone directly.
RHYTHM - 1 00 Rhythms selectable
a. Press TONE/RHYTHM button again to enter RHYTHM mode, LED screen
will show an abbreviation for RHYTHM.
b. Use + or - buttons or hold FUNCTION button and input a NUMBER (0-9) with
the keyboard to recall a desired rhythm directly.
FUNCTION BUTTON
a. Press and hold the FUNCTION button, press one of the number white keys
to select a number directly (Note: the LED screen will show the number you
enter).
b. While holding the FUNCTION button, press one of the function keys to select
a function directly (Note: the LED screen will show the status of the selected
function as ON or OFF).
FUNCTION ADJUSTING ANGE
hythm Volume
000-31
Transpose
+/- 1 2 Semitones
Touch
001-003
Balance
000-1 27
Split Note
045-096
everb Level
001-008
Chorus Level
001-008
Time Signature
1 /4, 2/4, 3/4, 4/4, 5/4, 6/4, 3/8, 6/8, 1 2/8
9
LED
A
B
C
D
E
F
G
H
MENU BUTTON
Use MENU button to enter the Function Menu option and select a function.

OPERATING GUIDE
EN A. hythm Volume
Press +/- buttons to adjust Rhythm Volume, adjusting range: 0-31 .
B. Transpose
This function allows notes to be moved up and down by 1 2 semitones within an octave range.
Press +/- buttons to adjust the transposition, adjusting range: +/- 1 2 semitones.
C. Touch
This keyboard is touch sensitive, when the system starts, a touch sensitivity setting is loaded.
Press +/- buttons to select the touch level, adjusting range: 001 -003.
D. Balance
Under Dual Voice setting mode, press +/- buttons to adjust the balance volume between the
voices. Adjusting range: 000-1 27.
E. Split Note
Press +/- buttons to adjust the split note position. Adjusting range: 045-096.
F. everb Level
Press +/- buttons to adjust the reverb level. Adjusting range: 001 -008.
G. Chorus Level
Press +/- buttons to adjust the chorus level. Adjusting range: 001 -008.
H. Time Signature
Press +/- buttons to adjust the metronome time signature setting. Time signature types: 1 /4,
2/4, 3/4, 4/4, 5/4, 6/4, 3/8, 6/8, 1 2/8.
1 0

OPERATING GUIDE
EN
FUNCTION KEYS
11
1 . everb Effect
- Press and hold FUNCTION button, press REVERB ON/OFF key on keyboard to switch
REVERB effect on. LED screen shows ON.
- Press and hold FUNCTION button, press REVERB ON/OFF key on keyboard again to
switch the REVERB effect off. LED screen shows OFF.
- Under MENU, select Reverb Level function to adjust the effect level.

OPERATING GUIDE
EN
3. Dual Voice
- Press and hold FUNCTION button, press DUAL VOICE ON/OFF key on the keyboard to
switch DUAL VOICE function on. LED screen shows ON.
- Press and hold FUNCTION button, press DUAL VOICE ON/OFF key on keyboard again to
switch the DUAL VOICE function off. LED screen shows OFF.
- HOW TO USE THE DUAL VOICE FUNCTION -
a. Start Tone mode at first and select an instrument as main voice.
b. Press DUAL VOICE ON/OFF key to select the second dual voice tone; default second voice:
050 STRINGS2
c. Use +/- buttons or NUMBER EY to select a sound as dual voice tone.
d. Under MENU, select Balance to adjust dual voice balance volume.
1 2
2. Chorus Effect
- Press and hold FUNCTION button, press CHORUS ON/OFF key on keyboard to switch
CHORUS effect on. LED screen shows ON.
- Press and hold FUNCTION button, press CHORUS ON/OFF key on keyboard again to
switch the CHORUS effect off. LED screen shows OFF.
- Under MENU, select Chorus Level function to adjust the effect level.
4. Split Function
- Press and hold FUNCTION button, press SPLIT ON/OFF key on the keyboard to switch
SPLIT function on. LED screen shows ON.
- Press and hold FUNCTION button, press SPLIT ON/OFF key on keyboard again to switch
the SPLIT function off. LED screen shows OFF.
- HOW TO USE THE SPLIT FUNCTION -
a. Start Tone mode at first and select an instrument as main voice.
b. Press SPLIT ON/OFF key to select the second keyboard split tone; default second voice:
050 STRINGS2
c. Use +/- buttons or NUMBER EY to select a sound as split tone.
d. Under MENU, select Split Note to adjust the split note position.
5. Percussion Function
- Press and hold FUNCTION button, press PERCUSSION ON/OFF key on the keyboard to
switch PERCUSSION function on. LED screen shows ON.
- Press and hold PERCUSSION button, press SPLIT ON/OFF key on keyboard again to
switch the PERCUSSION function off. LED screen shows OFF.
OPERATING GUIDE
EN
1 3
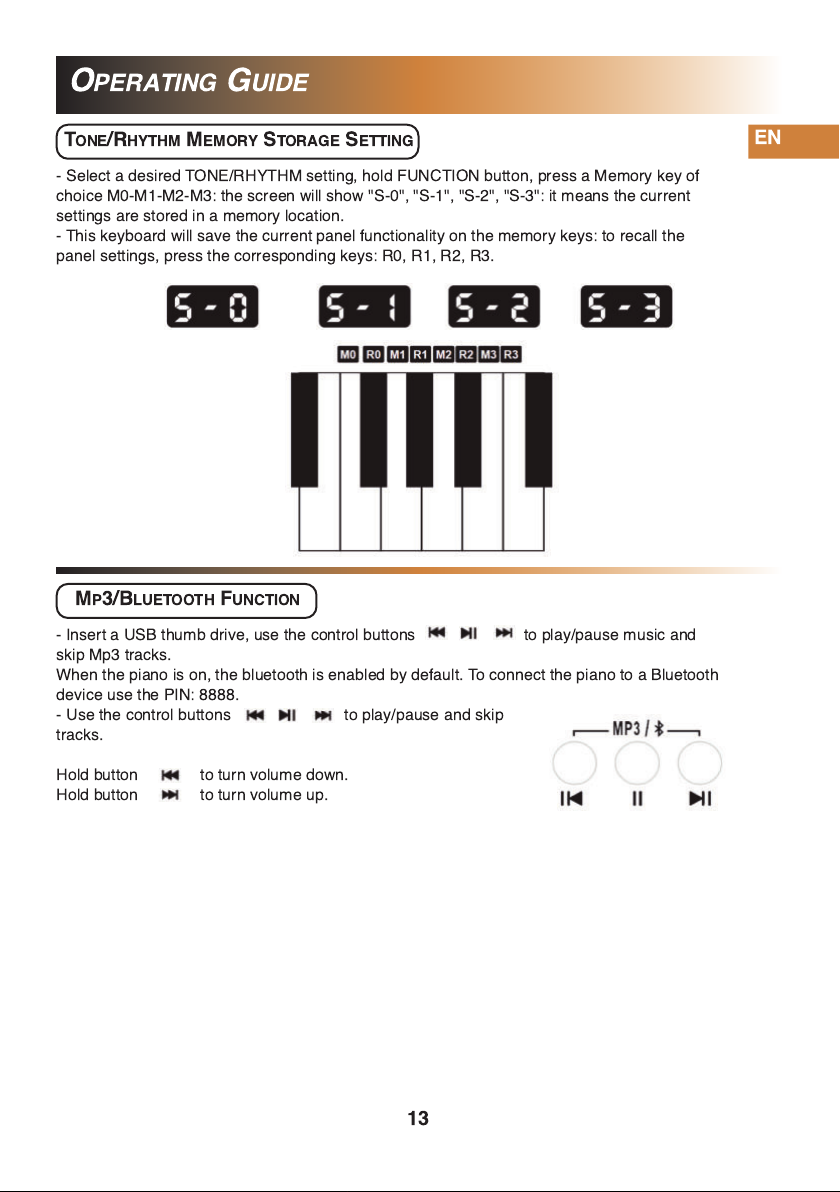
- Select a desired TONE/RHYTHM setting, hold FUNCTION button, press a Memory key of
choice M0-M1 -M2-M3: the screen will show "S-0", "S-1 ", "S-2", "S-3": it means the current
settings are stored in a memory location.
- This keyboard will save the current panel functionality on the memory keys: to recall the
panel settings, press the corresponding keys: R0, R1 , R2, R3.
TONE/ HYTHM MEMO Y STO AGE SETTING
MP3/BLUETOOTH FUNCTION
- Insert a USB thumb drive, use the control buttons to play/pause music and
skip Mp3 tracks.
When the piano is on, the bluetooth is enabled by default. To connect the piano to a Bluetooth
device use the PIN: 8888.
- Use the control buttons to play/pause and skip
tracks.
Hold button to turn volume down.
Hold button to turn volume up.
OPERATING GUIDE
EN
1 4
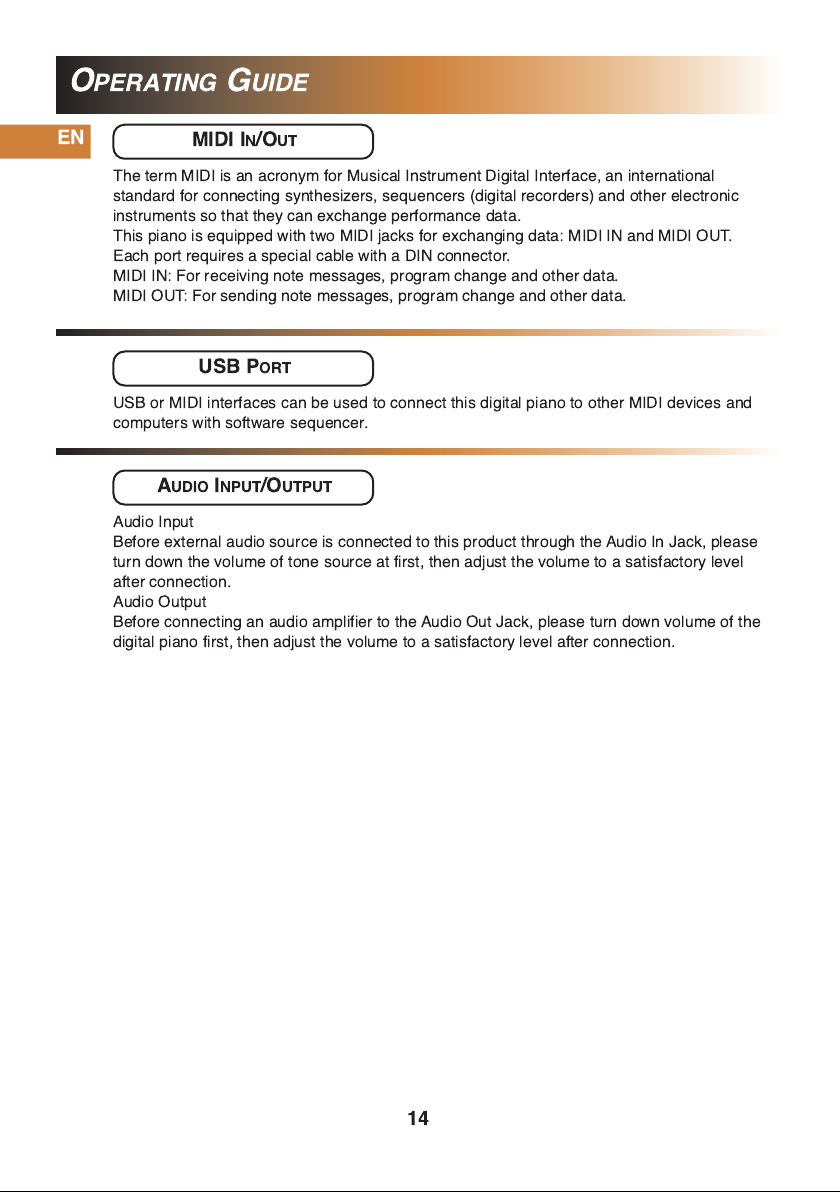
MIDI IN/OUT
The term MIDI is an acronym for Musical Instrument Digital Interface, an international
standard for connecting synthesizers, sequencers (digital recorders) and other electronic
instruments so that they can exchange performance data.
This piano is equipped with two MIDI jacks for exchanging data: MIDI IN and MIDI OUT.
Each port requires a special cable with a DIN connector.
MIDI IN: For receiving note messages, program change and other data.
MIDI OUT: For sending note messages, program change and other data.
USB PO T
USB or MIDI interfaces can be used to connect this digital piano to other MIDI devices and
computers with software sequencer.
AUDIO INPUT/OUTPUT
Audio Input
Before external audio source is connected to this product through the Audio In Jack, please
turn down the volume of tone source at first, then adjust the volume to a satisfactory level
after connection.
Audio Output
Before connecting an audio amplifier to the Audio Out Jack, please turn down volume of the
digital piano first, then adjust the volume to a satisfactory level after connection.

TONE LIST
EN
Number
1
2
3
4
5
6
7
8
9
1 0
11
1 2
1 3
1 4
1 5
1 6
1 7
1 8
1 9
20
21
22
23
24
25
26
27
28
29
30
31
32
33
Name
GrandPno
BritePno
E.G.Pno
HnkyTonk
ElecPno1
ElecPno2
Harpschd
Clavi
Celesta
Glocken
MusicBox
VbPhone
Marimba
Xylophon
TubBells
Dulcimer
HamndOrg
Perc Org
Rock Org
ChrchOrg
ReedOrgn
Acordion
Harmnica
TgAccord
GtrNylon
GtrSteel
Gtr Jazz
GtrClean
GtrMuted
GtrOvrdr
Gtr Dist
GtrHarmo
Aco Bass
Number
34
35
36
37
38
39
40
41
42
43
44
45
46
47
48
49
50
51
52
53
54
55
56
57
58
59
60
61
62
63
64
65
66
Name
Fig Bass
PickBass
Fre Bass
SlapBas1
SlapBas2
SynBass1
SynBass2
Violin
Viola
Cello
Cnt Bass
Str trem
Str Pizz
Harp
Timpani
Strings1
Strings2
Str Syn1
Str Syn2
ChoirAah
VoiceDoo
VoiceSyn
Orch Hit
Trumpet
Trombone
Tuba
Mute Tpt
Fr Horn
BrassSec
BrasSyn1
BrasSyn2
SopraSax
Alto Sax
Number
67
68
69
70
71
72
73
74
75
76
77
78
79
80
81
82
83
84
85
86
87
88
89
90
91
92
93
94
95
96
97
98
99
Name
Teno Sax
Bton Sax
Oboe
Eng Horn
Bassoon
Clarinet
Piccolo
Flute
Recorder
PanFlute
Btl Blow
ShkHachi
Whistle
Ocarina
SqurWave
SawTooth
Calliope
Chiff
Charang
VoicLead
5th Lead
BassLead
New Age
Warm Pad
PlySynth
ChoirPad
BowGlass
MetalPad
HaloPad
Sweep
Rain
SoundTrk
Crystal
1 5
TONE LIST
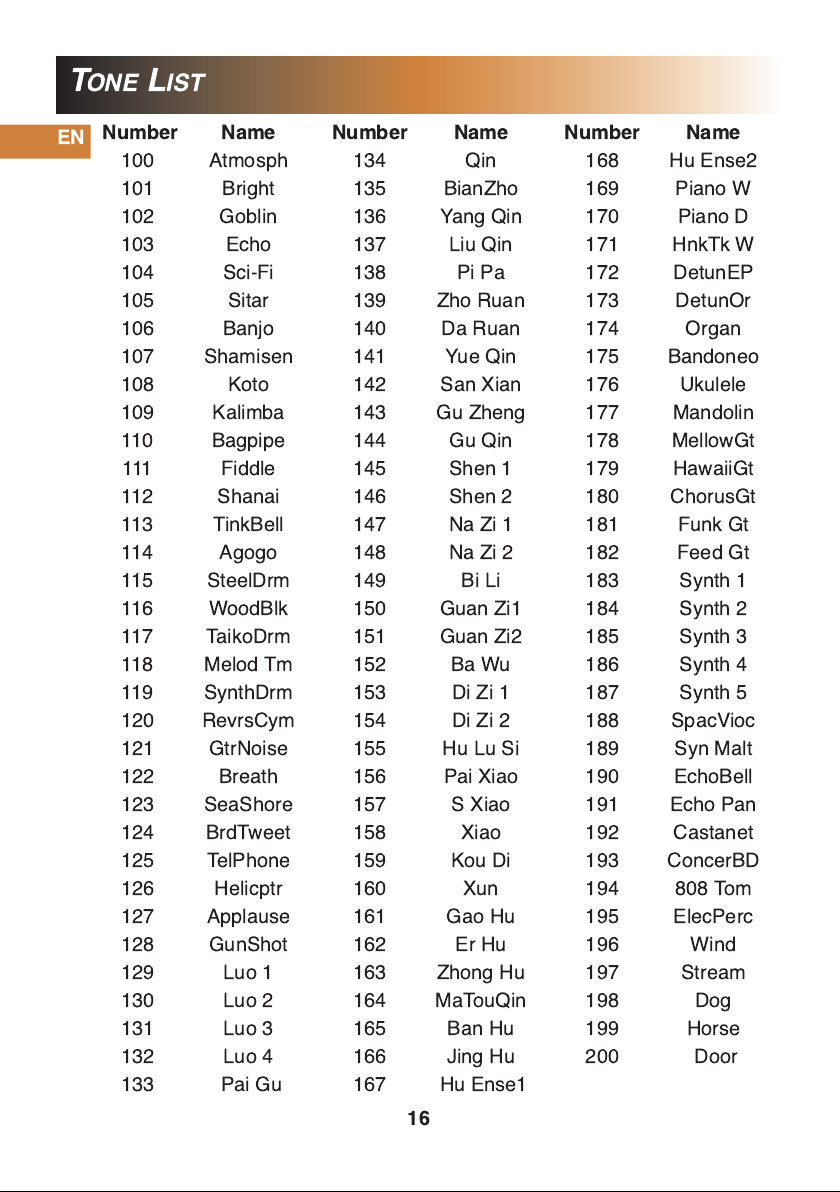
EN Number
1 00
1 01
1 02
1 03
1 04
1 05
1 06
1 07
1 08
1 09
11 0
111
11 2
11 3
11 4
11 5
11 6
11 7
11 8
11 9
1 20
1 21
1 22
1 23
1 24
1 25
1 26
1 27
1 28
1 29
1 30
1 31
1 32
1 33
Name
Atmosph
Bright
Goblin
Echo
Sci-Fi
Sitar
Banjo
Shamisen
oto
alimba
Bagpipe
Fiddle
Shanai
TinkBell
Agogo
SteelDrm
WoodBlk
TaikoDrm
Melod Tm
SynthDrm
RevrsCym
GtrNoise
Breath
SeaShore
BrdTweet
TelPhone
Helicptr
Applause
GunShot
Luo 1
Luo 2
Luo 3
Luo 4
Pai Gu
Number
1 34
1 35
1 36
1 37
1 38
1 39
1 40
1 41
1 42
1 43
1 44
1 45
1 46
1 47
1 48
1 49
1 50
1 51
1 52
1 53
1 54
1 55
1 56
1 57
1 58
1 59
1 60
1 61
1 62
1 63
1 64
1 65
1 66
1 67
Name
Qin
BianZho
Yang Qin
Liu Qin
Pi Pa
Zho Ruan
Da Ruan
Yue Qin
San Xian
Gu Zheng
Gu Qin
Shen 1
Shen 2
Na Zi 1
Na Zi 2
Bi Li
Guan Zi1
Guan Zi2
Ba Wu
Di Zi 1
Di Zi 2
Hu Lu Si
Pai Xiao
S Xiao
Xiao
ou Di
Xun
Gao Hu
Er Hu
Zhong Hu
MaTouQin
Ban Hu
Jing Hu
Hu Ense1
Number
1 68
1 69
1 70
1 71
1 72
1 73
1 74
1 75
1 76
1 77
1 78
1 79
1 80
1 81
1 82
1 83
1 84
1 85
1 86
1 87
1 88
1 89
1 90
1 91
1 92
1 93
1 94
1 95
1 96
1 97
1 98
1 99
200
Name
Hu Ense2
Piano W
Piano D
HnkTk W
DetunEP
DetunOr
Organ
Bandoneo
Ukulele
Mandolin
MellowGt
HawaiiGt
ChorusGt
Funk Gt
Feed Gt
Synth 1
Synth 2
Synth 3
Synth 4
Synth 5
SpacVioc
Syn Malt
EchoBell
Echo Pan
Castanet
ConcerBD
808 Tom
ElecPerc
Wind
Stream
Dog
Horse
Door
1 6
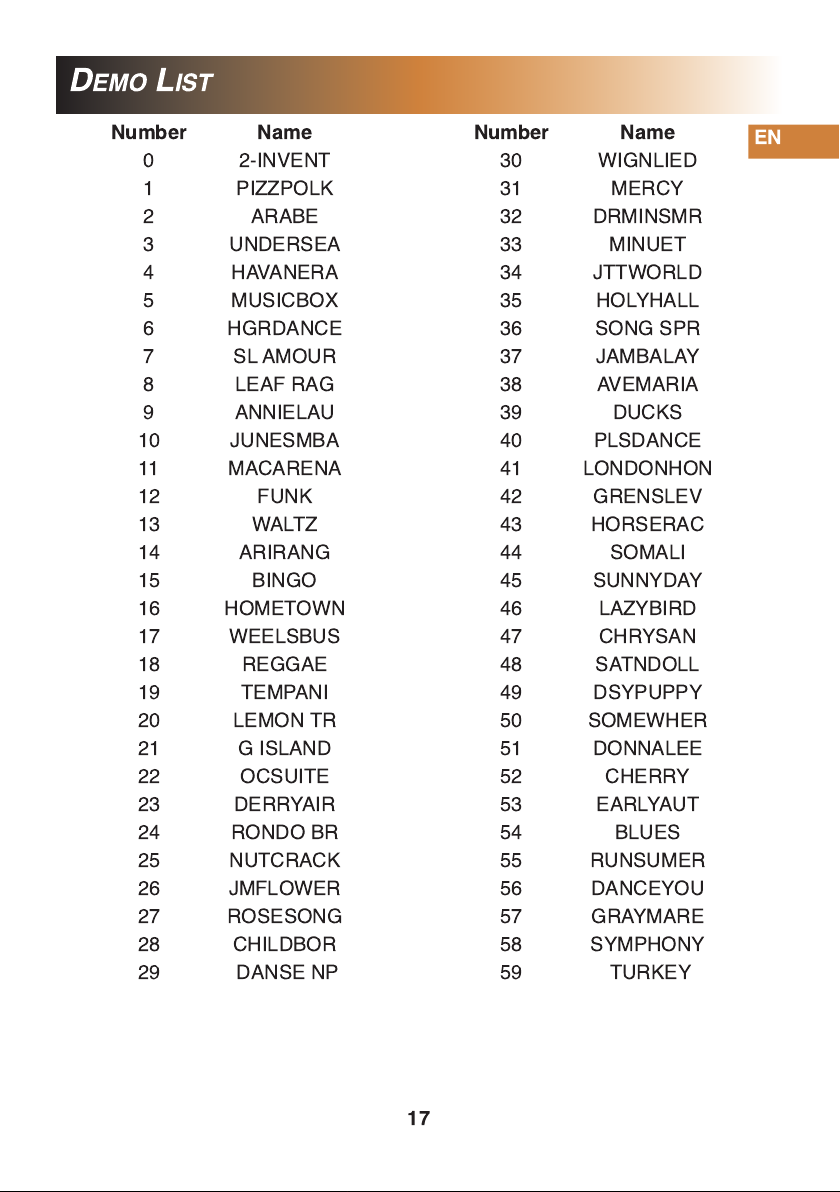
DEMO LIST
EN
Number
0
1
2
3
4
5
6
7
8
9
1 0
11
1 2
1 3
1 4
1 5
1 6
1 7
1 8
1 9
20
21
22
23
24
25
26
27
28
29
Name
2-INVENT
PIZZPOL
ARABE
UNDERSEA
HAVANERA
MUSICBOX
HGRDANCE
SL AMOUR
LEAF RAG
ANNIELAU
JUNESMBA
MACARENA
FUN
WALTZ
ARIRANG
BINGO
HOMETOWN
WEELSBUS
REGGAE
TEMPANI
LEMON TR
G ISLAND
OCSUITE
DERRYAIR
RONDO BR
NUTCRAC
JMFLOWER
ROSESONG
CHILDBOR
DANSE NP
Number
30
31
32
33
34
35
36
37
38
39
40
41
42
43
44
45
46
47
48
49
50
51
52
53
54
55
56
57
58
59
Name
WIGNLIED
MERCY
DRMINSMR
MINUET
JTTWORLD
HOLYHALL
SONG SPR
JAMBALAY
AVEMARIA
DUC S
PLSDANCE
LONDONHON
GRENSLEV
HORSERAC
SOMALI
SUNNYDAY
LAZYBIRD
CHRYSAN
SATNDOLL
DSYPUPPY
SOMEWHER
DONNALEE
CHERRY
EARLYAUT
BLUES
RUNSUMER
DANCEYOU
GRAYMARE
SYMPHONY
TUR EY
1 7
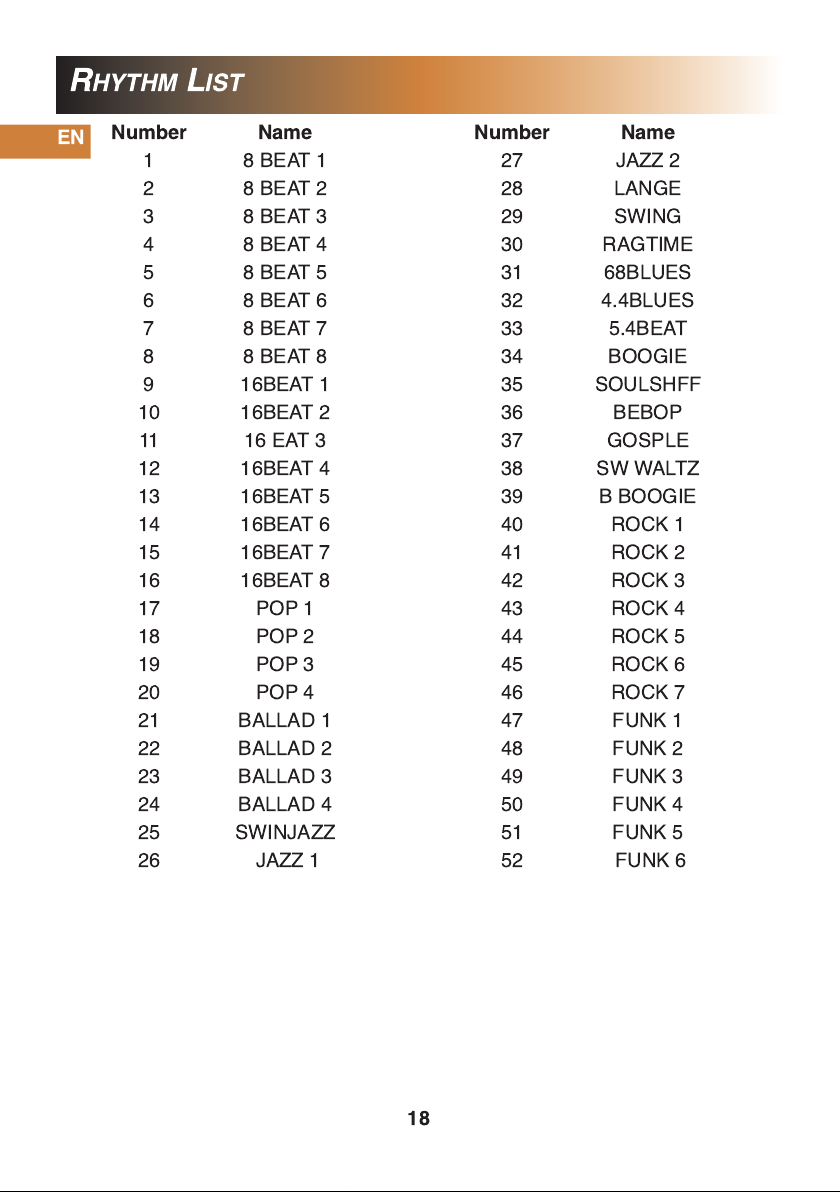
RHYTHM LIST
EN Number
1
2
3
4
5
6
7
8
9
1 0
11
1 2
1 3
1 4
1 5
1 6
1 7
1 8
1 9
20
21
22
23
24
25
26
Name
8 BEAT 1
8 BEAT 2
8 BEAT 3
8 BEAT 4
8 BEAT 5
8 BEAT 6
8 BEAT 7
8 BEAT 8
1 6BEAT 1
1 6BEAT 2
1 6 EAT 3
1 6BEAT 4
1 6BEAT 5
1 6BEAT 6
1 6BEAT 7
1 6BEAT 8
POP 1
POP 2
POP 3
POP 4
BALLAD 1
BALLAD 2
BALLAD 3
BALLAD 4
SWINJAZZ
JAZZ 1
Number
27
28
29
30
31
32
33
34
35
36
37
38
39
40
41
42
43
44
45
46
47
48
49
50
51
52
Name
JAZZ 2
LANGE
SWING
RAGTIME
68BLUES
4.4BLUES
5.4BEAT
BOOGIE
SOULSHFF
BEBOP
GOSPLE
SW WALTZ
B BOOGIE
ROC 1
ROC 2
ROC 3
ROC 4
ROC 5
ROC 6
ROC 7
FUN 1
FUN 2
FUN 3
FUN 4
FUN 5
FUN 6
1 8
Table of contents
Languages:
Other TechnoPiano Musical Instrument manuals


