Funkey DP-61 II User manual

Disposal
Rechargeable Batteries and Batteries
The supplied rechargeable batteries or batteries are recyclable. Please
dispose of them at special waste collection points or your local dealer.
Only dispose of exhausted batteries or rechargeable batteries to ensure
environmental protection.
WEEE-Declaration
Your product is designed and manufactured with materials and
components of high quality, which are recyclable and can be reused.
The symbol means that your product should be disposed of separately
from household waste when it reaches its end of life. Please dispose of
this equipment at your local collection point or recycling center. Please
help to protect the environment in which we all live.
CE
All specifications and appearances are subject to change without
notice. All information was correct at time of printing. Musikhaus Kirstein
GmbH does not guarantee for the accuracy or completeness of any
description, photograph or statement contained in this manual. Printed
colors and specifications may vary slightly from product. Products from
Musikhaus Kirstein GmbH are only sold through authorized dealer.
Distributors and dealers are not agents of Musikhaus Kirstein GmbH
and have no authority to bind Musikhaus Kirstein GmbH legally in any
way. This manual is protected by copyright. Any copying or reprint, even
in excerpts, is only allowed with written consent of Musikhaus Kirstein
GmbH. The same applies to reproduction or copying of images, even in
altered form.
Operators Manual
Funkey DP-61 II
Digital Piano

CautionWarningCaution
◆Do not disassemble or modify thi s instrument in any way, otherwise it will cause the shock,scalding an d personal injury risk.You should entrust the int ernal inspection,deb ugging and mainte nance to your dealer or the place you bought it.
◆If there is wear and tear occurs in power cord or power plug, or a sudden power failure in use,and noticing the smell of abn ormal smell or the electric gra nd piano smoking, you should turn off power,unplug the power plug immedi ately and find qualified repairman to carry out the overhauling.
◆Before cleaning the electric grand piano, yo u should turn off power a nd upplug the power plug,do not do the charged op eration with wet hands. Do not wipe and clean the electric grand piano with corrosiv e solvent.
◆Do not put the electric grand piano on vibrating, slantwise or unstable surface, otherwise the electric grand piano may overturn to hurt human body. You should always ensure th at you use the screws provided to fix the electric grand piano on the bracket. The electric grand pi ano may overturn from the bracket and cause the risk of personal risk if the electric grand piano is unstable
◆Avoid the electric grand p iano in the rain or use it in the washy and wet place.Do n ot put the
•Containers (vase, potted plant, cup, cosmetic bottle or medicine bo ttle) are full of water or other liquid; Be sure to obey the following basic notice in use so as not to harm yourself or others and damage this instrument or other external equipment. These notic e includes (but are not limited to) the following. ◆Do not play music loudly for a long time. The excessive volume will damage your hearing,so you should take special c are to use headphone
following objects on the electric grand piano.
•The fire source of the naked fire,such as the lighted candle. Prevent the water,liquid,small me tal objects and fire soure from spraying ou t into this instrument,then,it may cause the fire disaster or electric shock.•Small metal objects (including hairpin, sewing needle and coin);
◆Avo id placing the electric grand piano at the following places in order to avoid damaging the electric grand piano and internal co mponents
·The neighborhood of the air conditioner ,The place where the direct sunlight shines or an y oth er places that prompt the instrument to create the high temperature
◆Do not place the electric grand piano in the neighborhood of other electric appliance,it may cause the mutual interference between the electric ap pliance ,do n ot put the heavy objects o n the electric grand piano,do not use excessive force to press the piano's keys and poke the control switches.
◆When you don't use the electric grand piano for a long time, you should upplug the power plug,you should hold the power plug and should not pull the power cord when you upplug the power plug of this instrument.
◆Be sure to install brackets according to t he instruction and ensure all th e connection is very firm. Moreover,you should choose the appropriate position to i nstall the brackets
•When you place the electric grand piano on the bracket, take care not to let your fingers be clamped between the piano and rack.
•When you move the electric grand piano,there should be two persons carry together at least. The brackets may overturn and cause the risk of personal injury if you try to move the electric grand piano by yourself
•Beside s, examine whether screws are untight regularly. You should tighten them if you have found the untight screws
◆Keep the AC p ower cord from the heating source such as radiator etc. Do not overbend the power cord.Do not put heavy objects on the power cord. Do not p lace the power cord where the people walk.Do not wrap other thing around the power cord in o rder to avoid damaging it.
·The place of high temperature and much dust.·Kitchen or other places with oil fume.
· 6W×2
Parts were equipped with this electric grand pianoOutput powerAC230V 50HzPower
14
· GB/T12105-1998、GB/8898-2001· GB13837-2003、GB17625.1-2003
· 26KGS
Appendix V.Technical Specifications
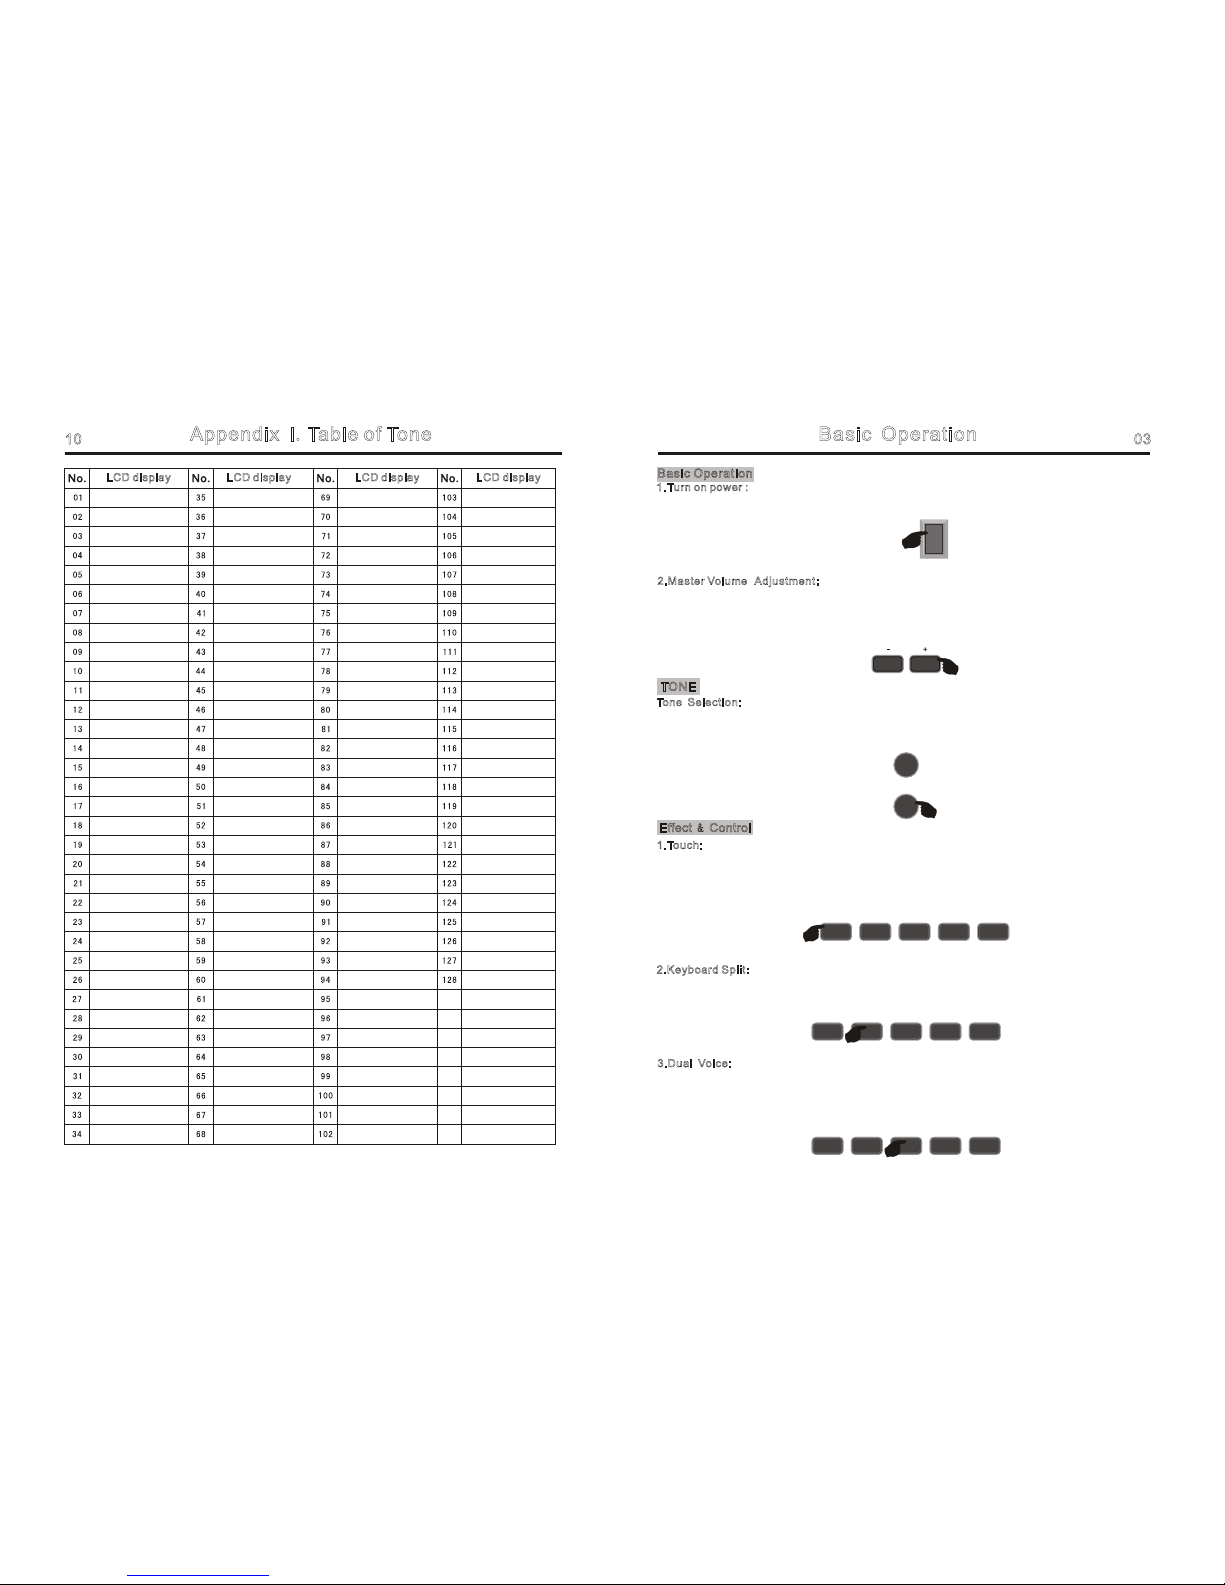
Carried StandardDisplayTone
128 kinds of tone
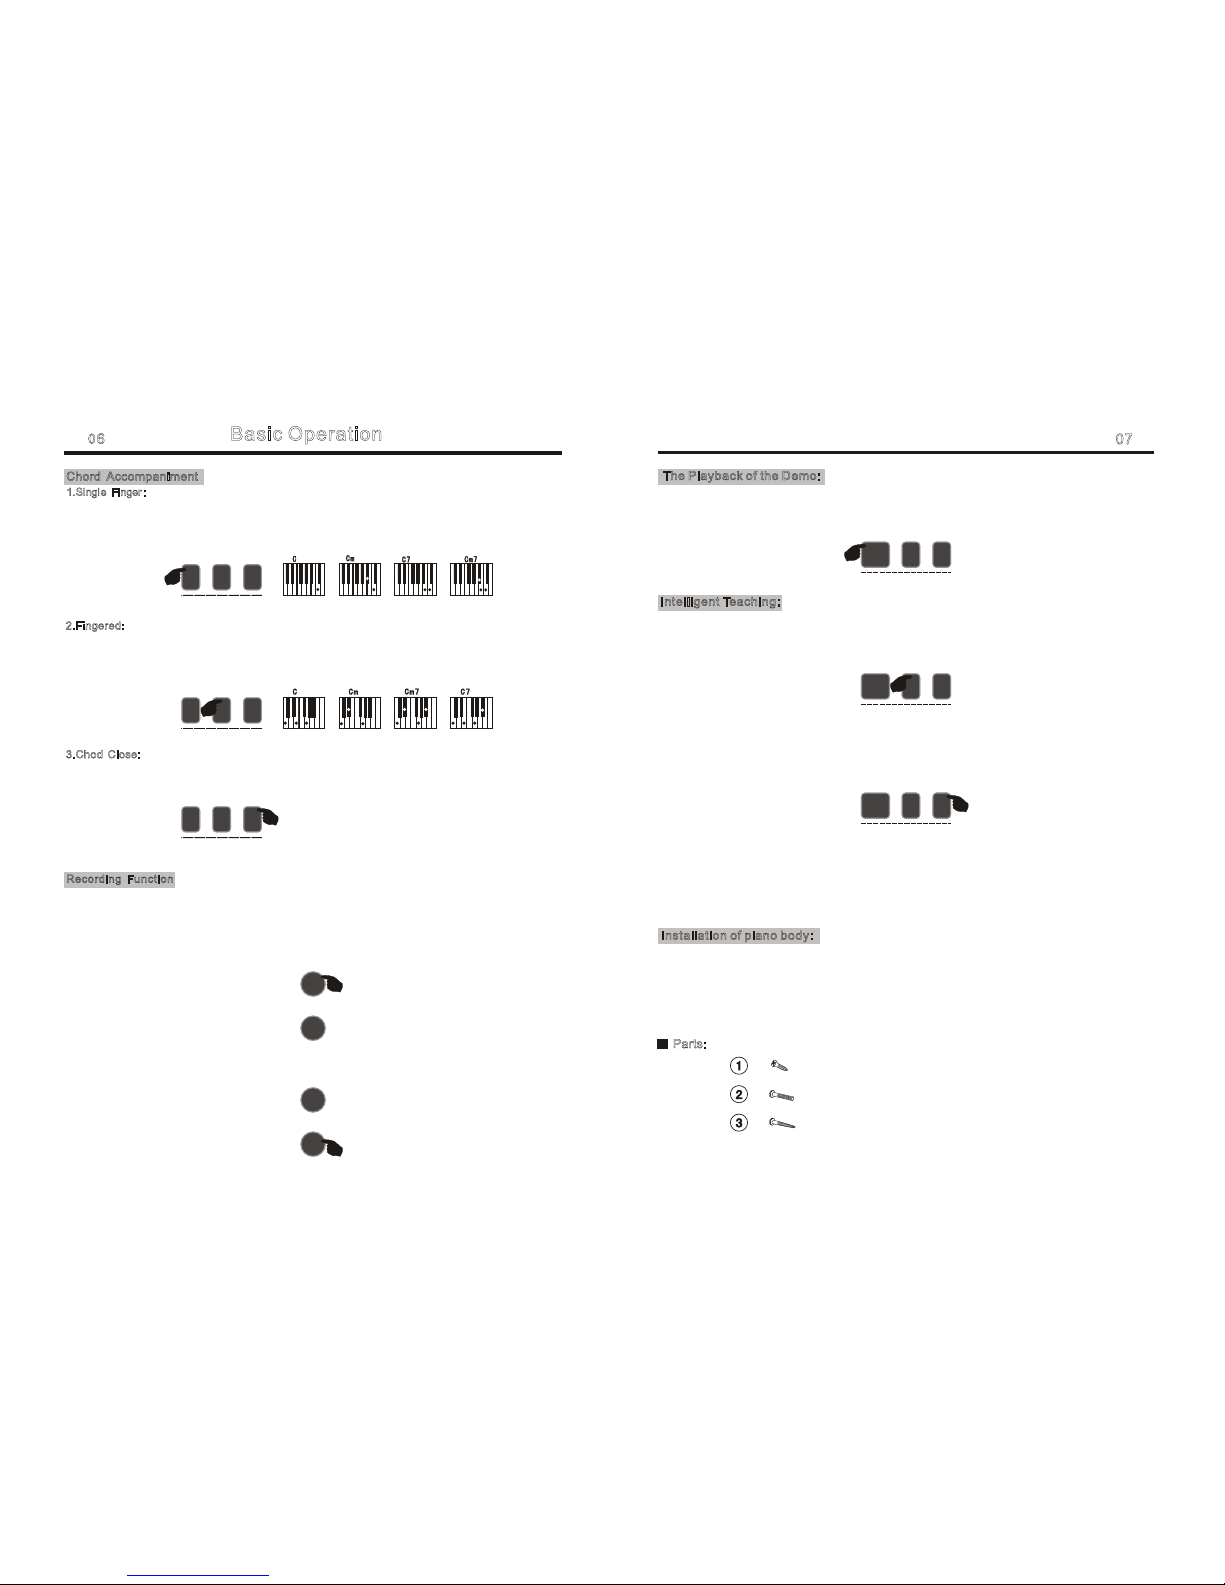
LCD displayStyle128 kinds of auto accompanimentsDemo 12 pcs of demoEf fect controlRecording and programmingRecording、PlaybackLearningLesson1、Lesson2Accompaniment controlStart/Stop,Sync,Fill-in,Intro/EndingChord controlOther controlPower Switch、Master Volume、Accompaniment Volume、Tempo、Chord VolumeExternal JacksHeadphone Out、Line out、Pedal SustainDiapasonC3~C8≤3centGross WeightIntonation Touch、Split、Dual、Sustain、Vibrato、Metronome、Data Wheel Single Finger,Fingered,Chord CloseCarton Size
· 1070×490×265(mm)· Mounting Screw、Operation Instruction、Power Adaptor

Appendix III.Table of Demo
13
010402050306071008110912NO. NO. Code of songCode of songPossible Reason/ResolutionTroubleAccompanying a slight noise in turning ON /OFF power.After turned on power, pressed the key,there was no sound.
In a tone,note and note quality has the slight difference.
The master volume or the accompanimentvolume is abnormal.
In SYNC status, auto ac compament does not start.
When use the mobile phone,the electric grand piano has the noise.
Normal phenomenon. Please do not worry.
Check whether main volume but ton was set p roper position.Check whether headphone out jack was connected with other equipment so that the built-in speaker system cutted off automatically.
This is normal phenomenon caused by different tone Samplin g system of the electr ic grand piano.
Please check whether the master volume control or accompaniment volume control was set the suitable position
Please check whether single finger or fingered was set.Now ,play a note at left-hand keyboard area (19 keys in the left-hand keyboard area).
Turkish MarchOh SusannaImpromptuAmerican PatrolRed RiverHaw-TreeThe Song Of SeasonKatiolliaSerenadeEspanoLieder Mozart Piano Sonata
Appendix IV.Trouble Shooting
When use the external power,there was no sound when the piao was open,there was anything displayed on the LCD.Please check whether the power socket has the electricity,whether the power adaptor was inserrted well.Check whether the power jack has the bad contact or the voltage isn't enough.Mobile phone can disturb the electric grand piano. To avoid the noise, please turn off the mobile phone or use it in far away.This is normal phenomenon.it is because the sustain setting of the different tone of the grand electric piano was best length.When you use the sustain function,some tone has the long sustain,some tone has the short sustain1、Panel ControlAppendixⅡ ,Table of Style Ap pendix Ⅲ,Table of Demo Appendix Ⅳ,Trouble shooting
111
9-1011-1213131487
Panel control and external functionAssembly Drawing Ap pendix ,Table of ToneTable of Contents2、LCD Display Screen DiagramAppendix Ⅴ,Technical specifications1、Turn on Power 1、Touch3、Dual Voice Power Connection2、Use of Headphone1、Pedal Sustain3、Connection with Amplifier of Hi-Fi EquipmentTone Selection
2、Keyboard Split
4、Sustain5、Vibrato6、Metronome7、Data Wheel1、Selecting Style2、Start/stop3、Sync4、Fill-in5、Intro/Ending6、Tempo Adjustment7、Accompaniment Volume Adjustment8、Chord Volume Adjustment
Chord Function
1、Single Finger1、Lesson 12、Fingered3、Chord Close
The Playback of the Demo
Preparation before performanceStyle&The Relative Function of the StyleEffect&ControlRecording FunctionBasic OperationTone
12
22
22
2
2
2
3
23
3
3
33344
4
445555
5666667
7
54
1、Recording2、Playback
66
2、Adjustment of Ma ster Volume
3
2、Lesson 2External functionBasic Operation Method3、External J acksIntelligent TeachingInstallation of piano body
7
7

6.Chord Volume18.Dual Voice
DUALRECDRD
VIBRASUSTAINSINGLEFINGERLEARNVELOCLTY
SPLIT
VIBRA
Panel Control and External Jacks
智能教学
主音量124679835
1011
1312
7.Recording/Playback Button8.LCD Display screen9.Style/Tone 10.Touch/Keyboard Split/Dual Voice /Sustain/Vibrato Button
Panel Control and External Jacks
1.Power Switch Button2.Master Volume Button3.Start/Stop/Sync/Fill in / /Intro/Ending Button4.Accompaniment Volume Button5.Metronome、Tempo Button6.Chord Volume ButtonMETRONOME CHORDVOLUMEACCOMPANIMENT VOLUMESTART/STOPSYNCFILL IN INTRO/ENDINGTEMPO12.Single Finger/Fingered/Chord Close Button13.Data Wheel Button
11.Demo、Lesson1、Lesson2 Button
DEMOGUIDE2GUIDE1
ONOFFPOWER TOUCHSPLITDUALSUSTAINVIBRATOLSTYLERECPLAYTONEDATA WHEELSINGLEFINGERCHORD CLEARCHORD FUNCTION
ACCOMPANIMENT CONTRO220V2314
Line OutHeadphone
1.Pedal Sustain3.Headphone out4.Line Out2.220V InputPedal Sustain
3.Song2.Style 4.Digit Display5.Tempo Display
7.Accompaniment Volume10.B/W Keys Display11.Single Finger
12.Fingered
17.Keyboard split
16.Touch19.Recording13.Learning1.Tone
15.Vibrato
14.Sustain8.Metronome9.Staff
ClubPop16Pop8Pop8Soul8RockRapPopPopRock60sSoul70sSoulFunk16ShufflTwistBritPopHardRockFusionFunkShufFusShuflRockRol1RockRol2StrtRockJazzRockFastGospFolkRockRkBillyRkBoogieRkChaChaRkClassiRkShufflRockPopOberPokaPolkaPopBluGrss1BluGrss2BluGrss3PopWltzUSAMarchHullGullTarantlaLmboRockSwgWaltzPubPianoJzzWltz1JzzWltz2ShowTunePolkaWaltzChaChaRumbaJivePasodoblSamba1Samba2 SchlRck1SchlRck2FoxTrotVieWaltzTango1Tango2BosanovaMambo1Mambo2BoleroCumbiaLatnRockDiscoLtnTijuana ReggaeSalsaCalypsoGuadDancReggae12Reggae16SloRock1SloRock2SloRock3SlowSoul8BtAdriaClssPnoUnpluggdPopBalldPopNewAg8BModernCntryBldLoveSongMdCnPopElecPopAcouBlldPianoBldRBBalladRckBlldSlowEasyAnaBlldEBalladTechno1Techno2FnkyDscoSatNightClubLtnDscoChocDiscoFoxDiscoFnkDscoHandDscoPrtyDscoSmbaUKPopClubDnceModernRBHipShfflChrlStonDiscoPopDiscSoulDiscTrotEuroBeatRapRaveBndShfl1BndShfl2BndShfl3FastBnd1FastBnd2CatGrveDixieJzzMedJazzJazzBandJazzClubRagtimeCountry1Country2
Appendix II.Table of Style
0112LCD display LCD display LCD display LCD display 3、External Jacks2、LCD Display Screen Diagram
1、Panel Control

Appendix II.Table of Style
Club Pop16 Beat Pop8 Beat Pop8 Beat Soul8 Beat RockRap PopPop Rock60’s Soul70’s SoulFunk16 Beat ShuffleTwistBritish PopHard RockFusionFunkShuffl FusionShuffl Rock'n Roll 1Rock'n Roll 2Straight RockJazz RockFastGospel FolkRockRockBillyRockBoogie RockChaCha RockClassical RockShuffle RockPopOber PolkaPolka PopBlue GrassBlue Grass 2Blue Grass 3Pop WaltzUSA MarchHully GullyTarantellaLimbo RockSwing WaltzPub PianoJazz Waltz 1Jazz Waltz 2Show TunePolkaWaltzCha ChaRumbaJivePasodobleSamba 1Samba 2Schlager Rock 1Schlager Rock 2FoxTrotViennese WaltzTango1Tango2BossanovaMambo 1Mambo 2BoleroCumbiaLatin RockDisco LatinTijuana ReggaeSalsaCalypsoGuadDanceReggae12Beat Reggae16Beat Slow Rock 1Slow Rock 2Slow Rock 3Slow Soul8 Beat AdriaClassic PianoUnpluggedPop BalladPop New Age8 Beat ModernCountry BalladLove SongModern Country PopElectro PopAcoustic BalladPiano BalladR&B BalladRock BalladSlow & EasyAnalog BalladE_BalladTechno 1Techno 2Funky DiscoSaturday NightClub LatinDisco ChocolateDisco FoxDisco FunkDisco HandsDisco PartyDisco SambaUK PopClub DanceModern R&BHip ShuffleCharleston DiscoPopDiscoSoulDiscoTrotEuroBeatRapRaveBig Band Shuffle1Big Band Shuffle2Big Band Shuffle3Fast Band 1Fast Band 2Cat GrooveDixie JazzMedium JazzJazz Big BandJazz ClubRagtimeCountry 1Country 2
Preparation before performance
LINE OUT
2.Use of headphone:
Line out
AmplifierSpeaker box
Insert headphone plug into“HEADPHONE”jack in the rear of the electric grand piano.The internal speaker cuts off automatically . It does not interfere with others,if you use headphone during performance.It is special for personal monitor and exercising at night.External Function The sustain function can produce natural sustain by stepping upon sustain pedal when you perform.Please insert the plug of sustain pedal into SUS PEDAL jack. You can open/close the sustain function through the sustain pedal plug.1.Pedal Sustain:3.Connection wlth Amplifier or Hi-Fi Equipment: This electric grand piano has built-in speaker system.It can be connected with other exter nal amplifier or speaker system.First turn off the power of electric grand piano and external equipments,then insert one end of stereo audio ca ble into LINE IN or Aux IN jack of other hi- fi equipment and insert the other end into LINE OUT jack in rear panel of electric piano. Note: All the above external facilities are not equipped with this product,users need to buy themsevles, please forgive us for this.SUSTAIN PEDAL JACKAC 220V
1. First Make sure whether the power switch of ElectricGrand piano is at OFF p osition.If not,pull the Switch to OFF position.
Caution:When you do not use this piano, you should unplug the plug of AC power 220V from power socket safe ly in oder to avoid the obsta cle of piano parts or other accident for the power is on for long-time. Power ConnectionCautionBe sure power voltage is AC 220V 10%, Too high or low Voltage will cause the damage of the electric grand piano. Do not unplug the power cord from power socket when the power is on.Fuse replacement shall be only made by qualified person.+-1102Name of StyleName of StyleName of StyleName of Style
2.Conect power cord: Insert power cord in power socket.

Appendix I.Table of Tone10ShamisenKalimbaBagPipeBrthNseSeashoreBrdTweetTeleRingHelicoptApplauseGunShotSteelDrmWoodBlckTaikoDrmMelodTomSynthDrmRevCymblTinklBelAcoPianoBrtPianoElcPianoHnkPianoRhoPianoChoPianoHrpchordClvichrdCelestaGlcknsplMusicBoxVibphoneMarimbaXylophonTubBellsDulcimerDrawOrgPercOrgRockOrgChurhOrgReedOrgAccrdionHarmnicaTangoAccNylonGtrSteelGtrJazzGtrCleanGtrMutedGtrOverGtrDstorGtrGtrHrmncAcoBassElecBassBassPickFretBassSlpBass1SlpBass2SynBass1SynBass2ViolinViolaCelloCntrBassTremoStrPizziStrOrchHarpTimpaniString1String2SynStr1SynStr2ChoirAahVoiceOohSynVoiceOrchHitTrumpetTromboneTubaMuteTrmpFrnchHrnBrassSecSynBrss1SynBrss2SoprnSaxAltoSaxTenorSaxBariSaxOboeEngHornBassoonClarinetPiccoloFluteRecorderPanFluteBottBlowShakuhacWhistleOcarinaSquareSawtoothCalliopeChiffCharangVoice FifthsBas+LeadN ew AgeWarmPolysynChoirBowedMetallicHaloSweepRainSoundtrkCrystalAtmospheBrightsGoblinsEchoesSci-FiSitarBanjoKotoFiddleShanaiAgogoGtrFrtONOFF Press[POWER] button to turn on"power",press it again to turn off power of e lec tric grand piano.1.Turn on power :Power03
Basic Operation
Tone Selection:TONE
Effect & Control
VIBRATOTOUCHSUSTAINDUALSPLITTOUCHSUSTAINDUALVIBRATOSPLITTOUCHSUSTAINDUALVIBRATOSPLIT1.Touch:2.Keyboard Split:3.Dual Voice: The default status is "TONE",When the electric grandpiano is open.If current status is not tone.You need to press[TONE]button.or you can select tone by data wheel rotary button. Press[ MASTER VOLUME] "+,-"button,Users can do the suitable adjustment on the whole volume depend on their requirement .You also can use data wheel rotary button to adjust.The default Volume is14,When the eletric grand piano is open. Under normal status,press [DUAL] button ,the keyboard enters the model of dual voice.Namely each note is composed of two voices,The first voice is the voice before you pressed dual voice button,and the second voice is the selected voice after pressed dual voice button.2.Master Volume Adjustment:
MASTERVOLUME
The keyboard of th is pianois the touch response keyboard.When the p ian o is open,touch function starts automatically.When you play keyboard with different touch,the piano will play different size volume .Pre ss [TOUC H] butto n ,the touch function exits and keyboard touch was cancelle d. Press [TOUCH] button again,the touch function will start again. Press[SPLIT ]button, from the left 24th key, the keyboard forms left and right two tone keyboards.In''tone'' model, press data wheel button to adjust the tone of the right Keyboard.
STYLETONE
LCD display LCD display LCD display LCD display Basic Operation

1.Selecting Style:STYLETONE2.Start/Stop:Style & The Relative Function of the Style This electric grand piano has 128 kinds of style for your choice.For style table,please refer it to t he detailed Appendix II. Press [STYLE]button to enter style selection function.LCD displays current style number.To select 001-128style,Use data wheel r ot ary button to choose.Basic OperationSYNCSTART/STOPFILL ININTRO/ENDINGACCOMP CONTROL7.Data Wheel:DATA WHEELTEMPOTOUCHSUSTAINDUALVIBRATOSPLITMETRONOME6.Metronome5.Vibrato Press[VIBRATO]button to start vibrato function.It will produce the aquiver effect tone if you play with B/W keys at t he same time.Press[VIBRATO]botton again to exit the function. Press[METRONOME]button,the tick-tock beat soun d will occur. Here are four kinds of beats can be chos en,Press this button again,it goes into the next kind of beat.The LCD has the relative display.Press[START/STOP] button to exit this function. The data wheel can adjust your own favou rite tone or style convenientlly during performance,The LCD has the relative display when the data wheel was rotated as to you can choose your favorite tone or style rapidly.users aslo can adjust the volume size(Press the volume button firstly,then rotate the data wheel,the LCD has the relative display) In default satus when the piano is open, press the[START/STOP]button to play style. Press[START/STOP]button again,It can exit other function.4.Sustain: Press[sustain]button to start sustain function. It w ill produce prolonged effect if you play with B/W keys at the same time. Press [sustain] button again to exit the function.TOUCHSUSTAINDUALVIBRATOSPLITAppendix I.Table of Tone09Acoustic Grand PianoBright Acoustic PianoElectric Grand PianoHonky-tonk P ianoRhodes PianoChorused PianoHarpsichord ClavichordCelestaGlockenspiel Music boxVibraphoneMarimbaXylophoneTubular BellDulcimerDrawbar Organ Percussive OrganRock OrganChurch OrganReed OrganAccordionHarmonicaTango AccordionAcoustic Guitar (nylo n) Acoustic Guitar (steel)Electric Guitar (jazz)Electric Guitar (clean)Electric Guitar (mut ed)Overdriven GuitarDistortion GuitarGuitar HarmonicsAcoustic BassElectric Bass(finger)Electric Bas s (pick)Fretless BassSlap Bass 1Slap Bass 2Synth Bass 1Synth Bass 2ViolinViolaCelloContrabassTremolo StringsPizzicato StringsOrchestral HarpTimpaniString Ensemble 1String Ensemble 2Synth Strings 1Synth Strings 2Choir Aah sVoice Ooh sSynth VoiceOrchestra HitTrumpetTromboneTubaMuted TrumpetFrench HornBrass SectionSynth Brass 1Synth Brass 2Soprano Sa xAlto SaxTenor SaxBaritone SaxOboeEnglish HornBassoonClarinetPiccoloFluteRecorderPan FluteBot tle BlowShakuhachiWhistleOcarinaLead 1 (square)Lead 2 (sawtooth)Lead 3(calliope lead)Lead 4 (chiff lead)Lead 5 (charang) Lead 6 (voice)Lea d 7 (fifths)Lead 8(bass+lead)Pad 1 (new age)Pad 2 (warm )Pad 3 (polysynth) Pad 4 (choir)Pa d 5 (bowed)Pad 6 (metallic)Pad 7 (halo)Pad 8 (sweep)FX 1 (r ain)FX 2 (soundt rack)FX 3 (crystal) FX 4(atmo sphere)FX 5 (brightness)FX 6 (goblins)FX 7 (echoes)FX 8 (sci-fi) SitarBanjoShamisenKotoKalimbaBagpipeFiddleShanaiTinkle BellAgogoSteel DrumsWoodblockTaiko DrumMelodic TomSynth DrumReverse CymbalGuitar Fret NoiseBreath NoiseSeashoreB ird TweetTelephone RingHelicopterApplauseGunshot04Name of ToneName of ToneName of ToneName of Tone

05
Basic Operation
SYNCSTART/STOPFILL ININTRO/ENDINGSYNCSTART/STOPFILL ININTRO/ENDING3.Sync Function:4.Fill-lN:5.Intro/Ending: When you press[INTRO/ENDING]button,an intro will be played,and then it contitues to play after gone to the normal style,wh en you press [INTRO/ENDING] button during style playback,the style playback will be finis hed after a paragra ph of ending is played.6.Tempo Adjustment:
8.Chord Volume Adjustment:
INTRO/ENDINGSTART/STOPFILL INSYNC7.Accompaniment Volume Adjustment: Press[SYNC]button to start sync accompaniment function and press any key of 19 keys in left hand to start style synchronously.If chord function is started,press relevant key of 19 keys in chord are a to start au to chord synchronously.If a style was being played previously.press[SYNC]button to stop style and start sync accompaniment function. Press[FILL-IN]button to insert a intermezzo during style playback as to enhance the performane effect,then play based on the original style. Press[TEMPO]+/- buttons,it can adjust the playback tempo of style,metronome,de mo.The adjustment range is 30-240,the default is “120” after the power is on.
CHORDVOLUME
ACCOMPANIMENT VOLUME
TEMPO METRONOMEACCO MPANIMENT CONTROL The default Chord Vol is 16,you can adjust Chord Vol by pressing[CHORD VOL]+ or - button.TheLCD has the relative display when you adjust.The system will restore the default Chord Vol automatically if you press t he[CHORD VOL] button at the same time.T he default is16 after the power is on.ACCOMPANIMENT CONTROLACCOMPANIMENT CONTROL The default Accompaniment Vol is 16,you can adjust Acompaniment Vol by pressing [ACCOMPANIMENT] + or - button.The LCD has the relative display when yo u adjust .The system will restore the default Accompani ment Vol automatically if you pr ess the Accompaniment Vol +/-buttons at the same time.The default is 16 after the power is on.08Assembly Drawing113332113332

062.Fingered:3.Chod Close:Chord Accompaniment
1.Single Finger:
Recording Function
2.Press [PLAYBACK] butto n to play the recorded notes.
SINGLE FINGERFINGEREDCHORD CLEARBasic OperationRECORDINGPLAYBACKCHORD FUNCTIONRECORDINGPLAYBACK When style is started,press [SINGLE FIN GER] button to enter the function of single finger autochord,Now in 1~19 keys of the chord area,applying different fingerings to hear different chord accompaniment,press [START/STOP] button to exit this function.CHORD FUNCTIONCHORD FUNCTION When style is started,press[FINGERED]button to enter the function of fingered auto bass chord.Now in 1-19 keys of the chord area,applying different fingerings to hear different chord accompaniments.Press[START/STOP]button to exit this function. After the chord was started,press[CHOR D CLOSE]bu tton to stop chord accompaniment while style con tin ues to play. 1.Pr ess[RECORDING]button to enter recording model.The metronome sound sounds an d the default tempo is 120.Now press a ny key to start recording.The maximum recording quantity is 180.When the maximum quantity is full,metrono me sound will stop and the next note ca nn't be recorded.Everytimeyou press this button,the previous memor y will be cleared and the piano will enter into the recor ding model again.SINGLE FINGERFINGEREDCHORD CLEARSINGLE FINGERFINGEREDCHORD CLEAR 1 .As shown in the figure , first assemble the stands into one body and fasten with 4pcs of M5×60 screws. 2.As shown in the figure, connect left and right stands and supporting plates with pedal rack and f ront baffle and fasten with 4pcs of M5×60 screws. 3.As shown in the figure, place piano body on the base and fasten with 12 pcs of M4x14 screws and 4pcs of M6X20 screws.07M6*20 Scre w 4 pieces
M5*60 Screw 8 pieces
M4*14 S crew 12 piecesINTELLIGENT TEACHINGCaution: Press[INTELLIGENT TEACHING]button to enter teaching model ,then, press white keys to choose dif ferent songs.Press this button again,exits teaching function.The current tone can choose different songs. Press this button again,exits teaching function.The current tone can can be changed If you press [TONE]button and adjust the data wheel in the playback course. Press[D EMO]button to play song. Press this button again,It will play the ne xt song.(Please refer the 11th page DEMO Appendix).Press [START/STOP ] button,the playback of the Demo will stop. The Playback of t he Demo: 1.Lesson-1:Whe you press any button for learning,no matter whether the performance is right or wrong.It will produce the correct melody notes, and repeats its accompaniment that is one button one note model. 2.Lesson-2:the master volume will be clo sed over when you play the piano key and follow the piano key notes.The master volume will r ecover the perf ormance of learning the piano key of of this song if you don't play the piano key for 3 seconds.DEMO LESSON2LESSON1Intelligent Teaching: Parts:Installation of piano body:Note:Pls refer the assembly drawing on the page 08.DEMO LESSON2LESSON1DEMO LESSON2LESSON1INTELLIGENT TEACHINGINTELLI GENT TEACHING
Table of contents
Other Funkey Musical Instrument manuals