tekflo Breeze User manual

Breeze Hand Dryer
Instructions Manual

2
Table of Contents
Product Dimensions 3
Product Features, Technical Specications & Package Contents 4
Installation & Safety Guidelines 5
Installation Instructions 6
Operation Guidelines 8
Cleaning & Maintenance Guidelines 9
Warranty Details 10
Notes 11

3
219mm
220mm
535mm
220mm 118mm
508mm
62mm
245mm
Product Dimensions

4
Product Features, Technical Specications
& Package Contents
Product Features:
•Recessed design make this a streamlined and unobtrussive dryer ideal for where
space is at a premium.
•18cm deep alcove that captures and evaporates water thanks to a hygienic
absorbent ceramic surface.
•Heavy duty stainless steel casing gives excellent ongoing protection against
corrosion and vandalism.
•The automatic ‘no touch’ operation ensures impeccable hygiene.
•Users enjoy an ultra-fast drying time of just nine seconds!
•Maximum output comes at minimal power consumption to help reduce carbon
footprint.
•No unnecessary energy wastage thanks to the automatic cut-off.
•Reduced noise levels make this one of the quietest and most discrete dryers in
any class.
•Built in removable HEPA filter for hygienic operation with filtered air.
•Easy to install and maintain.
•Available in Brushed Metal finish.
Technical Specications:
•Shell material/s: 304 Stainless Steel
•Standard finish: Brushed Metal
•Rated voltage: AC 220-240V
•Rated frequency: 50 / 60 Hz
•Rated power: 1,100W
•Installation: recessed wall mounted
•Drying time: 9 seconds
•Air speed: 90 M/s
•Noise output: 75dB
• Operation: infrared automatic ‘no
touch’
•Timing protection: 60 seconds auto
cut o
•Thermal protection: cut off above
70C
• Drip proof: IPX3
•Filter: HEPA lter
•Unit dimensions: 280 W x 535 H x
180 D mm (62mm from surface)
•Net weight: 12.5 kg
•Warranty: 2 Years
•Certication: CE, RoHs
Package Contents:
•Hand dryer
•Fixtures and ttings
•User manual and installation guide

5
Installation & Safety Guidelines
• All electrical installation and repair work should be carried out by a qualied
electrician in accordance with current locals codes or regulations.
• Do not attempt any disassembly or modication of the unit that is not expressly
stated in this manual.
• Do not install when the product (power cable) is electried.
• Install securely in a location strong enough to support the weight of the unit.
• Install the hand dryer on a smooth surface and in an area where people are not
likely to collide with the object once installed.
• Do not scratch, damage, process, excessively bend, pull, twist or bundle the
power cable, and do not place heavy objects onto it or trap it.
• Do not use in a hot location such as a shower room, where condensation may
form on the unit, or where water may splash directly at the unit.
• Do not install this hand dryer above sources of water such as sinks or taps.
• Do not install in locations where salt damage may occur, or where corrosive,
neutral, or reductive gases are present.

6
Installation Instructions
1) Remove dryer cover:
•Loosen the dryer cover by removing the mounting screws located at the bottom
and sides of the unit.
2) Remove dryer body:
•Use a Phillips screwdriver (over 150mm long) to loosen the screws and remove
the hand dryer body.
3) Create recess & prepare framework:
•Prepere recess in wall: 248mm W x 510mm H x 119mm D.
•As shown in the diagram, drill holes at the corresponding positions and insert
the wall plugs (4 in total) into the holes.
•Use a slotted screwdriver to line up the electrical supply entry hole and then
insert the wires.
•Place the metal framework into the wall and tighten the xings.
4) Fit dryer body:
•Place the dryer body back into the framework and using a Phillips screwdriver
tighten the screws to fix the hand dryer body.
5) Connect wiring:
•Connect wiring to the terminal connector.
6) Replace dryer cover:
•Place the dryer cover slowly onto the framework.
7) Check everything lines up:
•The sensor and the air outlet should be aligned with the position on the cover.
•Tighten mounting screws and x cover in place.
Recommended Mounting Heights
Measurements are from the bottom of the recessed framework to the floor.
•Mens / Ladies: 900mm
•Disabled / Children: 750mm

7
1) 2)
3) 4) 5)
Visit www.tekflo.com or email enquiries@tekflo.com for more information
1) Remove dryer cover:
• Loosen the dryer cover by removing the
mounting screws located at the bottom
and sides of the unit.
2) Remove dryer body:
• Use a Phillips screwdriver (over 150mm
long) to loosen the screws and remove
the hand dryer body.
3) Prepare framework:
• As shown in the diagram, drill holes at
the corresponding positions and insert
the wall plugs (4 in total) into the
holes.
• Use a slotted screwdriver to line up the
electrical supply entry hole and then
insert the wires.
• Place the metal framework into the wall
and tighten the fixings.
4) Fit dryer body:
• Place the dryer body back into the
framework and using a Phillips
Screwdriver tighten the screws to fix the
hand dryer body.
5) Connect Wiring:
• Connect wiring to the terminal
connector.
Philips Screws
Mounting Screws
Installation Instructions Breeze Hand Dryer
6) Replace dryer cover:
• Place the dryer cover slowly onto the
framework.
7) Check everything lines up:
• The sensor and the air outlet should be
aligned with the position on the cover.
• Tighten mounting screws and fix cover
in place.
Recommended Mounting Heights
Measurements are from the bottom of the
recessed framework to the floor
• Mens / Ladies: 900mm
• Disabled: 750mm
Visit www.tekflo.com or email enquiries@tekflo.com for more information
Installation Instructions Breeze Hand Dryer
6) 7)
8
Operation Guidelines
1. Before inserting hands under the dryer, shake o any excess water.
2. This hand dryer incorporates no touch sensor activation for hygienic use. Simply
place your hands within the air outlet compartment and the hand dryer will be
automatically activated.
3. Remove your hands away from the air outlet and the hand dryer will be
deactivated after 2 seconds.
4. The hand dryer will automatically cut o after running for 60 seconds if the
sensor is activated for this period. If need be, remove hands from the sensor and
return your hands and the dryer will re-activate.
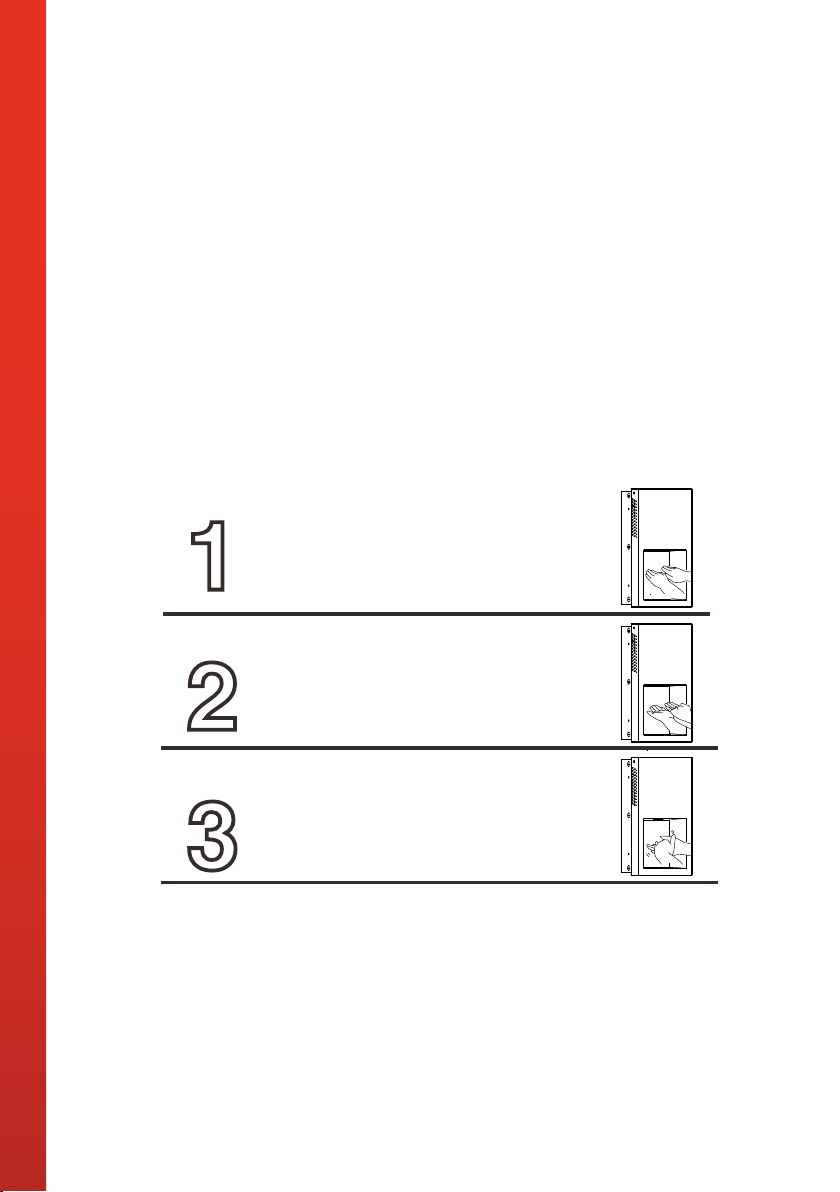
Insert hands into dryer face down,
slowly move hands back and forth.
Turn hands over, again slowly move
hands back and forth.
Finally rub hands together whilst in
dryer.
9
Cleaning & Maintenance Guidelines
Cleaning and maintenance should be carried out by service personnel only, after
ensuring that the unit is disconnected from the power supply. It is recommended
that cleaning be carried out regularly every week.
A) Cleaning the unit body
1. Simply wipe down the exterior of the dryer with a damp cloth, removing any
build of up dirt, paying particular attention to the sensor.
B) Maintenance of absorbent ceramic surface
1. Remove the security xings and lift o the outer casing.
2. Slide out ceramic plate from rear of casing.
3. Wash ceramic plate with warm soapy water and remove any soap residue before
drying with a clean cloth.
4. Avoid cleaning with products that contain bleach, hydrochloric acids or chlorides.
5. Avoid stainless steel cleaner from making contact with ceramic as it can stain
ceramic. Avoid use of oily cleaners to prevent ceramic pores from clogging.
6. Avoid use of steel wool wvhich can scratch surface.
7. Replace ceramic plate and ret outer casing.
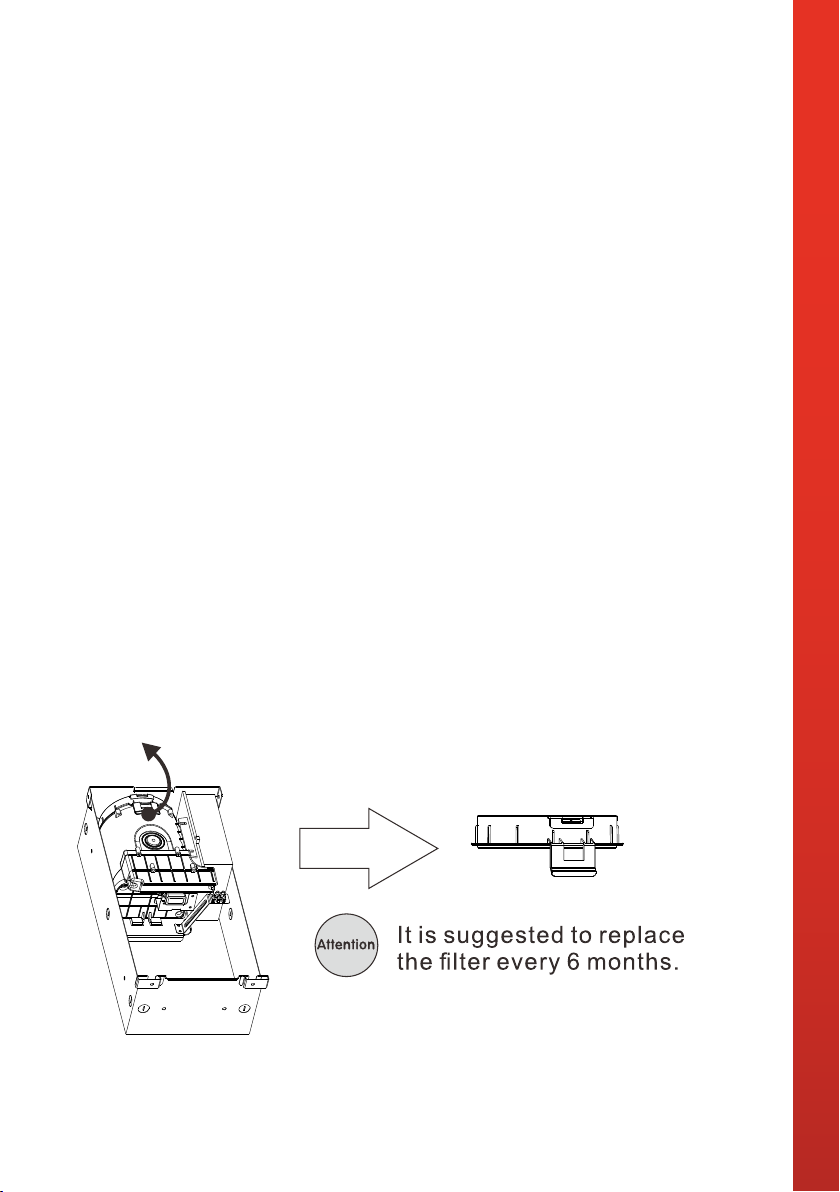
C) Cleaning the air lter
1. Remove the air lter component.
2. For a light clean – use a vacuum cleaner to remove any build of dirt. For a more
thorough clean – soak the air lter in warm water.
3. Replace the air lter back within the body.

10
Warranty Details
•All Teko Hand Dryers are guaranteed to be free from defects in parts and
manufacture for 2 years from the date of purchase, provided that the product is
used under the normal operating conditions stated within the manual.
•The warranty is only available to the original purchaser and is not transferable.
Your consumer rights are not aected.
•If there are any defects with your hand dryer please contact the provider stating
your invoice number, date of purchase, full name and address.
•
Do not attempt to repair or take apart the hand dryer your self. If the hand dryer
has been tampered with before it arrives with us, the warranty will be void.
•We advise that all customers retain original packaging should the unit need to be
returned.
•If your hand dryer occurs a problem outside of the warranty period, we oer a
repair service where we can collect and professionally repair your hand dryer.

11
Notes

12
Visit www.teko.com or email enquiries@teko.com
for more information
Table of contents
Other tekflo Dryer manuals


Popular Dryer manuals by other brands

American Dryer Corp.
American Dryer Corp. AD-75 parts manual

Whirlpool
Whirlpool WGD97HEXL0 installation instructions

Siemens
Siemens EXTRAKLASSE 660 Instructions for use

Mitsubishi Electric
Mitsubishi Electric JT-MC206GS-W-E user manual

Maytag
Maytag MED5700TQ1 parts list

Amana
Amana LED20AW-PLED20AW installation instructions


