Telos Quantum Magnetic Tuning User manual

Quantum Magnetic Tuning
INSTRUCTION MANUAL
Version 1.0

TABLE OF CONTENT
2
Safety Instructions...............................................................3
Caution
Warning
General Safety Instructions
Front panel
Connecting-Real panel
Front panel
Packing content..................................................................4
Specification.....................................................................5
Placement.........................................................................6
Application.......................................................................7
Contact us........................................................................8
An QMT is supplied with the following items
Placement
Instruction
Note
Warning
Instructions
Grounding Connector
Powerinput
Dimension
Weight

SAFTEY INSTRUCTIONS
3
This symbol is intended to alert the user to the presence of uninsulated dangerous voltages
within the enclosure of suf cient magnitude to cause electric shock.
This symbol is intended to alert the user to the presence of important operation, maintenance
and servicing information in the instruction and service manuals.
Explanation of symbols used in this manual or on the rear of the device:
Caution
•To reduce the risk of electric shock, do not remove the cover.
•No user serviceable parts inside.
•Refer servicing to quali ed service personnel.
•Replace the mains fuse in the plug with one of the same type and rating.
•Disconnect supply cord before changing fuse.
Warning
To reduce the risk of re or electric shock, do not expose this device to rain or moisture. Shock hazard - do not
open.
This product is designed to comply with interna- tional directives on the
Restriction of Hazardous Substances in electronic equipment. The wheel-
ie bin logo indicates compliance and that these products must be recycled
or processed as according to these directives.
General Safety Instructions
All safety and operation instructions should be read carefully before the 250i is operated. Keep the Owners
Manual in a safe place for future reference.
•Read these instructions.
•Keep these instructions.
•Heed all warnings.
•Follow all instructions.
• Do not use the device near water, for example near a bathtub, kitchen sink, in a wet basement, near a swim-
ming pool, etc.
• Clean only with a dry cloth.
• Mounting to a wall or ceiling should be via a heavy-duty bracket or
shelf designed for audio equipment use.
•The device should be situated away from heat sources such as radiators,
stoves, or other appliances that produce excessive amounts of heat.
•DO NOT place the device directly onto carpeted surfaces.
•Avoid exposing the device to extremely high or low temperatures.
•The device should be connected to a mains power supply only of the
type described in the operating instructions, and/or as marked on the rear of the unit.
•DO NOT defeat the safety earth of the grounding type mains plug, severe injury or death may result. If the
provided plug does not t into your outlet, contact your dealer or consult an electrician.
•The power cord should be routed so that it is not likely to be walked on or pinched by items placed on or
against it.
•Unplug the device during lightning storms or when unused for long periods of time.
•DO NOT let objects or liquids fall into the device, expose the device to drip- ping or splashing or place a vessel
containing liquid on top of the device.
•Keep this device out of reach of children.
•DO NOT operate the device with the cover removed.
•DO NOT bypass any fuse, replace only with the value and type speci ed.
•DO NOT attempt to repair the device. In the event of a problem, please

4
PACKING OF CONTENT
An QMT is supplied with the following items
Quantum Magnetic Tuning
USB charging cable
Adapter
Rubber foot pad (x4)
Placement
QMT can be place any where and carry around to magnetize your audio equipment.
Instruction
1. Connect the power to QMT.
2. Place the QMT at the center of your system, or ground.
Note
The grouding signal from your equipment could be with RCA, mini spade(screw from the case), HDMI, XLR,
or any possible connectors from your machine, please contact your local dealer for the connector that fit your
equipment.
Warning
DO NOT connect any QMT signal to any speaker's connector or power amplifier's output signal.

SPECIFICATION
5
Grounding Connector
6 x WBT-0703 CU Nextgen Pole Terminal - Gold Plated
Powerinput
100V-240V
Dimension
215mmx180mmx20mm
Weight
1.15kg
215mm
180mm
20mm
PLACEMENT
6
This symbol is intended to alert the user to the presence of uninsulated dangerous voltages
within the enclosure of suf cient magnitude to cause electric shock.
Connecting-Real panel
Front panel
Top View
Design by Telos
Made in Taiwan
www.telos-audio.com.tw
CAUTION
RISK OF
ELECTRIC SHOCK
DO NOT OPEN
SN:0001
DC5V/2A
APPLICATION
7
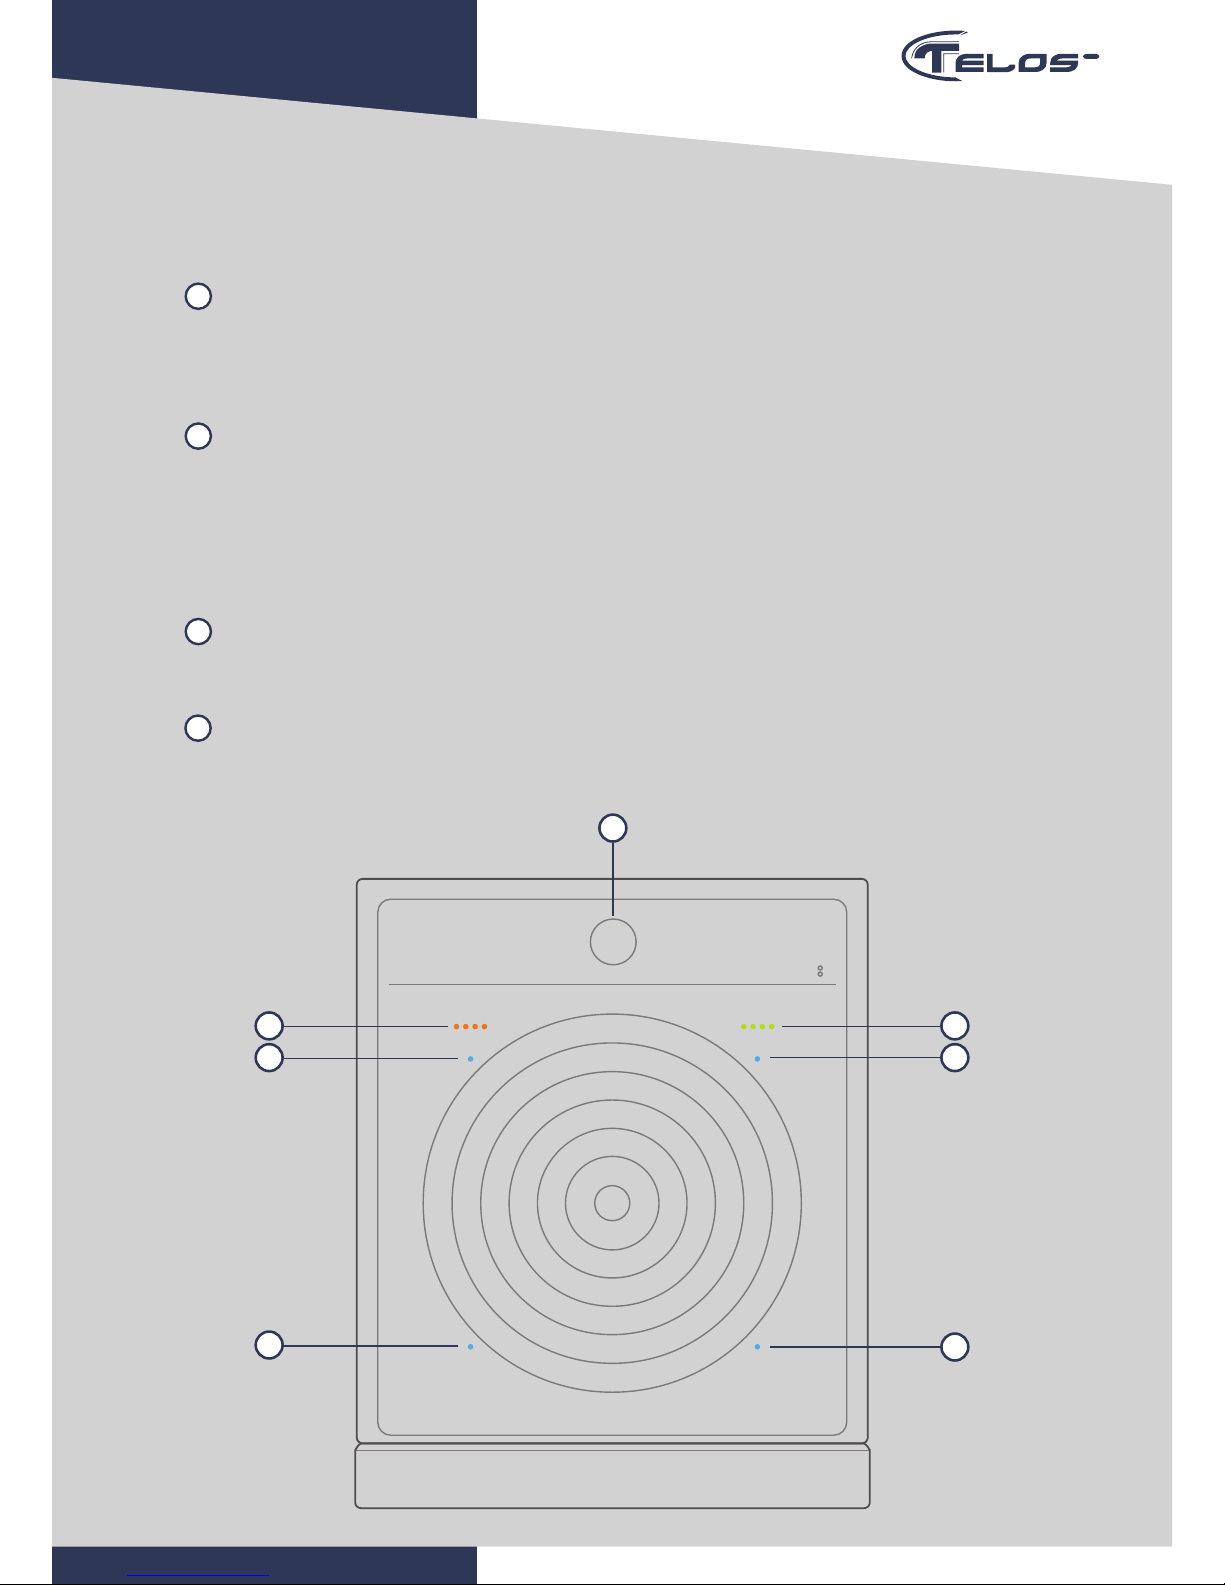
Instructions
At the left hand side, From left to right, There are 3 LEDs indicate the three sweep functions controlled by the
function key.
Orange LEDs at the left
1. First LED, when LED lights for 10 seconds, 0-100Khz swept. The last one second is increased for 1Khz.
This mode is recommended for CD.
2. Seconds LED, 0-100Khz sweep for 1 minute
3. The third LED, 0-100Khz sweep for 5 minutes.
A
Green LEDs at the right
At the right hand side, From left to right, There are 4 LEDs.
1. The first three LEDs indicate the Battery percentage.
first 33%
seconds 66%
third 100%
2. The forth LED indicates when charging.
B
Power off function
During Quantum sweep, you can force power off by click and hold the button for 2 seconds,
The 4 blue LEDs will blink. And the power will turn off
C
Memorize function:
During Quantum sweep, you can save the current function for the next time you use.
By click and hold for 4 seconds, the LEDs will blink again after power off, then your current function is saved.
D
AB
C
C C
C
C

8
CONTACT US
TELOS AUDIO DESIGN
TEL : +886-2-23702900 FAX : +886-2-23702909
www.telos-audio.com.tw E-mail : [email protected]
Grounding Noise Reducer
Table of contents


