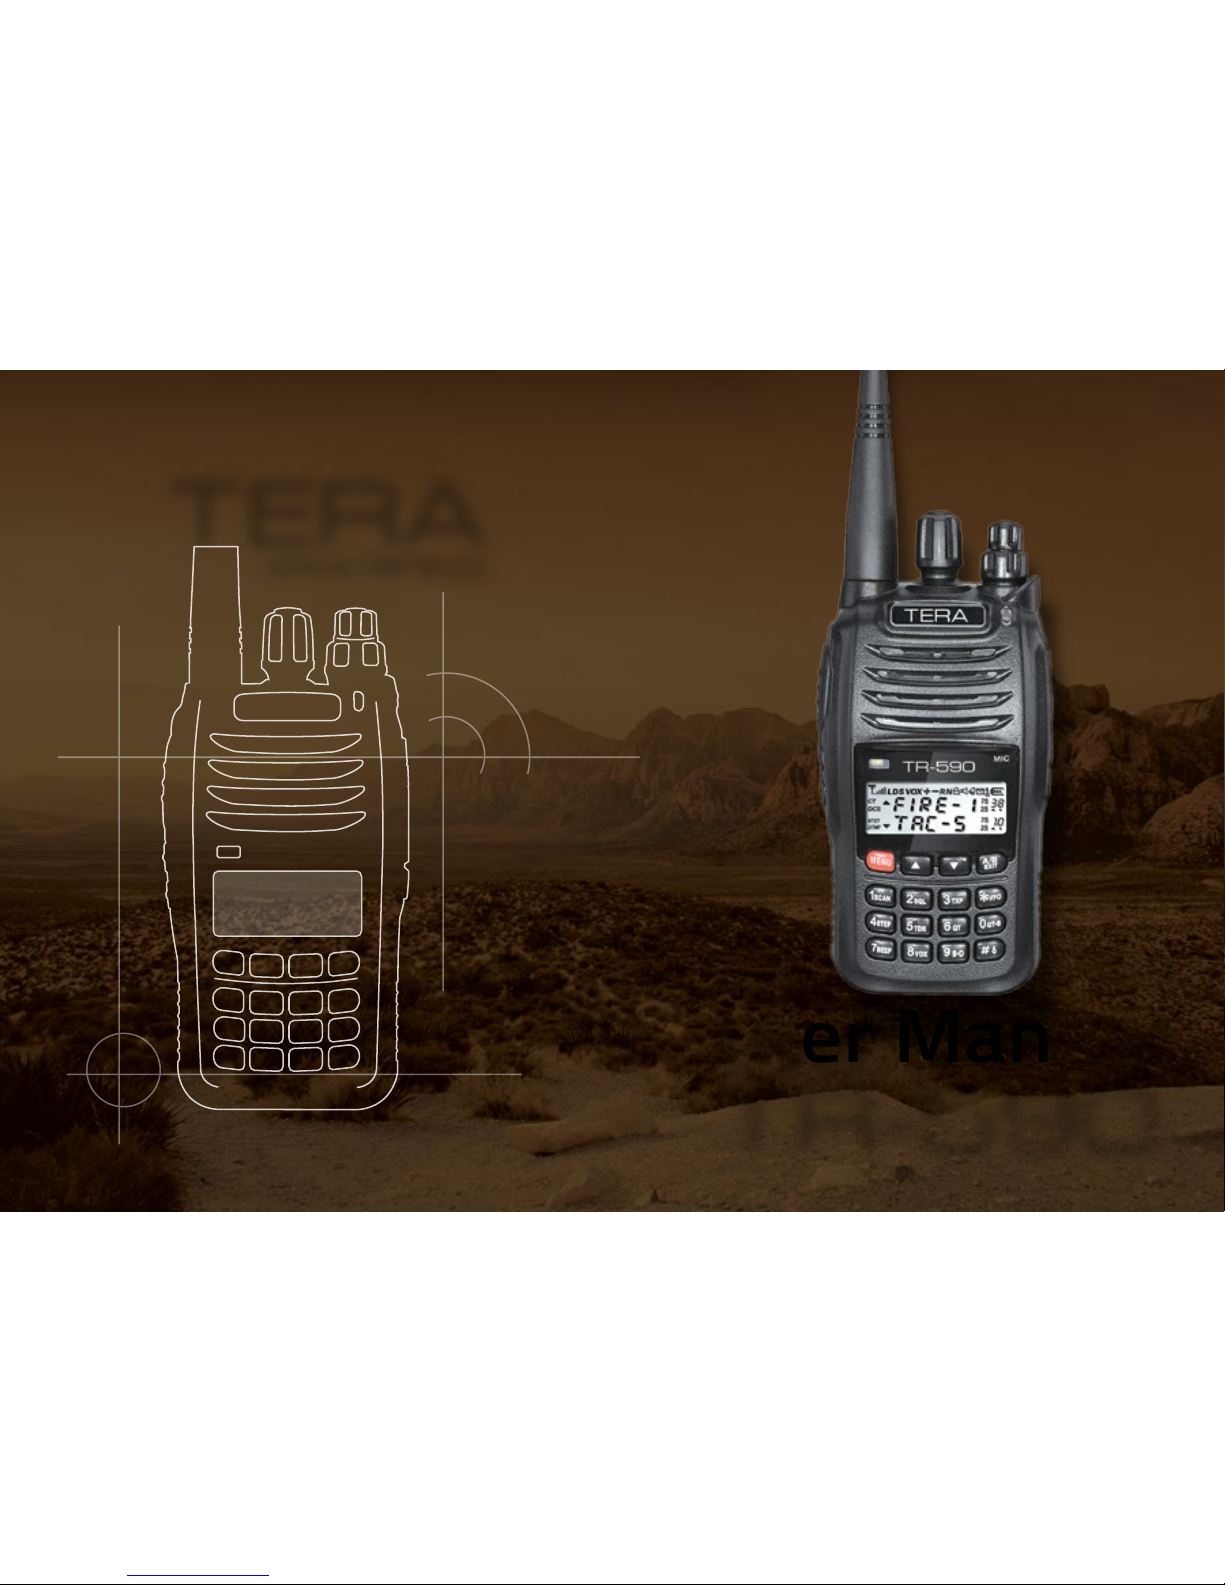
Tera TR-590 User manual

TERA
User Manual
TR-590
www.tera.co
TERA
User Manual
TR-590
www.tera.co

TERA
TR-590
2
TERA
Thank you for purchasing TERA model TR-590. This dual-band
VHF/UHF two-way radio features up to 200 channels, 5 watt
output, alpha-numeric display and true dual receive. This radio
can operate up to 20 hours on a single charge with its included
1600 mAh Li-ion battery.
To get the most out of your radio, please read this manual carefully before use.

TERA
TR-590
3
Initial Programming
This commercial handheld radio ships from the manufacture “Displayed Locked” per FCC rules.
You must first use the programming software to unlock this radio for the first time of use.
You will need the programming cable to connect your radio to your computer for programming.
Please contact your dealer for radio programming software.
When programming this radio for the first time , it is recommended you first READ the radio with
the software and then save this file for future reference. In addition, after you READ this radio with
software, first make your programming and frequency changes, then send this edited file back to
your radio. Please contact the dealer you purchased this radio from or TERA should you have any
questions.

TERA
TR-590
4
TERA
Online Service and Support
The TERA website provides additional information about
obtaining service or support for the TERA line of two-way
radios and accessories.
Visit: www.tera.co

TERA
TR-590
5
Safety Matters
The following recommendations will help you understand this radios safety requirements.
1. Only qualified TERA technicians are allowed to service this two-way radio. Do not
disassemble the radio by yourself as it will void the warranty.
2. Use only the TERA brand battery pack and desk charger, so as to not damage the
transceiver.
3. Do not expose this radio to long periods of direct sunlight, or hot or humid areas.
4. Do not put this radio in dusty or dirty locations.
5. Do not use harsh chemicals, cleaning solvents, or strong detergent to wash this radio.
6. Never transmit on this radio without an antenna.
Caution
Safety and operability of this radio can’t be guaranteed unless TERA brand accessories or parts
are used.
User Manual

TERA
TR-590
6
Content
Initial Programming ............................................ 3
Included In Box..................................................... 9
Getting Acquainted ............................................. 10
Battery Information............................................ 10
Charge Operation................................................. 11
Antenna Information.......................................... 13
Radio Overview .................................................... 14
Screen...................................................................... 14
Basic Operations.................................................. 16
Switch ON/OFF .................................................... 16
Volume Adjustment............................................ 16
Monitor Function ................................................. 17
Make A Call ............................................................ 17
Receive A Call........................................................ 17
Factory Default..................................................... 18
Side Key Custom-Setting.................................. 18
Function Shortuts Process ............................... 20
Functions Operating Instructions................... 25
Scan Mode (MENU 0)......................................... 25
Squelch Level Setting (MENU 1) .................... 25
Transmit Power Selection (MENU 2)............ 26
Channel Step Frequency (MENU 3)............... 26
Wide / Narrow Band Set (MENU 4)............... 27
Repeater Offset or Shift (MENU 5) ............... 27
Repeater Offset Frequency Dir (MENU 6).. 28
Receive CTCSS / DCS Code (MENU 7).......... 28
Transmit CTCSS / DCS Code (MENU 8)........ 29
Scan Add (MENU 9)............................................. 29
Scan Method (MENU 10).................................. 30
Lock (MENU 11) ................................................... 30
Keyboard Auto-lock (MENU 12)..................... 31
Coded Squelch Freq. Scan (MENU 13)......... 31
BootSnd (MENU 14) ........................................... 32
Beep Tone Setting (MENU 15)........................ 32
Flashlight Set (MENU 16) ................................. 33
Auto Backlight Set (MENU 17)........................ 33
RxTxLED (MENU 18) ........................................... 34
FM Radio (MENU 19).......................................... 34

TERA
TR-590
Squelch Level Setting (MENU 1) .................... 25
Transmit Power Selection (MENU 2)............ 26
Channel Step Frequency (MENU 3)............... 26
Wide / Narrow Band Set (MENU 4)............... 27
Repeater Offset or Shift (MENU 5) ............... 27
Repeater Offset Frequency Dir (MENU 6).. 28
Receive CTCSS / DCS Code (MENU 7).......... 28
Transmit CTCSS / DCS Code (MENU 8)........ 29
Scan Add (MENU 9)............................................. 29
Scan Method (MENU 10).................................. 30
Lock (MENU 11) ................................................... 30
Keyboard Auto-lock (MENU 12)..................... 31
Coded Squelch Freq. Scan (MENU 13)......... 31
BootSnd (MENU 14) ........................................... 32
Beep Tone Setting (MENU 15)........................ 32
Flashlight Set (MENU 16) ................................. 33
Auto Backlight Set (MENU 17)........................ 33
RxTxLED (MENU 18) ........................................... 34
FM Radio (MENU 19).......................................... 34
7
FM Radio (MENU 20).......................................... 35
Timer Set (MENU 21) ......................................... 35
Single / Dual Display Mode (MENU 22)....... 36
Single Display (MENU 23)................................. 36
Transmit Time Out Timer (MENU 24)........... 37
Busy Channel Lock Out (MENU 25) .............. 37
Squelch Mode (MENU 26)................................ 38
Squelch-Tail Eliminate (MENU 27) ................ 38
Power Save (MENU 28)..................................... 39
VOX Control (MENU 29) .................................... 39
VOX Delay (MENU 30)........................................ 40
Edit & Save Channel Name (MENU 31)....... 40
Memory Channel Store (MENU 32) .............. 41
Memory Channel Delete (MENU 33)............ 41
Reset........................................................................ 42
Reverse Frequency Function........................... 42
Main Band Operation A/B Switch ................. 42
VFO or Memory Channel Mode...................... 43
Wired Clone ........................................................... 44
Troubleshooting ................................................... 45
Specification ......................................................... 47
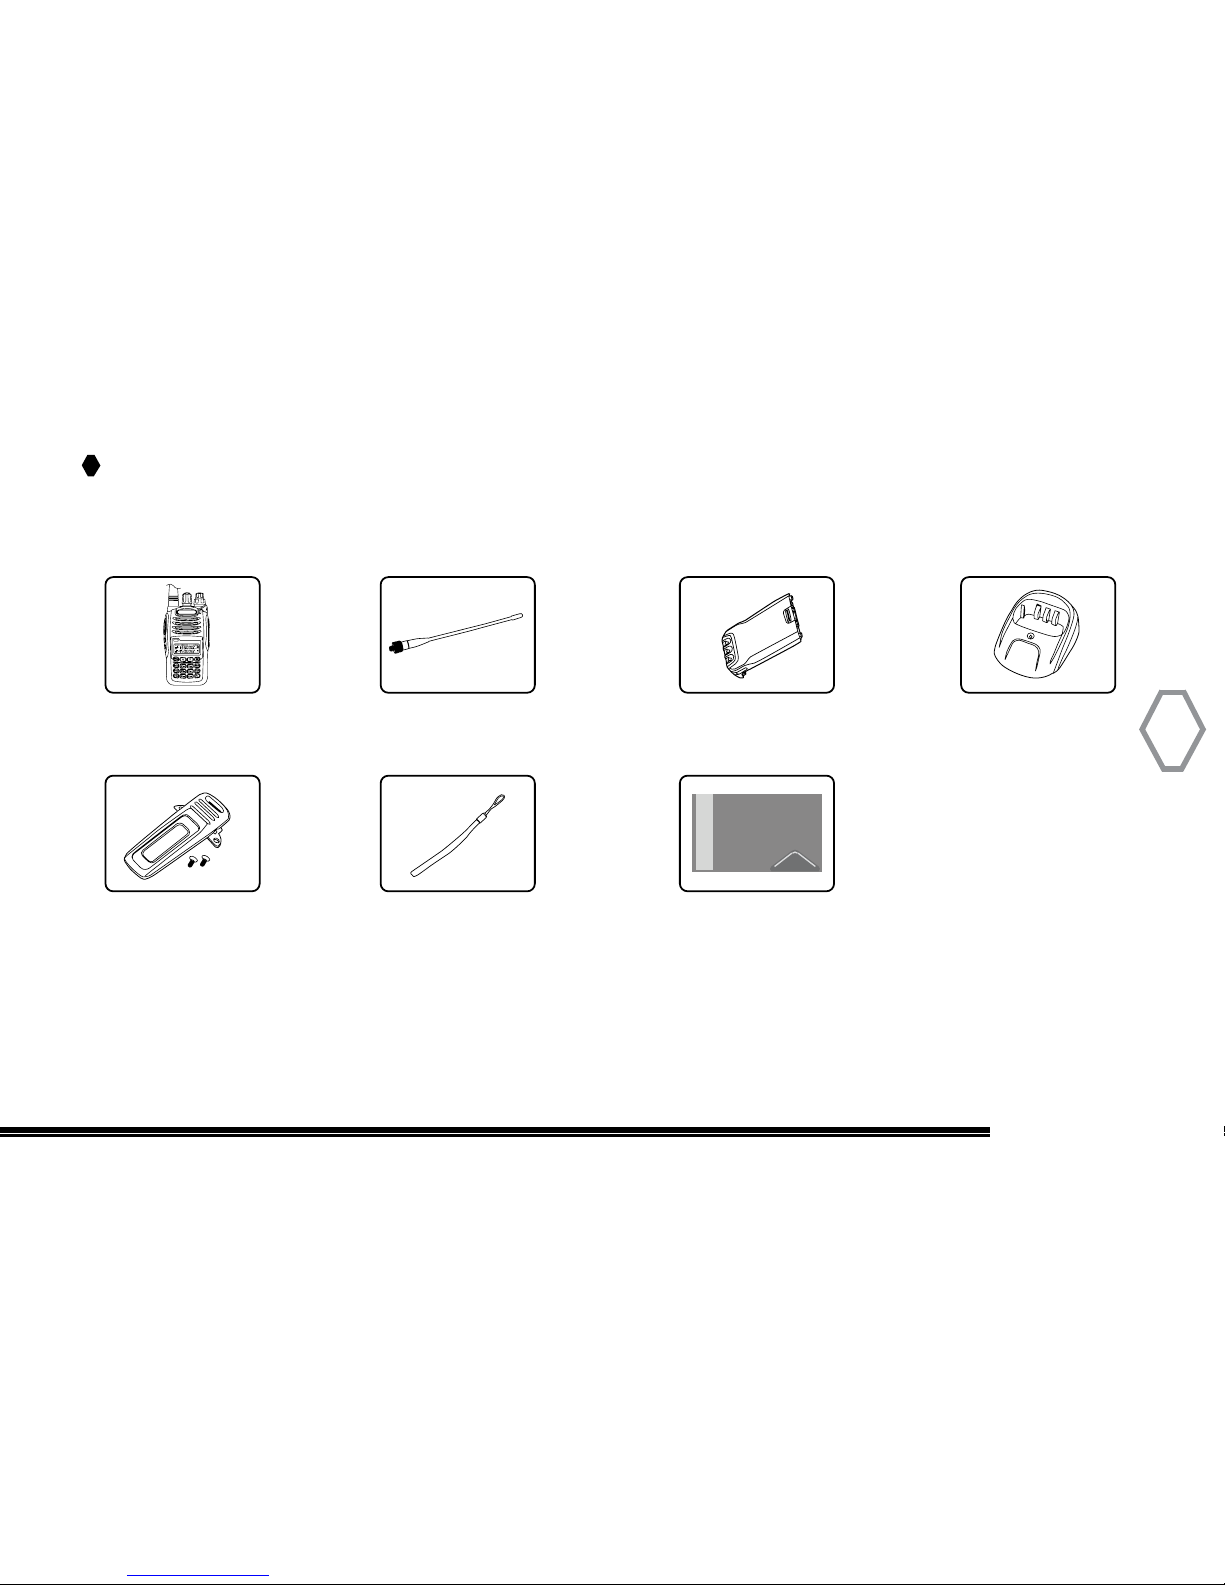
Optional Accessories .......................................... 49
Service and Support............................................ 50
Warranty and Repair Services ........................ 50
Terms of Warranty .............................................. 52
Warning Notes...................................................... 54
Safety....................................................................... 55

TERA
TR-590
8
Check Product
Please unpack the radio and the included accessories. We recommend that you check the box
for the items listed below to ensure everything is in the box.
Please contact your dealer should any items be missing from the box.

TERA
TR-590
9
Included In Box
Radio Antenna Battery Charger
Belt Clip Hand Strap User Manual
TERA
TERA

TERA
TR-590
10
Getting Acquainted
Battery Information
Battery Type: Li-Ion 1600 mAh Battery. Please charge the included TERA battery for
1-2 hours before use. Leave the radio or battery pack in the supplied charger cup until
the red charging light goes off and the green LED light comes on which indicates the
battery pack is fully charged and ready to use.
Note:
1. Do not short-circuit the battery terminals or dispose the battery in fire. Never attempt to
disassemble the battery pack.
2. Charge the battery in 32-105 F temperature. Otherwise the battery may not fully charge.
3. Turn off the radio before your initial charge. Use of the radio while charging may cause noise
or interfere during reception or transmission.
4. Do not pull/plug the adapter and the battery during charging to avoid interference with the
charging procedure.
5. If the battery life quickly runs down even if it is fully and correctly charged, this means the
battery life is over and this battery will need replacing. Please contact your authorized TERA
dealer to purchase a new battery.

TERA
TR-590
11
6. NEVER charge the battery or radio with battery if they are wet. Before charging, you should dry
them off with a towel or cloth to avoid danger.
Warning:
Conductive metals such as jewelry, keys or decorating lace may result in short circuit
and generate a large quantity of heat when coming to contact with battery electrodes.
Treat any battery carefully especially when placing it into pocket, wallet or other metal
container as they can short out.
Charge Operation
Please charge as follows:
1. Turn off the radio.
2. Plug the AC connector of adapter into an AC output socket

TERA
TR-590
12
3. Vertically insert the battery or radio equipped with battery into the charger. Make sure the
charger and battery is well contacted.
4. After the radio and/or battery are inserted into the charger, the LED glows red and that means
the charger is ready for normal charging; if the LED flashes red, it means the remaining battery
power is too low and a trickle charge is in process. After the battery power has reached a
certain amount during trickle charge, the charger automatically turns to normal (fast) charge
mode (solid Red colored LED).
5. The battery is fully charged (97%-100%) when LED glows green. The charger stops charging
automatically.
Caution when Charging the Battery
1. The battery is not fully charged from the factory. Please charge the battery before initial use or
after long-period of storage.
2. Repeat charging 2 to 3 times will make the battery reach its best capacity. Please replace or
Note
Trickle charge is not allowed to exceed 30 minutes. If the LED is still flashing in red after 30
minutes, it means that the charger cannot provide power to the battery. Check if the battery or
charger is damaged.

TERA
TR-590
13
charge the battery if battery power is low.
3. The supplied Li-ion battery includes a (6) six month warranty and is good for typically 400-500
charging cycles.
Antenna Information
The supplied flexible antenna is suitable for standard-distance communications. TERA
also offers extended length higher gain antennas to increase your communications
range. For more information about available accessories, visit: www.tera.co
CAUTION
Radio communication range may be greatly reduced when operating inside of concrete
structures like buildings and parking structures.
TIP
When storing radio for more then 3 weeks at a time, it is best to remove the TERA battery from
radio. This will maintain a full charge in battery so it’s ready for use. Batteries will hold a charge
6-12 months when removed from radio.

TERA
TR-590
14
Radio Overview
Screen
Receive-Working
A/B Switch
Full Power Remaining
Battery Status Indicator:
Battery exhausted. Please change out battery or charge it..
+/
Transmitter-Working
Signal Strength Indication
Low Power
Middle Power
High Power
CDCSS Signaling
CTCSS Signaling
Reverse Frequency
DTMF Encoder - Receive Frequency Dispersion
VOX
Dual Receiver Mode
Tone
Keyboard Lock
Battery Power Indicator
Channel or Function Number
Channel Scan
/
Add
Channel Number
Busy Channel Lock
/
Unlock
Indicative Narrowband Channels

TERA
TR-590
15
PPT K ey
Programmable SK1
Programmable SK2
Earphone / Speaker Mic Jack
Antenna
Channel Selector
Flashlight
LCD
Function Key
Number Keys
Up/Down key
Power Switch
/Volume Control of the
top frequency
bottom frequency
LED Indicator
Speaker
Microphone
Exit
Lock
1
2
3
4
56 12 13
7
8
9
1
0
1717
16
15
14
3
4
5
6
7
8
9
10
11
12
13
14
15
16
17
11
Volume Control of the
TERA
TERA
TERA
1
2

TERA
TR-590
16
Basic Operations
Switch ON/OFF
Rotate the top right knob clockwise until a “Du” sound and a “Ka Ta” sound, to confirm
that the radio’s power is on; Rotate the top right knob counter-clockwise until a “Ka Ta”
sound means to turn off the radio.
Volume Adjustment
Rotate the power control button/volume controller clockwise to
turn on the radio, rotate further to adjust the desired volume.

TERA
TR-590
17
Monitor Function
A weak signal that is hardly heard during normal operation process can be monitored by
pressing [bottom left side key]. Volume can be adjusted by rotating the power control
button/volume controller even if there is lack of signal. Release [bottom left side key] to
go back to normal radio operation.
Make A Call
To make a call, hold down [PTT] key and speak into the microphone with normal voice.
Please keep the microphone 3 to 5 inches away from your mouth.
Note:
1. Hold down [PTT] key and the LED glows red, the radio begins to transmit.
2. If LED flashes red during TX, the battery needs re-charging. The radio can not transmit when
battery is low. Reduce your TX power level or recharge the battery
as soon as possible.
Receive A Call
Release [PTT] key to receive a call. Adjust squelch in programing to recieve signal.

TERA
TR-590
18
Emergency Alert Function
This function is enabled by key settings and/or your dealer. Long press [Middle key] to
activate this function. The radio will send out alarm and make alarm sound.
Factory Default
Short-press SK1 key, to enable flashing flashlight; Long-press SK1 key, to turn the
flashlight on.
Side Key Custom-Setting
The User can set customization features for side key (SK1, SK2) with the software.
Long-press can set the following function:
Choose: Momentary monitoring; Timer; Scan; FM Radio; Anti-interference scanning;
Alarm; Flashlight
Short-press can set the following function:
Choose: Quiet monitoring; Timer; Scan; FM Radio; Anti-interference scanning; Alarm;

TERA
TR-590
19

TERA
TR-590
20
Function Shortuts Process
ID Name Function
Shortcut Screen Display Setting Select Optional Paramenter Confrim
Setting
Return to
Standby
0 Scan Mode “MENU” + “0” Press or to start scan functions “A/B EXIT”
1 Squelch Level
Setting
“MENU” + “1” “MENU” Press or
to select
Set Squelch Level 0-9;
Default Squelch Level = 5
“MENU” “A/B EXIT”
2 Transmit
Power
“MENU” + “2” “MENU” Press or
to select
HIGH: high power;
MID: medium;
LOW: low power output
“MENU” “A/B EXIT”
3 Step
Frequency
“MENU” + “3” “MENU” Press or
to select
Step Frequency: 2.5kHz, 5kHz,
6.25kHz, 10kHz, 12.5kHz,
25kHz, 50kHz, 100kHz
“MENU” “A/B EXIT”
4 Wide /
Narrow Band
“MENU” + “4” “MENU” Press or
to select
WIDE: wide band (25kHz)
NARROW: narrow band
(12.5kHz)
“MENU” “A/B EXIT”
5 Repeater
Offset
Frequency
“MENU” + “5” “MENU” Press or
to select
0~99.995MHz optional.
00.600MHz for VHF
05.000MHz for UHF
“MENU” “A/B EXIT”
6 Repeater
Shift
Direction
“MENU” + “6” “MENU” Press or
to select
+: plus frequency shift
-: minus frequency shift
OFF: No TX shift (simplex)
“MENU” “A/B EXIT”
7 Receive
CTCSS/DCS
Tone
“MENU” + “7” “MENU” Press or
to select tone.
Press # to
choose between
CTCSS, DCS, OFF
50 sets of CTCSS tones
(67.0Hz~254.1Hz)
105 sets digital tones (D023N~
D754N) 105 sets reverse digital
tones (D023I~D754I)
“MENU” “A/B EXIT”
Table of contents
Other Tera Transceiver manuals
Popular Transceiver manuals by other brands

KYL
KYL KYL-220 manual

Thrane&Thrane
Thrane&Thrane SAILOR 6249 installation manual

KELVIN HUGHES
KELVIN HUGHES X-band installation instructions

Motorola
Motorola 9000SM - Canopy 900 MHz Subscriber Module user manual

Keysight Technologies
Keysight Technologies M1650A Getting started guide

DRAKE
DRAKE TR7 manual