The Greenhouse People Silverline Assembly instructions

Please read all information before you begin, some of the tips and techniques may
save you a lot of time and frustration later on. These help sheets should be used in
conjunction with the manufactures instruction manual.
Safety:
Some of the components in this kit may cause injury if not used sensibly. When
handling any of the metal components and during glazing please take care and
wear gloves, goggles and ear protectors when you judge necessary.
Preparation:
Bear in mind that constructing your greenhouse can take
some time, you may need to leave it and come back to it.
The more space available in which to work the better, a
large clean,clear garage floor is ideal or a flat lawn area.
Tidy your work space prior to assembly. This will reduce
the chances of loosing any of the smaller components.
It is a good idea to find a tub for all your nut and bolts etc...
Organising your components:
On opening your main greenhouse box DO NOT UNWRAP
any of the labelled bundles until they are required.
Assess each component in accordance with the parts list.
Separate like from like components.
Tools advise:
You will save yourself a lot of time by purchasing a 10mm
nut spinner (see picture), it is much quicker and easier to
use than a 10mm spanner (also pictured). You may have
an attachment in a ratchet set that will suit this job.
Other tools that may be may be required are shown in the
picture to the right.
Using the manufacturers manual:
Read the information relevant to each stage of construction
immediately before you begin.
Study each drawing carefully before you begin each stage
of construction.
PTO
Additional help from 'The Greenhouse People'.
Toughened and Horticultural Glass
VERY IMPORTANT INFORMATION:
OUR TOUGHENED GLASS SIZES ARE DIFFERENT FROM THOSE SPECIFIED IN THE MANUFACTURERS
MANUAL. OUR GLAZING PLAN CAN BE FOUND AT THE BACK OF THESE AMENDMENT SHEETS!
Please take extra CARE handling toughened glass. It is extremely vulnerable to BREAKAGE at the edges and in
particular, the CORNERS. When you are MOVING it, please take care not to brush the EDGES of the glass
against concrete etc.. as it can SHATTER or BREAK very easily. Likewise, it should ALWAYS be stacked on
wooden bearers, or cardboard, or carpet, or anything to avoid direct contact with a hard floor.
Once the glass is installed into the frame the whole structure becomes much more RIGID.
The toughened glass in particular is very resilient to face on DAMAGE.
If you are unsure about anything to do with your greenhouse please ring us on 01782 388811.
SILVERLINE
Remember use these hints and tips alongside the manufacturers instruction booklet.
WIND DAMAGE
PREVENTION!
Before you begin to assemble your greenhouse it is a good idea to
workout if any bolts which need to be slid into the glazing bar channels
as instructed in the manual (e.g. bolts for the vertical door bar stiffener
758 shown on page 15 of the manual). This will save you a lot of time
and frustration later on.
Make sure that all of your horizontal and diagonal bracings are located
in the correct holes (see manufacturers manual and internal pictures).
The greenhouse MUST be level and square before you begin glazing.
If not the glass will not fit properly and your door will not slide smoothly.
If you have difficulty inserting the glass try loosening the surrounding
bracings and glazing bars slightly to allow some movement in the
frame.
The black 2' glazing
strips must be used to
fit toughened glass in
the ends not the grey
strips 452 which are
redundant.
The louvre can be
located in either the
back or the side.
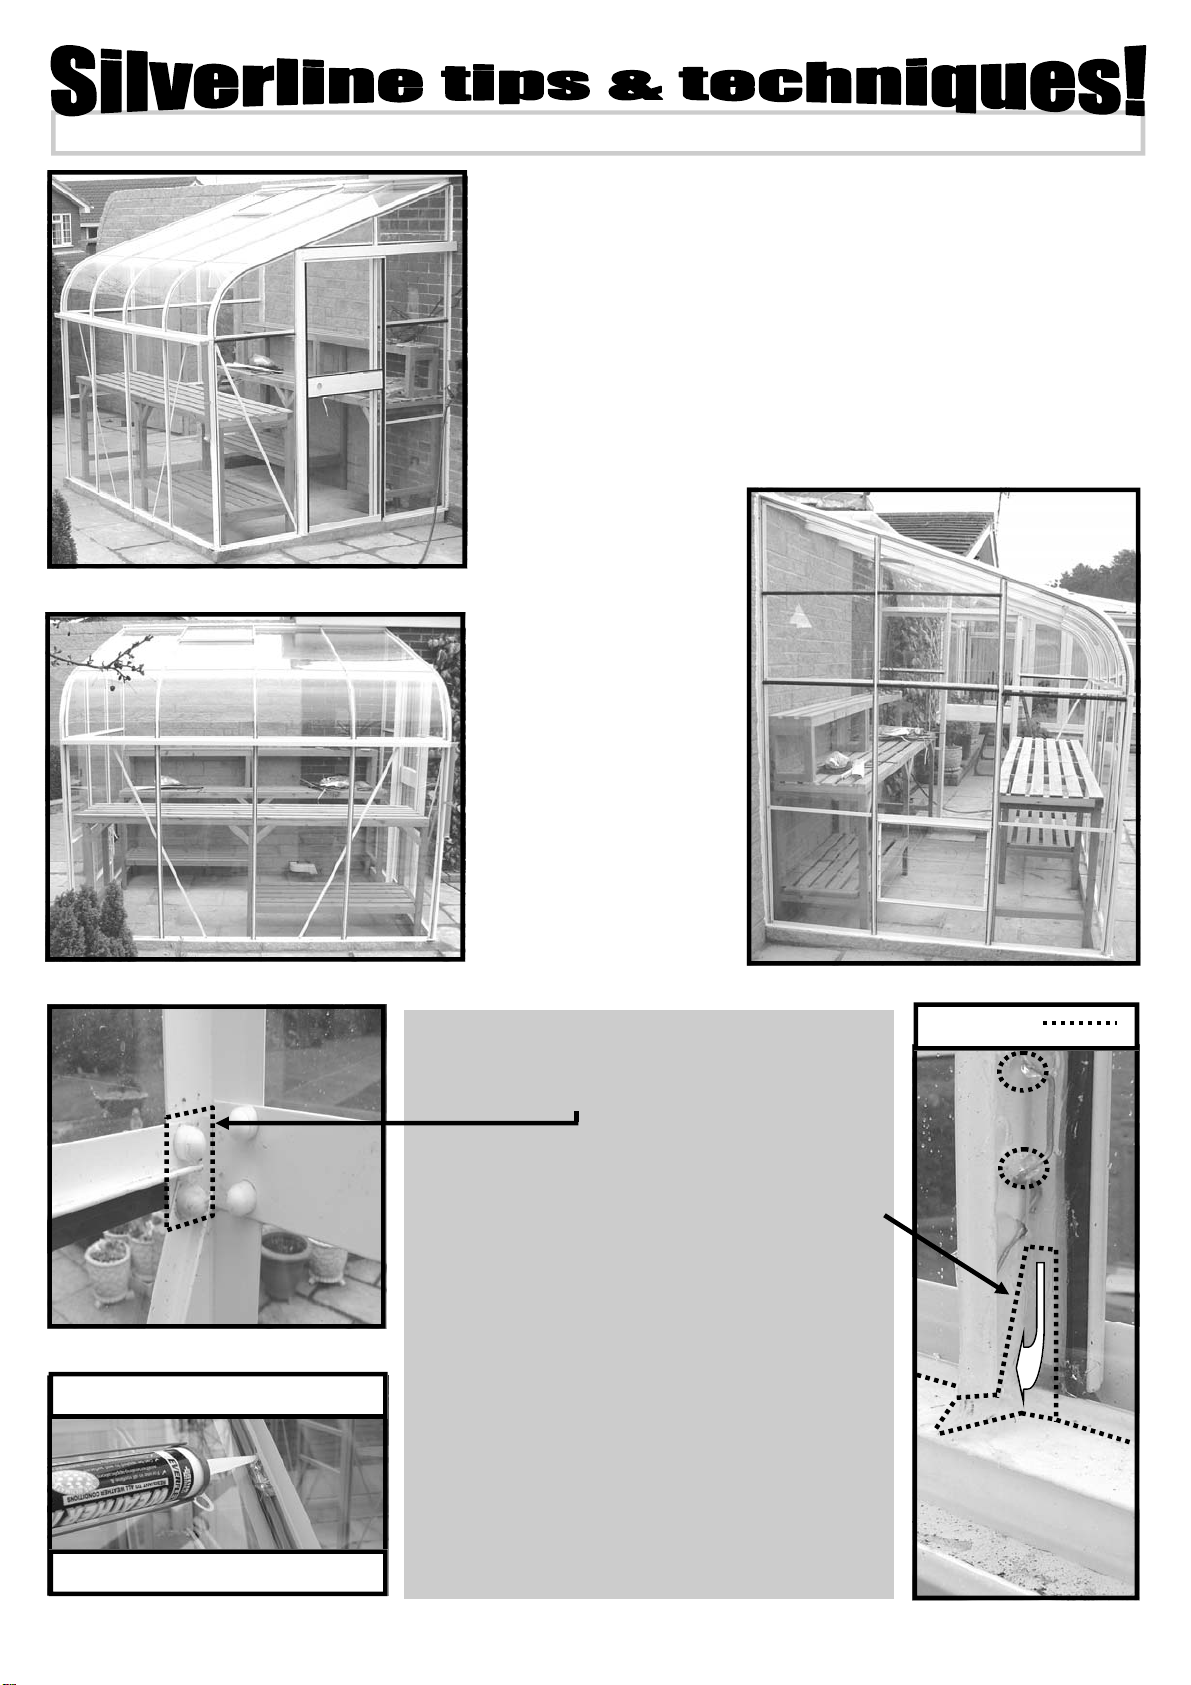
Siliconing Tips:
Before glazing it is a good idea to silicone behind
each corner plate 205.
It is also advisable to create a silicone runway where
the curved bars make contact with the gutter. This
helps any water which lands on the roof to run down
the roof glazing bar channels straight into the gutter.
Silicone between each grey glazing strip in your roof.
A bead of silicone should be run across the back
edge of the gutter where it comes in contact with the
curved acrylic panes.
To help prevent your glass from being blown out dur-
ing strong winds it is a good idea to apply some blobs
of silicone around the glazing clips and the corners
of each pane. This will greatly increase the rigidity
of your greenhouse and help it resist more extreme
conditions. In strong winds it is a good idea to shut
roof vents and doors to prevent them being buffeted
and bent out of shape. GUTTER
Silicone =
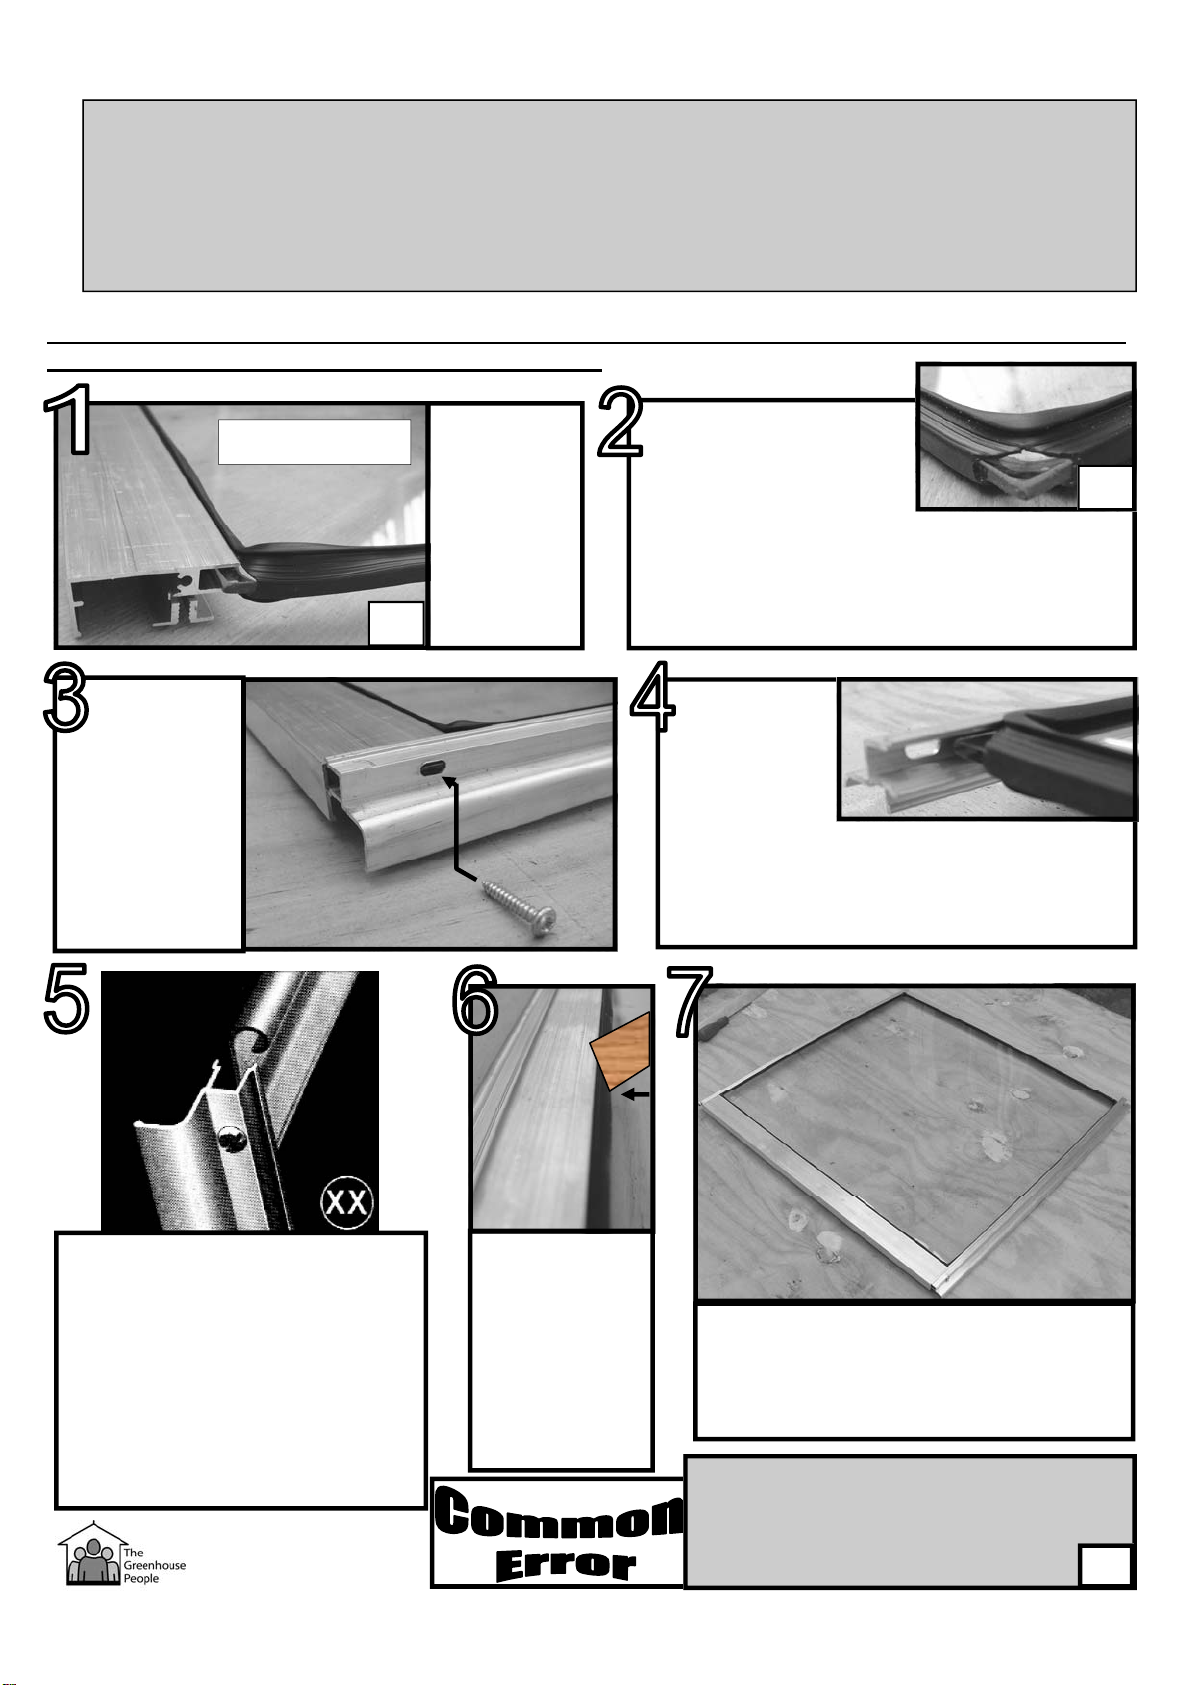
Roof Vent Assembly: (See pictures)
When making the vent it is important to keep flicking between the manual diagrams and the text.
Work a step at a time, studying each diagram closely before you begin.
The rubber can be difficult to insert into the vent frame but using a rubber mallet will help. If you
don't have a mallet available adding some washing-up liquid to the rubber can do wonders.
IMPORTANT Note: For Glass 3.6mm - 4.5mm thick, leave out rubber seal, using silicone as a
replacement on all edges. Erectors tips
Below are some step by step pictures which when used in CONJUNCTION with the manual will
hopefully make assembly a little easier to follow.
Cut rubber seal to fit
each corner when
indicated in the manual.
If you stretch the rubber
from corner to corner cutting each in-turn the
rubber is stretched thinner and there is NO
slack. This allows the vent sides and top to
be pushed on much easier.
Fit roof vent
bottom bar,
centrally
over the
glass and
carefully
knock down
into position.
Fix top bar over glass attach
with screws through the holes in
the left and right vent sides.
Check diagonal measurements
are equal for squareness.
Adjust if necessary and tighten
all screws.
Push the
rubber back
under the
groove with a
flat wooden
edge to tidy up
the rubber
seal.
The vent is now ready to slide into the
ridge. The picture shows the vent as it
will look from the outside of your
greenhouse.
Fit left and
right vent
bars (check
which is which)
over the glass
and screw
corners loosely
at this stage to
the bottom bar.
Each vent
side bar will
extend beyond
the glass and
rubber at the
top so that the
final section of the vent can be put into
place. Cut the seal 138 so that it butts
flush together centrally at the top.
915
896 /897
915 896 / 897
401
138
Glass 610 x 610
C
A
When attaching your window sill bar
into the roof of your Silverline make
sure it is the right way round or
the window will not sit properly. SS

If you have any queries please
do not hesitate to call us on
01782 388811.
www.thegreenhousepeople.co.uk
Door assembly and glazing:
The intermediate door bar 986 can be used in
either orientation depending on which end the
door is located.
The glass in the door (toughened glass shown,
note large single panes) is cushioned against the
metal frame by adhesive foam strips. The glass is
stuck onto these strips and secured into position
with the long black plastic 'Door glazing cap' 991.
Each strip needs to be cut to fit the length of the
door. The best way to attach the strips is to lip
them UNDER the outside frame of the door and
press them down onto the surface of the glass
(see diagram to the right). It can be difficult to
insert the strip, a flat screwdriver can be used to
tease the cap into position.
986
Door track:
Part 758 is shown in the manual the wrong way
round because of the door end bracings. It can
only fit on one way and that is opposite to the S
diagram (page 15) the manufacturer has shown.
The Pictures far left show the bar the correct
way up.
It is a good idea to use WD40 in your door track
and door track sill to make the door glide easily.
The door needs to be slid onto the door track
before you attach part 757 which acts as a door
stop and a draft excluder.
991
991
758
757
974
758
Door lock:
The Silverline is primarily
designed to be fitted onto a
wall with a door. Because
of this the lock is designed
to fit on the inside of the
greenhouse to stop access
from the outside.
It is important however to stop the door blowing
open in the wind when unattended. Leaving the
door open in high winds can result in the glass being
blown out. The easiest and cheapest way to secure
the door is to shut the door and drill a hole in the
door track for a padlock to slide through.
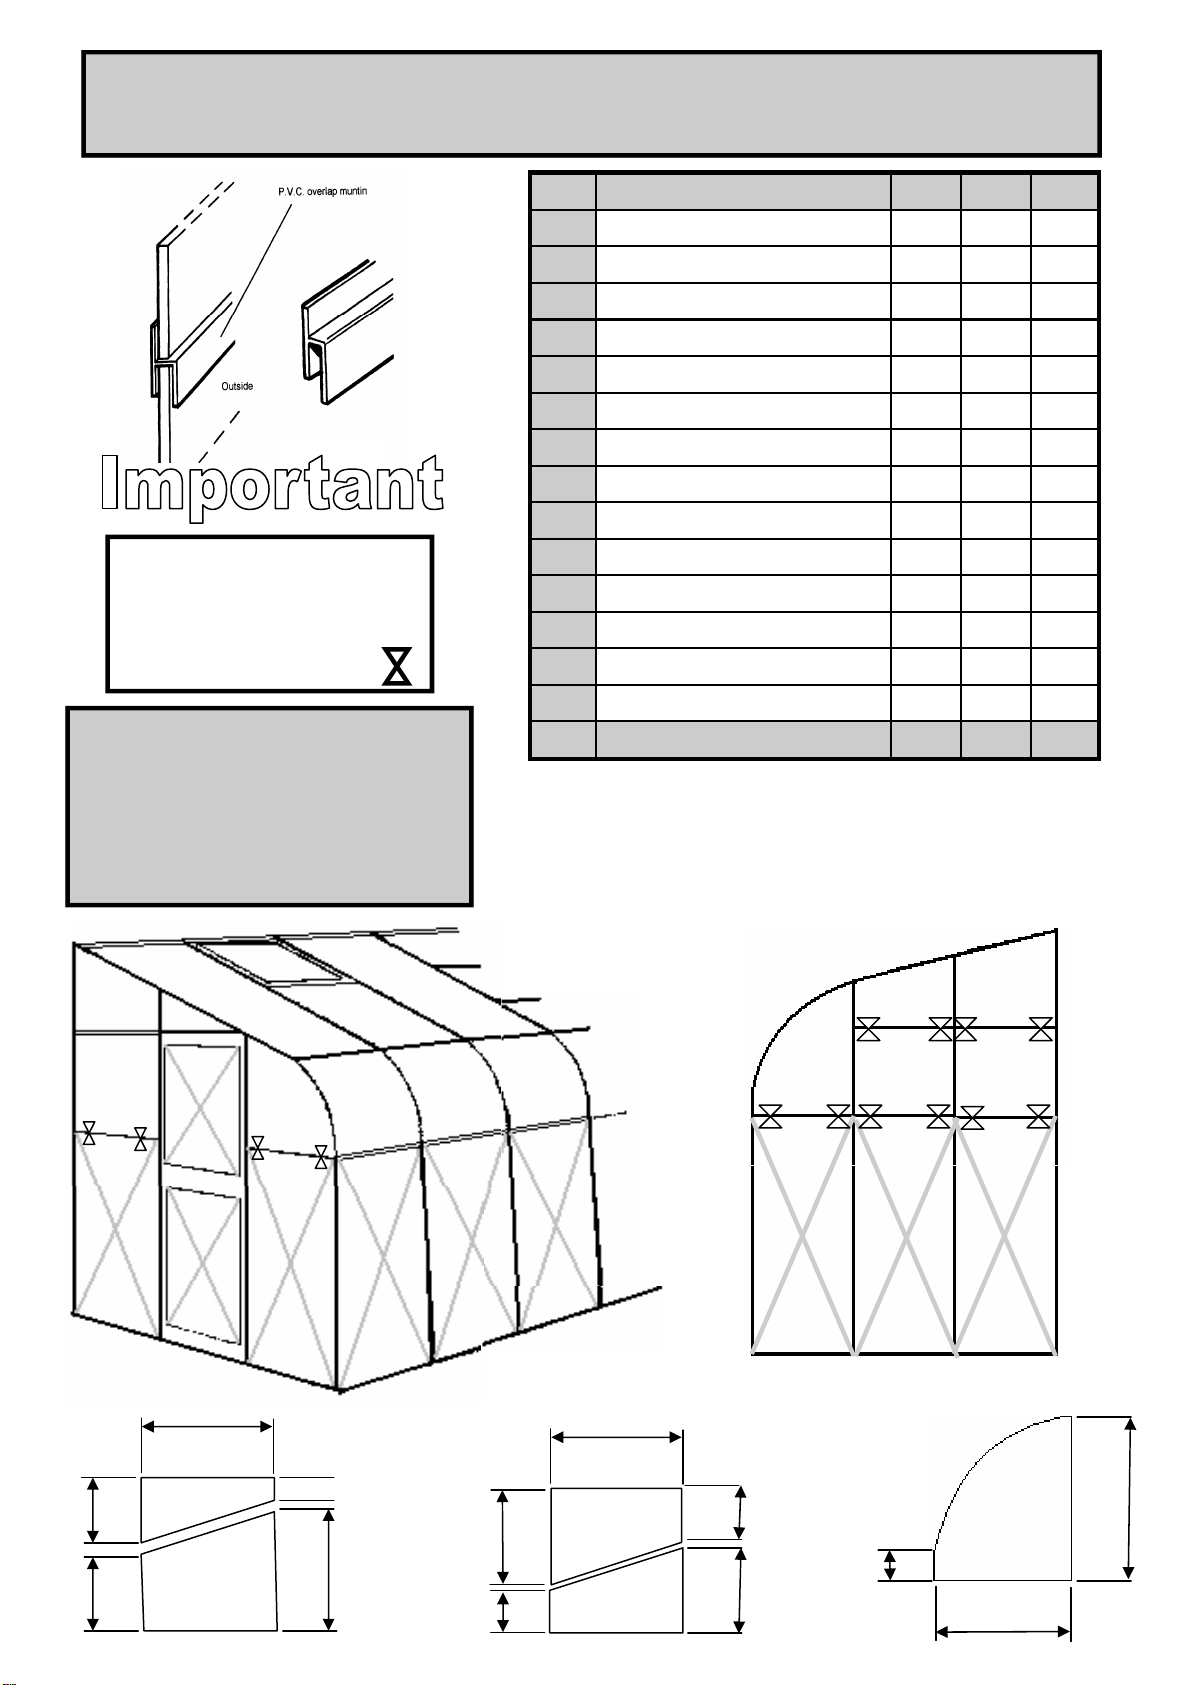
Glazing Plan for Silverline lean-to glazed with large pane
TOUGHENED glass. Use this plan, not the one in your manual.
Code Size (mm) 8x6 10x6 12x6
A 610 x 610 1 2 2
C 610 x 457 2 2 2
D 610 x 525 1 1 1
E As drawing 1 1 1
G As drawing 1 1 1
H As drawing 1 1 1
K 610 x 610 2mm plastic 4 5 6
J Curved Glass 610 x 535 2 2 2
L 610 x 1660 3 3 4
P As drawing 1 1 1
R 610 x 995 1 2 2
BB 610 x 1345 9 10 11
HH 610 x 764 1 1 1
JJ 610 x 916 1 1 1
TOTAL 29 33 36
P
H
288 200
610
6
482
283 195
610
91 389
E
G 610
49
535
J
BB BB BB
C C
G H
J
BB BB BB BB BB
D
JJ
HH
E
K
K
K
L R
A L
J
Pictured above 2’ long black
plastic Muntins. Use these
strips where indicated on the
diagrams to join together panes
of glass. The Muntins are
indicated with a;
FOR LOUVRE WINDOW
REPLACE 1 x BB (610 x 1347)
WITH 1 x A (610 x 700)
+ 1 x 610 x 200
+ 5 x 573 x 100 (Louvre glass)
IMPORTANT: A Louvre MUST go
in-between the two make-up panes.
P
Base
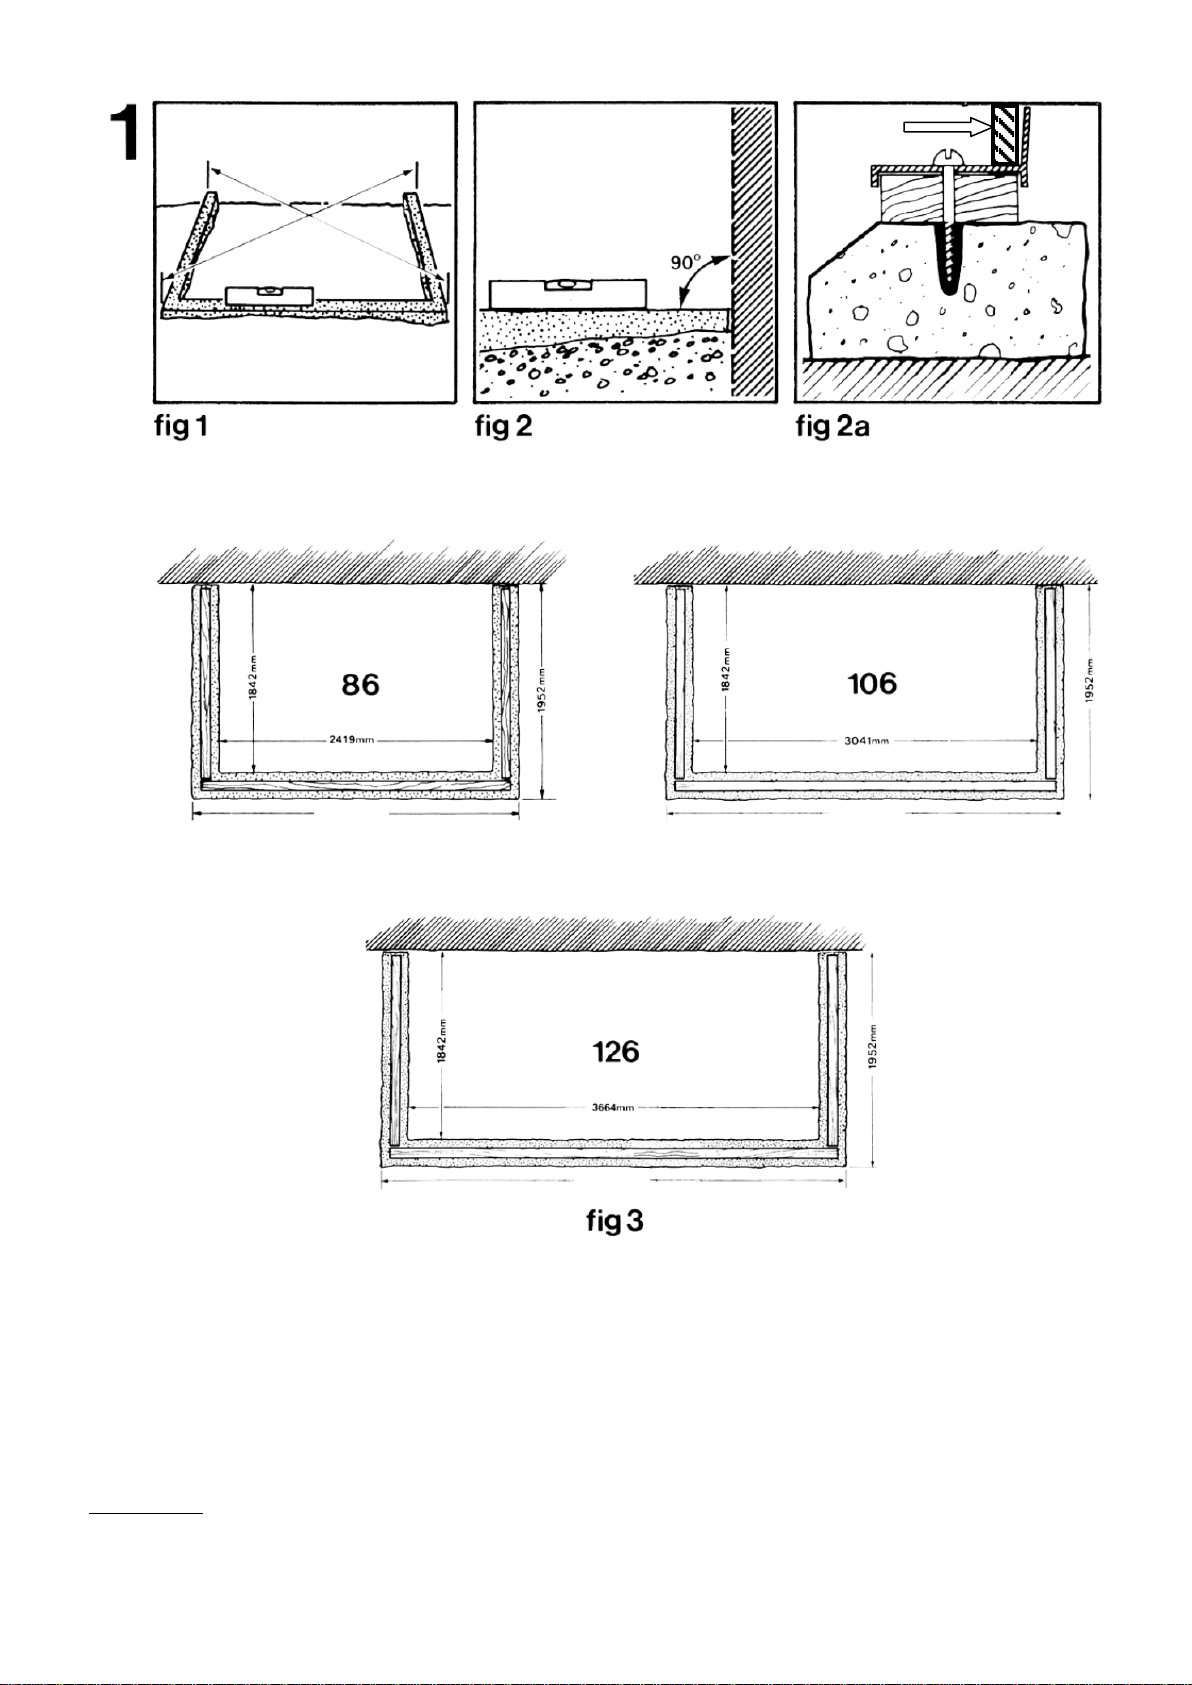
You need a base for your greenhouse to ensure that it is level and rigid. To save time and trouble in laying a
traditional brick or concrete base, Halls can supply a simple-to-assemble prefabricated base as an optional extra.
However, if you want to make your own base you should make it to the dimensions in fig. 3. It is most
important that the base is square and level so check that its diagonal measurements are equal as in fig. 1 and
that the angle between the wall and the base is 90ᵒas in fig. 2. Tanalised timber packing of not less than 12mm
thickness and not more than 30mm width should be made to fit the aluminium section, as shown in fig. 2a.
When the greenhouse has been assembled, it can be screwed to the base with no. 12 screws and rawlbolts (not
supplied) through the sill bar (not pre-drilled) in fig. 2a.
IMPORTANT
If you wish to erect your greenhouse on a solid concrete plinth, you should follow the outside dimensions in fig.
3. However it is important to avoid any possibility of water seeping under the base forming puddles. You should
ensure that the base slopes down towards the outside of the greenhouse. The timber packing will have to be
suitably tapered.
N.B. These diagrams are only if you are building your own base as opposed to buying the
prefabricated optional base, which is the easiest option.
GLASS
2635mm
3880mm
3257mm
4
Other The Greenhouse People Greenhouse Kit manuals

Popular Greenhouse Kit manuals by other brands


ModuLaro
ModuLaro AIGLE GH202020 Assembly instruction

Sunnydaze Decor
Sunnydaze Decor HB-838 Assembly instructions

Grandio
Grandio 2015 quick start guide

harvst
harvst Harvster user manual

FarmTek
FarmTek Growers supply GrowSpan Gothic Pro instruction manual

Palram
Palram CANOPIA HARMONY 701634 How to assemble


